ubuntu uses Alibaba cloud image source to quickly build kubernetes 1.15.2 cluster
1, Overview
When building k8s clusters, you need to visit google, download relevant images and install software, which is very troublesome.
Alicloud just provides k8s update source, which can be directly used by domestic users.
2, Environment introduction
| operating system | host name | IP address | function | to configure |
| ubuntu-16.04.5-server-amd64 | k8s-master | 192.168.10.130 | Master node | 2-core 4G |
| ubuntu-16.04.5-server-amd64 | k8s-node1 | 192.168.10.131 | Slave node | 2-core 4G |
| ubuntu-16.04.5-server-amd64 | k8s-node2 | 192.168.10.132 | Slave node | 2-core 4G |
Note: please ensure that the CPU is at least 2 cores and the memory is 2G
3, Preparation before installation
host name
Ensure the of 3 hosts / etc/hostname has been modified to the correct host name. Please restart the system after modification.
time
Make sure that the time zones of the three servers are the same. Forcibly change the time zone to Shanghai and execute the following command
ln -snf /usr/share/zoneinfo/Asia/Shanghai /etc/localtime
bash -c "echo 'Asia/Shanghai' > /etc/timezone"
Install ntpdate
apt-get install -y ntpdate
If the following error occurs
E: Could not get lock /var/lib/dpkg/lock - open (11: Resource temporarily unavailable)
E: Unable to lock the administration directory (/var/lib/dpkg/), is another process using it?
Execute 2 commands to solve
sudo rm /var/cache/apt/archives/lock
sudo rm /var/lib/dpkg/lock
Update using alicloud time server
ntpdate ntp1.aliyun.com
All 3 servers are executed to ensure the same time!
Please make sure that the firewall is turned off!
4, Official start
Disable swap
All hosts
sudo sed -i '/swap/ s/^/#/' /etc/fstab
sudo swapoff -a
Install Docker
Update apt source and add https support (all hosts)
sudo apt-get update && sudo apt-get install apt-transport-https ca-certificates curl software-properties-common -y
Add GPG Key (all hosts) using utc source
curl -fsSL https://mirrors.ustc.edu.cn/docker-ce/linux/ubuntu/gpg | sudo apt-key add
Add docker CE stable source address (all hosts)
sudo add-apt-repository "deb [arch=amd64] https://mirrors.ustc.edu.cn/docker-ce/linux/ubuntu $(lsb_release -cs) stable"
Install docker Ce (all hosts)
Install the latest version of docker
sudo apt-get update
sudo apt-get install -y docker-ce=5:19.03.1~3-0~ubuntu-xenial
Install kubelet, kubedm, kubectl
Add apt key and source (all hosts)
sudo apt update && sudo apt install -y apt-transport-https curl
curl -s https://mirrors.aliyun.com/kubernetes/apt/doc/apt-key.gpg | sudo apt-key add -

echo "deb https://mirrors.aliyun.com/kubernetes/apt/ kubernetes-xenial main" >>/etc/apt/sources.list.d/kubernetes.list
Installation (all hosts)
Latest kubelet
sudo apt update
sudo apt install -y kubelet=1.15.2-00 kubeadm=1.15.2-00 kubectl=1.15.2-00
sudo apt-mark hold kubelet=1.15.2-00 kubeadm=1.15.2-00 kubectl=1.15.2-00
Install kubernetes cluster (master only)
sudo kubeadm init --image-repository registry.aliyuncs.com/google_containers --kubernetes-version v1.15.2 --pod-network-cidr=192.169.0.0/16 | tee /etc/kube-server-key
Parameter interpretation:
--Image repository specifies the image source and Alibaba cloud's source. This will avoid the timeout when pulling the image. If there is no problem, you can see the successful log entry in a few minutes
--Kubernetes version specifies the version
--Pod network CIDR specifies the pod network address. Set as intranet segment!
The three intranet networks are:
Class C: 192.168.0.0-192.168.255.255
Class B: 172.16.0.0-172.31.255.255
Class A: 10.0.0.0-10.255.255.255
Output:

The WARNING message appears and can be ignored.
Output information, saved to / In the / etc / Kube server key file
Copy the kubeconfig file to the. kube directory of the home directory (master only)
mkdir -p $HOME/.kube
sudo cp -i /etc/kubernetes/admin.conf $HOME/.kube/config
sudo chown $(id -u):$(id -g) $HOME/.kube/config
Install the network plug-in to allow communication between pod s (master only)
Use the latest version of
kubectl apply -f https://docs.projectcalico.org/v3.8/manifests/calico.yaml
View the pod status under the Kube system namespace (master only)
kubectl get pod -n kube-system
Wait 1 minute, the effect is as follows:
NAME                                       READY   STATUS    RESTARTS   AGE
calico-kube-controllers-7bd78b474d-lpfvf   0/1     Running   0          67s
calico-node-vfm28                          1/1     Running   0          67s
coredns-bccdc95cf-dm4pb                    1/1     Running   0          111s
coredns-bccdc95cf-lvhcg                    1/1     Running   0          111s
etcd-k8s-master                            1/1     Running   0          69s
kube-apiserver-k8s-master                  1/1     Running   0          67s
kube-controller-manager-k8s-master         1/1     Running   0          59s
kube-proxy-jpqsq                           1/1     Running   0          111s
kube-scheduler-k8s-master                  1/1     Running   0          56s
View join node command (master only)
cat /etc/kube-server-key | tail -2
Output:
kubeadm join 192.168.10.130:6443 --token bz16uu.olqxoh5q5bnt50sd \
    --discovery-token-ca-cert-hash sha256:9177017ff3016dbb2aadf7484f7823f8b963c989fe9ecdccbe601c9305ce000f
Join node (node only)
Execute on each node
kubeadm join 192.168.10.130:6443 --token bz16uu.olqxoh5q5bnt50sd \
    --discovery-token-ca-cert-hash sha256:9177017ff3016dbb2aadf7484f7823f8b963c989fe9ecdccbe601c9305ce000f
Wait for 5 minutes to view the cluster status (master only)
root@k8s-master:~# kubectl get nodes
NAME         STATUS   ROLES    AGE     VERSION
k8s-master   Ready    master   5m54s   v1.15.2
k8s-node1    Ready    <none>   73s     v1.15.2
k8s-node2    Ready    <none>   71s     v1.15.2
Command Completion
(master only)
apt-get install bash-completion

source <(kubectl completion bash)
echo "source <(kubectl completion bash)" >> ~/.bashrc
source  ~/.bashrc
4, Deploy application
(master only)
Take flask as an example:
vim flask.yaml
The contents are as follows:
apiVersion: extensions/v1beta1
kind: Deployment
metadata:
  name: flaskapp-1
spec:
  replicas: 1
  template:
    metadata:
      labels:
        name: flaskapp-1
    spec:
      containers:
        - name: flaskapp-1
          image: jcdemo/flaskapp
          ports:
          - containerPort: 5000

---
apiVersion: v1
kind: Service
metadata:
  name: flaskapp-1
  labels:
    name: flaskapp-1
spec:
  type: NodePort
  ports:
  - port: 5000
    name: flaskapp-port
    targetPort: 5000
    protocol: TCP
    nodePort: 30005
  selector:
    name: flaskapp-1
Start application
kubectl apply -f flask.yaml
View application status
root@k8s-master:~# kubectl get pods -o wide
NAME                          READY   STATUS    RESTARTS   AGE   IP              NODE        NOMINATED NODE   READINESS GATES
flaskapp-1-59698bc97d-2xnhb   1/1     Running   0          24s   192.168.36.65   k8s-node1   <none>           <none>
The above information shows that this pod runs on k8s-node1 this host
Ping the IP address of the pod. If you can ping it, it means that the calico plug-in is running normally.
root@k8s-master:~# ping 192.168.36.65 -c 1
PING 192.168.36.65 (192.168.36.65) 56(84) bytes of data.
64 bytes from 192.168.36.65: icmp_seq=1 ttl=63 time=6.77 ms

--- 192.168.36.65 ping statistics ---
1 packets transmitted, 1 received, 0% packet loss, time 0ms
rtt min/avg/max/mdev = 6.777/6.777/6.777/0.000 ms
Test whether the pod can access the Internet
root@k8s-master:~# kubectl exec -it flaskapp-1-59698bc97d-2xnhb -- ping www.baidu.com -c 1
PING www.baidu.com (61.135.169.125): 56 data bytes
64 bytes from 61.135.169.125: seq=0 ttl=53 time=27.079 ms

--- www.baidu.com ping statistics ---
1 packets transmitted, 1 packets received, 0% packet loss
round-trip min/avg/max = 27.079/27.079/27.079 ms
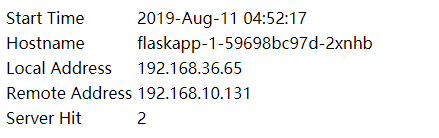
Accessing pod ip services using curl
root@k8s-master:~# curl 192.168.36.65:5000
<html><head><title>Docker + Flask Demo</title></head><body><table><tr><td> Start Time </td> <td>2019-Aug-11 04:52:17</td> </tr><tr><td> Hostname </td> <td>flaskapp-1-59698bc97d-2xnhb</td> </tr><tr><td> Local Address </td> <td>192.168.36.65</td> </tr><tr><td> Remote Address </td> <td>192.168.235.192</td> </tr><tr><td> Server Hit </td> <td>1</td> </tr></table></body></html>
View svc ports
root@k8s-master:~# kubectl get svc
NAME         TYPE        CLUSTER-IP      EXTERNAL-IP   PORT(S)          AGE
flaskapp-1   NodePort    10.107.181.43   <none>        5000:30005/TCP   3m40s
kubernetes   ClusterIP   10.96.0.1       <none>        443/TCP          10m
Direct web access k8s-node1 to port 30005
http://192.168.10.131:30005/
The effects are as follows:
5, Deploy dashboard visualization plug-in
summary
In the Kubernetes Dashboard, you can view the running status of applications in the cluster, and create and modify various Kubernetes resources, such as Deployment, Job, daemon, etc. Users can Scale Up/Down Deployment, execute Rolling Update, restart a Pod, or deploy new applications through a wizard. Dashboard can display the status and log information of various resources in the cluster.
It can be said that Kubernetes Dashboard provides most functions of kubectl, and you can choose according to the situation.
github address:
https://github.com/kubernetes/dashboard
install
Kubernetes does not deploy Dashboard by default. You can install it through the following command:
kubectl apply -f http://mirror.faasx.com/kubernetes/dashboard/master/src/deploy/recommended/kubernetes-dashboard.yaml
View service
root@k8s-master:~# kubectl --namespace=kube-system get deployment kubernetes-dashboard
NAME                   READY   UP-TO-DATE   AVAILABLE   AGE
kubernetes-dashboard   1/1     1            1           5m23s
root@k8s-master:~# kubectl --namespace=kube-system get service kubernetes-dashboard
NAME                   TYPE        CLUSTER-IP       EXTERNAL-IP   PORT(S)   AGE
kubernetes-dashboard   ClusterIP   10.100.111.103   <none>        443/TCP   5m28s
View pod
Make sure the status is Running
root@k8s-master:~# kubectl get pod --namespace=kube-system -o wide | grep dashboard
kubernetes-dashboard-8594bd9565-t78bj   1/1     Running   0          8m41s   192.169.2.7      k8s-node2    <none>           <none>
Allow external access
Note: it will occupy the terminal
kubectl proxy --address='0.0.0.0' --accept-hosts='^*$'
Configure login permissions
Dashboard supports Kubeconfig and Token authentication. In order to simplify the configuration, we give admin permission to the default user of dashboard through the configuration file dashboard-admin.yaml.
vim dashboard-admin.yml
The contents are as follows:
apiVersion: rbac.authorization.k8s.io/v1beta1
kind: ClusterRoleBinding
metadata:
  name: kubernetes-dashboard
  labels:
     k8s-app: kubernetes-dashboard
roleRef:
  apiGroup: rbac.authorization.k8s.io
  kind: ClusterRole
  name: cluster-admin
subjects:
- kind: ServiceAccount
  name: kubernetes-dashboard
  namespace: kube-system
Execute kubectl apply to make it effective
kubectl apply -f dashboard-admin.yml
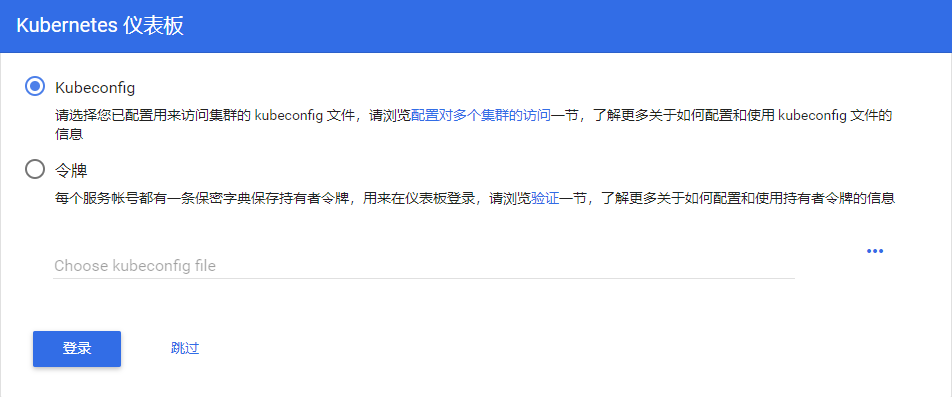
Access via browser
Note: 192.168.10.130 is the master ip
http://192.168.10.130:8001/api/v1/namespaces/kube-system/services/https:kubernetes-dashboard:/proxy/.
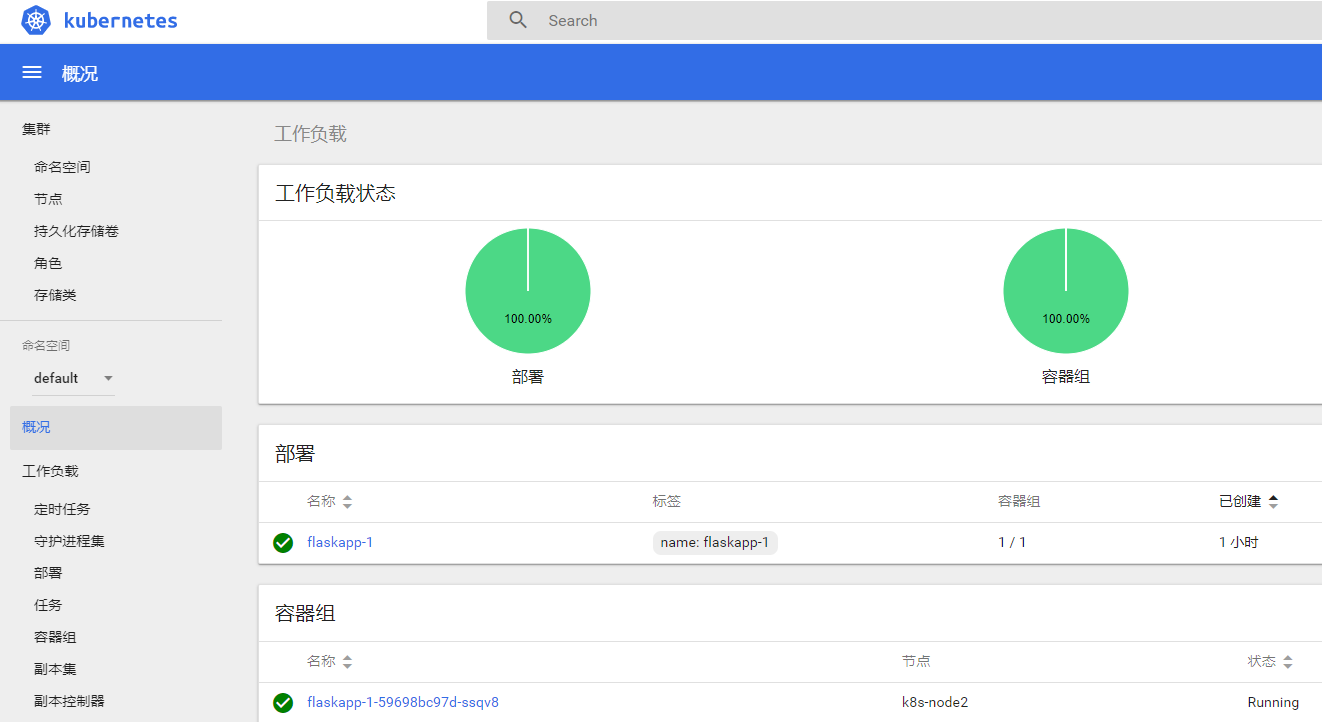
Now click skip on the login page
You can enter the Dashboard. The effect is as follows:
For the introduction of dashboard interface structure, please refer to the link:
https://www.cnblogs.com/kenken2018/p/10340157.html
6, Solve k8s the problem that nodePort cannot be accessed from the Internet
The above example of flash cannot be accessed through master ip+nodeport.
Because the firewall blocked
root@k8s-master:~# iptables -xnL|grep FORWARD
Chain FORWARD (policy DROP)
cali-FORWARD  all  --  0.0.0.0/0            0.0.0.0/0            /* cali:wUHhoiAYhphO9Mso */
KUBE-FORWARD  all  --  0.0.0.0/0            0.0.0.0/0            /* kubernetes forwarding rules */
Chain KUBE-FORWARD (1 references)
Chain cali-FORWARD (1 references)
terms of settlement:
iptables -P FORWARD ACCEPT
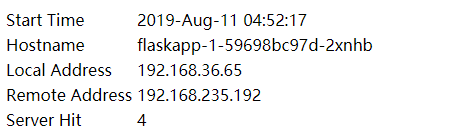
Access with master ip+nodeport
http://192.168.10.130:30005/
The effects are as follows:
Reference link:
https://blog.csdn.net/a610786189/article/details/80321727
Reference links for this article:
https://www.toutiao.com/i6703112655323791884
https://www.cnblogs.com/busigulang/p/10736040.html
https://www.cnblogs.com/qingfeng2010/p/10540832.html
https://www.cnblogs.com/kenken2018/p/10340157.html