PaddleSeg
PaddleSeg is an end to end image segmentation development kit developed by PaddlePaddle, covering a large number of high quality segmentation models in different directions, such as high precision and lightweight. Through modular design, two application modes of configuration driver and API call are provided to help developers more conveniently complete the whole process of image segmentation application from training to deployment. github address
Segmentation is widely used in medical treatment, such as lesion segmentation, vascular segmentation and so on.
background
Early stage of New Coronavirus pneumonia (COVID-19) is characterized by milled glass density, unclear boundary and distribution around the pleura or bronchovascular bundles. Pathology showed inflammatory exudation in alveolar cavity and alveolar septum. The imaging manifestations are mainly divided into nodular, patchy or patchy ground glass like density shadows. The lesions can be relatively limited or diffuse. With the further development of the disease, local consolidation shadows are combined.
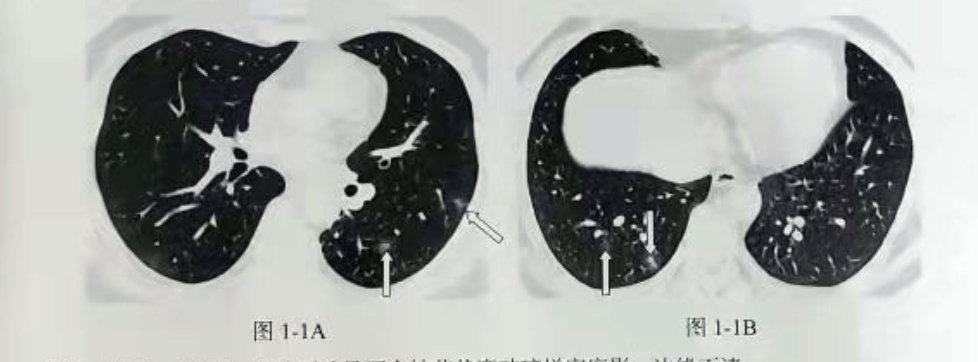
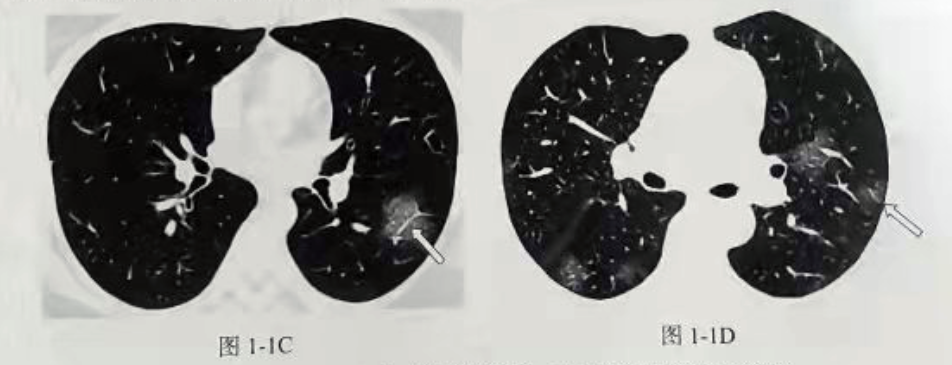
It can be seen that the rapid detection and location of the ground glass in CT has an important role in identifying whether the patient is suffering from New Coronavirus.
Now use PaddleSeg to segment the ground glass lesions, quickly find the corresponding lesion location on the original image, draw the contour, and tell the doctor the layer of the lesion in the chest CT, which greatly reduces the burden of imaging doctors.
Reference book COVID-19 imaging and clinical diagnosis
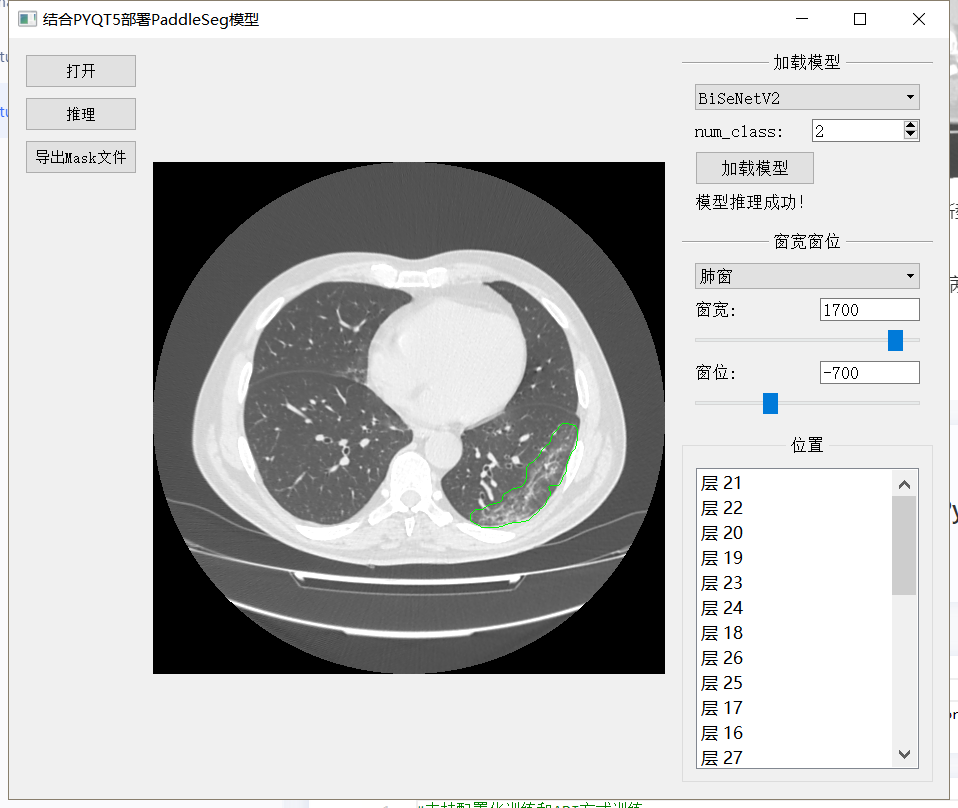
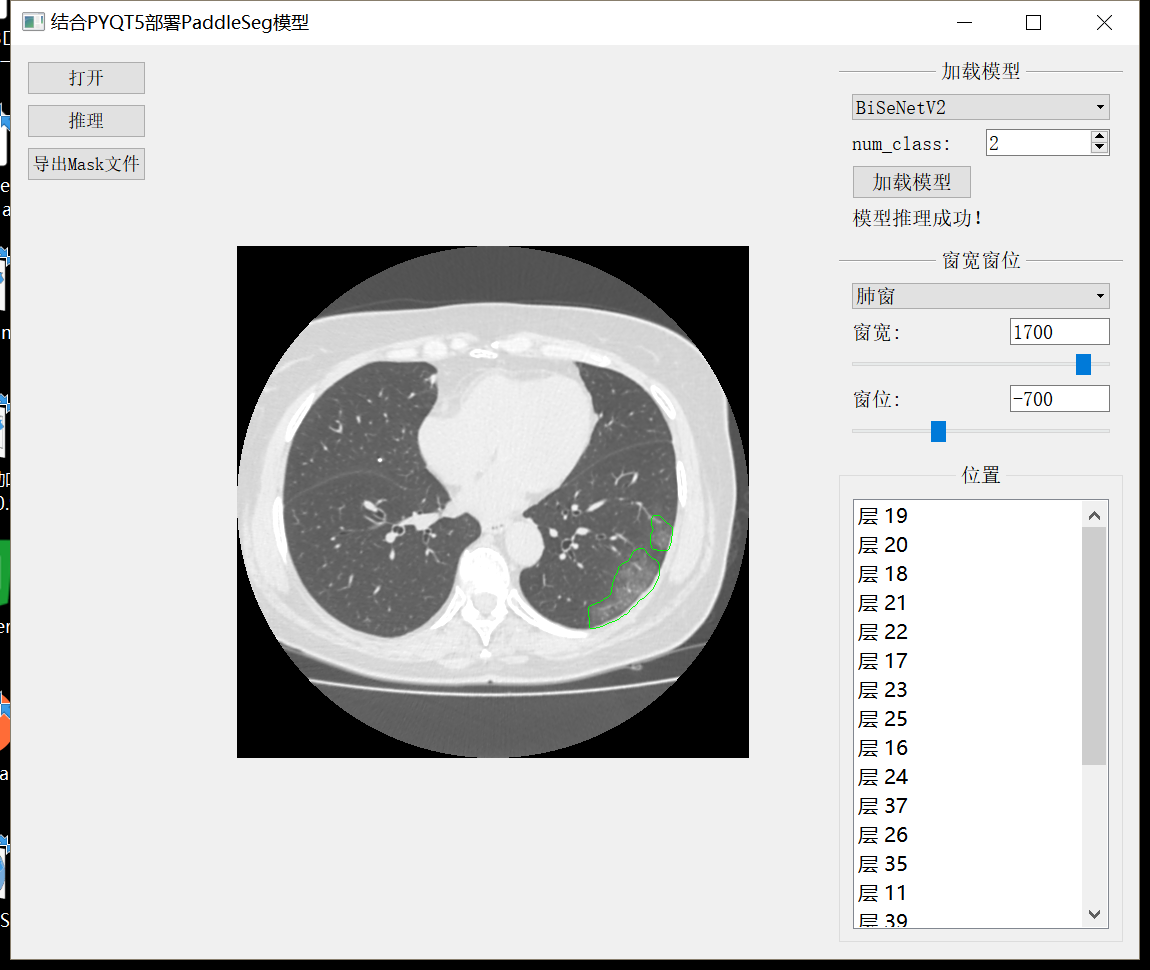
The final results were combined with PyQt to make a focus detection gadget
The model detection effect is shown in the figure below:
The effect of making gadgets combined with PyQT is shown in the figure below:
The video about the use of gadgets is as follows:
# Decompress data
#Data source: https://mosmed.ai/ , in case of copyright infringement, please contact and delete it immediately
#The original data is in NiFit format, then it is converted into png format and input PaddleSeg for training
!unzip data/data114821/MosMedSegPNG.zip -d /home/aistudio/work
#Support configuration training and API training
#API training is used here, so you can install it through pip install paddleseg
!pip install paddleseg SimpleITK
#Load common libraries
import os
import random
import numpy as np
import matplotlib.pyplot as plt
from random import shuffle
import cv2
import paddle
import paddleseg
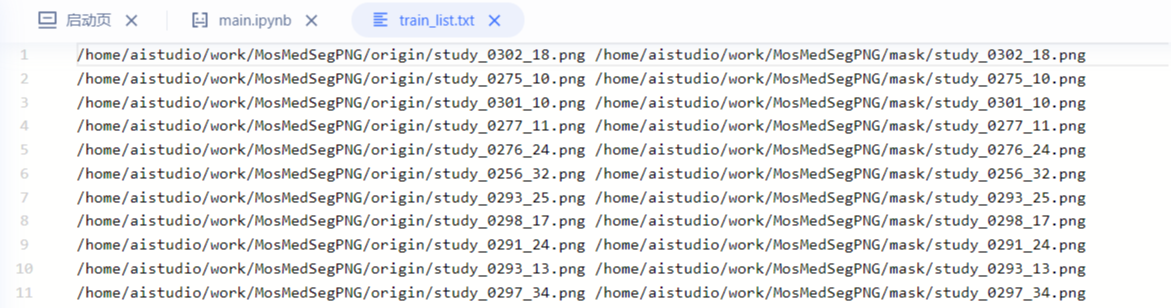
Divide the data and generate txt documents
Each line consists of two file paths + spaces. The first path is the path of the original image, and the second path is the mask path. The path here adopts absolute path, which will avoid the matching problem of filling in the parameters "dataset_root" and "train_path" when building Dataset. For example, after the absolute path is adopted, you don't need to care about the setting of "dataset_root".
### Partition dataset
random.seed(1000)
path_origin = '/home/aistudio/work/MosMedSegPNG/origin'
files = list(filter(lambda x: x.endswith('.png'), os.listdir(path_origin)))
random.shuffle(files)
rate = int(len(files) * 0.8)#Training set and test set 8:2
train_txt = open('/home/aistudio/work/MosMedSegPNG/train_list.txt','w')
val_txt = open('/home/aistudio/work/MosMedSegPNG/val_list.txt','w')
for i,f in enumerate(files):
    image_path = os.path.join(path_origin, f)
    label_path = image_path.replace("origin", "mask")
    if i < rate:
        train_txt.write(image_path + ' ' + label_path+ '\n')
    else:
        val_txt.write(image_path + ' ' + label_path+ '\n')
train_txt.close()
val_txt.close()

print('complete')
complete
Build transforms
Use some simple data enhancement, horizontal flip, random rotation, contrast, lightness, random blur, random clipping, etc.
import paddleseg.transforms as T
from paddleseg.datasets import Dataset

train_transforms = [
    T.Resize(target_size=(550, 550)),
    T.RandomHorizontalFlip(),
    T.RandomDistort(brightness_range = 0.2,
                 contrast_range = 0.2,
                 saturation_range = 0.2,
                 hue_prob = 0),
    T.RandomRotation(max_rotation = 10,im_padding_value =(0,0,0),label_padding_value = 0),#Random rotation
    T.RandomBlur(),
    T.RandomPaddingCrop(crop_size = (512, 512),
                 im_padding_value = (0,0,0),
                 label_padding_value = 0),
    T.Normalize()
]
val_transforms = [
    T.Resize(target_size=(512, 512)),
    T.Normalize()
]

dataset_root = '/home/aistudio/work/MosMedSegPNG'
train_path  = '/home/aistudio/work/MosMedSegPNG/train_list.txt'
val_path  = '/home/aistudio/work/MosMedSegPNG/val_list.txt'
# Build training set
train_dataset = Dataset(
    transforms = train_transforms,
                  dataset_root = dataset_root,
                  num_classes = 2,
                  train_path  = train_path,
                  mode = 'train'
                  )
#Validation set
val_dataset = Dataset(
    transforms = val_transforms,
                  dataset_root = dataset_root,
                  num_classes = 2,
                  val_path = val_path,
                  mode = 'val'
                  )
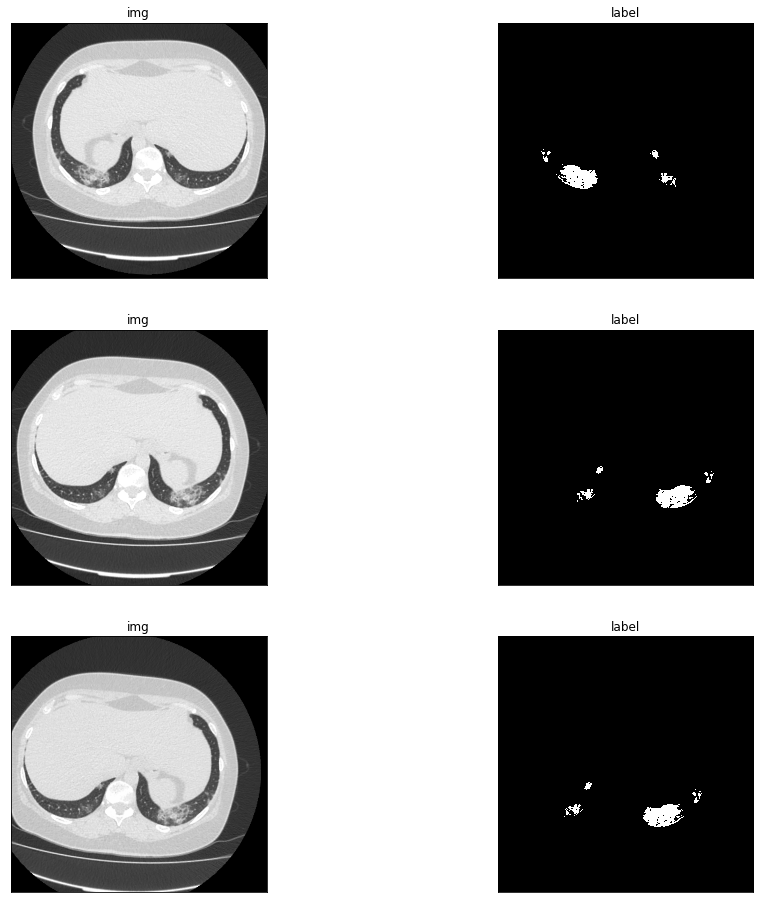
#Preview data enhanced.
plt.figure(figsize=(16,16))
for i in range(1,6,2):
    img, label = train_dataset[50]
    img = np.transpose(img, (1,2,0))
    img = img*0.5 + 0.5
    plt.subplot(3,2,i),plt.imshow(img,'gray'),plt.title('img'),plt.xticks([]),plt.yticks([])
    plt.subplot(3,2,i+1),plt.imshow(label,'gray'),plt.title('label'),plt.xticks([]),plt.yticks([])
    plt.show
Build the whole training process
Model - > loss function - > Optimizer - > hyperparameter - > train
Model: BiSeNetV2 is adopted, because the model is very light, and the model file is only about 9.7MB. Only the CPU runs in the deployment environment, so it is selected.
Loss function: a combination of CrossEntropyLoss and DiceLoss, with a specific gravity of 7:3.
Optimizer: the optimizer Momentum is adopted, the learning rate strategy is PolynomialDecay, and the initialization learning rate is 0.02
Super parameter: BatchSize is 8. A total of 200 rounds of training
The structure diagram of BiSeNetV2 is as follows:
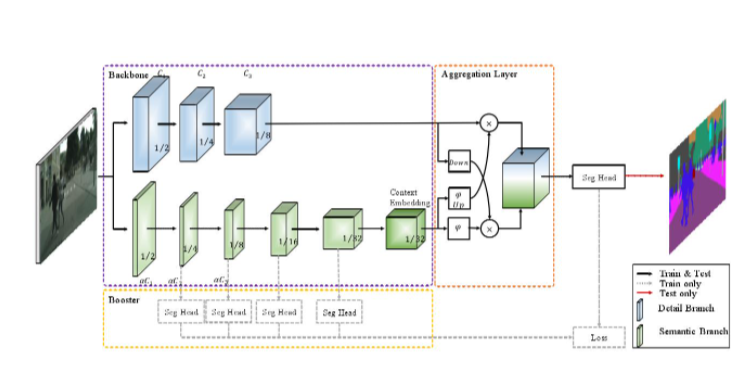
Thesis address: The original article refers to Yu, Changqian, et al. "BiSeNet V2: Bilateral Network with Guided Aggregation for Real-time Semantic Segmentation"
from paddleseg.models import UNet, BiSeNetV2
from paddleseg.core import train
from paddleseg.models.losses import CrossEntropyLoss,DiceLoss, MixedLoss
import paddle
num_classes = 2
model = BiSeNetV2(num_classes=num_classes)

# Set learning rate
batch_size=8
log_iters = int(len(train_dataset)/batch_size /3) #Log printing interval
iters = int(len(train_dataset)/batch_size) * 200 #Training times
save_interval = int(len(train_dataset)/batch_size) * 5 #Number of saved intervals
base_lr = 0.02
#Optimizer and loss function
lr = paddle.optimizer.lr.PolynomialDecay(base_lr, power=0.9, decay_steps=iters, end_lr=0.0000125)
optimizer = paddle.optimizer.Momentum(lr, parameters=model.parameters(), momentum=0.9, weight_decay=4.0e-5)
mixtureLosses = [CrossEntropyLoss(),DiceLoss() ]
mixtureCoef = [0.7,0.3]
losses = {}
losses['types'] = [MixedLoss(mixtureLosses, mixtureCoef)]*5
losses['coef'] = [1]*5

train(
    model=model,
    train_dataset=train_dataset,#Fill in the dataset of the training set
    val_dataset=val_dataset,#Fill in the dataset of the validation set
    optimizer=optimizer,#optimizer
    save_dir='/home/aistudio/Bisnet',#Save path
    iters=iters,
    batch_size=batch_size,
    save_interval=save_interval,
    log_iters=log_iters,
    losses=losses,#Pass in loss function
    use_vdl=True)#Use visual DL
assessment
Finally, the mIou of ground glass lesions was 0.6162157. It took 97s to reason in the environment of cup only. It only takes 5 seconds to use 16gGPU. In medical data, such as lung CT, if thin-layer data is used, it can reach 200 to 300 layers, which means that the model needs to infer more than 200 pictures. It can be seen that the pressure of inferring medical images in the environment of only CPU is very great. A lot of optimization work needs to be done.
import paddle
from paddleseg.core import evaluate
from paddleseg.models import BiSeNetV2
model = BiSeNetV2(num_classes=2)
#This is my training model save result path
model_path = '/home/aistudio/MyBestModel/BiSeNet_model.pdparams'
para_state_dict = paddle.load(model_path)
model.set_dict(para_state_dict)
evaluate(model,val_dataset)
2021-11-09 08:47:56 [INFO]	Start evaluating (total_samples: 157, total_iters: 157)...


157/157 [==============================] - 5s 30ms/step - batch_cost: 0.0299 - reader cost: 2.2512e-04


2021-11-09 08:48:01 [INFO]	[EVAL] #Images: 157 mIoU: 0.8069 Acc: 0.9977 Kappa: 0.9977
2021-11-09 08:48:01 [INFO]	[EVAL] Class IoU:
[0.9977 0.6162]
2021-11-09 08:48:01 [INFO]	[EVAL] Class Acc:
[0.9988 0.78  ]


(0.8069463282580509,
 0.9977263189425134,
 array([0.99771799, 0.61617467]),
 array([0.99875007, 0.77998328]),
 0.997726317139097)
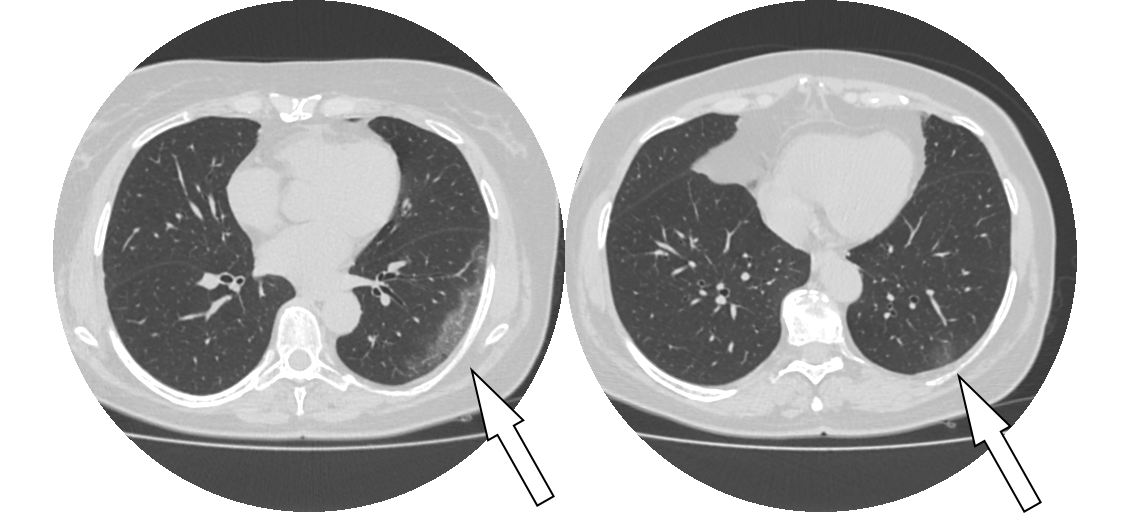
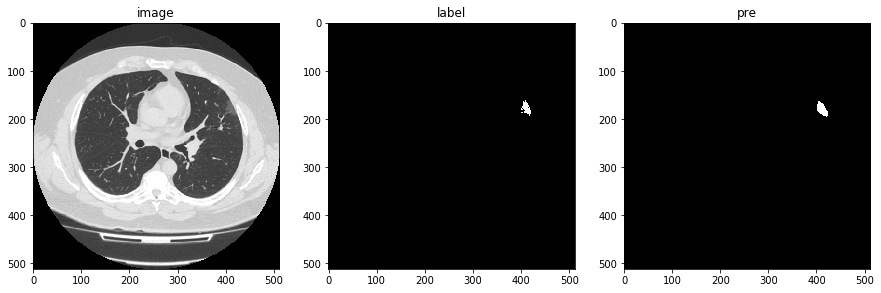
Display the prediction results
It can be seen that the model is not very good for the detail segmentation of ground glass lesions. However, the purpose of this project is to draw the outline of the lesion on the original image through the predicted mask results, so as to realize the detection and location of the lesion. Tell the doctor which layer has ground glass lesions, or tell the doctor that the area of ground glass lesions is the largest.
import cv2
from PIL import Image
import matplotlib.pyplot as plt
import numpy as np
import paddle
import paddleseg.transforms as T
from paddleseg.core import infer
from paddleseg.models import UNet,BiSeNetV2

def nn_infer(model, im, model_path):
    # Network definition
    para_state_dict = paddle.load(model_path)
    model.set_dict(para_state_dict)
    # Prediction results
    transforms = T.Compose([
    T.Resize(target_size=(512, 512)),
    T.Normalize()
        ])
    img, _ = transforms(im)
    img = paddle.to_tensor(img[np.newaxis, :])
    pre = infer.inference(model, img)
    pred = paddle.argmax(pre, axis=1).numpy().reshape((512, 512))
    return pred.astype('uint8')

params = '/home/aistudio/MyBestModel/BiSeNet_model.pdparams'
model = BiSeNetV2(num_classes=2 )
img_path = '/home/aistudio/work/MosMedSegPNG/origin/study_0271_20.png'
lab_path = '/home/aistudio/work/MosMedSegPNG/mask/study_0271_20.png'

img = np.asarray(Image.open(img_path))
lab = np.asarray(Image.open(lab_path))
# Restore size
pre = cv2.resize(nn_infer(model, img, params), (lab.shape[1], lab.shape[0]), cv2.INTER_NEAREST)
plt.figure(figsize=(15, 10))
plt.subplot(131);plt.imshow(img,'gray');plt.title('image')
plt.subplot(132);plt.imshow(lab,'gray');plt.title('label')
plt.subplot(133);plt.imshow(pre,'gray');plt.title('pre')
plt.show()
Infer the entire medical data image file Nifit file
Medical image data is generally in Nifit format or Dicom format. Is a kind of three-dimensional data. Because 2D data is used in the training process. Finally, when reasoning medical image data, we need to reason layer by layer, and then stack and combine the final results into three-dimensional data.
import SimpleITK as sitk
from paddleseg.core import infer
def wwwc(sitkImage,ww=1500,wc=-550):
    #Set window width and level
    min = int(wc - ww/2.0)
    max = int(wc + ww/2.0)
    intensityWindow = sitk.IntensityWindowingImageFilter()
    intensityWindow.SetWindowMaximum(max)
    intensityWindow.SetWindowMinimum(min)
    sitkImage = intensityWindow.Execute(sitkImage)
    return sitkImage

def readNii(path,isflipud=True):
    """Reading and loading data"""
    img = wwwc(sitk.ReadImage(path))
    data = sitk.GetArrayFromImage(img)
    #The images are flipped up and down, so turn them over
    if isflipud:
        data = np.flip(data,1)
    return data

def nn_infer(model, im):
    # Prediction results
    transforms = T.Compose([
    T.Resize(target_size=(512, 512)),
    T.Normalize()
        ])
    img, _ = transforms(im)
    img = paddle.to_tensor(img[np.newaxis, :])
    pre = infer.inference(model, img)
    pred = paddle.argmax(pre, axis=1).numpy().reshape((512, 512))
    return pred.astype('uint8')
#File path of original medical data, format Nifit
origin_f_path = '/home/aistudio/study_0306.nii'
#Read through SimpleITK, set the window width and level, zoom to 0 ~ 255, and convert to numpy format
origin_numpy = readNii(origin_f_path).astype(np.uint8)
d,h,w = origin_numpy.shape
#Used to save the results.
result = np.zeros((d,h,w,3)).astype(np.uint8)
mask_numpy = np.zeros_like(origin_numpy).astype(np.uint8)
model_path = '/home/aistudio/MyBestModel/BiSeNet_model.pdparams'
model = BiSeNetV2(num_classes=2 )
para_state_dict = paddle.load(model_path)
model.set_dict(para_state_dict)
for i in range(d):
img = origin_numpy[i].copy()
img = np.expand_dims(img, axis=2)
img = np.concatenate((img, img, img), axis=-1).astype(np.uint8)
pre = cv2.resize(nn_infer(model, origin_numpy[i]), (512,512), cv2.INTER_NEAREST)
mask_numpy[i] = pre
ret,thresh = cv2.threshold(pre,0,255,cv2.THRESH_BINARY)
thresh = cv2.dilate(thresh, kernel=np.ones((5, 5), np.uint8), iterations=1)
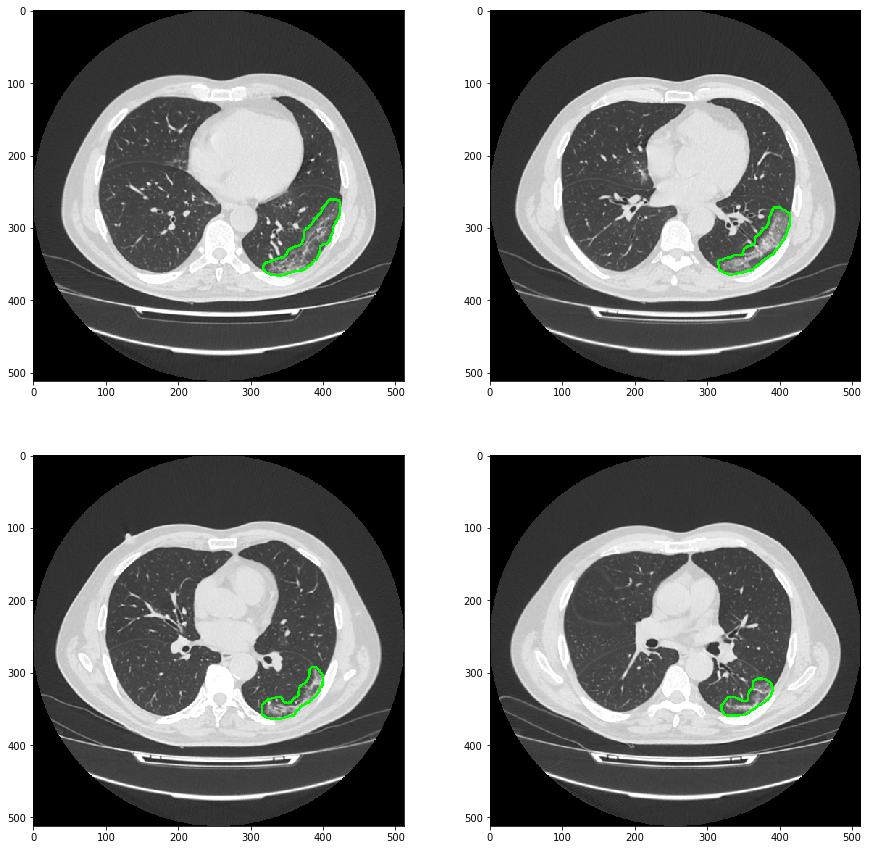
contours, hierarchy = cv2.findContours(thresh, 1, 2)
# This is the outline
img = cv2.drawContours(img, contours, -1, (0, 255, 0), 2)
result[i] = img
#Save the predicted mask into three-dimensional Nifit format.
mask_numpy = np.flip(mask_numpy, 1)
pre_sitkImage = sitk.GetImageFromArray(mask_numpy)
pre_sitkImage.CopyInformation(sitk.ReadImage(origin_f_path))
pre_sitkImage = sitk.Cast(pre_sitkImage, sitk.sitkUInt8)
save_path =origin_f_path.split('.')[0] + '_mask.nii'
sitk.WriteImage(pre_sitkImage, save_path)
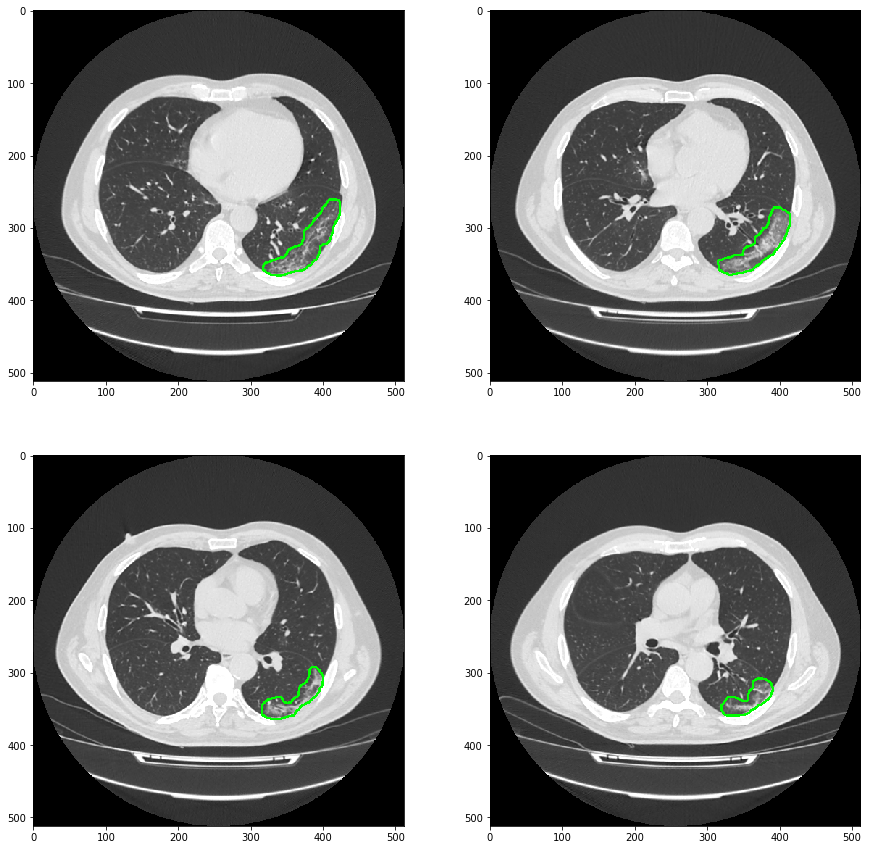
plt.figure(figsize=(15, 15))
plt.subplot(221);plt.imshow(result[20])
plt.subplot(222);plt.imshow(result[22])
plt.subplot(223);plt.imshow(result[24])
plt.subplot(224);plt.imshow(result[26])
plt.show()
The predicted maskNifit format and the original data format are read and opened with ITK snap overlay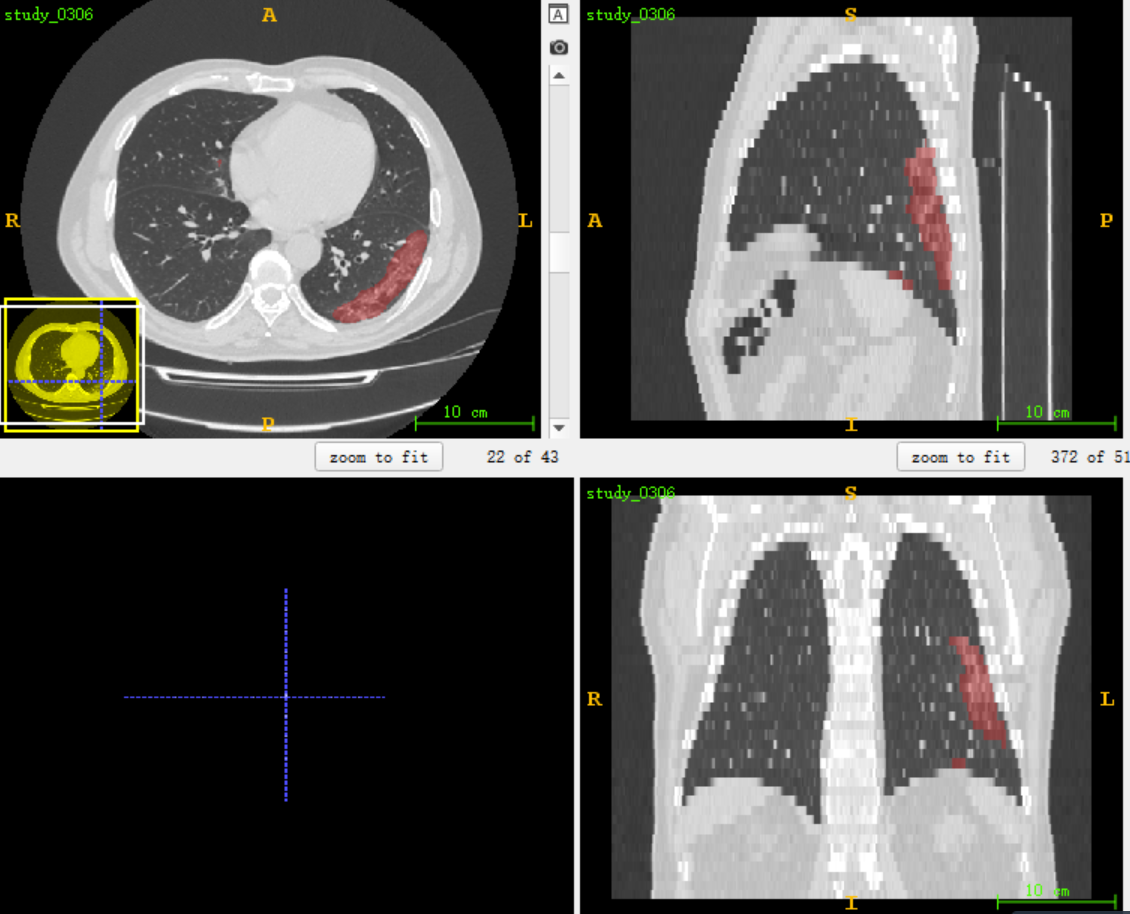
Finally, combined with PyQT, the ground glass lesion detection gadget is made
As shown in the figure
The code of the gadget is in the project file viewer. You can download it if you need it. It took a day to write it temporarily, so if there are all kinds of problems, please spray it gently
Please click here View the basic usage of this environment
Please click here for more detailed instructions.