Key points of text objectives
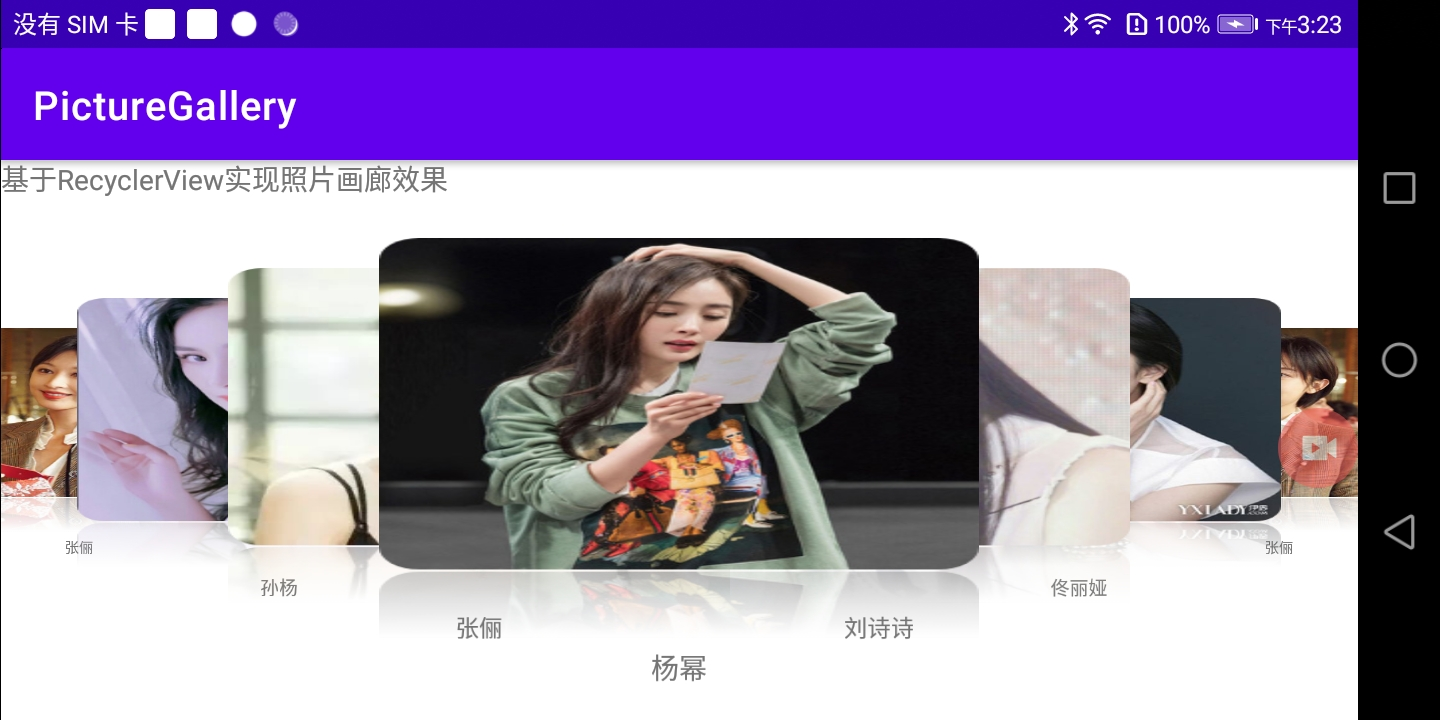
A previous article showed the gallery effect realized by RecyclerView, which is suitable for album / picture / list browsing effect. This article describes how to realize the 3D gallery effect shown in the figure below based on RecyclerView. The focus of the following effects is to realize the layer superposition of sub views, and the 3D rotation effect in the sliding process is relatively simple.
(1) No 3D rotation effect picture
(1) Picture with 3D rotation effect

Realization effect
As shown in the following figure, the code effect can ensure that the currently displayed sub views are displayed in the middle, and the sub views on both sides of the currently displayed view will be partially obscured by the centered view.
(1) Does not increase the effect of 3D rotation

(2) Increase the effect of 3D rotation

Principle of subview superposition
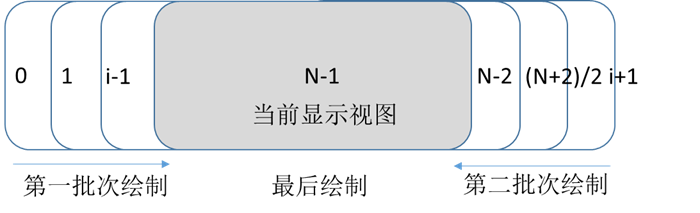
By default, the sub views are drawn and placed in order, which cannot achieve the effect of illustration. RecyclerView supports resetting the drawing order of sub views. The idea of setting the drawing is to set the currently displayed view as the last drawing, so that the currently displayed view can be superimposed on the adjacent view. The detailed design is as follows:
The drawing settings for drawing are as follows
| Draw batch | Subview serial number | Draw order |
|---|---|---|
| 1 | Current view left | 0 ~ i-1 |
| 2 | Current view to the right | i ~ N-2 |
| 3 | Current view | N-1 |
Note: i: the serial number of the currently displayed view in RecyclerView
N: RecyclerView subview length
Superposition implementation process
After understanding the principle, the code development is realized according to this idea. The main code includes rewriting RecyclerView and LayoutManager.
1. Rewrite RecylcerView to rearrange the drawing order of sub views
When RecyclerView works, it arranges sub views according to its default order rules. If you want to rearrange the order, you need to start sequence remake first
public GalleryRecyclerView(@NonNull Context context) {
    super(context);
    init();
}

public GalleryRecyclerView(@NonNull Context context, @Nullable AttributeSet attrs) {
    super(context, attrs);
    init();
}

public GalleryRecyclerView(@NonNull Context context, @Nullable AttributeSet attrs, int defStyleAttr) {
    super(context, attrs, defStyleAttr);
    init();
}

......
//Rearrange the opening sequence
private void init(){
    setChildrenDrawingOrderEnabled(true);
}
2. Set the drawing order of sub views
The basic idea has been introduced in the sub view superposition principle clip. The current display view is drawn last, the display view is drawn in the order of the first batch on the left, and the display view is drawn in the reverse order of the second batch on the right. The corresponding implementation code in the user-defined RecyclerView is as follows
/**
 * Rewrite the view layout order: the first half is drawn in order, the second half is drawn in reverse order, and the middle position
 * The last drawing in the middle position is count-1
 * The drawing order of the view before the middle position is i
 * The drawing order of the view after the middle position is center+count-1-i
 */
@Override
protected int getChildDrawingOrder(int childCount, int i) {
    GalleryLayoutManager layoutManager = (GalleryLayoutManager) getLayoutManager();
    //Calculate the middle position, that is, the position of the currently displayed view
    int center = layoutManager.getCenterVisiblePosition() - layoutManager.getFirstVisiblePosition();
    //Drawing sequence number of the view with sequence number i
    int order;
    if(i == center){
        order = childCount - 1;
    }else if(i < center){
        order = i;
    }else{
        order = center + childCount - 1 - i;
    }
    Log.d(TAG,"childCount = "+childCount+",center = "+center+",order = "+order+",i = "+i);
    return order;
}
In the above code implementation, the user-defined LayoutManager is used to calculate the position of the first sub view and the middle sub view of the currently displayed view. The corresponding code is as follows
/**
 * The basic idea of calculating the position of the middle view of the displayed view is based on the sliding distance of RecyclerView divided by the sub view spacing
 */
public int getCenterVisiblePosition(){
    int position = mScrollDistanceX / mChildIntervalWidth;
    int offset = mScrollDistanceX % mChildIntervalWidth;
    if(offset > mChildIntervalWidth/2){
        position++;
    }
    return position;
}

//Calculates the position of the first view displayed
public int getFirstVisiblePosition(){
    if(getChildCount() < 0){
        return  0;
    }
    View item = getChildAt(0);
    return getPosition(item);
}
3. Layout sub view
Since the layout of sub views requires the layout position of sub views, the HashMap is used to cache the layout positions of all sub views within the custom LayoutManager. Whether the displayed information has been added is defined as follows:
/**
 * Location in RecyclerView for storing subviews < P / >
 * key Is the sequence number of the subview, Rect is the position of the subview < P / >
 */
private Map<Integer , Rect> mChildPositionRects = new HashMap<>();
/**
 * Used to record whether the child view has been added to the RecyclerView
 * key Is the sequence number of the subview, and value is whether the subview is in the visible area. true indicates that it is displayed, and false indicates that it is not displayed
 */
private Map<Integer , Boolean> mChildHasAttached = new HashMap<>();
The main work of arranging sub views is to place sub views in the visible area and recycle and manage the sub views in the non visible area. The code in the custom LayoutManager is as follows
@Override
public void onLayoutChildren(RecyclerView.Recycler recycler, RecyclerView.State state) {
    if(getItemCount() == 0){
        detachAndScrapAttachedViews(recycler);
        return;
    }
    mChildHasAttached.clear();
    mChildPositionRects.clear();
    detachAndScrapAttachedViews(recycler);
    //Calculate the width of sub views and the spacing between adjacent sub views
    if(mChildIntervalWidth <= 0){
        View firstItem = recycler.getViewForPosition(0);
        measureChildWithMargins(firstItem, 0, 0);
        mChildWidth = getDecoratedMeasuredWidth(firstItem);
        mChildHeight = getDecoratedMeasuredHeight(firstItem);
        mChildIntervalWidth = (int) (mChildWidth*OVERLYING_RATIO);
    }
    //Offset in the horizontal direction of the subview
    int offsetX = 0;
    mStartX = getWidth()/2 - mChildWidth/2;
    for(int i = 0 ; i < getItemCount() ; i++){
        Rect rect = new Rect(offsetX + mStartX , 0 ,
                offsetX + mChildWidth + mStartX , mChildHeight);
        mChildPositionRects.put(i , rect);
        mChildHasAttached.put(i,false);
        offsetX += mChildIntervalWidth;
    }
    //Add view of visual area
    int visibleCount = getHorizontalSpace() / mChildIntervalWidth;
    Rect visibleRect = getVisibleArea();
    for(int i = 0; i < visibleCount; i++){
        insertView(i, visibleRect, recycler, false);
        Log.d(TAG,"the i ="+i+" visible count = "+visibleCount+",rect left = "+visibleRect.left);
    }
}
When moving horizontally, you need to recycle the sub views of the non display area in the custom LayoutManager and place the sub views of the display area. The corresponding code is as follows
//Absolute distance of lateral movement
private int mScrollDistanceX = 0;
@Override
public int scrollHorizontallyBy(int dx, RecyclerView.Recycler recycler, RecyclerView.State state) {
    //If there is no sub view to display in the view, it will not be accumulated
    if(getChildCount() <= 0){
        return dx;
    }
    int travel = dx;
    //Left edge
    if(mScrollDistanceX + dx < 0){
        Log.d(TAG,"Left edge reached");
        travel = -mScrollDistanceX;
    }else if(mScrollDistanceX + dx > ((getItemCount() -1)*mChildIntervalWidth)){
        //Right edge
        Log.d(TAG,"Right edge reached");
        travel = (getItemCount() -1)*mChildIntervalWidth - mScrollDistanceX;
    }
    mScrollDistanceX += travel;
    //Reclaim non display area subviews and place subviews in the visible area
    Rect visibleRect = getVisibleArea();
    for(int i = getChildCount()-1; i >=0 ; i--){
        View item = getChildAt(i);
        int position = getPosition(item);
        Rect rect = mChildPositionRects.get(position);
        //When it is judged that there is no intersection between the sub view and the visible area, the view is removed and recycled
        if(!Rect.intersects(rect,visibleRect)){
            removeAndRecycleView(item,recycler);
            mChildHasAttached.put(position,false);
            Log.d(TAG,"Remove view location:"+position);
        }else{
            //Place child views in visual area
            layoutDecoratedWithMargins(item , rect.left - mScrollDistanceX, rect.top ,
                    rect.right - mScrollDistanceX, rect.bottom);
            mChildHasAttached.put(position , true);
            Log.d(TAG,"Place view at:"+position);
        }
    }
    //RecyclerView fills the blank area at the beginning and end
    View firstItem = getChildAt(0);
    View lastItem = getChildAt(getChildCount() - 1);
    if(travel >= 0 ){
        //Slide left: slide to the bottom
        int minPos = getPosition(firstItem);
        //Fills the View to the right of the visible area
        for(int i = minPos; i < getItemCount(); i++){
            insertView(i, visibleRect, recycler, false);
        }
    }else{
        //Slide right: slide to the top
        int maxPos = getPosition(lastItem);
        //Fills the View to the left of the visible area
        for(int i = maxPos; i >= 0; i--){
            insertView(i, visibleRect, recycler, true);
        }
    }
    return travel;
}


//Insert a subview for the viewing area
private void insertView(int pos , Rect visibleRect , RecyclerView.Recycler recycler , boolean firstPos){
    Rect rect = mChildPositionRects.get(pos);
    if(Rect.intersects(visibleRect , rect) && !mChildHasAttached.get(pos)){
        //Insert a view only if it is not displayed in the visible area
        View item = recycler.getViewForPosition(pos);
        if(firstPos){
            addView(item , 0);
        }else{
            addView(item);
        }
        measureChildWithMargins(item,0,0);
        layoutDecoratedWithMargins(item, rect.left - mScrollDistanceX, rect.top ,
                rect.right - mScrollDistanceX, rect.bottom);
        mChildHasAttached.put(pos, true);
    }
}
So far, the non 3D gallery effect in exhibition 1 can be achieved
Achieve 3D rotation effect during sliding
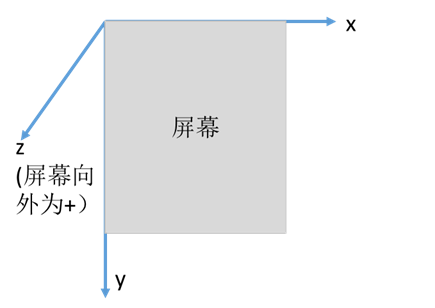
The realization of 3D rotation effect mainly depends on the calculation of rotation angle. First understand the 3D coordinate system of Android, and the detailed diagram is shown in the figure below. For rotation around the coordinate axis, clockwise is positive and counterclockwise is negative.
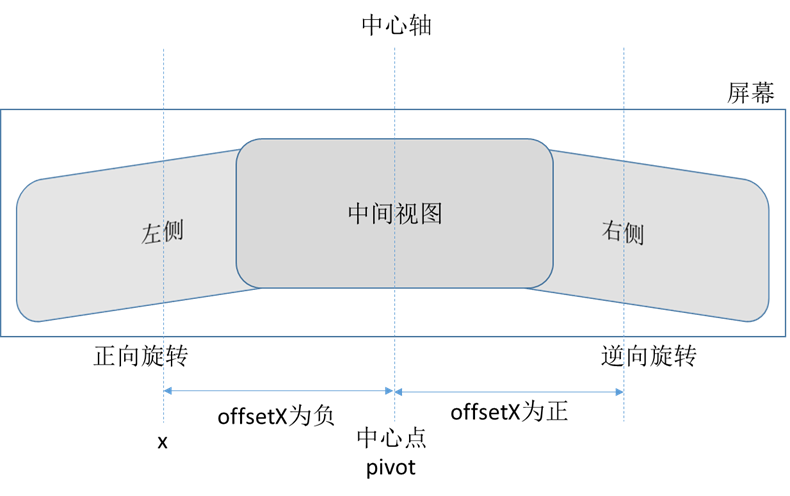
To achieve the effect of the illustration, the key is to set the rotation of the sub view around the y direction. The idea is as follows: the greater the offset X between the views on both sides and the center view, the greater the rotation angle. When offsetX is negative, the rotation angle is positive. In order to avoid obvious deformation of UI effect, the maximum transformation angle shall be limited in the actual operation process.
The code for calculating the rotation angle in the custom RecyclerView is as follows
private final float MAX_ROTATION_Y = 20.0f;
//The y-axis rotation angle is calculated according to the distance from the center point. The farther the distance, the greater the rotation
private float calculateRotationY(int offsetX){
    float rotation = -MAX_ROTATION_Y * offsetX / mIntervalDistance;
    if(rotation < -MAX_ROTATION_Y){
        rotation = -MAX_ROTATION_Y;
    }else if(rotation > MAX_ROTATION_Y){
        rotation = MAX_ROTATION_Y;
    }
    return rotation;
}
Setting the rotation of the sub view is implemented by rewriting the drawchild (canvas, view child, long drawingtime) method in the custom RecyclerView. The code is relatively simple. The pasted code is as follows
/**
 * Sets the zoom factor / rotation angle for the subview
 * @param canvas
 * @param child
 * @param drawingTime
 * @return
 */
@Override
public boolean drawChild(Canvas canvas, View child, long drawingTime) {
    int childWidth = child.getWidth() - child.getPaddingLeft() - child.getPaddingRight();
    int childHeight = child.getHeight() - child.getPaddingTop() - child.getPaddingBottom();
    int width = getWidth();
    if(width <= child.getWidth()){
        return super.drawChild(canvas, child, drawingTime);
    }
    int pivot = (width - childWidth)/2;
    int x = child.getLeft();
    float scale , alpha;
    alpha = 1 - 0.6f*Math.abs(x - pivot)/pivot;
    if(x <= pivot){
        scale = 2f*(1-mSelectedScale)*(x+childWidth) / (width+childWidth) + mSelectedScale;
    }else{
        scale = 2f*(1-mSelectedScale)*(width - x) / (width+childWidth) + mSelectedScale;
    }
    child.setPivotX(childWidth / 2);
    child.setPivotY(childHeight*2 / 5);
    child.setScaleX(scale);
    child.setScaleY(scale);
    float rotationY = calculateRotationY(x - pivot);
    if(Math.abs(x - pivot) < 5){
        child.setRotationY(0);
        rotationY = 0;
    }else {
        child.setRotationY(rotationY);
    }
    return super.drawChild(canvas, child, drawingTime);
}
So far, the 3D gallery effect has been fully realized
Code use
The effect described in this article is only customized for LayoutManager and RecyclerView. The preliminary effect can be achieved by copying the two files into the project. Relevant codes have been uploaded to Gitee
https://gitee.com/com_mailanglidegezhe/solid_gallery.git
Learning experience
Finally, I would like to thank Qijian for the technical training given in Chapter 8 of the book advanced and wonderful implementation of Android custom controls. The main methods and ideas described in this paper come from the guidance of this book. Due to the limitation of time and capability level, the effect of the 3D gallery is only DEMO level. At present, some possible problems are that the placement logic of occasional sub views fails during rapid sliding, especially when the overlap coefficient of adjacent sub views is less than 1 / 2. This part needs to be further optimized in the future. This paper first introduces the basic ideas and methods of implementation, and welcome your correction.