Today we demonstrate how to use Keras, Redis, Flask, and Apache for in-depth learning in a production environment
Over the years, Dega has also sorted out a lot of learning materials about artificial intelligence (including learning roadmap, two deep learning framework videos, image recognition, OpenCV, computer vision, deep learning and neural network videos, codes, books PPT), which can be shared with you for free if you need. You can get it for free by adding assistant prestige!

You can get it for free by scanning the code

Project structure
keras-complete-rest-api
├── helpers.py
├── jemma.png
├── keras_rest_api_app.wsgi
├── run_model_server.py
├── run_web_server.py
├── settings.py
├── simple_request.py
└── stress_test.py
Document interpretation:
- run_web_server.py contains all our Flask Web server code -- Apache will load it when we launch our deep learning Web application.
- run_model_server.py will:
- Load our Keras model from disk
- Constantly poll Redis to find new images for classification
- Classification of images (batch processing to improve efficiency)
- Write the inference results back to Redis so that they can be returned to the client through flash.
- settings.py contains all Python based settings of our in-depth learning production services, such as Redis host / port information, image classification settings, image queue names, etc.
- helpers.py contains run_web_server.py and run_model_server.py will use the utility function (i.e. base64 encoding).
- keras_rest_api_app.wsgi contains our WSGI settings, so we can service the Flask application from our Apache server.
- simple_request.py can be used to programmatically use the results of our deep learning API service.
- jemma.png is a picture of my Beagle. When we call the REST API to verify that it works, we will use it as an example image.
- Finally, we will use stress_test.py to put pressure on our server and measure image classification throughout the process.
We have an endpoint / predict on the flash server. This method is located in run_ web_ In server.py, the classification of input images will be calculated as needed. Image preprocessing is also running_ web_ Processing in server.py.
In order to prepare our server for production, I took the classification procedure function from a single script last week and put it in run_model_server.py. This script is very important because it will load our Keras model and grab images from the image queue in Redis for classification. The results are written back to Redis (/ predict endpoint and corresponding functions in run_web_server.py monitor Redis to send the results back to the client).
But unless we know the functions and limitations of deep learning REST API server, what are the benefits of it?
In stress_ In test.py, we test our server. We will do this by starting 500 concurrent threads that send our images to the server for parallel classification. I recommend running it on the server localhost to start, and then running it from a remote client.
Build our deep learning network application
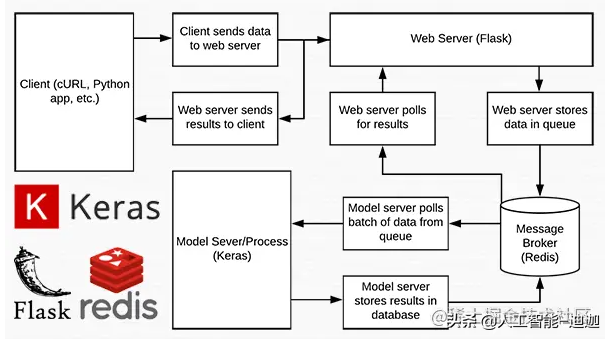
Figure 1: data flow diagram of deep learning REST API server built with Python, Keras, Redis and Flask.
Almost every line of code used in this project comes from our previous article on building extensible deep learning rest APIs - the only change is that we move some code to separate files to promote scalability in the production environment.
Setup and configuration
# initialize Redis connection settings
REDIS_HOST = "localhost"
REDIS_PORT = 6379
REDIS_DB = 0
# initialize constants used to control image spatial dimensions and
# data type
IMAGE_WIDTH = 224
IMAGE_HEIGHT = 224
IMAGE_CHANS = 3
IMAGE_DTYPE = "float32"
# initialize constants used for server queuing
IMAGE_QUEUE = "image_queue"
BATCH_SIZE = 32
SERVER_SLEEP = 0.25
CLIENT_SLEEP = 0.25
In settings.py, you will be able to change the parameters of the server connection, image size + data type, and server queue.
# import the necessary packages
import numpy as np
import base64
import sys
def base64_encode_image(a):
	# base64 encode the input NumPy array
	return base64.b64encode(a).decode("utf-8")
def base64_decode_image(a, dtype, shape):
	# if this is Python 3, we need the extra step of encoding the
	# serialized NumPy string as a byte object
	if sys.version_info.major == 3:
		a = bytes(a, encoding="utf-8")
	# convert the string to a NumPy array using the supplied data
	# type and target shape
	a = np.frombuffer(base64.decodestring(a), dtype=dtype)
	a = a.reshape(shape)
	# return the decoded image
	return a
The helpers.py file contains two functions -- one for base64 encoding and the other for decoding.
Coding is necessary so that we can serialize + store our images in Redis. Similarly, decoding is necessary so that we can deserialize the image into NumPy array format before preprocessing.
Deep learning web server
# import the necessary packages
from tensorflow.keras.preprocessing.image import img_to_array
from tensorflow.keras.applications.resnet50 import preprocess_input
from PIL import Image
import numpy as np
import settings
import helpers
import flask
import redis
import uuid
import time
import json
import io
# initialize our Flask application and Redis server
app = flask.Flask(__name__)
db = redis.StrictRedis(host=settings.REDIS_HOST,
	port=settings.REDIS_PORT, db=settings.REDIS_DB)
def prepare_image(image, target):
	# if the image mode is not RGB, convert it
	if image.mode != "RGB":
		image = image.convert("RGB")
	# resize the input image and preprocess it
	image = image.resize(target)
	image = img_to_array(image)
	image = np.expand_dims(image, axis=0)
	image = preprocess_input(image)
	# return the processed image
	return image
@app.route("/")
def homepage():
	return "Welcome to the PyImageSearch Keras REST API!"
@app.route("/predict", methods=["POST"])
def predict():
	# initialize the data dictionary that will be returned from the
	# view
	data = {"success": False}
	# ensure an image was properly uploaded to our endpoint
	if flask.request.method == "POST":
		if flask.request.files.get("image"):
			# read the image in PIL format and prepare it for
			# classification
			image = flask.request.files["image"].read()
			image = Image.open(io.BytesIO(image))
			image = prepare_image(image,
				(settings.IMAGE_WIDTH, settings.IMAGE_HEIGHT))
			# ensure our NumPy array is C-contiguous as well,
			# otherwise we won't be able to serialize it
			image = image.copy(order="C")
			# generate an ID for the classification then add the
			# classification ID + image to the queue
			k = str(uuid.uuid4())
			image = helpers.base64_encode_image(image)
			d = {"id": k, "image": image}
			db.rpush(settings.IMAGE_QUEUE, json.dumps(d))
			# keep looping until our model server returns the output
			# predictions
			while True:
				# attempt to grab the output predictions
				output = db.get(k)
				# check to see if our model has classified the input
				# image
				if output is not None:
					# add the output predictions to our data
					# dictionary so we can return it to the client
					output = output.decode("utf-8")
					data["predictions"] = json.loads(output)
					# delete the result from the database and break
					# from the polling loop
					db.delete(k)
					break
				# sleep for a small amount to give the model a chance
				# to classify the input image
				time.sleep(settings.CLIENT_SLEEP)
			# indicate that the request was a success
			data["success"] = True
	# return the data dictionary as a JSON response
	return flask.jsonify(data)
# for debugging purposes, it's helpful to start the Flask testing
# server (don't use this for production
if __name__ == "__main__":
	print("* Starting web service...")
	app.run()
In run_ web_ In server.py, you will see predict, which is associated with our REST API /predict endpoint.
The predict function pushes the encoded image to the Redis queue, and then circulates / polls until it obtains the prediction data from the model server. We then JSON encode the data and instruct flash to send the data back to the client.
Deep learning model server
# import the necessary packages
from tensorflow.keras.applications import ResNet50
from tensorflow.keras.applications.resnet50 import decode_predictions
import numpy as np
import settings
import helpers
import redis
import time
import json
# connect to Redis server
db = redis.StrictRedis(host=settings.REDIS_HOST,
	port=settings.REDIS_PORT, db=settings.REDIS_DB)
def classify_process():
	# load the pre-trained Keras model (here we are using a model
	# pre-trained on ImageNet and provided by Keras, but you can
	# substitute in your own networks just as easily)
	print("* Loading model...")
	model = ResNet50(weights="imagenet")
	print("* Model loaded")
	# continually pool for new images to classify
	while True:
		# attempt to grab a batch of images from the database, then
		# initialize the image IDs and batch of images themselves
		queue = db.lrange(settings.IMAGE_QUEUE, 0,
			settings.BATCH_SIZE - 1)
		imageIDs = []
		batch = None
		# loop over the queue
		for q in queue:
			# deserialize the object and obtain the input image
			q = json.loads(q.decode("utf-8"))
			image = helpers.base64_decode_image(q["image"],
				settings.IMAGE_DTYPE,
				(1, settings.IMAGE_HEIGHT, settings.IMAGE_WIDTH,
					settings.IMAGE_CHANS))
			# check to see if the batch list is None
			if batch is None:
				batch = image
			# otherwise, stack the data
			else:
				batch = np.vstack([batch, image])
			# update the list of image IDs
			imageIDs.append(q["id"])
		# check to see if we need to process the batch
		if len(imageIDs) > 0:
			# classify the batch
			print("* Batch size: {}".format(batch.shape))
			preds = model.predict(batch)
			results = decode_predictions(preds)
			# loop over the image IDs and their corresponding set of
			# results from our model
			for (imageID, resultSet) in zip(imageIDs, results):
				# initialize the list of output predictions
				output = []
				# loop over the results and add them to the list of
				# output predictions
				for (imagenetID, label, prob) in resultSet:
					r = {"label": label, "probability": float(prob)}
					output.append(r)
				# store the output predictions in the database, using
				# the image ID as the key so we can fetch the results
				db.set(imageID, json.dumps(output))
			# remove the set of images from our queue
			db.ltrim(settings.IMAGE_QUEUE, len(imageIDs), -1)
		# sleep for a small amount
		time.sleep(settings.SERVER_SLEEP)
# if this is the main thread of execution start the model server
# process
if __name__ == "__main__":
	classify_process()
run_ model_ The server.py file contains our classify_process function. This function loads our model and then runs the prediction on a batch of images. This process is best performed on the GPU, but the CPU can also be used.
In this example, for simplicity, we will use ResNet50 pre trained on the ImageNet dataset. You can modify classify_process to leverage your own deep learning model.
WSGI configuration
# add our app to the system path
import sys
sys.path.insert(0, "/var/www/html/keras-complete-rest-api")
# import the application and away we go...
from run_web_server import app as application
Pressure test
# import the necessary packages
from threading import Thread
import requests
import time
# initialize the Keras REST API endpoint URL along with the input
# image path
KERAS_REST_API_URL = "http://localhost/predict"
IMAGE_PATH = "jemma.png"
# initialize the number of requests for the stress test along with
# the sleep amount between requests
NUM_REQUESTS = 500
SLEEP_COUNT = 0.05
def call_predict_endpoint(n):
	# load the input image and construct the payload for the request
	image = open(IMAGE_PATH, "rb").read()
	payload = {"image": image}
	# submit the request
	r = requests.post(KERAS_REST_API_URL, files=payload).json()
	# ensure the request was sucessful
	if r["success"]:
		print("[INFO] thread {} OK".format(n))
	# otherwise, the request failed
	else:
		print("[INFO] thread {} FAILED".format(n))
# loop over the number of threads
for i in range(0, NUM_REQUESTS):
	# start a new thread to call the API
	t = Thread(target=call_predict_endpoint, args=(i,))
	t.daemon = True
	t.start()
	time.sleep(SLEEP_COUNT)
# insert a long sleep so we can wait until the server is finished
# processing the images
time.sleep(300)
Our stress_ The test.py script will help us test the server and determine its limitations. I always recommend stress testing your deep learning REST API server so that you know if (and more importantly, when) you need to add additional GPU, CPU, or RAM. This script starts NUM_REQUESTS thread and POST to / predict endpoint. It depends on our flash web application.
Compile and install Redis
Redis is an efficient in memory database, which will act as our queue / message agent. Getting and installing redis is very simple:
$ wget http://download.redis.io/redis-stable.tar.gz
$ tar xvzf redis-stable.tar.gz
$ cd redis-stable
$ make
$ sudo make install
Installing the Apache Web server
You can use other Web servers, such as nginx, but since I have more experience with Apache (and therefore generally more familiar with APACHE), I will use Apache in this example. Apache can be installed in the following ways:
$ sudo apt-get install apache2
If you created a virtual environment using Python 3, you will need to install the Python 3 WSGI + Apache module:
$ sudo apt-get install libapache2-mod-wsgi-py3
$ sudo a2enmod wsgi
To verify that Apache is installed, open a browser and enter the IP address of the Web server. If you can't see the server startup screen, make sure to open port 80 and port 5000. As far as I am concerned, the IP address of my server is 54.187.46.215 (yours will be different). Enter this in the browser and I see:

SYM link links to your Flash + deep learning application
By default, Apache provides content from / var/www/html. I recommend creating a symbolic link from / var/www/html to the flash web application. I have uploaded my deep learning + Flask application to the home directory in the directory named keras complete rest API:
$ ls ~
keras-complete-rest-api
I can symbolic link it to / var/www/html in the following ways:
$ cd /var/www/html/
$ sudo ln -s ~/keras-complete-rest-api keras-complete-rest-api
Update your Apache configuration to point to the Flask application
In order to configure Apache to point to our Flask application, we need to edit
/etc/apache2/sites-available/000-default.conf . Open in your favorite text editor (here I'll use vi):
$ sudo vi /etc/apache2/sites-available/000-default.conf
Provide your wsgipython home (path to Python bin directory) and wsgipython path (path to Python site package directory) configurations at the top of the file:
WSGIPythonHome /home/ubuntu/.virtualenvs/keras_flask/bin
WSGIPythonPath /home/ubuntu/.virtualenvs/keras_flask/lib/python3.5/site-packages
<VirtualHost *:80>
	...
</VirtualHost>
On Ubuntu 18.04, you may need to change the first line to:
WSGIPythonHome /home/ubuntu/.virtualenvs/keras_flask
Since we use the Python virtual environment in this example (I named my virtual environment keras_flask), we provide the paths to the bin and site packages directories for the Python virtual environment. Then, in the body of the, after ServerAdmin and DocumentRoot, add:
<VirtualHost *:80>
	...

	WSGIDaemonProcess keras_rest_api_app threads=10
	WSGIScriptAlias / /var/www/html/keras-complete-rest-api/keras_rest_api_app.wsgi

	<Directory /var/www/html/keras-complete-rest-api>
		WSGIProcessGroup keras_rest_api_app
		WSGIApplicationGroup %{GLOBAL}
		Order deny,allow
		Allow from all
	</Directory>

	...
</VirtualHost>
Symbolic link CUDA Library (optional, GPU only)
If you use GPU for deep learning and want to take advantage of CUDA (why don't you do that), unfortunately, Apache doesn't know the *. so Library of CUDA in / usr/local/cuda/lib64.
I'm not sure what is the "most correct" way to indicate the location of these CUDA libraries to Apache, but the "full crack" solution is to link all files from / usr/local/cuda/lib64 to / usr/lib:
$ cd /usr/lib
$ sudo ln -s /usr/local/cuda/lib64/* ./
Restart the Apache Web server
After editing the Apache configuration file and selecting the symbolic link CUDA deep learning library, be sure to restart the Apache server in the following ways:
$ sudo service apache2 restart
Test your Apache Web server + deep learning endpoint
To test whether Apache is properly configured to provide the flash + deep learning application, refresh your Web browser:
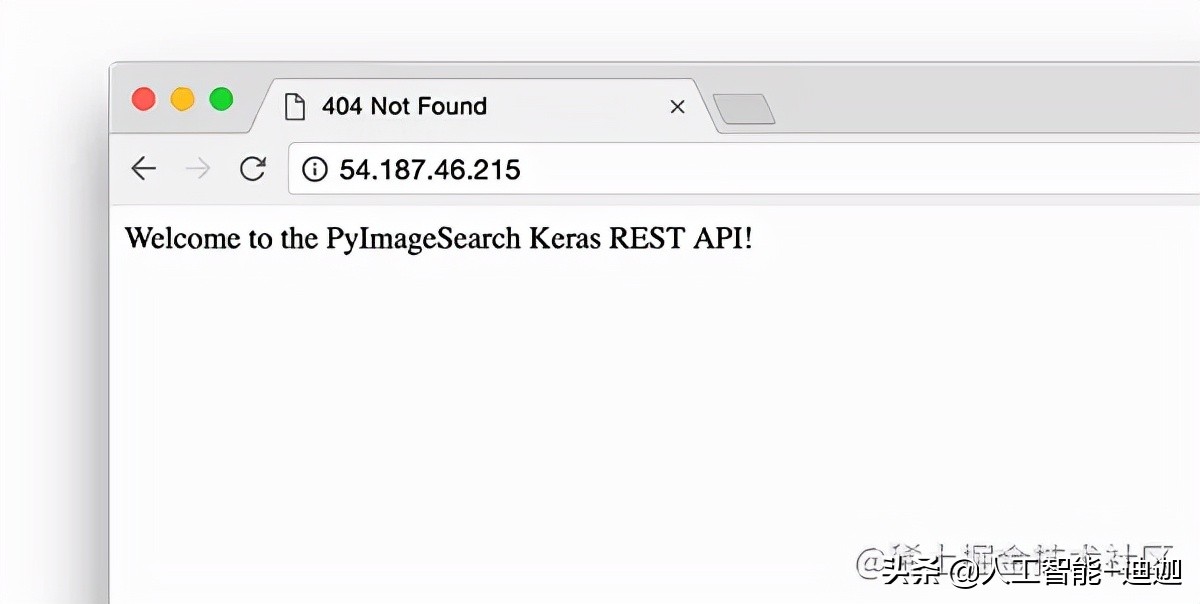
You should now see the text "welcome to PyImageSearch Keras REST API!" in your browser. Once you reach this stage, your Flash deep learning application should be ready. In conclusion, if you encounter any problems, please make sure to refer to the next section
Tip: if you encounter problems, monitor the Apache error log
For many years, I have been using Python + Web frameworks, such as Flask and Django, but I still make mistakes when configuring the environment correctly. Although I hope there is a bulletproof way to ensure that everything goes smoothly, the fact is that there may be some problems in the process. The good news is that WSGI logs Python events (including failures) to the server log. On Ubuntu, the Apache server log is located at / var/log/apache2 /:
$ ls /var/log/apache2
access.log error.log other_vhosts_access.log
During debugging, I often open a running Terminal:
$ tail -f /var/log/apache2/error.log
... so I can see the second mistake rolling in. Use the error log to help you start and run flash on the server.
Start your deep learning model server
Your Apache server should already be running. If not, you can start it by:
$ sudo service apache2 start
Then, you will start Redis storage:
$ redis-server
And start the Keras model server in a separate terminal:
$ python run_model_server.py
* Loading model...
...
* Model loaded
From there, try submitting sample images to your deep learning API service:
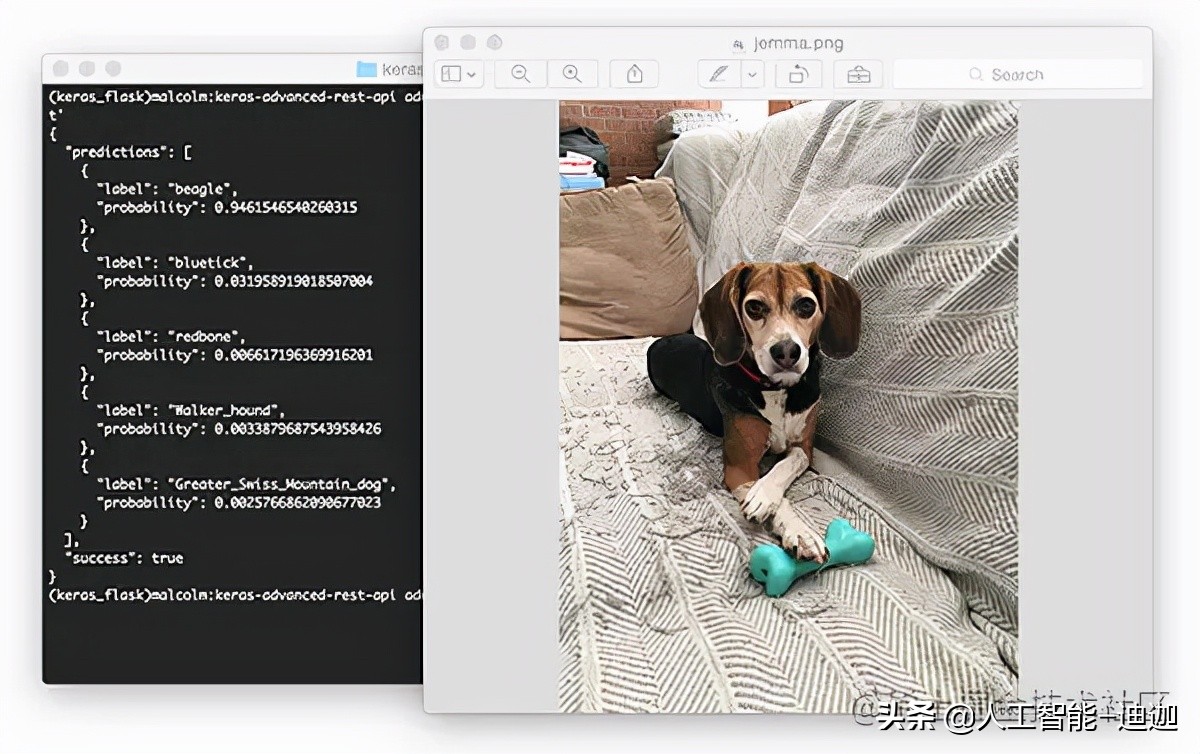
$ curl -X POST -F image=@jemma.png 'http://localhost/predict'
{
  "predictions": [
    {
      "label": "beagle",
      "probability": 0.9461532831192017
    },
    {
      "label": "bluetick",
      "probability": 0.031958963721990585
    },
    {
      "label": "redbone",
      "probability": 0.0066171870566904545
    },
    {
      "label": "Walker_hound",
      "probability": 0.003387963864952326
    },
    {
      "label": "Greater_Swiss_Mountain_dog",
      "probability": 0.0025766845792531967
    }
  ],
  "success": true
}
If everything is OK, you should receive formatted JSON output from the deep learning API model server, including category prediction + probability.
Stress test your deep learning REST API
Of course, this is just an example. Let's stress test the deep learning REST API. Open another terminal and execute the following command:
$ python stress_test.py
[INFO] thread 3 OK
[INFO] thread 0 OK
[INFO] thread 1 OK
...
[INFO] thread 497 OK
[INFO] thread 499 OK
[INFO] thread 498 OK
In run_ model_ In the server.py output, you will begin to see the following lines recorded to the terminal:
* Batch size: (4, 224, 224, 3)
* Batch size: (9, 224, 224, 3)
* Batch size: (9, 224, 224, 3)
* Batch size: (8, 224, 224, 3)
...
* Batch size: (2, 224, 224, 3)
* Batch size: (10, 224, 224, 3)
* Batch size: (7, 224, 224, 3)
Even if there is a new request every 0.05 seconds, our batch size will not exceed about 10-12 images per batch. Our model server can easily handle the load without sweating, and can be easily extended beyond this. If you do overload the server (maybe your batch size is too large and GPU memory is insufficient and an error message is displayed), you should stop the server and clear the queue using Redis CLI:
$ redis-cli
> FLUSHALL
From there you can adjust settings.py and
/Settings in / etc / apache2 / sites available / 000-default.conf. You can then restart the server.
Recommendations for deploying your own deep learning model to a production environment
One of the best suggestions I can give is to put your data, especially Redis server, close to GPU. You may want to start a huge Redis server with hundreds of GB RAM to process multiple image queues and provide services for multiple GPU machines. The problems here will be I/O latency and network overhead.
Assuming that 224 x 224 x 3 images are represented as a float32 array, the batch size of 32 images will be ~ 19MB of data. This means that for each batch request from the model server, Redis will need to extract 19MB of data and send it to the server. In terms of fast switching, this is no big deal, but you should consider running the model server and Redis on the same server to make the data close to the GPU.
summary
In today's blog post, we learned how to deploy the deep learning model into the production environment using Keras, Redis, Flask and Apache. Most of the tools we use here are interchangeable. You can replace TensorFlow or PyTorch with Keras. You can use Django instead of Flask. Nginx can be replaced with Apache.
The only tool I don't recommend replacing is redis. Redis can be said to be the best solution for in memory data storage. Unless you have a specific reason not to use redis, I suggest you use redis for queuing. Finally, we stress tested the deep learning REST API.
We submitted a total of 500 image classification requests to our server with a delay of 0.05 seconds between each request - our server was not phased (CNN's batch size never exceeded about 37%).