I. preparation before installation
1. Check whether mysql has been installed and execute the command
[root@localhost /]# rpm -qa | grep mysql

From the execution results, we can see that mysql-libs-5.1.73-5.el6 has been installed_ 6.x86_ 64. Execute the delete command
[root@localhost /]# rpm -e --nodeps mysql-libs-5.1.73-5.el6_6.x86_64
Execute the query command again to see whether to delete it
[root@localhost /]# rpm -qa | grep mysql

2. Query all folders corresponding to Mysql
[root@localhost /]# whereis mysql
mysql: /usr/bin/mysql /usr/include/mysql
[root@localhost lib]# find / -name mysql
/data/mysql
/data/mysql/mysql
Delete related directories or files
[root@localhost /]# rm -rf /usr/bin/mysql /usr/include/mysql /data/mysql /data/mysql/mysql
Verify that the deletion is complete
[root@localhost /]# whereis mysql
mysql:
[root@localhost /]# find / -name mysql
[root@localhost /]#
3. Check whether the mysql user group and user exist. If not, create it
[root@localhost /]# cat /etc/group | grep mysql
[root@localhost /]# cat /etc/passwd |grep mysql
[root@localhost /]# groupadd mysql
[root@localhost /]# useradd -r -g mysql mysql
[root@localhost /]#
4. The Mysql installation package for Linux is downloaded from the official website
Download command:
[root@localhost /]# wget https://dev.mysql.com/get/Downloads/MySQL-5.7/mysql-5.7.24-linux-glibc2.12-x86_64.tar.gz
You can also go directly to mysql official website Select another version to download.
II. Install Mysql
1. Find the Mysql installation package under the directory where you execute the wget command or your upload directory: mysql-5.7.24-linux-glibc2.12-x86_64.tar.gz
Execute the decompression command:
[root@localhost /]#  tar xzvf mysql-5.7.24-linux-glibc2.12-x86_64.tar.gz
[root@localhost /]# ls
mysql-5.7.24-linux-glibc2.12-x86_64
mysql-5.7.24-linux-glibc2.12-x86_64.tar.gz
After decompression, you can see that there is an additional decompression file in the current directory. Move the file to * * / usr/local/mysql**
Execute the move command:
[root@localhost /]# mv mysql-5.7.24-linux-glibc2.12-x86_64 /usr/local/mysql
2. Create a data directory under * * / usr/local/mysql * *
[root@localhost /]# mkdir /usr/local/mysql/data
3. Change the user groups, users and permissions of all directories and folders under the mysql directory
[root@localhost /]# chown -R mysql:mysql /usr/local/mysql
[root@localhost /]# chmod -R 755 /usr/local/mysql
4. When compiling, installing and initializing mysql, be sure to remember the password at the end of the initialization output log (temporary password of database administrator)
[root@localhost /]# cd /usr/local/mysql/bin
[root@localhost bin]# ./mysqld --initialize --user=mysql --datadir=/usr/local/mysql/data --basedir=/usr/local/mysql
*Supplementary notes:*
An error may occur:

If this problem occurs, first check whether the link library file is installed. Use the command to check
[root@localhost bin]# rpm -qa|grep libaio
[root@localhost bin]#
After running the command, it is found that the link library file does not exist in the system
[root@localhost bin]# yum install libaio-devel.x86_64
After the installation is successful, continue to run the initialization command of the database. At this time, the following errors may occur:

After executing the following command, run the initialization command of the database again:
[root@localhost bin]# yum -y install numactl
5. After running the initialization command successfully, the output log is as follows:
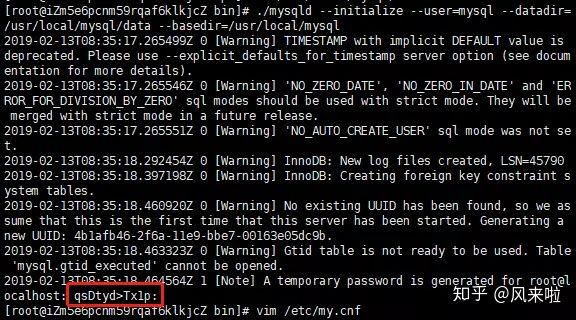
Record the last position of the log** root@localhost : * * is the string after. This string is the temporary login password of mysql administrator.
6. Edit the configuration file my.cnf and add the configuration as follows
[root@localhost bin]#  vi /etc/my.cnf

[mysqld]
datadir=/usr/local/mysql/data
port = 3306
sql_mode=NO_ENGINE_SUBSTITUTION,STRICT_TRANS_TABLES
symbolic-links=0
max_connections=400
innodb_file_per_table=1
#The case of the table name is unclear, and the sensitivity is
lower_case_table_names=1
7. Start mysql server
[root@localhost /]# /usr/local/mysql/support-files/mysql.server start
The following results are displayed, indicating that the database installation is successful

If the following prompt message appears
Starting MySQL... ERROR! The server quit without updating PID file
Check whether mysql and mysqld services exist. If so, end the process and re execute the start command
#Query service
ps -ef|grep mysql
ps -ef|grep mysqld

#End process
kill -9 PID

#Start service
 /usr/local/mysql/support-files/mysql.server start

8. Add a soft connection and restart the mysql service
[root@localhost /]#  ln -s /usr/local/mysql/support-files/mysql.server /etc/init.d/mysql
[root@localhost /]#  ln -s /usr/local/mysql/bin/mysql /usr/bin/mysql
[root@localhost /]#  service mysql restart
9. Log in to mysql and change the password (the password is the temporary password generated in step 5)
[root@localhost /]#  mysql -u root -p
Enter password:
mysql>set password for root@localhost = password('yourpass');

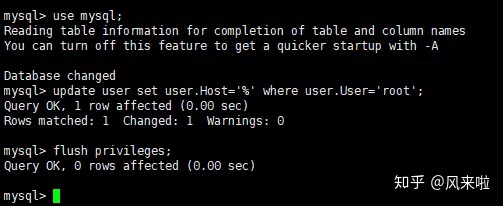
10. Open remote connection
mysql>use mysql;
msyql>update user set user.Host='%' where user.User='root';
mysql>flush privileges;
11. Set automatic startup
1,Copy service files to init.d Next, and rename to mysql
[root@localhost /]# cp /usr/local/mysql/support-files/mysql.server /etc/init.d/mysqld
2,Give executable permission
[root@localhost /]# chmod +x /etc/init.d/mysqld
3,Add service
[root@localhost /]# chkconfig --add mysqld
4,Displays a list of services
[root@localhost /]# chkconfig --list