1, Understanding MHA
1. When is MHA
MHA (MasterHigh Availability) is a set of excellent software for failover and master-slave replication in MySQL high availability environment.
The emergence of MHA is to solve the problem of MySQL single point.
During MySQL failover, MHA can automatically complete the failover operation within 0-30 seconds.
MHA can ensure the consistency of data to the greatest extent in the process of failover, so as to achieve high availability in the real sense.
2. Composition of MHA
1. MHA Node
The MHA Node runs on each MySQL server.
2. MHA Manager (management node)
MHA Manager can be deployed on an independent machine to manage multiple master slave clusters; It can also be deployed on a slave node.
The MHA Manager will periodically probe the master node in the cluster. When the master fails, it can automatically promote the slave of the latest data to the new master, and then point all other slave to the new master again. The entire failover process is completely transparent to the application.
3. Characteristics of MHA
1. During automatic failover, MHA tries to save binary logs from the down primary server to ensure that data is not lost to the greatest extent.
2. Using semi synchronous replication can greatly reduce the risk of data loss. If only one slave has received the latest binary log, MHA can apply the latest binary log to all other slave servers, so it can ensure the data consistency of all nodes. (full synchronous replication, asynchronous synchronization)
3. At present, MHA supports a master-slave architecture with at least three services, i.e. one master and two slaves.
4. Principle of MHA
(1) Save binary log events from the master of downtime and crash;
(2) Identify the slave with the latest update;
(3) Apply different relay log s to other slave;
(4) Apply binary log events saved from the master;
(5) Upgrade a slave to a new master;
(6) Connect other slave to the new master for replication.
2, MHA construction steps
| host | IP address | assembly |
|---|---|---|
| MHA Manager (CentOS7.6-64 bit) | 192.168.9.150 | MHA node component, MHA manager component |
| Master (CentOS7.6-64 bit) | 192.168.9.151 | mysql5.7, MHA node component |
| Slave1 (CentOS7.6-64 bit) | 192.168.9.152 | mysql5.7, MHA node component |
| Slave2 (CentOS7.6-64 bit) | 192.168.9.153 | mysql5.7, MHA node component |
1. Turn off the firewall
[root@localhost ~]# systemctl stop firewalld
[root@localhost ~]# systemctl disable firewalld
[root@localhost ~]# setenforce 0
2. Modify host name
(1)MHA-Manager Node server
[root@localhost ~]# hostnamectl set-hostname manager
(2)master Node server
[root@localhost ~]# hostnamectl set-hostname master
(3)slave1 Node server
[root@localhost ~]# hostnamectl set-hostname slave1
(4)slave2 Node server
[root@localhost ~]# hostnamectl set-hostname slave2
3. Modify the main configuration file (/ etc/my.cnf)
Master ,Slave1,Slave2
Master Node server

[root@master ~]# vim /etc/my.cnf      #Comment out the character set command line
[mysqld]
server-id = 1                         #id is customized, but not consistent
log_bin = master-bin
log-slave-updates = true
#Enable binary log and allow binary files to be copied and updated from the server
[root@master ~]# systemctl restart mysqld
Slave1 Node server

[root@slave1 ~]# vim /etc/my.cnf      #Comment out the character set command line
server-id = 2                         #id is customized, but not consistent
log_bin = master-bin
relay-log = relay-log-bin
relay-log-index = slave-relay-bin.index
#The slave server should also enable binary logs, because it may also become the master server
[root@slave1 ~]# systemctl restart mysqld
Slave2 Node server

[root@slave2 ~]# vim /etc/my.cnf      #Comment out the character set command line
server-id = 3                         #id is customized, but not consistent
relay-log = relay-log-bin
relay-log-index = slave-relay-bin.index
#The slave server should also enable binary logs, because it may also become the master server
[root@slave2 ~]# systemctl restart mysqld
4. Create two soft links on both node servers
Master ,Slave1,Slave2
Master

[root@master ~]# ln -s /usr/local/mysql/bin/mysql /usr/sbin/
[root@master ~]# ln -s /usr/local/mysql/bin/mysqlbinlog /usr/sbin/
Slave1

[root@slave1 ~]# ln -s /usr/local/mysql/bin/mysql /usr/sbin/
[root@slave1 ~]# ln -s /usr/local/mysql/bin/mysqlbinlog /usr/sbin/
Slave2

[root@slave2 ~]# ln -s /usr/local/mysql/bin/mysql /usr/sbin/
[root@slave2 ~]# ln -s /usr/local/mysql/bin/mysqlbinlog /usr/sbin/
5. Configure MySQL with one master and two slaves
MySQL authorization for all database nodes
Master Node server

[root@master ~]# mysql -uroot -p123456
mysql> grant replication slave on *.* to 'myslave'@'192.168.9.%' identified by '123456';
#Synchronize use from database
mysql> grant all privileges on *.* to 'mha'@'192.168.9.%' identified by 'manager';
#manager usage
mysql> grant all privileges on *.* to 'mha'@'master' identified by 'manager';
mysql> grant all privileges on *.* to 'mha'@'slave1' identified by 'manager';
mysql> grant all privileges on *.* to 'mha'@'slave2' identified by 'manager';
#Prevent the slave library from connecting to the master library through the host name
mysql> flush privileges;
Slave1 Node server

[root@slave1 ~]# mysql -uroot -p123456
mysql> grant replication slave on *.* to 'myslave'@'192.168.9.%' identified by '123456';
mysql> grant all privileges on *.* to 'mha'@'192.168.9.%' identified by 'manager';
mysql> grant all privileges on *.* to 'mha'@'master' identified by 'manager';
mysql> grant all privileges on *.* to 'mha'@'slave1' identified by 'manager';
mysql> grant all privileges on *.* to 'mha'@'slave2' identified by 'manager';
mysql> flush privileges;
Slave2 Node server

[root@slave2 ~]# mysql -uroot -p123456
mysql> grant replication slave on *.* to 'myslave'@'192.168.9.%' identified by '123456';
mysql> grant all privileges on *.* to 'mha'@'192.168.9.%' identified by 'manager';
mysql> grant all privileges on *.* to 'mha'@'master' identified by 'manager';
mysql> grant all privileges on *.* to 'mha'@'slave1' identified by 'manager';
mysql> grant all privileges on *.* to 'mha'@'slave2' identified by 'manager';
mysql> flush privileges;
View binaries and synchronization points on the Master server
mysql> show master status;

Perform synchronization operations on Slave1 and Slave2 node servers
Slave1 and Slave2 equally

mysql> change master to master_host='192.168.9.151',master_user='myslave',master_password='123456',master_log_file='master-bin.000001',master_log_pos=2577;
#Specify the master server IP, user name and password, log name and offset
mysql> start slave;
#Start synchronization
Slave1 and Slave2 node servers view data synchronization results
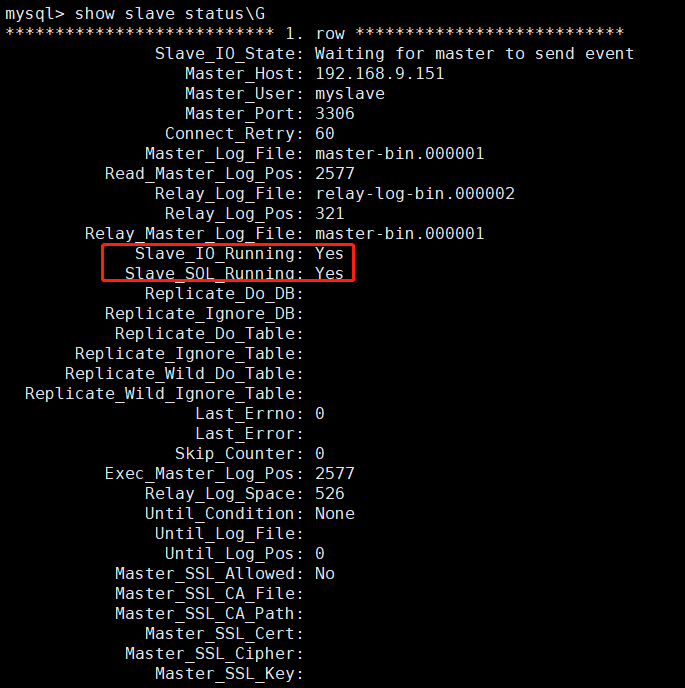
mysql> show slave status\G
#Check the parameter information related to the slave server thread and ensure that both IO and SQL threads are Yes, which means that the synchronization is normal
Both slave databases must be set to read-only mode
Slave1 and Slave2 Consistent operation
mysql> set global read_only=1;
#Both slave databases must be set to read-only mode
Verifying master-slave replication
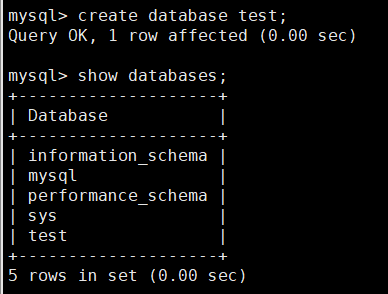
Master

mysql> create database test;
mysql> show databases;
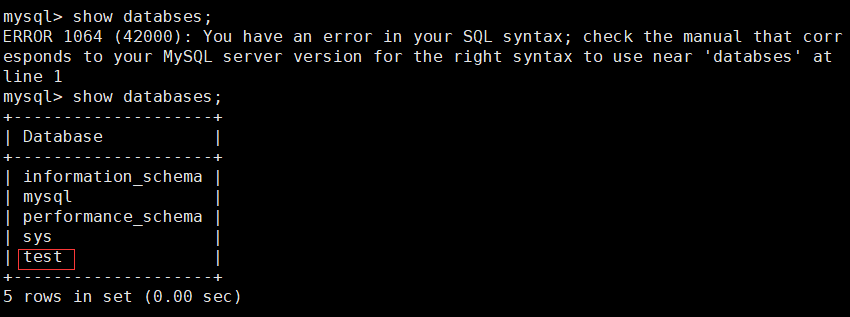
Check whether Slave1 and Slave2 are synchronized
mysql> show databases;
6. Install MHA
MHA dependent environments are installed on all servers. First, install the epel source
MHA-Manager,Master,Slave1,Slave2 Consistent operation

[root@manager ~]# yum install epel-release --nogpgcheck -y
[root@manager ~]# yum install -y perl-DBD-MySQL \
perl-Config-Tiny \
perl-Log-Dispatch \
perl-Parallel-ForkManager \
perl-ExtUtils-CBuilder \
perl-ExtUtils-MakeMaker \
perl-CPAN
To install the MHA package, you must first install the Node component on all servers
MHA-Manager,Master,Slave1,Slave2 Consistent operation

[root@manager ~]# cd /opt
[root@manager opt]# tar zxvf mha4mysql-node-0.57.tar.gz
[root@manager opt]# cd mha4mysql-node-0.57
[root@manager mha4mysql-node-0.57]# perl Makefile.PL
[root@manager mha4mysql-node-0.57]# make && make install

#The version of each operating system is different. Here, CentOS 7.6 must select version 0.57.
#You must first install the Node component on all servers, and finally install the Manager component on the MHA Manager Node, because the Manager depends on the Node component.
Install the Manager component on the MHA Manager node server
[root@manager ~]# cd /opt
[root@manager opt]# tar zxvf mha4mysql-manager-0.57.tar.gz
[root@manager opt]# cd mha4mysql-manager-0.57
[root@manager mha4mysql-manager-0.57]# perl Makefile.PL
[root@manager mha4mysql-manager-0.57]# make && make install
After the manager component is installed, several tools will be generated under / usr/local/bin:
| masterha_check_ssh | Check the SSH configuration of MHA |
|---|---|
| masterha_check_repl | Check MySQL replication status |
| masterha_manger | Script to start manager |
| masterha_check_status | Detect the current MHA operation status |
| masterha_master_monitor | Check whether the master is down |
| masterha_master_switch | Control failover (automatic or manual) |
| masterha_conf_host | Add or remove configured server information |
| masterha_stop | Close manager |
After the node component is installed, several scripts will also be generated under / usr/local/bin (these tools are usually triggered by MHAManager scripts without manual operation). The main contents are as follows:
| save_binary_logs | Save and copy binary logs of master |
|---|---|
| apply_diff_relay_logs | Identify the different relay log events and apply the different events to other slave s |
| filter_mysqlbinlog | Remove unnecessary ROLLBACK events (MHA no longer uses this tool) |
| purge_relay_logs | Clear relay log (does not block SQL threads) |
7. Configure password less authentication on all servers
Configure password less authentication to all database nodes on the manager node
[root@manager ~]# ssh-keygen -t rsa
#Create a key pair for the current user, "- t" specifies the encryption algorithm "rsa", and then press enter to confirm

[root@manager ~]# ssh-copy-id 192.168.9.151
[root@manager ~]# ssh-copy-id 192.168.9.152
[root@manager ~]# ssh-copy-id 192.168.9.153
#Import the public key into all MySQL servers, and then enter yes and MySQL database login password
Configure password less authentication to the database nodes slave1 and slave2 on the master
[root@master ~]# ssh-keygen -t rsa
[root@master ~]# ssh-copy-id 192.168.9.152
[root@master ~]# ssh-copy-id 192.168.9.153
Configure password less authentication to the database nodes master and slave2 on slave1
[root@master ~]# ssh-keygen -t rsa
[root@master ~]# ssh-copy-id 192.168.9.151
[root@master ~]# ssh-copy-id 192.168.9.153
Configure password less authentication to the database nodes master and slave1 on slave2
[root@master ~]# ssh-keygen -t rsa
[root@master ~]# ssh-copy-id 192.168.9.151
[root@master ~]# ssh-copy-id 192.168.9.152
8. Configure MHA on the manager node
On the manager node, copy the relevant scripts to the / usr/local/bin directory
[root@manager ~]# cp -rp /opt/mha4mysql-manager-0.57/samples/scripts /usr/local/bin
[root@manager ~]# ll /usr/local/bin/scripts/
Total consumption 32
-rwxr-xr-x. 1 mysql mysql  3648 5 December 31, 2015 master_ip_failover            #Script for VIP management during automatic switching
-rwxr-xr-x. 1 mysql mysql  9870 5 December 31, 2015 master_ip_online_change       #Management of vip during online switching
-rwxr-xr-x. 1 mysql mysql 11867 5 December 31, 2015 power_manager                 #Script to shut down the host after a failure
-rwxr-xr-x. 1 mysql mysql  1360 5 December 31, 2015 send_report                   #Script for sending alarms after failover
Copy the above script of VIP management during automatic switching to / usr/local/bin directory. Here, use master_ip_failover scripts to manage VIPs and failover
[root@manager ~]# cp /usr/local/bin/scripts/master_ip_failover /usr/local/bin
The modified contents are as follows: (delete the original contents, directly copy and modify vip related parameters)
[root@manager ~]# vim /usr/local/bin/master_ip_failover

#!/usr/bin/env perl
use strict;
use warnings FATAL => 'all';

use Getopt::Long;

my (
$command, $ssh_user, $orig_master_host, $orig_master_ip,
$orig_master_port, $new_master_host, $new_master_ip, $new_master_port
);
#############################Add content section#########################################
my $vip = '192.168.9.200';								    #Specify the address of the vip
my $brdc = '192.168.9.255';								    #Specify the broadcast address of the vip
my $ifdev = 'ens33';										#Specify the network card bound by vip
my $key = '1';												#Specifies the serial number of the virtual network card bound by the vip
my $ssh_start_vip = "/sbin/ifconfig ens33:$key $vip";		#Represents that the value of this variable is ifconfig ens33:1 192.168.9.200
my $ssh_stop_vip = "/sbin/ifconfig ens33:$key down";		#Represents that the value of this variable is ifconfig ens33:1 192.168.9.200 down
my $exit_code = 0;											#Specifies that the exit status code is 0
#my $ssh_start_vip = "/usr/sbin/ip addr add $vip/24 brd $brdc dev $ifdev label $ifdev:$key;/usr/sbin/arping -q -A -c 1 -I $ifdev $vip;iptables -F;";
#my $ssh_stop_vip = "/usr/sbin/ip addr del $vip/24 dev $ifdev label $ifdev:$key";
##################################################################################
GetOptions(
'command=s' => \$command,
'ssh_user=s' => \$ssh_user,
'orig_master_host=s' => \$orig_master_host,
'orig_master_ip=s' => \$orig_master_ip,
'orig_master_port=i' => \$orig_master_port,
'new_master_host=s' => \$new_master_host,
'new_master_ip=s' => \$new_master_ip,
'new_master_port=i' => \$new_master_port,
);

exit &main();

sub main {

print "\n\nIN SCRIPT TEST====$ssh_stop_vip==$ssh_start_vip===\n\n";

if ( $command eq "stop" || $command eq "stopssh" ) {

my $exit_code = 1;
eval {
print "Disabling the VIP on old master: $orig_master_host \n";
&stop_vip();
$exit_code = 0;
};
if ($@) {
warn "Got Error: $@\n";
exit $exit_code;
}
exit $exit_code;
}
elsif ( $command eq "start" ) {

my $exit_code = 10;
eval {
print "Enabling the VIP - $vip on the new master - $new_master_host \n";
&start_vip();
$exit_code = 0;
};
if ($@) {
warn $@;
exit $exit_code;
}
exit $exit_code;
}
elsif ( $command eq "status" ) {
print "Checking the Status of the script.. OK \n";
exit 0;
}
else {
&usage();
exit 1;
}
}
sub start_vip() {
`ssh $ssh_user\@$new_master_host \" $ssh_start_vip \"`;
}
## A simple system call that disable the VIP on the old_master
sub stop_vip() {
`ssh $ssh_user\@$orig_master_host \" $ssh_stop_vip \"`;
}

sub usage {
print
"Usage: master_ip_failover --command=start|stop|stopssh|status --orig_master_host=host --orig_master_ip=ip --orig_master_port=port --new_master_host=host --new_master_ip=ip --new_master_port=port\n";
}
Create the MHA software directory and copy the configuration file. Here, use the app1.cnf configuration file to manage the mysql node server
[root@manager ~]# mkdir /etc/masterha
[root@manager ~]# cp /opt/mha4mysql-manager-0.57/samples/conf/app1.cnf /etc/masterha
[root@manager ~]# vim /etc/masterha/app1.cnf                  #Delete the original content, directly copy and modify the IP address of the node server
[server default]
manager_log=/var/log/masterha/app1/manager.log            #manager log
manager_workdir=/var/log/masterha/app1                   #manager working directory
master_binlog_dir=/usr/local/mysql/data/                #The location where the master saves binlog. The path here should be consistent with the path of binlog configured in the master so that MHA can find it
master_ip_failover_script=/usr/local/bin/master_ip_failover  #Set the switching script for automatic failover, that is, the script above
master_ip_online_change_script=/usr/local/bin/master_ip_online_change  #Set the switching script for manual switching
password=manager			#Set the password of the root user in mysql, which is the password of the monitoring user created in the previous article
ping_interval=1				#Set the time interval for monitoring the main database and sending ping packets. The default is 3 seconds. When there is no response after three attempts, the failover will be carried out automatically
remote_workdir=/tmp			#Set the save location of binlog when remote mysql switches
repl_password=123456		#Set the password of the replication user
repl_user=myslave			#Set the user of the replication user
report_script=/usr/local/send_report     #Set the script of the alarm sent after switching
secondary_check_script=/usr/local/bin/masterha_secondary_check -s 192.168.9.152 -s 192.168.9.153     #Specifies the IP address of the slave server to check
shutdown_script=""			#Set the script to close the fault host after the fault occurs (the main function of this script is to close the host to prevent brain crack, which is not used here)
ssh_user=root				#Set ssh login user name
user=mha					#Set monitoring user root

[server1]
hostname=192.168.9.151
port=3306

[server2]
hostname=192.168.9.152
port=3306
candidate_master=1
#Set as the candidate master. After setting this parameter, the slave library will be promoted to the master library after the master-slave switch occurs, even if the slave library is not the latest slave in the cluster

check_repl_delay=0
#By default, if a slave lags behind the master by more than 100M of relay logs, MHA will not select the slave as a new master, because the recovery of the slave takes a long time; By setting check_repl_delay=0, MHA triggers the switch. When selecting a new master, the replication delay will be ignored. This parameter is set to candidate_ The host with master = 1 is very useful because the candidate master must be a new master in the process of switching

[server3]
hostname=192.168.9.153
port=3306
For the first configuration, you need to manually turn on the virtual IP on the Master node
[root@master ~]# /sbin/ifconfig ens33:1 192.168.9.200/24
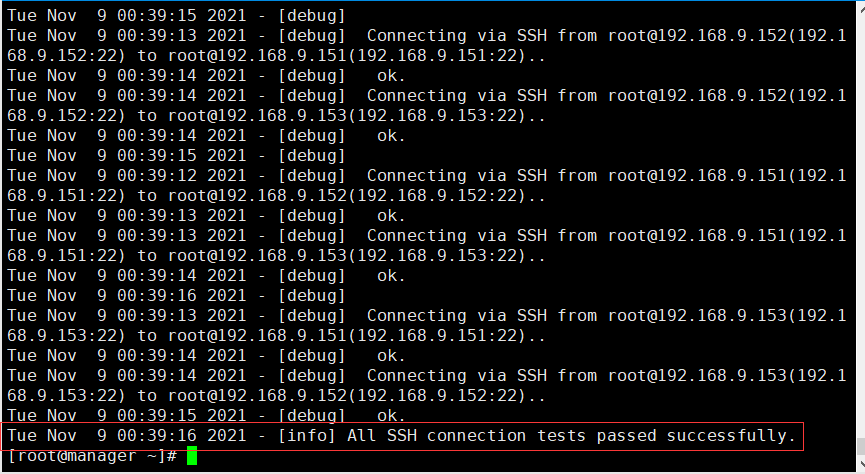
Test SSH password free authentication on the Manager node. If it is normal, it will output successfully
[root@manager ~]# masterha_check_ssh -conf=/etc/masterha/app1.cnf
Test the mysql master-slave connection on the manager node, and the word MySQL Replication Health is OK appears at the end, indicating that it is normal
[root@manager ~]# masterha_check_repl -conf=/etc/masterha/app1.cnf
Start MHA on the manager node
[root@manager ~]# nohup masterha_manager --conf=/etc/masterha/app1.cnf --remove_dead_master_conf --ignore_last_failover < /dev/null > /var/log/masterha/app1/manager.log 2>&1 &

#--remove_dead_master_conf: this parameter indicates that the ip address of the old master database will be removed from the configuration file after the master-slave switch
#--manger_log: log storage location
#--ignore_last_failover: by default, if MHA detects continuous downtime and the interval between two outages is less than 8 hours, it will not fail. The reason for this restriction is to avoid ping pong effect
 This parameter represents ignoring the last MHA Files generated by trigger switching. By default, MHA After switching, the log directory will be recorded in the log directory, that is, the log set above app1.failover.complete File. If the file is found in this directory during the next switch, the switch is not allowed unless the file is deleted after the first switch. For convenience, it is set to--ignore_last_failover
Viewing the MHA status, you can see that the current master is the MySQL 1 node
[root@manager ~]# masterha_check_status --conf=/etc/masterha/app1.cnf
Check the MHA log to see that the current master is 192.168.9.151
[root@manager ~]# cat /var/log/masterha/app1/manager.log | grep "current master"
Check whether the VIP address 192.168.32.200 of MySQL1 exists. This VIP address will not disappear because the manager node stops MHA service
[root@manager ~]# masterha_stop --conf=/etc/masterha/app1.cnf   #Close the manager service
[root@master ~]# ifconfig
3, Fault simulation
1. Fault simulation
Monitor observation logging on the Manage node
[root@manager ~]# tail -f /var/log/masterha/app1/manager.log
Stop the MySQL service on Master node Mysql1
[root@master ~]# systemctl stop mysqld
After a normal automatic switching, the MHA process will exit. HMA will automatically modify the contents of the app1.cnf file and delete the down mysql1 node. Check whether mysql2 takes over VIP
[root@slave1 ~]# ifconfig
Check the monitoring and observation log records of the manager node again. You can see that the master has been down and the master node has failed. Slave1 is selected as the new master node

2. Fault repair
Repair mysql
[root@master ~]# systemctl restart mysqld.service
Repair master-slave
mysql> show master status;
Perform synchronization on the original master database server (192.168.9.151)
mysql> change master to master_host='192.168.9.152',master_user='myslave',master_password='123456',master_log_file='master-bin.000004',master_log_pos=154;
mysql> start slave;
Modify the configuration file app1.cnf on the manager node (add this record again, because it will disappear automatically when it detects failure)
[root@manager ~]# vim /etc/masterha/app1.cnf
secondary_check_script=/usr/local/bin/masterha_secondary_check -s 192.168.9.151 -s 192.168.9.153
[server1]
hostname=192.168.9.151
port=3306

[server2]
candidate_master=1
check_repl_delay=0
hostname=192.168.9.152
port=3306

[server3]
hostname=192.168.9.153
port=3306
Start MHA on the manager node
[root@manager ~]# nohup masterha_manager --conf=/etc/masterha/app1.cnf --remove_dead_master_conf --ignore_last_failover < /dev/null > /var/log/masterha/app1/manager.log 2>&1 &