This series of articles is to explain Python OpenCV image processing knowledge. In the early stage, it mainly explains the introduction of image and the basic usage of OpenCV. In the middle stage, it explains various algorithms of image processing, including image sharpening operator, image enhancement technology, image segmentation, etc. in the later stage, it studies image recognition and image classification application in combination with in-depth learning. I hope the article is helpful to you. If there are deficiencies, please forgive me~
The last article mainly built CNN model through Keras deep learning to recognize Arabic handwritten character images, a very classic image classification text. This paper will explain in detail how pytoch constructs a fast RCNN model to realize wheat target detection. It mainly refers to the model of big brother kaggle and brother Liu, and we recommend you to pay attention to it. This is a very classic image recognition text. I hope you like it, watch it and cherish it.
In the second stage, we entered Python image recognition. This part mainly focuses on target detection, image recognition and deep learning related image classification. Nearly 50 articles will be shared. Thank you for your continued support. The author will continue to cheer!
At the same time, this part of knowledge is the author's reference and summary, and has become a charging column to make some milk powder money for Xiaobao. Thank you for your love. If you have any questions, please feel free to talk to me privately. I just hope you can learn from this series and cheer together. Code download address (remember star if you like):
Image recognition:
- [Python image recognition] 45. Introduction to object detection cases and basic usage of ImageAI
- [Python image recognition] 46. Detailed explanation of image defogging in image preprocessing (ACE algorithm and dark channel a priori defogging algorithm)
- [Python image recognition] 47. Keras deep learning constructs CNN to recognize Arabic handwritten character images
- [Python image recognition] 48. Pytoch constructs fast RCNN model to realize wheat target detection
Image processing:
- [Python image processing] i. basic knowledge of image processing and OpenCV entry function
- [Python image processing] II. OpenCV+Numpy library reading and modifying pixels
- [Python image processing] III. acquiring image attributes, ROI regions of interest and channel processing
- [Python image processing] 4. Mean filter, block filter, Gaussian filter and median filter for image smoothing
- [Python image processing] v. image fusion, addition and image type conversion
- [Python image processing] VI. image zoom, image rotation, image flip and image translation
- [Python image processing] VII. Image thresholding and algorithm comparison
- [Python image processing] VIII. Image corrosion and image expansion
- [Python image processing] IX. image opening operation, closing operation and gradient operation of morphology
- [Python image processing] X. image top hat operation and black hat operation of morphology
- [Python image processing] Xi. Gray histogram concept and OpenCV histogram drawing
- [Python image processing] XII. Image affine transformation, image perspective transformation and image correction of image geometric transformation
- [Python image processing] XIII. Image top hat operation and black hat operation based on gray three-dimensional image
- [Python image processing] XIV. Image graying based on OpenCV and pixel processing
- [Python image processing] XV. Gray linear transformation of image
- [Python image processing] XVI. Logarithmic transformation and gamma transformation of gray nonlinear transformation of image
- [Python image processing] 17. Roberts operator, Prewitt operator, Sobel operator and Laplacian operator for image sharpening and edge detection
- [Python image processing] XVIII. Scharr operator, Canny operator and LOG operator for image sharpening and edge detection
- [Python image processing] XIX. Region segmentation based on K-Means clustering for image segmentation
- [Python image processing] XX. Image quantization processing, sampling processing and local mosaic effects
- [Python image processing] 21. Image downward sampling and upward sampling of image pyramid
- [Python image processing] XXII. Principle and implementation of Python image Fourier transform
- [Python image processing] 23. High pass filtering and low-pass filtering of Fourier transform
- [Python image processing] 24. Ground glass, relief and paint special effects for image special effects processing
- [Python image processing] XXV. Sketch, nostalgia, lighting, fleeting time and filter effects of image special effects processing
- [Python image processing] XXVI. Image classification principle and image classification case based on KNN and naive Bayesian algorithm
- [Python image processing] XXVII. Introduction to OpenGL and drawing basic graphics (I)
- [Python image processing] XXVIII. OpenCV fast face detection and face detection in video
- [Python image processing] twenty-nine.MoviePy video editing library to achieve tiktok short video cut merge operation
- [Python image processing] 30. Detailed summary of 10000 words of image quantization and sampling processing (recommended)
- [Python image processing] XXXI. Detailed summary of 20000 words of image point operation processing (grayscale processing and thresholding processing)
- [Python image processing] 32. Detailed summary of 10000 words of Fourier transform (image denoising) and Hough transform (feature recognition)
- [Python image processing] 33. Detailed explanation of various special effects and principles of images (ground glass, relief, sketch, nostalgia, fleeting time, filter, etc.)
- [Python image processing] XXXIV. Detailed explanation of the fundamentals of digital image processing and geometric drawing (recommended)
- [Python image processing] 35. Introduction to OpenCV image processing, arithmetic logic operation and image fusion (recommended)
- [Python image processing] 36. Detailed explanation of OpenCV image geometric transformation (translation, scaling, rotation, mirror affine perspective)
- [Python image processing] 37. OpenCV and Matplotlib drawing histogram ten thousand words detailed explanation (mask histogram, H-S histogram, night and day judgment)
- [Python image processing] 38. Detailed explanation of OpenCV image enhancement (histogram equalization, local histogram equalization, automatic color equalization)
- [Python image processing] 39. Detailed explanation of Python image classification (Bayesian image classification, KNN image classification, DNN image classification)
- [Python image processing] 40. Detailed explanation of the first Python image segmentation in the whole network (threshold segmentation, edge segmentation, texture segmentation, watershed algorithm, K-Means segmentation, overflow filling segmentation and region positioning)
- [Python image processing] 41. Detailed explanation of Python image smoothing 10000 words (mean filter, box filter, Gaussian filter, median filter, bilateral filter)
- [Python image processing] 42. Detailed explanation of Python image sharpening and edge detection (Roberts, Prewitt, Sobel, Laplacian, Canny, LOG)
- [Python image processing] 43. Detailed explanation of Python image morphology processing (corrosion expansion, opening and closing operation, gradient top hat and black hat operation)
- Ten thousand word long article tells novices how to learn Python image processing (the end of the first part)
1, Pytoch installation
For pytoch installation, you need to select the corresponding environment on the official website, and then execute it according to the automatically generated installation command.
- Official website: https://pytorch.org/

Select the version that matches you. Here is my installation selection.

Installation code:
- pip3 install torch torchvision torchaudio
- conda install pytorch torchvision torchaudio cpuonly -c pytorch
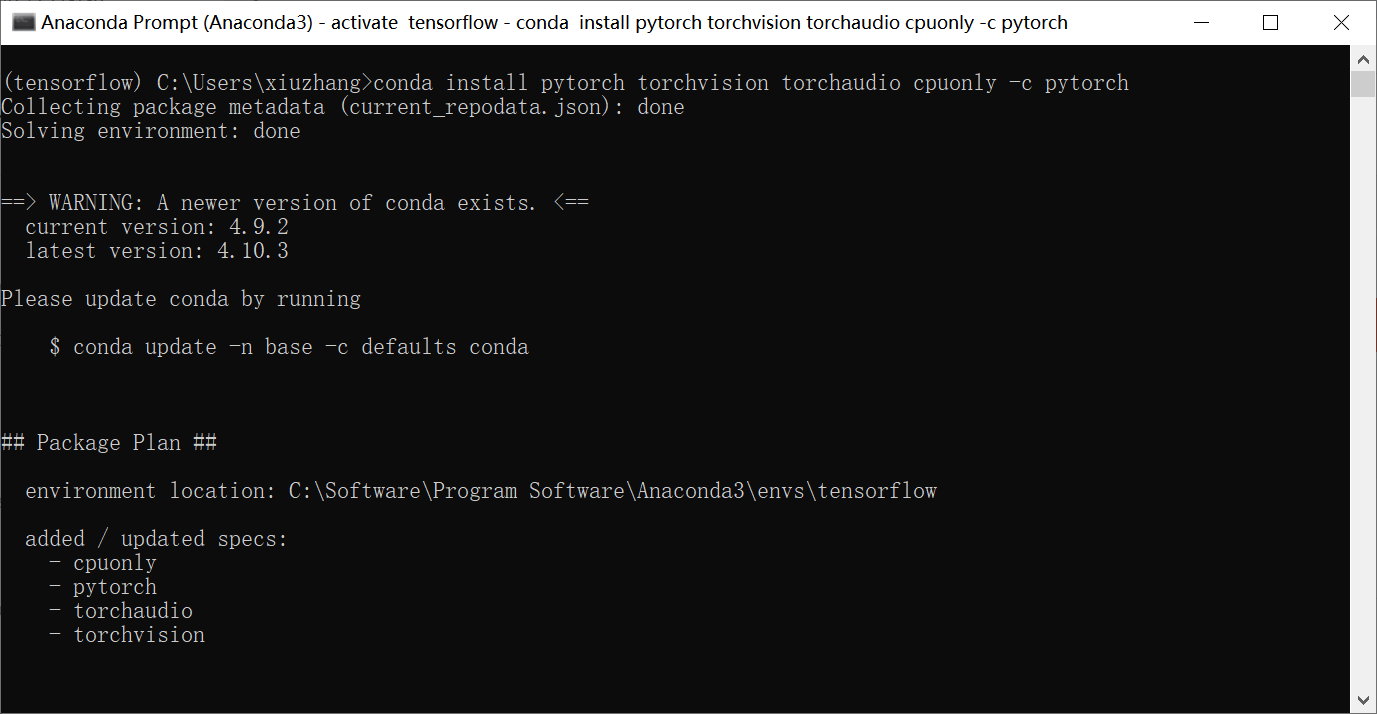
Install the expansion pack augmentations at the same time.
- pip install albumentations
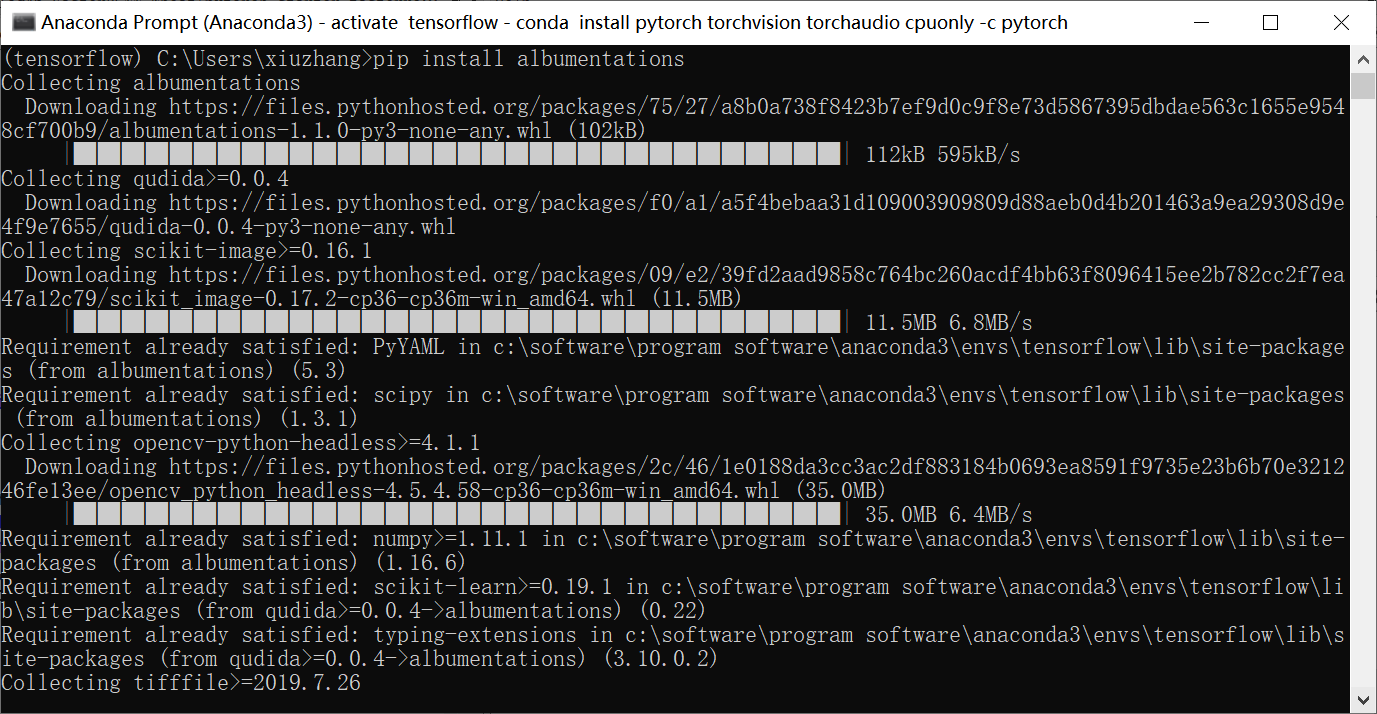
2, Dataset description
1.Kaggle competition
The data set is from Kaggle - global wheat detection data. The title is "can you use image analysis to help identify wheat?"

Topic introduction:
Open your pantry and you are likely to find several wheat products. In fact, your breakfast toast or cereal may depend on this common grain. As a popular food and crop, wheat has been widely studied. In order to obtain a large amount of accurate data about the global wheat field, plant scientists use the image of "wheat head" to detect the peak at the top of plants containing grain. These images are used to estimate the density and size of different wheat varieties. Farmers can use this data to assess their health and maturity when making management decisions on their fields.
However, it is visually challenging to accurately detect wheat head in outdoor field images. Dense wheat plants often overlap, and the wind will blur the photos. Both make it difficult to identify a single head. In addition, appearance varies depending on maturity, color, gene type, and head orientation. Finally, because wheat is planted all over the world, different varieties, planting density, patterns and field conditions must be considered. Wheat development models need to be summarized among different growth environments. Current detection methods involve primary and secondary detectors (Yolo-v3 and fast RCNN), but even if large data sets are used for training, the deviation to the training area still exists.
The global wheat head data set is led by nine research institutions from seven countries, including the University of Tokyo. Since then, many institutions have joined their pursuit of accurate detection of wheat heads, including the global food safety institute, DigitAg, Kubota and Hiphen. In this competition, you will detect wheat heads from outdoor images of wheat plants, including wheat data sets from around the world. Using global data, you will focus on common solutions to estimate the number and size of wheat heads. In order to better measure the performance of unknown genotype, environment and observation conditions, the training data set covers multiple regions. You will use more than 3000 images from Europe (France, UK, Switzerland) and North America (Canada). The test data include about 1000 images from Australia, Japan and China.
Wheat is the staple food in the world, which is why this competition must take into account different growth conditions. Models developed for wheat phenotypes need to be able to generalize between environments. If successful, researchers can accurately estimate the density and size of wheat heads of different varieties. With improved testing, farmers can better evaluate their crops and eventually bring grain, toast and other favorite dishes to your table. For more details on data collection and procedures, visit:
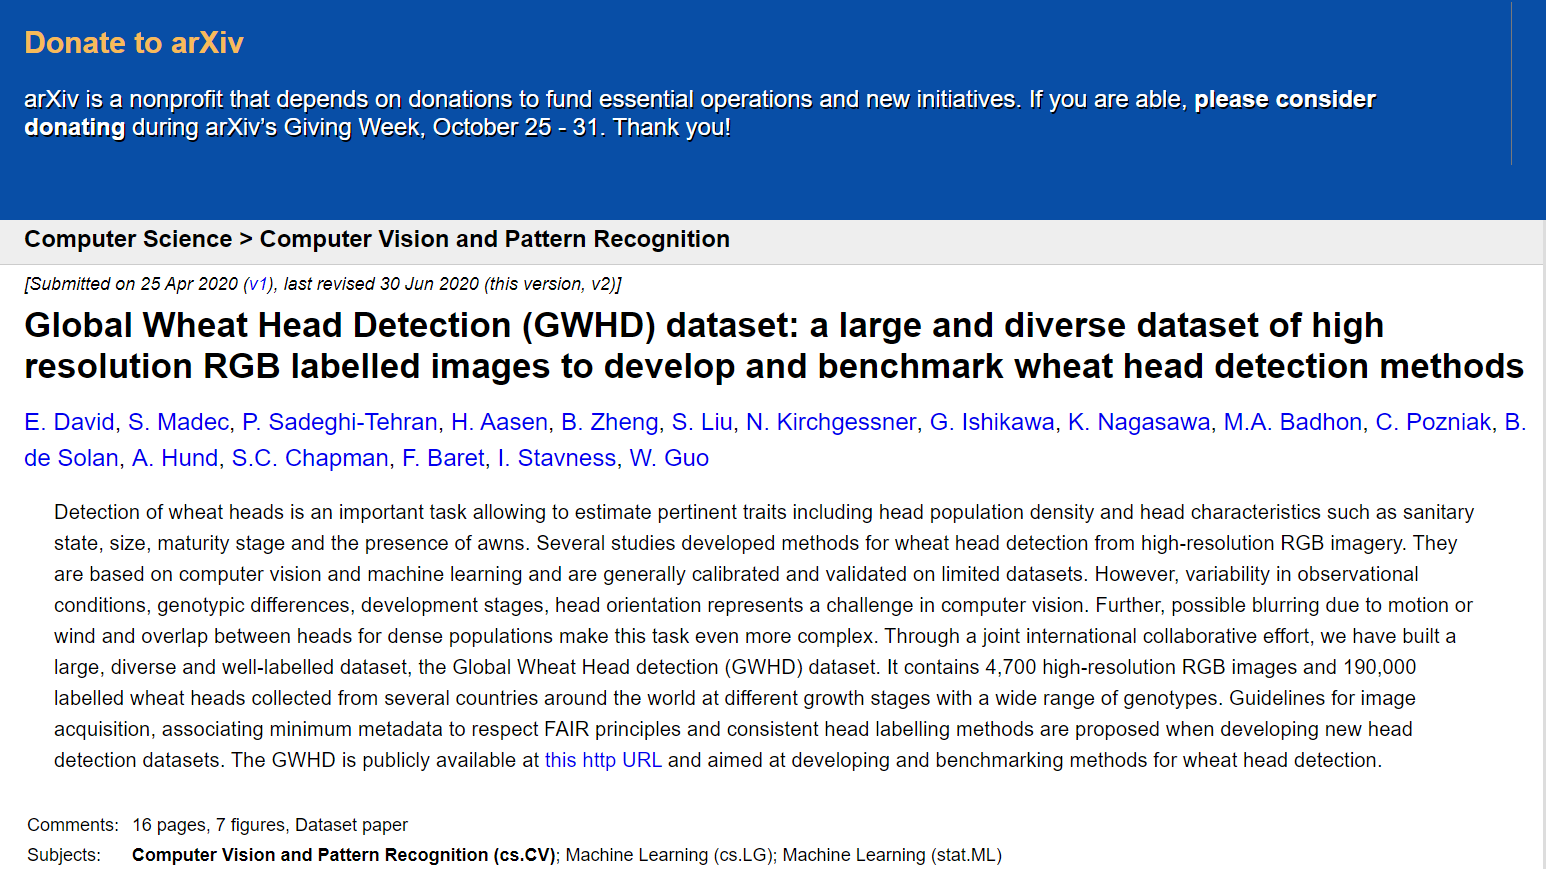
2. Data set introduction
What data format should we expect?
The data is the image of wheat field. Each recognized wheat head has a bounding box, and not all images contain wheat head / bounding box. These images are recorded in many places around the world.
- CSV data is simple: the image ID matches the file name of a given image and contains the width and height of the image and the bounding box (see below). train.csv each bounding box has a row, and not all images have bounding boxes. Most test set images are hidden and contain a small number of test images for you to use when writing code.
What are we predicting?
You are trying to predict the bounding box around each wheat head in the image. If there is no wheat head, there must be no bounding box for prediction.
The dataset contains four files
- train.csv - training data
- sample_submission.csv - sample submission file with correct format
- train.zip - training image
- test.zip - test image
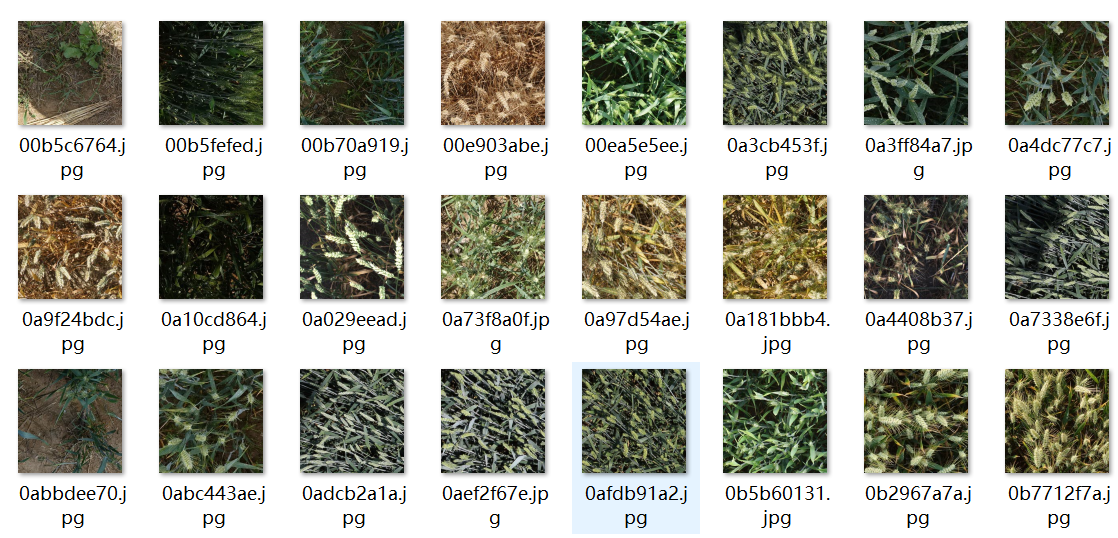
The data set is shown in the following figure:
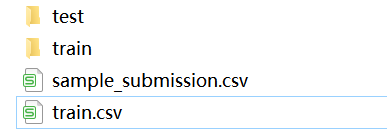
The folder contains the wheat image whose name is its ID.
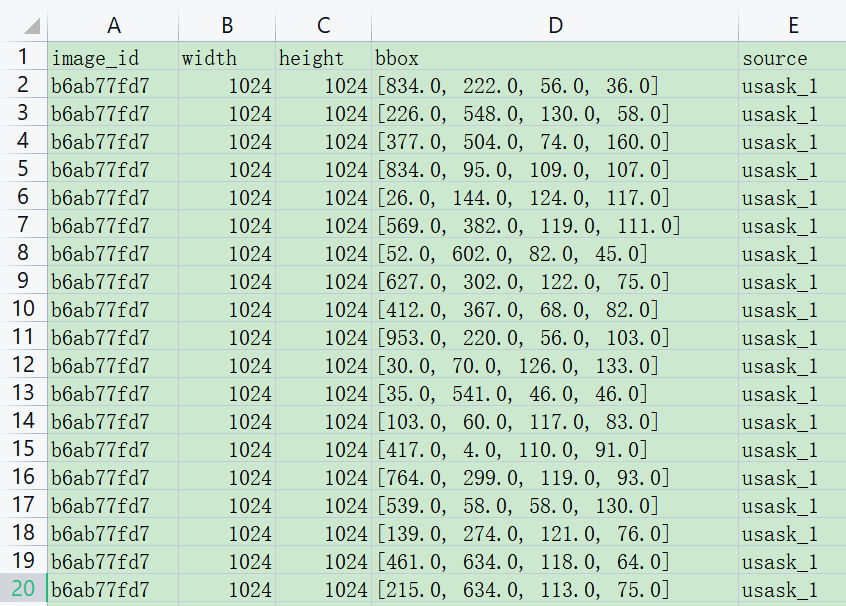
The corresponding five columns of results in train.csv are:
- image_id - unique image ID
- Width - the width of the image
- Height - the height of the image
- bbox - a bounding box, Python style list in the format [xmin, ymin, width, height]
- source - the category corresponding to the image
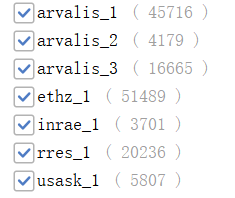
The distribution of wheat types in the training set is shown in the figure below:
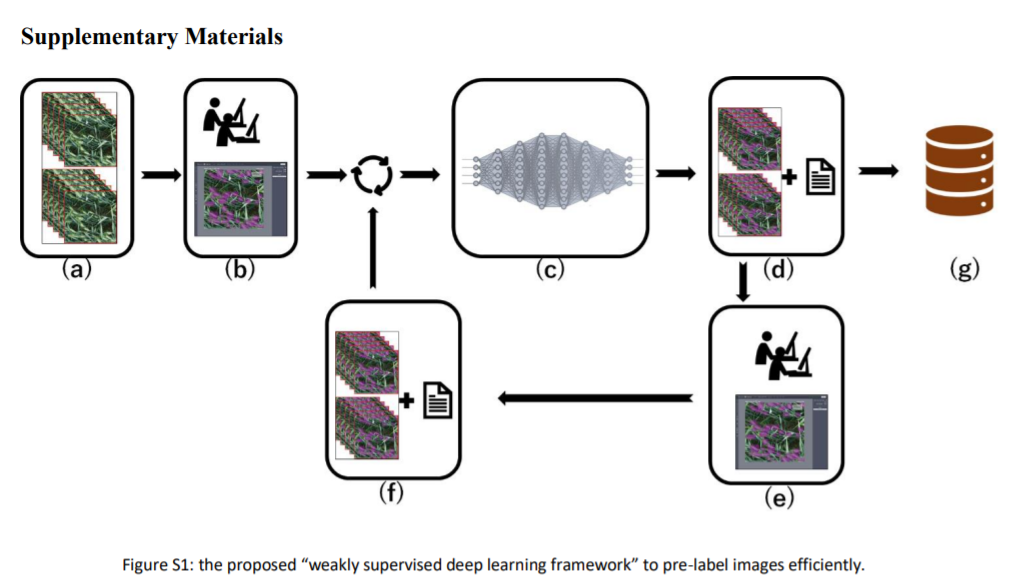
The overall process of wheat prediction is shown in the figure below:
The model evaluation parameters are as follows. We recommend you to read the introduction on kaggle's official website.
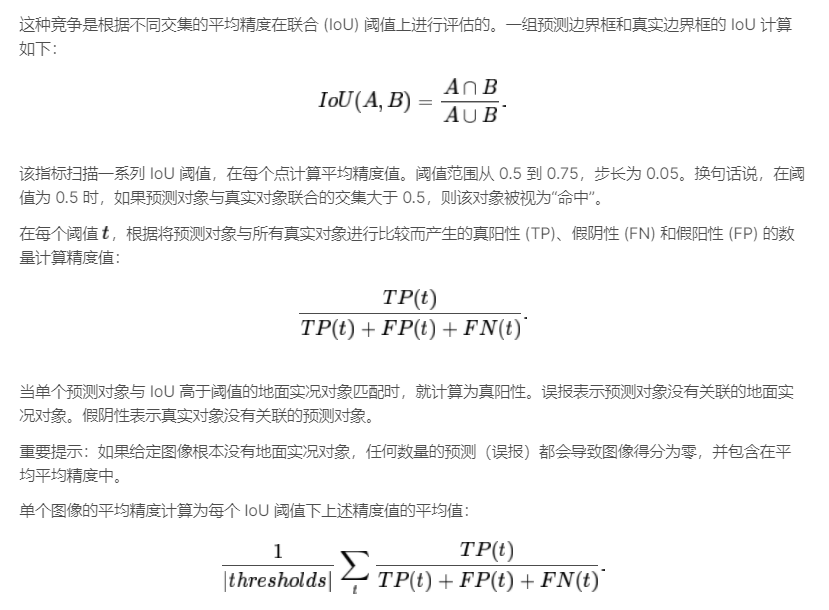
The submission format requires a set of bounding boxes separated by spaces. For example:
- ce4833752, 0.5 0 0 100 100
It indicates that the image ce4833752 has a bounding box with aconfidence of 0.5, x== 0 and y== 0, and awidth and height of 100.
The file should contain a title and have the following format, and each line you submit should contain all bounding boxes for a given image.
image_id,PredictionString
ce4833752,1.0 0 0 50 50
adcfa13da,1.0 0 0 50 50
6ca7b2650,
1da9078c1,0.3 0 0 50 50 0.5 10 10 30 30
7640b4963,0.5 0 0 50 50
3, Code implementation
Next, we refer to Mr. Kaggle Peter's code to reproduce the fast RCNN model.
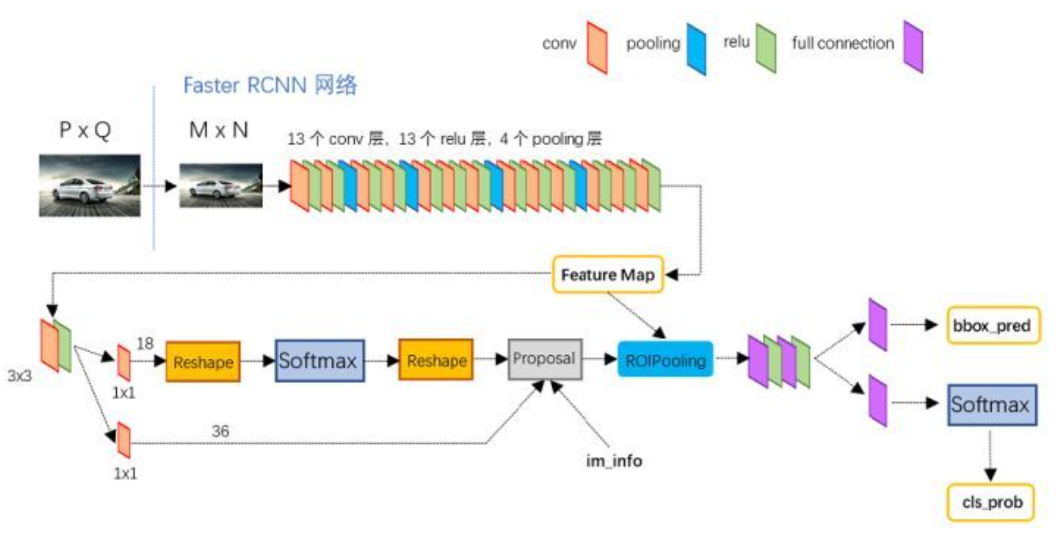
The framework of the model is shown in the figure below. I believe everyone is familiar with it. I also recommend you to use it and deeply understand the principle behind it.
1. Read wheat data
The code for reading wheat dataset is as follows:
# -*- coding: utf-8 -*-
"""
Created on Fri Oct 29 13:42:38 2021
@author: xiuzhang
"""
import os
import re
import cv2
import pandas as pd
import numpy as np
from PIL import Image
import albumentations as A
from matplotlib import pyplot as plt
from albumentations.pytorch.transforms import ToTensorV2

import torch
import torchvision
from torchvision.models.detection.faster_rcnn import FastRCNNPredictor
from torchvision.models.detection import FasterRCNN
from torchvision.models.detection.rpn import AnchorGenerator
from torch.utils.data import DataLoader, Dataset
from torch.utils.data.sampler import SequentialSampler

from dataset import WheatDataset

#-----------------------------------------------------------------------------
#Step 1 function definition
#----------------------------------------------------------------------------
#Extract the four coordinates of the box
def expand_bbox(x):
    r = np.array(re.findall("([0-9]+[.]?[0-9]*)", x))
    if len(r) == 0:
        r = [-1, -1, -1, -1]
    return r

#Training image enhancement
def get_train_transform():
    return A.Compose([
        A.Flip(0.5),
        ToTensorV2(p=1.0)
    ], bbox_params={'format': 'pascal_voc', 'label_fields': ['labels']})

#Verify image enhancement
def get_valid_transform():
    return A.Compose([
        ToTensorV2(p=1.0)
    ], bbox_params={'format': 'pascal_voc', 'label_fields': ['labels']})

def collate_fn(batch):
    return tuple(zip(*batch))

#-----------------------------------------------------------------------------
#The second step is to define variables and read data
#-----------------------------------------------------------------------------
DIR_INPUT = 'data'
DIR_TRAIN = f'{DIR_INPUT}/train'
DIR_TEST = f'{DIR_INPUT}/test'
train_df = pd.read_csv(f'{DIR_INPUT}/train.csv')
print(train_df.shape)

train_df['x'] = -1
train_df['y'] = -1
train_df['w'] = -1
train_df['h'] = -1

#Read four coordinates
train_df[['x', 'y', 'w', 'h']] = np.stack(train_df['bbox'].apply(lambda x: expand_bbox(x)))
train_df.drop(columns=['bbox'], inplace=True)
train_df['x'] = train_df['x'].astype(np.float)
train_df['y'] = train_df['y'].astype(np.float)
train_df['w'] = train_df['w'].astype(np.float)
train_df['h'] = train_df['h'].astype(np.float)

#Get image id
image_ids = train_df['image_id'].unique()
valid_ids = image_ids[-665:]
train_ids = image_ids[:-665]
valid_df = train_df[train_df['image_id'].isin(valid_ids)]
train_df = train_df[train_df['image_id'].isin(train_ids)]
print(valid_df.shape, train_df.shape)
print(train_df.head())
The display results are shown in the figure below. The image id and data are obtained respectively and divided into train and valid.

The code of dataset.py file is as follows:
- Get image id
- Obtain image pixel values and normalize them
- Obtain the boundary corresponding to the image (x | y | w | h)
# -*- coding: utf-8 -*-
"""
Created on Fri Oct 29 13:42:38 2021
@author: xiuzhang
"""
import numpy as np
import cv2
import torch
from torch.utils.data import Dataset


class WheatDataset(Dataset):

    def __init__(self, dataframe, image_dir, transforms=None):
        super().__init__()

        self.image_ids = dataframe['image_id'].unique()
        self.df = dataframe
        self.image_dir = image_dir
        self.transforms = transforms

    def __getitem__(self, index: int):
        image_id = self.image_ids[index]
        records = self.df[self.df['image_id'] == image_id]

        image = cv2.imread(f'{self.image_dir}/{image_id}.jpg', cv2.IMREAD_COLOR)
        image = cv2.cvtColor(image, cv2.COLOR_BGR2RGB).astype(np.float32)
        image /= 255.0

        boxes = records[['x', 'y', 'w', 'h']].values
        boxes[:, 2] = boxes[:, 0] + boxes[:, 2]
        boxes[:, 3] = boxes[:, 1] + boxes[:, 3]

        area = (boxes[:, 3] - boxes[:, 1]) * (boxes[:, 2] - boxes[:, 0])
        area = torch.as_tensor(area, dtype=torch.float32)

        # there is only one class
        labels = torch.ones((records.shape[0],), dtype=torch.int64)

        # suppose all instances are not crowd
        iscrowd = torch.zeros((records.shape[0],), dtype=torch.int64)

        target = {}
        target['boxes'] = boxes
        target['labels'] = labels
        # target['masks'] = None
        target['image_id'] = torch.tensor([index])
        target['area'] = area
        target['iscrowd'] = iscrowd

        if self.transforms:
            sample = {
                'image': image,
                'bboxes': target['boxes'],
                'labels': labels
            }
            sample = self.transforms(**sample)
            image = sample['image']

            target['boxes'] = torch.stack(tuple(map(torch.tensor, zip(*sample['bboxes'])))).permute(1, 0)

        return image, target, image_id

    def __len__(self) -> int:
        return self.image_ids.shape[0]
2. Visual display
Next, we will simply visualize the wheat image. The code is as follows:
# -*- coding: utf-8 -*-
"""
Created on Fri Oct 29 13:42:38 2021
@author: xiuzhang
"""
import os
import re
import cv2
import pandas as pd
import numpy as np
from PIL import Image
import albumentations as A
from matplotlib import pyplot as plt
from albumentations.pytorch.transforms import ToTensorV2

import torch
import torchvision
from torchvision.models.detection.faster_rcnn import FastRCNNPredictor
from torchvision.models.detection import FasterRCNN
from torchvision.models.detection.rpn import AnchorGenerator
from torch.utils.data import DataLoader, Dataset
from torch.utils.data.sampler import SequentialSampler

from dataset import WheatDataset

#-----------------------------------------------------------------------------
#Step 1 function definition
#----------------------------------------------------------------------------
#Extract the four coordinates of the box
def expand_bbox(x):
    r = np.array(re.findall("([0-9]+[.]?[0-9]*)", x))
    if len(r) == 0:
        r = [-1, -1, -1, -1]
    return r

#Training image enhancement
def get_train_transform():
    return A.Compose([
        A.Flip(0.5),
        ToTensorV2(p=1.0)
    ], bbox_params={'format': 'pascal_voc', 'label_fields': ['labels']})

#Verify image enhancement
def get_valid_transform():
    return A.Compose([
        ToTensorV2(p=1.0)
    ], bbox_params={'format': 'pascal_voc', 'label_fields': ['labels']})

def collate_fn(batch):
    return tuple(zip(*batch))

#-----------------------------------------------------------------------------
#The second step is to define variables and read data
#-----------------------------------------------------------------------------
DIR_INPUT = 'data'
DIR_TRAIN = f'{DIR_INPUT}/train'
DIR_TEST = f'{DIR_INPUT}/test'
train_df = pd.read_csv(f'{DIR_INPUT}/train.csv')
print(train_df.shape)

train_df['x'] = -1
train_df['y'] = -1
train_df['w'] = -1
train_df['h'] = -1

#Read four coordinates
train_df[['x', 'y', 'w', 'h']] = np.stack(train_df['bbox'].apply(lambda x: expand_bbox(x)))
train_df.drop(columns=['bbox'], inplace=True)
train_df['x'] = train_df['x'].astype(np.float)
train_df['y'] = train_df['y'].astype(np.float)
train_df['w'] = train_df['w'].astype(np.float)
train_df['h'] = train_df['h'].astype(np.float)

#Get image id
image_ids = train_df['image_id'].unique()
valid_ids = image_ids[-665:]
train_ids = image_ids[:-665]
valid_df = train_df[train_df['image_id'].isin(valid_ids)]
train_df = train_df[train_df['image_id'].isin(train_ids)]
print(valid_df.shape, train_df.shape)
print(train_df.head())

#-----------------------------------------------------------------------------
#Step 3 load data
#-----------------------------------------------------------------------------
train_dataset = WheatDataset(train_df, DIR_TRAIN, get_train_transform())
valid_dataset = WheatDataset(valid_df, DIR_TRAIN, get_valid_transform())

train_data_loader = DataLoader(
    train_dataset,
    batch_size=2,
    shuffle=False,
    num_workers=0,
    collate_fn=collate_fn
)

valid_data_loader = DataLoader(
    valid_dataset,
    batch_size=2,
    shuffle=False,
    num_workers=0,
    collate_fn=collate_fn
)

#-----------------------------------------------------------------------------
#Step 4 data visualization
#-----------------------------------------------------------------------------
#Extract training data and categories
device = torch.device('cuda') if torch.cuda.is_available() else torch.device('cpu')
images, targets, image_ids = next(iter(train_data_loader))
images = list(image.to(device) for image in images)
targets = [{k: v.to(device) for k, v in t.items()} for t in targets]
boxes = targets[0]['boxes'].cpu().numpy().astype(np.int32)
sample = images[0].permute(1, 2, 0).cpu().numpy()

fig, ax = plt.subplots(1, 1, figsize=(10, 8))

#Draw wheat target recognition box
for box in boxes:
    cv2.rectangle(sample,
                  (box[0], box[1]),
                  (box[2], box[3]),
                  (255, 0, 0), 3)

    ax.text(box[0],
            box[1] - 2,
            '{:s}'.format('wheat'),
            bbox=dict(facecolor='blue', alpha=0.5),
            fontsize=12,
            color='white')

ax.set_axis_off()
ax.imshow(sample)
plt.show()
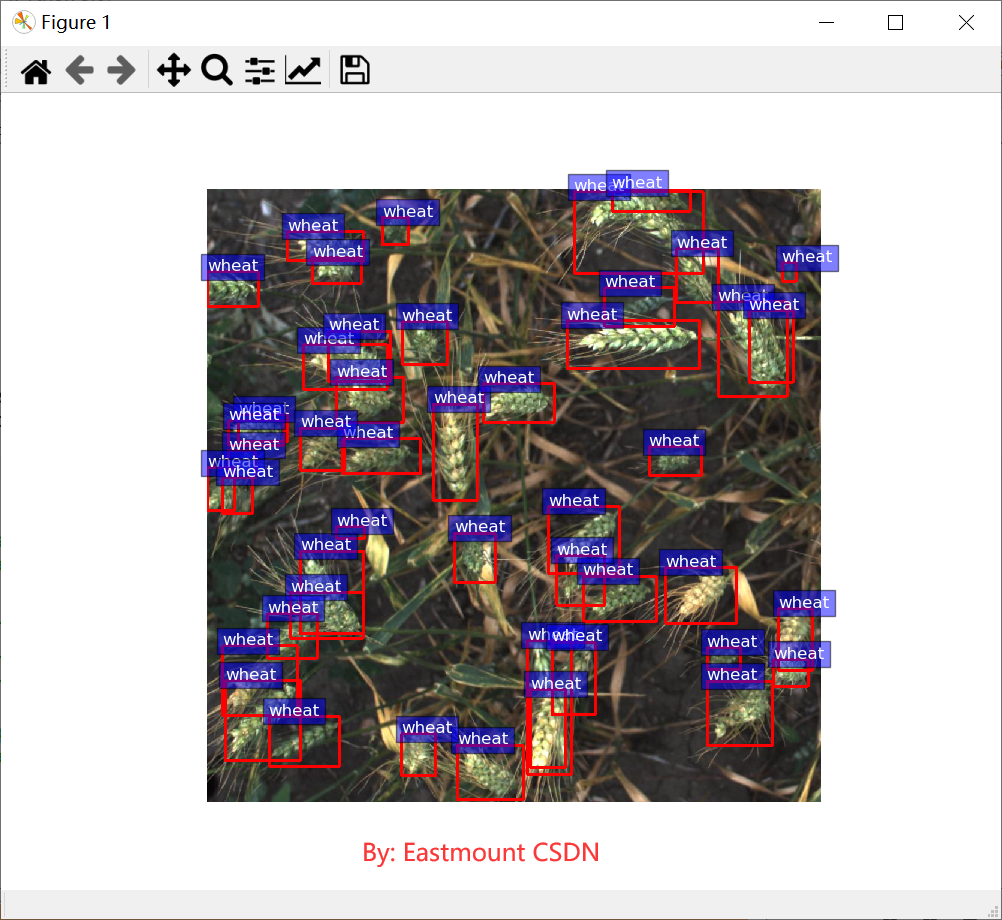
The output result is shown in the figure below. According to the boundary defined by train.csv, we draw a wheat red box to mark wheat. In the final test set, we hope to automatically predict the boundary of wheat, so as to effectively identify the area and quantity of wheat.
Warning:
- Clipping input data to the valid range for imshow with RGB data ([0...1] for floats or [0...255] for integers).
3. Build fast RCNN model
Next, fast RCNN model is constructed, which is a classical model of target detection. Its core code is as follows:
- model.roi_heads.box_predictor = FastRCNNPredictor(in_features, num_classes)
#-----------------------------------------------------------------------------
#Step 5 model construction
#-----------------------------------------------------------------------------
num_classes = 2  #1 class (wheat) + background
lr_scheduler = None
num_epochs = 1
itr = 1

class Averager:
    def __init__(self):
        self.current_total = 0.0
        self.iterations = 0.0

    def send(self, value):
        self.current_total += value
        self.iterations += 1

    @property
    def value(self):
        if self.iterations == 0:
            return 0
        else:
            return 1.0 * self.current_total / self.iterations

    def reset(self):
        self.current_total = 0.0
        self.iterations = 0.0

#load a model pre-trained on COCO
model = torchvision.models.detection.fasterrcnn_resnet50_fpn(pretrained=True)

#Gets the number of classifier input features
in_features = model.roi_heads.box_predictor.cls_score.in_features

#replace the pre-trained head with a new one
model.roi_heads.box_predictor = FastRCNNPredictor(in_features, num_classes)

#Parameter setting
model.to(device)
params = [p for p in model.parameters() if p.requires_grad]
optimizer = torch.optim.SGD(params, lr=0.005, momentum=0.9, weight_decay=0.0005)
#lr_scheduler = torch.optim.lr_scheduler.StepLR(optimizer, step_size=3, gamma=0.1)

loss_hist = Averager()
print("Start training....")

# Iterative training
for epoch in range(num_epochs):
    loss_hist.reset()

    for images, targets, image_ids in train_data_loader:

        images = list(image.to(device) for image in images)
        targets = [{k: v.to(device) for k, v in t.items()} for t in targets]
        for t in targets:
            t['boxes'] = t['boxes'].float()

        loss_dict = model(images, targets)
        losses = sum(loss for loss in loss_dict.values())
        loss_value = losses.item()
        loss_hist.send(loss_value)
        print("loss is :",loss_value)

        optimizer.zero_grad()
        losses.backward()
        optimizer.step()
        if itr % 50 == 0:
            print(f"Iteration #{itr}/{len(train_data_loader)} loss: {loss_value}")
        itr += 1

    #Update learning rate
    if lr_scheduler is not None:
        lr_scheduler.step()
    print(f"Epoch #{epoch} loss: {loss_hist.value}")

torch.save(model.state_dict(), 'fasterrcnn_resnet50_fpn.pth')
print("Next Test....")
The operation process is shown in the figure below:
Downloading: "https://download.pytorch.org/models/fasterrcnn_resnet50_fpn_coco-258fb6c6.pth"
to C:\Users\xxx/.cache\torch\hub\checkpoints\fasterrcnn_resnet50_fpn_coco-258fb6c6.pth
100%|██████████| 160M/160M [04:06<00:00, 679KB/s]
4. Model prediction
Add the final complete code of model prediction as follows:
- Step 1: function definition
- Step 2: define variables and read data
- Step 3: load data
- Step 4: Data Visualization
- Step 5: fast RCNN model construction
- Step 6: model test
# -*- coding: utf-8 -*-
"""
Created on Fri Oct 29 13:42:38 2021
@author: xiuzhang
"""
import os
import re
import cv2
import pandas as pd
import numpy as np
from PIL import Image
import albumentations as A
from matplotlib import pyplot as plt
from albumentations.pytorch.transforms import ToTensorV2

import torch
import torchvision
from torchvision.models.detection.faster_rcnn import FastRCNNPredictor
from torchvision.models.detection import FasterRCNN
from torchvision.models.detection.rpn import AnchorGenerator
from torch.utils.data import DataLoader, Dataset
from torch.utils.data.sampler import SequentialSampler

from dataset import WheatDataset

#-----------------------------------------------------------------------------
#Step 1 function definition
#----------------------------------------------------------------------------
#Extract the four coordinates of the box
def expand_bbox(x):
    r = np.array(re.findall("([0-9]+[.]?[0-9]*)", x))
    if len(r) == 0:
        r = [-1, -1, -1, -1]
    return r

#Training image enhancement
def get_train_transform():
    return A.Compose([
        A.Flip(0.5),
        ToTensorV2(p=1.0)
    ], bbox_params={'format': 'pascal_voc', 'label_fields': ['labels']})

#Verify image enhancement
def get_valid_transform():
    return A.Compose([
        ToTensorV2(p=1.0)
    ], bbox_params={'format': 'pascal_voc', 'label_fields': ['labels']})

def collate_fn(batch):
    return tuple(zip(*batch))

#-----------------------------------------------------------------------------
#The second step is to define variables and read data
#-----------------------------------------------------------------------------
DIR_INPUT = 'data'
DIR_TRAIN = f'{DIR_INPUT}/train'
DIR_TEST = f'{DIR_INPUT}/test'
train_df = pd.read_csv(f'{DIR_INPUT}/train.csv')
print(train_df.shape)

train_df['x'] = -1
train_df['y'] = -1
train_df['w'] = -1
train_df['h'] = -1

#Read four coordinates
train_df[['x', 'y', 'w', 'h']] = np.stack(train_df['bbox'].apply(lambda x: expand_bbox(x)))
train_df.drop(columns=['bbox'], inplace=True)
train_df['x'] = train_df['x'].astype(np.float)
train_df['y'] = train_df['y'].astype(np.float)
train_df['w'] = train_df['w'].astype(np.float)
train_df['h'] = train_df['h'].astype(np.float)

#Get image id
image_ids = train_df['image_id'].unique()
valid_ids = image_ids[-665:]
train_ids = image_ids[:-665]
valid_df = train_df[train_df['image_id'].isin(valid_ids)]
train_df = train_df[train_df['image_id'].isin(train_ids)]
print(valid_df.shape, train_df.shape)
print(train_df.head())

#-----------------------------------------------------------------------------
#Step 3 load data
#-----------------------------------------------------------------------------
train_dataset = WheatDataset(train_df, DIR_TRAIN, get_train_transform())
valid_dataset = WheatDataset(valid_df, DIR_TRAIN, get_valid_transform())

train_data_loader = DataLoader(
    train_dataset,
    batch_size=2,
    shuffle=False,
    num_workers=0,
    collate_fn=collate_fn
)

valid_data_loader = DataLoader(
    valid_dataset,
    batch_size=2,
    shuffle=False,
    num_workers=0,
    collate_fn=collate_fn
)

#-----------------------------------------------------------------------------
#Step 4 data visualization
#-----------------------------------------------------------------------------
#Extract training data and categories
device = torch.device('cuda') if torch.cuda.is_available() else torch.device('cpu')
images, targets, image_ids = next(iter(train_data_loader))
images = list(image.to(device) for image in images)
targets = [{k: v.to(device) for k, v in t.items()} for t in targets]
boxes = targets[0]['boxes'].cpu().numpy().astype(np.int32)
sample = images[0].permute(1, 2, 0).cpu().numpy()

fig, ax = plt.subplots(1, 1, figsize=(10, 8))

#Draw wheat target recognition box
for box in boxes:
    cv2.rectangle(sample,
                  (box[0], box[1]),
                  (box[2], box[3]),
                  (255, 0, 0), 3)

    ax.text(box[0],
            box[1] - 2,
            '{:s}'.format('wheat'),
            bbox=dict(facecolor='blue', alpha=0.5),
            fontsize=12,
            color='white')

ax.set_axis_off()
ax.imshow(sample)
plt.show()

#-----------------------------------------------------------------------------
#Step 5 model construction
#-----------------------------------------------------------------------------
num_classes = 2  #1 class (wheat) + background
lr_scheduler = None
num_epochs = 1
itr = 1

class Averager:
    def __init__(self):
        self.current_total = 0.0
        self.iterations = 0.0

    def send(self, value):
        self.current_total += value
        self.iterations += 1

    @property
    def value(self):
        if self.iterations == 0:
            return 0
        else:
            return 1.0 * self.current_total / self.iterations

    def reset(self):
        self.current_total = 0.0
        self.iterations = 0.0

#load a model pre-trained on COCO
model = torchvision.models.detection.fasterrcnn_resnet50_fpn(pretrained=True)

#Gets the number of classifier input features
in_features = model.roi_heads.box_predictor.cls_score.in_features

#replace the pre-trained head with a new one
model.roi_heads.box_predictor = FastRCNNPredictor(in_features, num_classes)

#Parameter setting
model.to(device)
params = [p for p in model.parameters() if p.requires_grad]
optimizer = torch.optim.SGD(params, lr=0.005, momentum=0.9, weight_decay=0.0005)
#lr_scheduler = torch.optim.lr_scheduler.StepLR(optimizer, step_size=3, gamma=0.1)

loss_hist = Averager()
print("Start training....")

# Iterative training
for epoch in range(num_epochs):
    loss_hist.reset()

    for images, targets, image_ids in train_data_loader:

        images = list(image.to(device) for image in images)
        targets = [{k: v.to(device) for k, v in t.items()} for t in targets]
        for t in targets:
            t['boxes'] = t['boxes'].float()

        loss_dict = model(images, targets)
        losses = sum(loss for loss in loss_dict.values())
        loss_value = losses.item()
        loss_hist.send(loss_value)
        #print("loss is :",loss_value)

        optimizer.zero_grad()
        losses.backward()
        optimizer.step()
        if itr % 50 == 0:
            print(f"Iteration #{itr}/{len(train_data_loader)} loss: {loss_value}")
        itr += 1

    #Update learning rate
    if lr_scheduler is not None:
        lr_scheduler.step()
    print(f"Epoch #{epoch} loss: {loss_hist.value}")

torch.save(model.state_dict(), 'fasterrcnn_resnet50_fpn.pth')
print("Next Test....")

#-----------------------------------------------------------------------------
#Step 6 model test
#-----------------------------------------------------------------------------
images, targets, image_ids = next(iter(valid_data_loader))
images = list(img.to(device) for img in images)
targets = [{k: v.to(device) for k, v in t.items()} for t in targets]
boxes = targets[0]['boxes'].cpu().numpy().astype(np.int32)
sample = images[0].permute(1, 2, 0).cpu().numpy()

model.eval()
cpu_device = torch.device("cpu")

outputs = model(images)
outputs = [{k: v.to(cpu_device) for k, v in t.items()} for t in outputs]
fig, ax = plt.subplots(1, 1, figsize=(16, 8))
for box in boxes:
    cv2.rectangle(sample,
                  (box[0], box[1]),
                  (box[2], box[3]),
                  (220, 0, 0), 3)

ax.set_axis_off()
ax.imshow(sample)
plt.show()
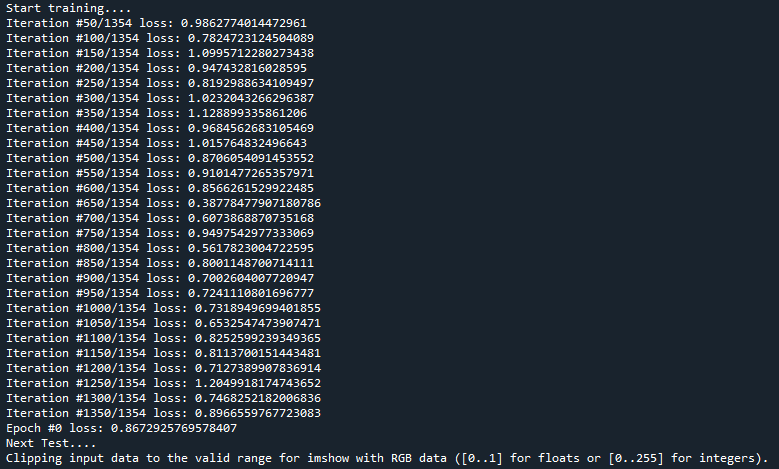
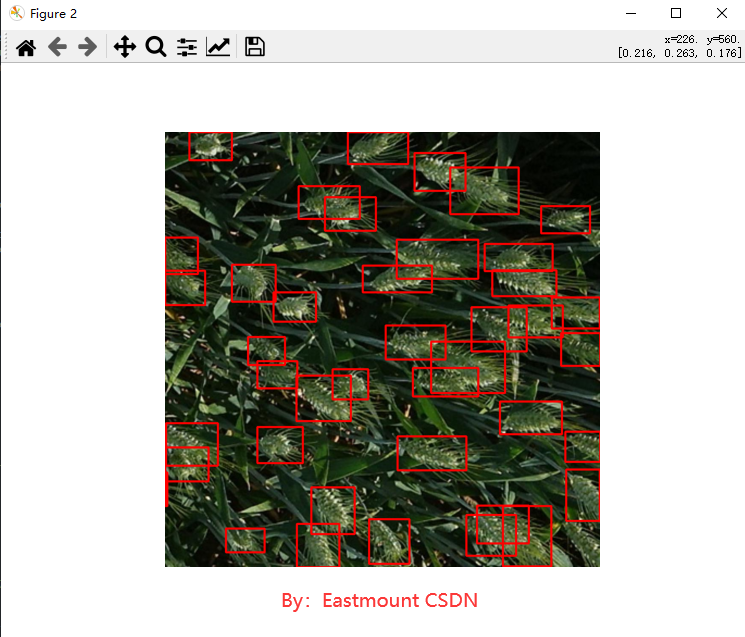
The running results of the model are shown in the figure below. You can see the iterative loss. It is recommended to experiment with a good target detection environment.
At the same time, the images of the test set or verification set are recognized, as shown in the following figure:
4, Summary
At this point, the introduction of this article ends. I hope it will be helpful to you. The detailed comparative experiment and algorithm evaluation are also required to be completed by the readers themselves, and the subsequent author's articles will also be introduced in depth.
- 1, Pytoch installation
- 2, Dataset description
1.Kaggle competition
2. Data set introduction - 3, Code implementation
1. Read wheat data
2. Visual display
3. Build fast RCNN model
4. Model prediction
Code and dataset download address:
"Beginning of winter - Xiao Luo Qing"
Early winter has arrived, and the Yellow ginkgo leaves fall with the cold wind. There are bursts of residual fragrance from time to time along Guanshan Avenue, and the cold wind also wraps the clothes of passers-by. With the flow of time, I spent the first year of my life. Although I can't express it in words, I have already been familiar with this wonderful world and felt the love of my family. Of course, I occasionally experience some troubles, more than the cold in these two days. Whenever I feel uncomfortable, I will scream or get upset. Fortunately, my mother and mother-in-law can always pick me up at the first time and swing in their arms to comfort me. Shaking and shaking, when I see my mother's loving eyes, I always raise the corners of my mouth immediately. It is a giggle that can only be raised in my mother's arms, and then enter a sweet dream. Although I am still young, it seems that I can feel my mother's love for this smile. It is the first cup of milk tea in Lidong that flows into her heart.
"Ding Dong Ding..." when I woke up, I heard a wechat video from afar on the phone. I couldn't wait to take my mobile phone, but I didn't know how to connect it. At this time, my mother held me to press the green answer button. Seeing the familiar glasses, doll beard and face, I called "Baba" (that's the pronunciation). Family affection, the rose that smiles forever, no matter how long it takes, is unforgettable and fragrant. On the phone, my father said that the north of his circle of friends ushered in the first snow, EDG won the championship, arbor and street quietly changed into snow-white winter clothes last night, let us remember to keep warm. My mother replied that the cold wind in Guiyang is particularly cold these two days. Xiao Luoluo is getting better from her cold and makes my father remember to wear more clothes. Listening to their daily chatter, I tumbled and frolicked around from time to time, as if to prove that I was the most important member of the family. "Mom's fish in sour soup is ready. We're ready to eat. You should eat early. Luo Luo, don't worry. Take care of yourself." with the heat rising from the old pot at home, the call ended.
Perhaps, at the age of one, I don't know what this means, but I know that watching the video in my mother's arms makes my father far away very happy, like the sweetness of eating watermelon. A little older, in my primary school composition, I may write a sentence: "this is the taste of home and the feelings people track in life. It is just like the happiness, anger and sweetness of the world burning sour soup fish in the stove. It is precisely because of this taste that mother will fall in love with father, father will pursue mother, and they will love the most lovely me".
Perhaps, my childlike world can't remember these, but my father and mother will always remember my every day. Love, in the moment, love, in an instant. Xiao Luoluo wishes everyone a happy beginning of winter.
(by: eastmount in Wuhan on November 8, 2021) http://blog.csdn.net/eastmount/ )
Thank you for sharing. The references are as follows: