preface
1. This article mainly refers to Blogs: Click to enter , it integrates the pseudo distributed environment construction and some pit stepping matters.
2. There are three node machines built in the environment: pc1, pc2 and pc3. Among them, pc1 is the management machine, and the three node machines all use the user Sillyhumans. If the user names of the three machines are different, you may need to modify them slightly when configuring the address below.
3. Operate after closing the firewall.
4. Allow the management machine to log in to other node machines (including itself) ssh password free.
1, What are pseudo distributed clusters?
In short, it is to simulate the integrated distribution of multiple machines on one machine (pretending to have multiple servers)
2, Install Hadoop
First download Hadoop : Click to enter Download
My next version is 3.3


Upload to l user directory for decompression
tar -zxvf hadoop-3.3.0.tar.gz
After decompression, change the file name to hadoop
mv hadoop-3.3.0 hadoop
Then configure the environment variables, enter the. bashrc file, and add the following code at the end of the file
export HADOOP_HOME=/home/Sillyhumans/hadoop
export PATH=$PATH:$HADOOP_HOME/bin:$HADOOP_HOME/sbin
Then save and exit, and execute the command to make the configuration effective
source .bashrc
Verification: enter hadoop version. If version information appears, the configuration is successful

3, Pseudo distributed environment construction
Configure the mappings in the hosts file
su root
 Input password
vi /etc/hosts
Add the following at the end:
192.168.100.1 pc1
192.168.100.2 pc2
192.168.100.3 pc3
Enter the etc/hadoop file in the hadoop directory
Edit the following files and modify them according to your host name (if the permission is not enough, you can switch to root first)
vi core-site.xml
 Amend to read as follows:
<configuration>
        <property>
                <name>hadoop.tmp.dir</name>
                <value>file:/home/Sillyhumans/hadoop/tmp</value>
                <description>Abase for other temporary directories.</description>
        </property>
        <property>
                <name>fs.defaultFS</name>
                <value>hdfs://pc1:9000</value>
        </property>
</configuration>

vi hdfs-site.xml
 Amend to read as follows:
<configuration>
        <property>
                <name>dfs.replication</name>
                <value>3</value>
        </property>

        <property>
                <name>dfs.namenode.name.dir</name>
                <value>file:/home/Sillyhumans/hadoop/tmp/dfs/name</value>
        </property>

        <property>
                <name>dfs.datanode.data.dir</name>
                <value>file:/home/Sillyhumans/hadoop/tmp/dfs/data</value>
        </property>

        <property>
                <name>dfs.secondary.http.address</name>
                <value>dfs://pc1:9870</value>
        </property>
</configuration>

vi hadoop-env.sh
 Add to it jdk route: export JAVA_HOME=/home/Sillyhumans/java

vi mapred-site.xml
 Amend to read as follows:
<configuration>
        <property>
                <name>mapreduce.framework.name</name>
                <value>yarn</value>
        </property>
        <property>
                <name>mapred.job.tracker.http.address</name>
                <value>0.0.0.0:50030</value>
        </property>

        <property>
                <name>mapred.task.tracker.http.address</name>
                <value>0.0.0.0:50060</value>
        </property>

        <property>
                <name>mapreduce.admin.user.env</name>
                <value>HADOOP_MAPRED_HOME=$HADOOP_COMMON_HOME</value>
        </property>
        <property>
                <name>yarn.app.mapreduce.am.env</name>
                <value>HADOOP_MAPRED_HOME=$HADOOP_COMMON_HOME</value>
        </property>
</configuration>

vi yarn-site.xml
 Amend to read as follows:
<configuration>
        <property>
                <name>yarn.nodemanager.aux-services</name>
                <value>mapreduce_shuffle</value>
        </property>

</configuration>
4, Add two node machines
Possible problems: check the ip address and enter
stop-all.sh
ip addr
Observe the ip address of ens33. Two ip addresses may appear at this time, as shown in the figure:

One is the address set by yourself and the other is the dynamic address. When configuring hadoop, the dynamic address of the server will be used. As a result, the management interface will not display the information of other node machines. You need to edit ifconfig-ens33
vi /etc/sysconfig/network-scripts/ifcfg-ens33
Change the BOOTPROTO value to static and restart the server.
Then edit the hadoop workers file
vi ~/hadoop/etc/hadoop/workers
Add node machine
Sillyhumans@pc1
Sillyhumans@pc2
Sillyhumans@pc3
After saving, send hadoop and. bashrc to pc2 and pc3
su Sillyhumans
scp -r hadoop Sillyhumans@pc2:~/
scp -r hadoop Sillyhumans@pc3:~/
scp .bashrc Sillyhumans@pc2:~/
scp .bashrc Sillyhumans@pc3:~/
Make. bashrc effective in pc2 and pc3, respectively
ssh Sillyhumans@pc2
source .bashrc
exit
ssh Sillyhumans@pc3
source .bashrc
exit
preservation
5, Start hadoop
Format is required for the first startup. First enter sbin and enter as follows
cd ~/hadoop/sbin
hdfs namenode -format
The selection y appears
Open hadoop
start-all.sh
Verification: enter jps on each node machine


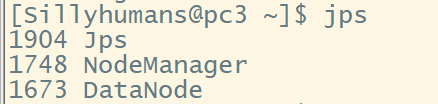
Enter the management interface of the browser. At this time, there are three node machines
