preface
In the previous chapter, I took you to build the CAS Server side project, that is, we built a unified single sign on authentication center. Next, we can build the CAS client project, and then realize the interactive authentication between the client and the server, so as to complete single sign on.
Next, you will follow brother Yige to build CAS client and finally realize single sign on!
1, Build CAS client
1. Create a new project
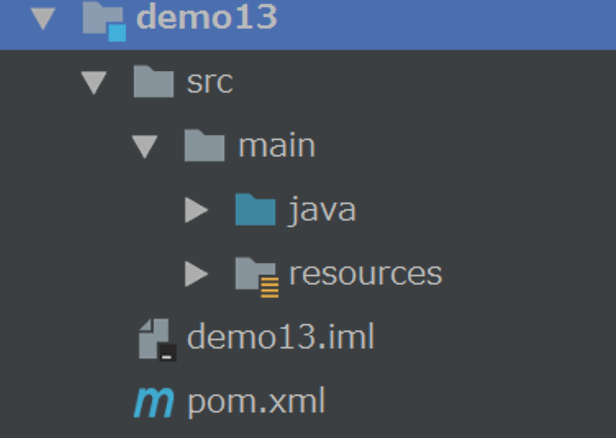
In the previous Spring Security project, we created a new module as the CAS Client project, as shown in the following figure.
2. Introduce dependency
Then, the related dependencies are introduced into the pom.xml file of this module.
<dependencies>
<dependency>
<groupId>org.springframework.boot</groupId>
<artifactId>spring-boot-starter-security</artifactId>
</dependency>
<dependency>
<groupId>org.springframework.security</groupId>
<artifactId>spring-security-web</artifactId>
</dependency>
<dependency>
<groupId>org.springframework.security</groupId>
<artifactId>spring-security-cas</artifactId>
</dependency>
<dependency>
<groupId>org.springframework.boot</groupId>
<artifactId>spring-boot-starter-web</artifactId>
</dependency>
<dependency>
<groupId>org.springframework.security</groupId>
<artifactId>spring-security-test</artifactId>
<scope>test</scope>
</dependency>
</dependencies>
<build>
<plugins>
<plugin>
<groupId>org.springframework.boot</groupId>
<artifactId>spring-boot-maven-plugin</artifactId>
</plugin>
</plugins>
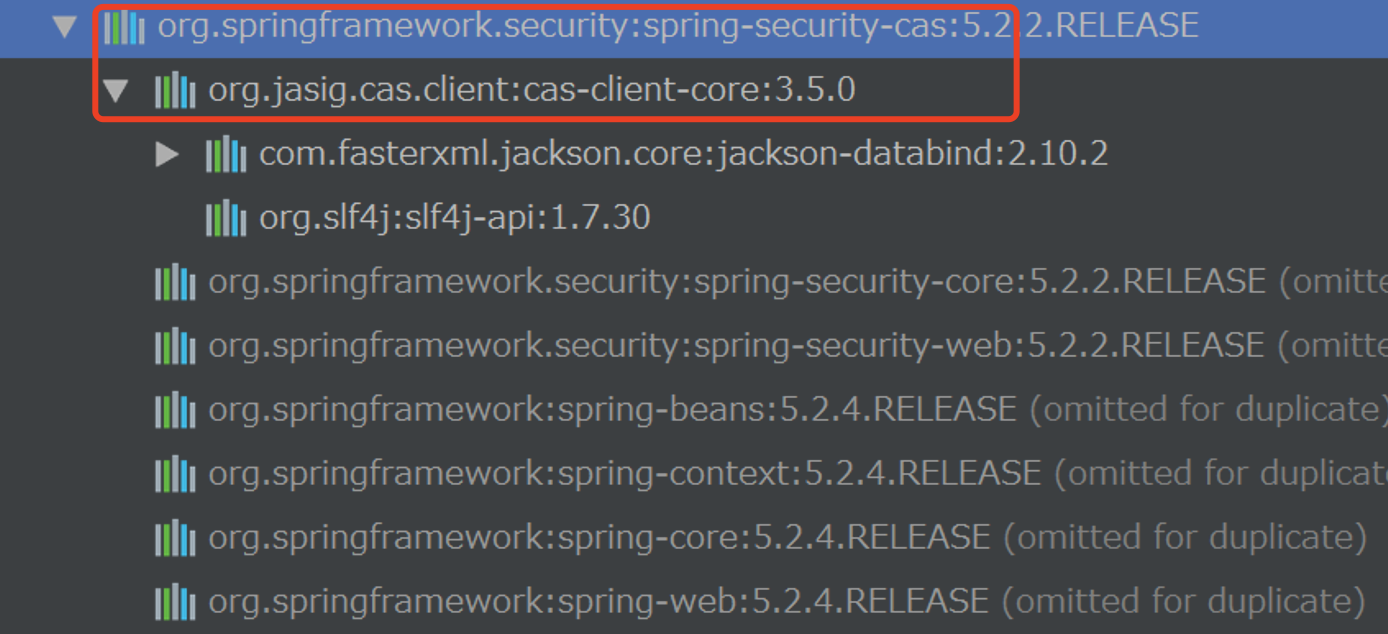
</build>The most important dependency is spring security CAS. Its internal dependencies are as follows:
3. Configure CAS Client
Create an application.yml file and add CAS Client related configurations, mainly those associated with CAS Server. Please fill in the address information of your CAS Server here.
cas:
  #Configure the server
  server:
    #The main path of cas server, which points to our cas server
    prefix: https://cas.yyg.cn:8443/cas
    #Point to the login page of cas server
    login: ${cas.server.prefix}/login
    #Point to the exit login page of cas server
    logout: ${cas.server.prefix}/logout
  #Configure the client
  client:
    #Configure cas client url prefix
    prefix: http://client.cas.yyg.cn:8080
    #Configure client login address
    login: ${cas.client.prefix}/login/cas
    #Configure the exit login interface as a relative path
    relative: /logout/cas
    #Configure the exit login interface as an absolute path
    logout: ${cas.client.prefix}${cas.client.relative}
  user:
    #Configure the user name to log in to the cas server
    inmemory: yyg
4. Create configuration class
In the previous section, I have created the configuration information related to CAS Client. In order to facilitate us to reference the configuration information, we can create a corresponding configuration class CasSecurityConfig, and in this class, we can create some filters related to single sign on.
@Configuration
public class CasSecurityConfig {

    @Value("${cas.server.prefix}")
    private String casServerPrefix;

    @Value("${cas.server.login}")
    private String casServerLogin;

    @Value("${cas.server.logout}")
    private String casServerLogout;

    @Value("${cas.client.login}")
    private String casClientLogin;

    @Value("${cas.client.logout}")
    private String casClientLogout;

    @Value("${cas.client.relative}")
    private String casClientLogoutRelative;

    @Value("${cas.user.inmemory}")
    private String casUserInMemory;

    /**
     * Configure properties of CAS Client
     *
     * @return
     */
    @Bean
    public ServiceProperties serviceProperties() {
        ServiceProperties serviceProperties = new ServiceProperties();
        // Consistent with the URL monitored by CasAuthenticationFilter
        serviceProperties.setService(casClientLogin);
        // Whether to turn off single sign on is false by default, so it can not be set.
        serviceProperties.setSendRenew(false);
        return serviceProperties;
    }

    /**
     * Configure CAS authentication entry and provide the redirection address of user browser
     *
     * @param sp
     * @return
     */
    @Bean
    @Primary
    public AuthenticationEntryPoint authenticationEntryPoint(ServiceProperties sp) {
        CasAuthenticationEntryPoint entryPoint = new CasAuthenticationEntryPoint();
        // Login address of CAS Server authentication
        entryPoint.setLoginUrl(casServerLogin);
        entryPoint.setServiceProperties(sp);
        return entryPoint;
    }

    /**
     * To configure the ticket verification function, you need to provide the address of the CAS Server verification ticket
     *
     * @return
     */
    @Bean
    public TicketValidator ticketValidator() {
        // By default, Cas20ProxyTicketValidator is used, and the validation entry is ${casServerPrefix}/proxyValidate
        return new Cas20ProxyTicketValidator(casServerPrefix);
    }

    /**
     * Create a user in memory and assign permissions
     *
     * @return
     */
    @Bean
    public UserDetailsService userDetailsService() {
        InMemoryUserDetailsManager manager = new InMemoryUserDetailsManager();
        manager.createUser(User.withUsername(casUserInMemory).password("").roles("USER").build());
        return manager;
    }

    /**
     * Set cas authentication processing logic
     *
     * @param sp
     * @param ticketValidator
     * @param userDetailsService
     * @return
     */
    @Bean
    public CasAuthenticationProvider casAuthenticationProvider(ServiceProperties sp, TicketValidator ticketValidator, UserDetailsService userDetailsService) {
        CasAuthenticationProvider provider = new CasAuthenticationProvider();
        provider.setServiceProperties(sp);
        provider.setTicketValidator(ticketValidator);
        provider.setUserDetailsService(userDetailsService);
        provider.setKey("yyg");
        return provider;
    }

    /**
     * A special filter for CAS authentication is provided, and the authentication logic of the filter is provided by CasAuthenticationProvider
     *
     * @param sp
     * @param ap
     * @return
     */
    @Bean
    public CasAuthenticationFilter casAuthenticationFilter(ServiceProperties sp, AuthenticationProvider ap) {
        CasAuthenticationFilter filter = new CasAuthenticationFilter();
        filter.setServiceProperties(sp);
        filter.setAuthenticationManager(new ProviderManager(Arrays.asList(ap)));
        return filter;
    }

    /**
     * Configure the single sign on filter to accept the logout request sent by the cas server
     *
     * @return
     */
    @Bean
    public SingleSignOutFilter singleSignOutFilter() {
        SingleSignOutFilter singleSignOutFilter = new SingleSignOutFilter();
        singleSignOutFilter.setCasServerUrlPrefix(casServerPrefix);
        singleSignOutFilter.setIgnoreInitConfiguration(true);
        return singleSignOutFilter;
    }

    /**
     * Forward logout request to cas server
     *
     * @return
     */
    @Bean
    public LogoutFilter logoutFilter() {
        LogoutFilter logoutFilter = new LogoutFilter(casServerLogout, new SecurityContextLogoutHandler());
        // Set the path of the client logout request
        logoutFilter.setFilterProcessesUrl(casClientLogoutRelative);
        return logoutFilter;
    }

}
5. Create Security configuration class
Then create a WebSecurityConfig configuration class to intercept the authentication of related interfaces and configure the filters related to single sign on.
@EnableWebSecurity(debug = true)
public class WebSecurityConfig extends WebSecurityConfigurerAdapter {

    @Autowired
    private AuthenticationProvider authenticationProvider;

    @Autowired
    private AuthenticationEntryPoint entryPoint;

    @Autowired
    private CasAuthenticationFilter casAuthenticationFilter;

    @Autowired
    private SingleSignOutFilter singleSignOutFilter;

    @Autowired
    private LogoutFilter requestSingleLogoutFilter;

    @Override
    protected void configure(AuthenticationManagerBuilder auth) {

        auth.authenticationProvider(authenticationProvider);
    }

    @Override
    protected void configure(HttpSecurity http) throws Exception {
        http.authorizeRequests()
                .antMatchers("/admin/**")
                .hasRole("ADMIN")
                .antMatchers("/user/**")
                .hasRole("USER")
                .antMatchers("/login/cas", "/favicon.ico", "/error")
                .permitAll()
                .anyRequest()
                .authenticated()
                .and()
                .exceptionHandling()
                //Set authentication entry
                .authenticationEntryPoint(entryPoint)
                .and()
                //Add filters to perform single sign on processing logic
                .addFilter(casAuthenticationFilter)
                //Process authentication logic
                .addFilterBefore(singleSignOutFilter, CasAuthenticationFilter.class)
                //Process logout
                .addFilterBefore(requestSingleLogoutFilter, LogoutFilter.class);
    }

}
6. Create test interface
Next, create a UserController and test it. According to the previous WebSecurityConfig configuration class, the / user interface requires that visitors must have user role permissions to access, so it is a protected resource.
@RestController
@RequestMapping("/user")
public class UserController {

    @GetMapping
    public String hello() {

        return "hello, user";
    }

}
7. Create project entry class
/**
 * cas Client to achieve authentication with cas server
 */
@SpringBootApplication
public class Demo13Application {

    public static void main(String[] args) {

        SpringApplication.run(Demo13Application.class, args);
    }

}
8. Client project structure
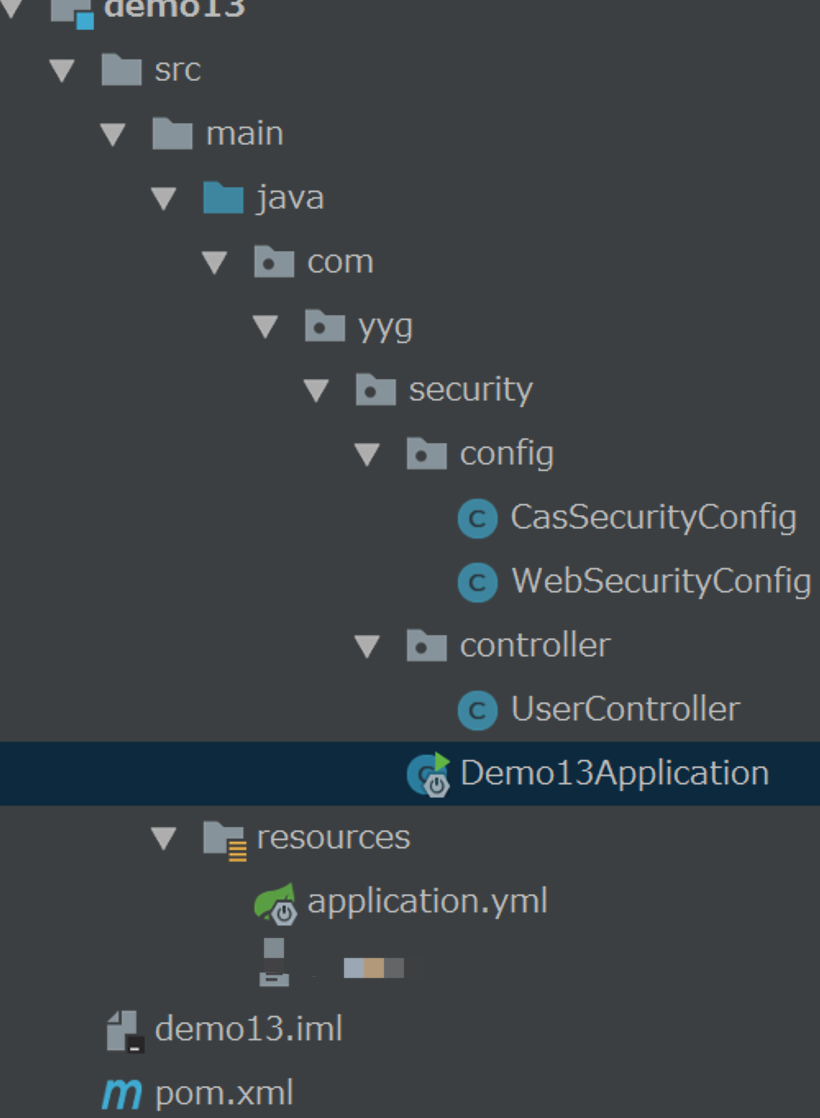
So far, I have written the core code of CAS Client project. You can follow my project creation process to create multiple CAS Client projects. There is only one CAS Server project and multiple CAS Client projects.
The code structure of the whole project is as follows:
9. Start operation project
Next, we start the client project and conduct interface test to see if we can jump to CAS Server for unified authentication when we are not logged in.
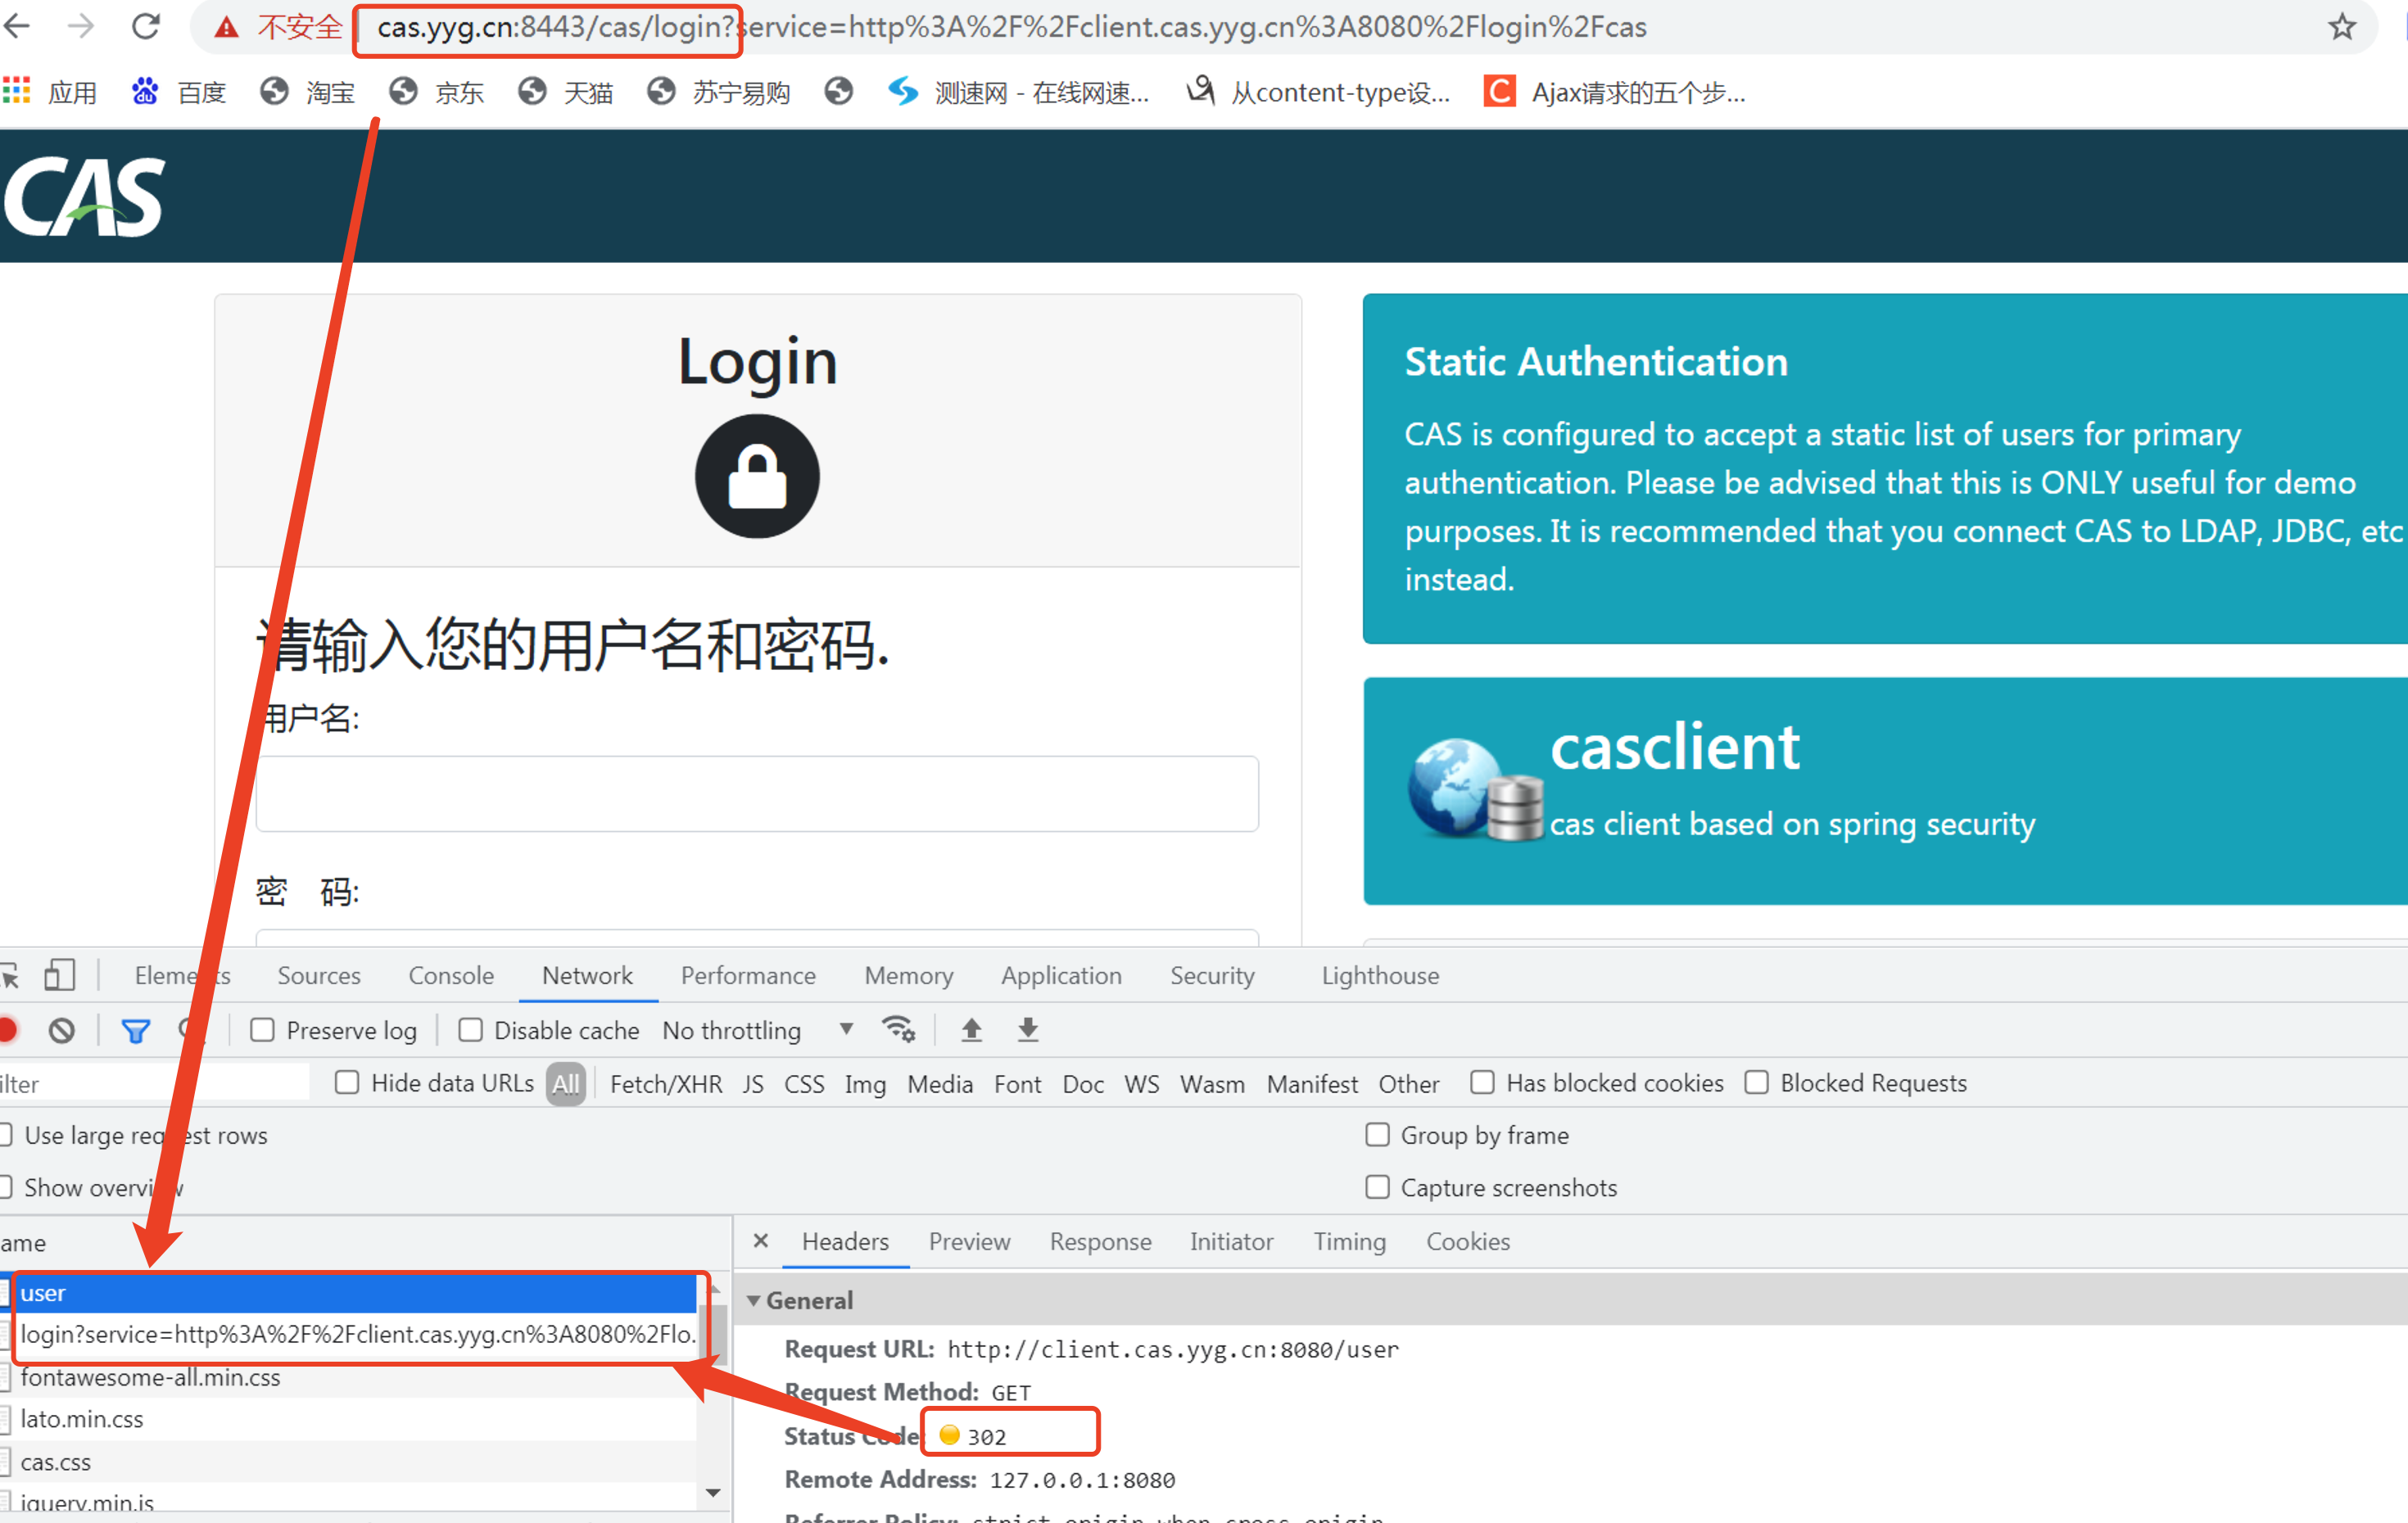
We enter it directly in the browser http://client.cas.yyg.cn:8080/user Address, which is the test interface defined in our CAS Client project. It can only be accessed with user role permission. It can not be accessed directly without login.

Before we enter http://client.cas.yyg.cn:8080/user After the address is, on the browser console, we can find that a 302 redirect occurs when accessing the interface, which will redirect from the / user interface to the / cas/login login interface of CAS Server. Here, we need to enter the user name and password previously configured in the application.properties configuration file of CAS Server, yyg:123
When we enter the correct user name and password, CAS Server will redirect back from CAS Server to CAS Client after successful authentication, so as to access / user interface.
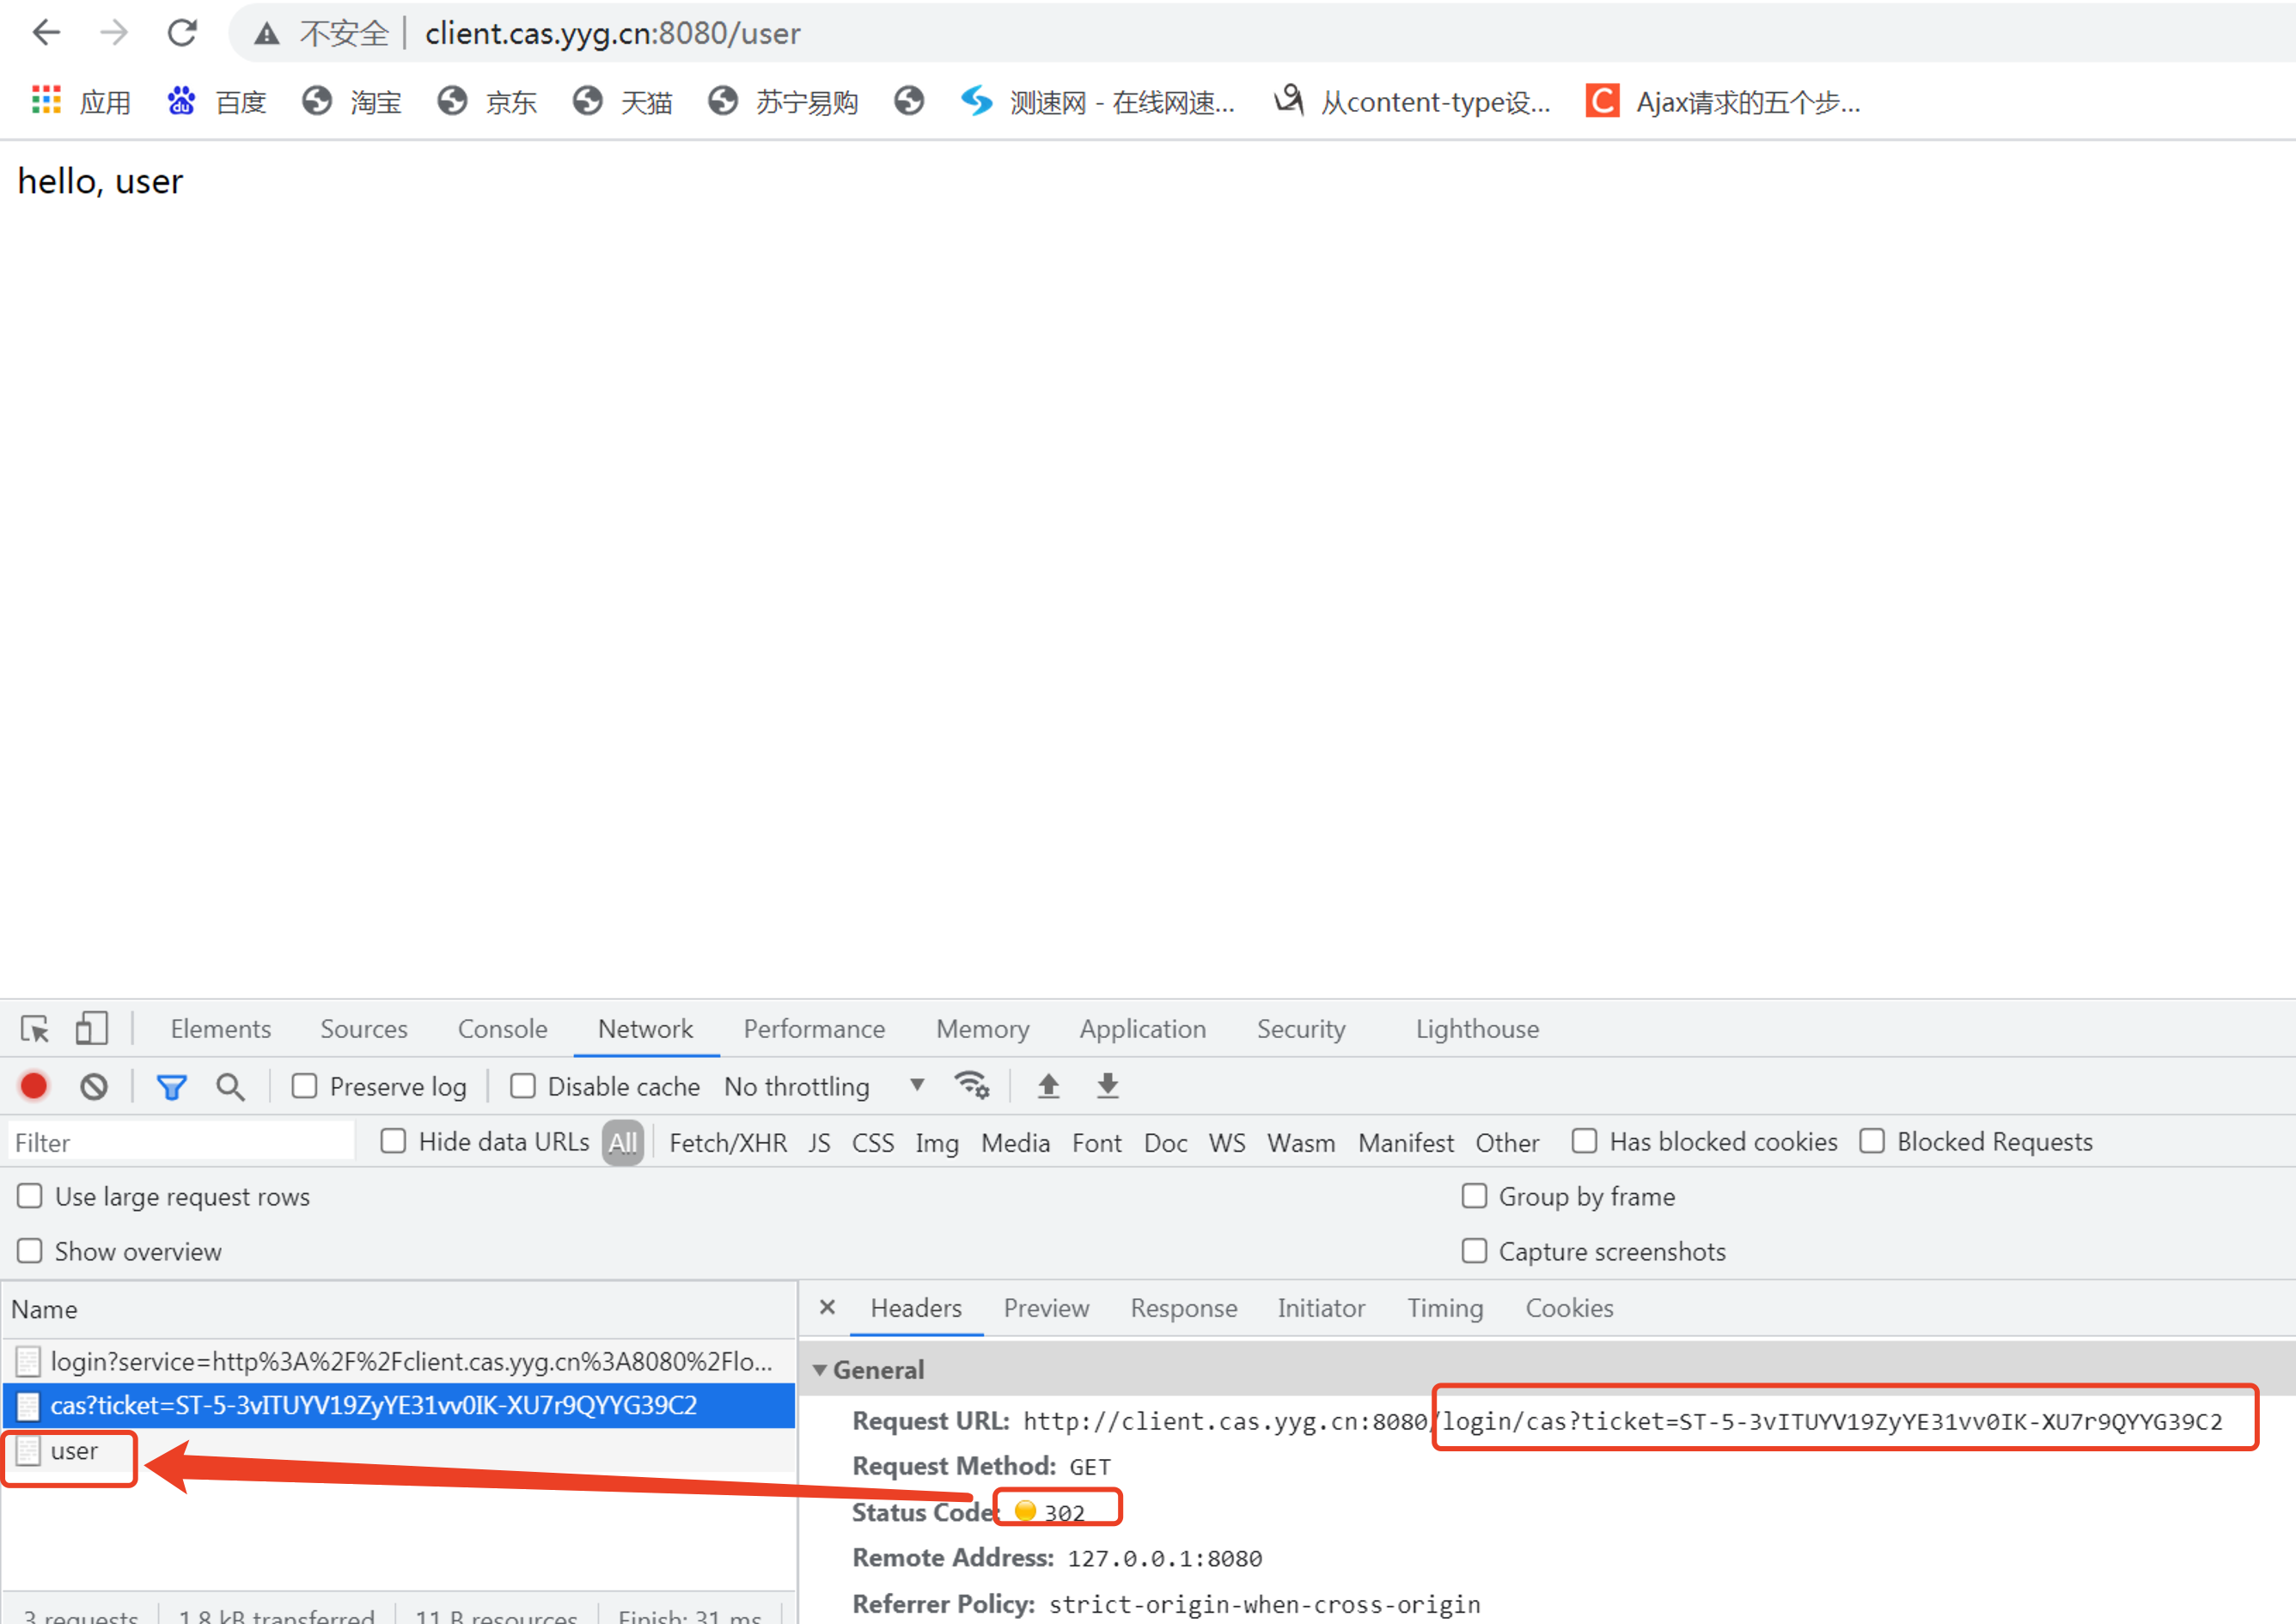
In this way, the interactive authentication between CAS Client and CAS Server is realized.
2, Single sign off
After realizing single sign on, we can also realize single sign off.
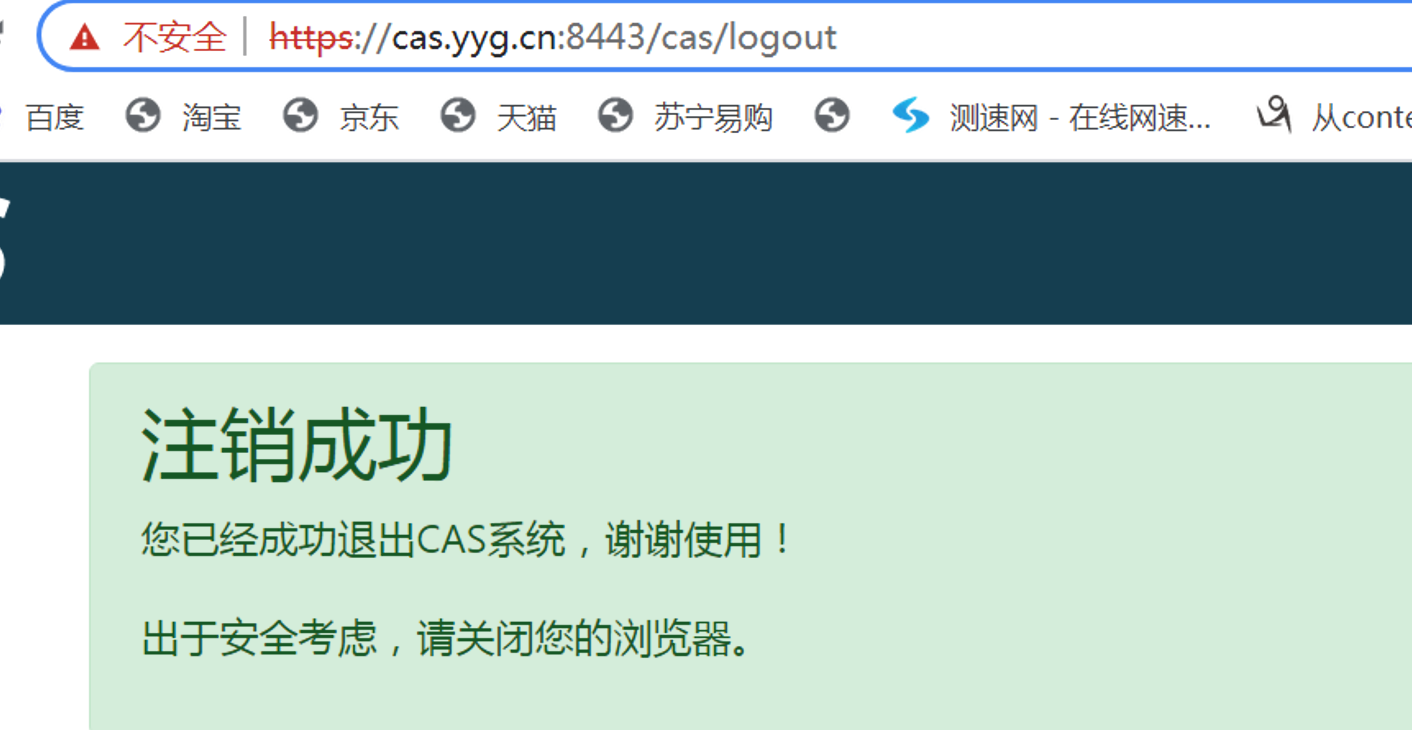
At this time, we can pass the request https://cas.yyg.cn:8443/cas/logout Address to perform single sign off, so that when a CAS client project exits, all other clients in the CAS Server also log off.
So far, Yige has simply implemented single sign on and single sign off based on CAS framework. We use CAS Server as a unified central Certification Center, and then create several CAS Client projects to realize the requirement of single sign on.
Have you learned? If you think this series of articles are helpful to you, please praise it in the comment area!