1, Kubedm deploys K8S cluster architecture
| host name | IP address | Installation components |
| master (2C/4G, the number of cpu cores is required to be greater than 2) | 192.168.229.90 | docker,kubeadm,kubelet,kubectl,flannel |
| node01(2C/2G) | 192.168.229.80 | docker,kubeadm,kubelet,kubectl,flannel |
| node02(2C/2G) | 192.168.229.70 | docker,kubeadm,kubelet,kubectl,flannel |
| Harbor node (hub.kgc.com) | 192.168.229.60 | docker,docker-compose,harbor-offline-v1.2.2 |
The overall deployment steps are as follows:
1. Install Docker and kubedm on all nodes
2. Deploy Kubernetes Master
3. Deploy container network plug-in
4. Deploy the Kubernetes Node and add the node to the Kubernetes cluster
5. Deploy the Dashboard Web page to visually view Kubernetes resources
6. Deploy Harbor private warehouse to store image resources
1. Environmental preparation
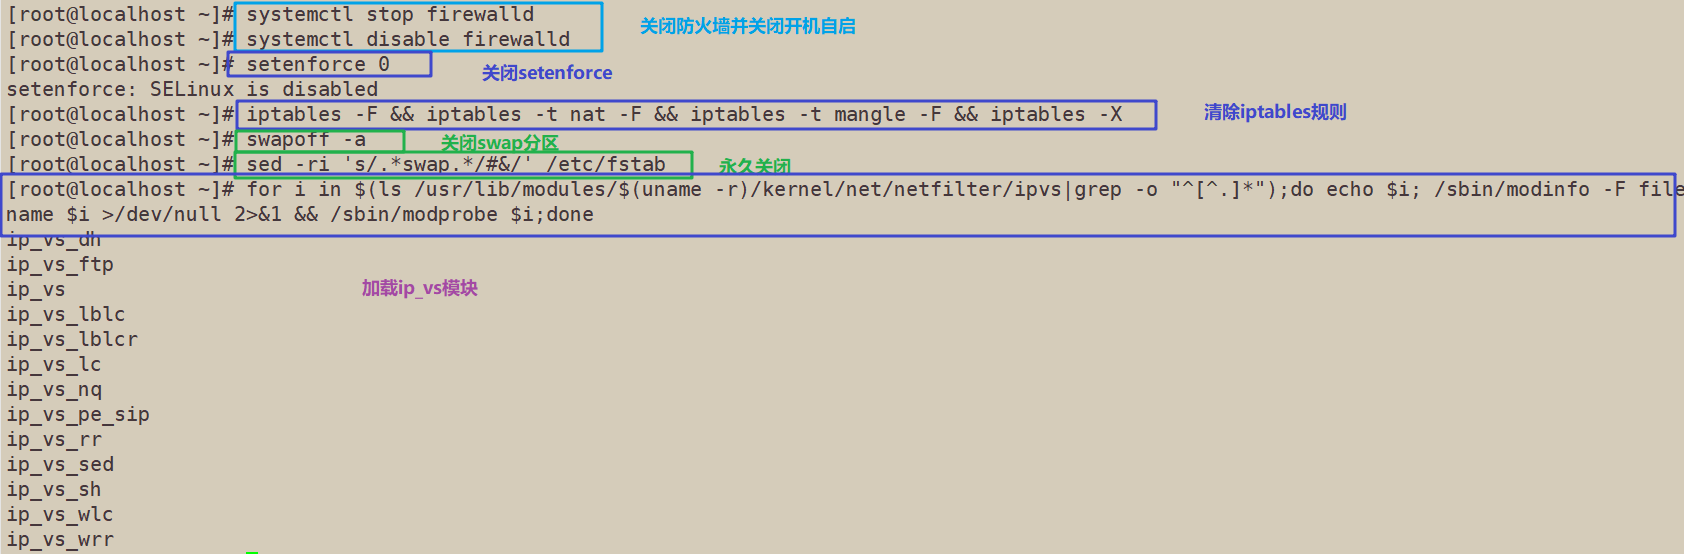
//All nodes, turn off firewall rules, turn off selinux, and turn off swap
systemctl stop firewalld
systemctl disable firewalld
setenforce 0
iptables -F && iptables -t nat -F && iptables -t mangle -F && iptables -X
swapoff -a	#The swap partition must be closed
sed -ri 's/.*swap.*/#&/' /etc/fstab	#Permanently close the swap partition, and the & symbol represents the last matching result in the sed command
#Load ip_vs module
for i in $(ls /usr/lib/modules/$(uname -r)/kernel/net/netfilter/ipvs|grep -o "^[^.]*");do echo $i; /sbin/modinfo -F filename $i >/dev/null 2>&1 && /sbin/modprobe $i;done
//Modify host name
hostnamectl set-hostname master
hostnamectl set-hostname node01
hostnamectl set-hostname node02


//Modify hosts file for all nodes
vim /etc/hosts
192.168.229.90 master
192.168.229.80 node01
192.168.229.70 node02

//Adjust kernel parameters
cat > /etc/sysctl.d/kubernetes.conf << EOF
#Turn on the bridge mode to transfer the traffic of the bridge to the iptables chain
net.bridge.bridge-nf-call-ip6tables=1
net.bridge.bridge-nf-call-iptables=1
#Turn off ipv6 protocol
net.ipv6.conf.all.disable_ipv6=1
net.ipv4.ip_forward=1
EOF

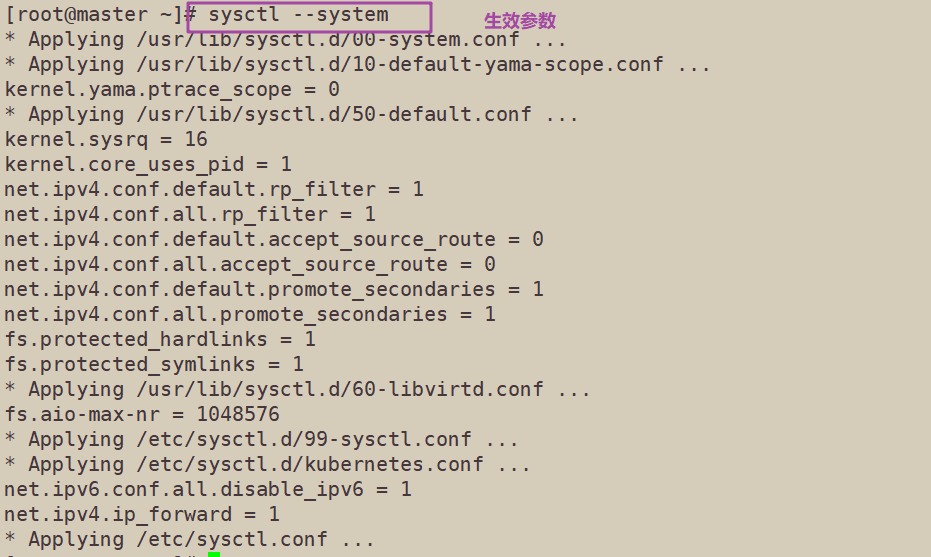
//Effective parameters
sysctl --system
2. Install docker on all nodes
yum install -y yum-utils device-mapper-persistent-data lvm2
yum-config-manager --add-repo https://mirrors.aliyun.com/docker-ce/linux/centos/docker-ce.repo
yum install -y docker-ce docker-ce-cli containerd.io
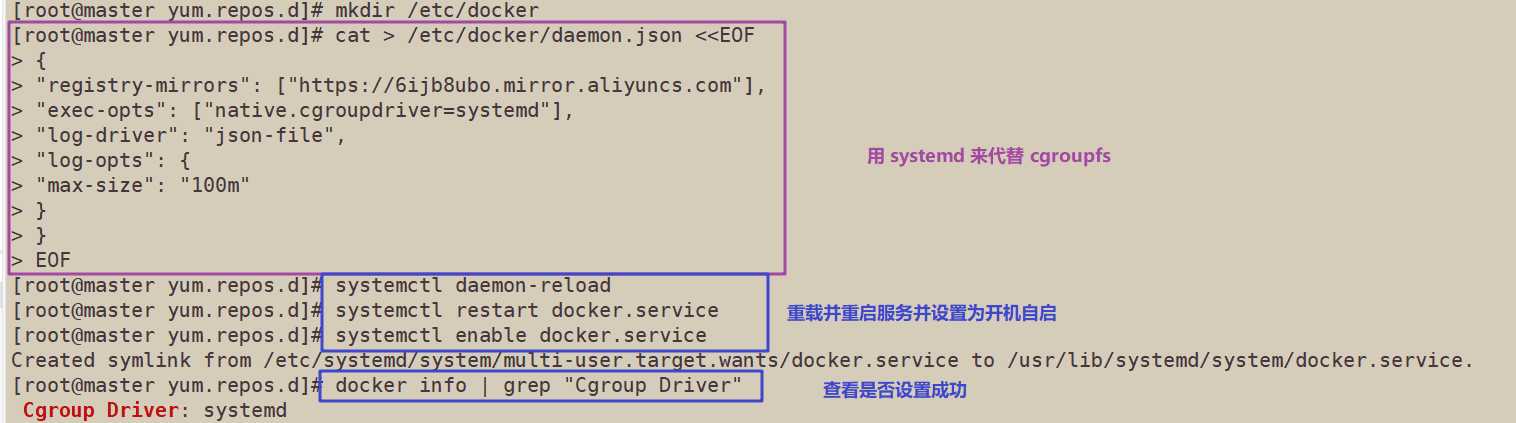
mkdir /etc/docker
cat > /etc/docker/daemon.json <<EOF
{
"registry-mirrors": ["https://6ijb8ubo.mirror.aliyuncs.com"],
"exec-opts": ["native.cgroupdriver=systemd"],
"log-driver": "json-file",
"log-opts": {
"max-size": "100m"
}
}
EOF
#The Cgroup managed by system D is used for resource control and management, because compared with Cgroupfs, system D limits CPU, memory and other resources more simply, mature and stable.
#The logs are stored in JSON file format with a size of 100M and stored in / var/log/containers directory to facilitate ELK and other log systems to collect and manage logs.
systemctl daemon-reload
systemctl restart docker.service
systemctl enable docker.service
docker info | grep "Cgroup Driver"
Cgroup Driver: systemd


3. Kubedm, kubelet and kubectl are installed on all nodes
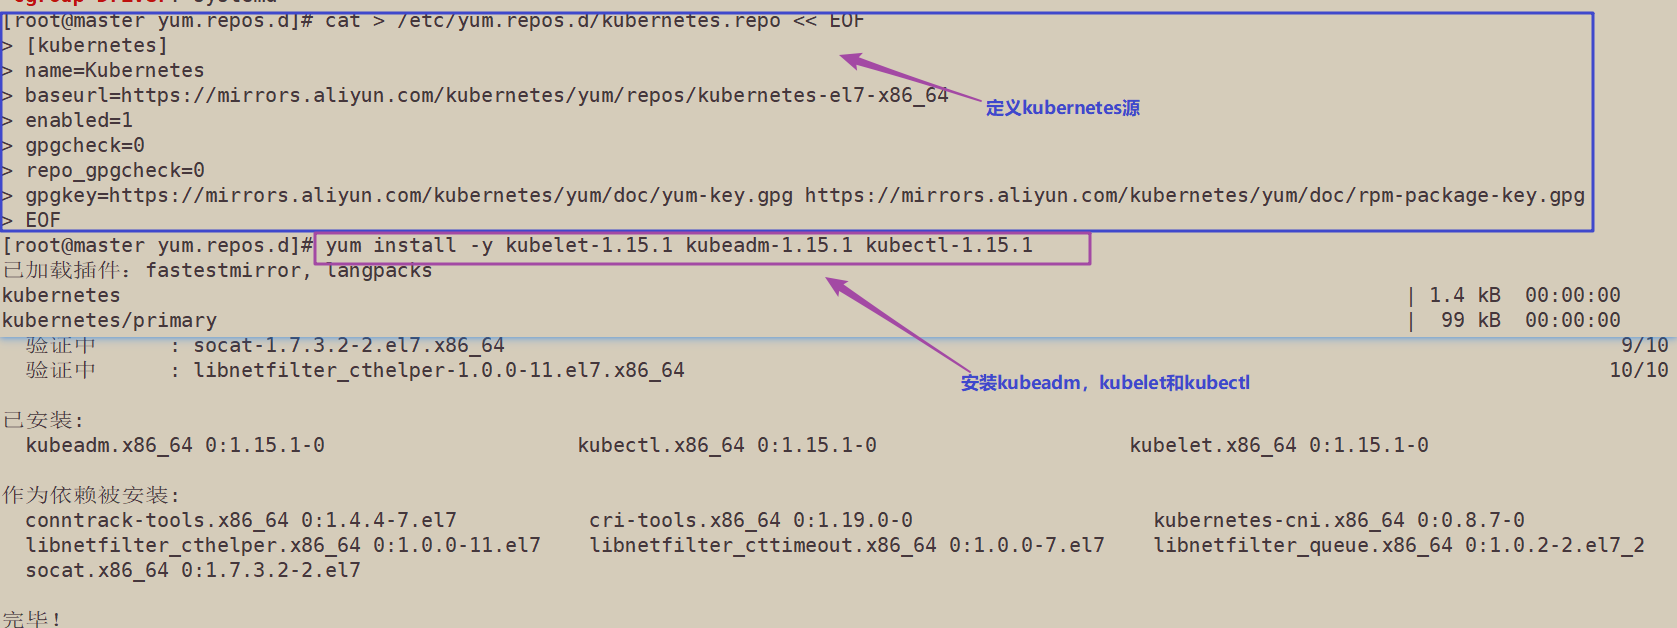
//Define kubernetes source and install kubedm, kubelet and kubectl
cat > /etc/yum.repos.d/kubernetes.repo << EOF
[kubernetes]
name=Kubernetes
baseurl=https://mirrors.aliyun.com/kubernetes/yum/repos/kubernetes-el7-x86_64
enabled=1
gpgcheck=0
repo_gpgcheck=0
gpgkey=https://mirrors.aliyun.com/kubernetes/yum/doc/yum-key.gpg https://mirrors.aliyun.com/kubernetes/yum/doc/rpm-package-key.gpg
EOF

yum install -y kubelet-1.15.1 kubeadm-1.15.1 kubectl-1.15.1
//Startup and self startup kubelet
systemctl enable kubelet.service
#After K8S is installed through kubedm, it exists in Pod mode, that is, the bottom layer runs in container mode, so kubelet must be set to start automatically

3. Deploy K8S cluster
//View images required for initialization
kubeadm config images list

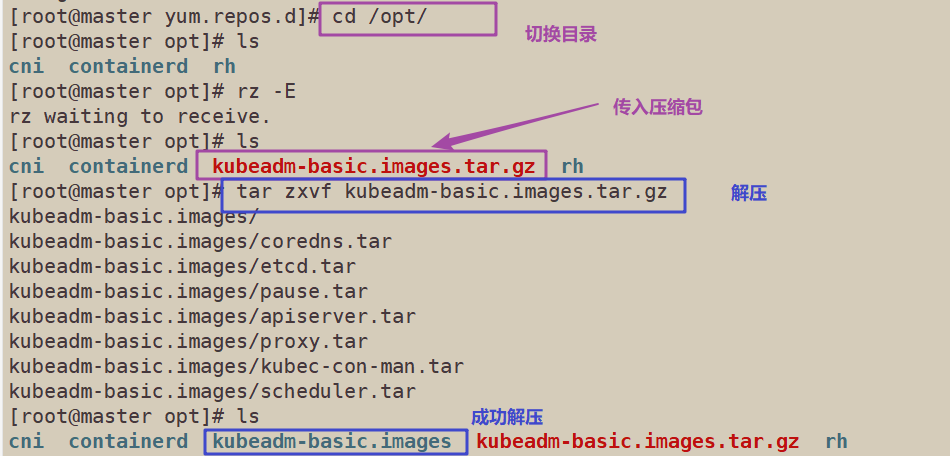
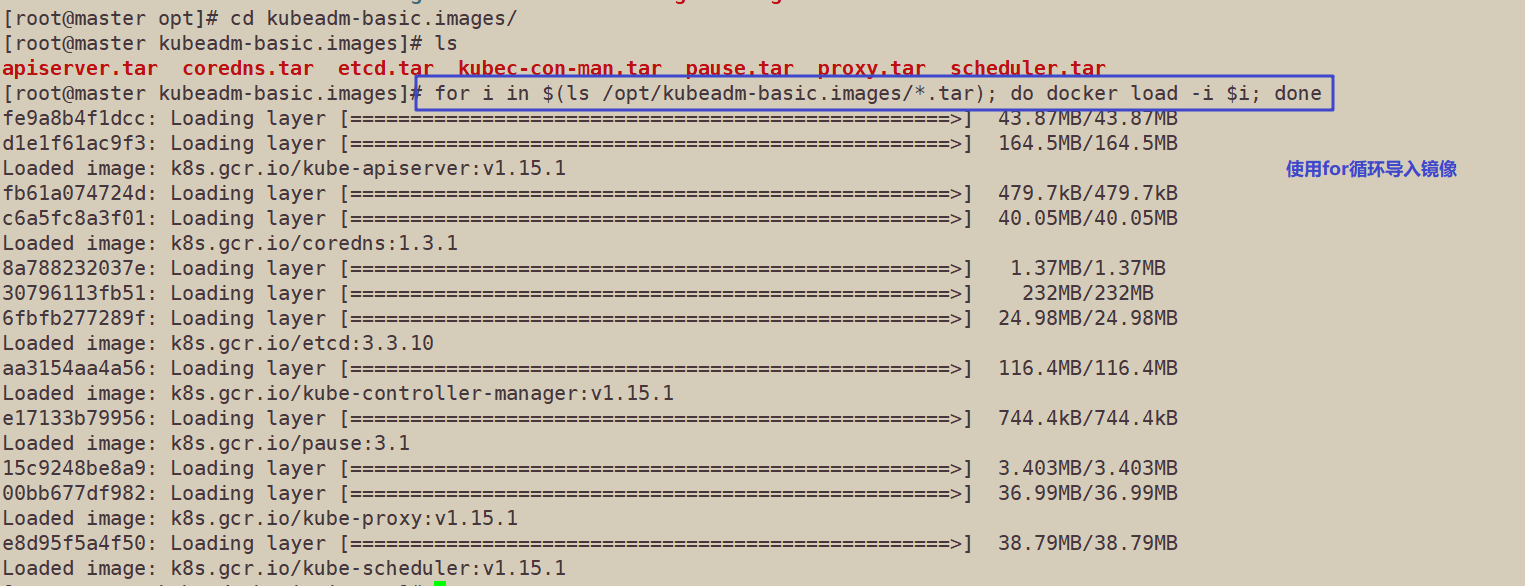
//On the master node, upload the kubedm-basic.images.tar.gz compressed package to the / opt directory
cd /opt
tar zxvf kubeadm-basic.images.tar.gz

for i in $(ls /opt/kubeadm-basic.images/*.tar); do docker load -i $i; done
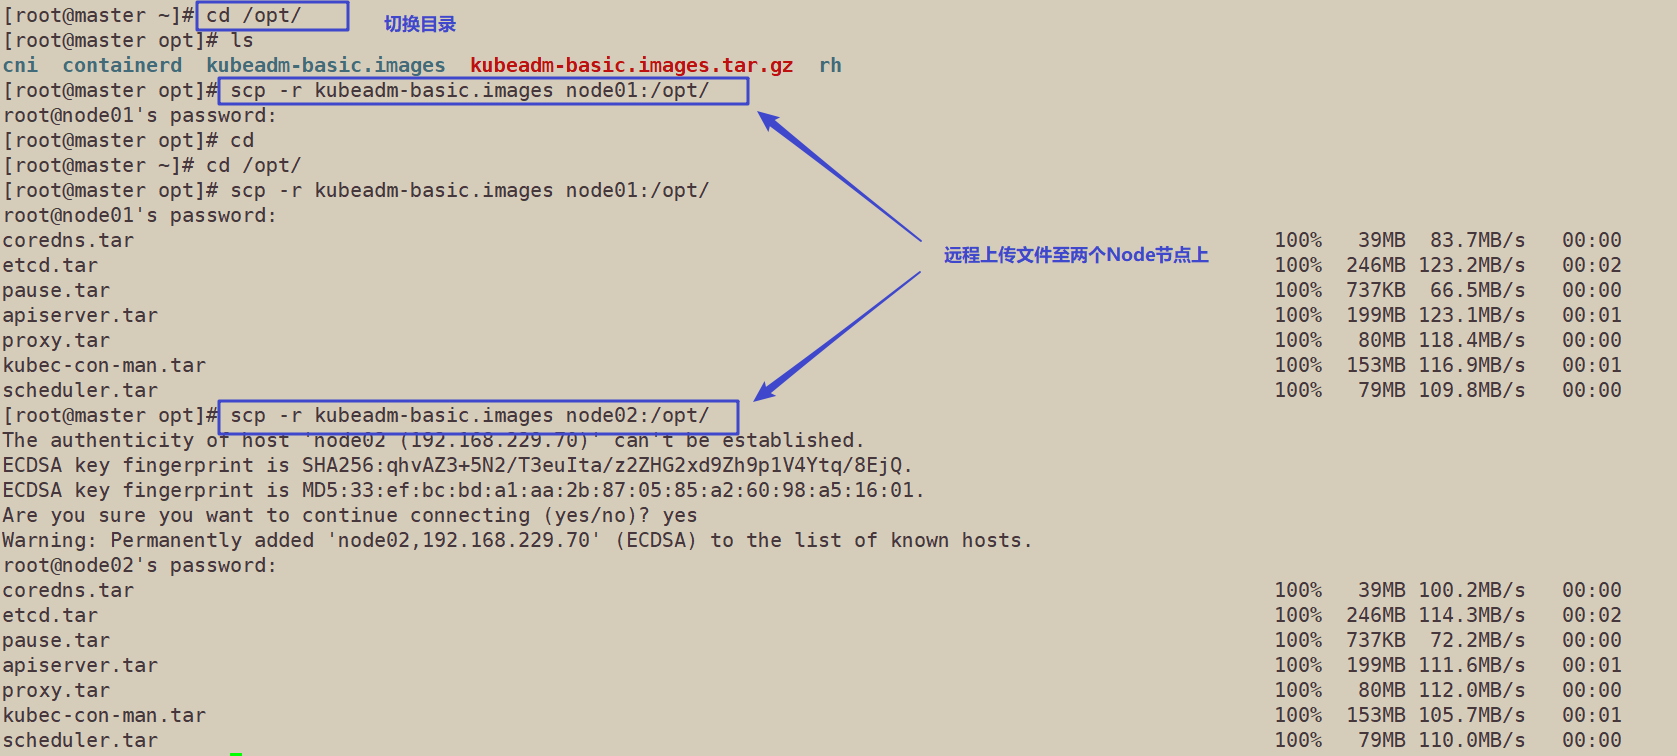
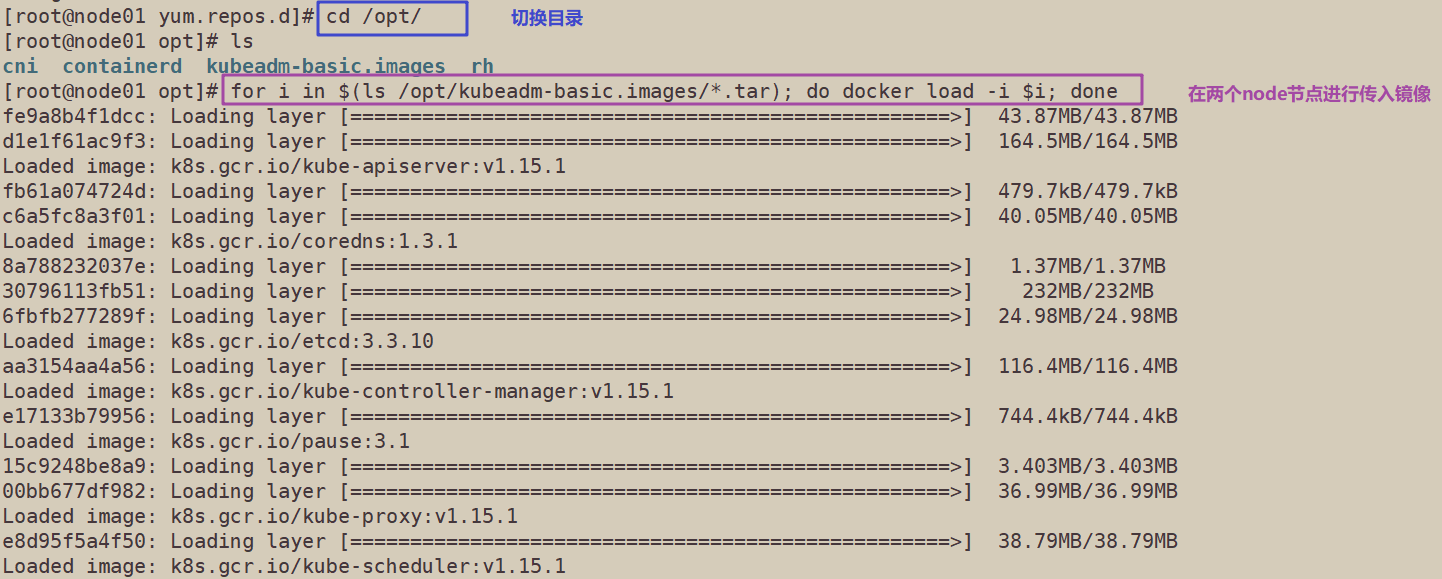
//Copy the image and script to the node node, and execute the script bash /opt/load-images.sh on the node node
scp -r kubeadm-basic.images root@node01:/opt
scp -r kubeadm-basic.images root@node02:/opt
//Initialize kubedm
Method 1:
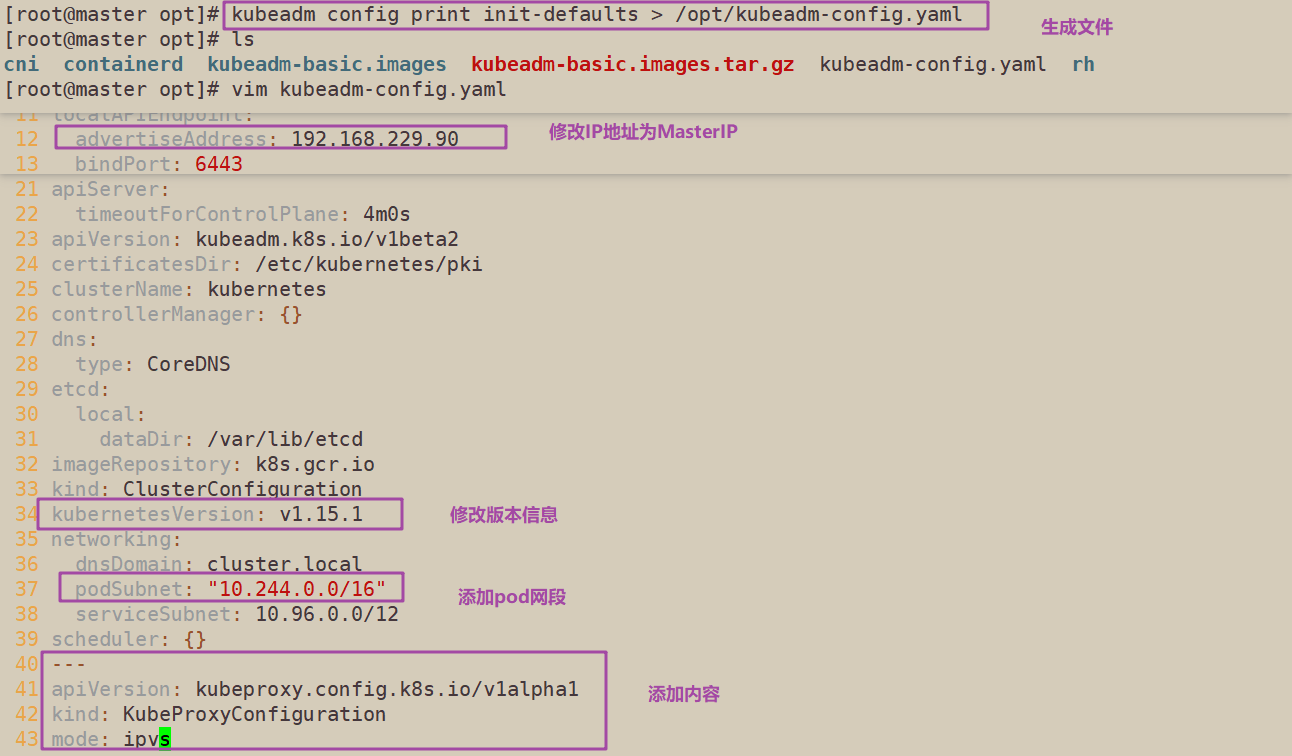
kubeadm config print init-defaults > /opt/kubeadm-config.yaml
cd /opt/
vim kubeadm-config.yaml
......
11 localAPIEndpoint:
12 advertiseAddress: 192.168.229.90 #Specifies the IP address of the master node
13 bindPort: 6443
......
34 kubernetesVersion: v1.15.1 #Specify the kubernetes version number
35 networking:
36 dnsDomain: cluster.local
37 podSubnet: "10.244.0.0/16" #Specify the pod network segment. 10.244.0.0/16 is used to match the flannel default network segment
38 serviceSubnet: 10.96.0.0/16 #Specify service segment
39 scheduler: {}
--- #Add the following at the end
apiVersion: kubeproxy.config.k8s.io/v1alpha1
kind: KubeProxyConfiguration
mode: ipvs #Change the default service scheduling mode to ipvs mode
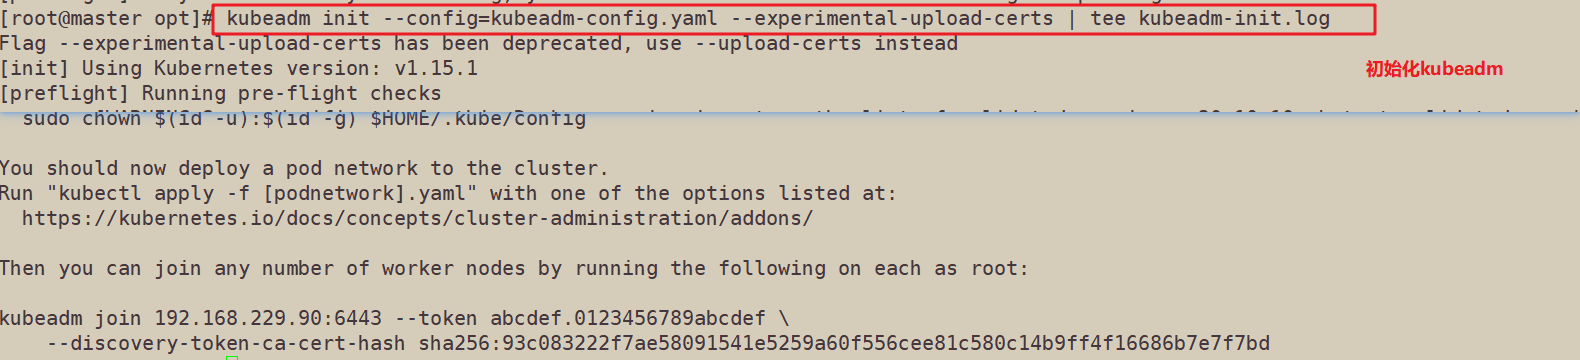
kubeadm init --config=kubeadm-config.yaml --experimental-upload-certs | tee kubeadm-init.log
#--The experimental upload certs parameter can automatically distribute the certificate file when joining the node in the subsequent execution. From version k8sV1.16, replace it with -- upload certs
#Tee kubedm-init.log is used to output logs

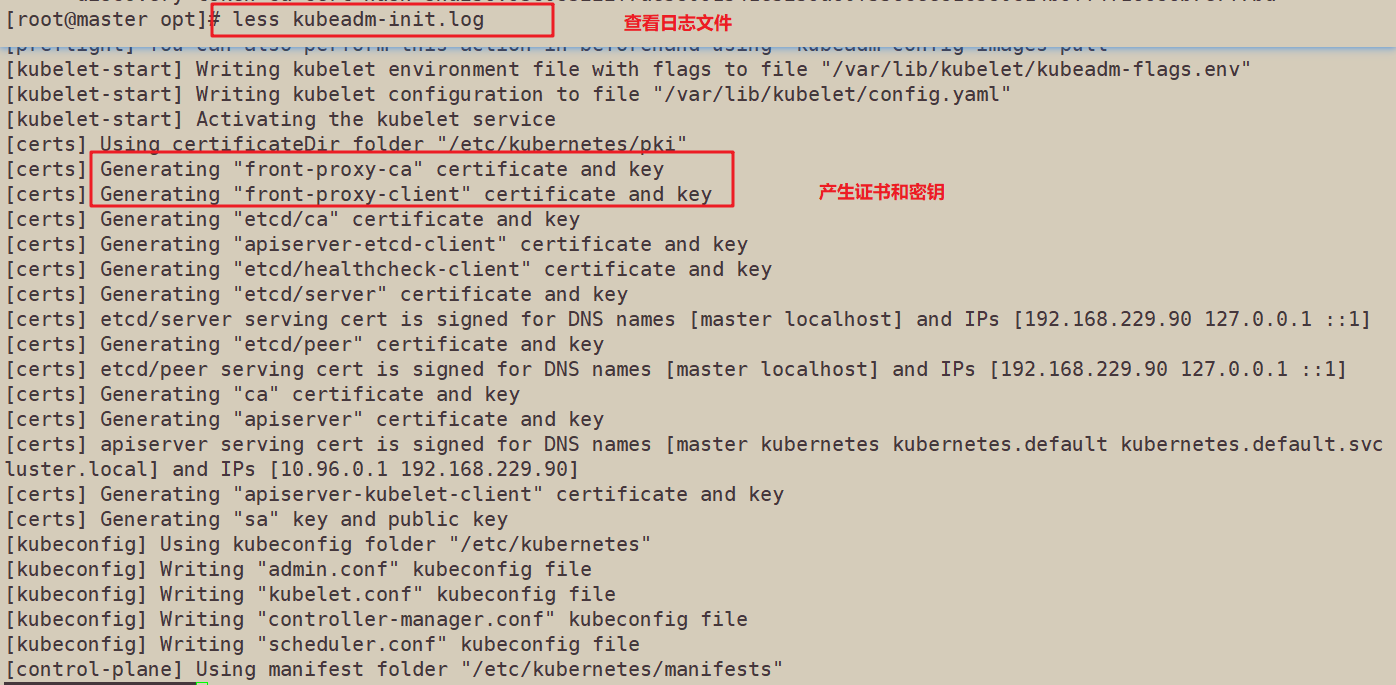
//View kubedm init log
less kubeadm-init.log
//kubernetes configuration file directory
ls /etc/kubernetes/

//Directory for storing ca and other certificates and passwords
ls /etc/kubernetes/pki

Method 2:
kubeadm init \
--apiserver-advertise-address=0.0.0.0 \
--image-repository registry.aliyuncs.com/google_containers \
--kubernetes-version=v1.15.1 \
--service-cidr=10.1.0.0/16 \
--pod-network-cidr=10.244.0.0/16
--------------------------------------------------------------------------------------------
To initialize the cluster, use the kubedm init command. You can specify either specific parameters or configuration file initialization.
Optional parameters:
--Apiserver advertisement address: the IP address notified by apiserver to other components. Generally, it should be the IP address of the Master node for internal communication of the cluster. 0.0.0 means all available addresses on the node
--Apiserver bind port: the listening port of apiserver. The default value is 6443
--CERT dir: ssl certificate file for communication. The default is / etc/kubernetes/pki
--Control plane endpoint: a shared terminal on the console plane, which can be a load balanced ip address or dns domain name. It needs to be added in high availability clusters
--Image repository: the image repository for pulling images. The default is k8s.gcr.io
--Kubernetes version: Specifies the kubernetes version
--Pod network CIDR: the network segment of the pod resource must be consistent with the value setting of the pod network plug-in. Generally, the default value of Flannel network plug-in is 10.244.0.0/16, and the default value of Calico plug-in is 192.168.0.0/16;
--Service CIDR: the network segment of the service resource
--Service DNS domain: the suffix of the full domain name of the service. The default is cluster.local
---------------------------------------------------------------------------------------------
After initialization of method 2, you need to modify the configmap of Kube proxy to enable ipvs
kubectl edit cm kube-proxy -n=kube-system
 modify mode: ipvs


Tips:
......
Your Kubernetes control-plane has initialized successfully!

To start using your cluster, you need to run the following as a regular user:

mkdir -p $HOME/.kube
sudo cp -i /etc/kubernetes/admin.conf $HOME/.kube/config
sudo chown $(id -u):$(id -g) $HOME/.kube/config

You should now deploy a pod network to the cluster.
Run "kubectl apply -f [podnetwork].yaml" with one of the options listed at:
https://kubernetes.io/docs/concepts/cluster-administration/addons/

Then you can join any number of worker nodes by running the following on each as root:

kubeadm join 192.168.229.90:6443 --token rc0kfs.a1sfe3gl4dvopck5 \
--discovery-token-ca-cert-hash sha256:864fe553c812df2af262b406b707db68b0fd450dc08b34efb73dd5a4771d37a2
//Set kubectl
Kubectl can perform corresponding management operations only after being authenticated and authorized by API server. The cluster deployed by kubedm generates an authentication configuration file / etc/kubernetes/admin.conf with administrator privileges, which can be loaded by kubectl through the default path of "$HOME/.kube/config".
mkdir -p $HOME/.kube
cp -i /etc/kubernetes/admin.conf $HOME/.kube/config
chown $(id -u):$(id -g) $HOME/.kube/config
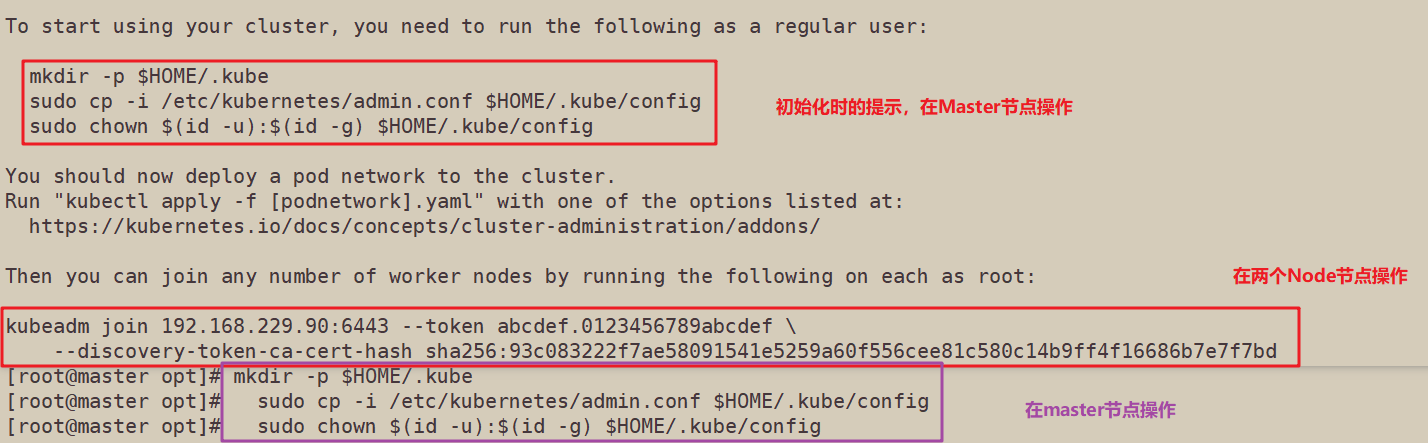
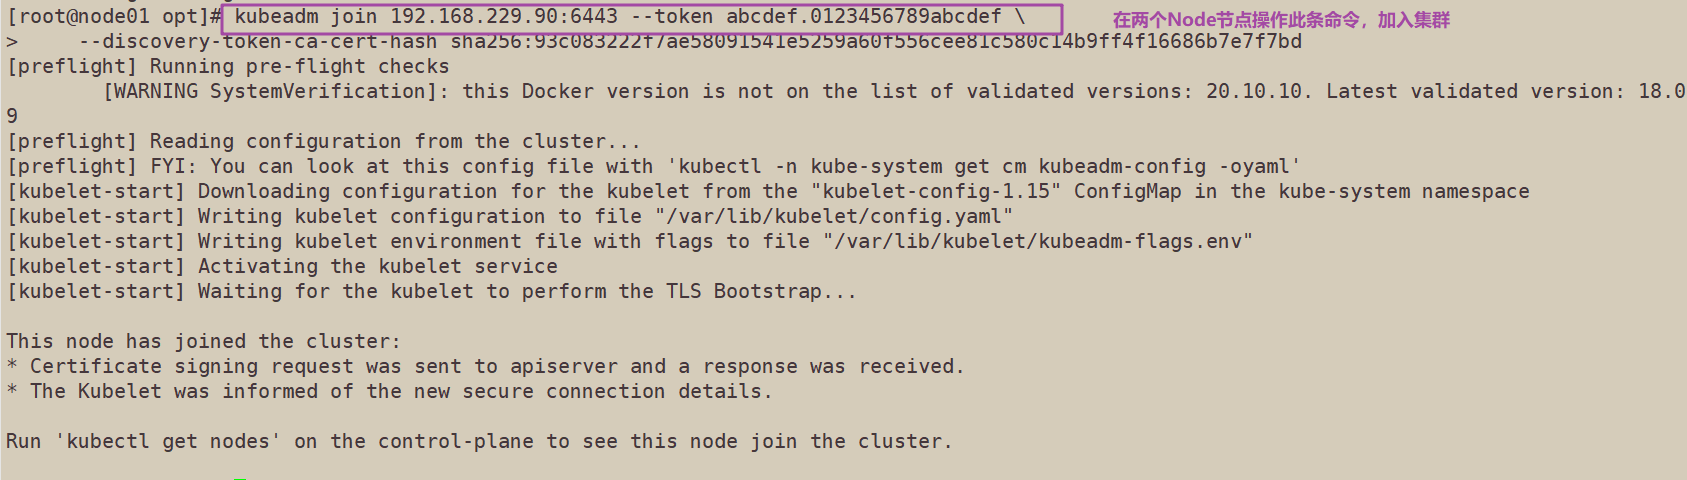
//Execute the kubedm join command on the node node to join the cluster
kubeadm join 192.168.229.90:6443 --token rc0kfs.a1sfe3gl4dvopck5 \
--discovery-token-ca-cert-hash sha256:864fe553c812df2af262b406b707db68b0fd450dc08b34efb73dd5a4771d37a2

//Deploy network plug-in flannel on all nodes
Method 1:
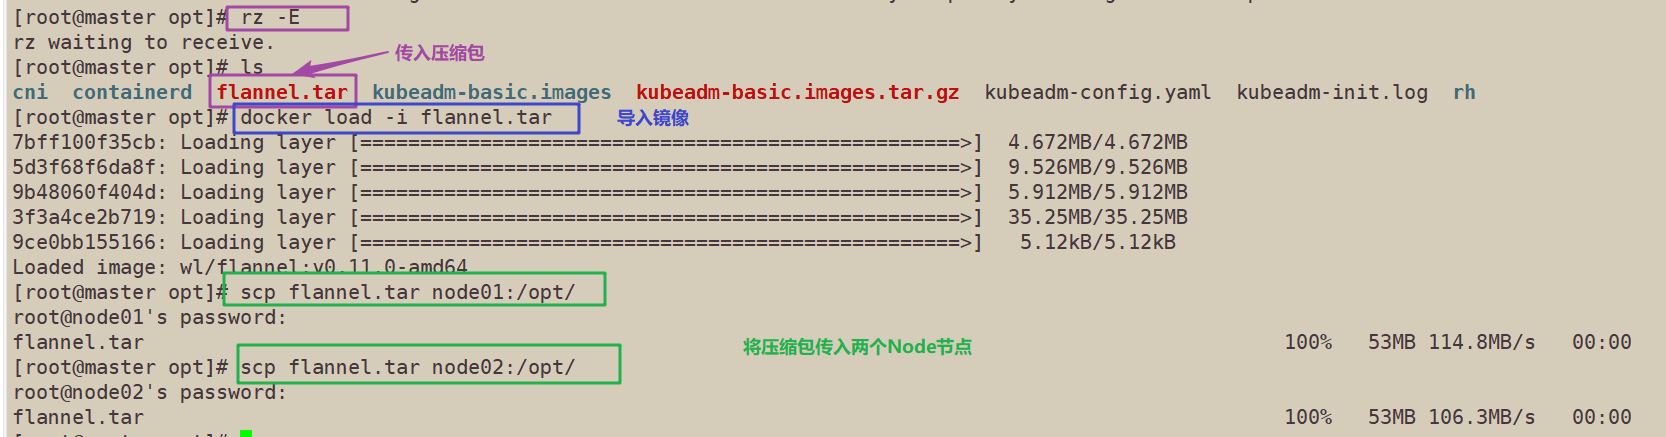
//All nodes upload the flannel image flannel.tar to the / opt directory, and the master node uploads the kube-flannel.yml file
cd /opt
docker load < flannel.tar

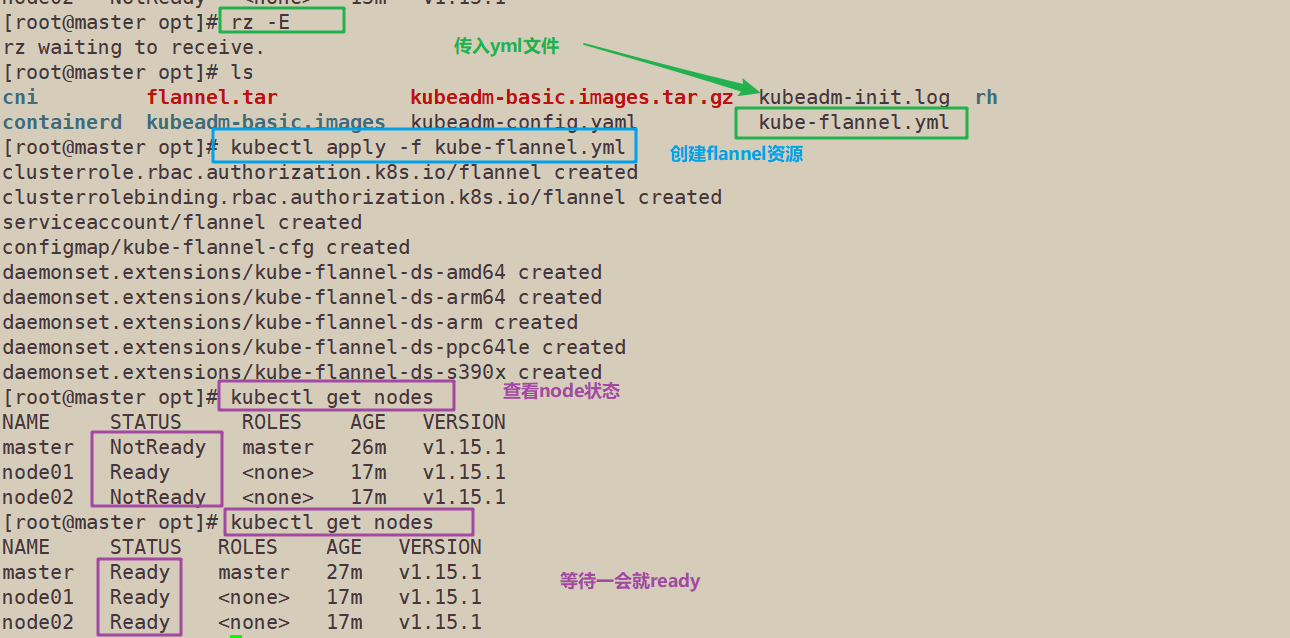
//Create a flannel resource in the master node
kubectl apply -f kube-flannel.yml
Method 2:
kubectl apply -f https://raw.githubusercontent.com/coreos/flannel/master/Documentation/kube-flannel.yml
//View node status on the master node (wait a few minutes)
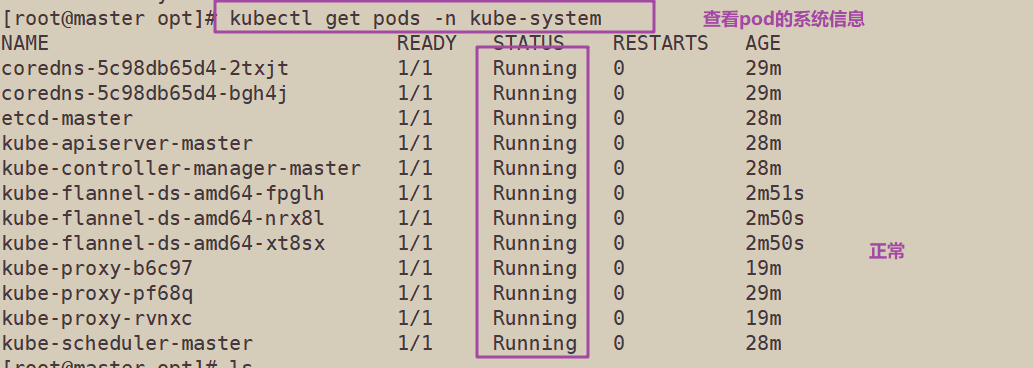
kubectl get nodes
NAME STATUS ROLES AGE VERSION
master Ready master 71m v1.15.1
node01 Ready <none> 99s v1.15.1
node02 Ready <none> 96s v1.15.1

kubectl get pods -n kube-system
NAME READY STATUS RESTARTS AGE
coredns-bccdc95cf-c9w6l 1/1 Running 0 71m
coredns-bccdc95cf-nql5j 1/1 Running 0 71m
etcd-master 1/1 Running 0 71m
kube-apiserver-master 1/1 Running 0 70m
kube-controller-manager-master 1/1 Running 0 70m
kube-flannel-ds-amd64-kfhwf 1/1 Running 0 2m53s
kube-flannel-ds-amd64-qkdfh 1/1 Running 0 46m
kube-flannel-ds-amd64-vffxv 1/1 Running 0 2m56s
kube-proxy-558p8 1/1 Running 0 2m53s
kube-proxy-nwd7g 1/1 Running 0 2m56s
kube-proxy-qpz8t 1/1 Running 0 71m
kube-scheduler-master 1/1 Running 0 70m
//Test pod resource creation
kubectl create deployment nginx --image=nginx

kubectl get pods -o wide
NAME READY STATUS RESTARTS AGE IP NODE NOMINATED NODE READINESS GATES
nginx-554b9c67f9-zr2xs 1/1 Running 0 14m 10.244.1.2 node01 <none> <none>

//Expose ports to provide services
kubectl expose deployment nginx --port=80 --type=NodePort

kubectl get svc
NAME TYPE CLUSTER-IP EXTERNAL-IP PORT(S) AGE
kubernetes ClusterIP 10.96.0.1 <none> 443/TCP 25h
nginx NodePort 10.96.15.132 <none> 80:32698/TCP 4s

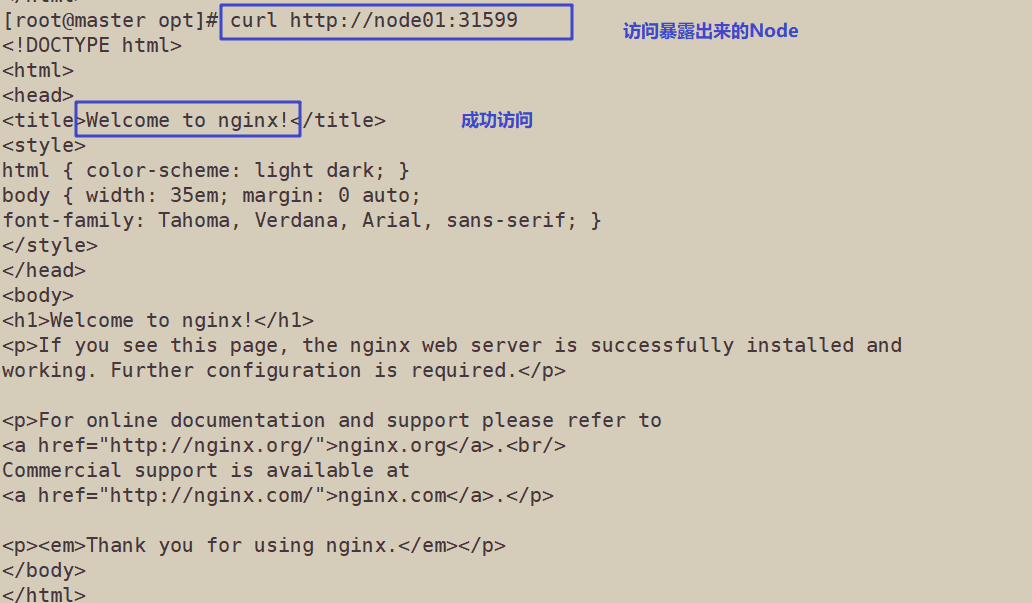
//Test access
curl http://node01:31599 # use the IP of Node1 or node2 for access test
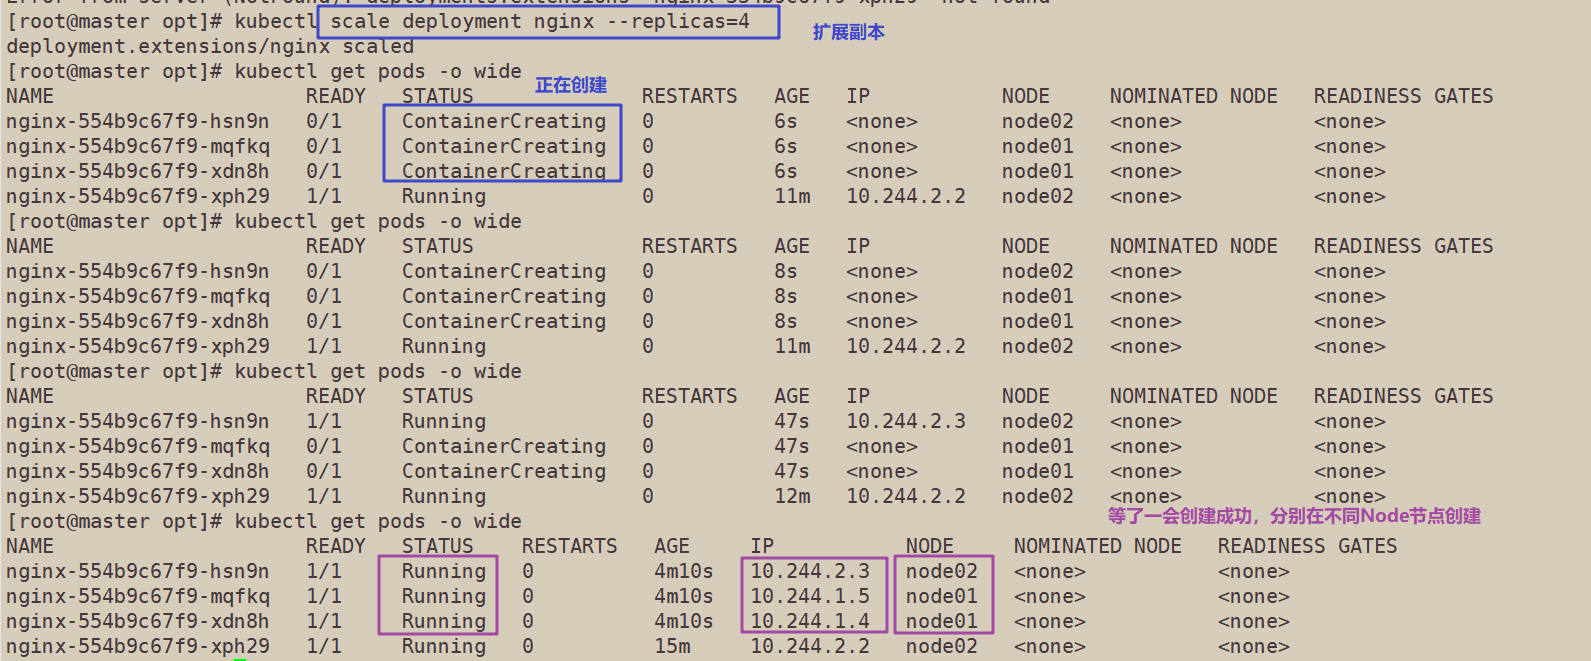
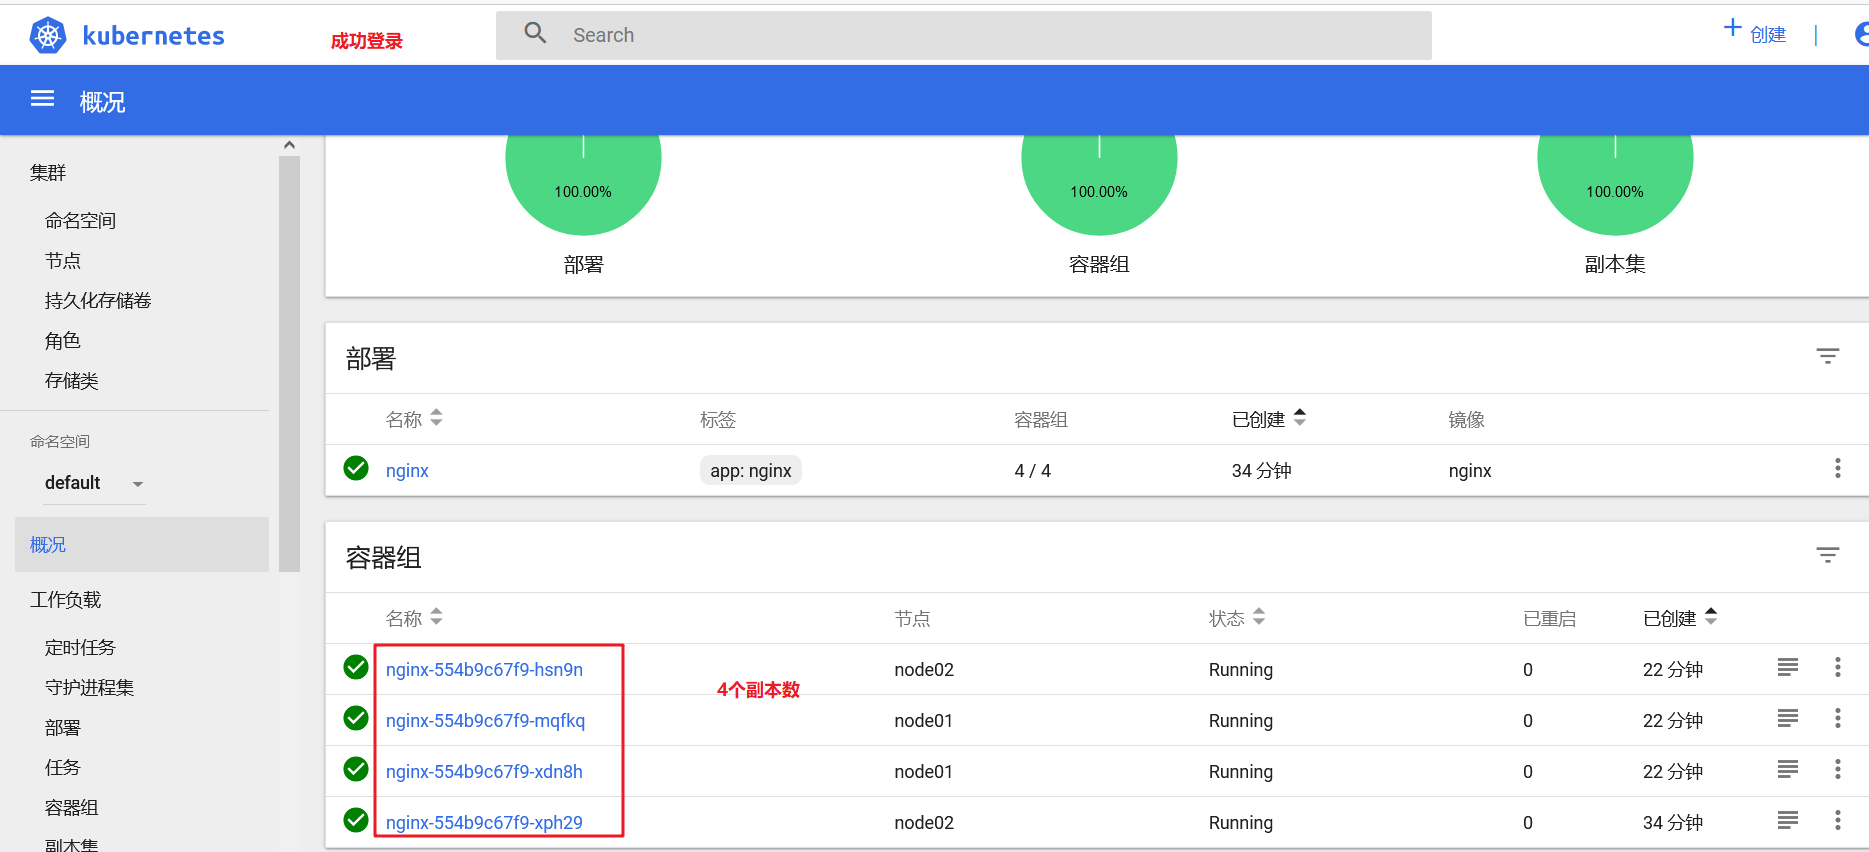
//Expand 3 copies
kubectl scale deployment nginx --replicas=3
kubectl get pods -o wide
NAME READY STATUS RESTARTS AGE IP NODE NOMINATED NODE READINESS GATES
nginx-554b9c67f9-9kh4s 1/1 Running 0 66s 10.244.1.3 node01 <none> <none>
nginx-554b9c67f9-rv77q 1/1 Running 0 66s 10.244.2.2 node02 <none> <none>
nginx-554b9c67f9-zr2xs 1/1 Running 0 17m 10.244.1.2 node01 <none> <none>
2, dashboard deployment
1. Installing dashboard
//Install dashboard on all nodes
Method 1:
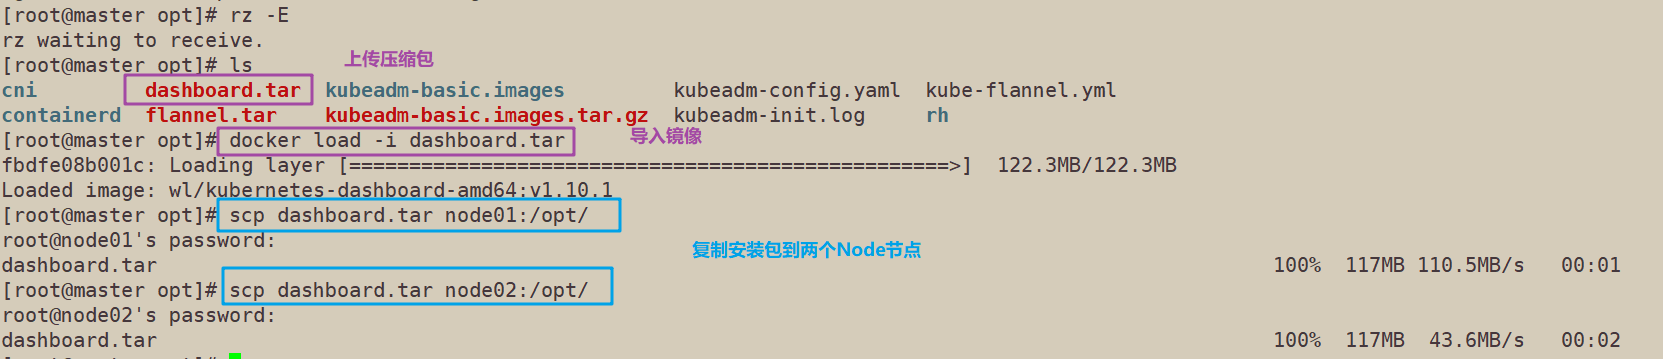
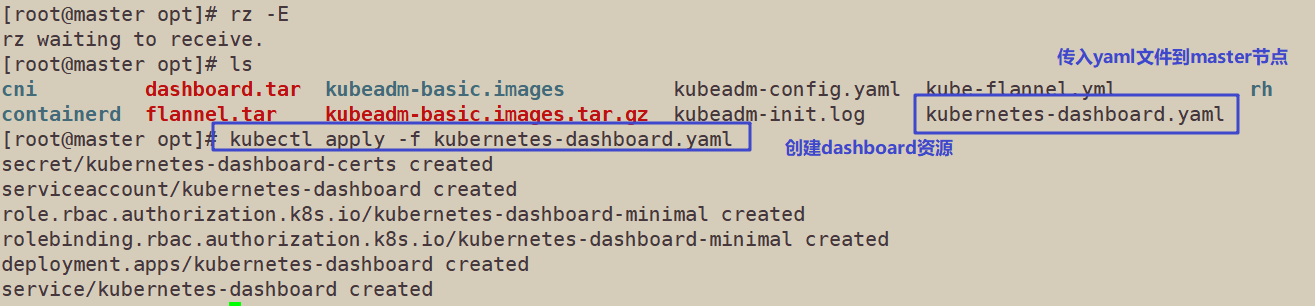
//All nodes upload the dashboard image dashboard.tar to the / opt directory, and the master node uploads the kubernetes-dashboard.yaml file
cd /opt/
docker load < dashboard.tar

kubectl apply -f kubernetes-dashboard.yaml

Method 2:
kubectl apply -f https://raw.githubusercontent.com/kubernetes/dashboard/v2.0.0/aio/deploy/recommended.yaml
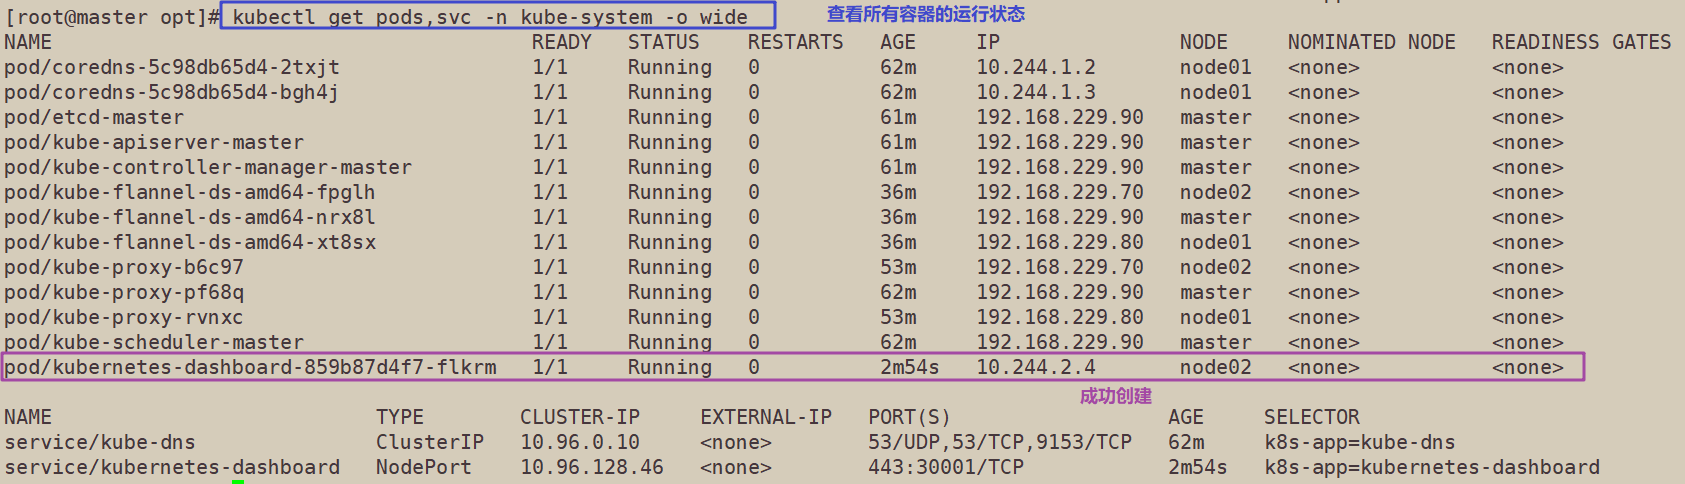
//View the running status of all containers
[root@master opt]# kubectl get pods,svc -n kube-system -o wide
NAME                                        READY   STATUS    RESTARTS   AGE     IP               NODE     NOMINATED NODE   READINESS GATES
pod/coredns-5c98db65d4-2txjt                1/1     Running   0          62m     10.244.1.2       node01   <none>           <none>
pod/coredns-5c98db65d4-bgh4j                1/1     Running   0          62m     10.244.1.3       node01   <none>           <none>
pod/etcd-master                             1/1     Running   0          61m     192.168.229.90   master   <none>           <none>
pod/kube-apiserver-master                   1/1     Running   0          61m     192.168.229.90   master   <none>           <none>
pod/kube-controller-manager-master          1/1     Running   0          61m     192.168.229.90   master   <none>           <none>
pod/kube-flannel-ds-amd64-fpglh             1/1     Running   0          36m     192.168.229.70   node02   <none>           <none>
pod/kube-flannel-ds-amd64-nrx8l             1/1     Running   0          36m     192.168.229.90   master   <none>           <none>
pod/kube-flannel-ds-amd64-xt8sx             1/1     Running   0          36m     192.168.229.80   node01   <none>           <none>
pod/kube-proxy-b6c97                        1/1     Running   0          53m     192.168.229.70   node02   <none>           <none>
pod/kube-proxy-pf68q                        1/1     Running   0          62m     192.168.229.90   master   <none>           <none>
pod/kube-proxy-rvnxc                        1/1     Running   0          53m     192.168.229.80   node01   <none>           <none>
pod/kube-scheduler-master                   1/1     Running   0          62m     192.168.229.90   master   <none>           <none>
pod/kubernetes-dashboard-859b87d4f7-flkrm   1/1     Running   0          2m54s   10.244.2.4       node02   <none>           <none>

NAME                           TYPE        CLUSTER-IP     EXTERNAL-IP   PORT(S)                  AGE     SELECTOR
service/kube-dns               ClusterIP   10.96.0.10     <none>        53/UDP,53/TCP,9153/TCP   62m     k8s-app=kube-dns
service/kubernetes-dashboard   NodePort    10.96.128.46   <none>        443:30001/TCP            2m54s   k8s-app=kubernetes-dashboard
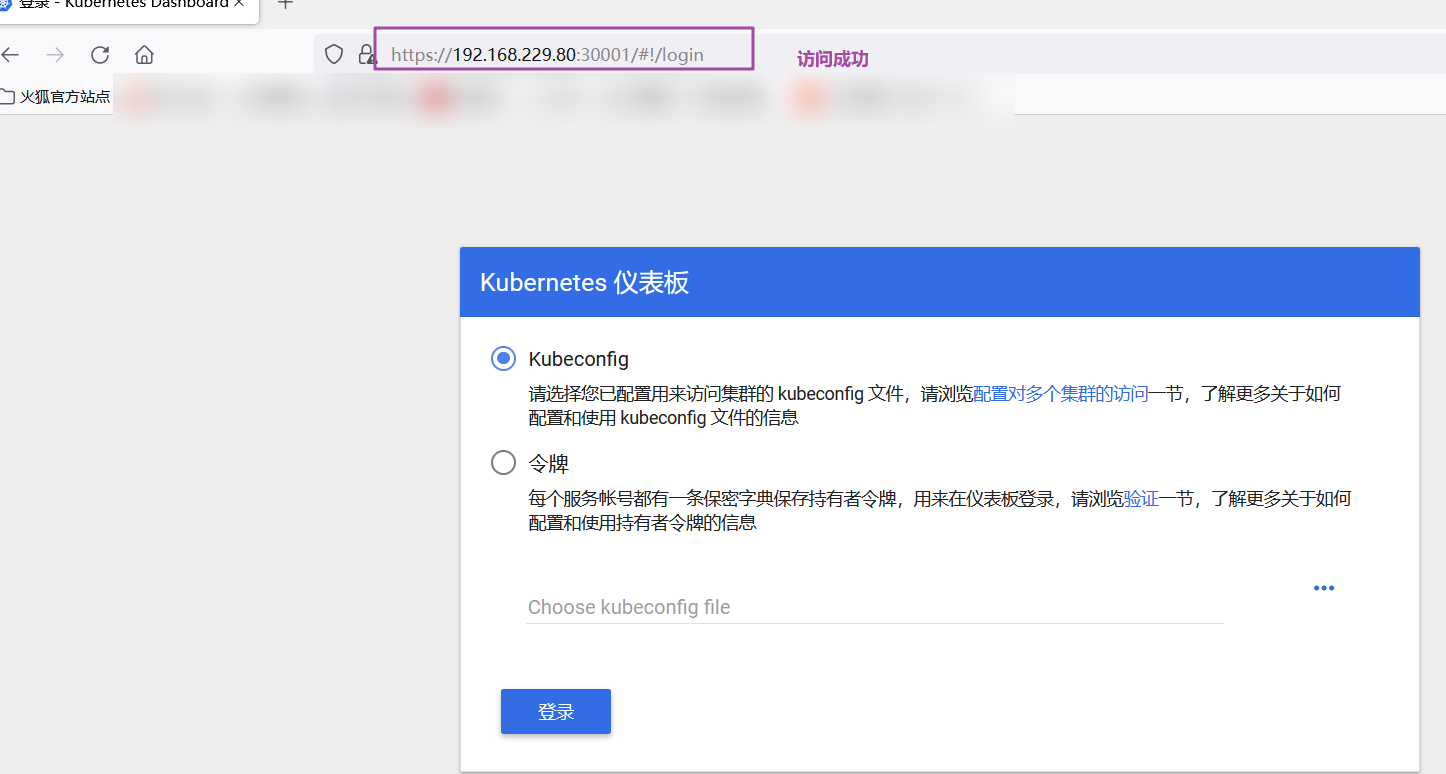
2. Use Firefox or 360 browser to access
https://node02:30001/
https://192.168.229.80:30001 / # use Node1 or node2 to access
//Create a service account and bind the default cluster admin administrator cluster role
kubectl create serviceaccount dashboard-admin -n kube-system

kubectl create clusterrolebinding dashboard-admin --clusterrole=cluster-admin --serviceaccount=kube-system:dashboard-admin

//Get token key
kubectl describe secrets -n kube-system $(kubectl -n kube-system get secret | awk '/dashboard-admin/{print $1}')
Name: dashboard-admin-token-xf4dk
Namespace: kube-system
Labels: <none>
Annotations: kubernetes.io/service-account.name: dashboard-admin
kubernetes.io/service-account.uid: 736a7c1e-0fa1-430a-9244-71cda7899293

Type: kubernetes.io/service-account-token

Data
====
token: eyJhbGciOiJSUzI1NiIsImtpZCI6IiJ9.eyJpc3MiOiJrdWJlcm5ldGVzL3NlcnZpY2VhY2NvdW50Iiwia3ViZXJuZXRlcy5pby9zZXJ2aWNlYWNjb3VudC9uYW1lc3BhY2UiOiJrdWJlLXN5c3RlbSIsImt1YmVybmV0ZXMuaW8vc2VydmljZWFjY291bnQvc2VjcmV0Lm5hbWUiOiJkYXNoYm9hcmQtYWRtaW4tdG9rZW4teGY0ZGsiLCJrdWJlcm5ldGVzLmlvL3NlcnZpY2VhY2NvdW50L3NlcnZpY2UtYWNjb3VudC5uYW1lIjoiZGFzaGJvYXJkLWFkbWluIiwia3ViZXJuZXRlcy5pby9zZXJ2aWNlYWNjb3VudC9zZXJ2aWNlLWFjY291bnQudWlkIjoiNzM2YTdjMWUtMGZhMS00MzBhLTkyNDQtNzFjZGE3ODk5MjkzIiwic3ViIjoic3lzdGVtOnNlcnZpY2VhY2NvdW50Omt1YmUtc3lzdGVtOmRhc2hib2FyZC1hZG1pbiJ9.uNyAUOqejg7UOVCYkP0evQzG9_h-vAReaDtmYuCPdnvAf150eBsfpRPL1QmsDRsWF0xbI2Yb9m1VajMgKGneHCYFBqD-bsw0ffvbYRwM-roRnLtX-qN1kGMUyMU3iB8y_L6x-ZhiLXwjxUYZzO4WurY-e0h3yI0O2n9qQQmencEoz4snUKK4p_nBIcQrexMzO-aqhuQU_6JJQlN0q5jKHqnB11TfNQX1CNmTqN_dpZy0Wm1JzujVEd-6GQg7xawJkoSZjPYKgmN89z3o2o4cRydshUyLlb6Rmw_FSRvRWiobzL6xhWeGND4i7LgDCAr9YPRJ8LMjJYh_dPbN2Dnpxg
ca.crt: 1025 bytes
namespace: 11 bytes
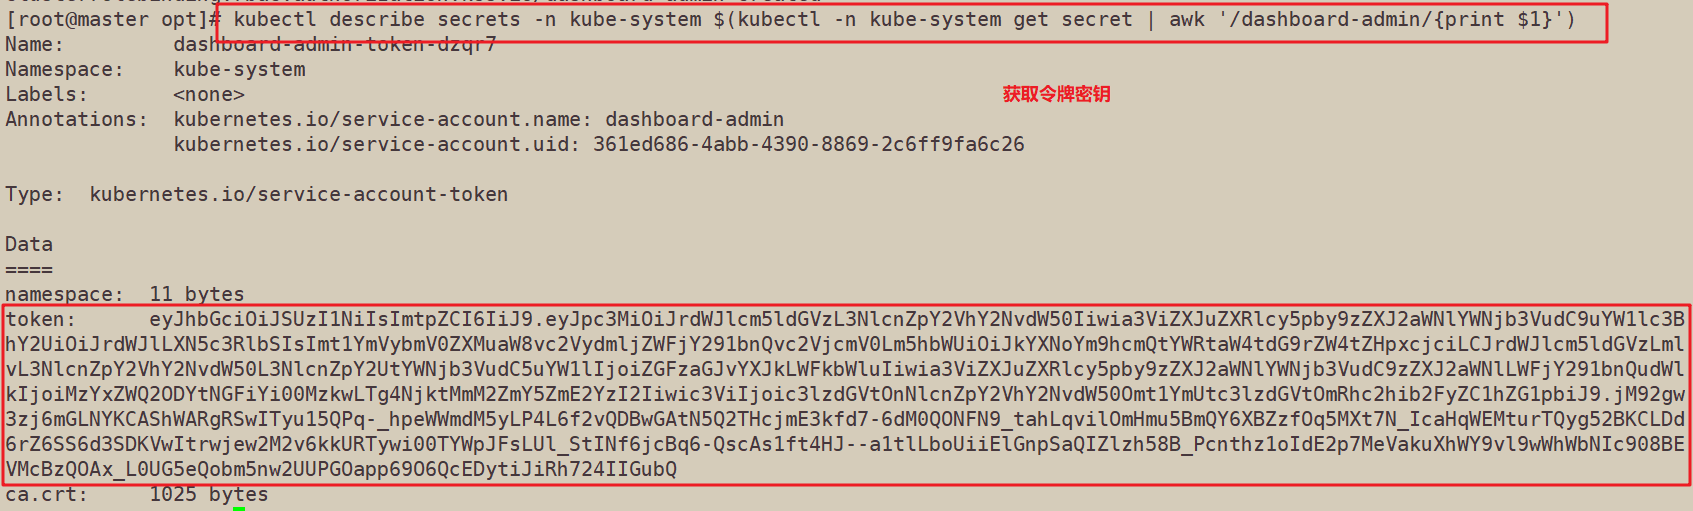
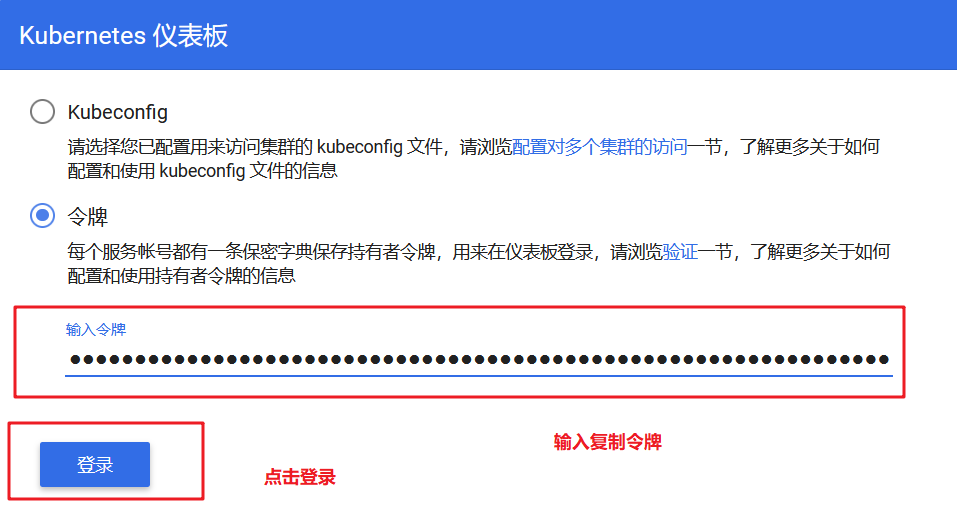
//Copy the token and log in to the website directly
3, Install Harbor private warehouse
//Modify host name
hostnamectl set-hostname hub.ly.com

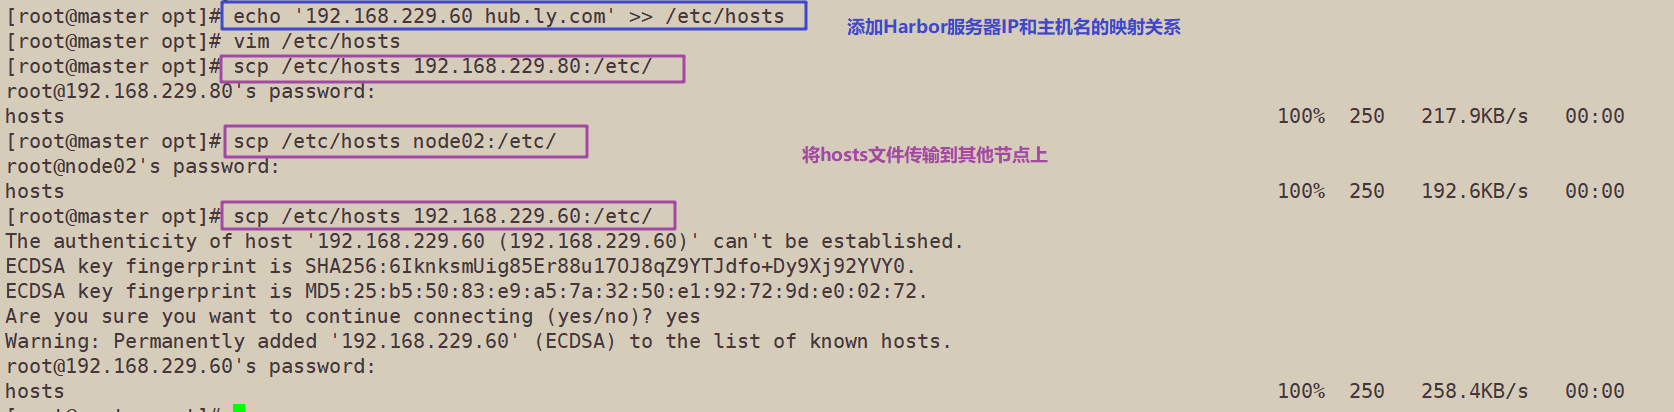
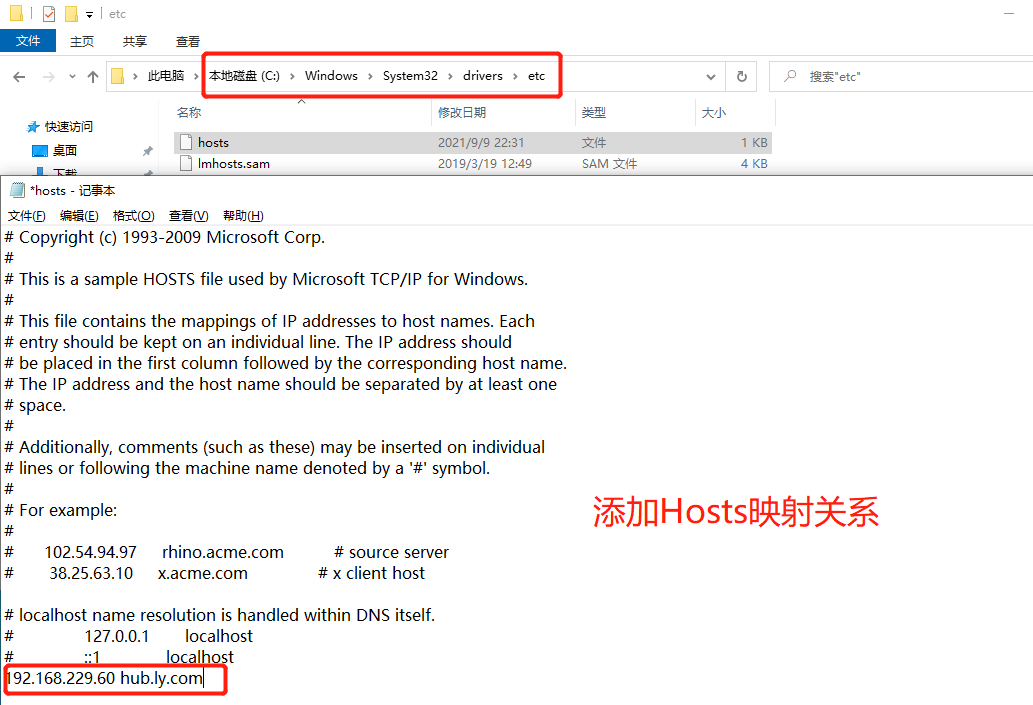
//All nodes plus hostname mapping
echo '192.168.229.60 hub.ly.com' >> /etc/hosts
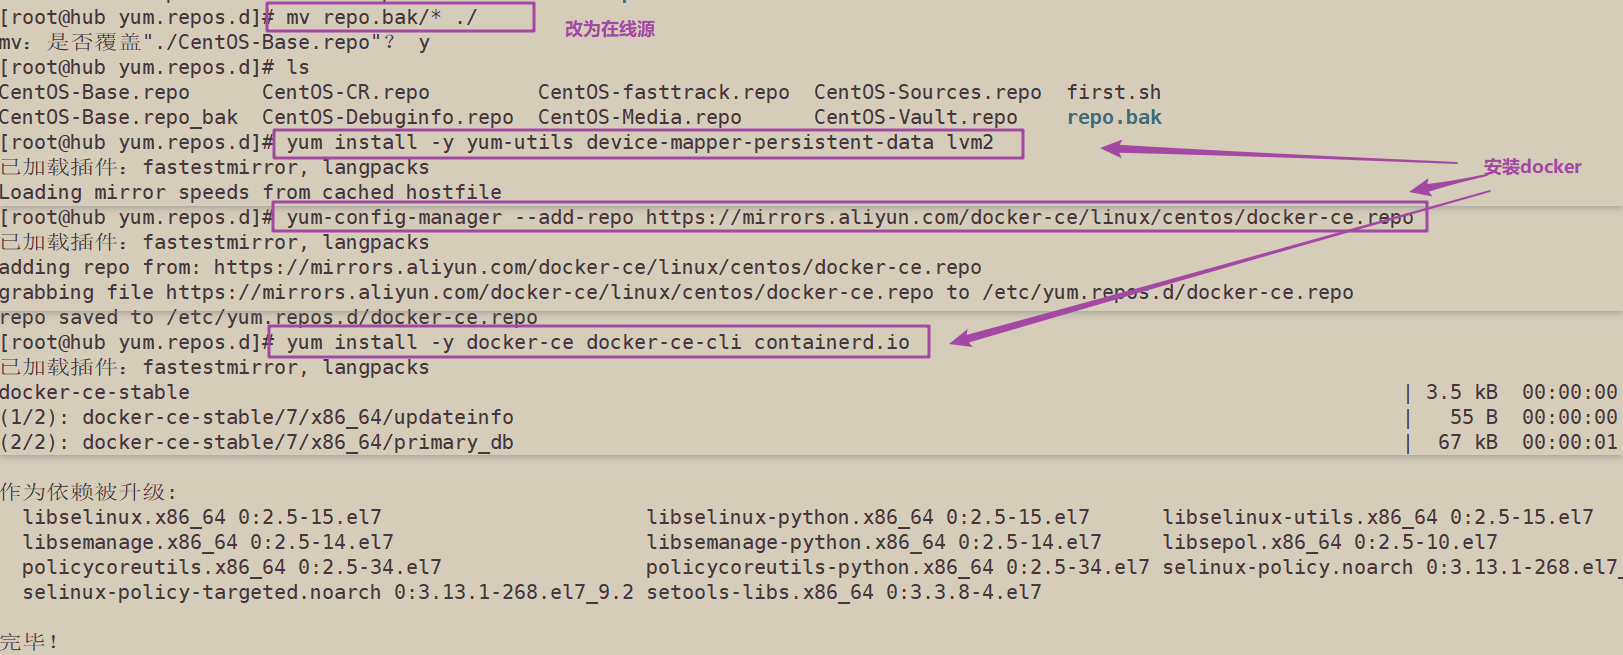
//Install docker
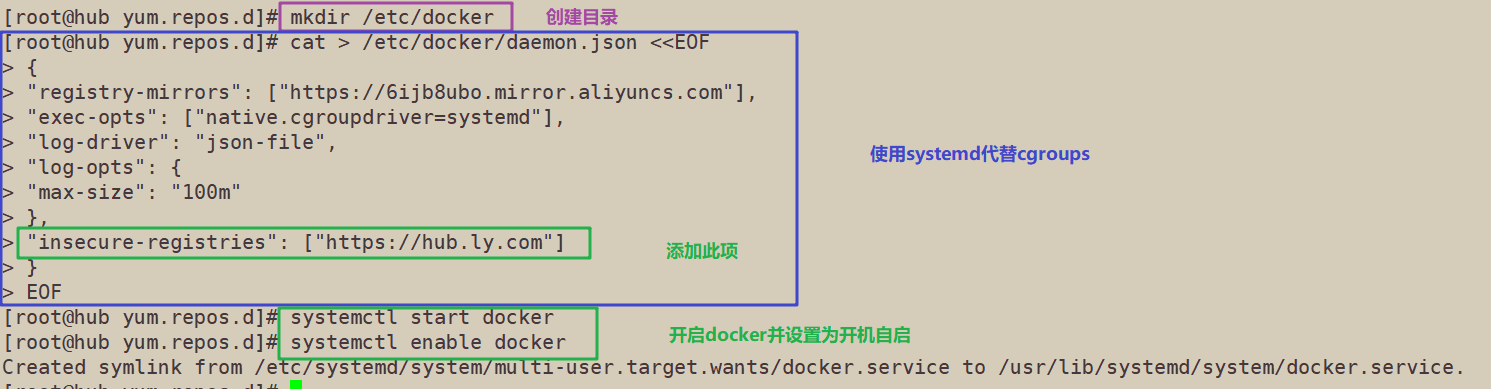
yum install -y yum-utils device-mapper-persistent-data lvm2
yum-config-manager --add-repo https://mirrors.aliyun.com/docker-ce/linux/centos/docker-ce.repo
yum install -y docker-ce docker-ce-cli containerd.io

mkdir /etc/docker
cat > /etc/docker/daemon.json <<EOF
### The following commands also need to be re executed on the master and node nodes because the harbor warehouse address was not specified before
{
"registry-mirrors": ["https://6ijb8ubo.mirror.aliyuncs.com"],
"exec-opts": ["native.cgroupdriver=systemd"],
"log-driver": "json-file",
"log-opts": {
"max-size": "100m"
},
"insecure-registries": ["https://hub.ly.com"]
}
EOF

systemctl start docker
systemctl enable docker
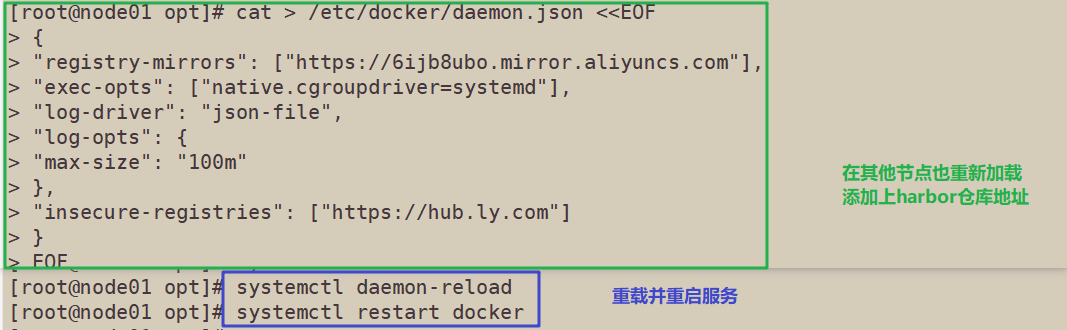
//All node nodes modify the docker configuration file and add the private warehouse configuration
cat > /etc/docker/daemon.json <<EOF
{
"registry-mirrors": ["https://6ijb8ubo.mirror.aliyuncs.com"],
"exec-opts": ["native.cgroupdriver=systemd"],
"log-driver": "json-file",
"log-opts": {
"max-size": "100m"
},
"insecure-registries": ["https://hub.ly.com"]
}
EOF

systemctl daemon-reload
systemctl restart docker
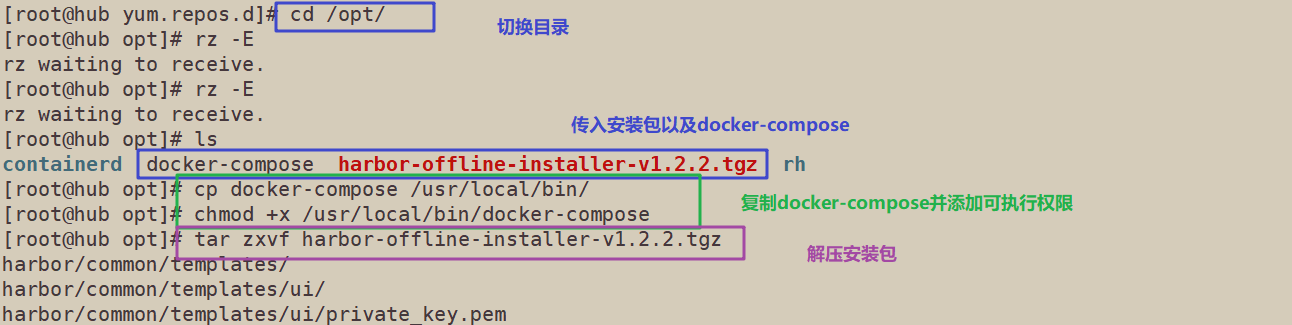
//Install Harbor
//Upload the harbor offline installer v1.2.2.tgz and docker compose files to the / opt directory
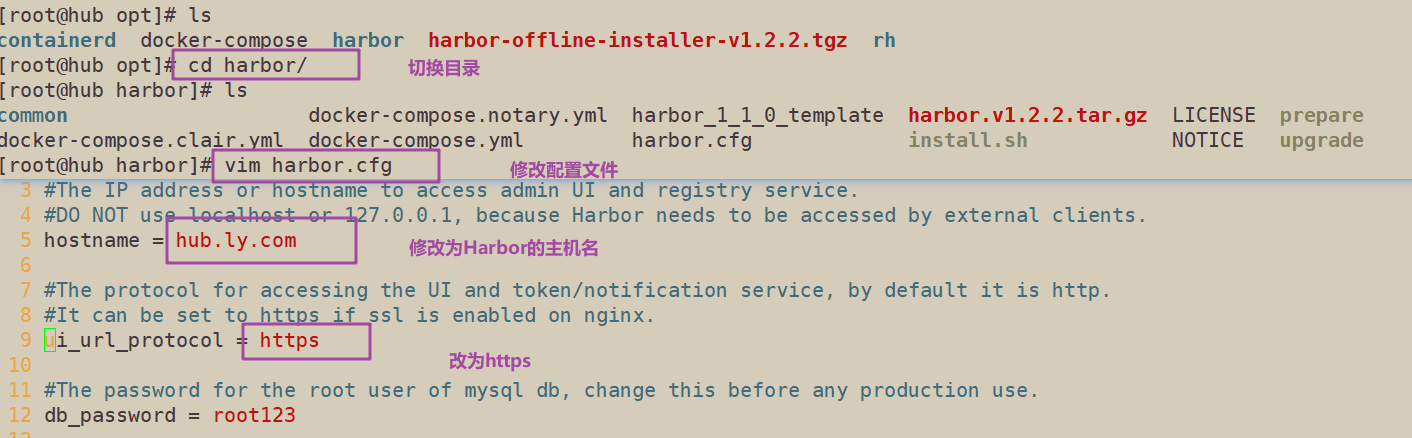
cd /opt
cp docker-compose /usr/local/bin/
chmod +x /usr/local/bin/docker-compose

tar zxvf harbor-offline-installer-v1.2.2.tgz
cd harbor/
vim harbor.cfg
5 hostname = hub.ly.com
9 ui_url_protocol = https
24 ssl_cert = /data/cert/server.crt
25 ssl_cert_key = /data/cert/server.key
59 harbor_admin_password = Harbor12345
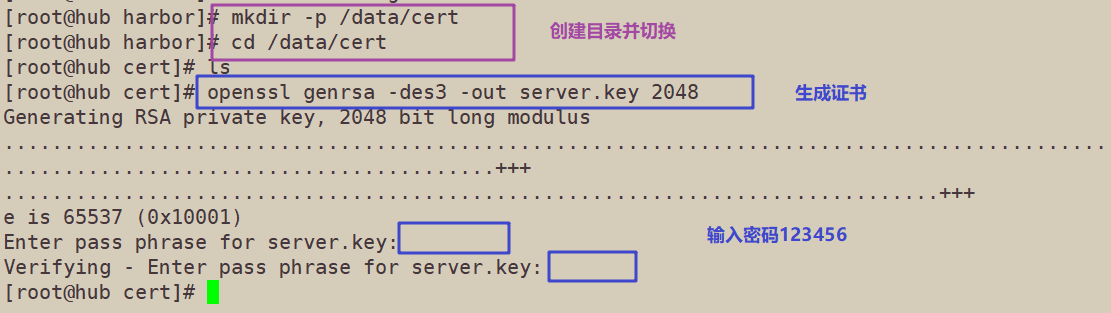
//Generate certificate
mkdir -p /data/cert
cd /data/cert
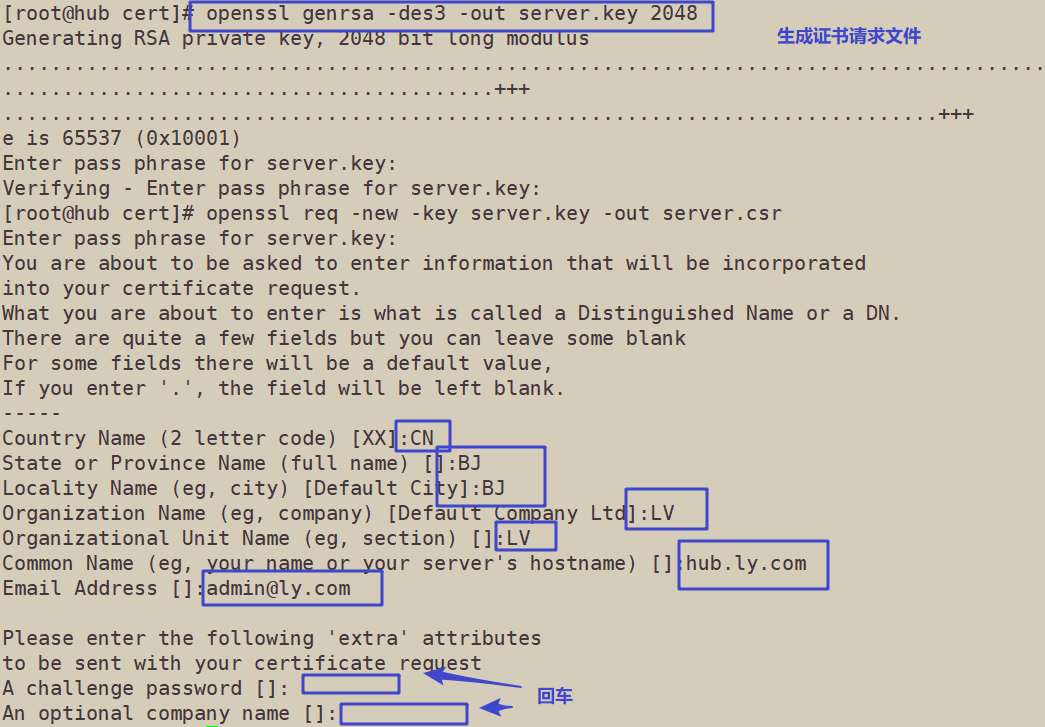
#Generate private key
openssl genrsa -des3 -out server.key 2048
Enter the password twice: 123456
#Generate certificate signing request file
openssl req -new -key server.key -out server.csr
Enter private key password: 123456
Enter country name: CN
Enter province name: BJ
Enter city name: BJ
Enter Organization Name: LV
Enter Organization Name: LV
Enter domain name: hub.ly.com
Enter administrator mailbox: admin@ly.com
All others are directly returned
#Backup private key
cp server.key server.key.org

#Clear private key password
openssl rsa -in server.key.org -out server.key
Enter private key password: 123456

#Signing certificate
openssl x509 -req -days 1000 -in server.csr -signkey server.key -out server.crt

chmod +x /data/cert/*

cd /opt/harbor/
./install.sh

Browser access: https://hub.ly.com
User name: admin
Password: Harbor 12345

//Log in to harbor on a node node
docker login -u admin -p Harbor12345 https://hub.ly.com

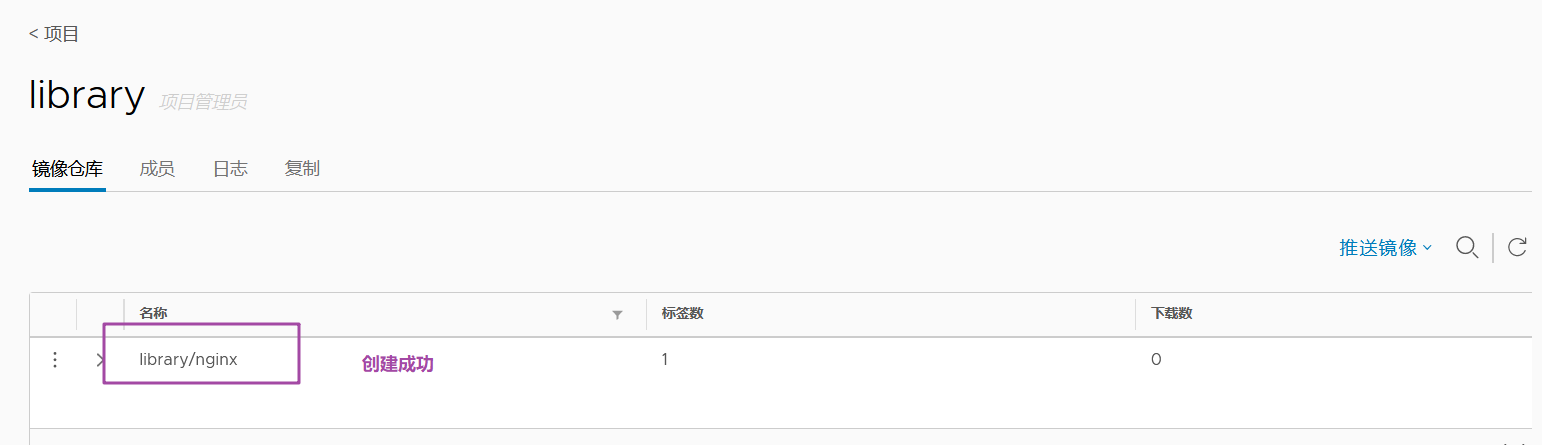
//Upload image
docker tag nginx:latest hub.ly.com/library/nginx:v1
docker push hub.ly.com/library/nginx:v1

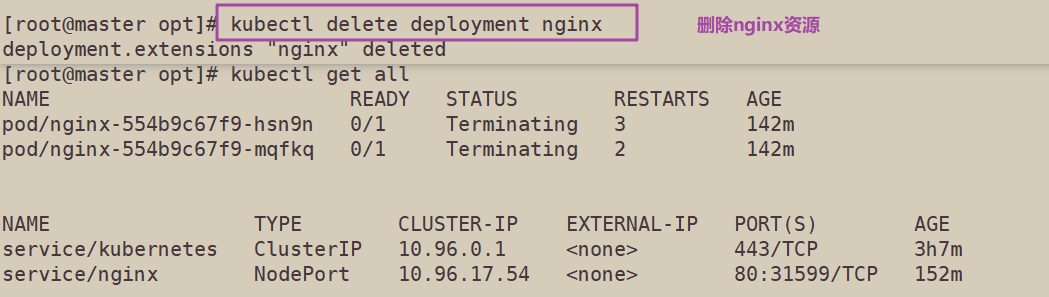
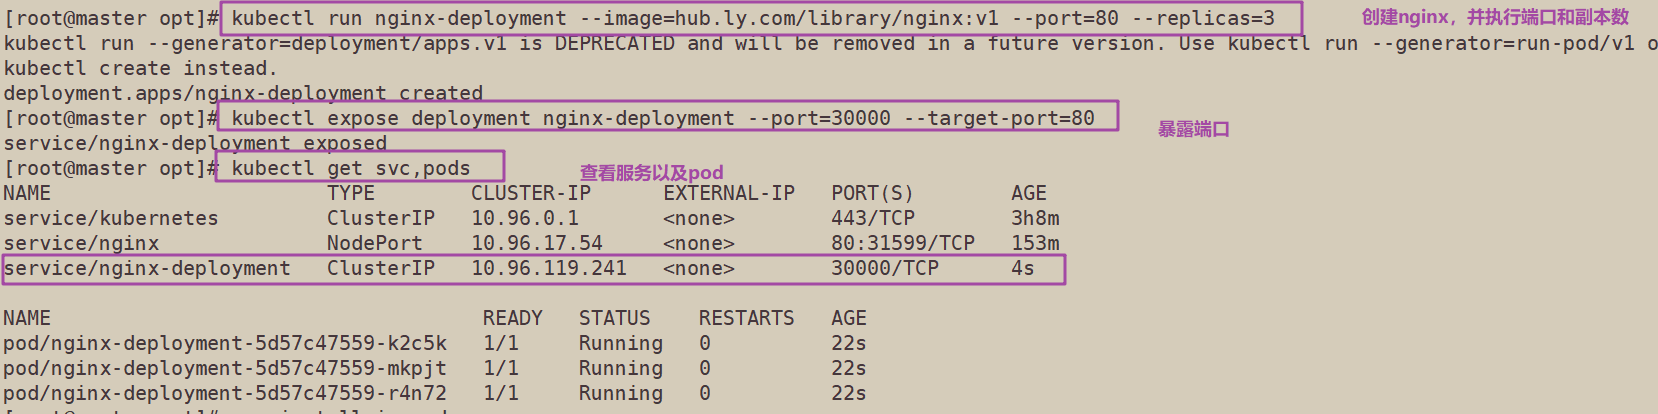
//Delete the previously created nginx resource on the master node
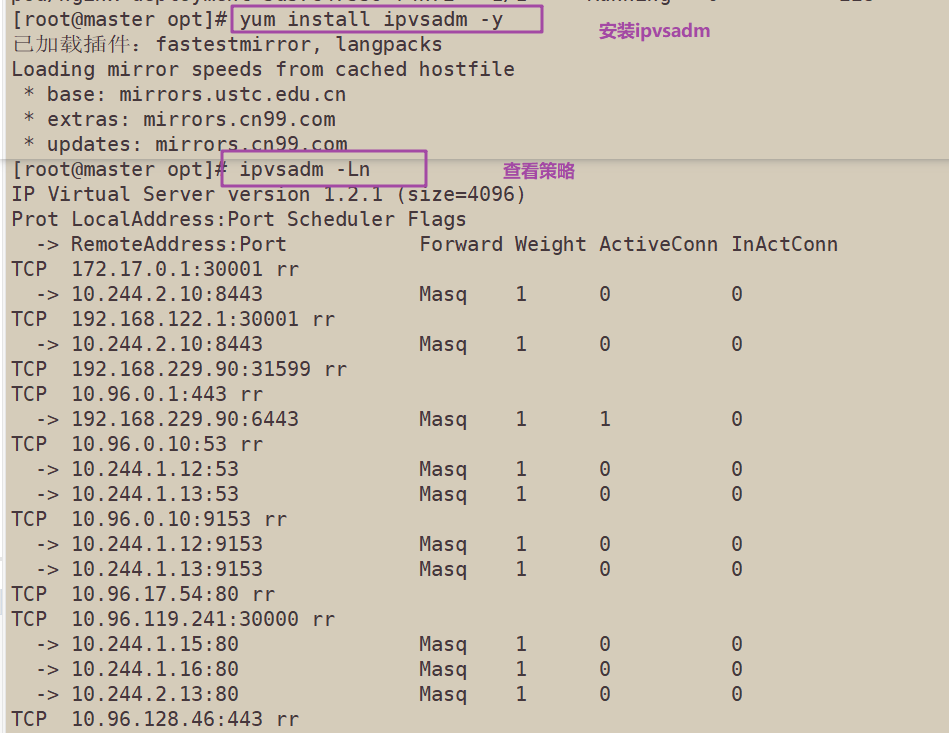
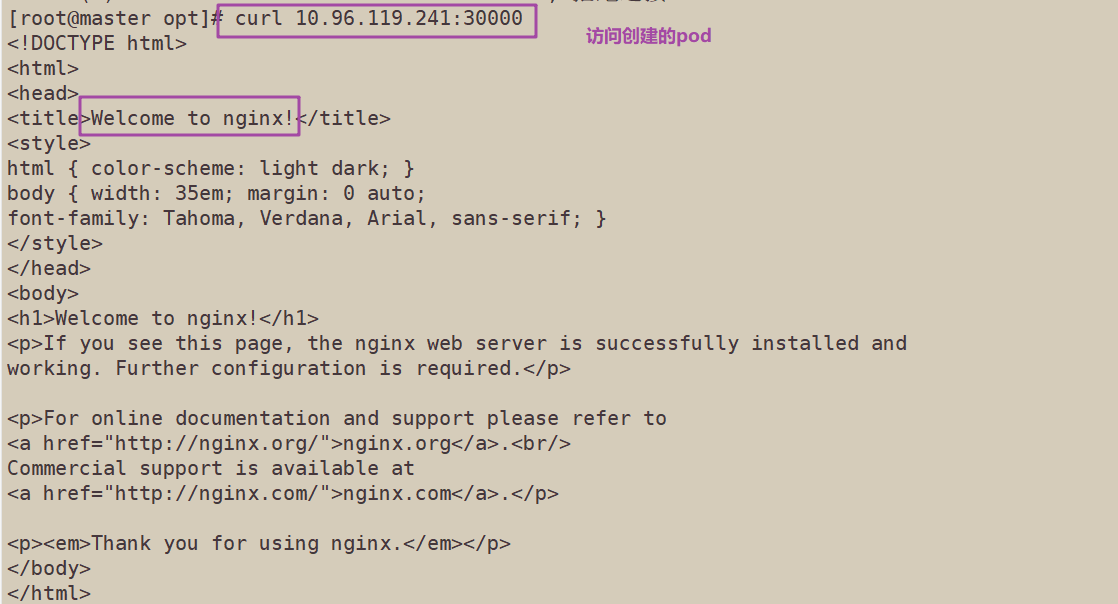
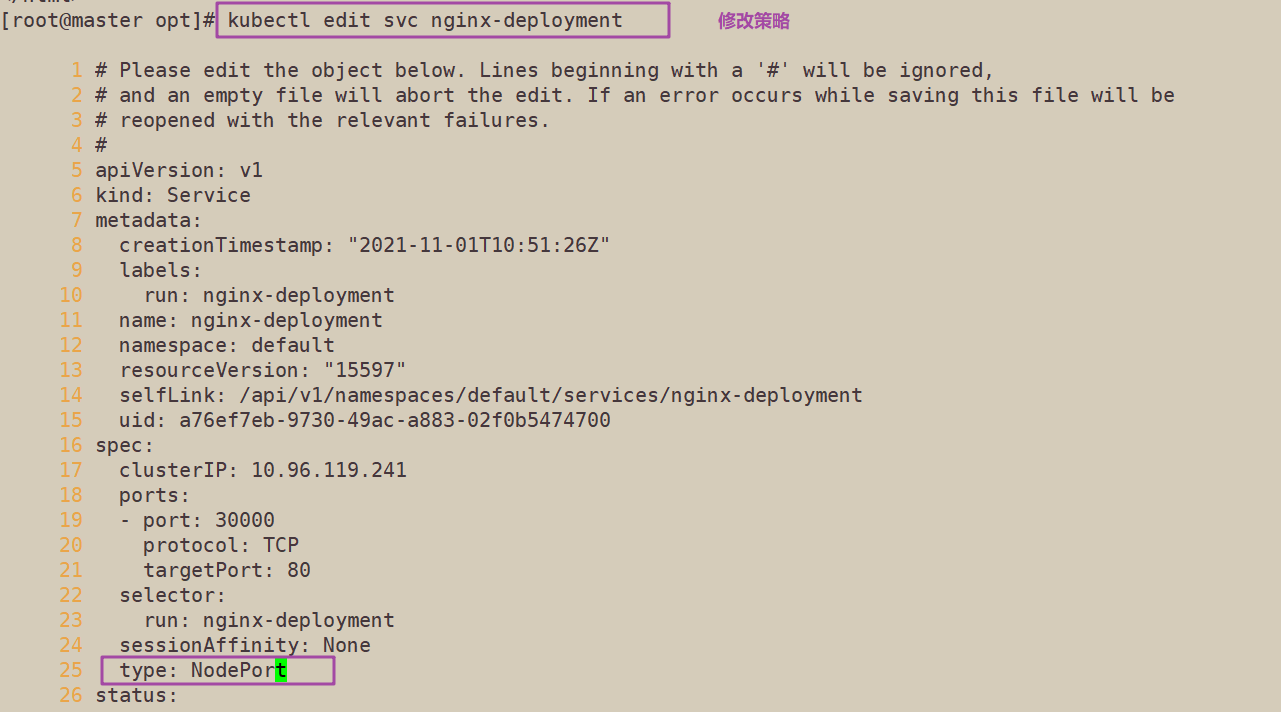
kubectl delete deployment nginx

kubectl run nginx-deployment --image=hub.ly.com/library/nginx:v1 --port=80 --replicas=3

kubectl expose deployment nginx-deployment --port=30000 --target-port=80
kubectl get svc,pods
NAME TYPE CLUSTER-IP EXTERNAL-IP PORT(S) AGE
service/kubernetes ClusterIP 10.96.0.1 <none> 443/TCP 10m
service/nginx-deployment ClusterIP 10.96.222.161 <none> 30000/TCP 3m15s

NAME READY STATUS RESTARTS AGE
pod/nginx-deployment-77bcbfbfdc-bv5bz 1/1 Running 0 16s
pod/nginx-deployment-77bcbfbfdc-fq8wr 1/1 Running 0 16s
pod/nginx-deployment-77bcbfbfdc-xrg45 1/1 Running 0 3m39s


yum install ipvsadm -y
ipvsadm -Ln

curl 10.96.222.161:30000


kubectl edit svc nginx-deployment
25 type: NodePort	#Change the scheduling policy to NodePort

kubectl get svc
NAME TYPE CLUSTER-IP EXTERNAL-IP PORT(S) AGE
service/kubernetes ClusterIP 10.96.0.1 <none> 443/TCP 29m
service/nginx-deployment NodePort 10.96.222.161 <none> 30000:32340/TCP 22m

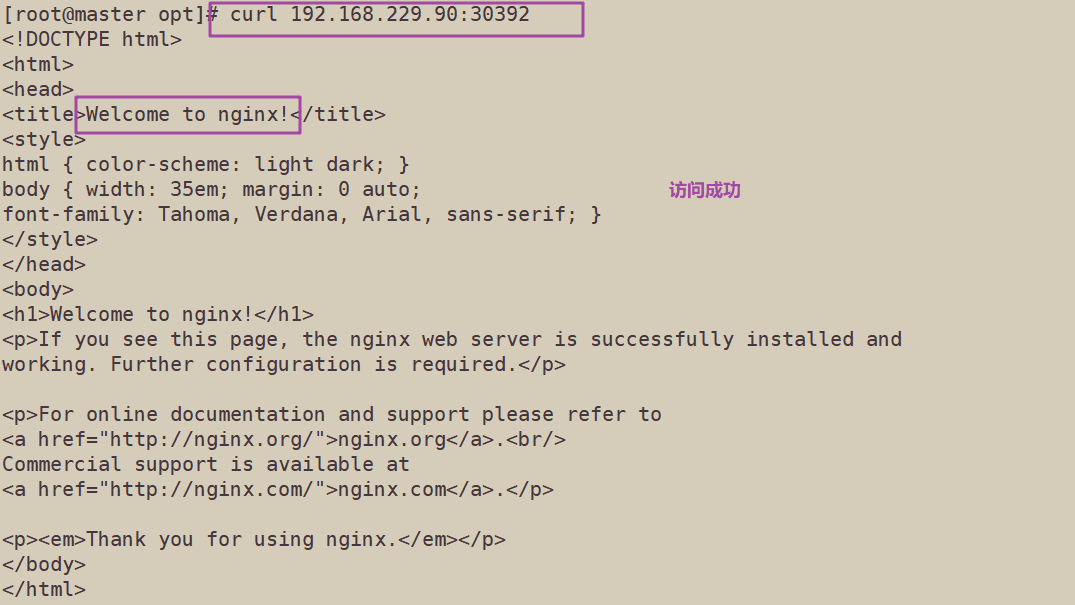
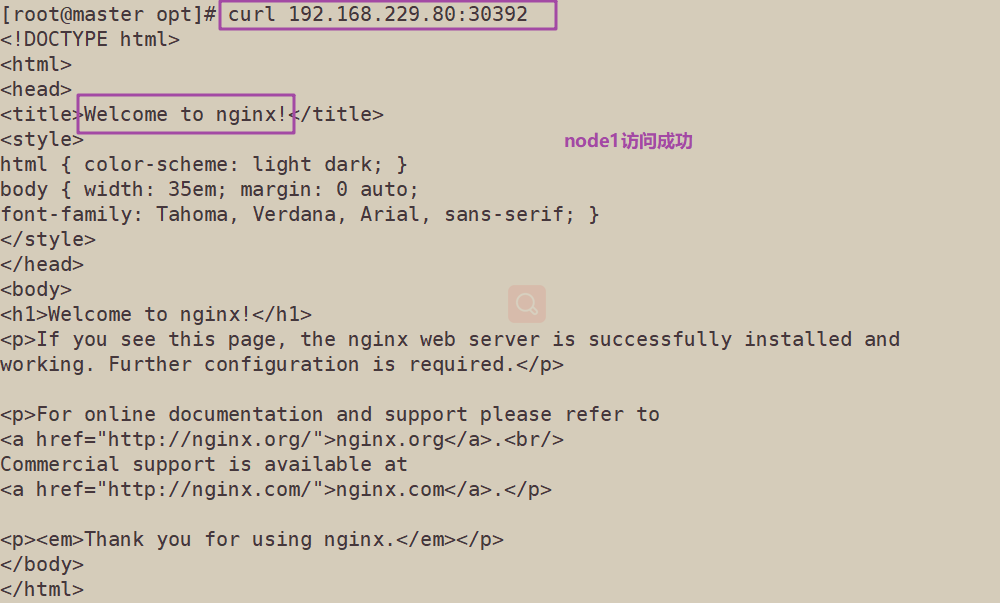
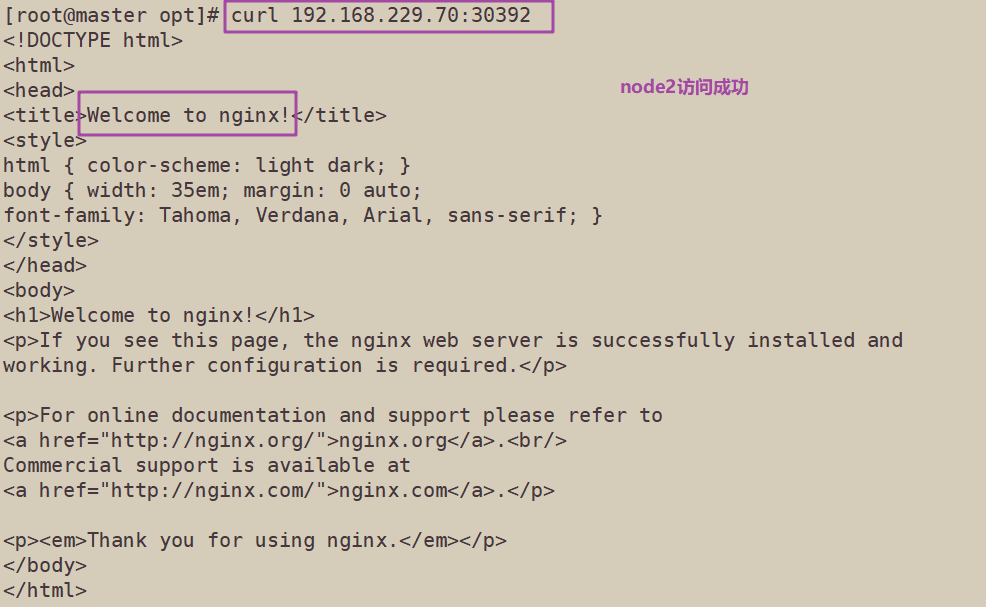
Browser access:
192.168.229.90:30392
192.168.229.80:30392
192.168.229.70:30392
4, Kernel parameter optimization scheme
cat > /etc/sysctl.d/kubernetes.conf <<EOF
net.bridge.bridge-nf-call-iptables=1
net.bridge.bridge-nf-call-ip6tables=1
net.ipv4.ip_forward=1
net.ipv4.tcp_tw_recycle=0
vm.swappiness=0	#The use of swap space is prohibited and is allowed only when the system is out of memory (OOM)
vm.overcommit_memory=1	#Do not check whether the physical memory is sufficient
vm.panic_on_oom=0	#Open OOM
fs.inotify.max_user_instances=8192
fs.inotify.max_user_watches=1048576
fs.file-max=52706963	#Specifies the maximum number of file handles
fs.nr_open=52706963	#Only versions above 4.4 are supported
net.ipv6.conf.all.disable_ipv6=1
net.netfilter.nf_conntrack_max=2310720
EOF