preface
After making so many sensors, I played by myself. This time, my family couldn't watch it. I had to have an ultraviolet sensor. Before I went out, I looked at the ultraviolet intensity (solemnly declare: I'm not a single dog!!! (, ◡✧) I saw that there were really suitable modules on the Internet, so I finished one. This time we will make an intelligent ultraviolet sensor.
Hardware selection
Omnipotent, cheap and easy to use (in fact, it seems that it is not so easy to use recently, but it is really cheap) ESP32S .
The UV sensor is a digital UV sensor with light snow UV Sensor C , 42 yuan is a little expensive for QWQ, but you can directly obtain the UV intensity without using your own analog measurement. The response wavelength is 280-430nm, and the official data are also very complete.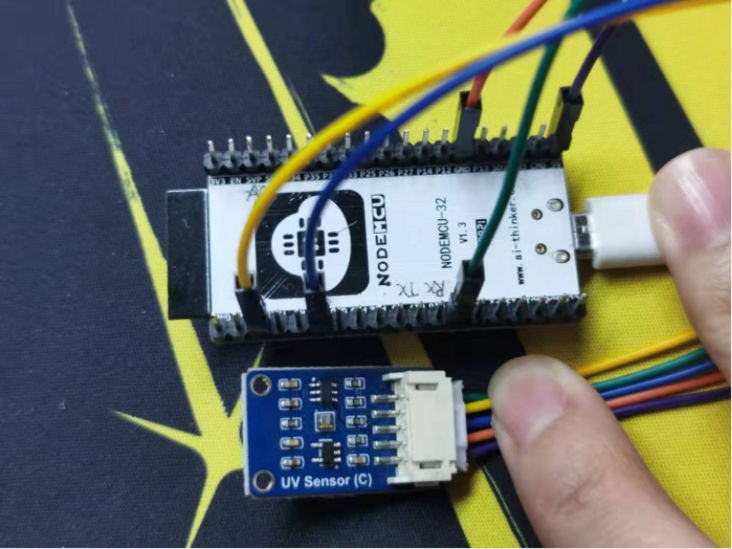
And the external thinking loop of our equipment - Yihui Spirit 1 Edge computer.
2, Use steps
Get code
In order to facilitate the explanation of logic, I will disrupt the order of the code and may cut it. If you want to run directly with the code, you can go directly The secret treasure house of inspiration desktop Get the code, or directly clone:
https://gitee.com/inspiration-desktop/DEV-lib-arduino.git
After downloading or clone code, the four folders are used this time:

Cjson: the cjson library I transplanted is the standard cjson library. Put it in the libraries folder under the arduino installation directory and Baidu can use the cjson functions.
libsddc: I transplanted it from the official SDDC library and the SDK I wrote, and just put it in the libraries folder. Inside is the processing function of SDDC protocol. We don't care.
Waveshare_UV_C: It is the library of voice broadcast module officially provided by Weixue, but this library is a little different. It is made for AVR architecture chips. A warning will pop up when compiling:
But I looked at the contents of the library, except for an int that doesn't seem to be used_ The pin is defined. All other pins should work normally.
In addition, when loading the library, you need to select Waveshare: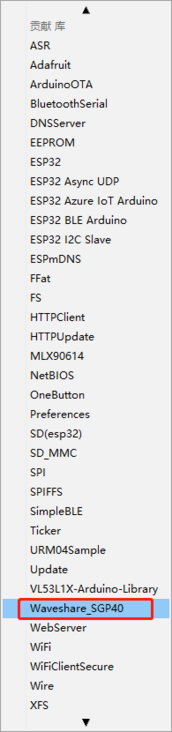
In the demo folder are the demo codes of our various sensors: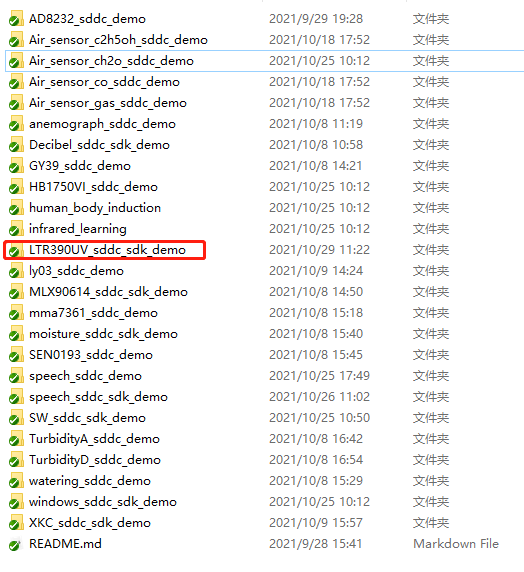
Ltr390uv in red circle_ sddc_ sdk_ The demo folder contains our code. Click in to see LTR390UV_sddc_sdk_demo.ino file. Double clicking the file will automatically start Arduino ide to open the code. Select the corresponding COM port in tools - > port and click upload to burn the code into the board: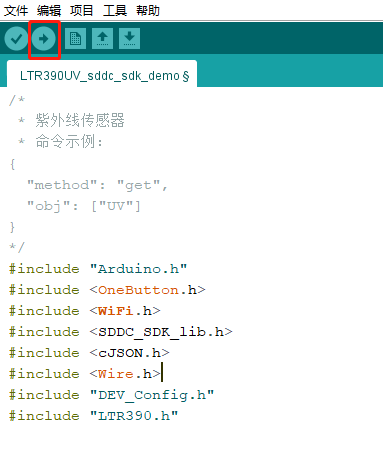
For the specific arduino tutorial, see my previous articles arduino Development Guide and arduino development: the first application based on ESP32S - infrared temperature measuring gun (with pin diagram)
Equipment control command:
Via Spirit 1's application or Sniffer Commands sent to sensor devices:
Obtain UV intensity data
{
  "method": "get",
  "obj": ["UV"]
}
Device and protocol initialization process:
It is written based on the official demo and does not need to be modified. It is mainly about device initialization, pin configuration, and protocol initialization.
/*
 * Initialize sensor
 */
void sensor_init()
{
    // Initialize I2C
    if(LTR390_Init() != 0)
    {
        Serial.print("LTR390 init err!!!");
        while(1);
    }
    LTR390_SetIntVal(5, 20);
    pinMode(INT_OUT, INPUT);
    // Create sensor task, periodically sensor data and send it to EdgerOS
    xTaskCreate(UV_sensor_task, "UV_sensor_task", ESP_TASK_STACK_SIZE, NULL, ESP_TASK_PRIO, NULL);
}

void setup() {
    byte mac[6];
    Serial.begin(115200);
    Serial.setDebugOutput(true);
    Serial.println();

    sensor_init();

    // Clear the state of the key state machine
    button.reset();

    // Create a key scanning thread, long press the IO0 key, and the ESP32 will enter the SmartConfig mode after releasing it
    sddc_printf("Press and hold the key to enter Smartconfig...\n");
    button.attachLongPressStop(esp_io0_key_task);
    xTaskCreate(esp_tick_task, "button_tick", ESP_TASK_STACK_SIZE, NULL, ESP_TASK_PRIO, NULL);

    // Start WiFi and connect to the network
    WiFi.begin(ssid, password);
    while (WiFi.status() != WL_CONNECTED)
    {
        delay(500);
        Serial.print(".");
    }

    // Get and print IP address
    Serial.println("");
    Serial.println("WiFi connected");
    Serial.print("'ip :");
    Serial.print(WiFi.localIP());
    Serial.println("' to connect");

    // sddc protocol initialization
    sddc_lib_main(&sys_cfg);

    // Obtain and print the mac address of the network card
    WiFi.macAddress(mac);
    sddc_printf("MAC addr: %02x:%02x:%02x:%02x:%02x:%02x\n",
              mac[5], mac[4], mac[3], mac[2], mac[1], mac[0]);
    // Use the network card mac address to set the device unique ID UID
    sddc_set_uid(G_sddc, mac);
}

void loop() {
    // Run SDDC protocol cycle
    while (1)
    {
        sddc_printf("SDDC running...\n");
        sddc_run(G_sddc);
        sddc_printf("SDDC quit!\n");
    }

    // Destroy SDDC protocol
    sddc_destroy(G_sddc);
}
Configure device information
This part of the code can configure the WiFi name and WiFi password, the pin to be used, and configure the information displayed by the device on Spirit 1:
#define SDDC_ CFG_ Port 680u / / port number used by SDDC protocol
#define PIN_ Input 0 / / select IO0 to control
#define ESP_TASK_STACK_SIZE       4096
#define ESP_TASK_PRIO             25
#define INT_ Out 14 / / select IO14 to interrupt the output

static const char* ssid = "EOS-Tenda";             // WiFi name
static const char* password = "1234567890";        // WiFi password
static double UV;
OneButton button(PIN_INPUT, true);


/*
 *  Information definition of the current device
 */
DEV_INFO    dev_info = {
            .name     = "Ultraviolet sensor",
            .type     = "device.UV",
            .excl     = SDDC_FALSE,
            .desc     = "ESP-32S + LTR390UV",
            .model    = "IDUV01B",
            .vendor   = "inspiration-desktop",
};

/*
 *   System registration object aggregation
 */
SDDC_CONFIG_INFO sys_cfg = {
        .token             = "1234567890",            // Device password
        .devinfo           = &dev_info,
        .io_dev_reg        = io_dev,
        .io_dev_reg_num    = ARRAY_SIZE(io_dev),
        .num_dev_reg       = num_dev,
        .num_dev_reg_num   = ARRAY_SIZE(num_dev),
        .state_get_reg     = dev_state_get_reg,
        .state_get_reg_num = ARRAY_SIZE(dev_state_get_reg),
        .dis_dev_reg       = dis_dev,
        .dis_dev_num       = ARRAY_SIZE(dis_dev),
};
Callback function registration
This is the location where the callback function is registered after receiving the command. Only the functions registered here can be called correctly by the SDK and perform correct actions.
For specific SDK analysis, please refer to The official series of coerced death! SDK framework based on sddc protocol_ sdk_ Lib parsing and The official series of coerced death! From DDC sniffer to SDDC_ sdk_ Data analysis of Lib
/*
 *  Registration of object function and processing method of digital quantity equipment
 */
NUM_DEV_REGINFO num_dev[] = {
//        {"set_num_demo", demo}, / / string is the input command, and demo is the command processing function
};

/*
 *  Display device object function and processing method registration
 */
DIS_DEV_REGINFO dis_dev[] = {
//        {"set_dis_demo", demo}, / / string is the input command, and demo is the command processing function
};

/*
 * IO Device object setting function and processing method registration
 */
IO_DEV_REGINFO io_dev[] = {
//        {"set_io_demo", demo}, / / string is the input command, and demo is the command processing function
};

/*
 *  System object status get registration
 */
DEV_STATE_GET  dev_state_get_reg[] = {
    {"UV",   DEV_NUM_TYPE,  single_get_sensor},
//        {"demo", dev_num_type, num_get_demo}, / / demo is the input command, and the string is the command processing function
//        {"demo",   DEV_IO_TYPE,  io_get_demo},
//        {"demo", DEV_DISPLAY_TYPE, dis_get_demo},

};
Data acquisition and reporting process
Here is the processing flow written by ourselves, which can be changed according to your needs. After receiving set or get, enter the corresponding processing function according to the previously registered function.
static void UV_sensor_task(void *arg)
{
    double val = 0;
    while(1)
    {
        val = LTR390_UVS();
        UV = val;
        if(digitalRead(8) == 1){
        Serial.print("UV = ");
        Serial.println(UV);
  }
        delay(300);
    }
}
/*
 *  Single acquisition of data
 */
sddc_bool_t single_get_sensor(char *objvalue, int value_len)
{
    double value = UV;
    snprintf(objvalue, value_len, "%lf", value);
    return SDDC_TRUE;
}
summary
I tried it just now. The ultraviolet intensity outside is actually 9! I checked:
When the ultraviolet ray is the weakest (grade 0 ~ 2), it has no great impact on the human body. Just wear a sun hat when you go out; When the UV reaches level 3 ~ 4, in addition to wearing a sun hat, you need to prepare sunglasses and apply sunscreen on your body to avoid the harm of solar radiation to your skin; When the ultraviolet intensity reaches grade 5 ~ 6, you must walk in a cool place when you go out; When the UV reaches level 7 ~ 9, it is best not to bask in the sun on the beach from 10 a.m. to 4 p.m; When the UV index is greater than or equal to 10, you should try to avoid going out, because the UV radiation is very harmful at this time.
I haven't noticed it before! Not as strong as our ultraviolet light!