1, Prepare
1. Install ubuntu system
No system, play chicken feather!!! Of course, install a system first.
I won't write the tutorial. Just search online. Naturally, it's a pile!
Here I put a link for my reference, which is very detailed (the author said: "the most detailed in absolute history"), especially for Xiaobai!!!
What, still can't understand????? No, no, it's 2020! (dog head)
It doesn't matter. I've prepared someone else's for you (I'm so lazy that I didn't record it) Video tutorial.
Finally completed the installation, right? Then you can finally start to be presumptuous, hahaha!!!!!
2, Create a comfortable development environment (integration of work and entertainment)
1. Install Sogou input method
In order to type happily, you should first install Sogou input method in ubuntu (no choice, don't be picky about this input method)
The installation is very simple. Please visit it directly Official website , there are detailed tutorials.
2. Install NVIDIA driver
Replace the graphics card driver for the system
Find the software update, as shown in the figure below:
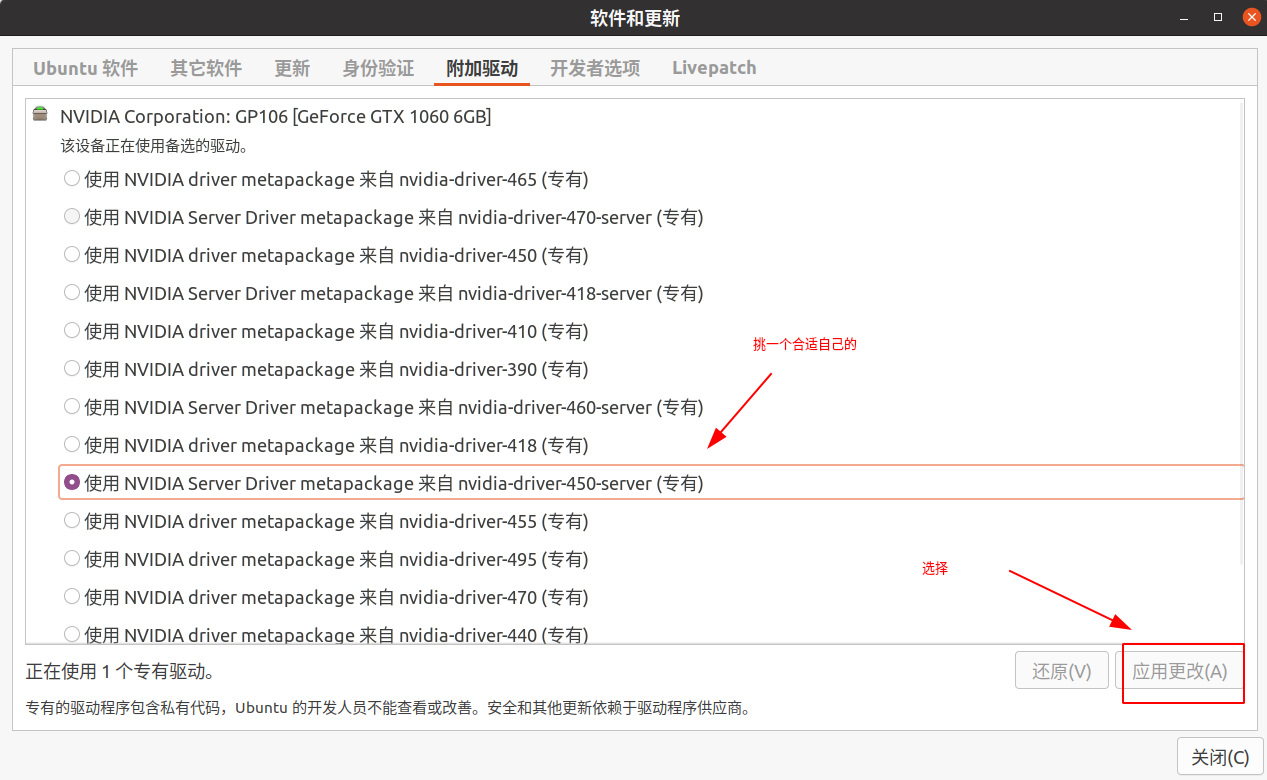
Then it's over. Just wait slowly.
Oh, Amitabha, don't fail, don't pray!!!
If this step fails, you don't have to play anything (dog head)!!!
In case of failure, relatives will Baidu themselves (really troublesome, all kinds of broken things). Generally speaking, they will not fail.
Of course, it's successful. Please don't owe your hands, change them around, and don't cry if it's damaged!!!!
**PS: say it three times** Choose a suitable one. Don't change it casually. It may be bad. Of course, in case you can't touch it!!!!
3. Deal with the problem of incorrect time under dual system
timedatectl set-local-rtc 1 --adjust-system-clock
4. Set a password for root
sudo passwd root
5. Change terminal use ZSH (not required)
To tell you the truth, it's not necessary, but I like it very much. After all, it can be equipped with plug-ins. How easy to use!
I won't say much about this. You can have a look This tutorial.
6. Install Google browser
Let's give you a browser download address , the link is dead, or I found it on the Internet.
How to install?
#Switch to the folder you want to download and use the cd command
cd <Folder name>  #For example, cd /home/sky/Download
#Installed commands
sudo dpkg -i  google-chrome-stable_current_amd64.deb
7. Install CUDA Toolkit and cuDNN
Here I will use CUDA Toolkit 10.2 as an example to explain.
**!!! PS: * * because the gcc version of Ubuntu 20 is 9.3, and the CUDA Toolkit 10.2 I installed requires gcc 7, I need to downgrade gcc. Reference link
The specific steps are as follows:
#First, install gcc-7:
sudo apt-get install gcc-7 g++-7

#Set the priority of gcc version:
sudo update-alternatives --install /usr/bin/gcc gcc /usr/bin/gcc-7 9
sudo update-alternatives --install /usr/bin/gcc gcc /usr/bin/gcc-9 1

#View priority:
sudo update-alternatives --display gcc

#Similarly, set g + +:
sudo update-alternatives --install /usr/bin/g++ g++ /usr/bin/g++-7 9
sudo update-alternatives --install /usr/bin/g++ g++ /usr/bin/g++-9 1
sudo update-alternatives --display g++
7.1 first install CUDA Toolkit 10.2
① Download and install
Link to the official website for download
I usually use runfile(local) installation
wget https://developer.download.nvidia.com/compute/cuda/10.2/Prod/local_installers/cuda_10.2.89_440.33.01_linux.run
sudo sh cuda_10.2.89_440.33.01_linux.run
**!!! ps: * * when installing here, do not install the graphics card driver (because it has been installed at the beginning and there is no figure). If you install it again, it will fail due to conflict.
Download two patches for installation, Patch 1,Patch 2,
Installed commands
sudo sh <Patch number one name>
sudo sh <Patch number two name>
② Configure environment variables and test
The additional contents are as follows:
export PATH=/usr/local/cuda/bin:$PATH
export LD_LIBRARY_PATH=/usr/local/cuda/lib64:$LD_LIBRARY_PATH
There are two situations:
If bash is used, it needs to be appended to ~ /. bashrc
If zsh is used, it needs to be appended to ~ /. zshrc
After addition
-
You can use the following commands
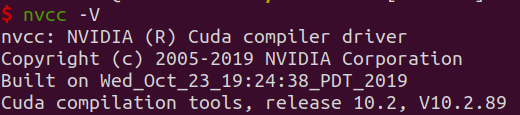
nvcc -V
The result is shown in the figure below: it indicates that the environment variable is appended successfully
-
Sample for CUDA test:
# Compile and test device deviceQuery:
cd /usr/local/cuda/samples/1_Utilities/deviceQuery
sudo make
./deviceQuery

# Compile and test bandwidth bandwidthTest:
cd ../bandwidthTest
sudo make
./bandwidthTest
If the final result of both tests is Result = PASS, CUDA installation is successful.
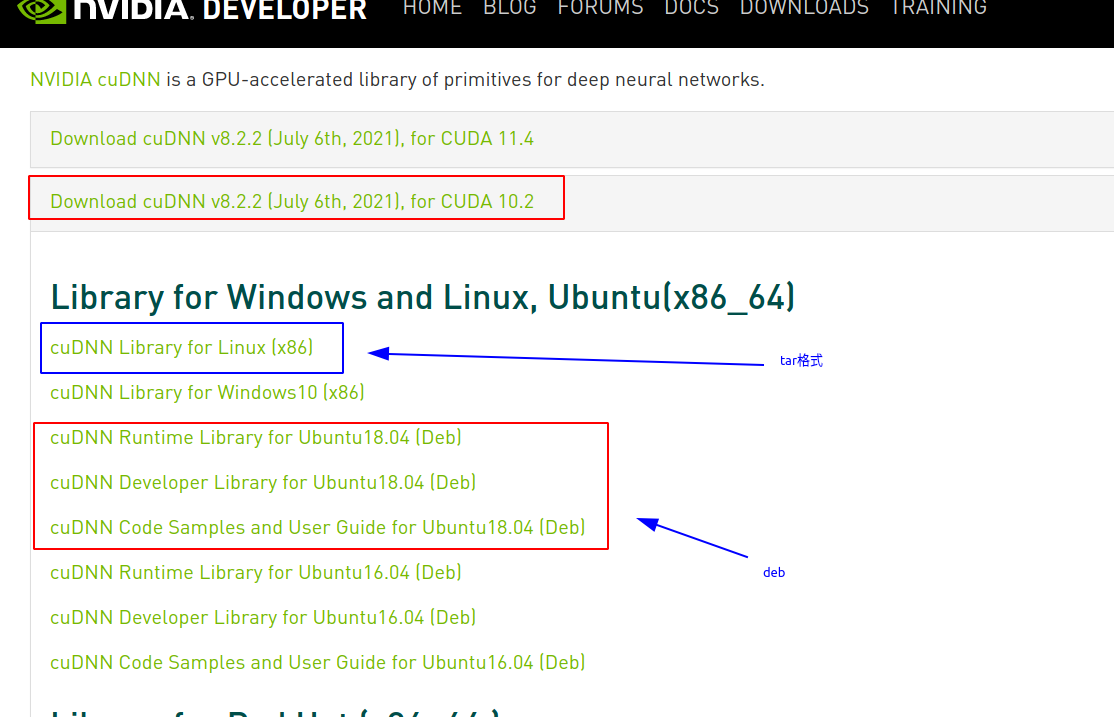
7.2 installation cuDNN
deb is recommended for installation. The steps are as follows
① Download and install
Go to the official website to download the link
- Install cuDNN with deb: (recommended)
sudo dpkg -i libcudnn8_8.0.4.30-1+cuda10.2_amd64.deb
sudo dpkg -i libcudnn8-dev_8.0.4.30-1+cuda10.2_amd64.deb
sudo dpkg -i libcudnn8-samples_8.0.4.30-1+cuda10.2_amd64.deb
- Install cuDNN with tar: after decompression, move the contents under include and lib64 to include and lib64 under cuda directory respectively.
sudo tar -xzvf cudnn-10.2-linux-x64-v8.0.3.33.tgz
cd cuda
sudo mv include/* /usr/local/cuda/include
sudo mv lib64/* /usr/local/cuda/lib64
②Test cuDNN:
cp -r /usr/src/cudnn_samples_v8/ ~
cd  ~/cudnn_samples_v8/mnistCUDNN
sudo make
sudo ./mnistCUDNN
If it runs successfully, the following message will be displayed: Test passed!
**ps: * * an error occurred during the test as follows:
WARNING - FreeImage is not set up correctly. Please ensure FreeImage is set up correctly. <<< : : :
I fixed it by using the following command:
sudo apt-get install libfreeimage3 libfreeimage-dev
8. Install clash
I won't talk about this, just look at it course
Picture of agent interface:

The above services cannot be realized automatically after startup. They can be realized indirectly through the startup software provided by ubuntu.
9. Install miniconda
go to The origin of Beijing Foreign Languages There are a set of settings such as downloading and related source changing.