Pure js calendar component learning notes
The following records the problems encountered in the process of completing the calendar component in pure js
Problems encountered
1. Drop down menu implementation
-
The display of the drop-down menu and the style that will appear after clicking the option box are written in advance
- For example, the drop-down menu already exists, but it is hidden. When I click the option box, I add a class name active to it, and then add display:block to display it through this class name
- Similarly, the style after the option box is clicked and the style after each option in the drop-down menu is selected is to add a class name to them through js to obtain the style written in advance.
- As usual, I will add styles to each dynamically changing element through js, which looks messy. It is better to write the implementation of element styles in css
-
Now describe the problem
<div class="select vacationSelect"> <!-- Content area --> <div class="selected"> <span class="content">Holiday arrangements</span> <i class="icon"></i> </div> <!-- Drop down box --> <div class="selectBox"> <ul> <li>1970 year</li> <li>1970 year</li> <li>1970 year</li> <li>1970 year</li> <li>1970 year</li> <li>1970 year</li> <li>1970 year</li> <li>1970 year</li> </ul> </div> </div>-
As shown in the code, I added the click event to the parent element named select. After clicking, the parent element will have another classname - > active. Then when the drop-down menu is displayed, I want to click li. li will be selected, that is, the text color of li will change.
-
Similarly, I also change the style of li by adding. active to li
-
But I found that the active I added to li was added to the parent element select
About adding class names and bubbling events
Problem description
- Here is the error code I wrote
for (let i = 0; i < selects.length; i++) { selects[i].addEventListener('click',function(event){ selects[i].className = selects[i].className + ' active'; }) } for (let i = 0; i < lis.length; i++) { lis[i].addEventListener('click',function(event){ for (let i = 0; i < lis.length; i++) { lis[i].className = "" } this.className = "active"; }) }-
Because I didn't know much about the method of using classList.add() to add class names
-
Therefore, this stupid method is used. Because the select already has the class name to be added, the class name is added by splicing (a big pit)
-
Later, I found that every time I click li, an active will be added to the parent element. Later, I changed the way to add the class name to
for (let i = 0; i < selects.length; i++) { selects[i].addEventListener('click',function(event){ //selects[i].className = selects[i].className + ' active'; selects[i].classList.add('active'); }) } -
Then the above problem is solved, including even if I use this.className = "active"; To add a class name to select, he didn't have the above problem, and I was confused again
-
Until I learned about the bubble of events
Event Bubbling
-
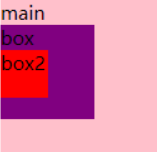
There are three nested boxes as shown in the figure

-
There are several situations:
- Click events have been added to all three boxes
- Clicking any child element will trigger the click event of itself and the parent element at the same time
- Only the parent element has a click event added:
- Clicking a child element will also trigger the click event of the parent element
- Only child elements have click events added:
- Click your own response, but click the parent element without response
- Click events have been added to all three boxes
-
Summary: when you want to perform operations on child elements, you will check whether the child elements have corresponding event handling functions. If not, you will find your parent element layer by layer to see if the parent element has any. If so, you will perform the operations of the parent element. If you have both yourself and the parent element, execute them all
-
-
Back to the question
-
First, when using add() to add a class name, if the class name already exists, it will not be added; this.className = "active"; Is to empty the original class name and add it. So even if I don't prevent the event from bubbling when I click li, it won't always add active when the parent element select is triggered. At this time, the event bubble still exists, but it is invisible.
-
Earlier, when I added printing for the click events of the parent element and the child element, when I click the child element, I also printed the click parent element in the parent element. I thought that because li is also part of the parent element select, clicking the click of the parent element of li will also trigger. In fact, this is also because of the bubble of events.
for (let i = 0; i < select.length; i++) { select[i].addEventListener('click',function(){ this.classList.add('active'); console.log("Parent element clicked"); }); } for (let i = 0; i < lis.length; i++) { lis[i].addEventListener('click',function(){ for (let i = 0; i < lis.length; i++) { lis[i].className = "" } this.className = "active"; console.log("Child element clicked"); }) } -
Because the event bubbles, add the original selections [i]. Classname = selections [i]. Classname + 'active'; There has always been a selection [i]. Classname that will change, so every time you click li, the parent element will continue to add active
-
In general, changing the method of adding class names directly or adding event.stopPropagation() to child elements to prevent event bubbling can solve my problem.
-
However, according to my requirements, it is not appropriate for me to add click events to the parent element and add click events to each child element through circular traversal. Event delegation can be used at this time
Event delegation
What is event delegation
- An event is originally bound to an element, but it is bound to the parent (or ancestor) element of the element. The execution effect is triggered by using the event bubble principle
Advantages of event delegation
- Improve web page performance.
- Events added through event delegates are still valid for later generated elements.
Follow the above question
-
Let's first understand that when an event bubble occurs, there will be some information during the transmission of the event
attribute describe currentTarget Reference of the current capture node pageX Abscissa of the current document at the event occurrence point pageY Ordinate of the current document at the event occurrence point target The node reference that generated the event type Current event type: such as click which For keyboard and mouse events, this property determines which key or button you pressed -
Use event bubbling and event delegation to optimize the above code
- Idea:
- Add a click event to the parent element select
- In the click event of the parent element, judge whether the currently clicked element is what we want through event.target.tagName
- If yes, do what you want instead of going back
- Final code
- Idea:
-
-
window.onload = function(){
    // Get element
    const selects = document.querySelectorAll('.select');

    // When the mouse clicks the arrow in the drop-down box, the arrow changes to an upward arrow
    // Click the drop-down box select to add a ClassName
    selects.forEach((item,index)=>{
        var cl = item.classList;
        item.addEventListener('click',function(e){
            // 1. Judge whether you have class name active
            // Click the drop-down box to expand and click the drop-down box again to retract
            if(cl.contains('active')){
                // 1.1 remove if any
                cl.remove('active');
            }else{
                // 1.2 if not, check whether there are other selectors. If there are other selectors, clear their active
                // The implementation has only one drop-down box that is expanded.
                removeClass();
                // Add your own class name active
                cl.add('active');
            }

            // Judge whether li is clicked by e.target.tagName
            if(e.target.tagName != 'LI') return;
            // If yes, add the class name active to li and clear the active of other unselected li
            // Because the obtained lis is a pseudo array, use the expansion operator to convert it into an array
            const lis = [...item.querySelectorAll('ul li')];
            // open is the returned class name containing the active element
            var open = lis.find(li => li.classList.contains('active'));
            open && open.classList.remove('active');
            e.target.classList.add('active');
        })
    })

    function removeClass(){
        const selects = [...document.querySelectorAll('.select')];
        var open = selects.find(select => select.classList.contains('active'));
        open && open.classList.remove('active');
    }
}
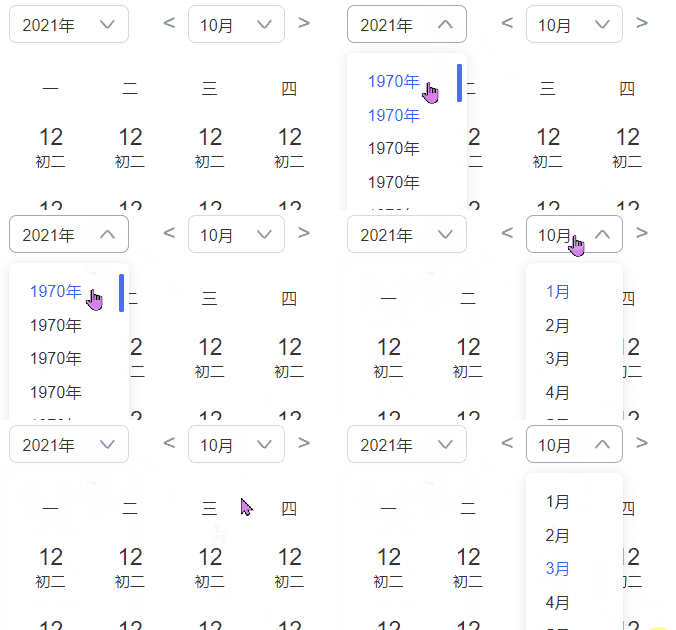
- Effect achieved

supplement
About getting elements
-
const selects = document.querySelectorAll('.select'); const lis = selects.querySelectorAll('ul li');-
It is wrong to select li in the above way. The selections we get is a pseudo array containing multiple elements
-
Select li from a pseudo array. Who knows which one you want to choose
-
The right thing to do is
- When these two elements are in a loop
const selects = document.querySelectorAll('.select'); selects.forEach((item,index)=>{ const lis = item.querySelectorAll('ul li'); }) -
It is special in this environment. Because we have many same selections and they all have ul li, it is better to obtain the li under different selections by looping through the selection
-