1. Review MVC
1.1 what is MVC
-
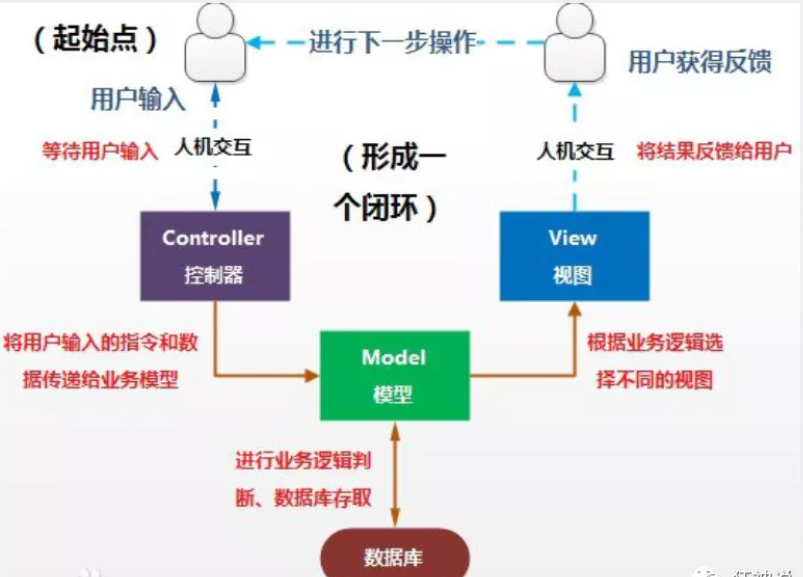
MVC is the abbreviation of model, view and controller. It is a software design specification.
-
It is a method to organize code by separating business logic, data and display.
-
The main function of MVC is to reduce the two-way coupling between view and business logic.
-
MVC is not a design pattern, MVC is an architecture pattern. Of course, there are differences between different MVCs.
Model: the data model provides the data to be displayed, so it contains data and behavior. It can be considered as a domain model or JavaBean component (including data and behavior), but now it is generally separated: Value Object (data Dao) and Service layer (behavior Service). That is, the model provides functions such as model data query and model data status update, including data and business.
View: it is responsible for displaying the model, which is generally the user interface we see and what customers want to see.
Controller: receives the user's request and delegates it to the model for processing (state change). After processing, the returned model data is returned to the view, which is responsible for displaying it. In other words, the controller does the work of a dispatcher.
The most typical MVC is the pattern of JSP + servlet + javabean.
1.2. Model1 Era
-
In the early development of web, model 1 is usually used.
-
Model1 is mainly divided into two layers: view layer and model layer.

Advantages of Model1: simple architecture, more suitable for small project development;
Model1 disadvantages: JSP responsibilities are not single, responsibilities are too heavy, and it is not easy to maintain;
1.3. Model 2 era
Model 2 divides a project into three parts, including view, control and model.
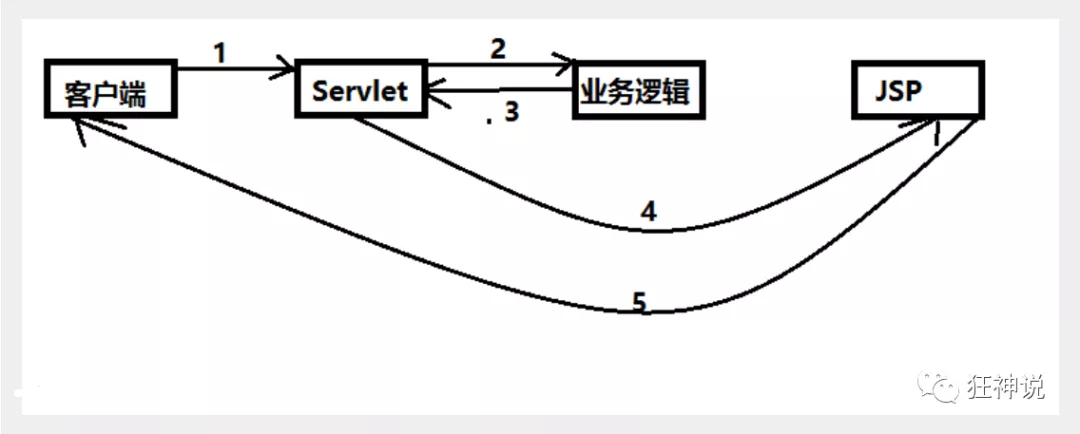
1. User sends request
2. The servlet receives the request data and calls the corresponding business logic method
3. After the business is processed, the updated data is returned to the servlet
4.servlet turns to JSP, which renders the page
5. Respond to the updated page of the front end
Responsibility analysis:
Controller: controller
Get form data
Call business logic
Go to the specified page
Model: Model
Business logic
Status of saved data
View: View
Display page
Model2 not only improves the reuse rate of code and the scalability of the project, but also greatly reduces the maintenance cost of the project. The implementation of Model 1 mode is relatively simple and suitable for rapid development of small-scale projects. The JSP page in Model 1 plays both the roles of View and Controller, mixing the control logic and presentation logic, resulting in very low code reusability and increasing the scalability of the application and the difficulty of maintenance. Model 2 eliminates the disadvantages of Model 1.
1.4 review Servlet
1. Create a Maven project as the parent project! pom dependency!
<dependencies>
        <dependency>
            <groupId>junit</groupId>
            <artifactId>junit</artifactId>
            <version>4.12</version>
            <scope>test</scope>
        </dependency>
        <dependency>
            <groupId>org.springframework</groupId>
            <artifactId>spring-webmvc</artifactId>
            <version>5.2.1.RELEASE</version>
        </dependency>
        <dependency>
            <groupId>javax.servlet</groupId>
            <artifactId>servlet-api</artifactId>
            <version>2.5</version>
        </dependency>
        <!--jsp of EL Other syntax support-->
        <dependency>
            <groupId>javax.servlet</groupId>
            <artifactId>jstl</artifactId>
            <version>1.2</version>
        </dependency>
    </dependencies>

    <!--Resource filtering-->
    <build>
        <resources>
            <resource>
                <directory>src/main/java</directory>
                <includes>
                    <include>**/*.xml</include>
                    <include>**/*.json</include>
                </includes>
            </resource>
            <resource>
                <directory>src/main/resources</directory>
                <includes>
                    <include>**/*.properties</include>
                    <include>**/*.xml</include>
                </includes>
                <filtering>false</filtering>
            </resource>
        </resources>
    </build>
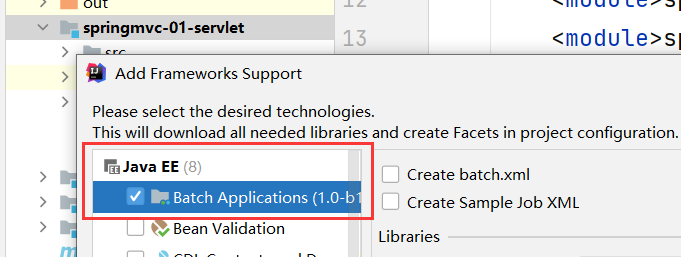
2. A Moudle: springmvc-01-servlet. Right click the project to add Web app support!
3. jar package support for importing jsp (imported)
4. Write a Servlet class to handle user requests
HelloServlet
public class HelloServlet extends HttpServlet {
    @Override
    protected void doGet(HttpServletRequest req, HttpServletResponse resp) throws ServletException, IOException {
        //1. Get front-end parameters
        String method = req.getParameter("method");
        if(method.equals("add")){
            req.getSession().setAttribute("msg","Yes add method");
        }
        if(method.equals("delete")){
            req.getSession().setAttribute("msg","Yes delete method");
        }
        //2. Call the business layer

        //3. View forwarding or redirection
        req.getRequestDispatcher("/WEB-INF/jsp/test.jsp").forward(req,resp);
    }

    @Override
    protected void doPost(HttpServletRequest req, HttpServletResponse resp) throws ServletException, IOException {
        doGet(req,resp);
    }
}
5. Write hello.jsp, create a JSP folder under the WEB-INF directory, and create hello.jsp
form.jsp
<%@ page contentType="text/html;charset=UTF-8" language="java" %>
<html>
<head>
    <title>Title</title>
</head>
<body>
<form action="/hello" method="post">
    <input type="text" name="method">
    <input type="submit">
</form>
</body>
</html>
6. Register the Servlet in web.xml
<?xml version="1.0" encoding="UTF-8"?>
<web-app xmlns="http://xmlns.jcp.org/xml/ns/javaee"
         xmlns:xsi="http://www.w3.org/2001/XMLSchema-instance"
         xsi:schemaLocation="http://xmlns.jcp.org/xml/ns/javaee http://xmlns.jcp.org/xml/ns/javaee/web-app_4_0.xsd"
         version="4.0">
    <servlet>
        <servlet-name>hello</servlet-name>
        <servlet-class>com.kuang.servlet.HelloServlet</servlet-class>
    </servlet>
    <servlet-mapping>
        <servlet-name>hello</servlet-name>
        <url-pattern>/hello</url-pattern>
    </servlet-mapping>


<!--    <session-config>-->
<!--        <session-timeout>15</session-timeout>-->
<!--    </session-config>-->
<!--    <welcome-file-list>-->
<!--        <welcome-file>index.jsp</welcome-file>-->
<!--    </welcome-file-list>-->

</web-app>
What does the MVC framework do
-
Mapping URLs to java classes or methods of java classes
-
Encapsulates data submitted by users
-
Processing request - calling related business processing - encapsulating response data
-
Render the response data. jsp / html and other presentation layer data
explain:
Common server-side MVC frameworks include Struts, Spring MVC, ASP.NET MVC, Zend Framework and JSF; Common front-end MVC frameworks: vue, angularjs, react, backbone; Other patterns evolved from MVC, such as MVP, MVVM and so on
2. What is spring MVC
2.1 general
Spring MVC is a part of the Spring Framework and a lightweight Web framework based on Java to implement MVC.
Features of Spring MVC:
1. Lightweight, easy to learn
2. Efficient MVC framework based on request response
3. Good compatibility with Spring and seamless combination
4. Agreement is greater than configuration
5. Powerful functions: RESTful, data validation, formatting, localization, theme, etc
6. Concise and flexible
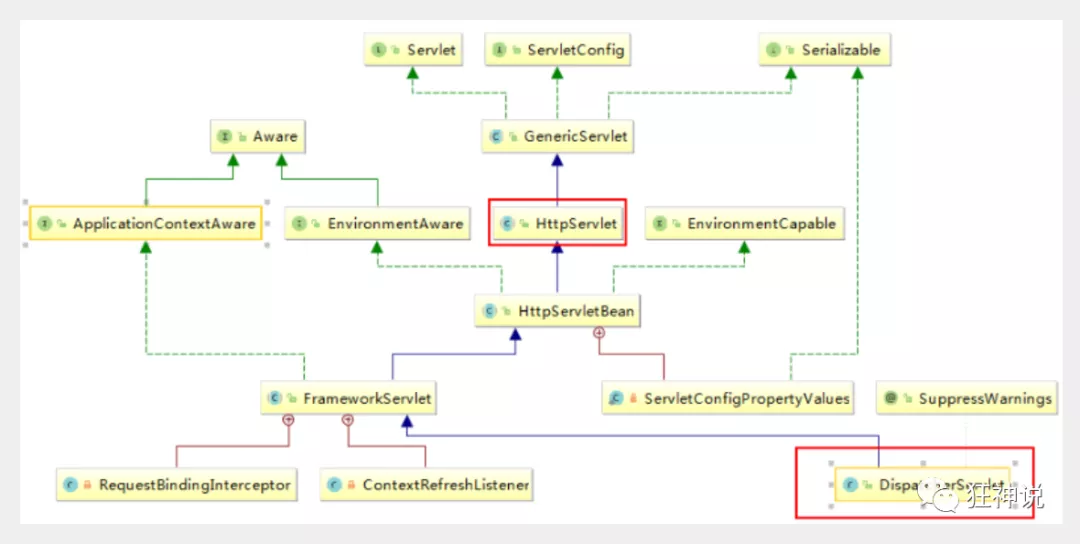
Spring's web framework is designed around the dispatcher Servlet.
The dispatcher servlet is used to distribute requests to different processors. Starting from Spring 2.5, users using Java 5 or above can develop based on annotations, which is very concise;
Because Spring MVC is good, simple, convenient and easy to learn, it is naturally seamlessly integrated with Spring (using SpringIoC and Aop), and the use convention is better than configuration. It can carry out simple junit testing, support Restful style, exception handling, localization, internationalization, data validation, type conversion, interceptors, etc
The most important point is that there are many people and companies
2.2 central controller
Spring's web framework is designed around dispatcher servlet. The dispatcher servlet is used to distribute requests to different processors. Starting from Spring 2.5, users using Java 5 or above can adopt annotation based controller declaration.
Like many other MVC frameworks, the Spring MVC framework is request driven. It distributes requests and provides other functions around a central Servlet. The dispatcher Servlet is an actual Servlet (it inherits from the HttpServlet base class).
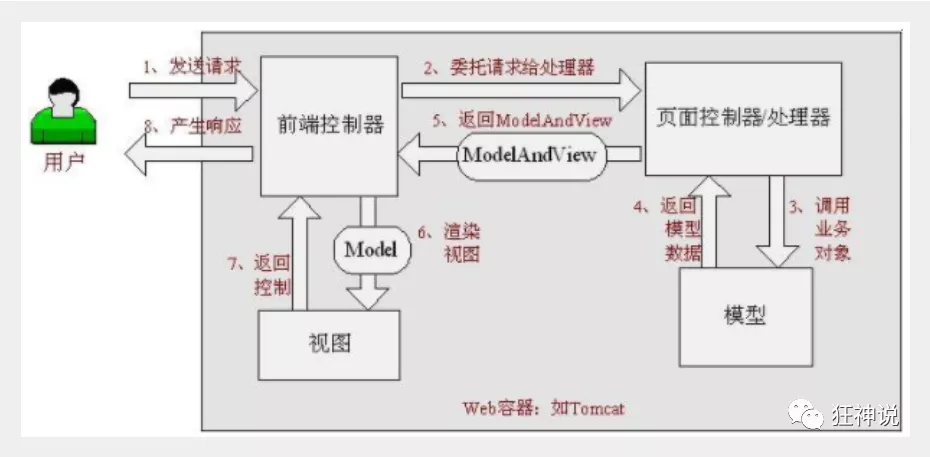
The principle of spring MVC is shown in the following figure:
When a request is initiated, the front controller intercepts the request, generates a proxy request according to the request parameters, finds the actual controller corresponding to the request, processes the request, creates a data model, accesses the database, and responds to the model to the central controller. The controller renders the view results using the model and view, and returns the results to the central controller, The result is then returned to the requester.
2.3 implementation principle of spring MVC
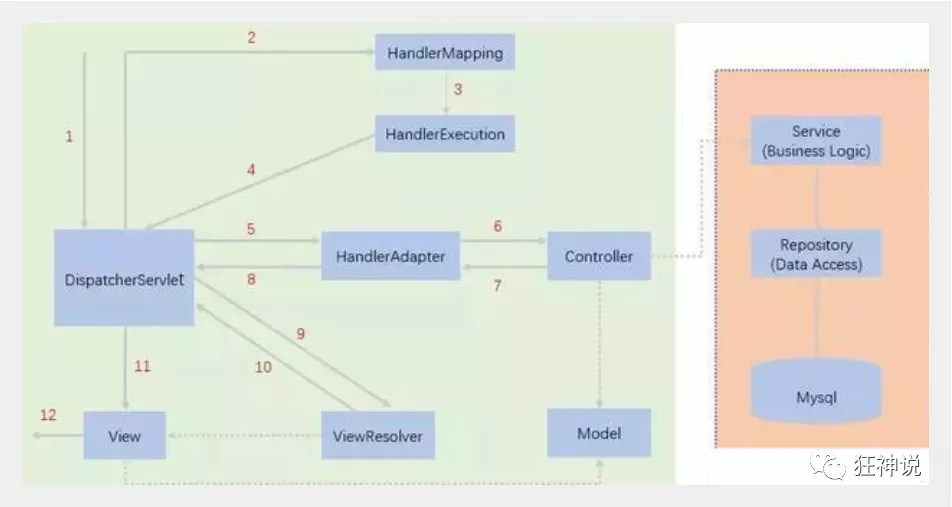
The figure shows a relatively complete flow chart of spring MVC. The solid line indicates the technology provided by the spring MVC framework, which does not need to be implemented by developers, and the dotted line indicates that it needs to be implemented by developers.
Briefly analyze the implementation process
Dispatcher servlet represents the front controller and is the control center of the whole spring MVC. When the user sends a request, the dispatcher servlet receives the request and intercepts the request.
We assume that the requested url is: http://localhost:8080/SpringMVC/hello
As above, the url is divided into three parts:
- http://localhost:8080 Server domain name
- Spring MVC is a web site deployed on the server
- hello indicates the controller
Through analysis, the above url is expressed as: request the hello controller of the spring MVC site located on the server localhost:8080.
HandlerMapping is processor mapping. DispatcherServlet calls HandlerMapping, which looks up the Handler according to the request url.
HandlerExecution refers to a specific Handler. Its main function is to find the controller according to the url. The controller found by the url above is: hello.
HandlerExecution passes the parsed information to DispatcherServlet, such as parsing controller mapping.
The HandlerAdapter represents a processor adapter that executes the Handler according to specific rules.
The Handler lets the specific Controller execute.
The Controller returns the specific execution information to the HandlerAdapter, such as ModelAndView.
The HandlerAdapter passes the view logical name or model to the dispatcher servlet.
DispatcherServlet calls the view resolver to resolve the logical view name passed by the HandlerAdapter.
The view parser passes the parsed logical view name to the dispatcher servlet.
DispatcherServlet calls a specific view according to the view result parsed by the view parser.
The final view is presented to the user.
First MVC program
1. Create a new Moudle, springmvc-02-hello, and add web support!
2. Confirm that the dependency of spring MVC is imported!
3. Configure web.xml and register dispatcher Servlet
<?xml version="1.0" encoding="UTF-8"?>
<web-app xmlns="http://xmlns.jcp.org/xml/ns/javaee"
         xmlns:xsi="http://www.w3.org/2001/XMLSchema-instance"
         xsi:schemaLocation="http://xmlns.jcp.org/xml/ns/javaee http://xmlns.jcp.org/xml/ns/javaee/web-app_4_0.xsd"
         version="4.0">
<!--    register DispatcherServlet-->
    <servlet>
        <servlet-name>springmvc</servlet-name>
        <servlet-class>org.springframework.web.servlet.DispatcherServlet</servlet-class>
<!--       Associate a springMVC File:< servlet-name>servlet.xml -->
        <init-param>
            <param-name>contextConfigLocation</param-name>
            <param-value>classpath:springmvc-servlet.xml</param-value>
        </init-param>
<!--        Startup level-->
        <load-on-startup>1</load-on-startup>
    </servlet>

<!--   / Match all requests (excluding.jsp)-->
    <!--  /*  Match all requests (including.jsp)-->
    <servlet-mapping>
        <servlet-name>springmvc</servlet-name>
        <url-pattern>/</url-pattern>
    </servlet-mapping>
</web-app>
4. Write the spring MVC configuration file! Name: SpringMVC-servlet.xml: [servletname] - servlet.xml
Note that the name requirements here are in accordance with the official
<?xml version="1.0" encoding="UTF-8"?>
<beans xmlns="http://www.springframework.org/schema/beans"
       xmlns:xsi="http://www.w3.org/2001/XMLSchema-instance"
       xsi:schemaLocation="http://www.springframework.org/schema/beans http://www.springframework.org/schema/beans/spring-beans.xsd">
<!--   Add process mapper -->
    <bean class="org.springframework.web.servlet.handler.BeanNameUrlHandlerMapping"></bean>
<!--   Add adapter mapper -->
    <bean class="org.springframework.web.servlet.mvc.SimpleControllerHandlerAdapter"></bean>
<!--    Add view parser: DispatcherServlet Give it to him ModelAndview
        1.Got it ModelAndView Data
        2.analysis ModeAndView View name for
        3.Splice the view name and find the corresponding view-->
    <bean class="org.springframework.web.servlet.view.InternalResourceViewResolver" id="internalResourceViewResolver">
<!--        prefix-->
        <property name="prefix" value="/WEB-INF/jsp/"></property>
<!--        suffix-->
        <property name="suffix" value=".jsp"></property>
    </bean>
	<!-- Register your own class-->
    <bean id="/hello" class="com.kuang.controller.HelloController"></bean>
</beans>
5. Write the business Controller we want to operate, either implement the Controller interface or add annotations; we need to return a ModelAndView, load data and seal the view;
public class HelloController implements Controller {
    @Override//Return to the view parser of springmvc-servlet.xml for processing
    public ModelAndView handleRequest(HttpServletRequest httpServletRequest, HttpServletResponse httpServletResponse) throws Exception {
        //ModelAndView models and views
        ModelAndView mv = new ModelAndView();
        //Encapsulate the object and put it in ModelAndView, Model
        mv.addObject("msg","HelloSpringMVC");
        //Encapsulate the view to jump to and put it in ModelAndView
        mv.setViewName("hello");
        //Equivalent to: / WEB-INF/jsp/hello.jsp just write a Hello, because the spring MVC servlet is equipped with a prefix and suffix
        return mv;//Return to the view parser of springmvc-servlet.xml for processing
    }
}
6. Give your class to the spring IOC container and register the bean
<bean id="/hello" class="com.kuang.controller.HelloController"></bean>
7. Write the jsp page to jump to and display the data stored in ModelandView
<%@ page contentType="text/html;charset=UTF-8" language="java" %>
<html>
<head>
   <title>Kuangshen</title>
</head>
<body>
${msg}
</body>
</html>
Possible problems: visit 404, troubleshooting steps:
Check the console output to see if there is any missing jar package.
If the jar package exists and the display cannot be output, add lib dependency in the project release of IDEA!
Restart Tomcat to solve the problem!
<?xml version="1.0" encoding="UTF-8"?>
<beans xmlns="http://www.springframework.org/schema/beans"
       xmlns:xsi="http://www.w3.org/2001/XMLSchema-instance"
       xsi:schemaLocation="http://www.springframework.org/schema/beans http://www.springframework.org/schema/beans/spring-beans.xsd">
<!--springmvc Three core elements-->

<!--Processor mapper-->
    <bean class="org.springframework.web.servlet.handler.BeanNameUrlHandlerMapping"></bean>
<!--Processor adapter-->
    <bean class="org.springframework.web.servlet.mvc.SimpleControllerHandlerAdapter"></bean>
<!--View parser: template engine Thymeleaf    Freemaker-->
    <bean class="org.springframework.web.servlet.view.InternalResourceViewResolver" id="InternalResourceViewResolver">
        <property name="prefix" value="/WEB-INF/jsp/"></property>
        <property name="suffix" value=".jsp"></property>
    </bean>
<!--    BeanNameUrlHandlerMapping:bean-->
    <bean id="/hello" class="com.kuang.controller.HelloController"></bean>
</beans>
<?xml version="1.0" encoding="UTF-8"?>
<web-app xmlns="http://xmlns.jcp.org/xml/ns/javaee"
         xmlns:xsi="http://www.w3.org/2001/XMLSchema-instance"
         xsi:schemaLocation="http://xmlns.jcp.org/xml/ns/javaee http://xmlns.jcp.org/xml/ns/javaee/web-app_4_0.xsd"
         version="4.0">
    <!--to configure DispatchServlet: This is SpringMVC Request distributor, front-end controller-->
    <servlet>
        <servlet-name>springmvc</servlet-name>
        <servlet-class>org.springframework.web.servlet.DispatcherServlet</servlet-class>
        <!--DispatchServlet To bind Spring Configuration file for-->
        <init-param>
            <param-name>contextConfigLocation</param-name>
            <param-value>classpath:springmvc-servlet.xml</param-value>
        </init-param>
        <!--Startup level: 1  That is, he will get up as soon as the server starts-->
        <load-on-startup>1</load-on-startup>
    </servlet>
    <!--stay SpringMVC in /   /*
        /:Only match all requests without going back to match jsp page
        /*:Match all requests, including jsp page-->
    <servlet-mapping>
        <servlet-name>springmvc</servlet-name>
        <url-pattern>/</url-pattern>
    </servlet-mapping>
</web-app>
Summary: let's look at an annotated version implementation, which is the essence of spring MVC.
Annotated version
1. Create a new Moudle, spring mvc-03-hello-annotation. Right click to add web support
2. Since Maven may have the problem of resource filtering, we will improve the configuration
<build>
   <resources>
       <resource>
           <directory>src/main/java</directory>
           <includes>
               <include>**/*.properties</include>
               <include>**/*.xml</include>
           </includes>
           <filtering>false</filtering>
       </resource>
       <resource>
           <directory>src/main/resources</directory>
           <includes>
               <include>**/*.properties</include>
               <include>**/*.xml</include>
           </includes>
           <filtering>false</filtering>
       </resource>
   </resources>
</build>
3. Introduce related dependencies in pom.xml file: mainly Spring framework core library, Spring MVC, servlet, JSTL, etc. we have introduced them in parent dependencies
4. Configure web.xml
<?xml version="1.0" encoding="UTF-8"?>
<web-app xmlns="http://xmlns.jcp.org/xml/ns/javaee"
         xmlns:xsi="http://www.w3.org/2001/XMLSchema-instance"
         xsi:schemaLocation="http://xmlns.jcp.org/xml/ns/javaee http://xmlns.jcp.org/xml/ns/javaee/web-app_4_0.xsd"
         version="4.0">
    <!--to configure DispatchServlet: This is SpringMVC Request distributor, front-end controller-->
    <servlet>
        <servlet-name>springmvc</servlet-name>
        <servlet-class>org.springframework.web.servlet.DispatcherServlet</servlet-class>
        <!--DispatchServlet To bind Spring Configuration file for-->
        <init-param>
            <param-name>contextConfigLocation</param-name>
            <param-value>classpath:springmvc-servlet.xml</param-value>
        </init-param>
        <!--Startup level: 1  That is, he will get up as soon as the server starts-->
        <load-on-startup>1</load-on-startup>
    </servlet>
    <!--stay SpringMVC in /   /*
        /:Only match all requests without going back to match jsp page
        /*:Match all requests, including jsp page-->
    <servlet-mapping>
        <servlet-name>springmvc</servlet-name>
        <url-pattern>/</url-pattern>
    </servlet-mapping>
</web-app>
5. Add Spring MVC configuration file
Add the springmvc-servlet.xml configuration file in the resource directory. The configuration form is basically similar to the Spring container configuration. In order to support annotation based IOC, the function of automatic package scanning is set. The specific configuration information is as follows
<?xml version="1.0" encoding="UTF-8"?>
<beans xmlns="http://www.springframework.org/schema/beans"
xmlns:xsi="http://www.w3.org/2001/XMLSchema-instance"
xmlns:mvc="http://www.springframework.org/schema/mvc"
xmlns:context="http://www.springframework.org/schema/context"
xsi:schemaLocation="http://www.springframework.org/schema/beans
http://www.springframework.org/schema/beans/spring-beans.xsd
http://www.springframework.org/schema/mvc
http://www.springframework.org/schema/mvc/spring-mvc.xsd
http://www.springframework.org/schema/context
http://www.springframework.org/schema/context/spring-context.xsd">
<!-- Auto scan package,,Make the annotations under the specified package effective,from IOC Unified container management -->
<context:component-scan base-package="com.kuang.controller"></context:component-scan>
<!-- Give Way Spring MVC Do not process static resources -->
<mvc:default-servlet-handler></mvc:default-servlet-handler>
<!-- support mvc Annotation driven: in spring Generally used in@RequestMapping Annotation to complete the mapping relationship
To make@RequestMapping Note effective
You must register with the context DefaultAnnotationHandlerMapping
And one AnnotationMethodHandlerAdapter example
These two instances are handled at the class level and method level, respectively
and annotation-driven Configuration helps us automatically complete the injection of the above two instances-->
<mvc:annotation-driven></mvc:annotation-driven>
<!-- Replace the processor mapper and processor adapter with a sweeping annotation-->
<!--springmvc Three core elements-->
<!-- <!–Processor mapper:–>-->
<!-- <bean class="org.springframework.web.servlet.handler.BeanNameUrlHandlerMapping"></bean>-->
<!-- <!–Processor adapter:–>-->
<!-- <bean class="org.springframework.web.servlet.mvc.SimpleControllerHandlerAdapter"></bean>-->
<!--View parser: template engine Thymeleaf Freemaker-->
<bean class="org.springframework.web.servlet.view.InternalResourceViewResolver" id="InternalResourceViewResolver">
<!--prefix-->
<property name="prefix" value="/WEB-INF/jsp/"></property>
<!--suffix-->
<property name="suffix" value=".jsp"></property>
</bean>
<!-- BeanNameUrlHandlerMapping:bean-->
</beans>
In the view parser, we store all views in the / WEB-INF / directory, which can ensure the view security, because the files in this directory cannot be accessed directly by the client.
- Make IOC comments effective
- Static resource filtering: HTML. JS. CSS. Pictures, videos
- Annotation driven MVC
- Configure view parser
6. Create Controller
Write a Java control class: com.kuang.controller.HelloControlle
@Controller
// @RequestMapping("/hello")
//  Writing on a class is equivalent to adding a layer of path and parent-child relationship
//  localhost:8080://hello/h1
public class HelloController {
    @RequestMapping("/h1")//Using this annotation to request is equivalent to handleRequest
    public String hello(Model model){
        //Encapsulate data
        model.addAttribute("msg","Hello,SpringMVCAnnotation!");
        return "hello";//Will be processed by the view parser
    }
}
- @The Controller is used to automatically scan the Spring IOC container during initialization;
- @RequestMapping is to map the request path. Here, because there are mappings on classes and methods, the access should be / HelloController/hello;
- The purpose of declaring Model type parameters in the method is to bring the data in the Action to the view;
- The result returned by the method is the name of the view Hello, plus the prefix and suffix in the configuration file to become WEB-INF/jsp/hello.jsp.
7. Create view layer
Create hello.jsp in the WEB-INF/ jsp directory. The view can directly retrieve and display the information brought back from the Controller; the values or objects stored in the Model can be retrieved through EL representation;
<%@ page contentType="text/html;charset=UTF-8" language="java" %>
<html>
<head>
   <title>SpringMVC</title>
</head>
<body>
${msg}
</body>
</html>
Summary
The implementation steps are actually very simple:
1. Create a new web project
2. Import relevant jar packages
3. Write web.xml and register dispatcher servlet
4. Write spring MVC configuration file
5. The next step is to create the corresponding control class, controller
6. Finally, improve the correspondence between the front-end view and the controller
7. Test, operation and commissioning
Three major components that must be configured to use spring MVC:
Processor mapper, processor adapter, view parser
Usually, we only need to manually configure the view parser, while the processor mapper and processor adapter only need to turn on the annotation driver, eliminating a large section of xml configuration
Controller cotoller
- The complex controller provides the behavior of accessing the application program, which is usually implemented by interface definition or annotation definition.
- The controller is responsible for parsing the user's request and transforming it into a model.
- In Spring MVC, a controller class can contain multiple methods
- In Spring MVC, there are many ways to configure the Controller
Implement Controller interface
Controller is an interface. Under the org.springframework.web.servlet.mvc package, there is only one method in the interface
//The class implementing the interface obtains the controller function
public interface Controller {
   //Process the request and return a model and view object
   ModelAndView handleRequest(HttpServletRequest var1, HttpServletResponse var2) throws Exception;
}
1. Write a Controller class, ControllerTest1
public class ControllerTest1 implements Controller {
    @Override
    public ModelAndView handleRequest(HttpServletRequest httpServletRequest, HttpServletResponse httpServletResponse) throws Exception {
    	//Returns a model view object
        ModelAndView mv = new ModelAndView();
        mv.addObject("msg","ControllerTest1");
        mv.setViewName("test");
        return  mv;

    }
}
2. After writing, register the requested bean in the Spring configuration file; name corresponds to the request path, and class corresponds to the class that handles the request
<bean name="/t1" class="com.kuang.controller.ControllerTest1"/>
3. Write the front-end test.jsp. Note that it is written in the WEB-INF/jsp directory, corresponding to our view parser
<%@ page contentType="text/html;charset=UTF-8" language="java" %>
<html>
<head>
   <title>libai</title>
</head>
<body>
${msg}
</body>
</html>
explain:
- It is an old method to implement the interface Controller and define the Controller
- The disadvantages are: there is only one method in a Controller. If you want multiple methods, you need to define multiple controllers; The way of definition is troublesome
Use annotation @ Controller
- @The Controller annotation type is used to declare that the instance of the Spring class is a Controller (another three annotations were mentioned when talking about IOC);
- Spring can use the scanning mechanism to find all annotation based controller classes in the application. In order to ensure that spring can find your controller, you need to declare component scanning in the configuration file.
<!-- Automatically scan the specified package, and submit all the following annotation classes to IOC Container management -->
<context:component-scan base-package="com.kuang.controller"/>
- Add a ControllerTest2 class and implement it with annotations;
@Controller//Represents that this class will be taken over by Spring
//If the return value of all methods in the annotated class is String and there is a specific page to jump to, it will be parsed by the view parser
public class ControllerTest2 {
    @RequestMapping("/t2")
    public String test1(Model model){
        model.addAttribute("msg","ControllerTest2");
        return "test";//WEB-INF/jsp/hello.jsp
    }
    @RequestMapping("/t3")
    public String test2(Model model){
        model.addAttribute("msg","ControllerTest3");
        return "test";
    }
}
It can be found that both of our requests can point to a view - test.jsp, but the results of the page results are different. It can be seen from here that the view is reused, and there is a weak coupling relationship between the controller and the view
Annotation is the most commonly used method!
RequestMapping
- @RequestMapping
- @The RequestMapping annotation is used to map URLs to a controller class or a specific handler method. Can be used on classes or methods. Used on a class to indicate that all methods in the class that respond to requests take this address as the parent path.
-
- Annotate only on Methods
@Controller//Represents that this class will be taken over by Spring
//If the return value of all methods in the annotated class is String and there is a specific page to jump to, it will be parsed by the view parser
public class TestController {
   @RequestMapping("/h1")  //Access path: http://localhost:8080  /Project name / h1
   public String test(){
       return "test";
  }
}
- 2. Annotate classes and methods at the same time
@Controller
@RequestMapping("/admin")
public class TestController {
   @RequestMapping("/h1")//Access path: http://localhost:8080  /The project name is / admin /h1. You need to specify the path of the class first, and then the path of the method
   public String test(){
       return "test";
  }
}
RestFul style
Restful is a style of resource location and resource operation. It's not a standard or agreement, it's just a style. The software designed based on this style can be more concise, more hierarchical, and easier to implement caching and other mechanisms.
function
Resources: all things on the Internet can be abstracted as resources
Resource operation: use POST, DELETE, PUT and GET to operate resources using different methods.
Add, delete, modify and query respectively.
Operate resources in the traditional way: achieve different effects through different parameters! Single method, post and get
http://127.0.0.1/item/queryItem.action?id=1 Query, GET
http://127.0.0.1/item/saveItem.action New, POST
http://127.0.0.1/item/updateItem.action Update, POST
http://127.0.0.1/item/deleteItem.action?id=1 Delete, GET or POST
Using RESTful operation resources: different effects can be achieved through different request methods! As follows: the request address is the same, but the function can be different!
http://127.0.0.1/item/1 Query, GET
http://127.0.0.1/item New, POST
http://127.0.0.1/item Update, PUT
http://127.0.0.1/item/1 DELETE
Learning test
Create a new class RestFulController
In Spring MVC, you can use the @ PathVariable annotation to bind the value of the method parameter to a URI template variable.
@Controller
public class RestFulController {

   //Map access path
   @RequestMapping("/commit/{p1}/{p2}")
   public String index(@PathVariable int p1, @PathVariable int p2, Model model){

       int result = p1+p2;
       //Spring MVC will automatically instantiate a Model object to pass values to the view
       model.addAttribute("msg", "result:"+result);
       //Return to view location
       return "test";
  }
}
Access path: http://localhost:8080/commit/1/2
**Think: * * What are the benefits of using path variables?
Make the path more concise;
It is more convenient to obtain parameters, and the framework will automatically perform type conversion.
Access parameters can be constrained by the type of path variables. If the types are different, the corresponding request method cannot be accessed. For example, if the access path here is / commit/1/a, the path does not match the method, rather than parameter conversion failure.
Modify the corresponding parameter type
//Map access path
@RequestMapping("/commit/{p1}/{p2}")
public String index(@PathVariable int p1, @PathVariable String p2, Model model){

   String result = p1+p2;
   //Spring MVC will automatically instantiate a Model object to pass values to the view
   model.addAttribute("msg", "result:"+result);
   //Return to view location
   return "test";
}
Access path: http://localhost:8080/commit/1/c Operation result 1c
Use the method property to specify the request type
//The mapped access path must be a POST request
@RequestMapping(value = "/hello",method = {RequestMethod.POST})
public String index2(Model model){
   model.addAttribute("msg", "hello!");
   return "test";
}
We use the browser address bar to access. By default, it is a Get request, and an error 405 will be reported:
//Map access path, must be a Get request
@RequestMapping(value = "/hello",method = {RequestMethod.GET})
public String index2(Model model){
   model.addAttribute("msg", "hello!");
   return "test";
}
If you change POST to GET, it is normal
Summary
The @ RequestMapping annotation of Spring MVC can handle HTTP requests, such as GET, PUT, POST, DELETE and PATCH.
All address bar requests will be of HTTP GET type by default.
Method level annotation variants are as follows: combined annotation
@GetMapping
@PostMapping
@PutMapping
@DeleteMapping
@PatchMapping
@GetMapping is a combined annotation, which is often used!
@GetMapping plays a shortcut to @ RequestMapping(method =RequestMethod.GET)
Comprehensive method
@Controller
public class RestFulController {

    //Original---------- http://localhost:8080/add?a=1&b=2
    @RequestMapping("/add")
    public String test1(int a, int b, Model model){
        int res= a+b;
        model.addAttribute("msg","Original style--The result is"+res);
        return "test";
    }

    //RestFul--------http://localhost:8080/add/1/4
    @RequestMapping("/add/{a}/{b}")
    public String test2(@PathVariable int a, @PathVariable int b, Model model){
        int res= a+b;
        model.addAttribute("msg","RestFul of/add/{a}/{b}The result is"+res);
        return "test";
    }
    //Use value or path
    @RequestMapping(value="/add/{a}/{b}",method = RequestMethod.GET)
    public String test3(@PathVariable int a, @PathVariable int b, Model model){
        int res= a+b;
        model.addAttribute("msg","RestFul of method = RequestMethod.GET The result is"+res);
        return "test";
    }
    //@RequestMapping(value="/add/{a}/{b}",method = RequestMethod.GET)
    @GetMapping("/add/{a}/{b}")//The above is simplified to
    public String test4(@PathVariable int a, @PathVariable int b, Model model){
        int res= a+b;
        model.addAttribute("msg","@GetMapping(\"/add/{a}/{b}\")The result is"+res);
        return "test";
    }
}
springmvc-servlet.xml
<?xml version="1.0" encoding="UTF-8"?>
<beans xmlns="http://www.springframework.org/schema/beans"
xmlns:xsi="http://www.w3.org/2001/XMLSchema-instance"
xmlns:mvc="http://www.springframework.org/schema/mvc"
xmlns:context="http://www.springframework.org/schema/context"
xsi:schemaLocation="http://www.springframework.org/schema/beans
http://www.springframework.org/schema/beans/spring-beans.xsd
http://www.springframework.org/schema/mvc
http://www.springframework.org/schema/mvc/spring-mvc.xsd
http://www.springframework.org/schema/context
http://www.springframework.org/schema/context/spring-context.xsd">
<context:component-scan base-package="com.kaung.controller"></context:component-scan>
<!--<!– Equivalent to previous handle That part–>-->
<!-- <mvc:default-servlet-handler></mvc:default-servlet-handler>-->
<!-- <mvc:annotation-driven></mvc:annotation-driven>-->
<bean class="org.springframework.web.servlet.view.InternalResourceViewResolver" id="internalResourceViewResolver">
<property name="prefix" value="/WEB-INF/jsp/"></property>
<property name="suffix" value=".jsp"></property>
</bean>
web.xml
 <!--to configure DispatchServlet: This is SpringMVC The core of; Request distributor, front controller-->
    <servlet>
        <servlet-name>springmvc</servlet-name>
        <servlet-class>org.springframework.web.servlet.DispatcherServlet</servlet-class>
        <!--DispatchServlet To bind Spring Configuration file for-->
        <init-param>
            <param-name>contextConfigLocation</param-name>
            <param-value>classpath:springmvc-servlet.xml</param-value>
        </init-param>
        <!--Startup level: 1  That is, he will get up as soon as the server starts-->
        <load-on-startup>1</load-on-startup>
    </servlet>
    <!--stay SpringMVC in /   /*
        /:Only match all requests without going back to match jsp page
        /*:Match all requests, including jsp page-->
    <servlet-mapping>
        <servlet-name>springmvc</servlet-name>
        <url-pattern>/</url-pattern>
    </servlet-mapping>
Several result jump methods
ModelAndView sets the ModelAndView object and jumps to the specified page according to the name of the view and the view parser
Page: {view parser prefix} + viewName + {view parser suffix}
<!-- view resolver  -->
<bean class="org.springframework.web.servlet.view.InternalResourceViewResolver"
     id="internalResourceViewResolver">
   <!-- prefix -->
   <property name="prefix" value="/WEB-INF/jsp/" />
   <!-- suffix -->
   <property name="suffix" value=".jsp" />
</bean>
public class ControllerTest1 implements Controller {

   public ModelAndView handleRequest(HttpServletRequest httpServletRequest, HttpServletResponse httpServletResponse) throws Exception {
       //Returns a model view object
       ModelAndView mv = new ModelAndView();
       mv.addObject("msg","ControllerTest1");
       mv.setViewName("test");
       return mv;
  }
}
ServletAPI
By setting the servlet API, no view parser is required
1. Output through HttpServletResponse
2. Redirection via HttpServletResponse
3. Forwarding through HttpServletResponse
@Controller
public class ResultGo {

   @RequestMapping("/result/t1")
   public void test1(HttpServletRequest req, HttpServletResponse rsp) throws IOException {
       rsp.getWriter().println("Hello,Spring BY servlet API");
  }

   @RequestMapping("/result/t2")
   public void test2(HttpServletRequest req, HttpServletResponse rsp) throws IOException {
       rsp.sendRedirect("/index.jsp");
  }

   @RequestMapping("/result/t3")
   public void test3(HttpServletRequest req, HttpServletResponse rsp) throws Exception {
       //forward
       req.setAttribute("msg","/result/t3");
       req.getRequestDispatcher("/WEB-INF/jsp/test.jsp").forward(req,rsp);
  }

}
SpringMVC
Forward and redirect through spring MVC - no view parser is required;
Before testing, you need to comment out the view parser
@Controller
public class ResultSpringMVC {
   @RequestMapping("/rsm/t1")
   public String test1(){
       //forward
       return "/index.jsp";
  }

   @RequestMapping("/rsm/t2")
   public String test2(){
       //Forward two
       return "forward:/index.jsp";
  }

   @RequestMapping("/rsm/t3")
   public String test3(){
       //redirect
       return "redirect:/index.jsp";
  }
}
Forward and redirect through spring MVC - view parser;
Redirection does not require a view parser. Its essence is to re request a new place, so pay attention to the path problem
You can redirect to another request implementation
@Controller
public class ResultSpringMVC2 {
   @RequestMapping("/rsm2/t1")
   public String test1(){
       //forward
       return "test";
  }

   @RequestMapping("/rsm2/t2")
   public String test2(){
       //redirect
       return "redirect:/index.jsp";
       //return "redirect:hello.do"; //hello.do is another request/
  }

}
data processing
1. The submitted domain name is consistent with the parameter name of the processing method
Submit data: http://localhost:8080/hello?name=kuangshen
Treatment method:
@RequestMapping("/hello")
public String hello(String name){
   System.out.println(name);
   return "hello";
}
2. The submitted domain name is inconsistent with the parameter name of the processing method
Submit data: http://localhost:8080/hello?username=kuangshen
Treatment method:
//@Requestparam ("username"): the name of the domain submitted by username
@RequestMapping("/hello")
public String hello(@RequestParam("username") String name){
   System.out.println(name);
   return "hello";
}
3. Submitted is an object
It is required that the submitted form field and the attribute name of the object are consistent, and the parameter can use the object
1. Entity class
public class User {
   private int id;
   private String name;
   private int age;
   //structure
   //get/set
   //tostring()
}
2. Submit data: http://localhost:8080/mvc04/user?name= Li Bai & id = 1 & age = 15
3. Treatment method:
//The front end accepts an object: id,name,age

    /**
     * 1.Accept the parameters passed by the front-end user, judge the name of the parameter, and assume that the name is directly on the method and can be used directly
     * 2.Suppose a User object is passed, matching the field names in the User object. If the names are the same, then ok. Otherwise, the matching is not true
     */
    @GetMapping("t2")
    public String test2(User user){
        System.out.println(user);
        return "test";
    }
Background output: user {id = 1, name = 'Li Bai', age=15}
Note: if an object is used, the parameter name passed by the front end must be consistent with the object name, otherwise it is null.
Data display to front end
First: through ModelAndView
public class ControllerTest1 implements Controller {

   public ModelAndView handleRequest(HttpServletRequest httpServletRequest, HttpServletResponse httpServletResponse) throws Exception {
       //Returns a model view object
       ModelAndView mv = new ModelAndView();
       mv.addObject("msg","ControllerTest1");
       mv.setViewName("test");
       return mv;
  }
}
The second is through ModelMap
ModelMap
@RequestMapping("/hello")
public String hello(@RequestParam("username") String name, ModelMap model){
   //Encapsulates the data to be displayed in the view
   //Equivalent to req.setAttribute("name",name);
   model.addAttribute("name",name);
   System.out.println(name);
   return "hello";
}
Third: through Model
Model
@RequestMapping("/ct2/hello")
public String hello(@RequestParam("username") String name, Model model){
   //1. Receive front-end parameters - @ RequestParam("username") is not required if the front-end field name is the same as that after String
   //Encapsulates the data to be displayed in the view
   //Equivalent to req.setAttribute("name",name);
   model.addAttribute("msg",name);
    //2. Pass the returned result to the front end
   System.out.println(name);
   //3. View jump
   return "test";

}
contrast
Model has only a few methods, which are only suitable for storing data, simplifying novices' operation and understanding of model objects;
ModelMap inherits LinkedMap. In addition to implementing some of its own methods, ModelMap also inherits the methods and features of LinkedMap;
ModelAndView can store data, set the returned logical view, and control the jump of the display layer.
Garbled code problem
<form action="/e/t" method="post">
 <input type="text" name="name">
 <input type="submit">
</form>
@Controller
public class Encoding {
   @RequestMapping("/e/t")
   public String test(Model model,String name){
       model.addAttribute("msg",name); //Gets the value of the form submission
       return "test"; //Jump to the test page and display the entered value
  }
}
Write your own simple filter
public class EncodingFilter implements Filter {

    @Override
    public void init(FilterConfig filterConfig) throws ServletException {

    }

    @Override
    public void doFilter(ServletRequest request, ServletResponse response, FilterChain chain) throws IOException, ServletException {
        request.setCharacterEncoding("utf-8");
        request.setCharacterEncoding("utf-8");
        chain.doFilter(request,response);
    }

    @Override
    public void destroy() {

    }
}
Spring MVC provides us with a filter that can be configured in web.xml. (the xml file has been modified and the server needs to be restarted!)
<filter>
   <filter-name>encoding</filter-name>
   <filter-class>org.springframework.web.filter.CharacterEncodingFilter</filter-class>
   <init-param>
       <param-name>encoding</param-name>
       <param-value>utf-8</param-value>
   </init-param>
</filter>
<filter-mapping>
   <filter-name>encoding</filter-name>
   <url-pattern>/*</url-pattern>
</filter-mapping>
However, we found that in some extreme cases, this filter does not support get well
Treatment method:
1. Modify tomcat configuration file: set encoding
Connector URIEncoding="utf-8" port="8080" protocol="HTTP/1.1"
          connectionTimeout="20000"
          redirectPort="8443" />
2. Customize the filter,,, and then configure the filter in web.xml!
package com.kuang.filter;

import javax.servlet.*;
import javax.servlet.http.HttpServletRequest;
import javax.servlet.http.HttpServletRequestWrapper;
import javax.servlet.http.HttpServletResponse;
import java.io.IOException;
import java.io.UnsupportedEncodingException;
import java.util.Map;

/**
* Filter to solve all the garbled codes of get and post requests
*/
public class GenericEncodingFilter implements Filter {

   @Override
   public void destroy() {
  }

   @Override
   public void doFilter(ServletRequest request, ServletResponse response, FilterChain chain) throws IOException, ServletException {
       //Handle the character encoding of the response
       HttpServletResponse myResponse=(HttpServletResponse) response;
       myResponse.setContentType("text/html;charset=UTF-8");

       // Transformation into agreement related objects
       HttpServletRequest httpServletRequest = (HttpServletRequest) request;
       // Enhanced request packaging
       HttpServletRequest myrequest = new MyRequest(httpServletRequest);
       chain.doFilter(myrequest, response);
  }

   @Override
   public void init(FilterConfig filterConfig) throws ServletException {
  }

}

//Custom request object, wrapper class of HttpServletRequest
class MyRequest extends HttpServletRequestWrapper {

   private HttpServletRequest request;
   //Coded flag
   private boolean hasEncode;
   //Define a constructor that can be passed into the HttpServletRequest object to decorate it
   public MyRequest(HttpServletRequest request) {
       super(request);// super must write
       this.request = request;
  }

   // Override methods that need to be enhanced
   @Override
   public Map getParameterMap() {
       // Get request method first
       String method = request.getMethod();
       if (method.equalsIgnoreCase("post")) {
           // post request
           try {
               // Handle post garbled code
               request.setCharacterEncoding("utf-8");
               return request.getParameterMap();
          } catch (UnsupportedEncodingException e) {
               e.printStackTrace();
          }
      } else if (method.equalsIgnoreCase("get")) {
           // get request
           Map<String, String[]> parameterMap = request.getParameterMap();
           if (!hasEncode) { // Ensure that the get manual encoding logic runs only once
               for (String parameterName : parameterMap.keySet()) {
                   String[] values = parameterMap.get(parameterName);
                   if (values != null) {
                       for (int i = 0; i < values.length; i++) {
                           try {
                               // Handle get garbled code
                               values[i] = new String(values[i]
                                      .getBytes("ISO-8859-1"), "utf-8");
                          } catch (UnsupportedEncodingException e) {
                               e.printStackTrace();
                          }
                      }
                  }
              }
               hasEncode = true;
          }
           return parameterMap;
      }
       return super.getParameterMap();
  }

   //Take a value
   @Override
   public String getParameter(String name) {
       Map<String, String[]> parameterMap = getParameterMap();
       String[] values = parameterMap.get(name);
       if (values == null) {
           return null;
      }
       return values[0]; // Retrieve the first value of the parameter
  }

   //Take all values
   @Override
   public String[] getParameterValues(String name) {
       Map<String, String[]> parameterMap = getParameterMap();
       String[] values = parameterMap.get(name);
       return values;
  }
}
Jason interactive processing
-
JSON (JavaScript object notation) is a lightweight data exchange format, which is widely used at present.
-
Data is stored and represented in a text format completely independent of the programming language.
-
The concise and clear hierarchy makes JSON an ideal data exchange language.
-
It is easy for people to read and write, but also easy for machine analysis and generation, and effectively improves the network transmission efficiency.
In the JavaScript language, everything is an object. Therefore, any type supported by JavaScript can be represented by JSON, such as string, number, object, array, etc. Look at his requirements and syntax format:
-
Objects are represented as key value pairs, and data is separated by commas
-
Curly braces save objects
-
Square brackets hold the array
JSON key value pairs are a way to save JavaScript objects, and the writing method is similar to that of JavaScript objects. The key name in the key / value pair combination is written in front and wrapped in double quotation marks "", separated by colon: and then followed by the value:
{"name": "libai"}
{"age": "3"}
{"sex": "male"}
JSON is a string representation of JavaScript objects. It uses text to represent the information of a JS object, which is essentially a string.
var obj = {a: ‘Hello’, b: ‘World’}; // This is an object. Note that the key name can also be wrapped in quotation marks
var json = ‘{“a”: “Hello”, “b”: “World”}’; // This is a JSON string, which is essentially a string
JSON and JavaScript objects interoperate
To convert from a JSON string to a JavaScript object, use the JSON.parse() method:
var obj = JSON.parse('{"a": "Hello", "b": "World"}');
//The result is {a: 'Hello', b: 'World'}
To convert from a JavaScript object to a JSON string, use the JSON.stringify() method:
var json = JSON.stringify({a: 'Hello', b: 'World'});
//The result is' {"a": "Hello", "b": "World"} '
Code test
<!DOCTYPE html>
<html lang="en">
<head>
   <meta charset="UTF-8">
   <title>JSON_Qin Jiang</title>
</head>
<body>

<script type="text/javascript">
   //Write a js object
   var user = {
       name:"Qin Jiang",
       age:3,
       sex:"male"
  };
   //Convert js object to json string
   var str = JSON.stringify(user);
   console.log(str);

   //Convert json string to js object
   var user2 = JSON.parse(str);
   console.log(user2.age,user2.name,user2.sex);

</script>

</body>
</html>
Jackson should be a better json parsing tool at present
Of course, there are more than one tool, such as Alibaba's fastjson and so on.
We use Jackson here. To use Jackson, we need to import its jar package;
<dependency>
   <groupId>com.fasterxml.jackson.core</groupId>
   <artifactId>jackson-databind</artifactId>
   <version>2.9.8</version>
</dependency>
Configuration required to configure spring MVC
web.xml
<?xml version="1.0" encoding="UTF-8"?>
<web-app xmlns="http://xmlns.jcp.org/xml/ns/javaee"
        xmlns:xsi="http://www.w3.org/2001/XMLSchema-instance"
        xsi:schemaLocation="http://xmlns.jcp.org/xml/ns/javaee http://xmlns.jcp.org/xml/ns/javaee/web-app_4_0.xsd"
        version="4.0">

   <!--1.register servlet-->
   <servlet>
       <servlet-name>SpringMVC</servlet-name>
       <servlet-class>org.springframework.web.servlet.DispatcherServlet</servlet-class>
       <!--Specified by initialization parameters SpringMVC The location of the configuration file is associated-->
       <init-param>
           <param-name>contextConfigLocation</param-name>
           <param-value>classpath:springmvc-servlet.xml</param-value>
       </init-param>
       <!-- Start sequence: the smaller the number, the earlier the start -->
       <load-on-startup>1</load-on-startup>
   </servlet>

   <!--All requests will be rejected springmvc intercept -->
   <servlet-mapping>
       <servlet-name>SpringMVC</servlet-name>
       <url-pattern>/</url-pattern>
   </servlet-mapping>

   <filter>
       <filter-name>encoding</filter-name>
       <filter-class>org.springframework.web.filter.CharacterEncodingFilter</filter-class>
       <init-param>
           <param-name>encoding</param-name>
           <param-value>utf-8</param-value>
       </init-param>
   </filter>
   <filter-mapping>
       <filter-name>encoding</filter-name>
       <url-pattern>/</url-pattern>
   </filter-mapping>

</web-app>
Configure springmvc-servlet.xml
<?xml version="1.0" encoding="UTF-8"?>
<beans xmlns="http://www.springframework.org/schema/beans"
      xmlns:xsi="http://www.w3.org/2001/XMLSchema-instance"
      xmlns:context="http://www.springframework.org/schema/context"
      xmlns:mvc="http://www.springframework.org/schema/mvc"
      xsi:schemaLocation="http://www.springframework.org/schema/beans
       http://www.springframework.org/schema/beans/spring-beans.xsd
       http://www.springframework.org/schema/context
       https://www.springframework.org/schema/context/spring-context.xsd
       http://www.springframework.org/schema/mvc
       https://www.springframework.org/schema/mvc/spring-mvc.xsd">

   <!-- Automatically scan the specified package, and submit all the following annotation classes to IOC Container management -->
   <context:component-scan base-package="com.kuang.controller"/>

   <!-- view resolver  -->
   <bean class="org.springframework.web.servlet.view.InternalResourceViewResolver"
         id="internalResourceViewResolver">
       <!-- prefix -->
       <property name="prefix" value="/WEB-INF/jsp/" />
       <!-- suffix -->
       <property name="suffix" value=".jsp" />
   </bean>

</beans>
Write a User entity class, and then we write our test Controller
//lombok needs to be imported
@Data
@AllArgsConstructor
@NoArgsConstructor
public class User {

   private String name;
   private int age;
   private String sex;

}
Here we need two new things, one is @ ResponseBody and the other is ObjectMapper object. Let's see the specific usage
Write a Controller;
//@Controller + @ ResponseBody only uses json
//Or RestController just walks json

//@/ / the Controller can only use the view parser
@RestController//Instead of using the view parser, only json is returned
public class UserController {

    @RequestMapping("/j1") //Products to solve the problem of json garbled code
    //@RequestMapping(value = "/j1",produces = "application/json;charset=utf-8")
    @ResponseBody//He will not go to the view parser and will directly return a string
    public String json1() throws JsonProcessingException {
        //jackson,objectMapper
        ObjectMapper mapper = new ObjectMapper();
        //Create an object
        User user = new User("Li Bai",20,"male");
        String str = mapper.writeValueAsString(user);
        return str;
    }

    @RequestMapping("/j2")
    @ResponseBody
    public String json2() throws JsonProcessingException {
        //jackson,objectMapper
        ObjectMapper mapper = new ObjectMapper();
        //Create an object
        User user1 = new User("Li 1 Bai",20,"male");
        User user2 = new User("Li 2 Bai",20,"male");
        User user3 = new User("Li 3 Bai",20,"male");
        User user4 = new User("Li 4 Bai",20,"male");
        List<User> userList = new ArrayList<>();
        userList.add(user1);
        userList.add(user2);
        userList.add(user3);
        userList.add(user4);

//        String str = mapper.writeValueAsString(userList);
//        return str;
        //Call the tool class written by yourself
        return JsonUtils.getJson(userList);

    }

    @RequestMapping("/j3")
    @ResponseBody
    public String json3() throws JsonProcessingException {

        ObjectMapper mapper = new ObjectMapper();
        //Without timestamp
        mapper.configure(SerializationFeature.WRITE_DATE_KEYS_AS_TIMESTAMPS, false);

        //Custom date format
        SimpleDateFormat sdf = new SimpleDateFormat("yyyy-MM-dd HH:mm:ss");
        mapper.setDateFormat(sdf);

		//Create a time object, java.util.Date
        Date date = new Date();
        //ObjectMapper, the default format after time parsing is: timestamp, timestamp: the number of milliseconds since January 1, 1970
        //Parse our object into json format
        return mapper.writeValueAsString(date);
    }
	//Use the tool class extracted by yourself,,, and JsoUtils are at the bottom
    @RequestMapping("/j4")
    @ResponseBody
    public String json4() throws JsonProcessingException {

        Date date = new Date();
        return JsonUtils.getJson(date,"yyyy-MM-dd HH:mm:ss");
    }

    // Use Ali's fastJSON
    @RequestMapping("/j5")
    public String json5() throws JsonProcessingException {

        List<User> userList = new ArrayList<>();
        //Create an object
        User user1 = new User("Li 1 Bai",20,"male");
        User user2 = new User("Li 2 Bai",20,"male");
        User user3 = new User("Li 3 Bai",20,"male");
        User user4 = new User("Li 4 Bai",20,"male");

        userList.add(user1);
        userList.add(user2);
        userList.add(user3);
        userList.add(user4);

        String string = JSON.toJSONString(userList);
        return string;

    }

}
Extract as tool class
If you want to use it frequently, it is troublesome. We can encapsulate these codes into a tool class; Let's write it
Unified solution of garbled code
The previous produces method is troublesome. If there are many requests in the project, each one should be added, which can be specified uniformly through Spring configuration, so you don't have to deal with them every time!
public class JsonUtils {
   //Realize code reuse and use the call of return
   public static String getJson(Object object) {
       return getJson(object,"yyyy-MM-dd HH:mm:ss");
  }

   public static String getJson(Object object,String dateFormat) {
       ObjectMapper mapper = new ObjectMapper();
       //Do not use time difference
       mapper.configure(SerializationFeature.WRITE_DATES_AS_TIMESTAMPS, false);
       //Custom date format object
       SimpleDateFormat sdf = new SimpleDateFormat(dateFormat);
       //Specify date format
       mapper.setDateFormat(sdf);
       try {
           return mapper.writeValueAsString(object);
      } catch (JsonProcessingException e) {
           e.printStackTrace();
      }
       return null;
  }
}
When we use tool classes, the code is more concise!
@RequestMapping("/json5")
public String json5() throws JsonProcessingException {
   Date date = new Date();
   String json = JsonUtils.getJson(date);
   return json;
}
<mvc:annotation-driven>
   <mvc:message-converters register-defaults="true">
       <bean class="org.springframework.http.converter.StringHttpMessageConverter">
           <constructor-arg value="UTF-8"/>
       </bean>
       <bean class="org.springframework.http.converter.json.MappingJackson2HttpMessageConverter">
           <property name="objectMapper">
               <bean class="org.springframework.http.converter.json.Jackson2ObjectMapperFactoryBean">
                   <property name="failOnEmptyBeans" value="false"/>
               </bean>
           </property>
       </bean>
   </mvc:message-converters>
</mvc:annotation-driven>
Unified solution for returning json strings
Use @ RestController directly on the class. In this way, all the methods in it will only return json strings. There is no need to add @ ResponseBody to each one! We generally use @ RestController in front and back-end separation development, which is very convenient!
FastJson
fastjson.jar is a package developed by Alibaba for Java development. It can easily realize the conversion between json objects and JavaBean objects, between JavaBean objects and json strings, and between json objects and json strings. There are many conversion methods to implement json, and the final implementation results are the same.
pom dependency of fastjson
<dependency>
   <groupId>com.alibaba</groupId>
   <artifactId>fastjson</artifactId>
   <version>1.2.60</version>
</dependency>
fastjson has three main classes:
JSONObject represents a json object
-
JSONObject implements the Map interface. I guess the underlying operation of JSONObject is implemented by Map.
-
JSONObject corresponds to the json object. You can obtain the data in the json object through various forms of get() methods. You can also use methods such as size(), isEmpty() to obtain the number of "key: value" pairs and judge whether they are empty. Its essence is accomplished by implementing the Map interface and calling the methods in the interface.
JSONArray represents an array of json objects
- Internally, there are methods in the List interface to complete the operation.
JSON represents the conversion of JSONObject and JSONArray
-
Analysis and use of JSON class source code
-
Carefully observe these methods, mainly to realize the mutual transformation between json objects, json object arrays, javabean objects and json strings.
The code is like @ RequestMapping("/j5") public String json5()