nn.Module neural network
4. Pool layer
Pooling layer: the pooling function uses the overall statistical characteristics of adjacent outputs at a location to replace the network output at that location. The essence is downsampling to reduce the amount of network parameters
Still the old rule, import module and dataset, CIFAR10,batchsize=64:
import torch
import torchvision
from torch import nn
from torch.nn import MaxPool2d
from torch.utils.data import DataLoader
from torch.utils.tensorboard import SummaryWriter

dataset = torchvision.datasets.CIFAR10('./dataset',train=False,transform=torchvision.transforms.ToTensor(),download=True)

dataloader = DataLoader(dataset,batch_size=64)
The input and output types of the pooling function of MaxPool2d we use this time are as follows:
input (batchsize, channel, height H, width W)
output (batchsize, channel, height H, width W)
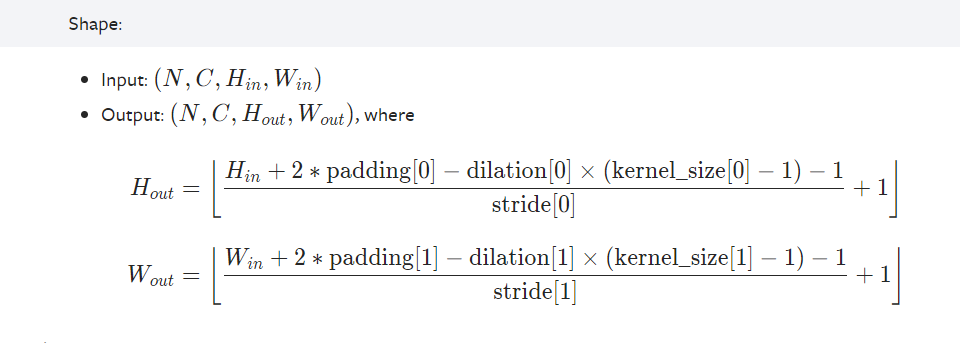
Therefore, first, according to the information in the figure below, construct a two-dimensional matrix with input as tensor data type, and use the reshape function to convert it to the size type required by MaxPool2d function:
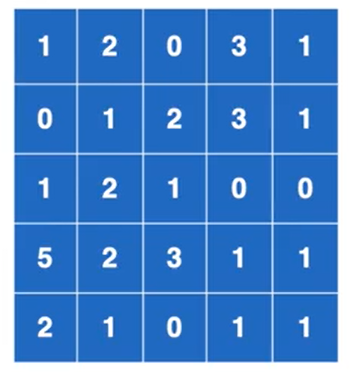
input = torch.tensor([[1,2,0,3,1],
                      [0,1,2,3,1],
                      [1,2,1,0,0],
                      [5,2,3,1,1],
                      [2,1,0,1,1]],dtype=torch.float32)
input = torch.reshape(input,(-1,1,5,5)) batchsize Calculate it yourself, channel 1, 5*5 Height width size of
Define class, inherit nn.Module, and construct neural network, including pooling layer:
class Chenyu(nn.Module):
    def __init__(self):
        super(Chenyu, self).__init__()
        self.maxpool1=MaxPool2d(kernel_size=3,ceil_mode=False)     Pooling function

    def forward(self,input):
        output = self.maxpool1(input)
        return output
After the data set is put into the neural network and pooled, the results are visually displayed on the tensorboard:
writer=SummaryWriter('logs_maxpool')
step = 0
for data in dataloader:
    imgs, target =data
    writer.add_images("input",imgs,step)
    output =chenyu(imgs)
    writer.add_images('output',output,step)
    step = step+1

writer.close()
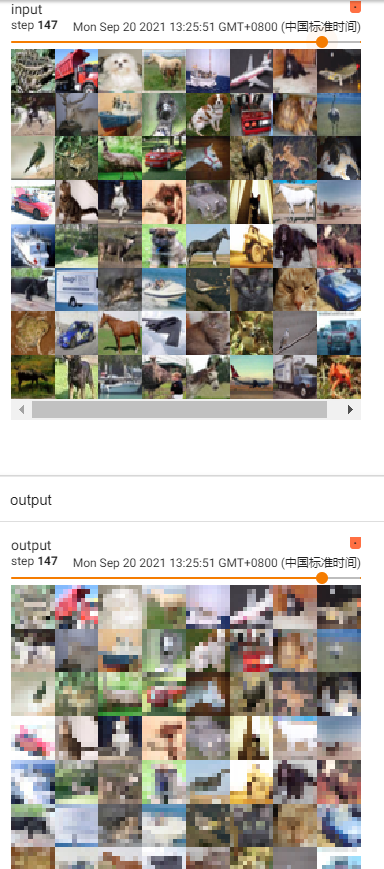
Display results:
We can see that after the processing of the pooling layer, the output picture becomes like a mosaic, which is the characteristic of the pooling layer. The overall statistical characteristics of the adjacent outputs at a certain location are used to replace the network output at that location.
5. Nonlinear activation function
Nonlinear activation: the purpose is to give more nonlinear characteristics to the neural network, so as to achieve the purpose we need.
Commonly used ReLU,Sigmoid and other activation functions
① Take ReLU as an example:
When the input value is greater than 0, it is itself, and when it is less than 0, it is set to 0
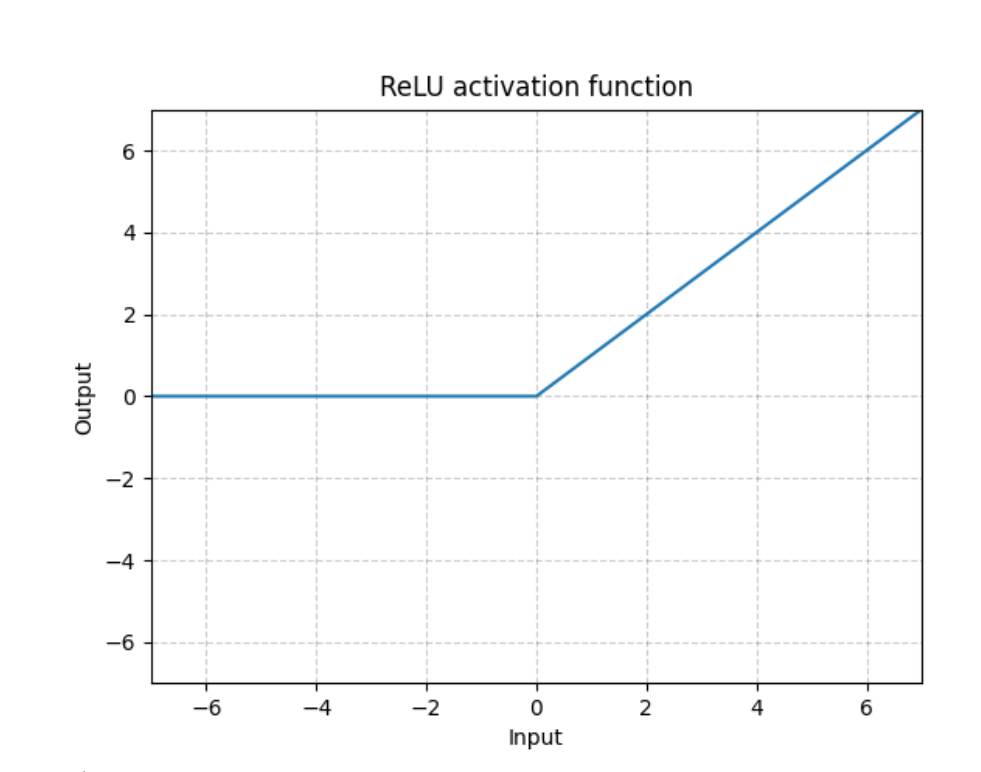
First, import the module, define the two-dimensional matrix of tensor type variables, and modify it with reshape:
import  torch
from torch import nn
from torch.nn import ReLU
input = torch.tensor([[1,-0.5],
                      [-1,3]])
torch.reshape(input,(-1,1,2,2))
Define class, inherit nn.Module class and create neural network, which contains nonlinear activation function ReLU:
class ChenYu(nn.Module):
    def __init__(self):
        super(ChenYu, self).__init__()
        self.relu1=ReLU()
        #When Inplace is False, the original data can be maintained. The default is False

    def forward(self,input):
        output = self.relu1(input)
        return output
Operation:`
chenyu=ChenYu()
output = chenyu(input)
print(output)
Operation results:
tensor([[1., 0.],
        [0., 3.]])
② Take Sigmoid as an example:
Sigmoid function is often used as the activation function of neural network to map variables between 0 and 1.
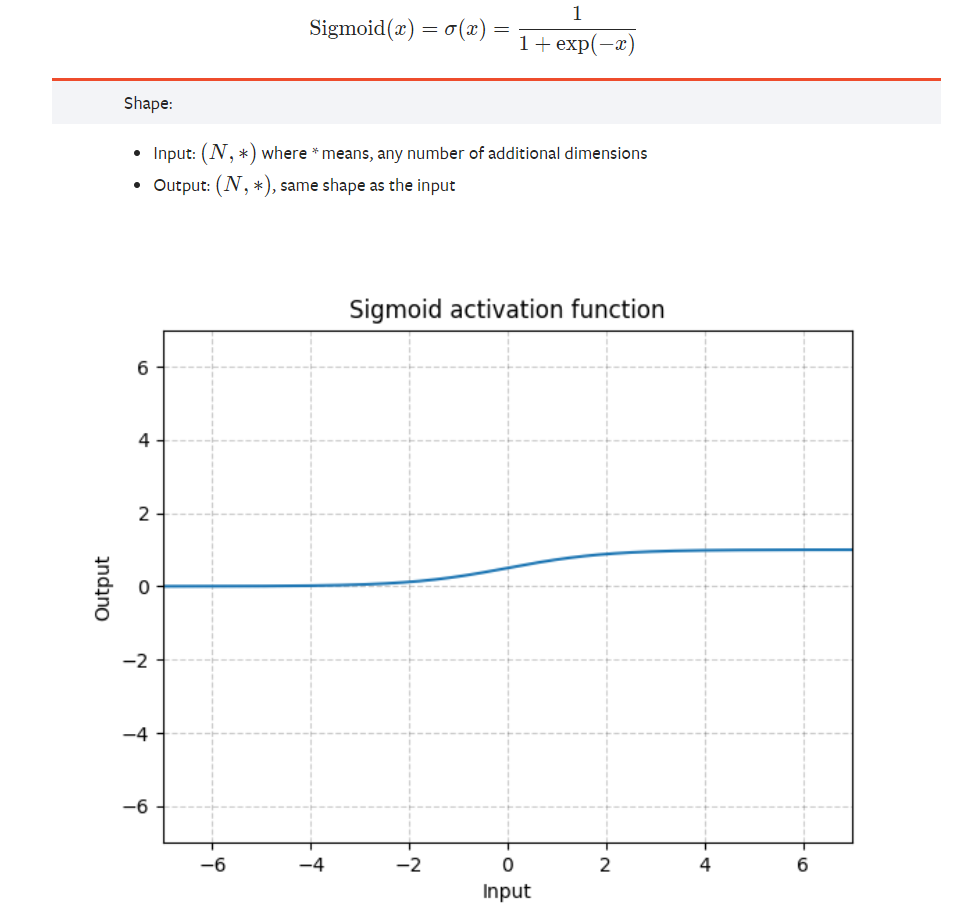
Take the dataset CIFAR10 as an example, set the batchsize to 64, and create a neural network, which contains the sigmoid activation function:
class ChenYu(nn.Module):
    def __init__(self):
        super(ChenYu, self).__init__()
        self.sigmoid1=Sigmoid()
        #When Inplace is False, the original data can be maintained. The default is False

    def forward(self,input):
        output = self.sigmoid1(input)
        return output
Input the samples in the data set into the neural network:
chenyu=ChenYu()
writer = SummaryWriter('./logs_sigmoid')
step =0

for data in dataloader:
    imgs, target = data
    writer.add_images('input',imgs,global_step=step)
    output = chenyu(imgs)
    writer.add_images('output',output,step)
    step=step+1

writer.close()
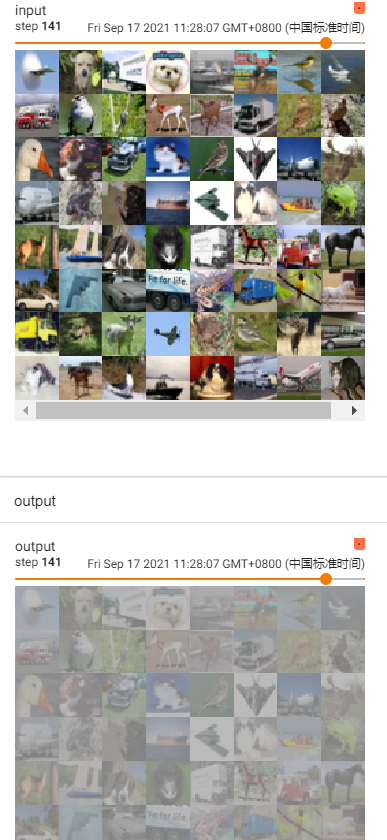
The output results are displayed on the tensorboard:
(it can be observed that the pictures output through the network are covered with gray}
6. Implementation of vgg16 sample model and use of Sequential() function:
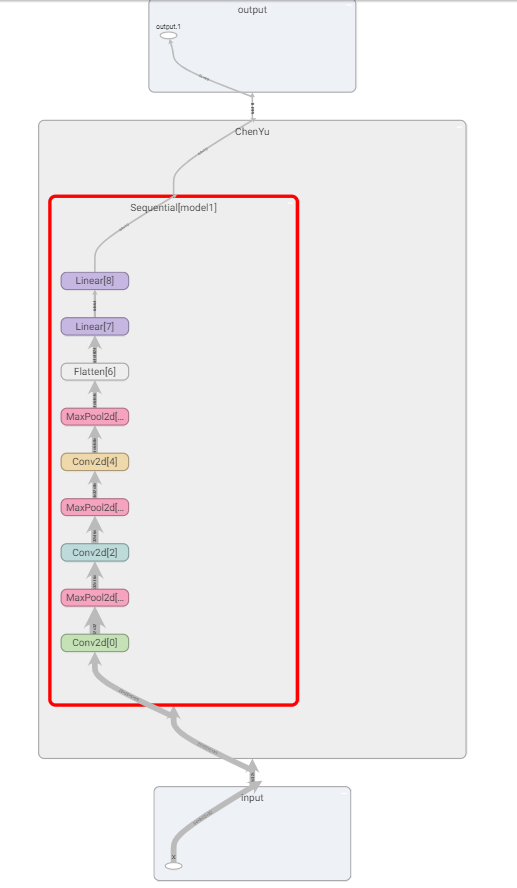
The following will construct the neural network according to the picture
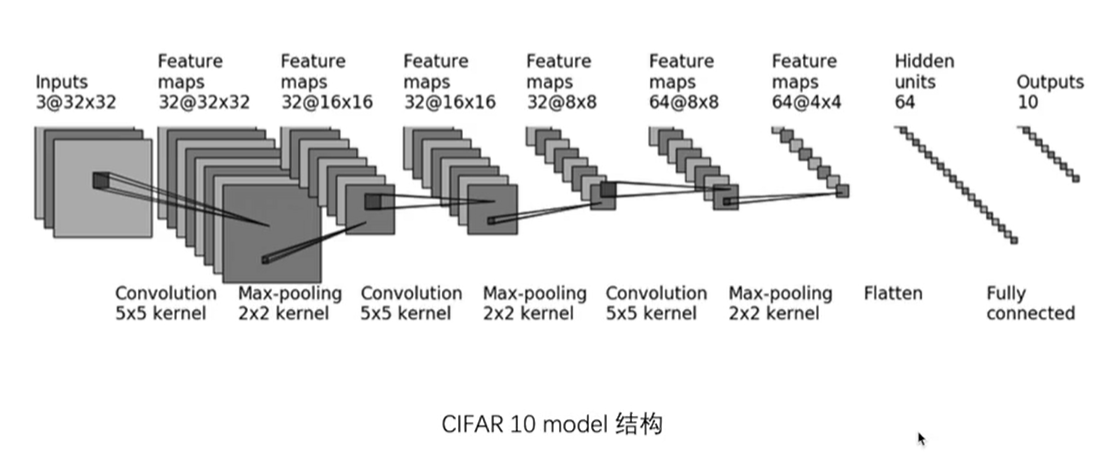
Import module:
import torch
from torch import nn
from torch.nn import Conv2d, MaxPool2d, Flatten, Linear, Sequential
from torch.utils.tensorboard import SummaryWriter
Construct neural network (three convolutions, three pooling, one flatten, two linear layers):
The Sequential () function is used here: the modules in Sequential need to be arranged in order. To ensure that the input and output sizes of adjacent layers match, the internal forward function has been implemented to make the code cleaner.
class ChenYu(nn.Module):
    def __init__(self):
        super(ChenYu, self).__init__()
        self.model1 =Sequential(              Sequential function
        Conv2d(3,32,5,padding=2),   First convolution
        MaxPool2d(2),				First pool layer
        Conv2d(32,32,5,padding=2),		Second convolution
        MaxPool2d(2),					Second pool layer
        Conv2d(32,64,5,padding=2),		Third convolution
        MaxPool2d(2),					Third pool layer
        Flatten(),						Flatten data flatten()function
        Linear(1024,64),				First linear layer
        Linear(64,10)					Second linear layer conversion
        )

    def forward(self,x):
        x=self.model1(x)					The model can be called directly and executed in turn according to the network structure designed in the model
        return x
Check whether the neural network is correct, and show the design structure of the network on the tensorboard:
Create fake data input= torch.ones()
chenyu=ChenYu()
print(chenyu)

#Judge whether the network is correct
input = torch.ones((64,3,32,32))
output = chenyu(input)
print(output.shape)

writer =SummaryWriter('logs_seq')
writer.add_graph(chenyu,input)
writer.close()
Design structure display:
