Recently, a code scanning gun will be integrated in the project, and I will be responsible for docking. I have to say, this code scanning gun is really the most annoying I've ever seen. The first is the hardware, which needs to be assembled by yourself, and then the network cable needs to make one to connect to their pin. There is no charging line, which needs 24V voltage, so it needs a voltage converter and then connected directly. The electrical part is responsible for the hardware, and then the software part. Normally, when a hardware device takes over, there will be a document informing the communication protocol. Some better ones have corresponding SDK s. However, there is only a 116 page english PPT on the official website. Asked the after-sales service that there is no Chinese version = = = = =, there is no way but to use Netease Youdao dictionary to translate it one by one=====

I make complaints about Tucao, so I can't make complaints about the Internet users.
Device connection configuration:
After the code scanning gun is installed and powered on, set the IP after it is in line with the equipment through the network cable.
The default IP of the code scanning gun is 192.168.60.101, and the IP can be set to the same network segment.
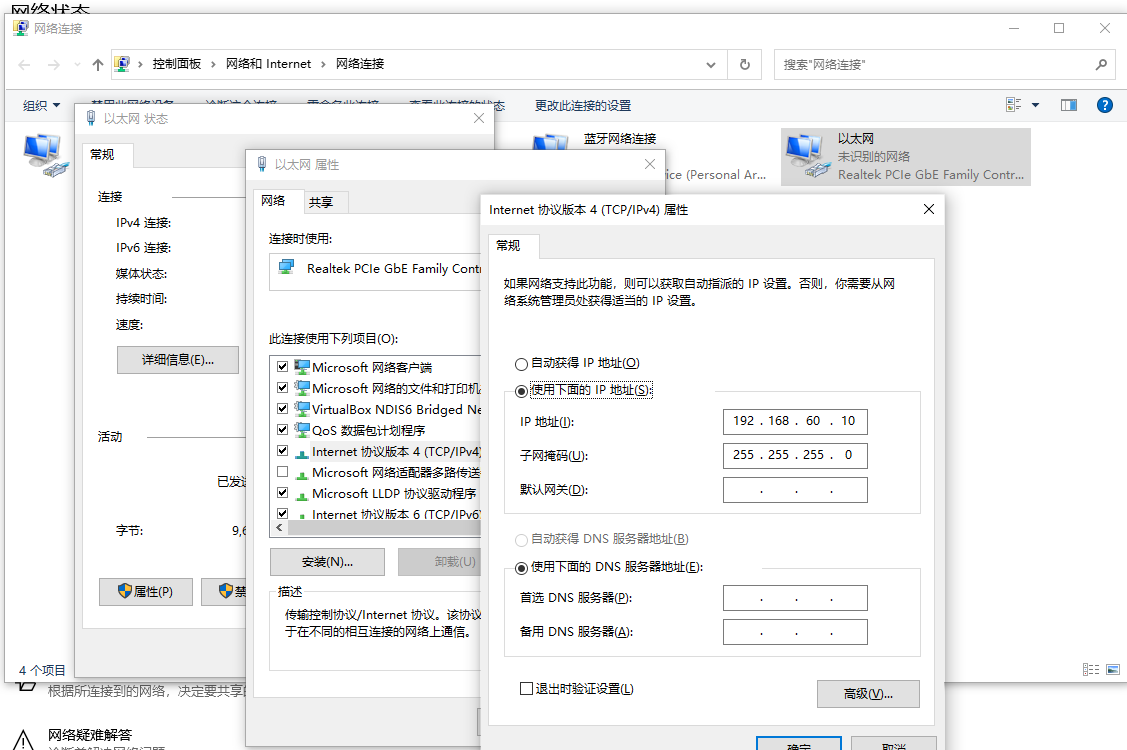
After setting, you can directly set and debug some configurations of the code scanning gun on the web page without downloading the software on the official website.
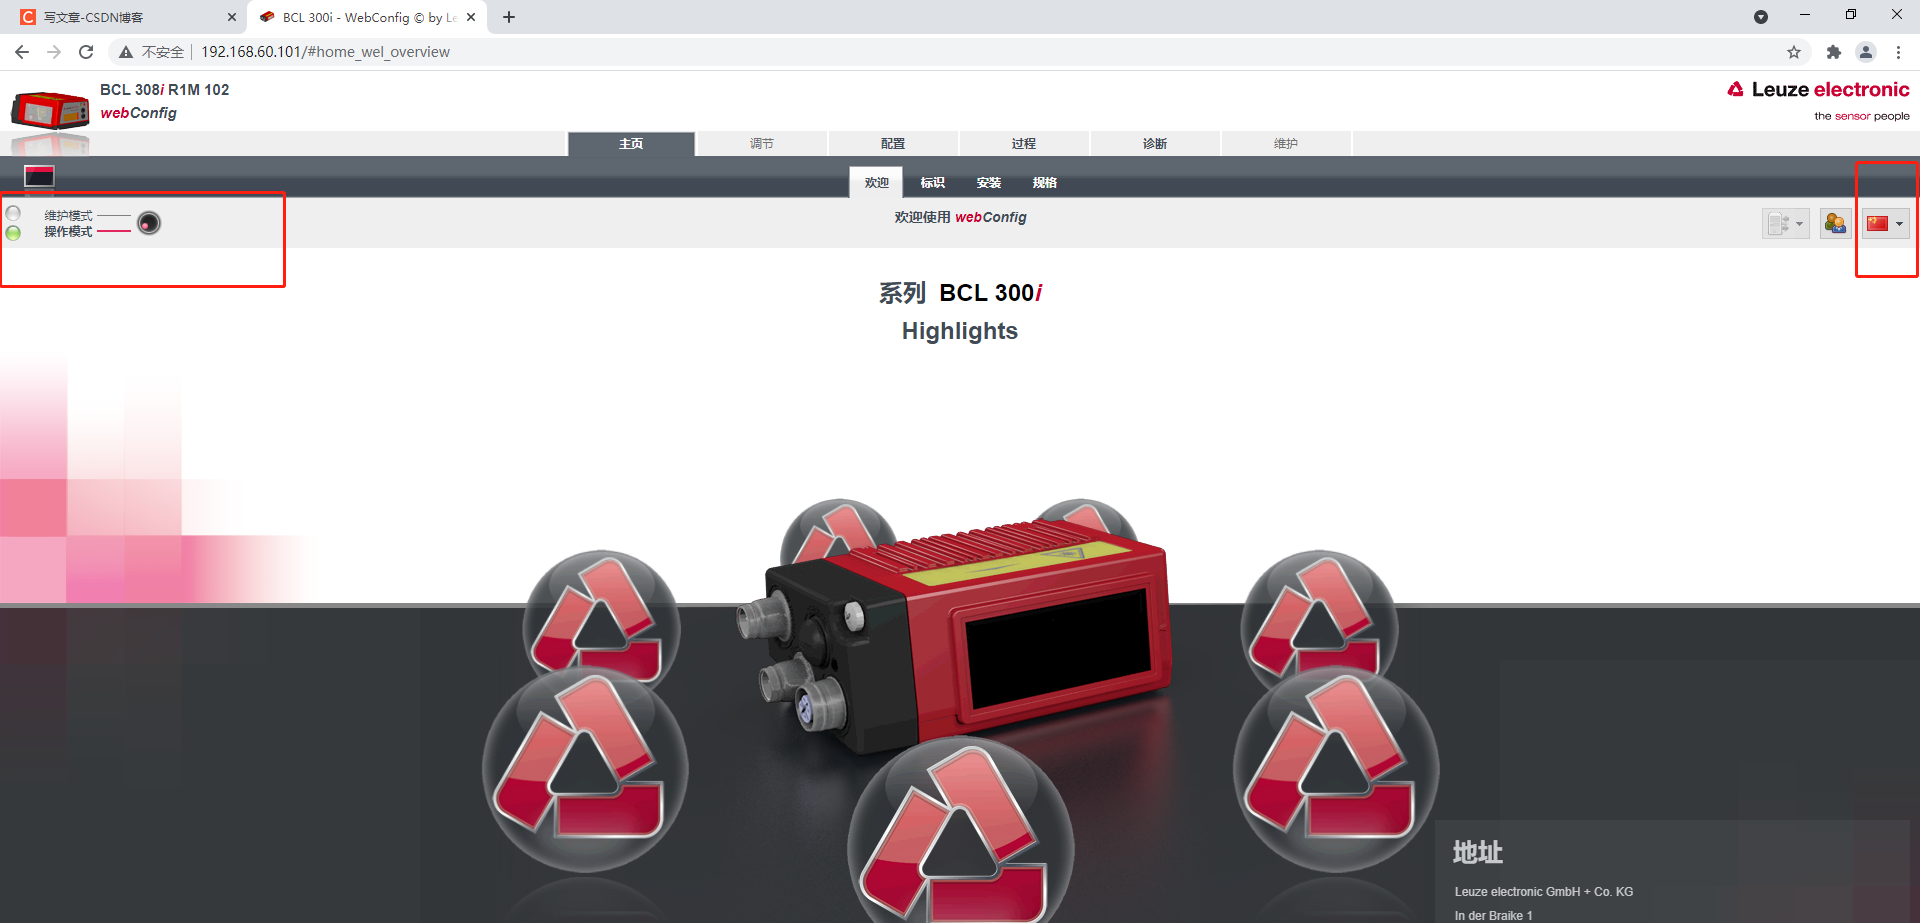
Enter 192.168.60.101 on the web page to enter the setting web page.
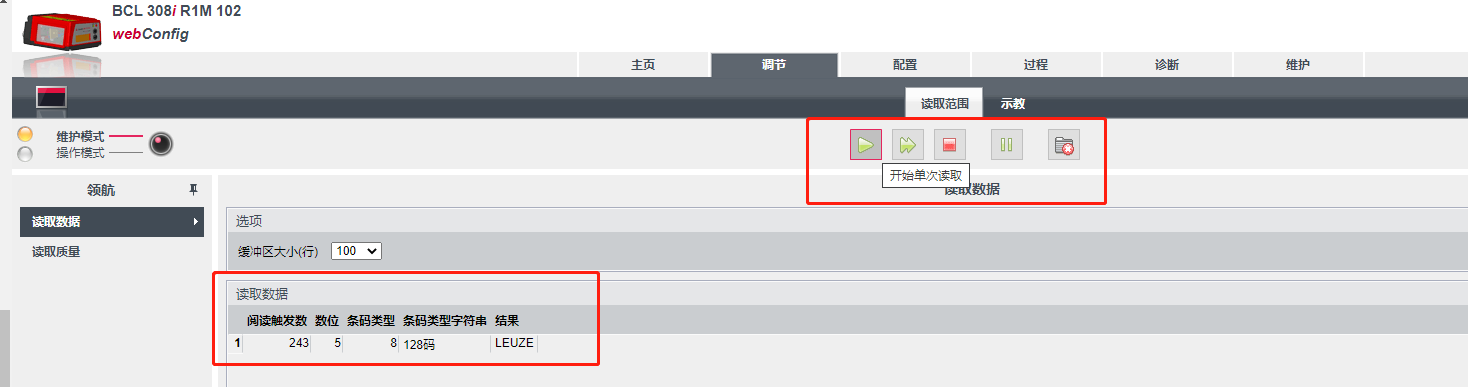
The national flag logo in the upper right corner can be set with language, otherwise pure English is really bad.
The operation mode and maintenance mode are set in the upper left corner. The operation mode adjustment function cannot be used. Click to switch the mode.
Set IP:
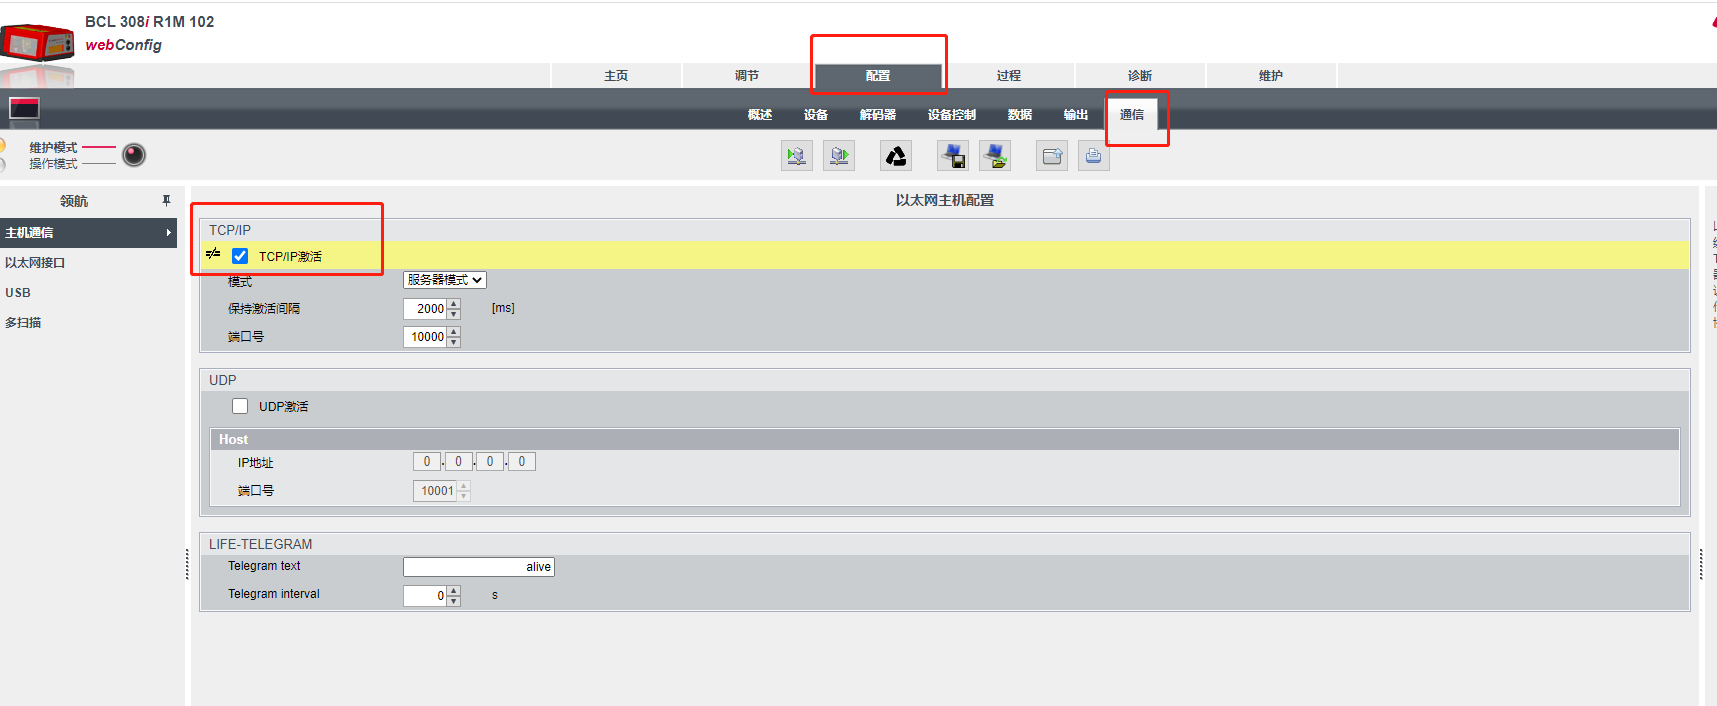
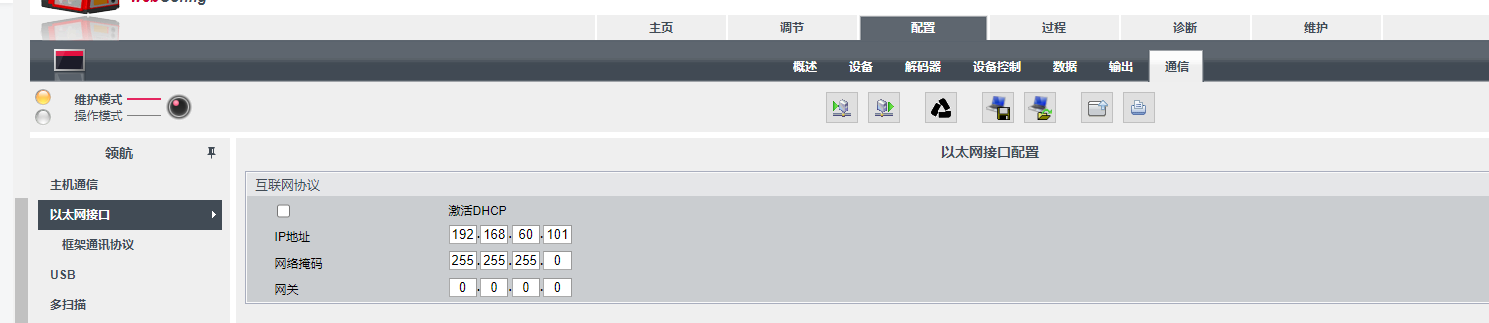
Configuration - communication, click TCP/IP activation to modify. Click the Ethernet interface to view and modify the IP. After modification, you need to power off and restart to complete the configuration.
Commissioning:
Adjust the reading range. Place the mouse on the corresponding button to display the corresponding function. When the barcode provided in the user manual is scanned, the data will be displayed below, indicating that the connection is successful.
Main communication commands:
*Write data, single execution:
ASCII is "+" and hexadecimal is "2B", which means that code scanning is enabled. It is only read once. Code scanning will be turned off after reading data, or it will be turned off if it is not read in a few seconds
ASCII is "-" and hexadecimal is "2D", indicating that code scanning is turned off. For details, refer to the ASCII code correspondence table at the end of the user manual
*Write data, continuous execution
ASCII is "JP +" and hexadecimal is "4A502B", indicating that continuous code scanning and continuous reading are enabled. The read data is added after the previous data
ASCII is "JP -" and hexadecimal is "4A502D", indicating that continuous scanning is turned off
ASCII is "H" and hexadecimal is "48", indicating that the device is restarted and initialized
Using socket communication, saomaqiang complete code:
The hexadecimal to byte array and ASCII code are directly converted to each other. I provided a tool class in my last blog.
package com.example.demo.barcodeScanners;

import com.example.demo.utils.HexToASCToBytes;

import java.io.*;
import java.net.Socket;


/**
 * @author zhangqianwei
 * @date 2021/10/21 16:04
 */
public class saomaqiang {
    private static Socket socket;

    static {
        try {
            //Establish socket connection through IP and port number
            socket = new Socket("192.168.60.101",10000);
            if (!socket.isConnected()){
                System.out.println("connection failed");
            }
            System.out.println("Connection succeeded");
        } catch (IOException e) {
            e.printStackTrace();
        }
    }

    public static void main(String[] args) {
        read();
    }

    /**
     * Write data, single execution:
     ASCII Is "+" and hexadecimal is "2B", indicating that code scanning is enabled. It is only read once. Code scanning will be turned off after reading data or it will be turned off if it is not read within a few seconds
     ASCII Yes "-", hexadecimal is "2D", which means code scanning is turned off. For details, refer to the ASCII code correspondence table at the end of the user manual
     * Write data, continuous execution
     ASCII Is "JP +" and hexadecimal is "4A502B", indicating that continuous code scanning and continuous reading are enabled. The read data is added after the previous data
     ASCII Is "JP -" and hexadecimal is "4A502D", indicating that continuous code scanning is turned off
     ASCII Is "H" and hexadecimal is "48", indicating that the device is restarted and initialized
     **/

    public static void read()  {
        try{
            OutputStream os = socket.getOutputStream();
            //Continuously read output data
            String sustainOpen = "4A502B";

            //hexStringToByteArray(), hexadecimal string to byte array
            byte[] openBytes = HexToASCToBytes.hexStringToByteArray(sustainOpen);

            os.write(openBytes);

            //Read the data obtained by the code scanning gun
             BufferedInputStream bis = new BufferedInputStream(socket.getInputStream());
             DataInputStream dis = new DataInputStream(bis);
             byte[] bytes = new byte[1]; // Read one byte at a time
             String ret = "";
             String ASC = "";

             while (dis.read(bytes) != -1) {
                ret += HexToASCToBytes.ByteArrayToHexString(bytes) + " ";
                if (dis.available() == 0) {
                    //When all data is converted, the converted hexadecimal string is returned
                    System.out.println(socket.getRemoteSocketAddress() + ":" + ret);
                    //Remove the previous status symbol, "30 20"
                    ret = ret.substring(12);
                    //Convert the converted hexadecimal string to ASC code
                    String[] hexs =  ret.split(" ");

                        for (String str:hexs){
                            ASC += HexToASCToBytes.convertHexToASC(str);
                        }
                        System.out.println("ASCII The code result is:"+ASC);

                        //Reset the code after scanning each time to ensure that the code converted each time is the latest
                        ret ="";
                        ASC ="";
                }
             }
            os.close();
        }catch (IOException e){
            e.printStackTrace();
        }finally {
            try {
                //To prevent exceptions, close the socket connection no matter what, otherwise it cannot be created again next time
                socket.close();
            }catch (IOException ioException){
                ioException.printStackTrace();
            }
        }
    }

    public static void close(){
        try {
            //Turn off continuous code scanning, "48" is to restart the device and initialize
            String close = "4A502D";
            byte[] closeBytes = HexToASCToBytes.hexStringToByteArray(close);
            OutputStream os = socket.getOutputStream();
            os.write(closeBytes);
            os.close();
        }catch (IOException e){
            e.printStackTrace();
        }finally {
            try {
                //To prevent exceptions, close the socket connection no matter what, otherwise it cannot be created again next time
                socket.close();
            }catch (IOException ioException){
                ioException.printStackTrace();
            }
        }
    }

}