Reverse proxy
In fact, an agent is an intermediary. A and B can be connected directly. A C is inserted in the middle, and C is an intermediary. According to the role of agents, they can be divided into forward agents and reverse agents
The forward proxy is the client proxy, the proxy client, and the server does not know the client that actually initiated the request

For example, if we can't access Google directly in China, we can send a request to the proxy server through a forward proxy server. The proxy server can access Google. In this way, the proxy goes to Google to get the returned data and then returns it to us, so that we can access Google
This reality can be compared to a scalper buying tickets
The reverse proxy is the server proxy, which is the proxy server. The client does not know the server that actually provides the service

The actual operation mode of Reverse Proxy is to use a proxy server to accept the connection request on the internet, then forward the request to the server on the internal network, and return the results obtained from the server to the client requesting connection on the internet. At this time, the proxy server appears as a server externally
Role of reverse proxy:
(1) To ensure the security of the intranet and prevent web attacks, large websites usually use the reverse proxy as the public network access address, and the web server is the intranet
(2) Load balancing, through the reverse proxy server to optimize the load of the website
In reality, reverse agency can be compared to the intermediary of renting a house
Nginx
Using Nginx as the reverse proxy server
Local domain name environment
If it is officially released and you need to buy a domain name, the test will be built locally. The steps are as follows:
The modified host file is used for local DNS service. It is written in a text file in the form of IP domain name. Its function is to establish an associated "database" between some common web address domain names and their corresponding IP addresses. When the user enters a web address in the browser, the system will automatically find the corresponding IP address from the Hosts file. Once it is found, The system will immediately open the corresponding web page. If it is not found, the system will submit the web address to the DNS domain name resolution server for IP address resolution.
The location of this file is under C:\Windows\System32\drivers\etc
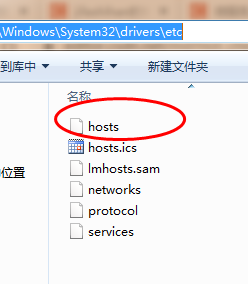
If you don't think it's troublesome to modify each time, you can use SwitchHosts. You can try this by yourself. My computer is easy to crash, so don't use it first
Because I tested it locally, I modified the local localhost to a domain name, such as mydomain.com. If there is a virtual machine or other environment, it can be replaced with the corresponding ip

Then I visit the service, http://127.0.0.1:7000/coupon/coupon/test , and then modify it to the corresponding domain name
http://mydomain.com:7000/coupon/coupon/test
Also accessible
Nginx configuration
The above demonstration is only about the local environment. If nginx is installed on other services, the domain name corresponds to the ip address of that nginx. Then, access is allocated in nginx, and different services are allocated to different URLs according to rules
Download and unzip Nginx, then start the command line in the installation directory and run nginx.exe,
E:\springbootLearn\nginx-1.20.1\nginx-1.20.1>nginx.exe
Then enter in the browser http://localhost:8080/ , if present

It indicates that the startup is successful, and then open nginx.conf in the conf directory to configure it. For example, I visit here http://mydomain.com:9001/coupon/coupon/test In the formal environment, set the ip corresponding to this domain name
server {
        listen       9001;
        server_name  mydomain.com;

		location ~ /coupon/ {
			proxy_pass http://127.0.0.1:7000;
		}
	}
In this way, if you visit the previous url and the request contains coupon, you can jump to the address of the corresponding ip. After the official release, 127.0.0.1 can be changed to the address of the corresponding service
Nginx basic usage
load balancing
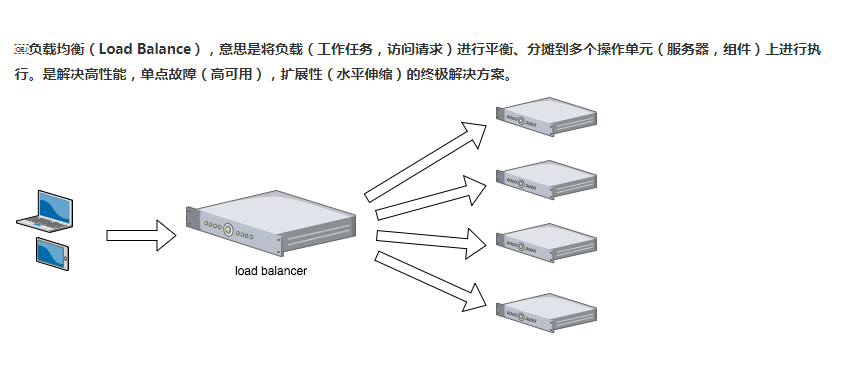
Load balancing is to distribute the load to multiple servers. There are many algorithms. If this is configured in nginx, you need to configure multiple server addresses
nginx load balancing
http {
   upstream gulimail{
        server 127.0.0.1:7000;
        server 192.168.0.28:8002;
    }

	server {
        listen       80;
        server_name  gulimail.com;

		location / {
			proxy_pass http://gulimail
			proxy_set_header Host $host;
            proxy_set_header X-Real-IP $remote_addr;
            proxy_set_header X-Forwarded-For $proxy_add_x_forwarded_for;
		}

	}

}
gulimail is the domain name of the service or the code of the project, and then set the proxy_set_header Host $host; The reason is that nginx will lose the host. Otherwise, the gateway will fail to intercept the host
In the project, the gateWay gateway can be set to
        - id: gulimail_host_route
           uri: lb://gulimall-product
          predicates:
            - Host=**.gulimail.com,gulimail.com
If you intercept gulimail.com, you will jump to commodity services
This coarse-grained matching is placed last and first, which will directly intercept some requests and fail to go to the matching configured below
- id: product_route
          uri: lb://gulimall-product
          predicates:
            - Path=/api/product/**
          filters:
            - RewritePath=/api/(?<segment>.*),/$\{segment}
Something like this may not match and is intercepted in front
According to my understanding, summarize the process. First, create a new domain name locally, corresponding to the ip address of nginx, then configure nginx, and allocate the corresponding services according to the url
Dynamic and static separation
In the project, some requests need background processing (such as. jsp,.do, etc.), and some requests do not need background processing (such as css, html, jpg, js, etc.). These files that do not need background processing are called static files, otherwise dynamic files. If static files are also placed on the server, the performance will be reduced during access. You can put static resources on another server, such as putting static resources in nginx and forwarding dynamic resources to tomcat server.
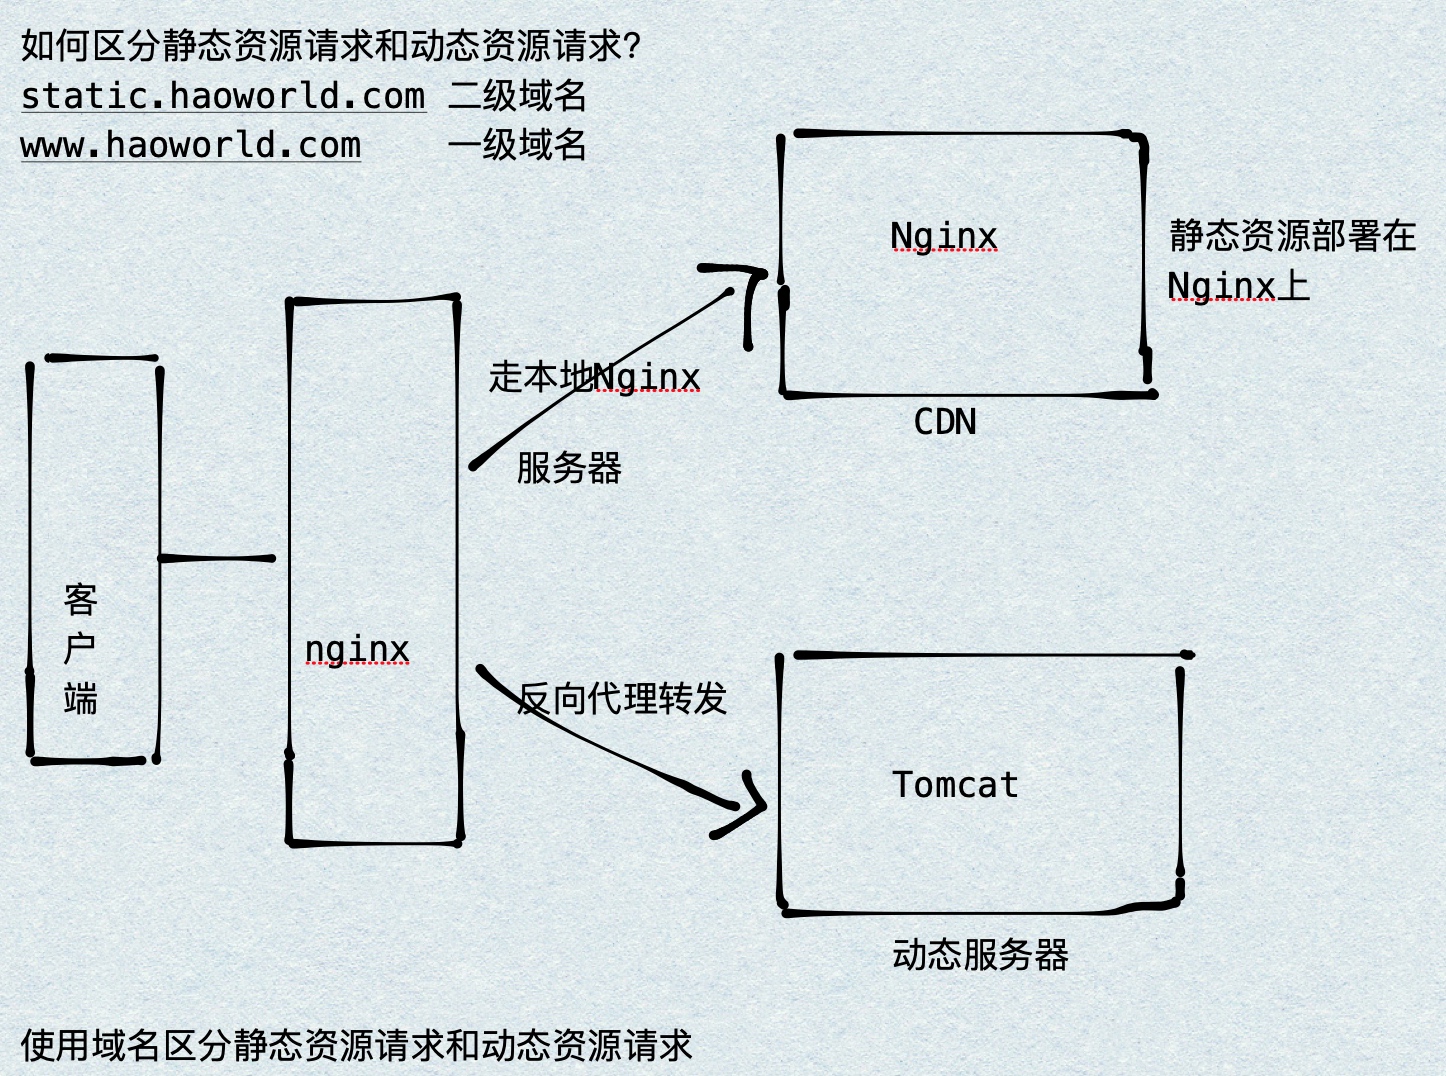
nginx configuration
Match the request url through location. Create / static/imgs under / Users/Hao/Desktop/Test (any directory). The configuration is as follows:
###Static resource access
server {
  listen       80;
  server_name  static.haoworld.com;
  location /static/imgs {
       root /Users/Hao/Desktop/Test;
       index  index.html index.htm;
   }
}
###Dynamic resource access
 server {
  listen       80;
  server_name  www.haoworld.com;

  location / {
    proxy_pass http://127.0.0.1:8080;
     index  index.html index.htm;
   }
}
Reference article:
[Nginx] realize dynamic and static separation
Nginx realizes dynamic and static separation
Dynamic and static separation of Nginx
cache
In order to improve the system performance, we usually put some data into the cache to speed up access. And db is responsible for data falling
Disk operation.
What data is suitable for caching?
1. The requirements for timeliness and data consistency are not high
2. Data with large access and low update frequency (more reads and less writes)
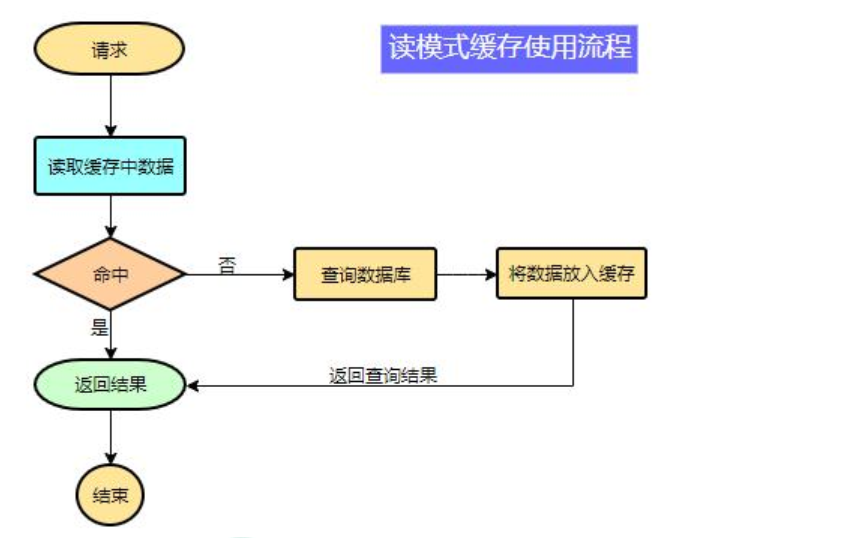
Pseudo code:
data = cache.load(id);//Load data from cache
If(data == null){
	data = db.load(id);//Load data from database
	cache.put(id,data);//Save to cache
}
return data;
The simplest cache is the local cache. Write a Map in the code, and then query whether the Map contains data before querying the data. If not, query the database, query the data, and save a copy to the Map.
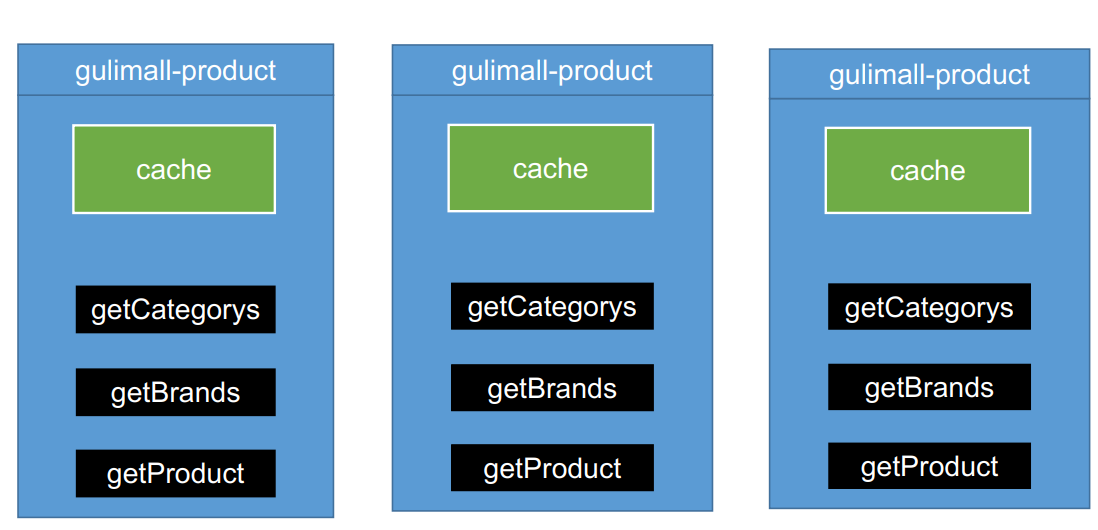
There will be problems with the local cache in the distributed environment. Load balancing may access three servers A, B and C, and it is possible to change the cache of server A, and then access server B for the second time. The cache of server B is still old, and there is no way to modify the cache synchronously to maintain data consistency
In the distributed case, the cache is extracted, and all servers access and operate the same cache
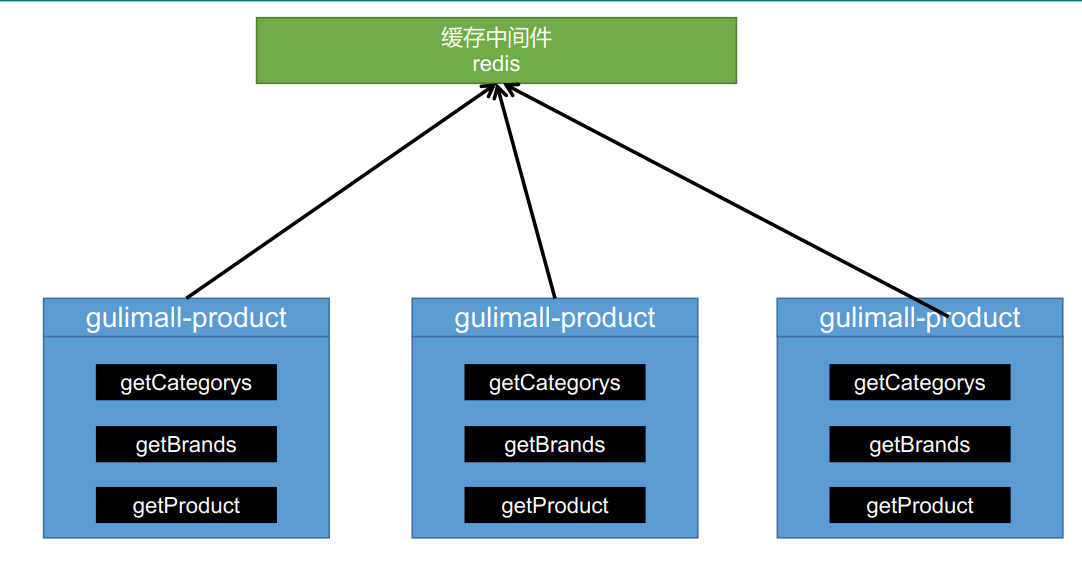 Note: during development, we should specify the expiration time for all data put into the cache, so that it can automatically trigger the process of data loading into the cache even if the system does not actively update the data. Avoid permanent data inconsistency caused by business collapse
spring boot integrates redis
pom.xml add reference
<dependency>
            <groupId>org.springframework.session</groupId>
            <artifactId>spring-session-data-redis</artifactId>
        </dependency>
Configuration in application.yml
 redis:
    host: 192.168.56.10
    port: 6379
redis using RedisTemplate
@Autowired
StringRedisTemplate stringRedisTemplate;
@Test
public void testStringRedisTemplate(){
	ValueOperations<String, String> ops = stringRedisTemplate.opsForValue();
	ops.set("hello","world_"+ UUID.randomUUID().toString());
	String hello = ops.get("hello");
	System.out.println(hello);
}
Idea searches for the files in the jar package. The shortcut key is ctrl+N. search for redisautoconfiguration,
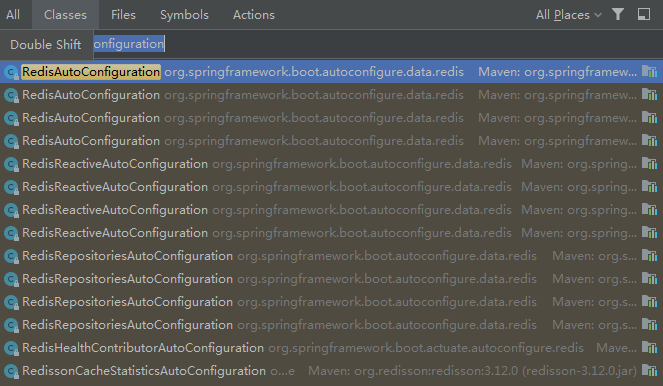
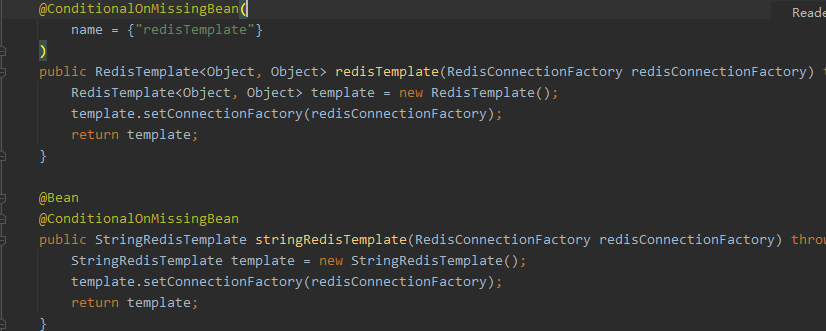
It includes RedisTemplate and StringRedisTemplate. One is of any type, and the other is convenient for string operation
Add cache logic to the program
 public Map<String, List<Catelog2Vo>> getCatelogJson2() {
        //Add cache logic. The data stored in the cache is JSON string
        //JSON is cross language and cross platform compatible
        //The data extracted from the cache should be reversed to usable object types, serialization and serialization
        String catalogJSON = stringRedisTemplate.opsForValue().get("catalogJSON");
        if (StringUtils.isEmpty(catalogJSON)) {
            //There is no data in the cache. Query the database
            Map<String, List<Catelog2Vo>> catelogJsonFromDb = getCatelogJsonFromDbWithRedisLock();
            //The found data is put into the cache, and the object is converted into JSON and put into the cache
            String s = JSON.toJSONString(catelogJsonFromDb);
            stringRedisTemplate.opsForValue().set("catalogJSON", s, 1, TimeUnit.DAYS);
            return catelogJsonFromDb;
        }
        Map<String, List<Catelog2Vo>> result = JSON.parseObject(catalogJSON, new TypeReference<Map<String, List<Catelog2Vo>>>() {
        });
        return result;
    }
Because JSON is cross platform, save JSON strings in redis, and then serialize and deserialize the saved and retrieved JSON strings
The stress test found that out of direct memory error will occur. This is because after spring boot 2.0, lettuce is used to operate Redis client by default. It uses netty for network communication. The lettuce bug leads to out of heap memory overflow. There are two solutions: the first is to upgrade the lettuce client, and the other is to switch to jedis
Switch jedis
<dependency>
<groupId>org.springframework.boot</groupId>
<artifactId>spring-boot-starter-data-redis</artifactId>
<exclusions>
	<exclusion>
		<groupId>io.lettuce</groupId>
		<artifactId>lettuce-core</artifactId>
	</exclusion>
</exclusions>
</dependency>
<dependency>
	<groupId>redis.clients</groupId>
	<artifactId>jedis</artifactId>
</dependency>
lettuce and jedis are the underlying clients operating redis. spring encapsulates the redisTemplate again and operates through the redisTemplate. It does not need to care about the underlying clients
Problems with high parallel delivery cache
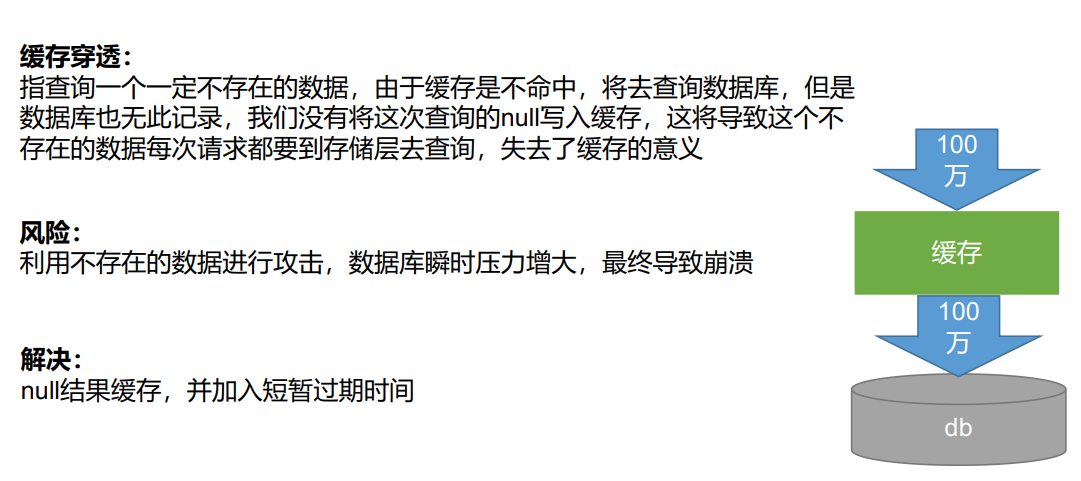
Cache penetration
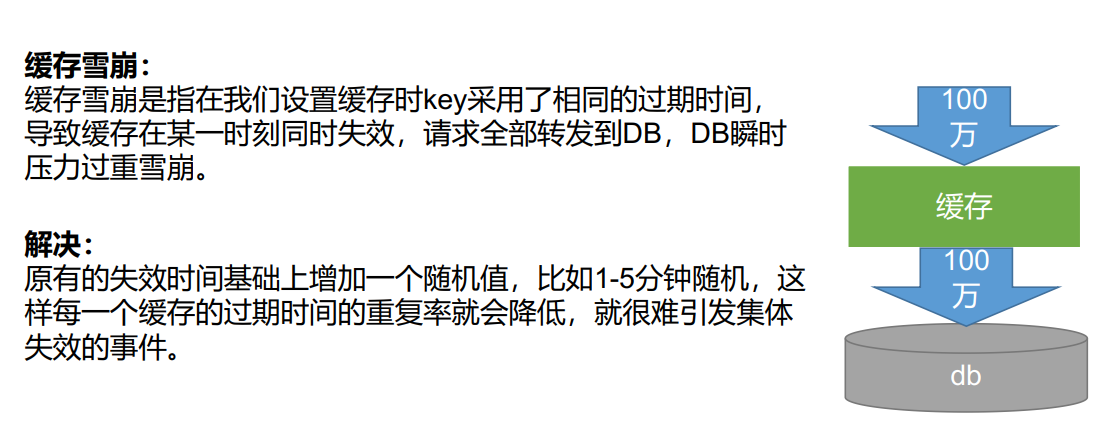
Cache avalanche
Buffer breakdown
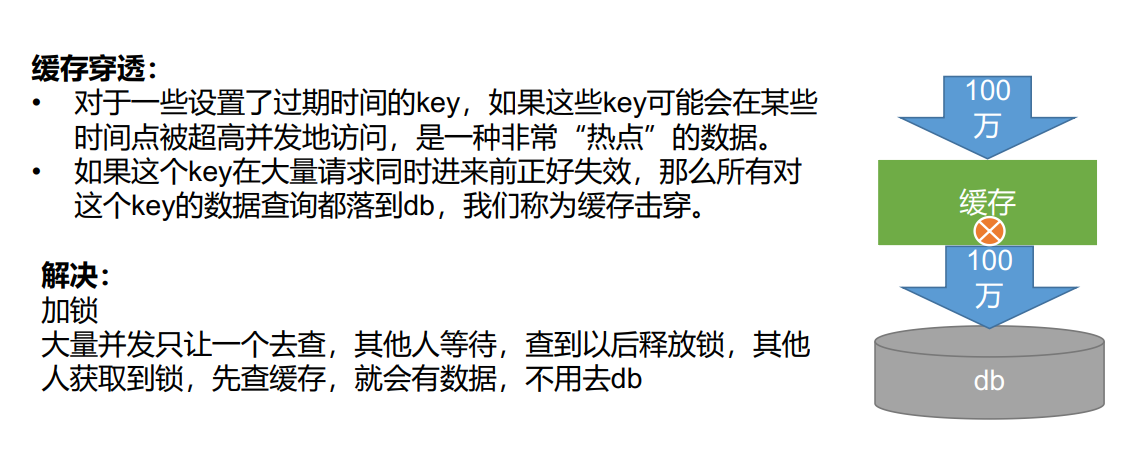
Solution: empty the result cache, solve the cache penetration problem, set the expiration time (plus random value), solve the cache avalanche problem, set the lock, and solve the cache breakdown problem
Lock
Local lock (single service)
  synchronized (this) {
            String catalogJSON = stringRedisTemplate.opsForValue().get("catalogJSON");
            if (StringUtils.isEmpty(catalogJSON)) {
                Map<String, List<Catelog2Vo>> result = JSON.parseObject(catalogJSON, new TypeReference<Map<String, List<Catelog2Vo>>>() {
                });
                return result;
            }
        }
As long as it is the same lock, all processes that need the lock can be locked. synchronized(this): all components of spring boot are singleton in the container.
Local Lock: synchronized, JUC (Lock), which can only Lock the current process. In a distributed case, if you want to Lock all, you must use a distributed Lock
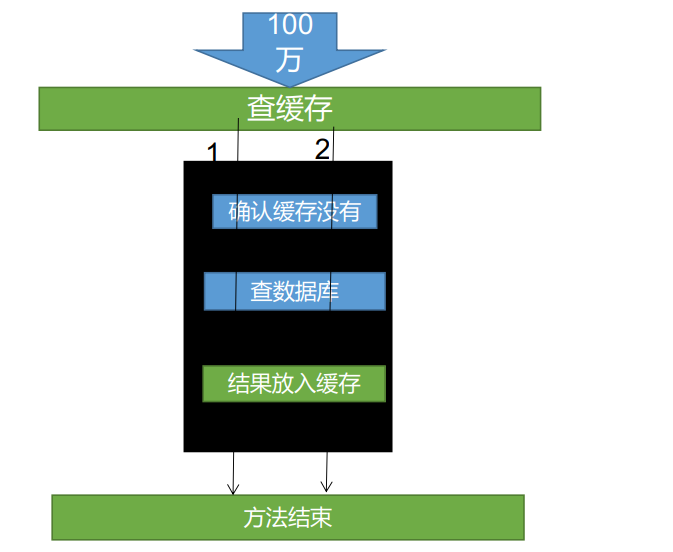
When using a local lock, the query database and the storage cache should be placed in the same lock. If the cache is placed outside the lock and issued high, thread 1 will finish processing the logic and release the lock, thread 2 will obtain the lock, and thread 1 will store the cache. In the process of storing the cache, there may be network delay and other reasons. When thread 2 reads the cache, thread 1 has not been stored in the cache, Query databases on both sides
Distributed lock
Distributed lock evolution principle: a distributed lock is the execution logic of multiple services occupying the lock, and then releasing the lock. During the lock occupation period of a service, other services can only wait, wait for the lock to be released, and then occupy the lock. The waiting mode can be used
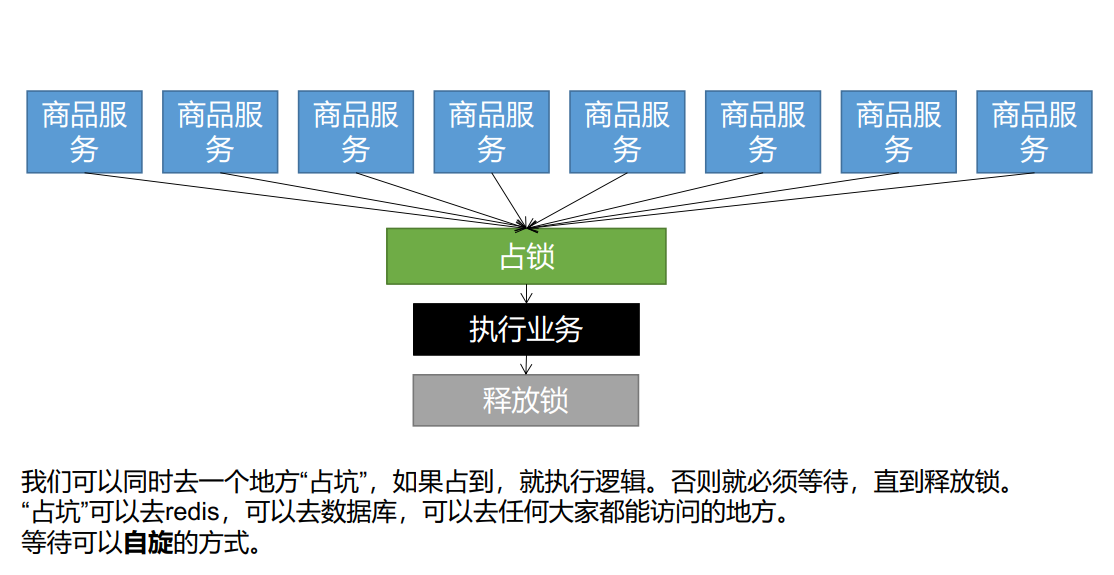
Distributed process lock Redis
Phase I:
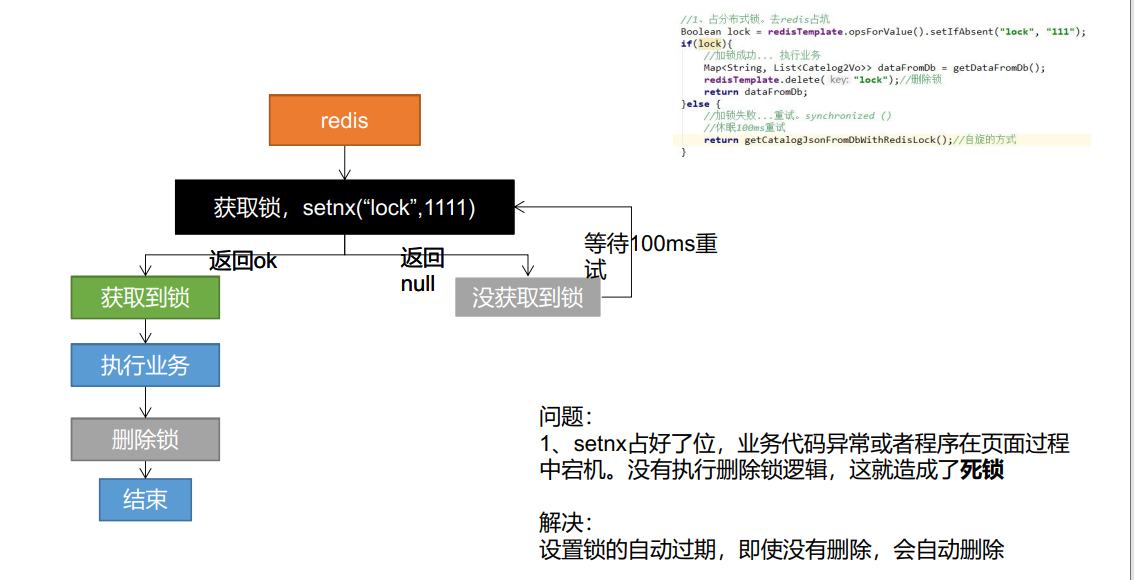
Phase II
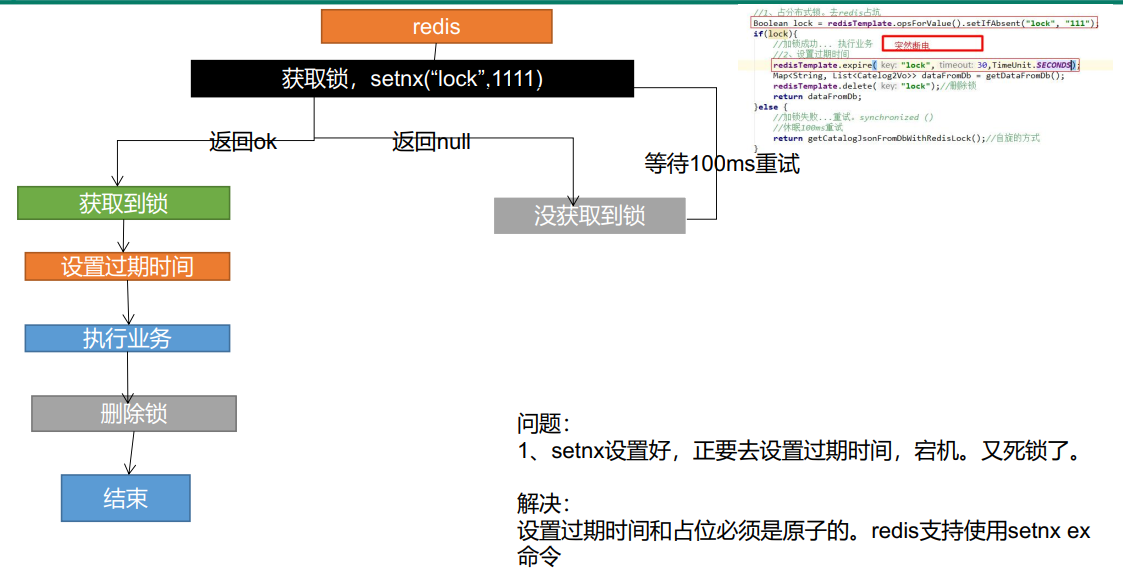
Phase III
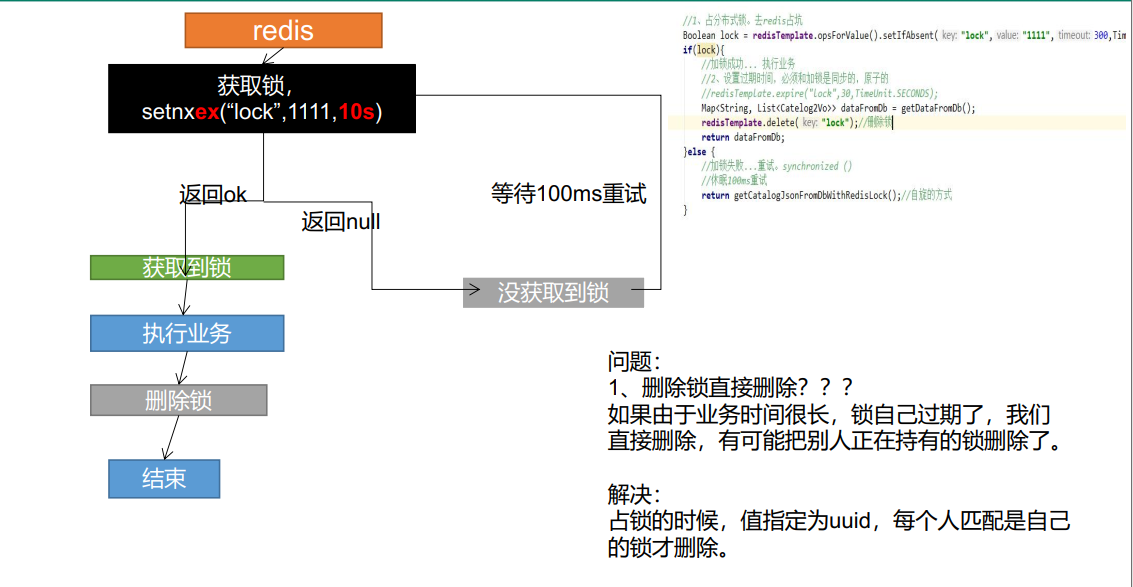
Phase IV
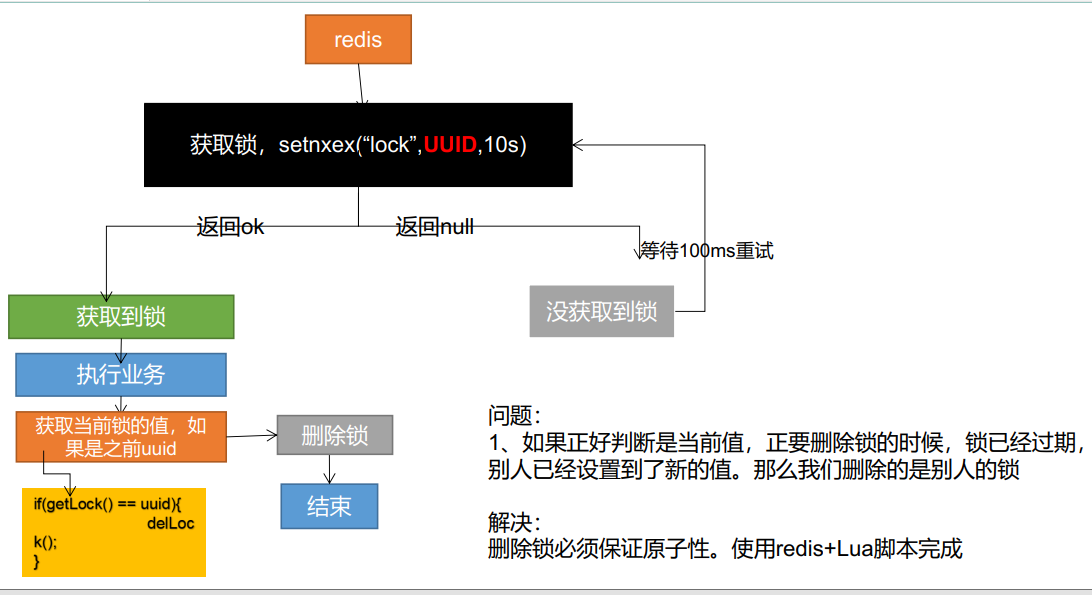
final result
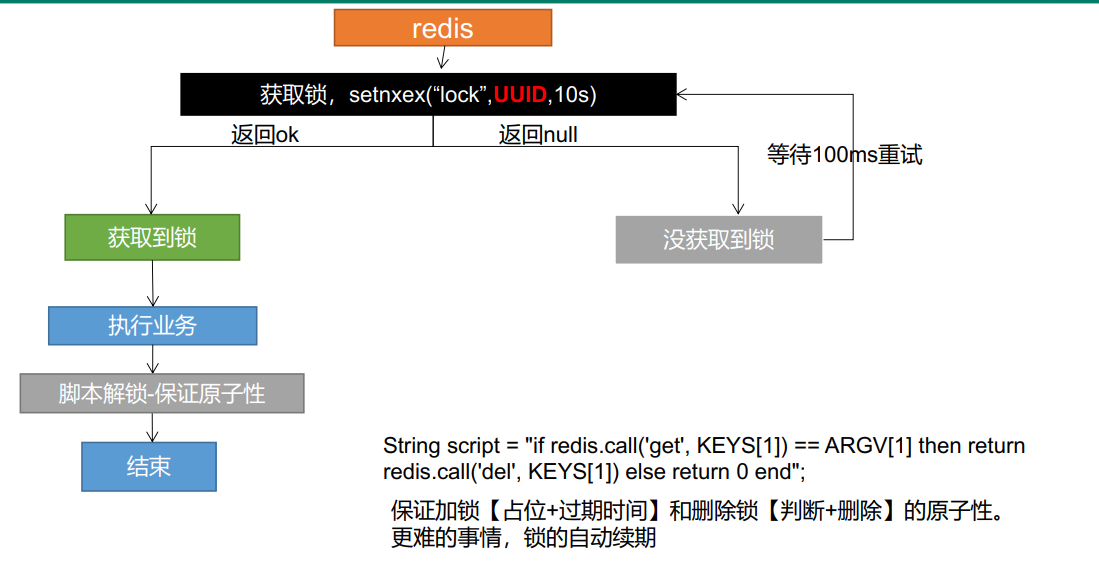
 //Distributed process lock Redis
    public Map<String, List<Catelog2Vo>> getCatelogJsonFromDbWithRedisLock() {
        //For distributed locks, set the lock expiration time at the same time. Atomic operations must be synchronized with locking
        String uuid = UUID.randomUUID().toString();
        Boolean lock = stringRedisTemplate.opsForValue().setIfAbsent("lock", "111", 300, TimeUnit.SECONDS);
        if (lock) {
            //Lock successfully, execute business
            Map<String, List<Catelog2Vo>> dataFromDB;
            try {
                dataFromDB = getDataFromDB();
            } finally {
                String script = "if redis.call('get',KEYS[1]) == ARGV[1] then return redis.call('del',KEYS[1])else return 0 end";
                //Delete lock, Lua script
                Long lock1 = stringRedisTemplate.execute(new DefaultRedisScript<Long>(script, Long.class), Arrays.asList("lock", uuid));
            }
            return dataFromDB;
        } else {
            //Failed to lock. Sleep for 2 seconds and try again
            try {
                Thread.sleep(2000);
            } catch (Exception e) {
                e.printStackTrace();
            }
            return getCatelogJsonFromDbWithRedisLock();//spin
        }
    }
Instead of setting a fixed string, set it to a random large string, which can be called a token.
Delete the key of the specified lock through the script instead of the DEL command.
The above optimization method will avoid the following scenarios:
The lock (key) obtained by client a has been deleted by the redis server due to the expiration time, but client a also executes the DEL command at this time. If client b has re acquired the lock of the same key after the expiration time set by a, then a will release the lock added by client b by executing DEL.
An example of an unlock script would be similar to the following
if redis.call("get",KEYS[1]) == ARGV[1]
then
    return redis.call("del",KEYS[1])
else
    return 0
end
The core is atomic locking and atomic unlocking
Redisson
Redisson is the Java version of Redis client officially recommended by Redis. It provides many functions and is very powerful. You can use it to implement distributed locks
Redisson
maven introduction
<dependency>
   <groupId>org.redisson</groupId>
   <artifactId>redisson</artifactId>
   <version>3.16.3</version>
</dependency>
There are Chinese documents to view (Github website is often inaccessible...)
Wiki Home
Under the config directory, create a new myredissoconfig
@Configuration
public class MyRedissonConfig {

    @Bean(destroyMethod = "shutdown")
    RedissonClient redisson() throws IOException{
        Config config = new Config();
        //Cluster mode
        //config.useClusterServers().addNodeAddress("127.0.0.1:7004","127.0.0.1:7001");
        //Single node mode
        config.useSingleServer().setAddress("redis://192.168.56.10:6379");
        return Redisson.create(config);
    }
}
Test reisson lock
Distributed lock and synchronizer
 @ResponseBody
    @GetMapping("/hello")
    public String hello() {
        //Only the lock has the same name, that is, the same lock
        RLock lock = redisson.getLock("my-lock");
        //Blocking wait. The default lock is 30s.
        //1) . automatic renewal of lock. If the business is too long, the lock will be automatically renewed for a new 30s during operation. Don't worry about long business hours. The lock will automatically expire and be deleted
        //2) . as long as the business of locking is completed, the current lock will not be renewed. Even if it is not unlocked manually, the lock will be automatically deleted after 30s by default
        lock.lock();
        try {
            System.out.println("Lock test,Execute business..." + Thread.currentThread().getId());
            Thread.sleep(10000);
        } catch (Exception e) {
            e.printStackTrace();
        } finally {
            //Unlock
            System.out.println("Release lock" + Thread.currentThread().getId());
            lock.unlock();
        }

        return "hello";
    }
Redisson lock features: there is a watchdog mechanism, which automatically renews the lock before it expires
  //Blocking wait. The default lock is 30s.
        //1) . automatic renewal of lock. If the business is too long, the lock will be automatically renewed for a new 30s during operation. Don't worry about long business hours. The lock will automatically expire and be deleted
        //2) . as long as the business of locking is completed, the current lock will not be renewed. Even if it is not unlocked manually, the lock will be automatically deleted after 30s by default
If you specify the unlocking time, it must be greater than the business time and will not be automatically renewed. It may have been unlocked before the business is executed
// Automatically unlock 10 seconds after locking
// There is no need to call the unlock method to unlock manually
lock.lock(10, TimeUnit.SECONDS);
If the lock timeout is passed, it will be sent to redis to execute the script to occupy the lock. The default time is the time we set
If the lock timeout is not specified, 30*1000[LockWatchdogTimeout watchdog default time] is used
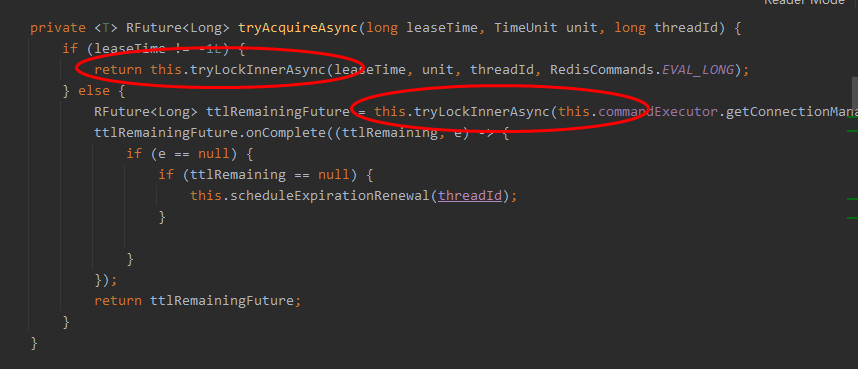
leaseTime!=- 1L, indicating that you have specified the time, enter

Execute script
The time is not specified. Take it from the configuration,
this.tryLockInnerAsync(this.commandExecutor.getConnectionManager().getCfg().getLockWatchdogTimeout(),
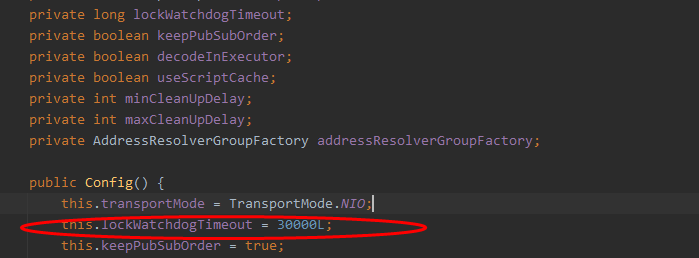
As long as the lock is occupied successfully, a scheduled task will be started to reset the expiration time for the lock. The new expiration time is the default time of the watchdog
 this.internalLockLeaseTime = commandExecutor.getConnectionManager().getCfg().getLockWatchdogTimeout();
 ...
protected RFuture<Boolean> renewExpirationAsync(long threadId) {
        return this.commandExecutor.evalWriteAsync(this.getName(), LongCodec.INSTANCE, RedisCommands.EVAL_BOOLEAN, "if (redis.call('hexists', KEYS[1], ARGV[2]) == 1) then redis.call('pexpire', KEYS[1], ARGV[1]); return 1; end; return 0;", Collections.singletonList(this.getName()), new Object[]{this.internalLockLeaseTime, this.getLockName(threadId)});
    }
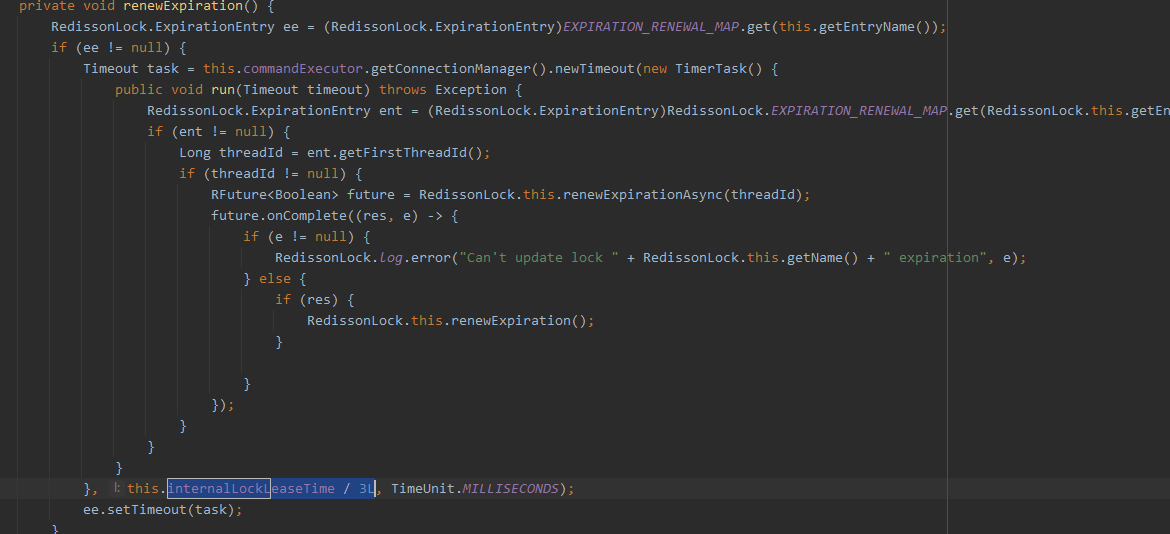
internalLockLeaseTime / 3L, one third of the watchdog time will be automatically renewed until 30s
Best practice: use lock.lock(30, TimeUnit.MINUTES);, Omit the whole renewal process and unlock manually
Read write lock
If there is a write operation and a write lock is added, others who read the result have to wait. If they are only read, they will not affect each other. If they are all write, they need to wait in line
 @GetMapping("/write")
    @ResponseBody
    public String writeValue() {
        RReadWriteLock lock = redisson.getReadWriteLock("rw-lock");
        String s = "";
        //Write lock
        RLock rLock = lock.writeLock();
        try {
            rLock.lock();
            s = UUID.randomUUID().toString();
            redisTemplate.opsForValue().set("writeValue", s);
            Thread.sleep(1000);
        } catch (Exception e) {
            e.printStackTrace();
        } finally {
            rLock.unlock();
        }
        return s;
    }

    @GetMapping("/read")
    @ResponseBody
    public String redValue() {
        RReadWriteLock lock = redisson.getReadWriteLock("rw-lock");
        String s = "";
        //Get the read lock. If other threads are writing, you need to wait until the write lock is released before reading
        RLock rLock = lock.readLock();
        rLock.lock();
        try {
            s = redisTemplate.opsForValue().get("writeValue");
            Thread.sleep(1000);
        } catch (Exception e) {
            e.printStackTrace();
        } finally {
            rLock.unlock();
        }
        return  s;
    }
During write operation, read waits. If the operation is completed, write releases the lock, and then read to obtain data. The read-write lock ensures that the latest data can be read. During modification, the write lock is an exclusive lock (mutex lock and exclusive lock), and the read lock is a shared lock. If the write lock is not released, read must wait
read+Read: equivalent to unlocked, concurrent read, only in redis Record all current read locks and lock them successfully
 write+Read: wait for write lock release
 write+Write: blocking mode
 read+Write: when reading, data is written. There is a read lock, and writing also needs to wait
 As long as there is a write, you need to wait
Semaphore
The distributed Semaphore Java object RSemaphore of Redisson based on Redis adopts an interface and usage similar to java.util.concurrent.Semaphore. It also provides asynchronous, Reactive and RxJava2 standard interfaces.
@GetMapping("/park")
    @ResponseBody
    public String park() throws InterruptedException {

        RSemaphore semaphore = redisson.getSemaphore("park");

//        semaphore.acquire(); //  Block waiting, get a signal, get a value and occupy a parking space

        boolean flag = semaphore.tryAcquire();//If it is not blocked and cannot be obtained, it will directly return false. You can limit the current


        if (flag) {
            return "Stop!";
        } else {
            return "The garage is full!";
        }

    }
 @GetMapping("/go")
    @ResponseBody
    public String go() {

        RSemaphore semaphore = redisson.getSemaphore("park");

        semaphore.release();//Release a parking space

        return "The car is leaving!";
    }
Lockout (CountDownLatch)
RCountDownLatch latch = redisson.getCountDownLatch("anyCountDownLatch");
latch.trySetCount(3);//Wait 3
latch.await();//Wait until the locking is completed


RCountDownLatch latch = redisson.getCountDownLatch("anyCountDownLatch");
latch.countDown();//Count minus one
Distributed lock Redisson
 public Map<String, List<Catelog2Vo>> getCatelogJsonFromDbWithRedissonLock() {
        //Lock name, lock granularity, the finer the faster
        RLock lock = redisson.getLock("catalogJson-lock");
        lock.lock();
        //Lock successfully, execute business
        Map<String, List<Catelog2Vo>> dataFromDB;
        try {
            dataFromDB = getDataFromDB();
        } finally {
           lock.unlock();
        }
        return dataFromDB;
    }
Cache data consistency
Double write mode
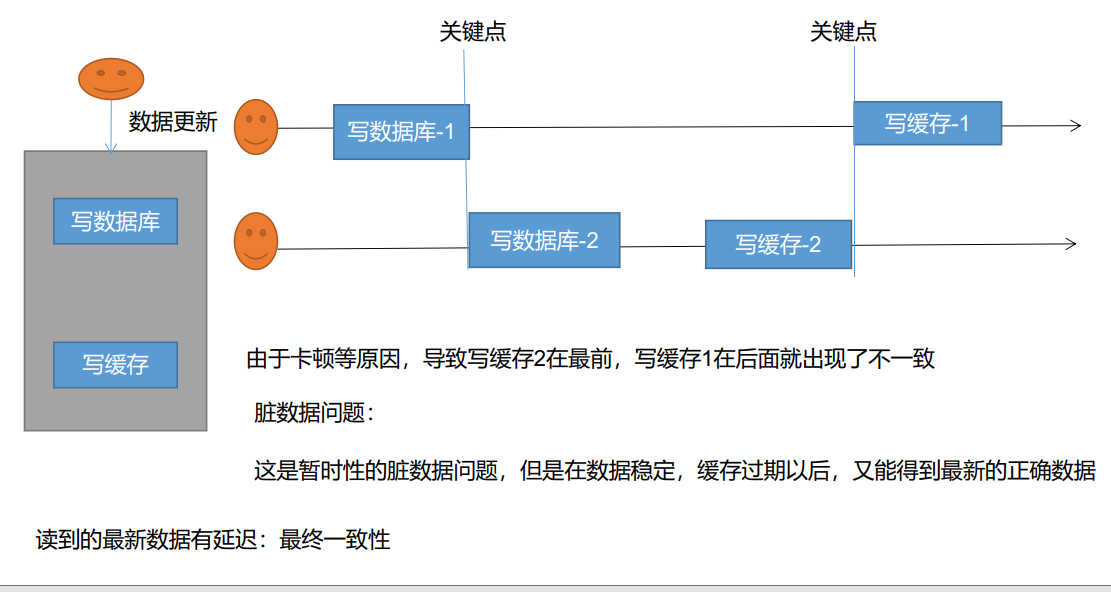
Double write mode: write to the database and write to the cache at the same time
failure mode
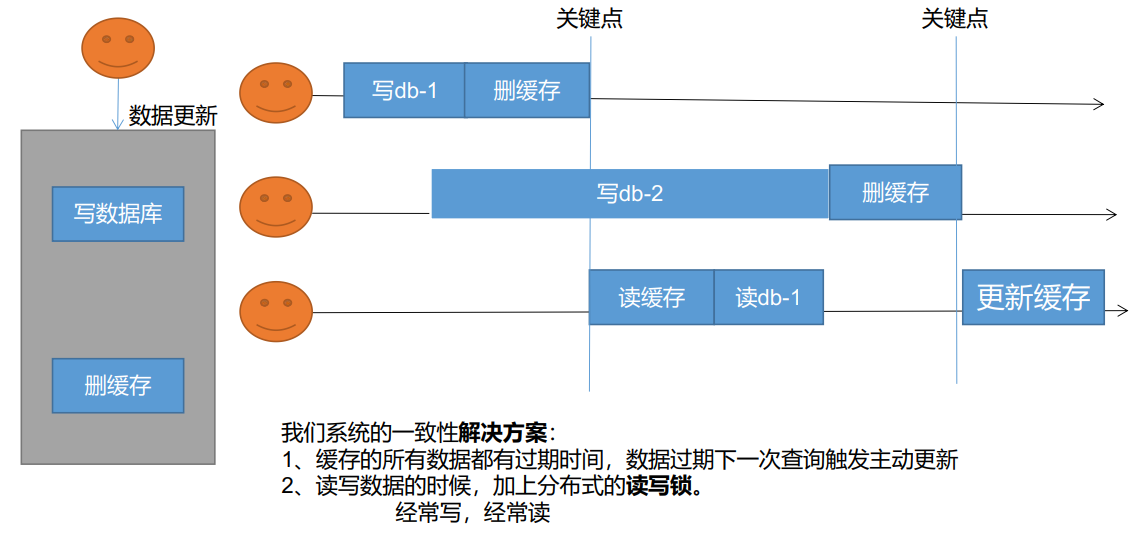
Failure mode: read the database, then delete the cache. The next time you see whether it is in the cache, get it from the database again. Possible problems: operation 1 writes to database db-1, then deletes the cache, operation 2 writes to database db-2, and the operation time is relatively long. Then operation 3 reads the cache. The cache has been deleted by operation 1, operation 3 reads db-1, then operation 2 deletes the cache, and operation 3 updates the cache. The data of db-1 is saved in the result cache. Adding a read-write lock will affect the performance if you write and read frequently. Occasional reading and writing has little effect
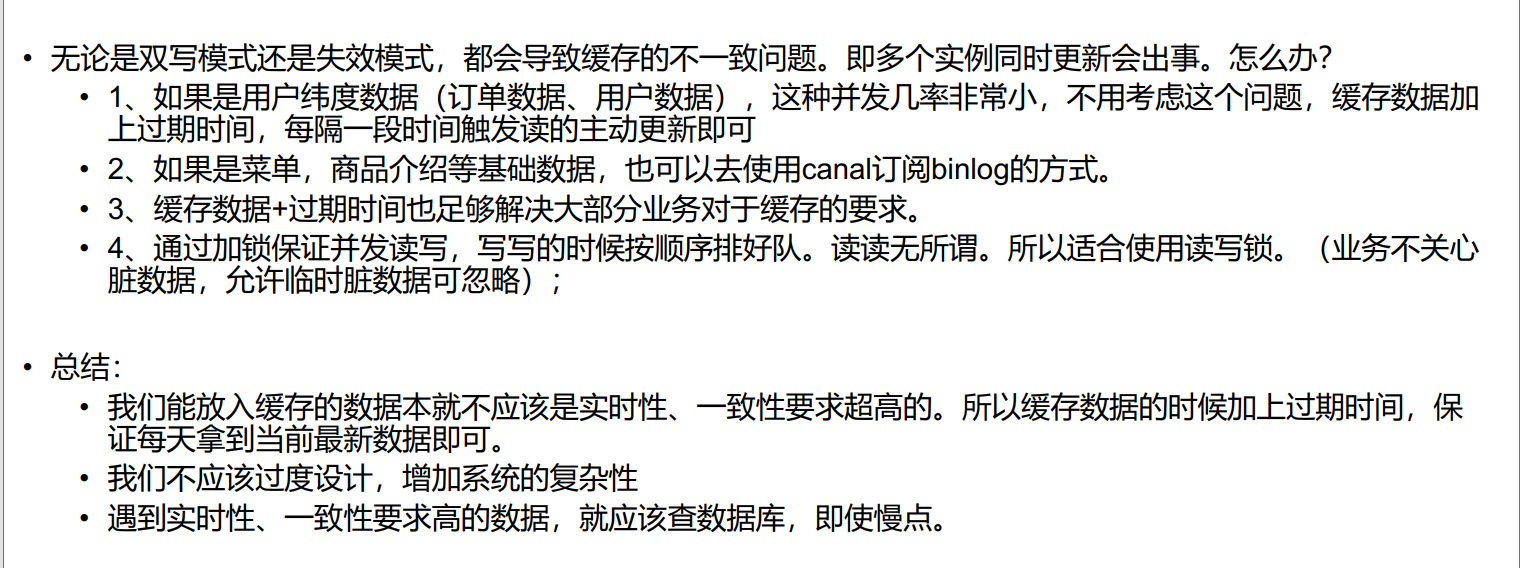
canal, which means waterway / pipeline / ditch, is mainly used for incremental log parsing based on MySQL database to provide incremental data subscription and consumption.
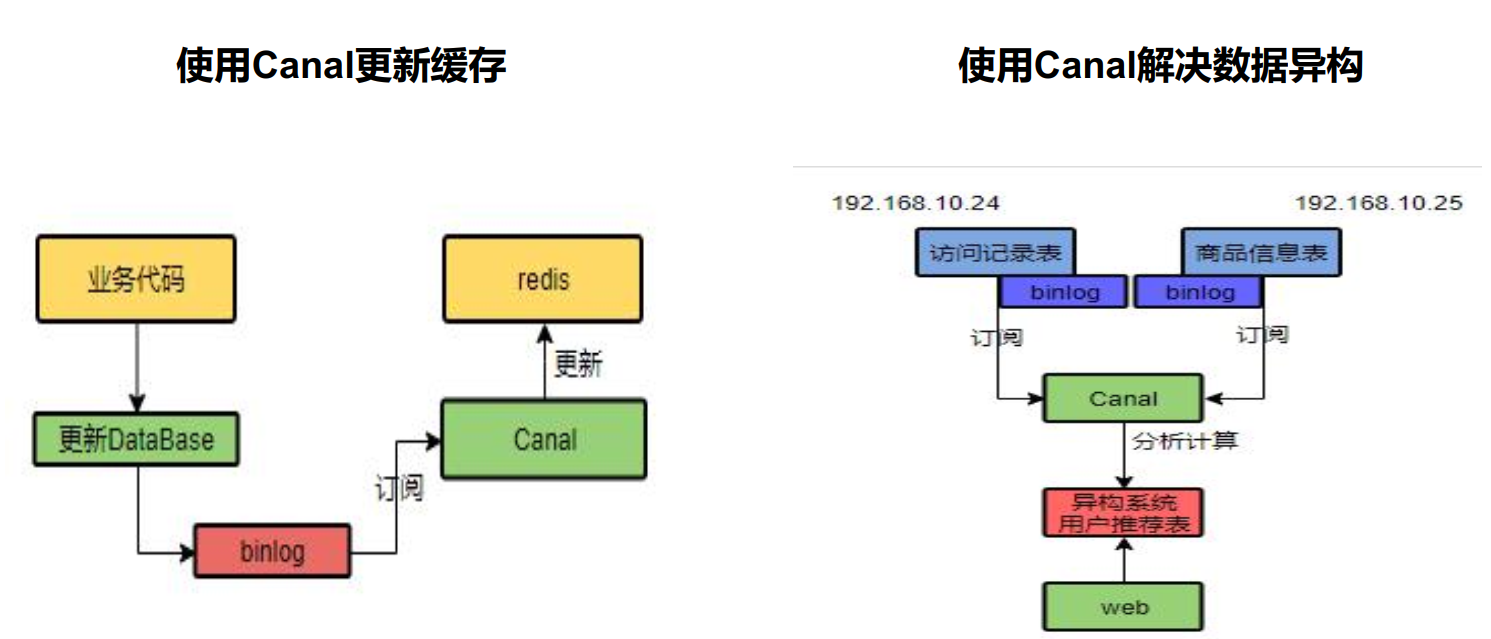
Super detailed introduction to Canal. Just read this one!
Spring cache simplifies the development of distributed cache
integration springcache Simplify cache development
1) ,Introduce dependency
.spring-boot-starter-cache, spring-boot-starter-data-redis2)
2),Write configuration
(i),What are automatically configured
	CacheAuroConfiguration Will import RedisCacheConfiguration;
	The cache manager is automatically configured RedisCachcManager
( 2),Configuration use redis As cache
	spring.cache.type=redis
3),Test using cache
	@Cacheable: Triggers cache popuLation.:Triggers the operation of saving data to the cache
	@CacheEvict: Triggers cache eviction.:Triggers the deletion of data from the cache
	@CachePut: Updates the cache without interfering with the method execution.:Does not affect method execution update cache
	@Caching:Regroups multiple cache operations to be applied on a method.:Combine the above operations
	@CacheConfig: Shares some common cache-related settings at class-Level.:Share the same cache configuration at the class level
	1),Enable cache function@EnabLeCaching
	2) ,Only annotations are needed to complete the caching operation
4) ,principle:
CacheAutoConfiguration -> RedisCacheConfiguration ->
Automatically configured RedisCacheManager->Initialize all caches->Each cache determines what configuration to use->If redisCacheConfiguration Use what you have,If not, use the default configuration
->To change the configuration of the cache, you only need to put one in the container RedisCacheConfiguration that will do->Will be applied to the current RedisCacheManager In all cache partitions managed
Introducing pom dependency
		<!-- because lettuce This causes an out of heap memory overflow, which is temporarily excluded jedis -->
        <dependency>
            <groupId>org.springframework.boot</groupId>
            <artifactId>spring-boot-starter-data-redis</artifactId>
            <exclusions>
                <exclusion>
                    <groupId>io.lettuce</groupId>
                    <artifactId>lettuce-core</artifactId>
                </exclusion>
            </exclusions>
        </dependency>

        <dependency>
            <groupId>redis.clients</groupId>
            <artifactId>jedis</artifactId>
        </dependency>
		<!--  Distributed caching requires and redis Use together -->
		<dependency>
			<groupId>org.springframework.boot</groupId>
			<artifactId>spring-boot-starter-cache</artifactId>
		</dependency>
Write configuration file
# Configure to use redis as cache
spring.cache.type=redis
# 1 hour in milliseconds
spring.cache.redis.time-to-live=3600000
# Configure the prefix of the cache name. If not configured, use the cache name as the prefix
# spring.cache.redis.key-prefix=CACHE_
# Whether the configuration prefix is effective is true by default
#spring.cache.redis.use-key-prefix=false
# Cache null value is true by default to prevent cache penetration
spring.cache.redis.cache-null-values=true
#spring.cache.cache-names=
Enable cache
@EnableCaching
Use cache
1) @ Cacheable: trigger to write data to cache
     /**
     * 1,For each data to be cached, we need to specify which name to put in the cache; [name by business type]
	 *@Cacheable(value = {"category"})
     * 	The result representing the current method needs to be cached. If there is in the cache, the method will not be called;
     * 	If there is no in the cache, the method will be called, and finally the result of the method will be put into the cache
     * 2,Default behavior
	 *	1)If there is in the cache, the method is not called
	 *  2)key Automatically generated by default, name of cache:: SimpleKey [] (automatically generated key value)
	 *	3)The cached value uses the jdk serialization mechanism by default to save the serialized data to redis
	 *  4)Default ttl time - 1
     * 3,custom
     * 	1)Specifies that the cache generates the specified key attribute, and accepts a spel
     * 	2)Specify the cache expiration time profile modification ttl
     * 	3)Save the cached value in json format
     * 4,Three problems of cache
     * 	1)Cache breakdown: Spring cache is unlocked by default, and sync = true needs to be set
     * 	2)
     */
@Cacheable(value = {"category"}, key = "#root.method.name", sync = true)
public List<CategoryEntity> getLeve1Categorys() {
		System.out.println("getLeve11categorys.....");
long l = System.currentTimeMillis();
List<CategoryEntity> categoryEntities = baseMapper.selectList(new Querywrapper<CategoryEntity>();
return categoryEntities;

}
@CacheEvict: triggers the deletion of data from the cache
/**
Cascade updates all associated data
* cacheEvict:failure mode
*1,Multiple cache operations @ caching at the same time
* 2,Specify to delete all data under a partition ecacheevict (valug, = "category", allentries = true) * 3. All data of the same type can be specified as the same partition. The partition name defaults to the cache name
*@param category
*/
//    @Caching(evict = {
//            @CacheEvict(value = "category", key = "'getLeve1Categorys'"),
//            @CacheEvict(value = "category", key = "'getCatalogJson'")
//    })
//     allEntries = true delete all cache bulk cleanup for category partition
   // @CacheEvict(value = {"category"}, allEntries = true) / / failure mode
    @CachePut//Double write mode
    public void updateCascade(CategoryEntity category) {
    }
@CachePut: does not affect method execution to update the cache
@Caching: combining the above cache operations
@Caching(evict = {
            @CacheEvict(value = "category", key = "'getLeve1Categorys'"),
            @CacheEvict(value = "category", key = "'getCatalogJson'")
    })
@CacheConfig: share the same cache configuration at the class level
Modify serializer for cache store
@EnableConfigurationProperties(CacheProperties.class)
@EnableCaching
@Configuration
public class MyCacheConfig {

/**
Things in the configuration file are not used;
*
1,The original configuration class bound to the configuration file looks like this
@ConfigurationProperties(prefix = "spring.cache")public cLass CacheProperties
*2,To make it effective: @ EnableConfigurationProperties(CacheProperties.class)
*@return
*/

    @Bean
    public RedisCacheConfiguration redisCacheConfiguration(CacheProperties cacheProperties) {

        RedisCacheConfiguration config = RedisCacheConfiguration.defaultCacheConfig();

        // Modify the default serializer
        config = config.serializeKeysWith(RedisSerializationContext.SerializationPair.fromSerializer(new StringRedisSerializer()));
        config = config.serializeValuesWith(RedisSerializationContext.SerializationPair.fromSerializer(new GenericJackson2JsonRedisSerializer()));

        CacheProperties.Redis redisProperties = cacheProperties.getRedis();

        if (redisProperties.getTimeToLive() != null) {
            config = config.entryTtl(redisProperties.getTimeToLive());
        }
        if (redisProperties.getKeyPrefix() != null) {
            config = config.prefixKeysWith(redisProperties.getKeyPrefix());
        }
        if (!redisProperties.isCacheNullValues()) {
            config = config.disableCachingNullValues();
        }
        if (!redisProperties.isUseKeyPrefix()) {
            config = config.disableKeyPrefix();
        }

        return config;
    }
}
Insufficient spring cache;
1) . read mode:
Cache penetration: query a null data. Solution: cache empty data; ache-null-values=true
Cache breakdown: a large number of concurrent queries come in and query an expired data at the same time. solve. Locking; Spring cache is unlocked by default, and sync = true needs to be set
Cache avalanche: a large number of Keys expire at the same time. Solution: add random time. Add expiration time.: spring.cache.redis.time-to-live=3600000
2) . write mode: (cache is consistent with database)
1) Lock reading and writing.
2) I. introduce Canal and sense the update of MysQL to update the database
3) Read more and write more. Just go directly to the database for query
Summary:
Regular data (read more and write less, real-time, data with low - consistency requirements); spring cache can be used
Special data: special design
I