A few days ago, when I chatted with a young man, I found a problem. He started learning Python from scratch, finished learning lists, dictionaries, functions, etc. Then he began to learn more about crawling. It took more than a month to learn nothing, but he couldn't do it at all.
In fact, the main reason for this problem is that the Python introductory knowledge is not good. What I mean by Python introductory knowledge is not only the basic knowledge such as lists, but also advanced programming content such as object-oriented and process threads.
This may be because beginners don't know how to lay the foundation. Unfortunately, the learning resources you choose do not give a good lecture on advanced programming, which makes learning hard later. Speed is not speed, so I personally think that my little buddies who want to learn Python crawls and other directions should first learn the introductory knowledge well.
Today I wrote a teaching article about Python Advanced Programming. After you have finished learning lists and other basics, learning this part will make your progress easier and smoother.
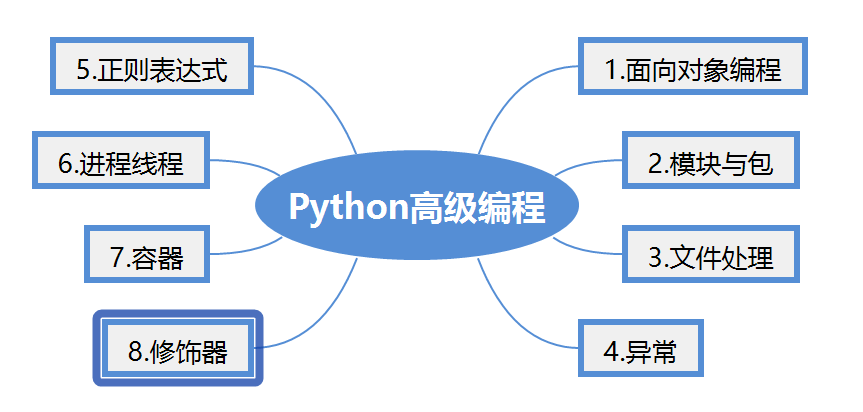
Let's first look at what Python advanced programming includes:
Article Directory
- 1. Object-oriented programming
- 2. Modules and Packages
- 3. Document handling
- 4. Exceptions
- 5. Regular Expressions
- 6. Process Threads
- 7. Container/Iterative Object/Generator
- 8. Decorators
1. Object-oriented programming
➿ (1) Object-oriented thinking
Object-oriented is an abstract programming thinking. Many programming languages have an idea. Python is a pure object-oriented language, which can be simply understood as focusing on how to solve problems rather than on how to implement them at the bottom level.
Object-oriented and process-oriented are two different ideas. The language of object-oriented programming is Python and so on. The language of process-oriented programming is C and so on. The programming thinking of writing code is different.

Take laundry as an example to understand these two ideas.
Washing clothes by hand is usually as dry as this: find basin-drain-add washing powder-soak clothes-rub-dry-rinse-screw-dry-air.
This is a process-oriented idea. Once you don't know what to do in the middle, you won't be able to wash your clothes well. For example, you don't know how to rub your clothes to make them dirty. For example, after rubbing, you don't screw-dry them and dry them directly, resulting in a lot of water, etc. One of the links is wrong, and you can't achieve the desired laundry results.
Washing clothes in the washing machine is usually so dry: turn on the washing machine - put your clothes in - add washing powder - press the start button - air dry.
It's an object-oriented idea. You don't need to know how the washing machine washes when you put your clothes in. You just need to know how to empty the powder after you put your clothes in and press the button.
Similarly, in programming languages, there is a difference. When C writes code, you have to pay attention to the underlying things like your memory, but when Python writes code, we hardly pay attention to the underlying things. The focus is on how to solve the problem.
Before formally involving code, there is a conceptual piece that needs to be understood before we can get better into object-oriented programming.

➿ (2) Two important object-oriented concepts: class and object
1. Concepts of objects and classes
It may be easier to understand these two concepts together by simply understanding that a class is a template for generating objects.
As we mentioned above, the example of a washing machine, if a washing machine is an object, then the drawings that make it are classes. If an egg is an object, then a hen is a class. If a dog is an object, then a dog is a class.
In Python, everything is an object, variables are objects, functions are objects, strings, lists, tuples, and so on are objects.

2. Object Details
(1) Composition of objects: object = property + method
Objects are made up of attributes and methods. Attributes can be understood as what objects have and methods can be understood as what objects can do.
(2) What are the characteristics of the object's attributes?
- Object properties can be abstract
For example, if the washing machine is an object, then the washing machine is colored, the color is an attribute, but the color is abstract, because it can be red, white, black, and so on.
- An object's properties can be another object
For example, if the computer is an object, then the computer has a hard disk, which is a property of the computer, so the property of the object can be another object.
- Large objects consist of small objects
For example, the mouse is an object, the wheel of the mouse is an object, the single-chip computer inside the mouse is an object, and so on. You will find that the mouse is a large object composed of many small objects.

(3) Method of object
There is a rule to understand first that an object's method can be called either by itself or by another object, which I will explain in detail later.
We won't talk about code here, because we need to talk about classes before we can better understand the classes and objects in the code, as we will see below.
3. Detailed Class
As mentioned above, classes are templates that produce objects, so classes are abstractions of objects and objects are representations of classes.
Since object = property + method, similarly, class = property + method.
(1) Create classes
Methods for creating classes:
class Class name:
	Attribute 1
    Attribute 2
    Method 1
    Method 2
#There can be multiple attributes and methods in a class, or only attributes or methods
For example, create a student class and use it to create objects
#Create Student Class
class Student:
    name = "Xiao Ming"	#The name attribute of the student class
    age = 18	#age attribute of student class
    def learn(self):	#learn method for students
        print("The student's learning method was called")

#Create object of Student class
s1 = Student() #Student() is a class object created, but for simplicity, I passed it to s1
s1.learn()	#Method of object
print(s1.age)	#Properties of the execution object

#These two lines of code can actually be written directly as Student().learn(), as well as a way to create objects with classes and call them
Execution results:
In fact, when you create an object of the Student class, the next three lines of code can be written like this, and the effect is the same:
Student().learn()	#Create class objects and use object methods
print(Student().age)	#Create an object of a class and execute its properties
Looking back, let's look at what attributes are and what methods are from a code-concept perspective.
Class attributes are what's inside a class, such as name and age, so name and age are attributes of the Student class.
Class method is what a class can do, for example, there is a function called learn(self), which can execute "the learning method of the students is called". That is, what the class can do, so the function learn(self) is the method of the class.
(1) Detailed attributes
We have described the properties of objects and the properties of classes before, so let's look at the differences and characteristics between them.
- Class Properties
1. Class properties are defined inside a class, outside any method
    	1. Create classes directly when you create them
     	2. Class name.New Property Name=Attribute Value
2. Using class properties:
   	1. object.Class Properties
   	2. class.Class Properties
3. The characteristics of class attributes:
   	1. Class attributes belong to class objects
   	2. Objects share class properties. If class properties change, all objects change
4. Class attributes have one and only one, all at once
- Object Properties
Object properties are defined within methods
1. Establish
		1. object.Instance Property Name=Attribute Value
		2. Method internal creation: self.Property Name = Attribute Value
2. Using object properties
		object.Instance Property Name
3. Object attributes are independent of each other
4. Naming conflicts between object and class attributes
		1. Give priority to object property names
		2. Object property names obscure class properties with the same name
(2) Detailed method description of the class
- Declaration of class methods
def Function name ( self,Parameter 1, parameter 2,....)
- self
1.self Default pass, no need to pass value
2.self Refers to the current instance (object)
3.There must be self Pass it on, but the name doesn't have to be self,Can be called aa
4.self Can be followed by multiple parameters, separated by "."
- Call to method
1.object.Method name (auto-pass object), for example s2.fun1()
2.Class name.Method name (class name ()) #"Class name ()" is equivalent to creating an object

Note: Method calls are similar to functions, and whoever calls it returns it to
- Initialization methods (methods of special classes)
def __init__():

1.This method does not need to be called and will execute automatically whenever an object is created
2.This method can only return None Value, cannot return other types of values
3.If you want to give init Pass multiple parameters, only by class name (multiple parameters)
4.If there is no definition in the class init,Call parent class by default
5.If multiple classes are redefined within a class init Method, will be last init Method Override
Example: Create an object, view the init executed by default, and pass multiple values; Call a method of a class to confirm that it is called and execute the passed value.
#Create Class
class Student:
    name = "Xiaomo"
    age  = "18"
    def __init__(self,aa,bb):
        print("init Called")
        print(aa)
        print(bb)
    def fun1(self):
        print("Function 1")
        print(self)
    def fun2(self):
        print("Function 2")

Student.fun1(Student(100,200)) #Create an object and pass multiple values to init
The result of execution is:
init Called
100
200
 Function 1
__main__.Student object at 0x000001DAD8168400>	#Storage address of self value
➿ (3) Three major object-oriented features
Three main features: encapsulation, inheritance, polymorphism.
1. Packaging
1. Objects have clear boundaries, and attributes and methods are protected within the boundaries. (Security)
2. Proper packaging.
3. Principles of encapsulation
(1)There will be no need to hide the external content.
(2)Hide properties and provide a common way to access them
		Private properties:__name="xxx"
2. Inheritance
Inheritance is the relationship between the parent and the child, such as dog and diha. Dog is the parent and diha is the child.
(1) Definition form (complete form of class)
	class Class name of the subclass (class name of the parent):
		attribute
    	Method
(2) parent class: base class, superclass
	object--top-level class
    Default inheritance if the object does not have a write inheritance relationship object
(3) Characteristics of Inheritance
- Subclasses can continue the properties and methods of the parent class
Example: Objects created with Subclasses call properties and methods of the parent class
# Define Parent Class
class A:
    name1 = "Attribute 1 of parent class"

    def aa(self):
        print("Method 1 of parent class")

# Define subclasses
class B(A):
    name2 = "Attribute 1 of the subclass"

    def bb(self):
        print("Method 1 of Subclass")

n = B()
print(n.name2)	#Call subclass properties
n.bb()	#Calling methods of subclasses
print(n.name1)	#Call properties of parent class
n.aa()	#Call method of parent class
The result of execution is:
Attribute 1 of the subclass
 Method 1 of Subclass
 Attribute 1 of parent class
 Method 1 of parent class
-
Scalability. The parent class expands and the subclass expands.
-
If the subclass does not have a constructor, the object calls the parent class.
-
If the subclass has its own constructor, it will not call the parent class.
-
The constructor of a subclass can call the constructor of a parent class in two ways:
Class name of parent class.__init__(self)	#Manually pass self
super().__init__()	#No need to add self
- Multiple Inheritance
A subclass can inherit multiple parent classes.
# Define parent class A
class A:
    name_a = "Parent Class A Attribute 1 of"
    def aa(self):
        print("Parent Class A Method 1")

# Define Parent Class B
class B:
    name_b = "Parent Class B Attribute 1 of"
    def bb(self):
        print("Parent Class B Method 1")

#Define Subclass C
class C(A,B): #Inherit two parent classes
    pass #skip

n = C()
print(n.name_a)
print(n.name_b)
n.aa()
n.bb()
The result of execution is:
Parent Class A Attribute 1 of
 Parent Class B Attribute 1 of
 Parent Class A Method 1
 Parent Class B Method 1
Note: Multi-inheritance has its advantages and disadvantages. It enhances its expandability. The disadvantage is that it is easy to confuse logic after complex inheritance relationship, which is difficult to understand. It also takes up a lot of resources, such as the well-known problem of diamond inheritance, which mainly involves mro and C3 algorithms. Understanding it can be Baidu.
(4) Method override
- If a method in a subclass has the same name as a method in a parent class, the parent class is overwritten.
#Define Parent Class
class Animal:
    def eat(self):
        print("Animals eat")

#Define Subdog
class dog(Animal):
    def eat(self):
        print("Dogs can eat")

d = dog()
d.eat()
The result of execution is:
Dogs can eat
-
After the subclass overrides the overridden method, there is no method in essence to replace the parent class, and the parent class's method still exists and can be called on other subclasses.
-
The precondition for method override is that the method name of the subclass must be exactly the same as that of the parent class
(5) Method overload
There are multiple methods (functions) with the same method name that are overloaded in Python by default.

3. Polymorphism and Polymorphism
Polymorphism: A class of things has many forms, is a way of using objects, subclasses override the methods of the parent class, call the same parent methods of different subclass objects, can produce different effects.
Examples: Take the example of selecting heroes for the glory of the king. Hero is the parent class, one of which is stroke. Cheng Biojin and his descendants are two subclasses respectively, and stroke is one of them. The caller is another parent, and there is a way to select a hero. This method calls the stroke method, and finally calls different subclasses (Cheng Biao Gold or descendants) to get different skill descriptions.
#Define parent Hero
class Hero :
    def stroke(self):   #Skill function
        print("Hero Skills")

#Define Subclass Course Bite Gold
class ChengYaoJin(Hero):
    def stroke(self):   #Skill function
        print("One Skill Jump, Two Skill Rotation, Big Recruitment")

#Define descendants of subcategories
class HouYi(Hero):
    def stroke(self):   #Skill function
        print("One skill, two skill shooting circle, big bird dizziness")

#Define Caller
class Person:
    def chose_hero(self,hero):  #Players choose Heroes
        hero.stroke()

c = ChengYaoJin()   #Cheng Bite Gold
x = HouYi()     #Offspring
p = Person()    #Game player
p.chose_hero(c)     #Players choose the course Bite Gold, and changing "c" to "x" produces different results
The result of execution is:
One Skill Jump, Two Skill Rotation, Big Recruitment
Polymorphism: Send different information to different objects. Different objects respond differently when they receive information.
#Define Birds
class Bird:
    def fly(self):
        print("birds fly")

#Define the aircraft class
class Plane:
    def fly(self):
        print("Airplane can fly")

#Define rocket class
class Rocket:
    def fly(self):
        print("Rocket will fly")

#Function calls fly method of parent class
def fun1(obj):
    obj.fly()

fun1(Bird())    #Calling the bird fly method
fun1(Plane())   #Calling the fly method of an aircraft class
fun1(Rocket())  #Call fly method of rocket class
The result of execution is:
birds fly
 Airplane can fly
 Rocket will fly
2. Modules and Packages
👳 (1) Modules
1. Definition
Modules refer to Python program files (source files). The file name of a module is the name of the module plus.py, which contains Python object definitions and Python statements. A module contains defining functions, classes, execution code, etc. In general, do not modify the module to avoid module failure.
2. Module Import
An imported form is allowed in Python to make module calls, a module in Python is also an object, and all global variables defined in the module become attributes of the module after import.
Syntax 1:import module name
If you want to import multiple modules, you can import multiple modules with only one import, separated by commas, but this is not recommended in Python's PEP 8 style, so to import several modules, write several imports to import one by one.
Example: Import math module and invoke sqrt() square function to square 9
import math
num = math.sqrt(9)
print(num)
Output results:
3.0
Tip: Operations in Python return a float type by default, so it is 3.0.
Syntax 2: from module name import function 1, function 2
Note that the functions here are not enclosed in parentheses.
Example: Import math module and invoke sqrt() square function to square 9
from math import sqrt
num = sqrt(9)
print(num)
Output results:
3.0
Syntax 3: from module name import
Normally, this grammar imports all the functions of a module. When you want to use more than one function of a module, you don't have to write one by one. I won't exemplify it here. It's the same.
Note:
Not all the functions in the module can be imported in all cases.
If there is one in the module__all__=["Function 1","Function 2"]Such a statement,
Then the imported module can only use function 1 and function 2.
If there are functions like Function 3 in the module, but not in the__all__=[list]Declared in the
Example: (This example needs to read the following custom module before you can understand it)
A new module called module 1 has been created, and the module code has two functions:
def fun1() : #Implement a+b and output results
    print("fun1")

def fun2() : #Implement a+b and output results
    print("fun2")
__all__ = ["fun1"]  #Declare that fun1() can only be called
Import all methods in the module in Syntax 3 in another Python file:
from module1 import *
fun1()
fun2()
Execution results are printed out only for fun1, and then error message fun2() is not defined and cannot be recognized because
stay module1 Of use__all__The only method declared to be callable is fun1().
3. Define aliases
Some modules or function names within the module are longer and inconvenient to use many times. You can customize the name of the module or function.
1. Module custom alias: import module name as alias
Example: Customize the time module to alias t and use it.
import time as t
t.sleep(3)  #Delay by three seconds
print("hello world")
Output after 3 seconds of program execution:
hello world
2. Function Custom Alias: from Module Name import Function Name as Alias
Example: Import the time module and customize the sleep() function by the name s
from time import sleep as s
s(5)	#Delay 5 seconds
print("hello world")
Output after 5 seconds of program execution:
hello world
4. Custom Modules
Everyone can generate custom modules for invocation, which are Python files. The Python files we create when we write code are equivalent to one module.
Note: The module being invoked should be placed in the same directory as the current Python file, otherwise the folder will be declared when importing.
Example: Customize one module and call it in another Python file.
Create a new Python file named module 1 with the following code:
def fun1(a,b) : #Implement a+b and output results
    print(a+b)
Create a new Python file in the same directory and call the module 1.py:
import module1
module1.fun1(20,30)
Run the current Python file result:
50
5. Module testing
Each module is executed by default when it is imported, but there are also a lot of internal test code inside the module. To avoid executing the test code inside the module when it is imported, there is a method involved:
Many modules have test methods internally:
if __name__ == "__main__":
	Code 1
This method can achieve a function, if executed in a module, code 1 will be executed. When other files import into the module, code 1 will not be executed, so the tests inside the module are generally placed in code 1.
Why? The magical point is u Name_u, The result of its execution in the current file is u main_u, When other files are imported, the result is the module name, so using this if statement, you can determine whether the module execution is executed in the current file or imported.
Give an example:
Create a new Python called module 1 as a module with the following code:
print(__name__) #Print_u name_u
Execution results:
__main__
Create a new Python file and import the module 1.py you just built:
import module1
Execution results:
module1
The results are different when the current file is executed and imported, so it becomes an internal test method for the module.
Note: In a custom module, it is not recommended to write a while break, otherwise the while break inside the module will be executed during the import process, which may not jump out, that is, the module has been imported and other code cannot be executed.
👳 (2) Package
1. Definition
A package is a folder in which the associated modules are placed and there are "__init__.py"This file, this folder is called a package.
Features of the package:
1.Packages are also objects
2.Must have__init__.py file
3.__init__.py Files are the way packages are constructed and control the importing behavior of packages, usually an empty package
4.Packages can have not only modules but also subpackages
2. Package creation
After creating a new project file in Pycharm software, open Pycharm to create a project folder click on the folder right-click pop-up option New Python Package complete the creation. The new folder created is the package, in which the init file is automatically created.

3. Import of packages
There are two main import methods.
Method 1: import package name. Module name. Target
Method 2: import package name. Subpackage. Module name. Target
The goal here can be variables, functions, and so on, which are described below.
4. Use of packages
Usage Form 1: General Use 1
import Package Name.Module name
 Package Name.Module name.function
Example: Create a package and use it in another.py file, requiring that the.py file not be included in the package created.
Step 1, open Pycharm to create a new project, create a package named demo, create a new.py file inside the package named my_module, code as follows:
a = 100
def fun1():
    print("This is a package")
Step 2, open another.py file and import the created package
import  demo.my_module
print(demo.my_module.a)
demo.my_module.fun1()
Execution results:
100
 This is a package
Usage Form 2: General Use 2
from Package Name import Module name
 Module name.function
 Module name.variable
Example: Following the demo package created above, I modify the code directly in Step 2 to import and use the package in this new way.
from demo import my_module
print(my_module.a)
my_module.fun1()
The results are the same:
100
 This is a package
Form 3: Alias and use
import Package Name.Module name as alias
 alias.function
 alias.variable
In Form 1 above, it may be found that importing a module is not easy to use, and you also need the package name and module name, can it be simple? Of course, give the module in the package a shortened alias, followed by an alias.
Following the example in Form 1 above, I will not change Step 1 here, but I will alias it directly in Step 2.
import  demo.my_module as n1    #Alias n1
print(n1.a)
n1.fun1()
Execution results:
100
 This is a package
The results are the same, but aliases are much easier to use if the code is longer.
Of course, you can also use Form 2 to import the package and alias it. You can use the alias instead. I won't give you an example. You can try it yourself.
Usage 4: Import a function
from Package Name.Module name import Function 1
 Function 1
Here I'm also following the package I created and working directly with another.py file.
from demo.my_module import fun1
fun1()
Execution results:
This is a package
Usage Mode 5: Import All Functions
When importing a module, we introduced import * as a way to import all the functions of the module, and here you can also import all the functions of the module in the package.
For example, there is a module called "hhhh" in the package named "demo". The code of the module is as follows:
def fun1():
    print("This is feature 1")
def fun2():
    print("This is feature 2")
Then we call it in another.py file;
from demo.hhhh import *
fun1()
fun2()
Execution results:
This is feature 1
 This is feature 2
6. About the use of all
About u all_u Use is described in the module, which is a list of functions that can be imported, but inside the package, u all_u Is a list of modules that can be imported, that is, declare which modules can be imported.
_u inside the package all_u Is in u init_u Declared in the file, not in which module.
Example: There are multiple modules in a package, in which modules declared by all can be imported, and modules not declared can not be imported.
Step 1, Inside the package named demo are hhhh and my_module has two modules, but all declares in the int file that only hhhh files can be used. The code of the int file is as follows:
__all__ = [
    "hhhh"  # hhhh module allows import
]
Step 2, import hhhh and my_in the demo package in the new.py file Module has two modules:
from demo import *	#Import all modules in the package
hhhh.fun1()		#Invoke fun1 function of hhhh module, output "This is function 1"
my_module.fun1()	#Call my_ fun1 function of module module, output "This is a package"
Execution results:

Obviously, although all modules are imported with *, hhhh hh modules declared to be importable by all are usable, and my_not declared by all Module module is not usable and is not recognized by the system.
👳 (3) Functions of modules and packages
1. Enhance code reusability. Useful code is available to more than one person, and many people can reuse it.
2. Improve the readability of the code. If all the code is in a.py file, it's too long to understand and maintain, so you can encapsulate some of the commonly used code into packages and modules, give it a literal name, and use it directly when needed, reducing the number of code and improving readability.
3. Reduce code redundancy. Some of the methods encapsulated in the module can be used directly by the parameters. Without writing the methods over again, it takes up memory and reduces code redundancy.
👳 (4) Installation of third-party libraries
Although Python has many built-in modules and packages, referred to as built-in modules, it is not enough to use built-in modules. After all, built-in modules are limited. We often use third-party libraries. It is necessary to learn how to install third-party libraries (packages) at this time.
Today, we will introduce the installation of three third-party modules and packages.
1. Install via pip
You can download and install the third module and packages through the package management command pip, provided that you install Python the way I mentioned in the previous article, "Introduction to Python Foundation". All options are checked so that you don't have to configure environment variables. First check to see if your pip is available.
Method: WIN+R calls up the running window_input cmd_pip can be used if the following PIP information appears
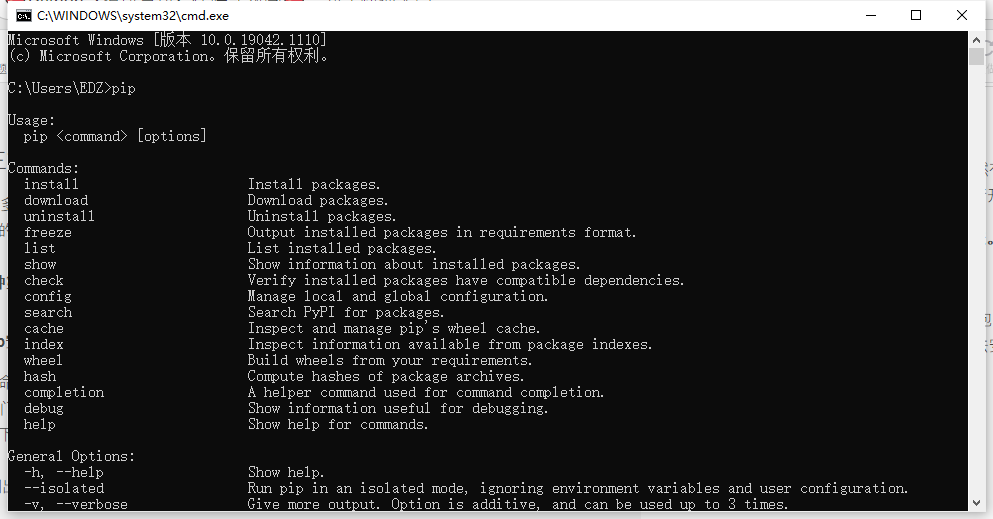
If the red letter says,'pip'in cmd is not an internal or external command or a runnable program or batch file, then you can configure the environment variables manually, but you can't go back and follow the steps I told you to install Python.
Returning to the question of how pip installs third-party modules and packages, first we need to know the name of the third-party modules and packages that we want to install, such as Pillow, a third-party library, which is a very powerful tool library for image processing in Python by:
1.WIN+R Call up the running window
2.input cmd
3.input pip install Pillow
4.Waiting for download and installation to complete
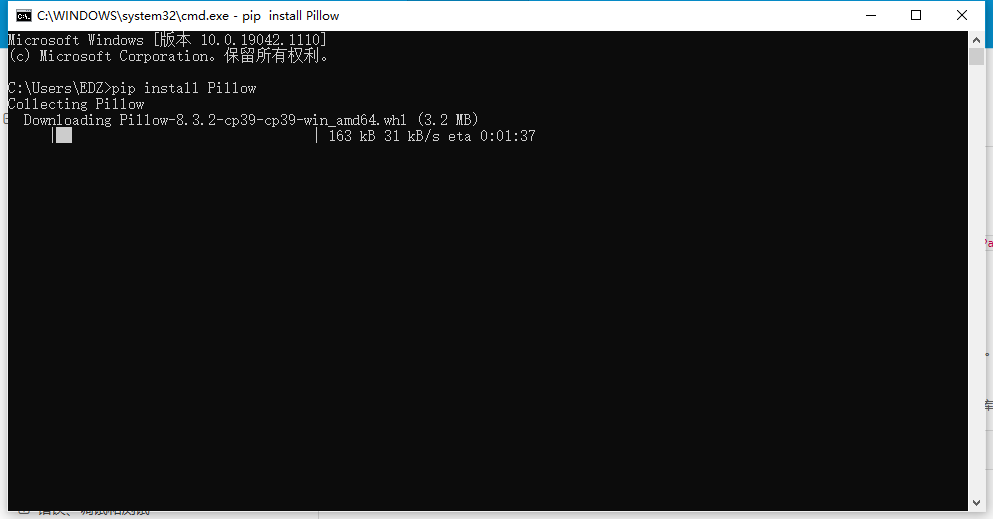
Sometimes there are a lot of red letters indicating that the download failed. This is normal because:
(1) Pip version is too low, upgrade the PIP version, enter in the black window: python-m PIP install-U pip
(2) The network is not good, just download it several times more.
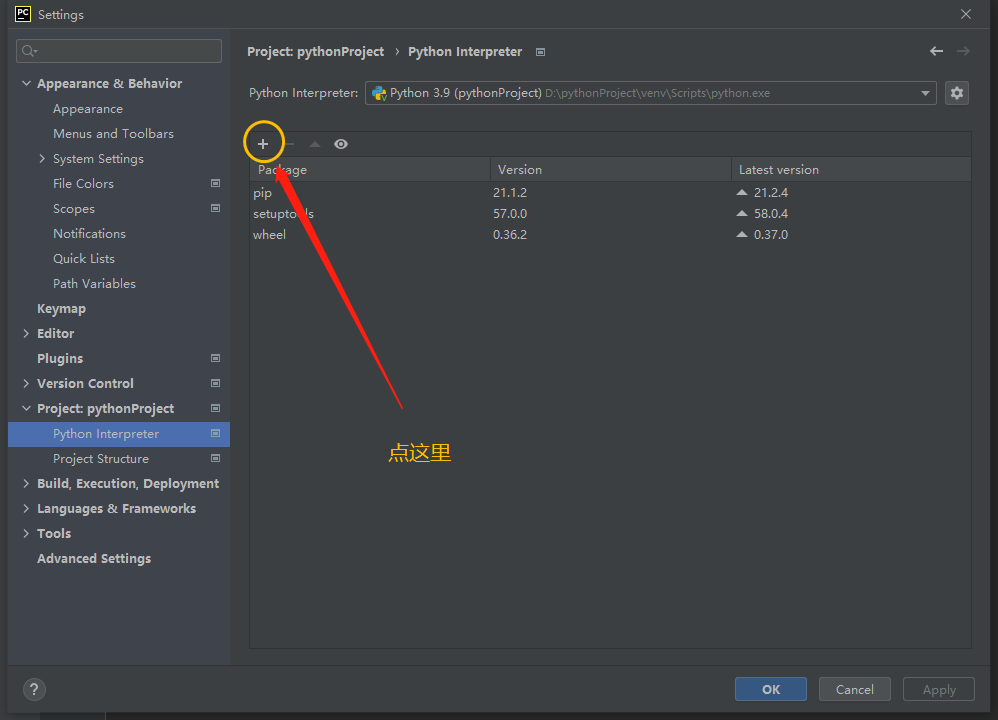
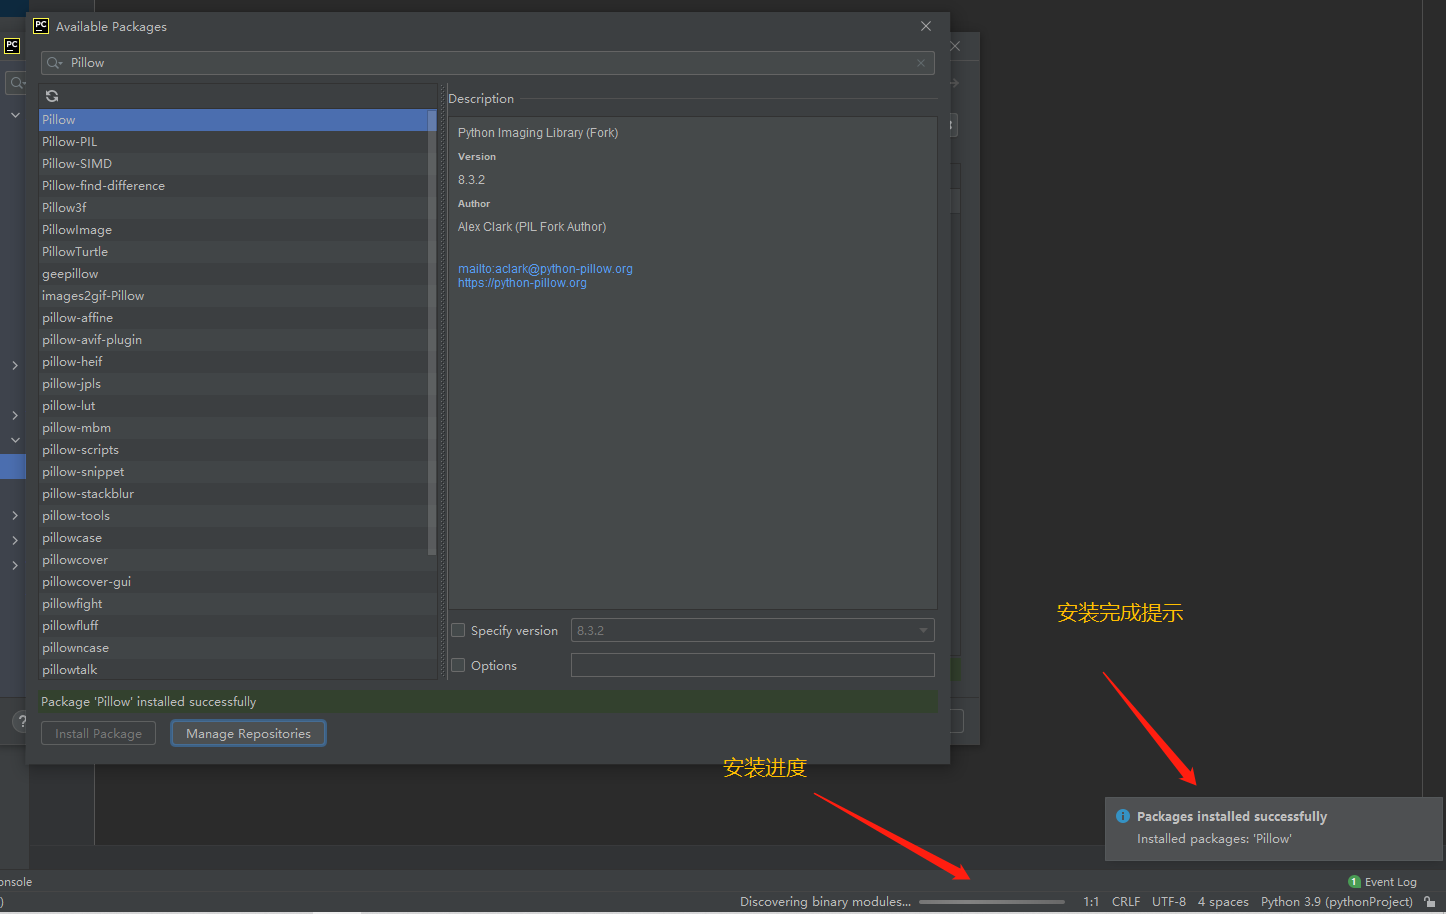
2. Install via Pycharm
It is not necessary to open the software to install via pip, but we can install via Pycharm as follows:
Click File_Settings_Project: Project Name_Python interpreter_Click+in the upper left corner
Enter the package name you want to install, select Click Install Package Wait for download and installation
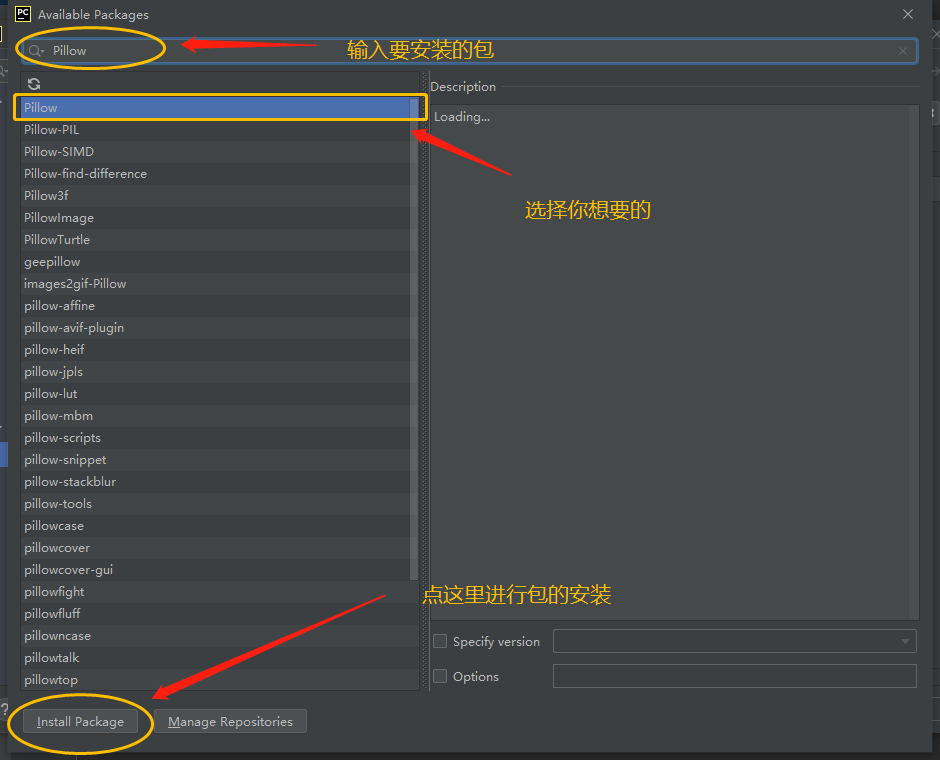
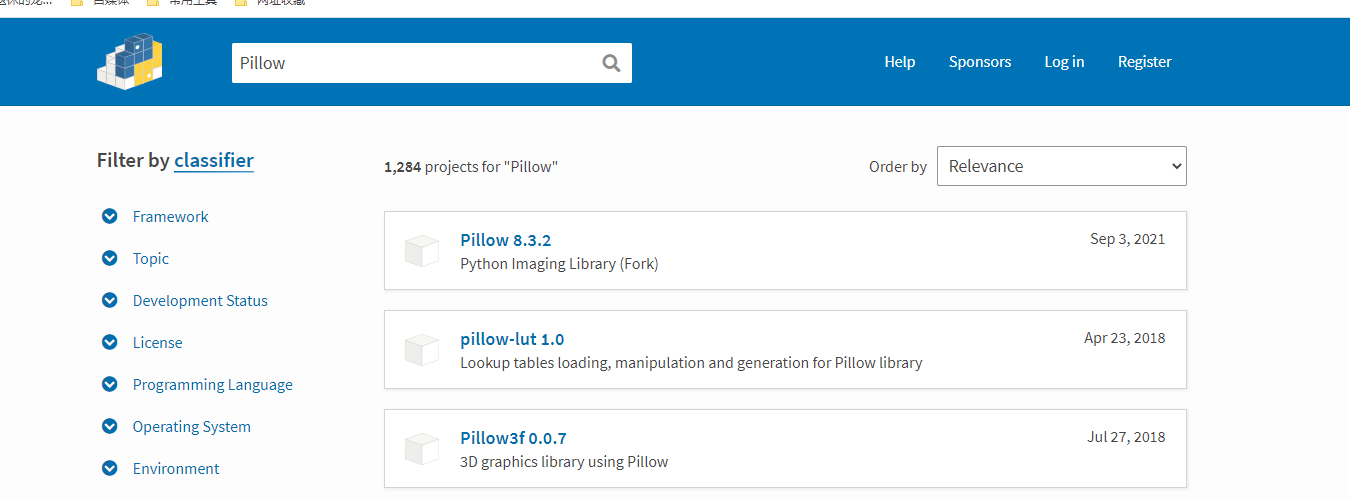
3. Download the.whl file through the channel for installation
You can search for and download the packages you want through such channels as the official website: https://pypi.org/ Search for third-party libraries you want to download, such as Pillow, and simply search for them:
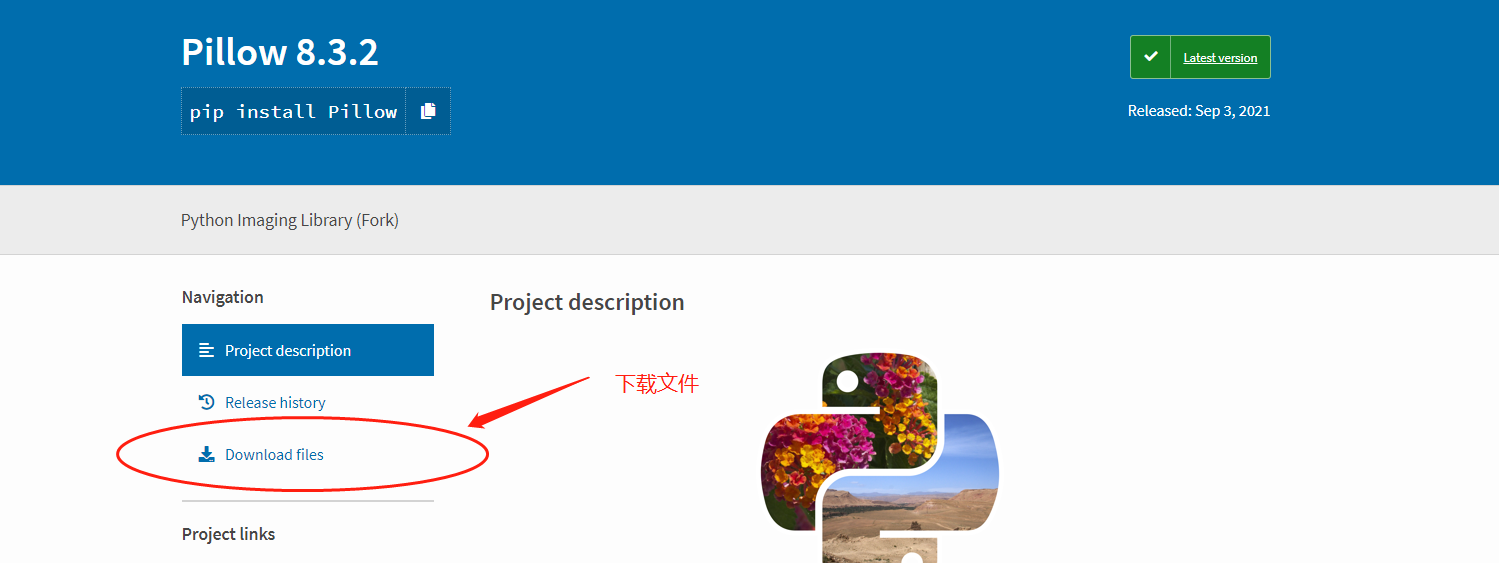
Then select the file you want to download, such as Pillow 8.3.2, go to the download page, and click Download files.
There are many versions after entering. It is recommended to choose the version that matches you, otherwise you may not be able to install it. Note the number of digits in Python, system and computer here.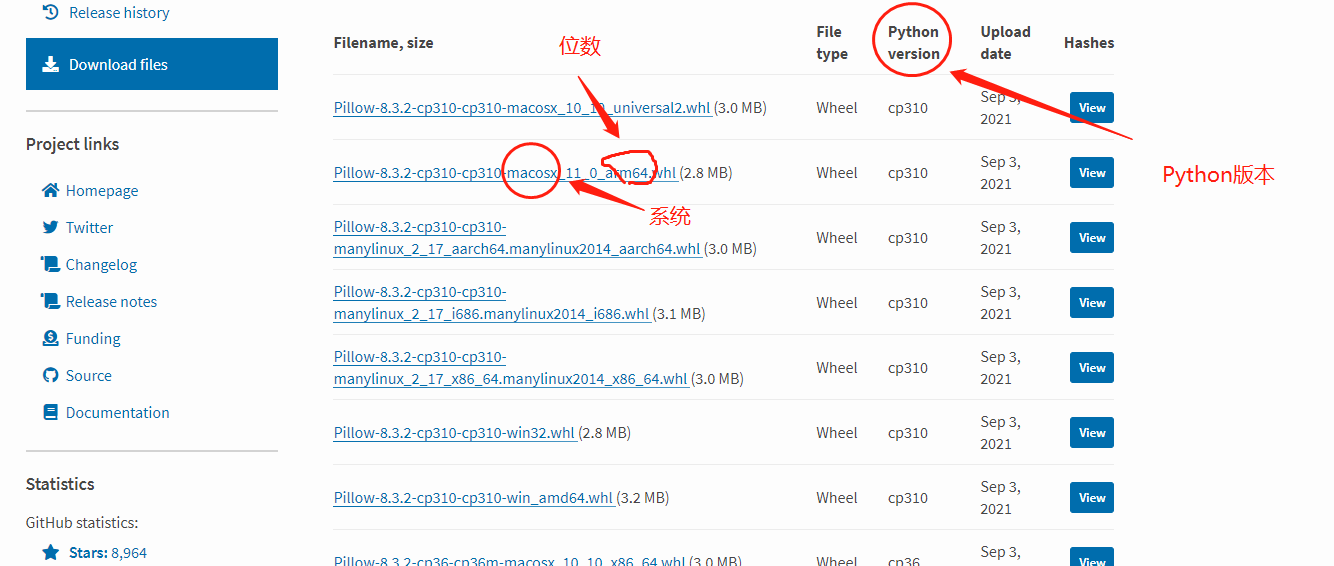
For example, my Python has 3.9.6 installed, so I'm running CP39, my computer is 64 bit, and I'm using Windows, so my next version is Pillow-8.3.2-cp39-cp39-win_amd64.whl This file.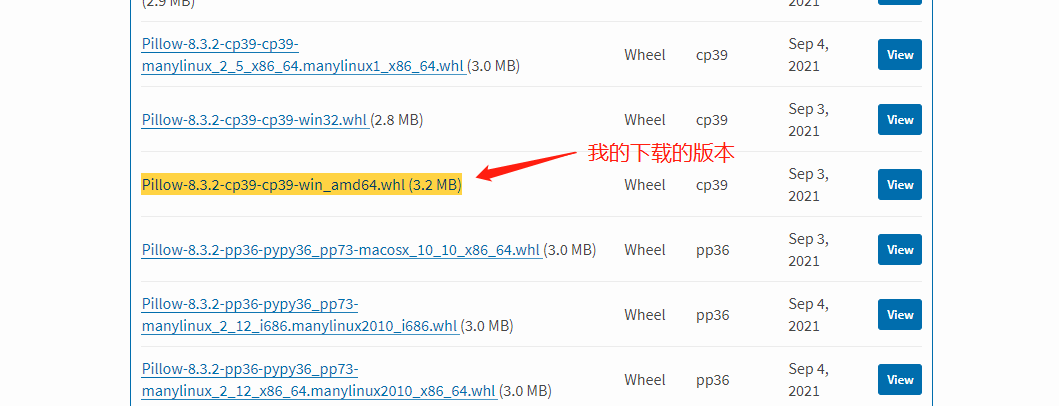
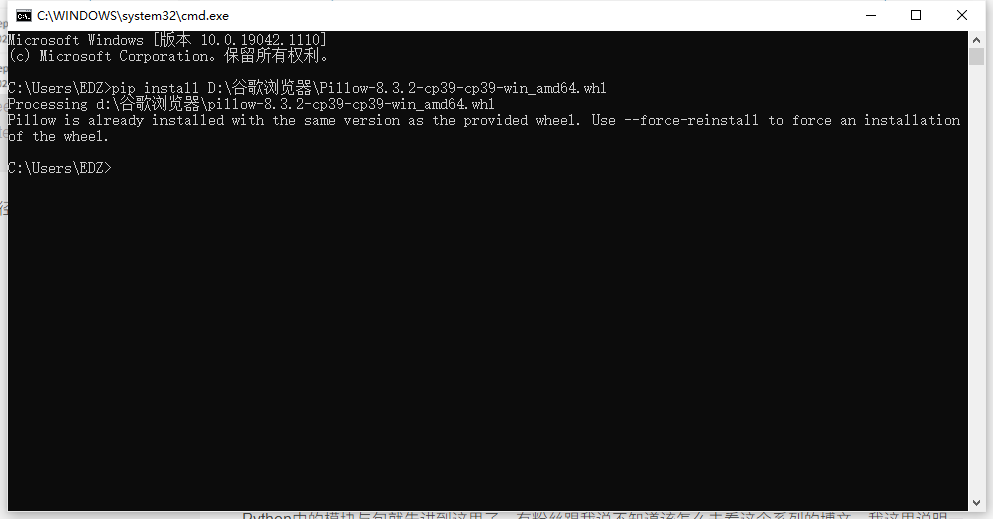
After downloading, WIN+R opens the command line and enters CMD. In the black window, enter the file name under the pip install file path. For example, the path I store after downloading is D:Google Browser, so the code I enter in the black window is:
pip install D:Chrome Pillow-8.3.2-cp39-cp39-win_amd64.whl
Then return to install and wait for the installation to complete.
3. Document handling
💼 (1) Definition and operation of documents
Files in a computer are usually a collection of information stored in the computer on the hard disk of the computer. The main manifestations are video, audio, pictures and documents, such as executable file.exe, document file.txt, web page file.html and so on.

💼 (2) Basic operation of documents
In reality, our operations on files can be roughly summarized as "Open Operation (Read, Delete, Modify, etc.) Save Close", which is still the case in Python. Before starting a file operation in Python, let's learn a few ways.
1.open(name,mode) ---- Open File
This is how Python opens a file, opens a file, and returns a file object.
Name refers to the filename. It must be written completely. Why? That is to write the path of storage + file name + suffix clearly.
Why write so much? Because there may be more than one file with the same file name even under the same storage path, the computer allows the existence of files with the same name as long as the suffixes are different, so the computer does not know who you are referring to unless you write all about it
Model is the mode in which files are opened, and the default is r, which is read-only. There are many ways to model, such as reading, writing and so on, which we will talk about later.
2.write("Content") ------ write
As the name implies, you write to a file object.
3.read() ------- read
Write to a file, either with or without numbers in parentheses. Writing a number means reading the whole content by default. Writing a number means reading X characters, for example, read(6) reads 6 characters from a file object.
4.close() ------ Close File
The method of closing a file. If you do not close a file after a file operation, the file is always open and operated on and consumes memory.
5. Cases
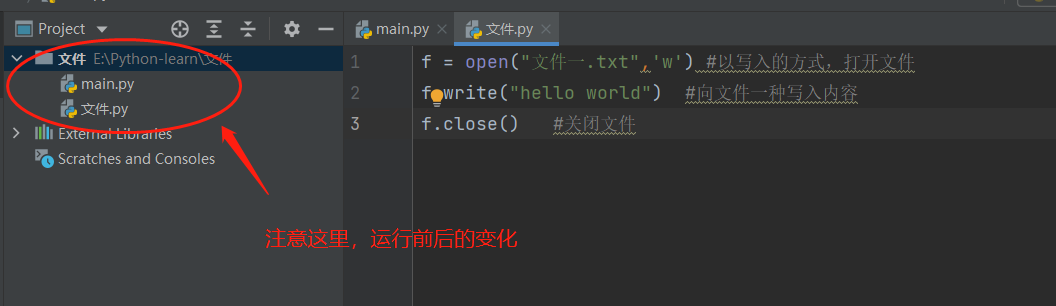
After learning about these four basic methods, let's start with a small case: create a new project, create a new Python file called File to write code, and then write "hello world" to a.txt file called File 1 as written:
f = open("Document One.txt",'w') #Open the file as a write
f.write("hello world")  #Write to File 1
f.close()   #Close File
As mentioned earlier, the open() method returns a file object, so we use f to receive it. This is the interface that did not run before:
After running:
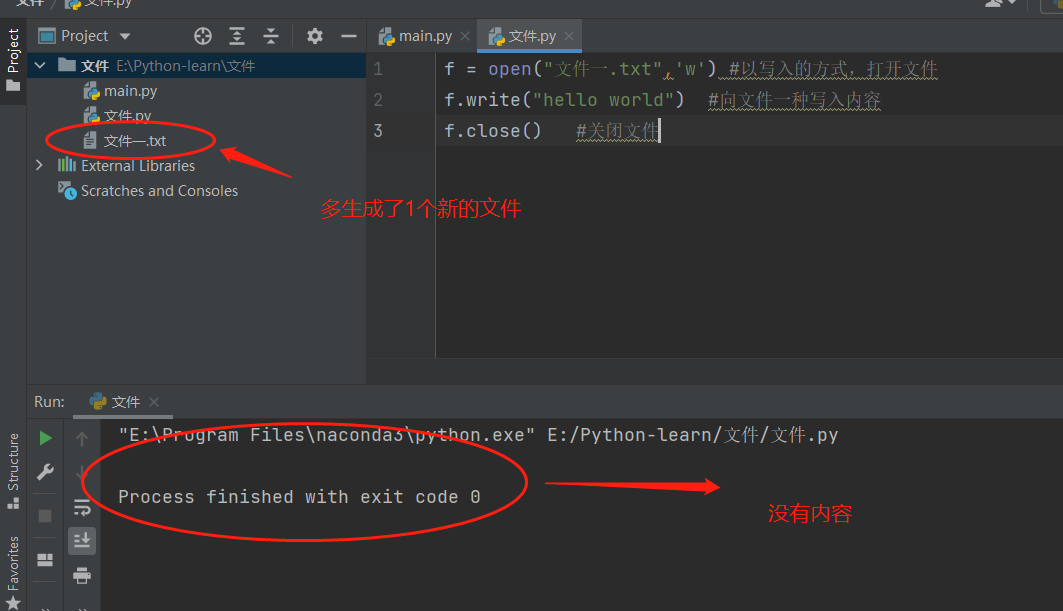
After running, a new file named "File 1.txt" was generated and opened to see what we entered. When writing, a file is created by default if it does not exist.
Similarly, we can read this file:
f = open("Document One.txt",'r') #Open the file as a write
print(f.read()) #read file
f.close()   #Close File
Run result:
hello world
This is the most basic file operation process.
One thing to note here is that the open(name,mode) mode determines what you can do when you start writing, that is, if you start writing code as follows:
f = open("Document One.txt",'r') #Open file read-only
It will be an error if you want to write() later, because r-read-only mode is declared in the model, so you do not have write permission, which should be noted.
6.mode Other modes of operation
There are many modes of operation in the model, so let's look at them in tabular form:
| Pattern | describe |
|---|---|
| r | Open the file as read-only with the pointer at the beginning |
| r+ | Read and write, file pointer at beginning |
| rb | Read-only file pointer begins in binary form |
| w | Write-only, file does not exist, new is created, existing is overwritten, pointer begins |
| w+ | Read-write, file does not exist, new is created, existing is overwritten, pointer begins |
| wb | Write-only, in binary form |
| a | Append mode, file pointer at end |
| a+ | Read-write, create if none exists, append directly |
| ab | Append as binary |
The pointer here can be interpreted as a cursor, where it is, and where your actions begin.
Example: Create a new.txt file named "test", write aaa to it for the first time, and bbb to it for the second time.
f = open("test.txt", 'a+')
f.write("aaa")
f.close()

f = open("test.txt")  # Default read-only mode
print(f.read())  # print contents

f = open("test.txt", 'a+')
f.write("bbb")
f.close()

f = open("test.txt")  # Default read-only mode
print(f.read())  # Print content again
Run result:
aaa
aaabbb
💼 (3) Methods and attributes of documents
1. Object properties of file
There are three common ways to view the properties of a file object:
1. closed
   	If the file object is closed, return True,Otherwise return False
2. mode
   	Returns the access mode of the file object
3. name
   	Name of the returned file
Case study: Operate on a file (arbitrarily) to see the name of the file being operated on, the mode of operation, and whether it is turned off.
f = open("test.txt", 'a+')
f.write("aaa")
f.close()

print(f.closed) #Check to see if it is closed
print(f.name)   #View File Name
print(f.mode)   #View mode of operation
Run result:
True
test.txt
a+
2. Object method of file
There are many methods for files. We have already mentioned a few things before, such as read() and write(), but there are still some common methods to master, such as the following:
1. close()
		Close File---very important
2. read([count])
		Read the contents of the file
		count: Number of bytes
3. readlines()
		Read everything, pack it into a list
4. readline()
		Read a row of data, append it, read it again
5. seek(offset,[from])
		Modify the position of the pointer from from Position moved offset Bytes
		from: 0 From the start, 1 from the current position, and 2 from the end
		oofset: Number of bytes to move
6. write()
		Write to File
Example: write aaabbbccc to the test.txt file and output the contents of the file as a list.
f = open("test.txt", 'a+')
f.write("aaabbbccc")
f.close()

f = open("test.txt")
print(f.readlines())
f.close()
Run result:
['aaabbbcccaaabbbccc']
💼 (4) os module
The os module is a module used to access the operating system and is often used in file operations. Modules are imported before use.
import os
1. About File Functions
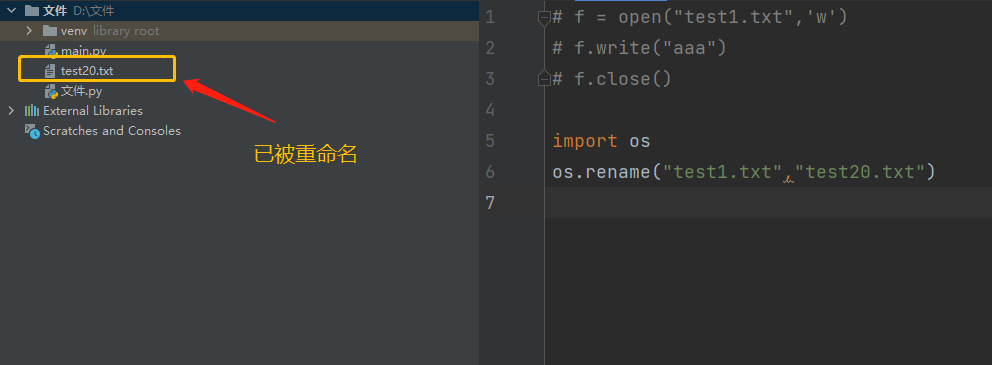
1.os.rename(Original file name, new file name)	-File Rename
2.os.remove(file name)	-Delete Files
	If you don't specify a path, look under the folder where the source code is located and find it without error.
	To delete files in a specified folder, the file name needs a specific path, such as os.remove(r"D:test_1 file name"),r Prevent slashes from escaping
Example: The file test1.txt already exists and is modified to test20.txt.
import os
os.rename("test1.txt","test20.txt")
Run result:
2. Functions of folders
1.os.mkdir(Folder Name)	-create folder
2.os.rmdir(Folder Name)	-remove folders
3.os.getced()	-Get Current Directory
4.os.chdir(Catalog)	-Switch directories
5.os.listdir(Catalog)	-Get all the files or folders under the current folder and return to a list
	os.listdir("aa") #Get all the files or folders under the aa folder and return a list
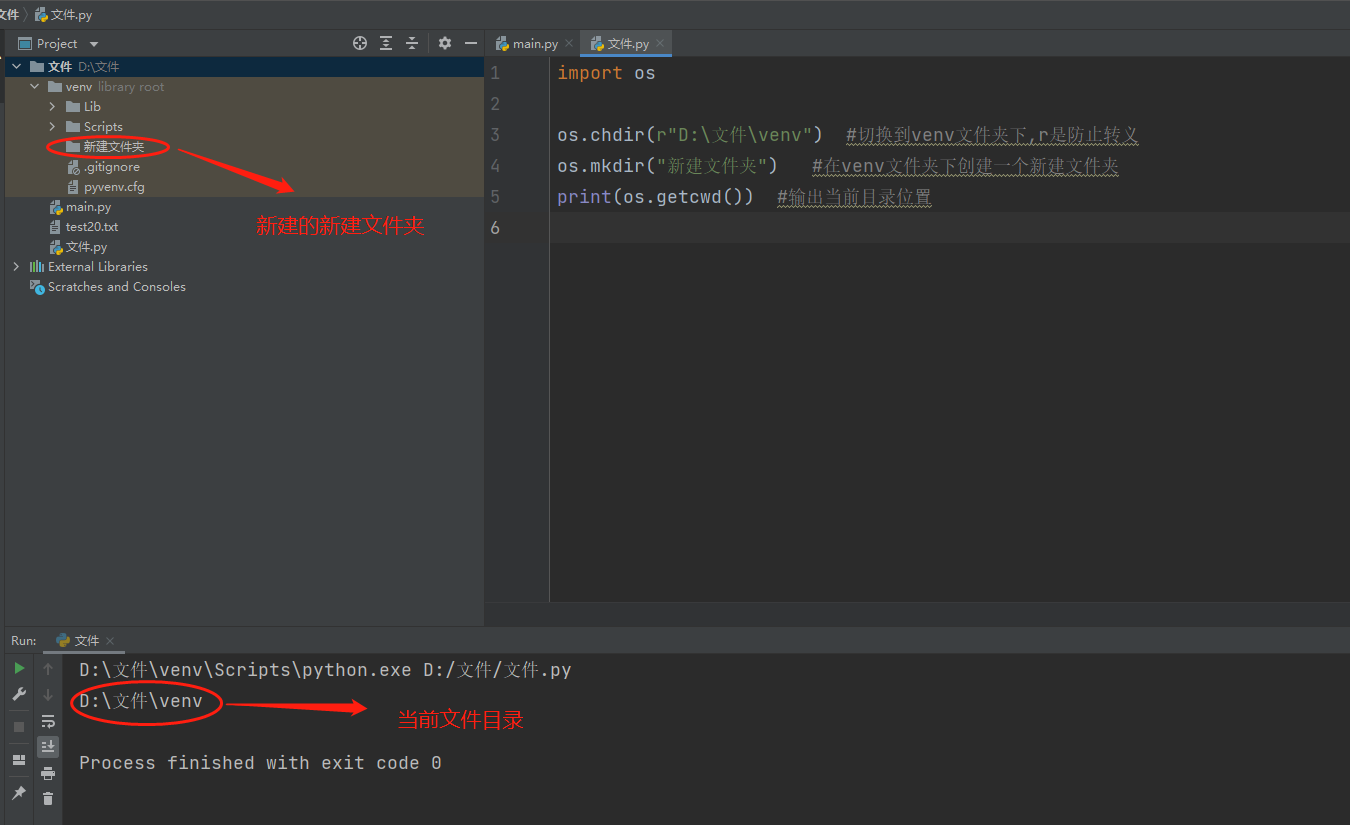
Example: Create a new folder inside the existing folder venv.
import os

os.chdir(r"D:file venv")  #Switch to the venv folder, r is to prevent escaping
os.mkdir("New Folder")   #Create a new folder under the venv folder
print(os.getcwd())  #Output Current Directory Location
Run result:
4. Exceptions
⚡ (1) Definition of exceptions
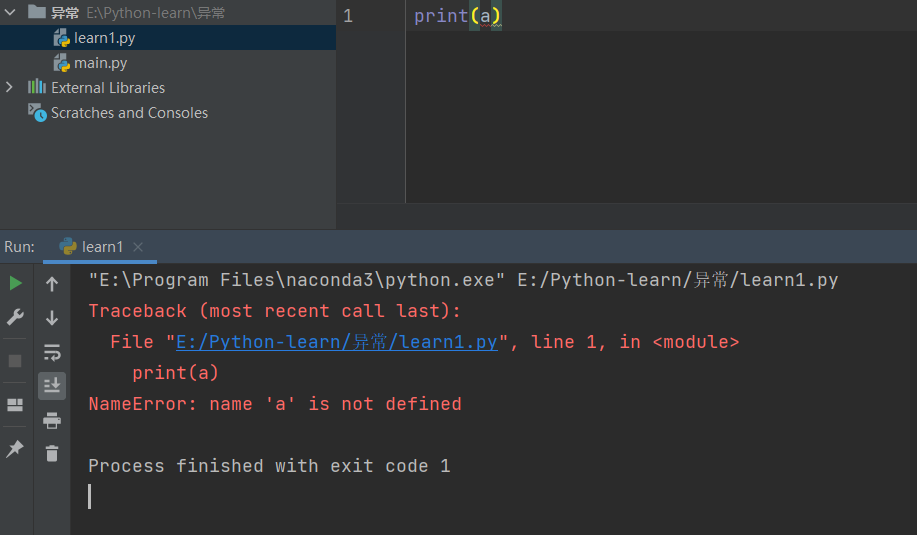
An exception is an event that occurs during the execution of a program and affects its normal execution. In general, an exception occurs when Python cannot properly handle the program.
For example, I just wrote a variable a in the code, run the program, pycharm can not recognize this variable, so the error is an exception.
⚡ (2) Handling of exceptions
So we need to know how to handle exceptions. There are many ways to handle exceptions. Let's look at them one by one.
1.try-except
It can handle code that may have errors, and after processing the errors, the red font will be converted to a short, normal font using the following:
try:
    Code with potential exceptions
except Exception type as variable
	Processed code
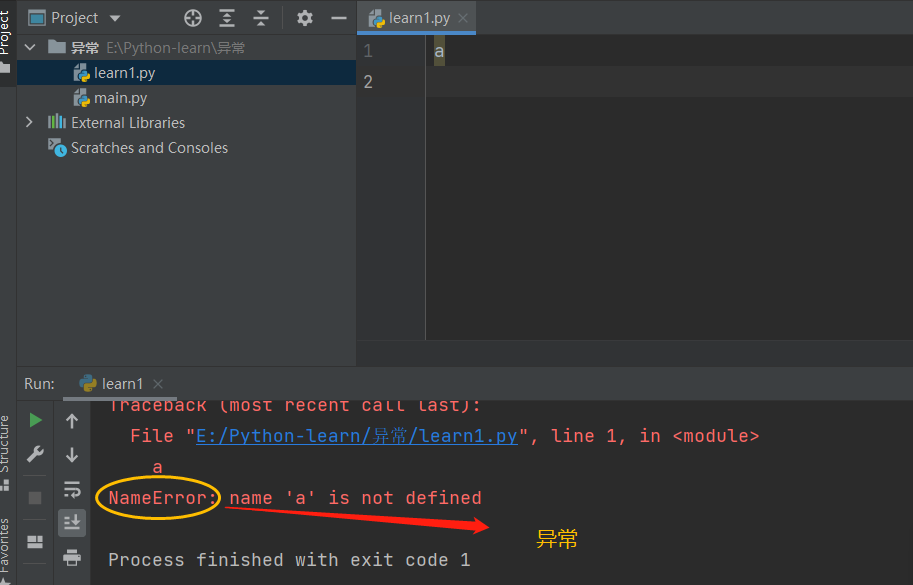
Example: Printing variable a directly will cause an error.
After tyr-except processing:
try:
    print(a)
except NameError as s:
    print(s)
Run again to see the effect:
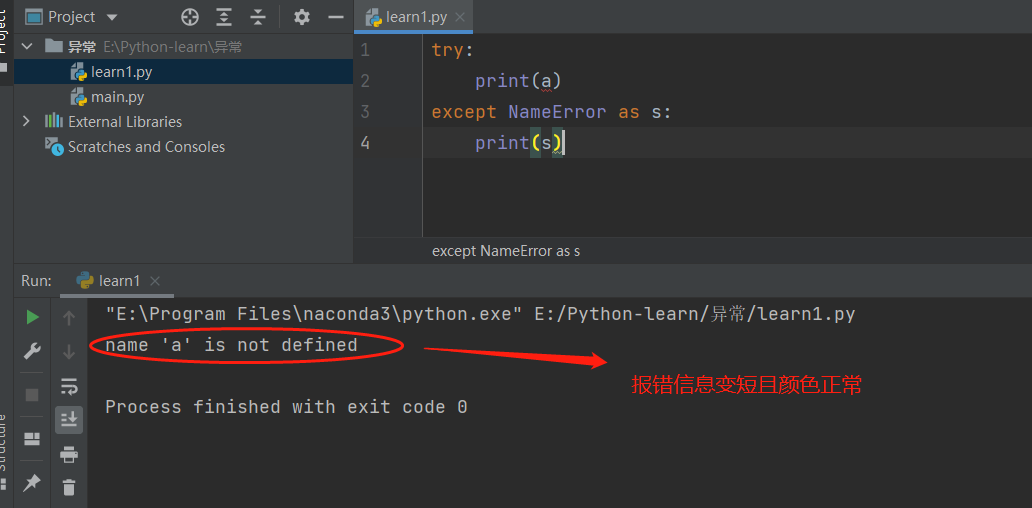
The reddish error message becomes short and the color is normal. Does this seem more comfortable?
The tyr-except here does not affect the operation of the code. If your code does not make a mistake, you write tyr-except. It will only execute the line of try code, which has no errors, then the code inside except will not be executed.
For example, let's have a normal:

2.try-except-except
This method is similar to the previous try-except writing, except that an additional exception is added later to determine a variety of possible error situations.
For example, there are two lines of code that may fail, two different types of exceptions, but you don't want it to be red.
try:
    1 / 0
    print(a)
except NameError as s:  # First, use as+variable
    print(s)
except ZeroDivisionError:  # Second, customize the output
    print("Divider cannot be zero")  # Content of custom output
Run result:
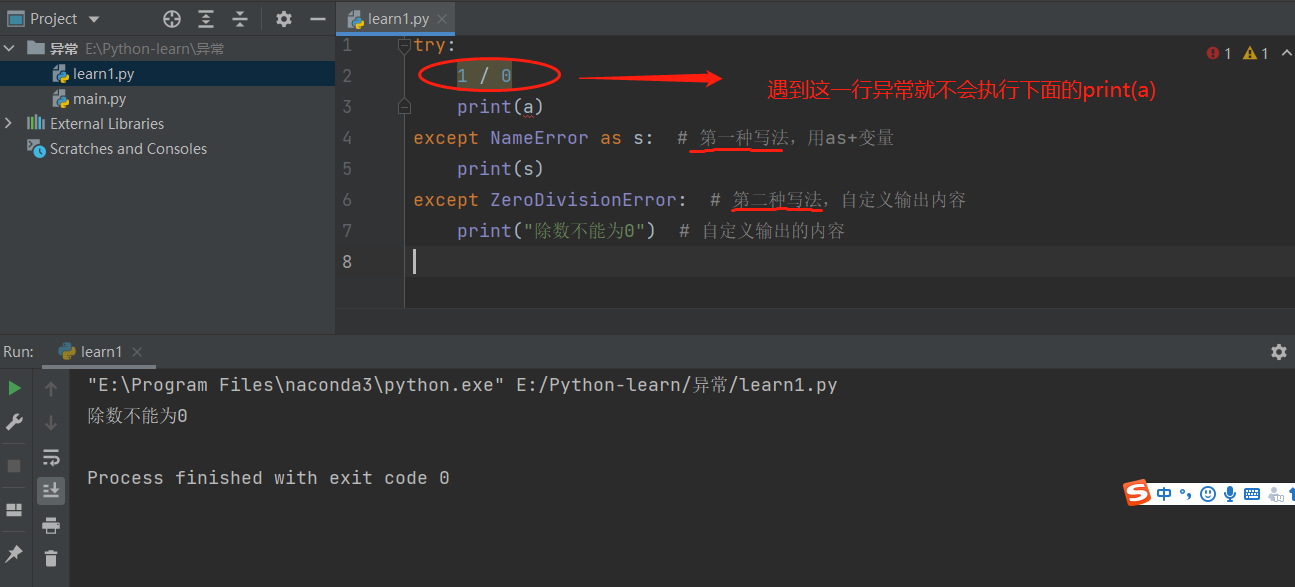
Errors, but not reddish, here's a look at the two ways except is written.
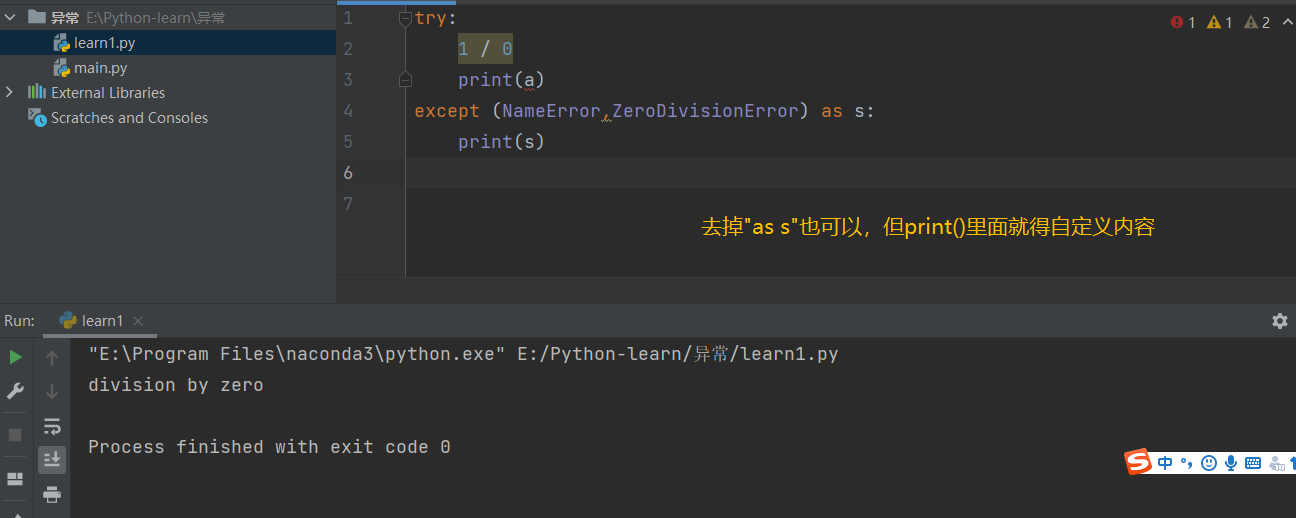
try-except is very flexible to write, so we can also use tuples to include exception types that may have errors and avoid writing multiple lines except, for example:
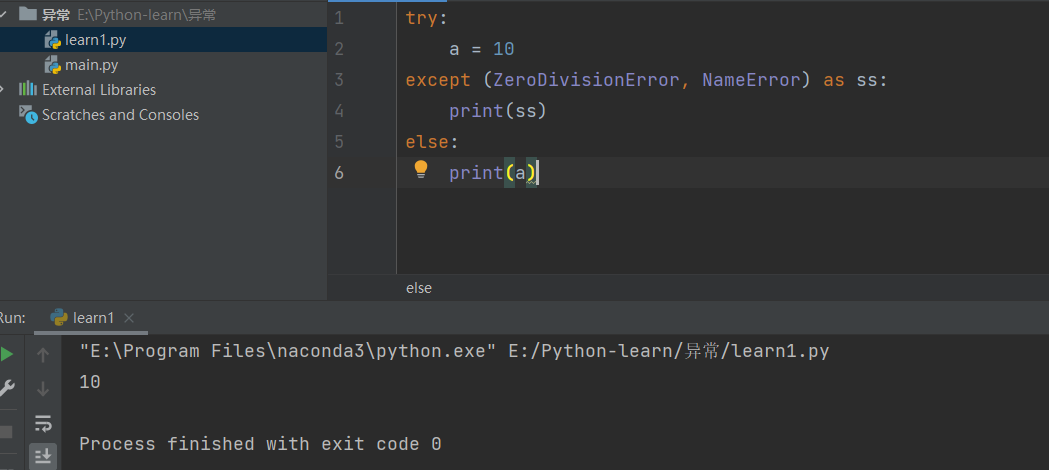
3.try-except-else
If there are no exceptions, execute the code in else, for example:
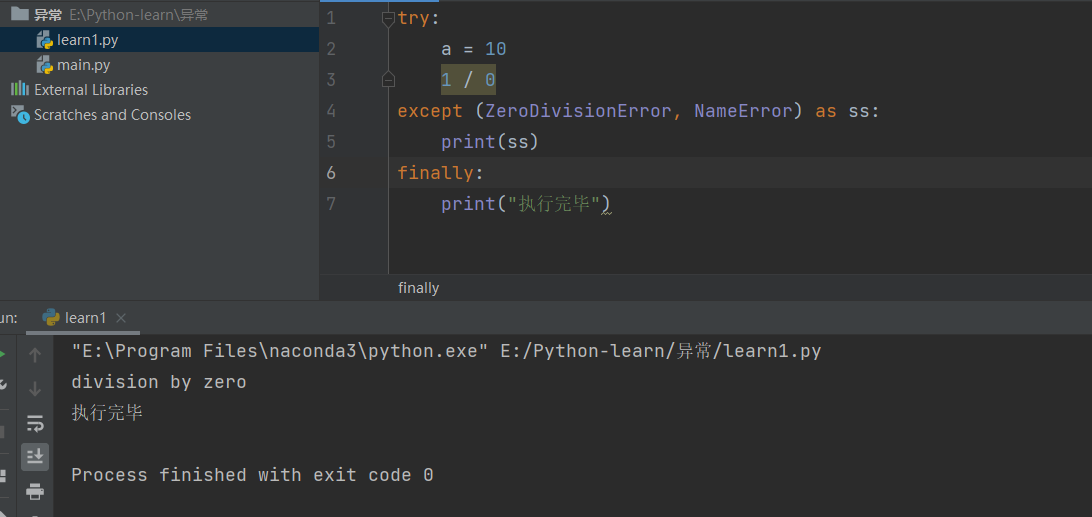
4.try-except-finally
Regardless of whether the code has an exception or not, the code inside finally is executed. For example:
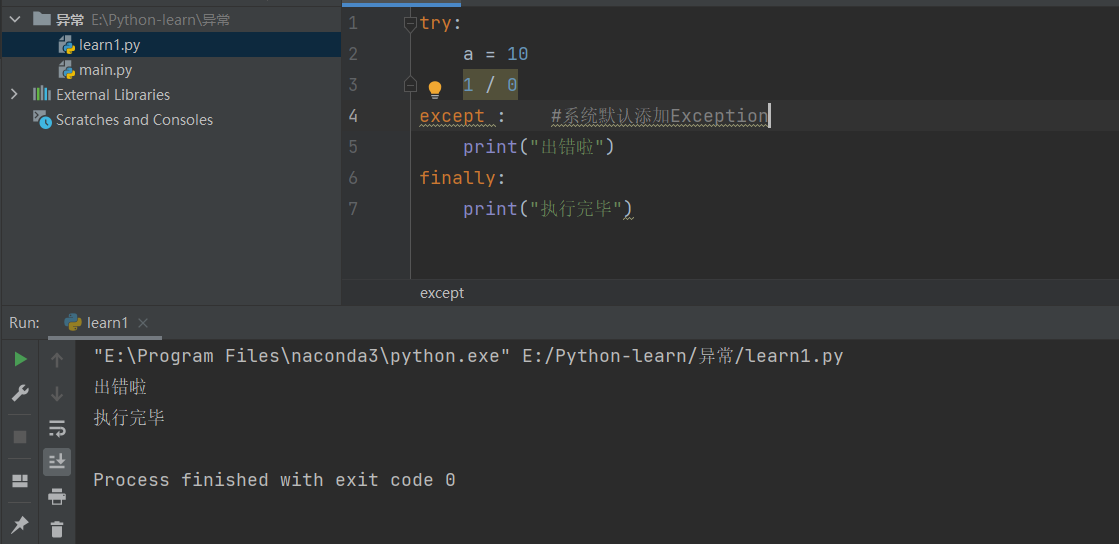
5. Top Class Exception
Exceept can be followed by no error type, because the system will assume by default that the following error is of type Exception, which is a top-level class that contains all error types.
⚡ (3) Custom Exceptions
Did you find that when we went ahead to do basic exception trapping, we had to write a try-except every time something went wrong, if there were more than one place that might go wrong? Do we need to write more than one try-except? Or the code can work in theory, but I want to make a rule that any behavior that doesn't conform to my rules will cause it to be abnormal, for example, if the password length exceeds my length, I want the program to be abnormal.
Custom exceptions can be used to throw an exception (throw an exception) raised by the keyword raise.
Example: Simulate the situation when a user enters a password, the password that the user enters cannot be less than 6 digits. Customize an exception to detect if the password that the user enters meets the requirements. If it does not, an exception is thrown, indicating that the password length and minimum password length that the user enters cannot be less than 6 digits.
class MyError(Exception):  # Classes for exception capture
    def __init__(self, length, min_len):  # Length password length for user input, min_len is the minimum length specified
        self.length = length
        self.min_len = min_len

    # Set description information for throwing exceptions
    def __str__(self):
        return "The length you entered is%s,Not less than%s" % (self.length, self.min_len)


def main():
    try:
        con = input("Please input a password:")  # Get the password the user entered
        l = len(con)  # Get the password length entered by the user
        if l  6:
            raise MyError(l, 6)  # An exception is thrown if the length is less than the set six digits
    except Exception as ss:  # Prompt if there are errors
        print(ss)
    else:
        print("Your password has been entered")  # Execute without error


main()
Run result:
From the above code, we use the knowledge of the class and instance objects in the previous object-oriented block. Forget to review them now. In addition, this combines the previous try-except with our keyword raise to cause exception capture.
5. Regular Expressions
✈️ (1) re module
Before we talk about regular expressions, we first know where to use them. Regular expressions are used in the findall() method, and most string retrieval can be done with findall().
1. Import re module
Before using regular expressions, you need to import the re module.
import re
2. The syntax of findall ():
Now that you have imported the re module, you can use the findall () method, so we need to be clear about how findall () is syntactically defined.
findall(Regular expression, target string)
It's not difficult to see that findall () consists of regular expressions and target strings, the target string is what you want to retrieve, so how to retrieve it is done through regular expressions, which is our focus today.
The result returned after using findall() is a list of regular strings
✈️ (2) Regular expressions
1. String Matching
(1) Common characters
Most letters and characters can match themselves.
import re
a = "abc123+-*"
b = re.findall('abc',a)
print(b)
Output results:
['abc']
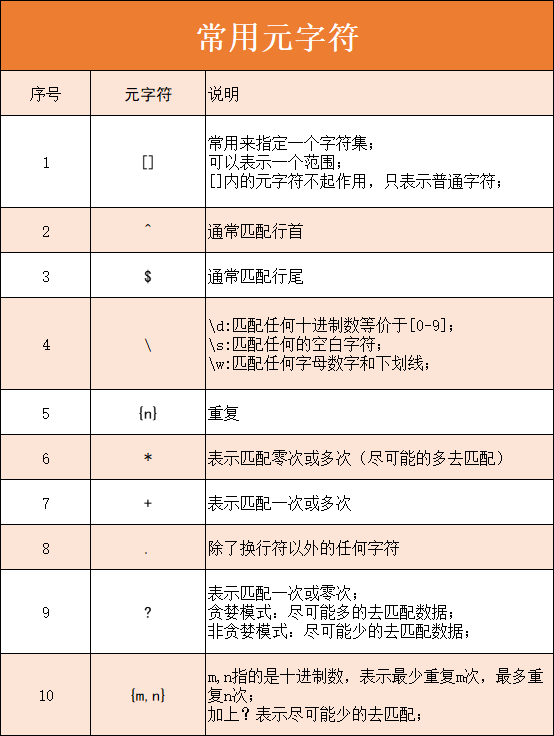
(2) Metacharacters
Metacharacters refer to. ^ $?+. Special characters like {} [] allow us to personalize the search of the target string and return the results we want.
Here I would like to introduce you to 10 commonly used metacharacters and their usage. Here I will first make a simple summary for you to remember, and then explain the use of each metacharacter one by one.
** 1️⃣ []**
There are three main ways to use []
- It is often used to specify a character set.
s = "a123456b"
rule = "a[0-9][1-6][1-6][1-6][1-6][1-6]b"	#This troublesome method is used here for the time being. It will be easier later than knocking so many [1-6]
l = re.findall(rule,s)
print(l)
The output is:
['a123456b']
- Can represent a range.
For example, to select an abc element in the string "abcabcaccaac":
s = "abcabcaccaac"
rule = "a[a,b,c]c"  # rule = "a[a-z0-9][a-z0-9][a-z0-9][a-z0-9]c"
l = re.findall(rule, s)
print(l)
The output is:
['abc', 'abc', 'acc', 'aac']
- Metacharacters within [] do not work, just ordinary characters.
For example, to select "caa" from the string "caabcabcaabc":
print(re.findall("caa[a,^]", "caa^bcabcaabc"))
The output is:
['caa^']
Note: When in the first position of [], it means that all matches except a are made, for example, changing the position of a and a in []:
print(re.findall("caa[^,a]", "caa^bcabcaabc"))
Output:
['caa^', 'caab']
2️⃣^
^ is usually used to match the beginning of a line, for example:
print(re.findall("^abca", "abcabcabc"))
Output results:
['abca']
3️⃣ $
$is usually used to match the end of a line, for example:
print(re.findall("abc$", "accabcabc"))
Output results:
['abc']
4️⃣
The backslash can be followed by different characters to express different special meanings, three of which are common.
- d: Matching any decimal number is equivalent to [0-9]
print(re.findall("cddda", "abc123abc"))
The output is:
['c123a']
It can be escaped to normal characters, for example:
print(re.findall("^abc", "^abc^abc"))
Output results:
['^abc', '^abc']
5️⃣ s
Match any blank characters such as:
print(re.findall("ss", "a c"))
Output results:
[' ', ' ']
6️⃣ w
Match any alphanumeric and underscore, equivalent to [a-zA-Z0-9_], for example:
print(re.findall("www", "abc12_"))
Output:
['abc', '12_']
7️⃣ {n}
{n} avoids duplicate writes, such as when we previously wrote w three times, and here we need to use {n}, where n denotes the number of matches, for example:
print(re.findall("w{2}", "abc12_"))
Output results:
['ab', 'c1', '2_']
8️⃣ *
*Indicates zero or more matches (as many matches as possible), for example:
print(re.findall("010-d*", "010-123456789"))
Output:
['010-123456789']
9️⃣ +
+means to match one or more times, for example
print(re.findall("010-d+", "010-123456789"))
Output:
['010-123456789']
🔟 .
. is a dot, which is not obvious here. It is used to manipulate any characters except line breaks, for example:
print(re.findall(".", "010n?!"))
Output:
['0', '1', '0', '?', '!']
1️⃣ 1️⃣ ?
What? Indicates a match once or zero times
print(re.findall("010-d?", "010-123456789"))
Output:
['010-1']
Note the greedy and non-greedy modes here.
Greedy pattern: Match as much data as possible, as if D was followed by a metacharacter, such as d*:
print(re.findall("010-d*", "010-123456789"))
Output:
['010-123456789']
Non-greedy mode: Match data as little as possible, as D followed by?, E.g. d?
print(re.findall("010-d*?", "010-123456789"))
The output is:
['010-']
1️⃣2️⃣{m,n}
m,n refers to the decimal number, which represents the minimum m repeats and the maximum n repeats, for example:
print(re.findall("010-d{3,5}", "010-123456789"))
Output:
['010-12345']
Add? Indicates as few matches as possible
print(re.findall("010-d{3,5}?", "010-123456789"))
Output:
['010-123']
There are other flexible ways to write {m,n}, such as:
- {1,} is equivalent to the + effect mentioned earlier
- {0,1} is equivalent to what was mentioned earlier? Effect
- {0,} is equivalent to the effect of * mentioned earlier
This is where we start with the commonly used metacharacters and how to use them. Let's take a look at other knowledge of regularity.
✈️ (3) Regular use
1. Compilation rules
In Python, the re module compiles a regular, re.compile (regular expression) using the compile() method, for example:
 s = "010-123456789"
 rule = "010-d*"
 rule_compile = re.compile(rule) #Return an object
 # print(rule_compile)
 s_compile = rule_compile.findall(s)
 print(s_compile)	#What is the object returned by printing compile()
Output results:
['010-123456789']
2. Use of Regular Objects
Regular objects can be used not only by findall(), which we have described earlier, but also by other methods. The results are different. Here is a brief summary:
(1)findall()
Find all strings that match re and return a list
(2)search()
Scan the string to find the location of this re match (only the first one found)
(3)match()
Determines whether Reis at the beginning of the string (matches the beginning of the line)
As an example, let's take the object returned after compile rule above. Instead of findall(), use match() to see what the result is:
s = "010-123456789"
rule = "010-d*"
rule_compile = re.compile(rule)  # Return an object
# print(rule_compile)
s_compile = rule_compile.match(s)
print(s_compile)  # What is the object returned by printing compile()
Output:
re.Match object; span=(0, 13), match='010-123456789'>
You can see that the result is a match object with a starting subscript position of 0-13 and a match of 010-123456789. Now that the object is returned, let's talk about some ways to manipulate this match object.
3. Operation method of Match object
Here's how to do it first, and then I'll give you another example. Match objects are commonly used in the following ways:
(1)group()
Returns a re matched string
(2)start()
Return where matching started
(3)end()
Return where matching ends
(4)span()
Returns the location of a tuple: (start, end)
Example: use span() to manipulate the object returned by search():
s = "010-123456789"
rule = "010-d*"
rule_compile = re.compile(rule)  # Return an object
s_compile = rule_compile.match(s)
print(s_compile.span())  #Using span() to process the returned object
The results are:
(0, 13)
4.re Module Functions
In addition to the findall() function described above, there are other functions in the re module to make an introduction:
(1)findall()
I won't say much about returning all matched strings from a regular expression, as I've described before.
(2) sub (regular, new, original)
The function of the sub() function is to replace strings, for example:
s = "abcabcacc" #Original string
l = re.sub("abc","ddd",s)   #Strings processed by sub()
print(l)
Output:
ddddddacc #Replace abc with ddd
(3) subn (regular, new string, original string)
subn() replaces strings and returns the number of times they have been replaced
s = "abcabcacc" #Original string
l = re.subn("abc","ddd",s)   #Strings processed by sub()
print(l)
Output:
('ddddddacc', 2)
(4)split()
split() splits a string, for example:
s = "abcabcacc"
l = re.split("b",s)
print(l)
Output results:
['a', 'ca', 'cacc']
6. Process Threads
🔰 (1) Multitask Operating System
The operating system can perform many tasks, such as our Windows system, in addition to the current execution of several tasks you can see, there are many tasks being performed in the background, you can use the Ctrl+Alt+Del key to call up the task manager to see.
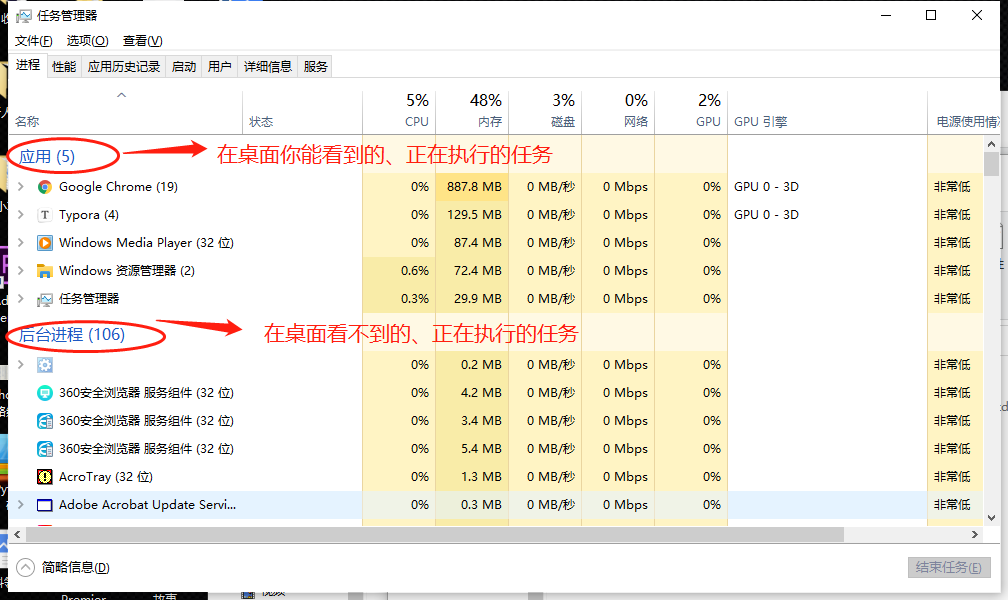
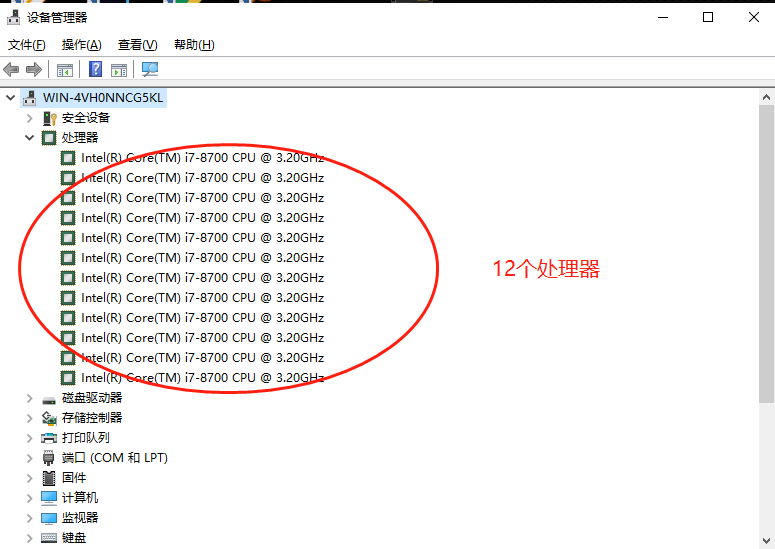
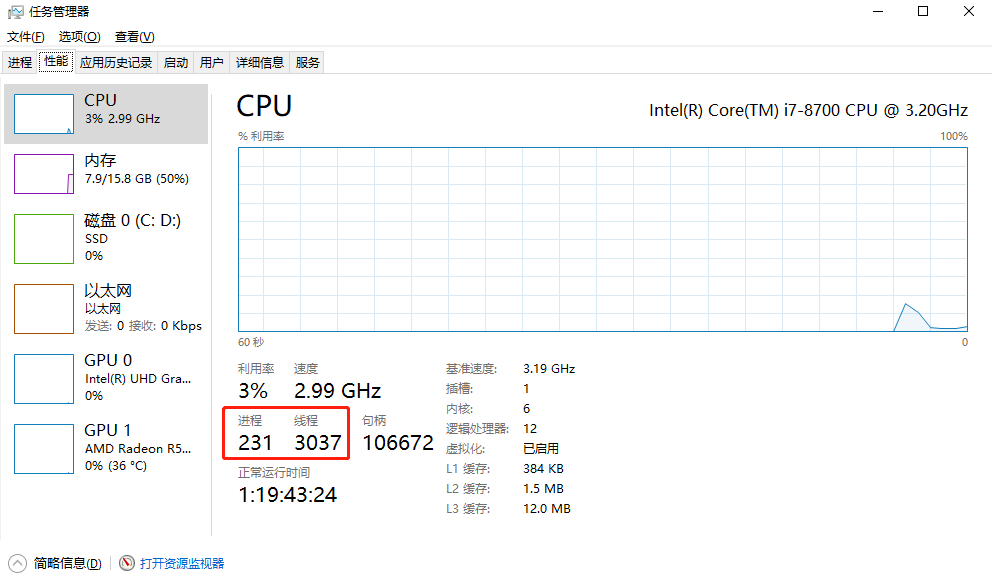
My computer configuration often sees properties with several core processors, such as my computer is 12 cores, which means that the computer can perform up to 12 tasks and run up to 12 processes simultaneously.
But why can our computers run hundreds of tasks at the same time?
In fact, this is due to the task scheduling of the operating system, most of the operating systems are scheduled in the form of preemptive time slices. The system can switch between several tasks very quickly in a very small time. For example, an 8-core operating system can theoretically only perform eight tasks at the same time in one second, but the system may switch between hundreds of tasks in one second. Task A can be executed once, Task B can be executed once, C Task execute once.. The result is that many tasks can be executed in one second, resulting in hundreds of tasks that are visible to the naked eye being executed all the time.
The term is "macro parallel, micro serial". In fact, the computer can only perform tasks that do not exceed the number of configured cores in extreme time, 8 cores or only 8 cores.
1. What is the process?
Now that tasks are mentioned, processes are tasks, and a process is equivalent to a task, which is the smallest unit of resources allocated by the operating system. In python, processes can be used to accomplish multiple tasks, which is one way to accomplish multiple tasks.
2. What is a thread?
Multiple subtasks of a process are called threads. Threads are the smallest unit of execution of a process. A process can have many threads, and each thread can perform different tasks.

Python supports both multiple processes and multiple threads, so let's start learning about processes and threads that enter Python.
🔰 (2) Python's multiprocessing (package)
If you're using multiple processes, your Python code is executed line by line, which is actually executing a process, which should be well understood.
To make more use of CPU resources, we can make use of multi-processes. Here is a description of the package multiprocessing commonly used in Python multi-processes. It has a lot of functions, such as sub-processes, communication, sharing, executing different forms, etc. Let's learn about some common uses.
1.Process - Process Class
Process is a process class within multiprocessing that enables multiprocesses to be implemented. Let's first look at its usage, and then we'll have a real example.
Process(target,name,args,kwargs)
- Target is the target. Where can I start a new process for the system to execute? You have to give the system a target.
- Name is the name of a process. You can set it or not. The default is Process-N, N is 1,2,3...N, and the system defaults from small to large.
- args and kwargs are parameters that can be used to pass to the target.
There are many methods in Process, the most common of which is the method by which start () starts a process.
Process name.start() #Start the process
Example: Written code is as follows, I want to see the effect of opening and not opening multiprocess call functions.
import time

#Two functions to execute simultaneously
def music() :
    for i in range(5):  #Execute 5 times
        print("Listening to music...")
        time.sleep(0.2) #Delay by 0.2s to make the contrast more noticeable

def movie():
    for i in range(5):
        print("Watch video...")
        time.sleep(0.2) #Delay 0.2s
music()
movie()
print("The main process has finished executing")
When multiple processes are not started, the effect is as follows:
You can see that this is normal behavior, the program runs from top to bottom, line by line, the three loops in music() will not execute inside movie () until they are executed, and the two functions will not execute the last line of print("the main process is executed") until they are executed.
Let's look at adding a multiprocess to the code in the above case:
import time
import multiprocessing


# Two functions to execute simultaneously
def music():
    for i in range(5):  # Execute 5 times
        print("Listening to music...")
        time.sleep(0.2)  # Delay by 0.2s to make the contrast more noticeable


def movie():
    for i in range(5):
        print("Watch video...")
        time.sleep(0.2)  # Delay 0.2s


if __name__ == "__main__":  # Resolve recursion when calling packages under Windows
    # Create Subprocess
    music_process = multiprocessing.Process(target=music)
    movie_process = multiprocessing.Process(target=movie)

    # Enable process
    music_process.start()
    movie_process.start()

    print("The main process has finished executing")
I added an IF statement to the code to judge u name_u This, why? Because under Windows system, the multiprocessing package will recursively occur, that is, it will execute repeatedly between "import module-call module". If you do not believe you can remove the if statement, and put all the code inside out to execute it, you will get an error. This is a phenomenon that will occur under Windows system. mac, linux and other systems do not need to add ifl to make a judgment.
About u Name_u = "Main" is a knowledge point that I have talked about during the initialization of modules and packages. If you don't understand it, you can go back and have a look.
Operation effect:
You can see that after starting the process, there are three processes running at the same time. One is the main process executing from top to bottom, and the other two sub-processes executing the music () and movie() processes are executing at the same time. So you don't have to wait three times for the code inside one of these functions to start the second one as you just did.
Same code, your execution may be different from mine, because the effect is randomly assigned according to the current state of the system, but it doesn't affect you to see that its result is multithreaded.
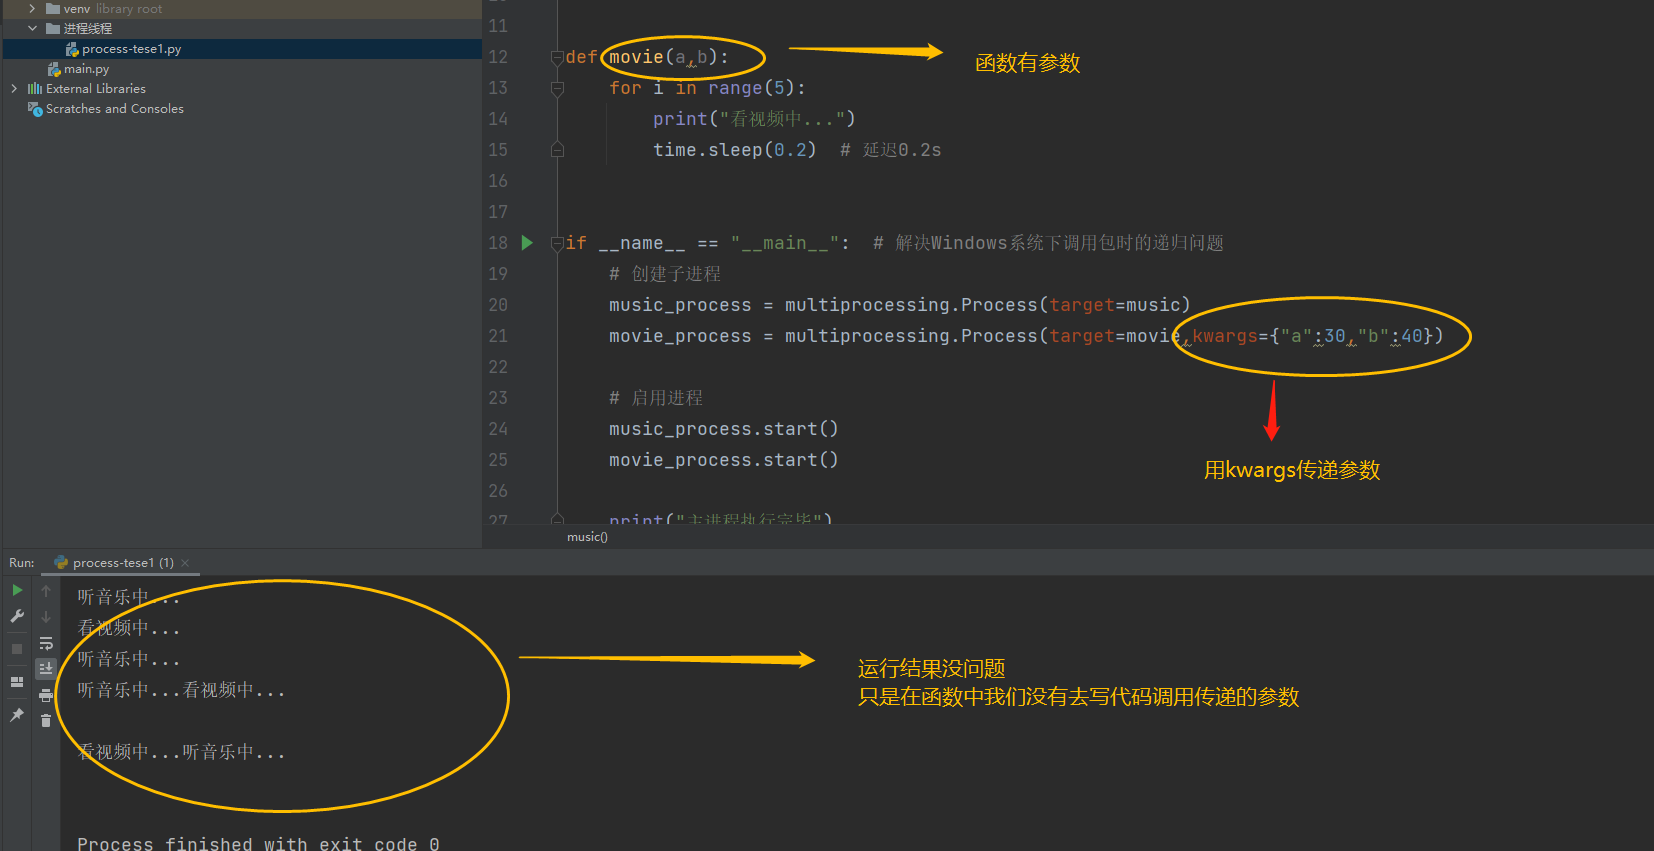
Finally, let's add that there are args and kwargs in Process that can be used for parameter transfer. args is a common parameter transfer. kwargs is a dictionary for parameter transfer. We also use the above code as an example to do more parameter transfer.
2. Get the number of the current process
Previously, we talked about how many processes are working at the same time when code is executed, so how do you look at the current process number to see which processes are currently running? Which are the main processes and which are the child processes? Three methods, let's look at them first, then use them together with examples.
(1) Get the number of the current process:
The getpid() method inside an os module needs to be used as follows:
os.getpid()
(2) Get the name of the current process
Or multiprocessing package with current_inside The process() method is used as follows:
multiprocessing.current_process()
(3) Get the number of the current parent process (main process)
Which parent process does the child process belong to? This uses getppid() inside the os module as follows:
os.getppid()

As you can see, let's get and print the name and number of the current process and the number of the parent process on the basis of the previous example.
import time
import multiprocessing
import os


# Two functions to execute simultaneously
def music():
    print("music Subprocess name:", multiprocessing.current_process())
    print("music Subprocess number:", os.getpid())
    print("music Number of the master process to which it belongs:", os.getppid())

    for i in range(5):  # Execute 5 times
        print("Listening to music...")
        time.sleep(0.2)  # Delay by 0.2s to make the contrast more noticeable


def movie(a, b):
    print("movie Subprocess name:", multiprocessing.current_process())
    print("movie Subprocess number:", os.getpid())
    print("movie Number of the master process to which it belongs:", os.getppid())
    for i in range(5):
        print("Watch video...")
        time.sleep(0.2)  # Delay 0.2s


if __name__ == "__main__":  # Resolve recursion when calling packages under Windows
    # Create Subprocess
    music_process = multiprocessing.Process(target=music)
    movie_process = multiprocessing.Process(target=movie, kwargs={"a": 30, "b": 40})

    # Enable process
    music_process.start()
    movie_process.start()

    print("Main process number:",os.getpid())
Run result:
Numbers and names can be printed whenever we use the thread fetching method.
🔰 (3) Threading module with multiple threads
Multiple processes can run several tasks at the same time. As we mentioned earlier, the smallest unit of a process is a thread. Threads can also perform multiple tasks. If a process has only one task (main process), it can also be said to have only one thread, such as when we don't use multiple processes to run code, then we can say one main process or one main thread.
1. Multithreaded class Thread class
A common module for multithreading is threading, which has a class to teach Thread, which is similar to the Process class we used earlier when we were multithreading. Let's first look at the usage:
Thread(target=None,name=None,args=(),kwargs=None)
- target:Executable target
- Name: The name of the thread Default Thread-N
- args/kwargs: Target parameter
Similarly, multithreading has to have an open method, much like the one before it:
start()
There are also ways to get the name of a thread:
threading.current_thread()
Knowing these points of knowledge, let's start with an example: use our multithreading with an example similar to the one above.
import threading,time

def music(name,loop):
    for i in range(loop):
        print("Listen to the music %s , No.%s second"%(name,i))
        time.sleep(0.2)

def movie(name,loop):
    for i in range(loop):
        print("Watch movie%s , No.%s second"%(name,i))
        time.sleep(0.2)

if __name__ =="__main__":
    music_thread = threading.Thread(target=music,args=("The closest person",3))
    movie_thread = threading.Thread(target=movie,args=("Tang Tan 2",3))
    music_thread.start()
    movie_thread.start()
    print("The main thread has finished executing")
Run result:
People closest to music , 0th
 Watch the movie Tang Tan 2 , 0th
 The main thread has finished executing
 People closest to music , First time to see the movie Tang Tan 2 , First

Watch the movie Tang Tan 2 , 2nd time listening to music closest person , Second
It can be seen that our multithreading is actually similar to multiprocess, and can also run multiple tasks. Here we also add the use of parameters.
2. Inherit the Thread class
In addition to implementing multithreaded tasks in the above way, we can also implement multithreaded tasks by inheriting classes.
Examples: multi-threaded printing of "cool" and "hair gone".
import threading,time

#Multithreaded Creation
class MyThread(threading.Thread):
    def __init__(self,name):    #Initialization
        super().__init__()  #Initialization method calling parent Thread
        self.name = name    #name becomes an instance property
    def run(self):
        #What Threads Do
        for i in range(5):
            print(self.name)
            time.sleep(0.2)
 #Instantiate Subthread
t1 = MyThread("Cool")
t2 = MyThread("No hair left")

t1.start()
t2.start()
MyThread is a class we created. It inherits from the parent threading.Thread, and we need to write down the initialization method of MyThread. We've also talked about super (). int () whenever it's called. We talked about it in the previous Object-Oriented article, so you can read it if you don't understand it.
Run result:
Cool
 No hair left
 Cool
 No hair left
 The cool hair is gone

The cool hair is gone

Cool
 No hair left
There are random effects. Your effect may be different from mine. When each computer runs multi-threaded code, which thread can grab the time slice and execute first.
Multithreading is also possible through class Thread inheritance.
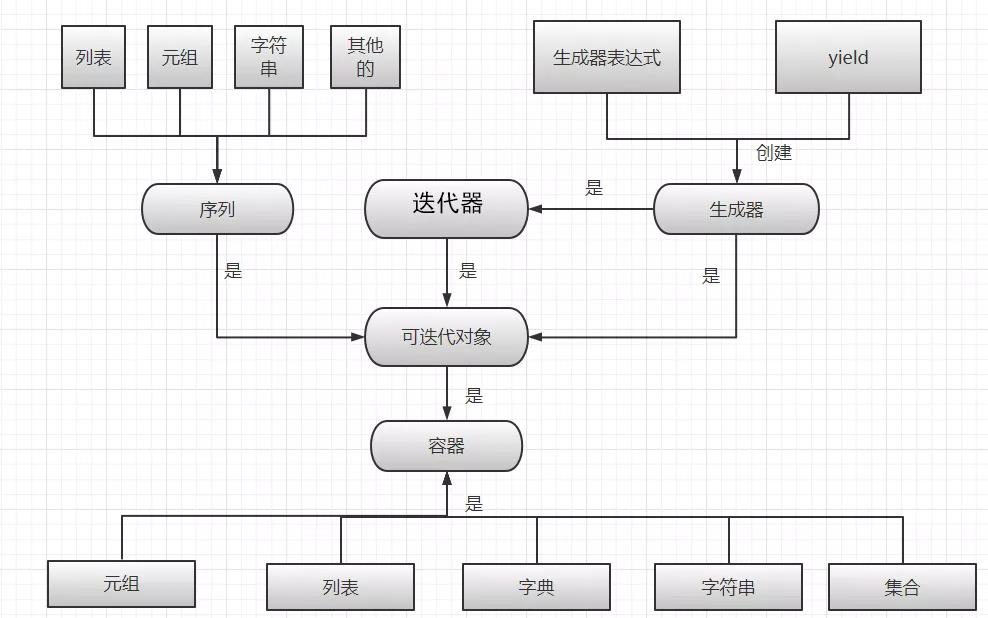
7. Container/Iterative Object/Generator
🚩 (1) Containers
In Python, containers are data structures that organize elements so that they can be iterated over and over again. To put it plain, they act like their name: they store things (data).
Containers do not really exist, they are not a data type, they are just a human concept. They are just a concept term created for easy learning. They can use member relationship operators (in or not in) to judge whether an object is inside a container or not.
Of course, it was not created by me. I don't have that much skill. It's created by the authorities. You don't have to worry that I'm teaching you some strange terms that people can't understand.. That's what python calls.

Common container types are list, tuple, str ing, dict, and set.
Since the data inside the container is iteratively available, we have to learn a new concept: iterative objects.
🚩 (2) Iterable objects
What is an Iterable Object?
In python, iterative objects do not refer to a specific data type; they refer to a container object that stores elements.
That is, if there is no data stored in the container, it is not an iterative object. Not all containers are iterative objects. Containers contain but are not limited to iterative objects.
Notice two points:
1.Many containers are iterative objects (containers contain iterative objects).

2.An Iterable object cannot iterate independently. Iteration is done by for To complete, any iterative object can be used directly for Loop for access.
For loop should not be unfamiliar to you? Have you ever thought about how it works inside the for loop? For example, this for loop example, why can I output every element in the list? How does it work internally?
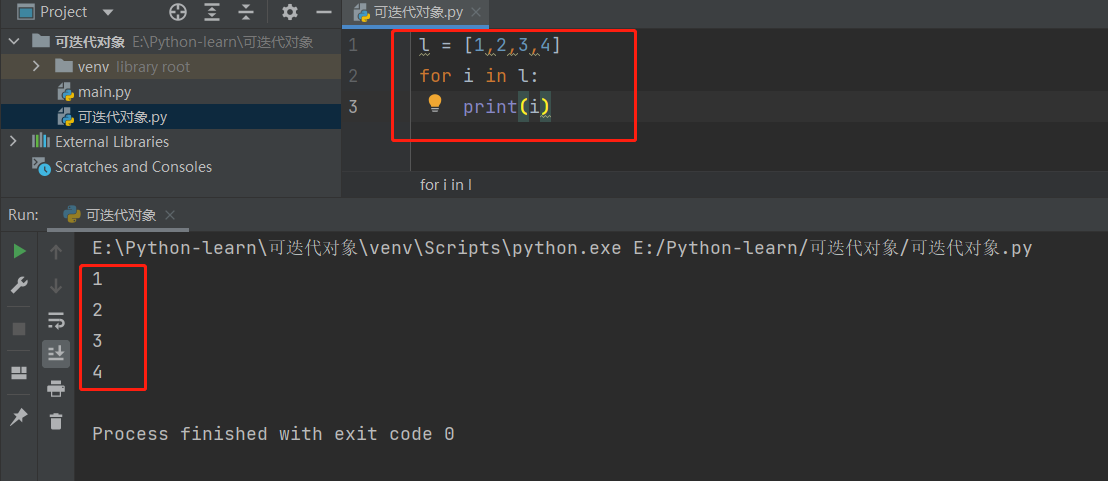
In fact, the for loop does two things:
1.Use __iter__() Back to an iterator, iterators are described below, so you know this first.

2.Use __next__() Gets each element in the iterator.
So we don't use a for loop to output every element in the list.
l = [1,2,3,4]
# for i in l:
#     print(i)
ite =l.__iter__() #Receive what ietr() did
print(ite)  #Print
print(ite.__next__())    #for Loop Step 1 when doing the second thing
print(ite.__next__())    #Step 2 of the for loop when doing the second thing
print(ite.__next__())    #Step 3 of the for loop when doing the second thing
print(ite.__next__())    #Step 4 for loop when doing the second thing
Output results:
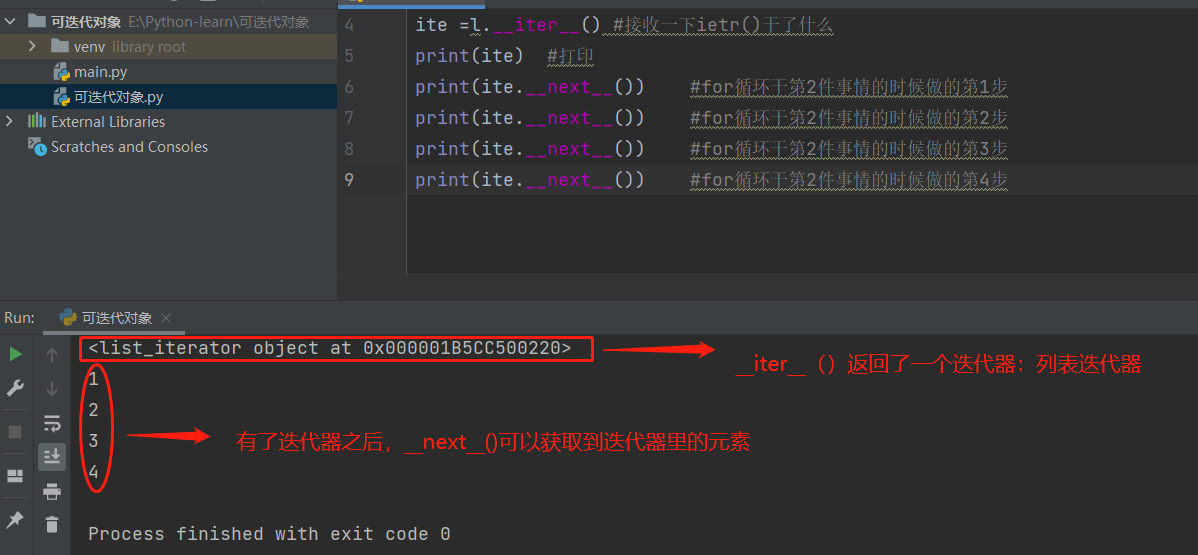
You can see that if we remove the line of code that prints ite, the execution will be the same as every element in the output list of the for loop, where the range is restricted four times, and in fact once iter_u () and 4 times u next_u (), that is, for loops access iteration objects through this way.
Moreover, the for loop essentially does both of these things, that is, if there is no u iter_u () first returns the iterator, u Next()u It is also impossible to get elements, which illustrates the second of the two points to note earlier: an iterative object cannot iterate independently.
There are two built-in functions that work the same way and are essentially the same. It is usually easier to use built-in functions, at least without writing so many underlines:
Built-in function iter() Essentially, __inter__() ,It also returns an iterator.

Built-in function next() Essentially, __next__(),It is also after having an iterator to get elements.
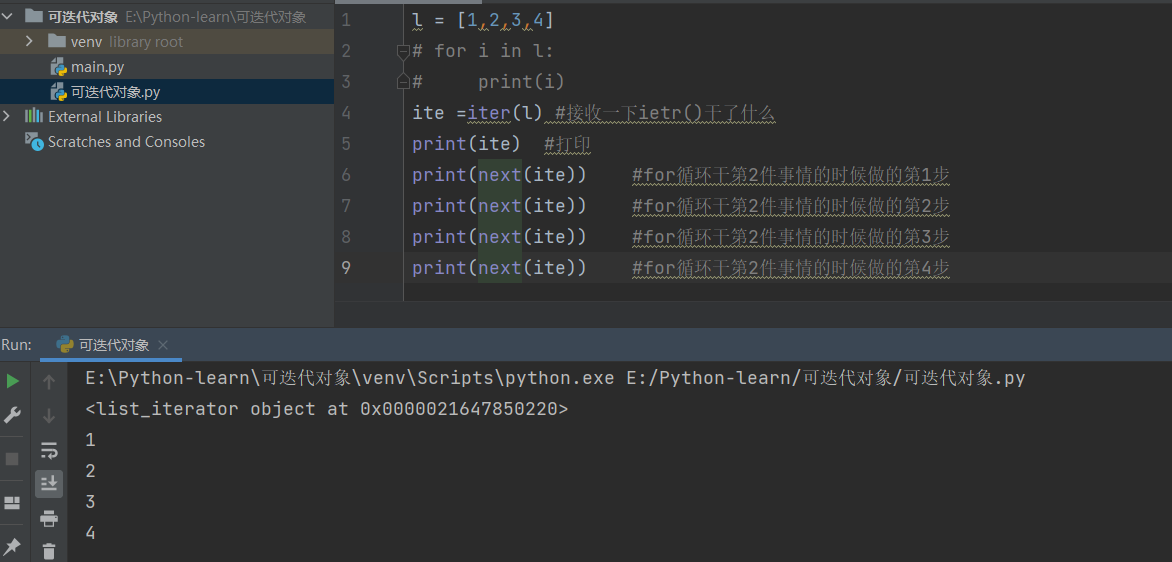
It can be seen that the results are the same, so now that iterators are mentioned, let's see what iterators are.

🚩 (3) Iterators
As we can see from the example of the for loop above,
As long as it is achieved__iter__()and__next__()An object is an iterator, which is an iterator.

In summary, iterators have__iter__()Generated by__next__()Make a call.
In that case, we talked about range() as an iterative object when we were learning Python basics, so it can also pass through u iter_u () that generates an iterator.
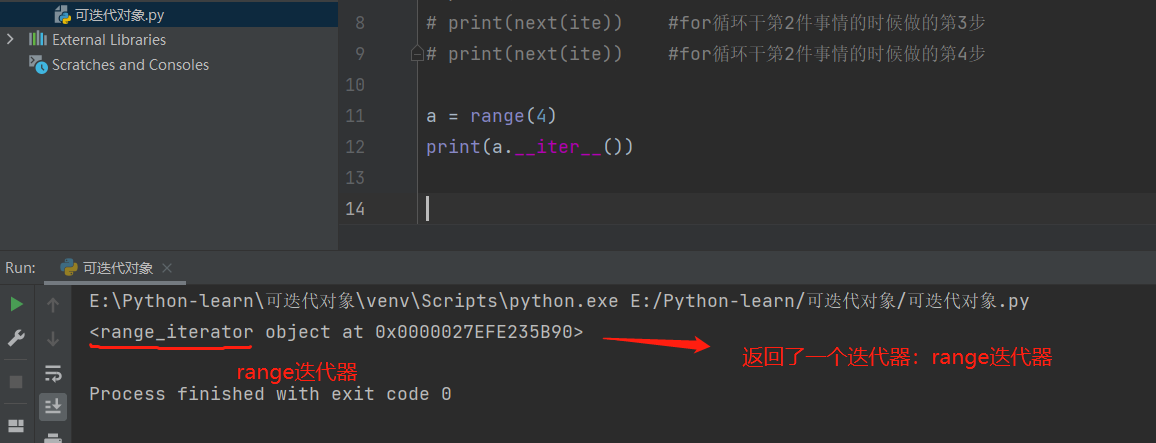
🚩 (4) Sequence
Sequence, as I mentioned in the special article Assignment Statements, is also an abstract concept. It contains lists, tuples, and strings. It does not exist in itself, and it is also a concept word that is easy to learn and create.
Iterable objects contain sequences, and since sequences contain lists, tuples, and strings, which were also covered in our previous examples, sequences can be used by iter () and next ().
Sequences can be divided into finite and infinite sequences. A finite sequence is one that has a range, for example, range(10) has already defined a range, whereas an infinite sequence is one that does not.
To generate an infinite sequence, we need a new module, itertools, which is used for the set of iteration functions of efficient loops. It has a method, count(), below it, which generates an iterator and has no range and can be interpreted as an infinite iterator.
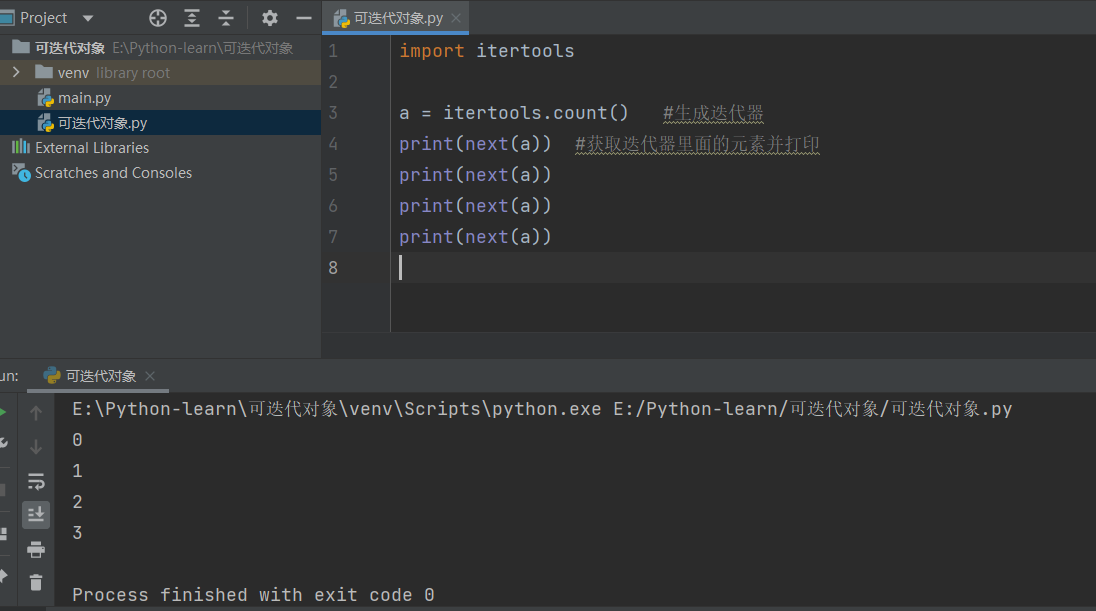
From this example, we can see that once executed, next() will get the contents of the iterator once and get them one by one. I have only written four next() here, and you will output several more times if you write a few more times.
Mechanisms such as next() that are called whenever they are needed are called lazy loading mechanisms, or lazy loading.
Instead, it loads in hungry Chinese style. For example, a for loop takes all the objects in an iterator as soon as it executes.
🚩 (5) List derivation
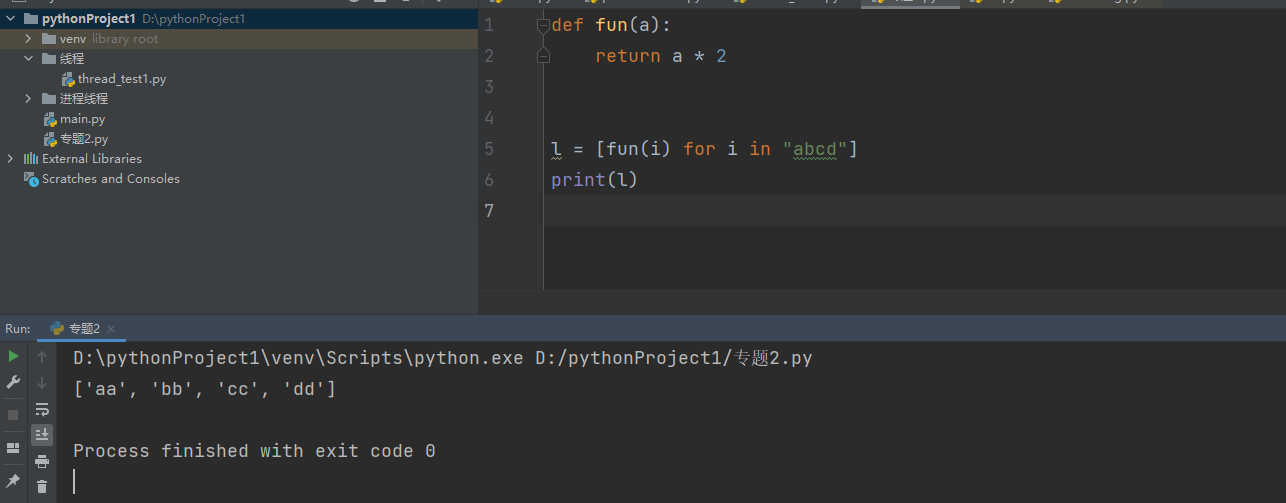
List derivation is related to generators. Before you talk about generators, you need to know what list derivation is. List derivation is one way to generate lists. The syntax is as follows:
l = [i for i in Iterable Objects]
i means the object to be put in the list, and the for loop is a formula.
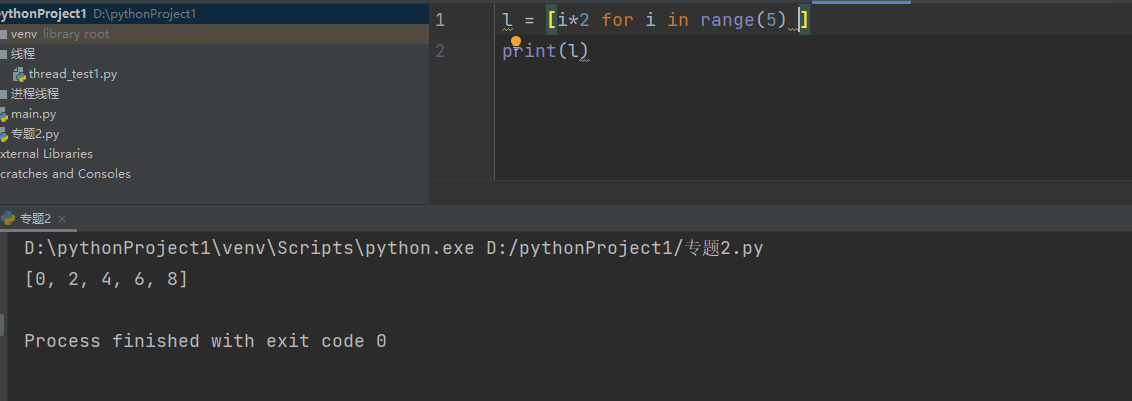
For example, let's try using list derivation to generate a list:
l = [i for i in range(5)]
print(l)
Run result:
[0, 1, 2, 3, 4]
Using list derivation, we can easily generate the list we want.
It also has many flexible uses, such as conditional judgment after
l = [i for i in range(5) if 45]
print(l)
Run result:
[0, 1, 2, 3, 4]
If the condition after if is true, the list can be generated normally. If false, the list derivation is invalid, and l will be an empty list.
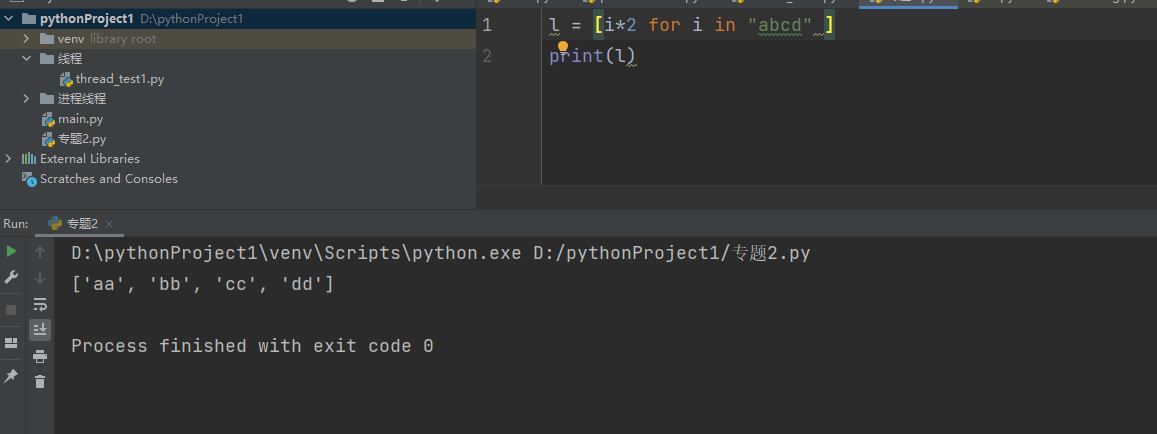
There are other flexible uses, such as manipulating the I before, such as doubling all the values of i:
We replace the iteration object with a string and the output will be the same, except that * represents the repeating operator in the string, so the effect becomes like this:
In addition, the previous i*2 can also be manipulated with functions, such as:
In short, list derivation is a flexible and fast way to generate lists.
So someone might say the opposite. List deductions are all operated on by []. Would () work? Does it generate a tuple? Let's see:

[] After replacing (), a generator generrator is returned, so let's talk about the generator again:
🚩 (6) Generator
Generators are objects that really exist in Python, unlike the concept of containers, which can be called directly from next().
1. The first way to create a generator: a generator expression
The first method of creation is similar to the list derivation by replacing [] with ():
l = (i for i in Iterable Objects)
For example, let's generate a generator and see if we can call it directly with next():
l = (i for i in "abcd")
print(next(l))
Run result:
a
As you can see, the generator can be called directly. So since the generator can be called by next(), the generator is a special iterator and an iterative object.
2. The second way to create the generator is yield
In addition to creating the generator in the same way as above, you can also create it with yield as follows:
yield Keyword
For example, let's create a generator with a function containing yield s:
def fun():
    a = 10
    while 1:
        a += 1
        yield a


b = fun()
print(b)
Run result:
generator object fun at 0x000001F2AD95E900>
The result is a generator, and at this point the function fun() is no longer a function, it is a generator, as long as yield appears in the function, the function becomes a generator.
Why does the while loop not always execute? Don't worry, let's take a look at the output:
def fun():
    a = 10
    while 1:
        a += 1
        yield a


b = fun()
print(next(b))
print(next(b))
print(next(b))
Run result:
11
12
13
I called it three times, so it runs three times, and while the loop exists, it doesn't work because of the lazy loading we mentioned earlier.
When it is needed and when it is called with next(), it is lazy loading, unlike hungry loading, which generates all the objects in advance, if it is done by a for loop here, for example:
def fun():
    a = 10
    while 1:
        a += 1
        print(a)

b = fun()
After running, the program will go into an infinite loop, adding a to itself. You can try the effect. This is Hungry Han Loading generates iterators in advance and calls all iterator objects, Hungry Han Loading magnifiers occupying resources.

Finally, summarize their relationship with a diagram:
8. Decorators
🏁 (1) The concept and function of modifiers
1. What is a modifier?
Decorators, also known as decorators, are functions themselves, which add some extra functions to the original functions or methods.
2. Function of modifiers
In general, the purpose of an ornament is to add extra functionality to an existing object.
For example, this function is a registered function, but sometimes when this user performs this operation, he is a registered user. I have written this function and do not want to move it, so we can add a login function to this function through the modifier.
It is often used in scenarios with faceted requirements, such as inserting logs, performance testing, transaction processing, caching, permission checking, and so on. Decorators are a great design to solve these kinds of problems. With them, we can pull out a lot of identical code that is not related to the function itself and continue to reuse it.

Modifier specific operation, let's slowly learn.
🏁 (2) Use of modifiers
1. Instructions for use
Before using the modifier, we have to remember a few instructions on how to use the modifier:
(1) The modifier's keyword is @ , As soon as it appears in your Python code, you can think of it as a modifier.
(2) A modifier modifies a function or a method, not a class.
(3) Modifiers must appear on the preceding line of the function or method being modified, and cannot be defined in the same line of the function.
Example:
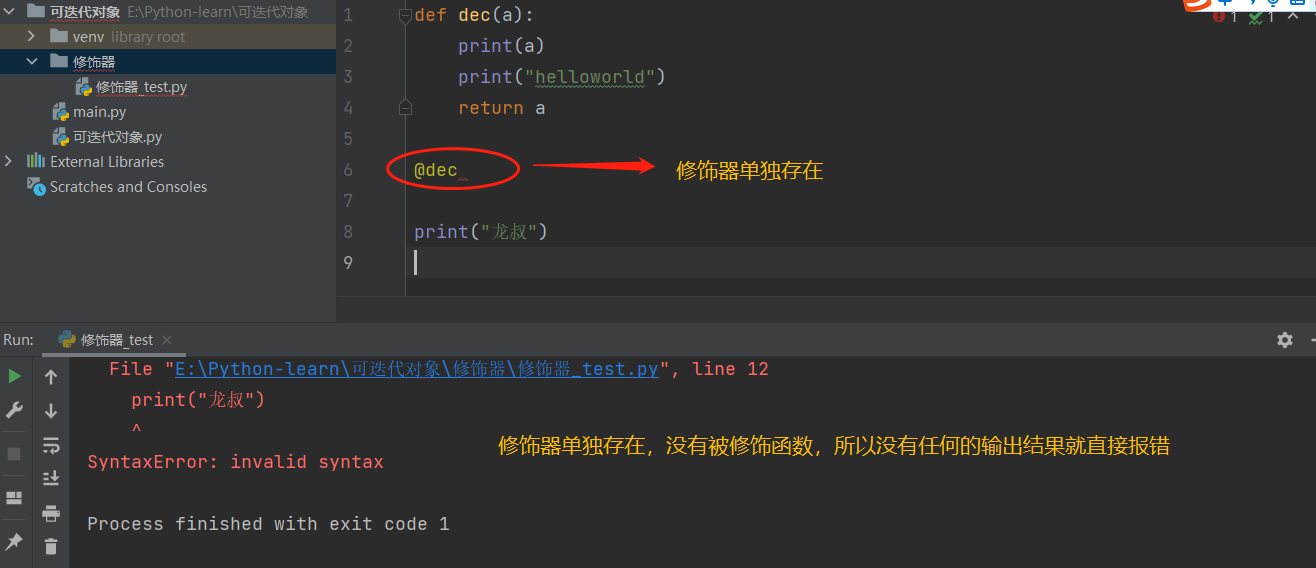
Although the modifier itself is a function, its appearance is regulated. The modifier above me does not appear in the first line of the modified function or method, so even print("Uncle Long") can't execute this line of code.
(4) The modifier itself is a function that passes the modified function as a parameter to the modifier, performs the functions in the modifier, returns the function object passed in, and calls the function returned.
These are important points, which we will further understand by using the modifier in a variety of ways.
2. Basic usage
If the decorated function is not called, then the function following @ is executed, and the decorated function is passed as a parameter, then the return value of the decorated function can be any value.
Example:
def dec(a):		#Modifier function
    print(a)	#See what the formal parameters passed
    print("helloworld")
    return None

@dec	#Use modifiers

def funA():		#Modified function
    pass
Run result:
function funA at 0x0000018D849BB670>
helloworld
First of all, we can see that this is a very simple example of using a modifier, calling the dec() modifier function with @dec, and the modified function funA() does nothing.
Next, let's see what the modified function funA() does not call, but is passed as a parameter to the modifier function dec(), so dec() needs a parameter to accept the passed value. I use a as a parameter. If you remove a, the system will get an error because the value returned by the modified function funA() is not acceptable, so you can try it.
Finally, there is one more point. Did you notice that the modifier funA() was not called? So the decorator function dec() returns anything, the above function returns None, you return a "sick" or anything. Let's see how the decorated function funA() is called.

If the decorated function is called, the decorator is executed directly and passed exclusively to the decorator as a parameter, but the return value of the decorator must be the current parameter.
Example:
def dec(a):
    print(a)
    print("helloworld")
    return "Be ill"

@dec	#Using modifier functions

def funA():
    pass

funA()	#Call Modified Function
Run result:
function funA at 0x000001F78A48B670>
helloworld
Traceback (most recent call last):
  File "E:Python-learn Iterable Object Modifier Modifier_test.py", line 11, in module>
    funA()
TypeError: 'str' object is not callable
There was an error saying that the string str cannot be iterated, why? In fact, the reason is that the modified function is called again when the modifier exists and is used. At this time, the return value can not be any value. At this time, the modifier function can only return the passed value. You can try to change return "sick" to return a to output normally, or you can remove this line of code of funA() without calling the repaired function. Then the output is normal.
def dec(a):
    print(a)
    print("helloworld")
    return a

@dec

def funA():
    pass

funA()
Run result:
function funA at 0x0000020F5664B670>
helloworld
Business as usual.
Let's see how the decorator's execution logic works:
def dec(a):
    print(a)
    print("Modifier function")
    return a

@dec

def funA():
    print("Modified Function")

funA()

print("Uncle Long")
Run result:
function funA at 0x000001D90E75B670>
Modifier function
 Modified Function
 Uncle Long
From this running result, we can see that the decorator's logic is that the decorated function funA() is called, but not executed directly. Instead, the decorator Dec is executed directly, and the decorated function funA() is passed as a parameter to the decorator dec, the code inside the decorator dec() is executed, and the code inside the decorated function funA() is executed after the value a is passed back. Finally, the decorated function funA() is completed before the remaining code is executed.
Let me use a more sketchy picture to show that:
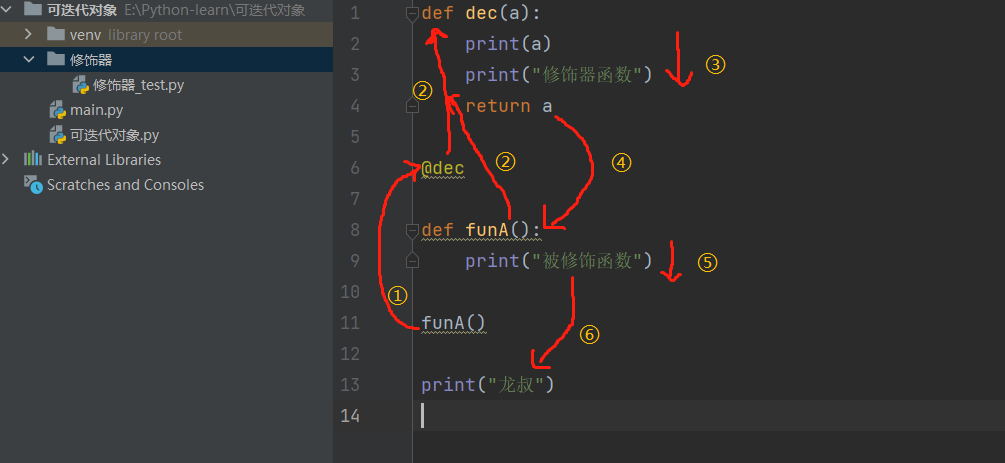
3. Other uses: function nesting
Previously, we talked about the basic usage of modifiers, which can be used in many ways, as well as function nesting.
Use a simple example to illustrate:
def A(x):	#Modifier function
    def B():	#Nested functions within modifier functions
        print("B")

    B()
    return x


@A	#Use modifiers
def C():	#Modified Function
    print("C")


C()	#Call Modified Function
Run result:
B
C
From the running result, the modified function can also be nested.
4. Other uses: closures
Closure is also a kind of function, but it is more special. I will not repeat the knowledge about closures here. In "Python Foundation", we have talked about the knowledge about closures. If you forget, you can go to see or Baidu. Let's see how the closures in the modifier work.
def A(x):
    def B():
        print("B")
        return x()  # C indifferent calls can only be one tier, which cannot be called by x

    return B


@A
def C():
    print("C")


C()
Run result:
B
C
You can see that in modifier functions, closures can also be used normally.

5. Other uses: Modified functions have parametric form
If the modified function has parameter passing, the parameter can only be passed to the embedded function inside the modifier function.
def A(x):	#Modifier function
    print(x)

    def B(aa, bbb):  # Embedded function that receives parameters passed by the modified function
        print("B")
        print(aa, bbb)
        return x(aa, bbb)  # C

    return B


@A
def C(n, nn):	#Modified Function
    print("C")


C("10", "20")
Run result:
function C at 0x00000206BED6B670>
B
10 20
C
It can be seen that although the modifier function C() passes parameters to the modifier function A(), the object C() is passed by default, the modifier function A() accepts the modifier function C(), and the parameters are passed to the function B() inside the modifier function A().
Even if you add two parameters in A(), it will not accept it, but will only make a mistake. As we have already said in the instructions for using the modifier, "The modified function is passed to the modifier as a parameter", so the modifier function only accepts the object of the modified function, other parameters if you want to pass, Then there must be other functions inside the modifier function to accept the passed parameters.
6. Other uses: modifiers with parameters, functions without parameters, using embedded functions to collect parameters
If the modifier has parameters but the modifier has no parameters, only the embedded function can be used to collect parameters.
def fun(a=20):
    print(a)

    def c(bb):
        print(bb)
        return bb  # It can be called indifferently because the funB is received on the second tier, which is equivalent to the first tier

    return c


@fun(30)
def funB():
    print("xixixi")


funB()
Run result:
30
function funB at 0x0000025DAE4DD0D0>
xixixi
🏁 (3) Python's built-in trimmers
Previously we talked about our custom modifiers. There are built-in modifiers in Python. Let's learn about three common Python built-in modifiers: staticmethod, classmethod, property.
Their purpose is to turn methods in classes into static methods, including class properties and methods of classes. Let's take a simple look at their use.
1.property
Property can change a method into a property. The method name being modified must be the same as the method name under property. Property can only be used for private properties.
For a comparison, we create a class without using property and use the methods within it, as follows:
class A:
    def __init__(self):
        self.age = 20   #Instance Properties
    def getattr(self):  #Print Instance Properties
        print(self.age)
    def setattr(self,newage):	#Assigning values to instance attributes
        self.age = newage

a = A()
a.setattr(30)
a.getattr()
Run result:
30
No problem, it works fine, so let's try the difference with the built-in modifier property.
Before using the built-in modifier property, we need to add a point: Private attributes, attributes created inside a function are private attributes and cannot be used outside a function without special handling. Private attributes are preceded by two underscores, such as u inside a class name is a private property, so let's take a simple example:
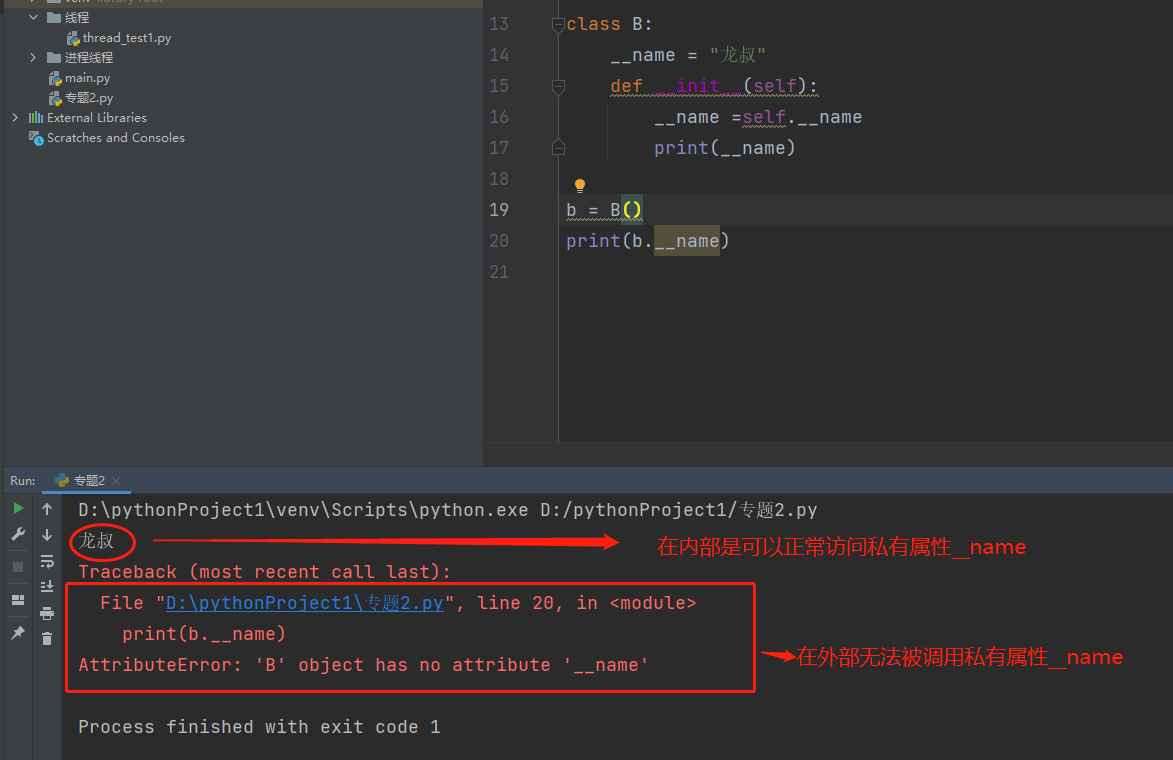
You can see that private attributes are accessible inside the class, but not outside (after some processing, they are accessible, not here, you can check them online).
Back to our built-in modifier property, in the previous example where we didn't use property, let's modify it to include the built-in modifier property.
class A:
    def __init__(self):
        self.__age = 20

    @property
    def age(self):	#Modified Method
        return self.__age

    @age.getter
    def age(self):	#Modified Method
        return self.__age

    @age.setter
    def age(self, newage):	#Modified Method
        self.__age = newage


a = A()
a.age = 200
print(a.age)
Run result:
200
From this example, we can see that the built-in modifier property can be used for private attributes and can change methods into attributes, such as a.age calling attributes instead of methods. Although age() appears several times in a class, it does not fail because of method overrides or because of the existence of property. Property specifies that the modified method name must be the same as the method name under property.

2.staticmethod - Static method
The built-in modifier staticmethod is a static method that pulls the modified method out of the class and becomes a separate function that cannot access the properties of the class.
Let's start by writing a simple class that compares using and not using staticmethod
class B:
    def __init__(self, name):
        self.name = name

    def eat(self):  # Print Passed Value
        print(self.name)


b = B("Uncle Long")
b.eat()
Run result:
Uncle Long
There's nothing wrong with this. Take a look at using staticmethod and add it directly:
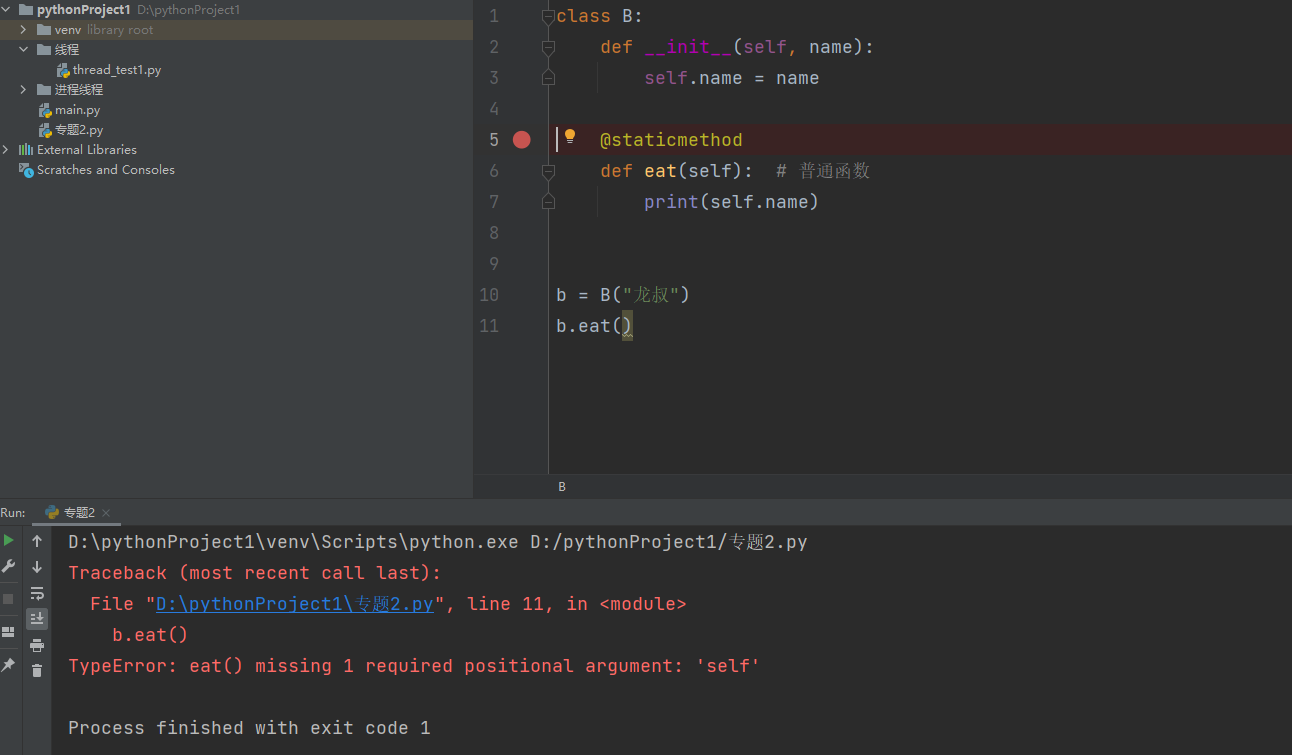
The reason for this error is that when @staticmethod is added, the eat() method becomes a normal function. Its position is inside the class, but it is actually equivalent to a normal function. It is not a class method, so you have to pass a value to it, otherwise the parameter self will pass no value and report a mistake.
The correct writing should be:
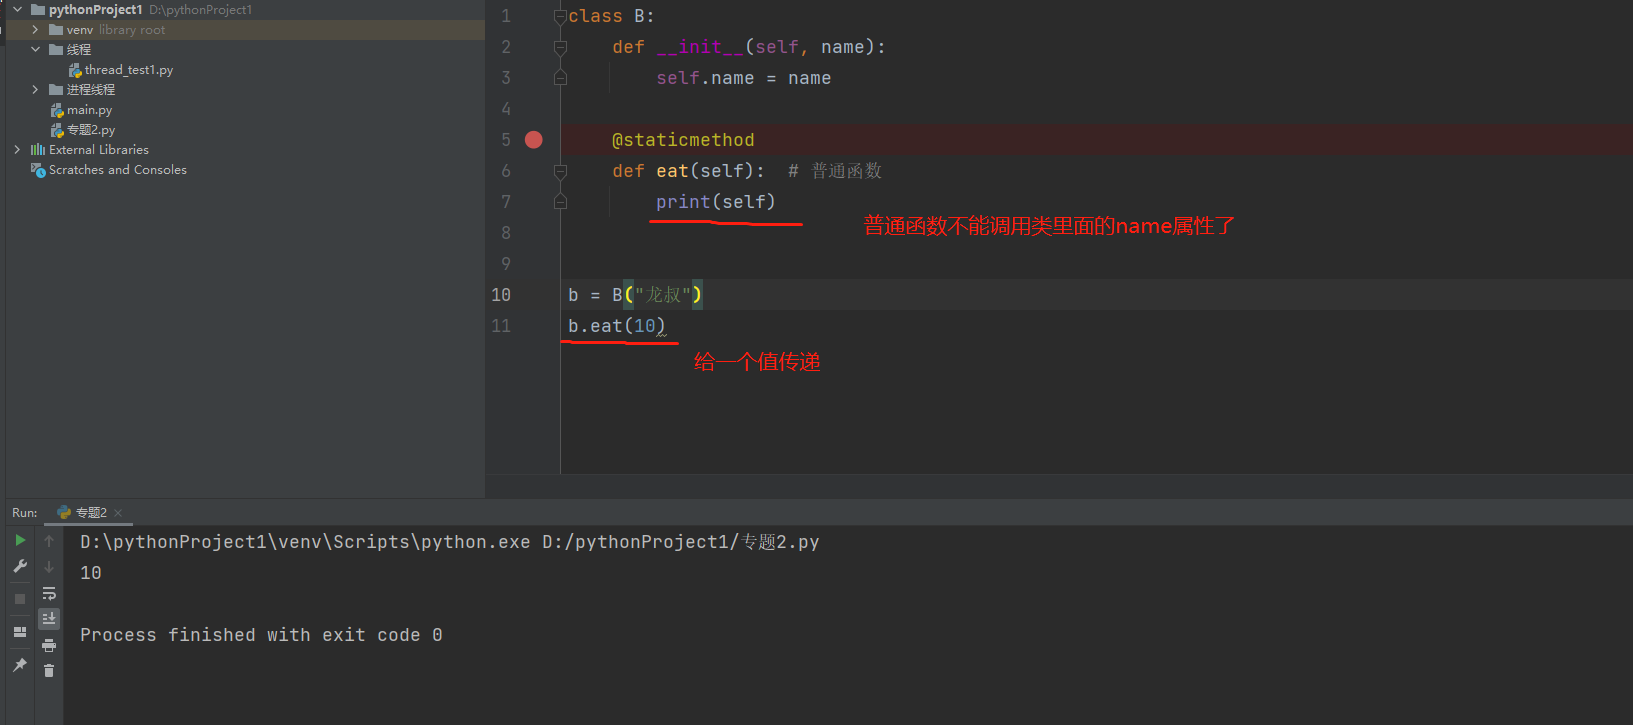
Let's summarize this static method:
1. This function is a normal function, and only this class can be used
2. Static methods can set parameters or do not require them(self)
3. This function cannot access the properties of a class
3.classmethod
The method modified by the classmethod differs from the instance method in that the first parameter received is not self, but cls (the specific type of the current class). The modified method cannot access the instance property, but it can access the class property.
class B:
    age = 10

    def __init__(self, name):
        self.name = name

    def sleep(self):    #Print
        print(self)

    @classmethod
    def eat(cls):  # Modified function
        print(cls)  #See if class or value is passed
        print(cls.age)  #Accessing the properties of a class
        print(self.name)	#Accessing the properties of an instance object


b = B("Uncle Long")
b.sleep()
b.eat()
Run result:
__main__.B object at 0x0000024FD7B3CFA0>
class '__main__.B'>
10
Traceback (most recent call last):
  File "D:pythonProject1 Theme 2.py", line 21, in module>
    b.eat()
  File "D:pythonProject1 Theme 2.py", line 14, in eat
    print(self.name)
NameError: name 'self' is not defined
It can be seen from the results that from the objects printed by sleep() and eat (), sleep() passes the object of instance object b created, while the function eat () modified by the modifier passes the class. From the point of view of eat() accessing the attributes of a class and an instance, it is OK to access the attributes of a class, but an error is made when accessing the attributes of an instance object.
So verify the previous statement: the method modified by the classmethod differs from the instance method in that the first parameter received is not self, but cls (the specific type of the current class). The modified method cannot access the instance property, but it can access the class property.
~
Run result:
__main__.B object at 0x0000024FD7B3CFA0>
class '__main__.B'>
10
Traceback (most recent call last):
  File "D:pythonProject1 Theme 2.py", line 21, in module>
    b.eat()
  File "D:pythonProject1 Theme 2.py", line 14, in eat
    print(self.name)
NameError: name 'self' is not defined
It can be seen from the results that from the objects printed by sleep() and eat (), sleep() passes the object of instance object b created, while the function eat () modified by the modifier passes the class. From the point of view of eat() accessing the attributes of a class and an instance, it is OK to access the attributes of a class, but an error is made when accessing the attributes of an instance object.
So verify the previous statement: the method modified by the classmethod differs from the instance method in that the first parameter received is not self, but cls (the specific type of the current class). The modified method cannot access the instance property, but it can access the class property.
That's all for today's sharing. Welcome to leave a message in the comments area.