catalogue
2. Configuration of PHP FPM file
Build nginx cache and add memcache function module
5. Configure the php loading module openresty
Configuration module file information
6.tomcat combined with memcache to realize session cross storage
PHP introduction
PHP, full name Hypertext Preprocessor, Chinese translation "Hypertext Preprocessor". The widely used open source general scripting language is especially suitable for Web development.
1. PHP is open source and free of charge. You can modify his kernel and use it for your own business projects.
2. PHP has rich development components
3. The community is mature, and more than 85% of the problems can find corresponding solutions in the community.
4. PHP has low learning cost and quick effect
5. The open source library is rich, and basically all types have open source products
6. PHP7.0 basically doesn't lose any language - that's the point!!!
7. Almost perfect support for mysql database
1.PHP source code compilation
php Download
http://www.php.net/ ##Official download address
Get the software package and unzip it. If the unzip fails due to the lack of plug-ins, install bz2 compression plug-ins
tar jxf php-7.4.12.tar.bz2
Software compilation
. / configure configuration
make compilation
make install install
Compilation Trilogy
./configure --prefix=/usr/local/lnmp/php --with-config-file-path=/usr/local/lnmp/php/etc --enable-fpm --with-fpm-user=nginx --with-fpm-group=nginx --with-curl --with-iconv --with-mhash --with-zlib --with-openssl --enable-mysqlnd --with-mysqli --with-pdo-mysql --disable-debug --enable-sockets --enable-soap --enable-inline-optimization --enable-xml --enable-ftp --enable-gd --enable-exif --enable-mbstring --enable-bcmath --with-fpm-systemd
During compilation, you will be prompted that the relevant package is missing
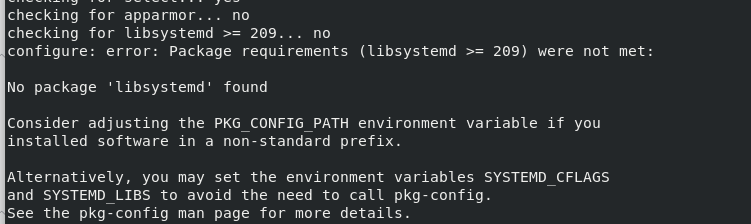
Install according to the prompts. Because the following two packages are missing from the rh-7.6 source, download them from the outside

yum install systemd-devel libxml2-devel sqlite-devel libcurl-devel libpng-devel oniguruma-devel -y
 Probably without these, everyone is different
If you are not sure if the configuration was successful,
You can enter:
echo $?
If the output is 0, it is successful
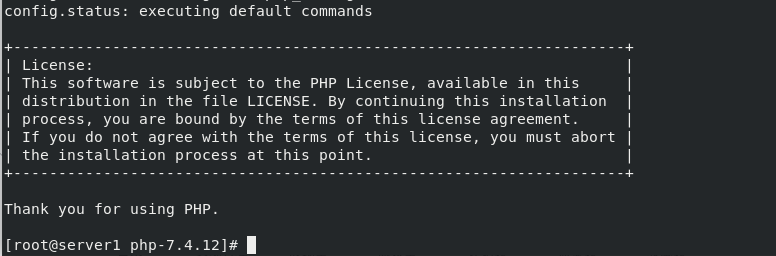
Configuration succeeded, compile and install
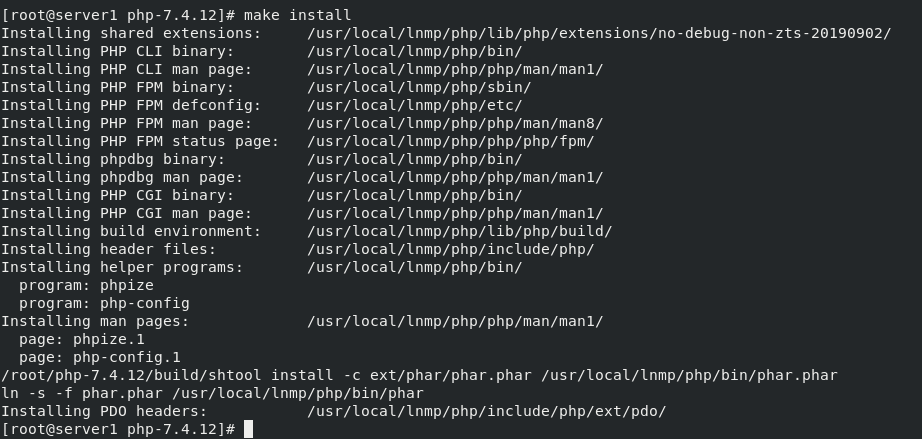
make compiled successfully
make install installation complete
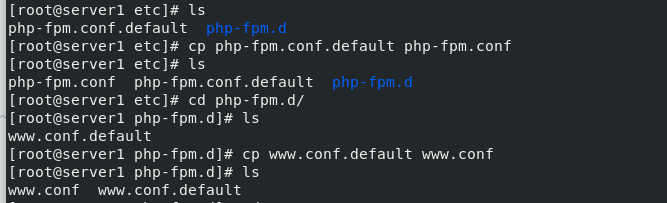
2. Configuration of PHP FPM file
Copy the configuration php-fpm.conf and www.conf files
notes:
php-fpm
PHP FPM is a program that implements Fastcgi, and its management object is PHP CGI
php-cgi
PHP CGI is just a CGI program. It can only parse requests and return results without process management
CGI
CGI is to ensure that the data transmitted from the web server is in standard format, which is convenient for the writer of CGI program
Fastcgi
Fastcgi is used to improve the performance of CGI programs (the standard CGI performs these steps for each request. Fastcgi starts a master, parses the configuration file, initializes the execution environment, and then starts multiple workers. When a request comes, the master will pass it to one worker, and then the next request can be accepted immediately. This avoids repeated labor and is naturally efficient.)
#fastcgi is a protocol that PHP FPM implements
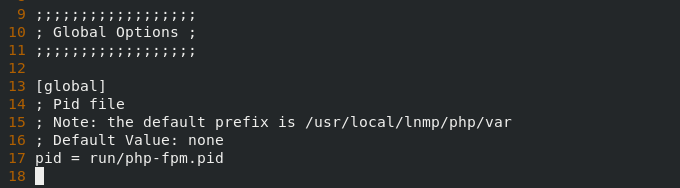
cd /usr/local/lnmp/php/etc/
cp php-fpm.conf.default php-fpm.conf  #Copy file
vim php.fpm.conf   #Edit profile
cd php-fpm.d/
cp www.conf.default www.conf


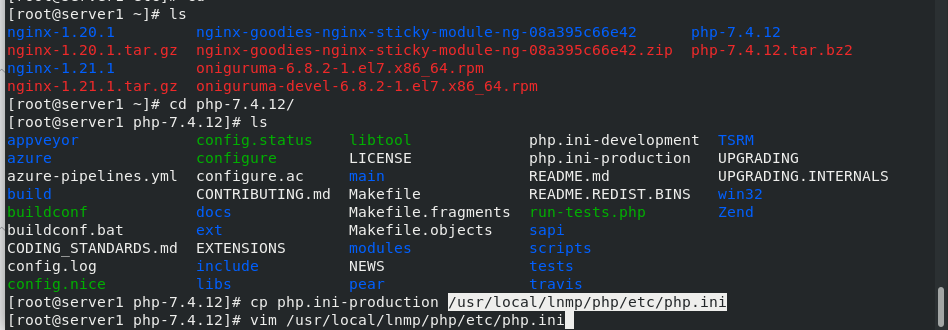
Copy php.ini configuration file
cd /root/php-7.4.12/
cp php.ini-production /usr/local/lnmp/php/etc/php.ini  #Copy to specified path
cd /usr/local/lnmp/php/etc
vim php.ini   #Edit the file and change the time zone to Asia Shanghai

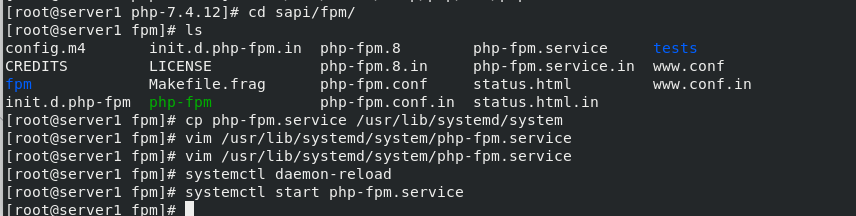
Configure php-fpm.service to add a service
cd /root/php-7.4.12/sapi/fpm
cp php-fpm.service /usr/lib/systemd/system  #Place the php service file in the specified directory
cd /usr/lib/systemd/system
ls
vim php-fpm.service
\\\
#ProtectSystem=full    #Comment this line
\\\
systemctl daemon-reload  #Overload service
systemctl start php-fpm.service  #open

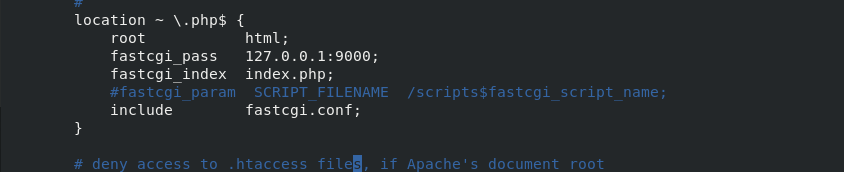
3.nginx+php-fpm
Modify the configuration file of nginx
vim /usr/local/nginx/conf/nginx.conf
Uncomment these lines of the php service, and annotate the fastcgi_param line. The final fastcgi file is changed to fastcgi.conf

 Write a php release file and restart nginx
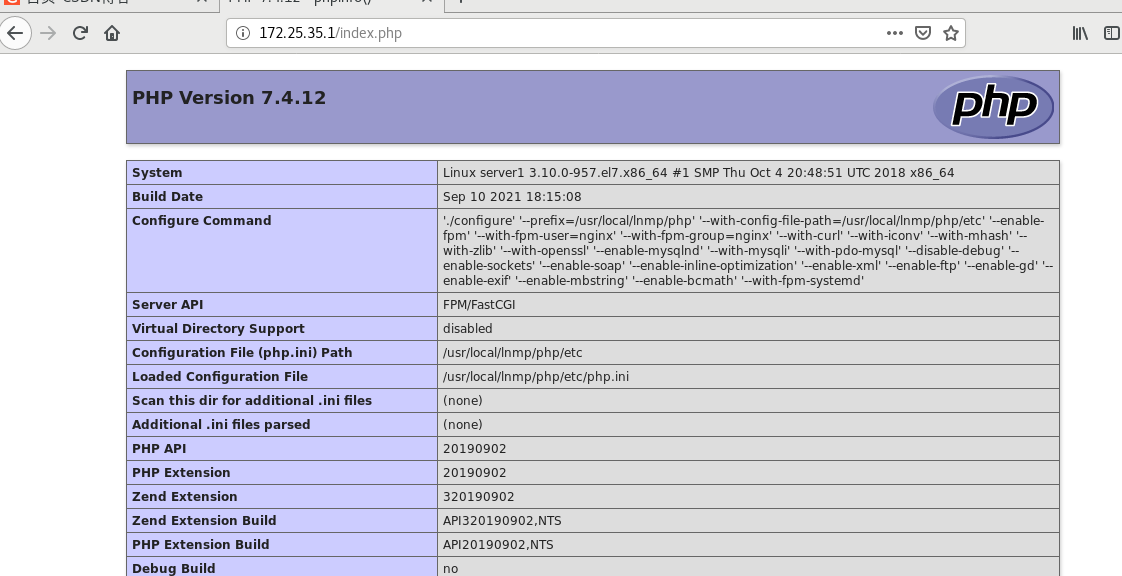
cd /usr/local/nginx/html/
vim index.php
///
<?php
phpinfo()
?>
///
nginx -s reload
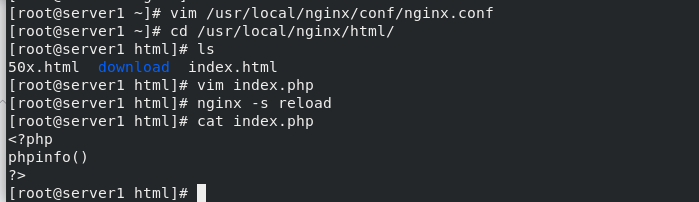
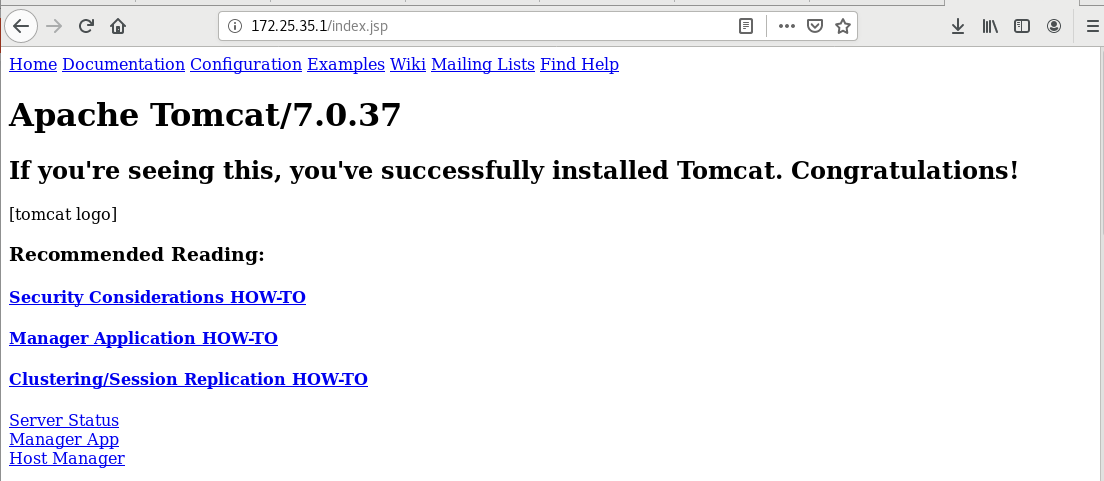
You can see the php page by visiting server1 from the real browser
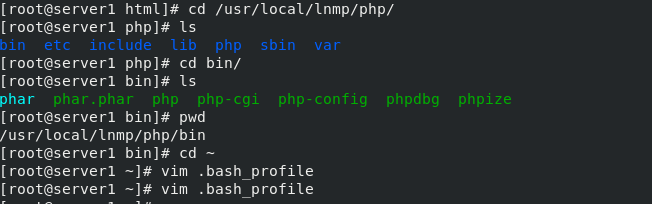
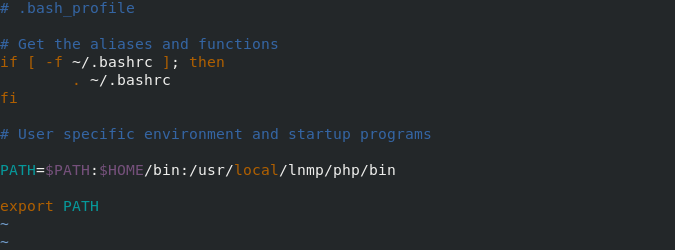
 Add environment variable
vim .bash_profile	##Add a file path to the. bash_profile file
source .bash_profile 		##Make it effective
echo $PATH

4. Add memcache module in php
Software download
Download and unzip tar zxf memcache-4.0.5.2.tgz
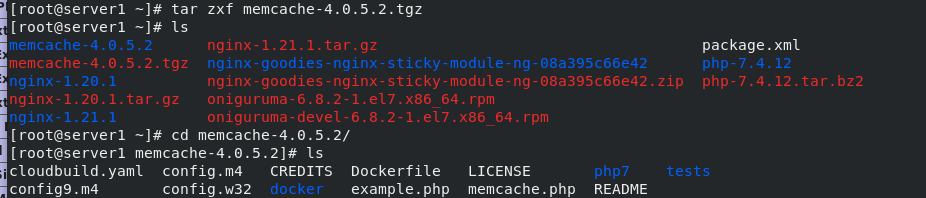
Switch the environment to the memcache-4.0.5.2 directory and execute phpize
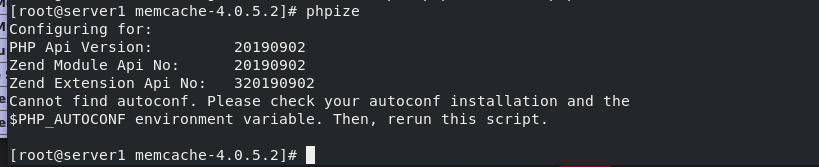
Download the dependent software and execute phpize again
yum install autoconf automake.noarch -y
phpize			##Extension succeeded

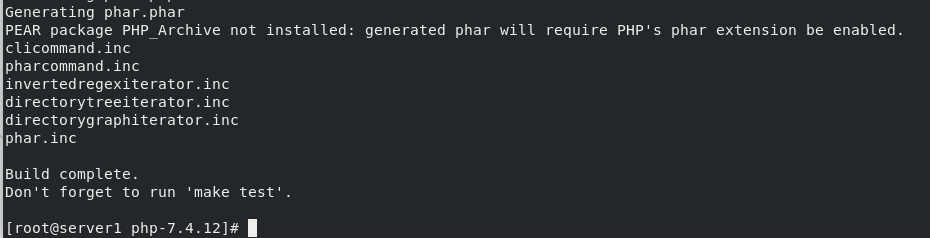
Compile the memcache source code, and follow the three steps of configure – make – make install
./configure --enable-debug
make
make install
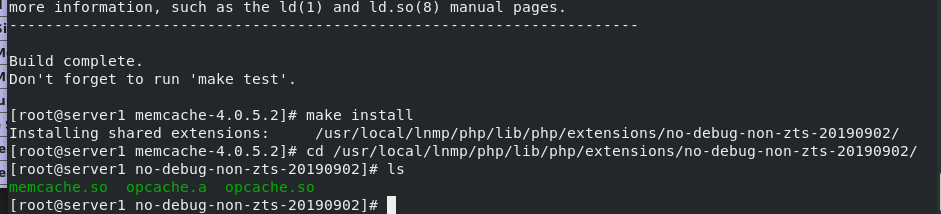
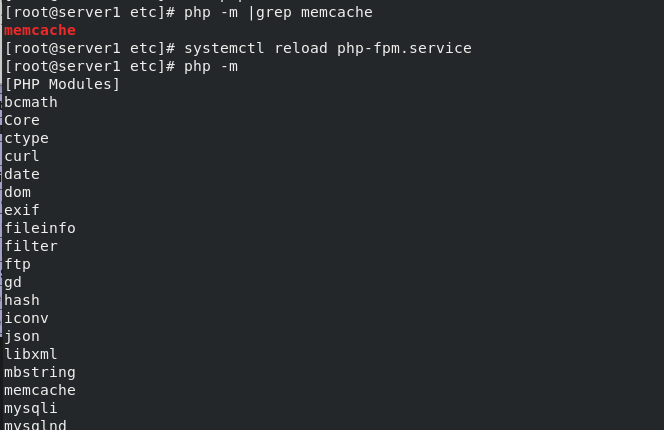
Edit php.ini, restart the service, and execute php -m to see memcache


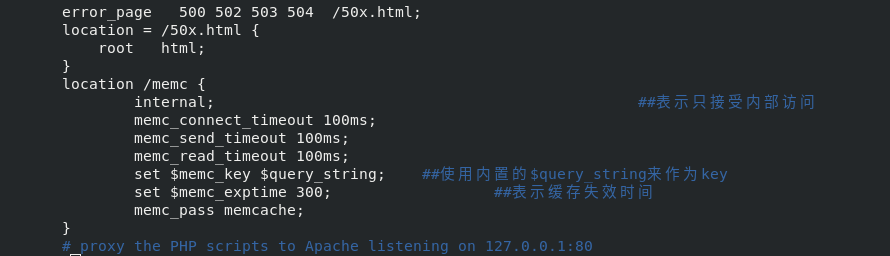
Build nginx cache and add memcache function module
Use MEMC nginx module to build an efficient and transparent cache mechanism.
If you need to cache, nginx can skip php and store it directly in memcache, but it can only do static storage. If you need dynamic storage, you still need to call php. After calling the data through php, nginx can get it directly from memcache next time, which greatly improves the efficiency. Therefore, the two strategies are carried out at the same time.
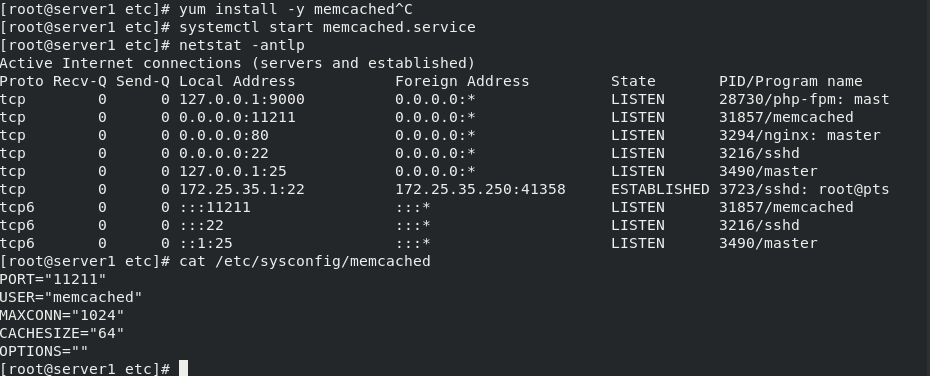
Install memcached, start the service, and view the port
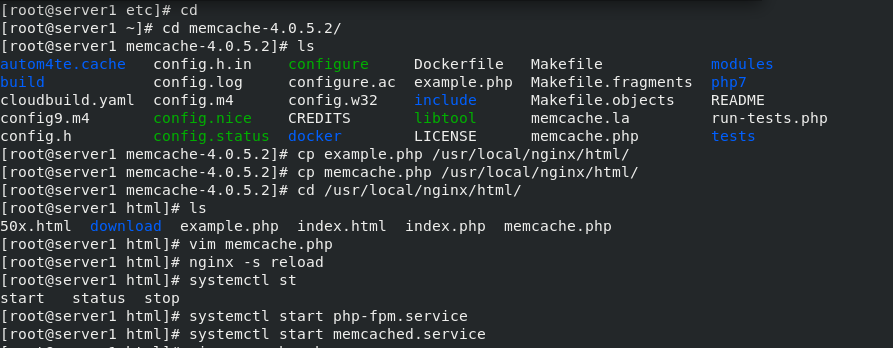
Switch the environment to the memcache directory, copy and compile the files, and finally restart the service
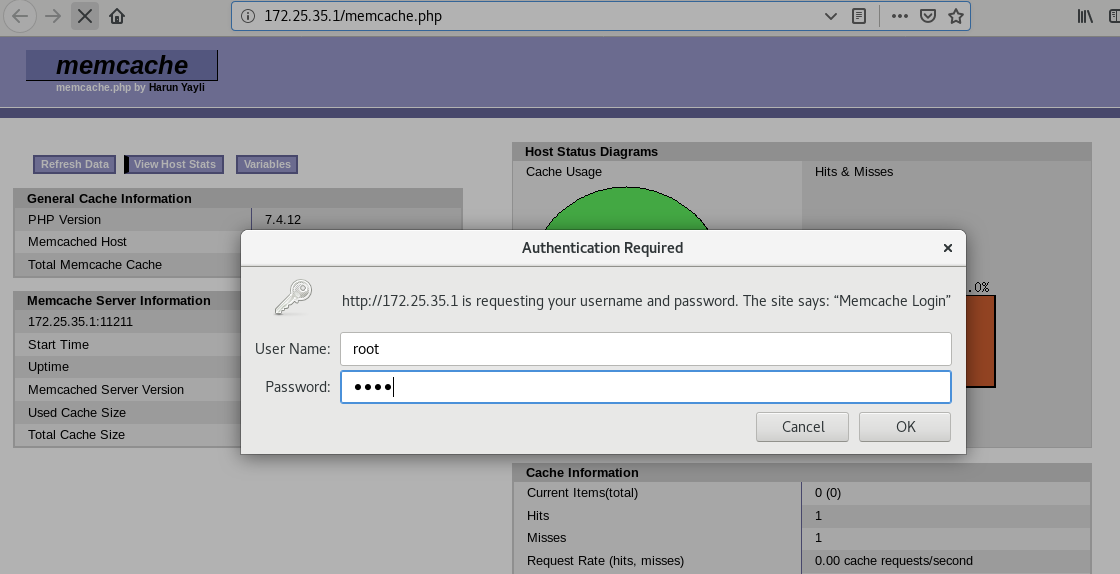
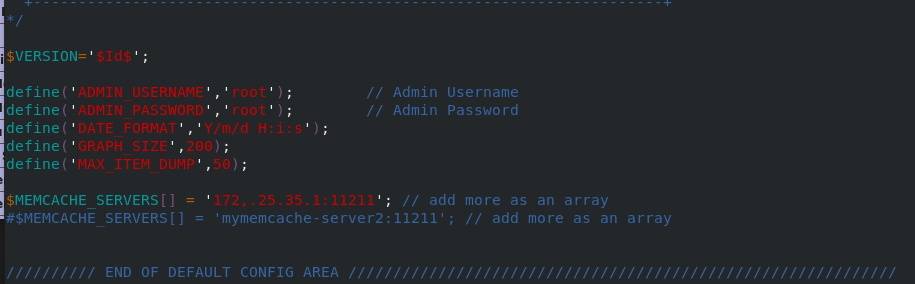 Test in the real browser and visit 172.25.35.1/example.php
The user name and password are just set as root and root
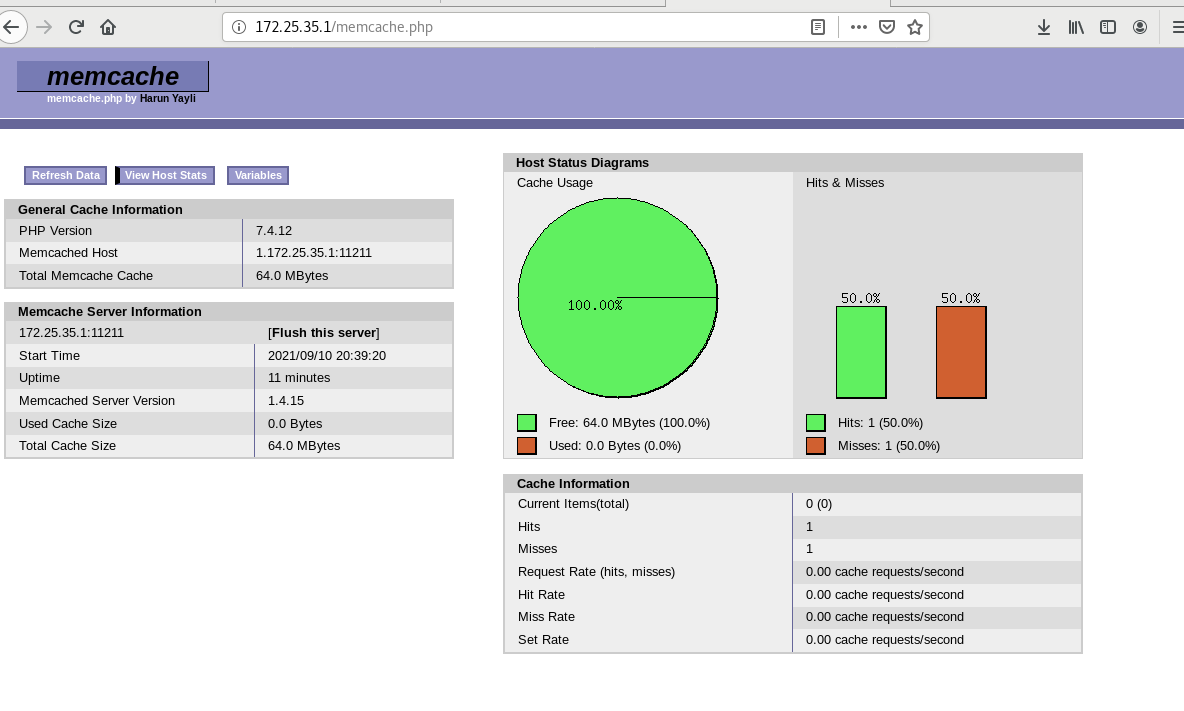
The current information processing rate cannot reach 100%, which needs to be optimized
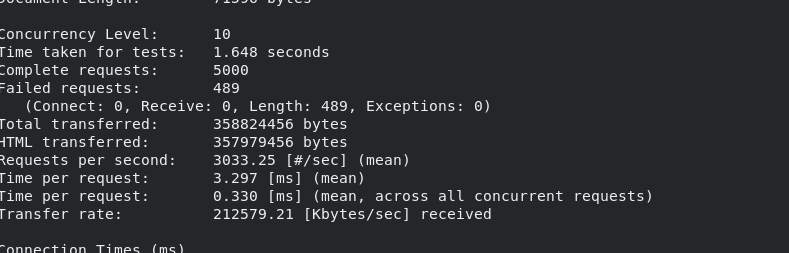
Execute the pressure test command in the real machine
ab -c20 -n 1000 http://172.25.35.1/example.php
Refresh the page and you can see that the information processing rate has reached 100% after the stress test of the real machine
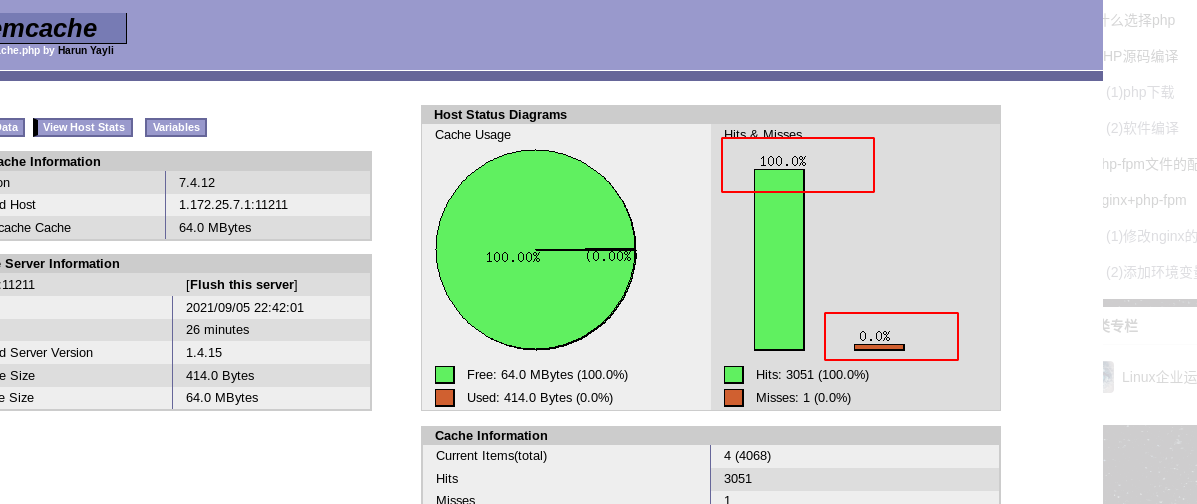
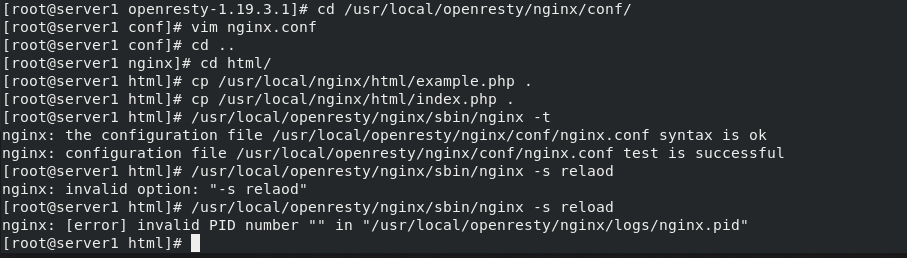
5. Configure the php loading module openresty
Based on openresty (build an efficient and transparent cache mechanism) access, the cache can be placed in nginx, which is faster
Note: nginx -s stop ## first stop nginx
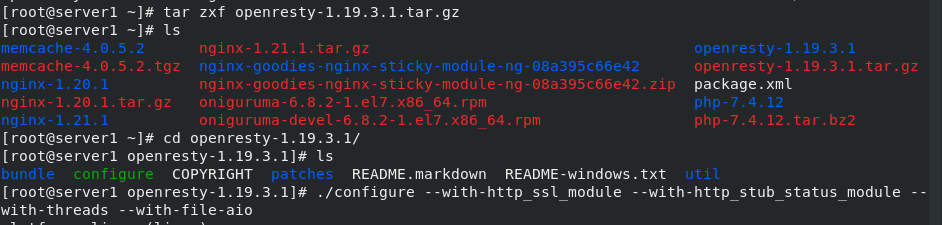
Download module
Official download address: https://openresty.org/cn/ After that, unzip, compile and install
tar zxf openresty-1.19.3.1.tar.gz
cd openresty-1.19.3.1/
./configure --with-http_ssl_module --with-http_stub_status_module --with-threads --with-file-aio
make
make install
Configuration module file information
Edit the configuration file of nginx in openresty, copy the configuration file, and restart the module

 Pressure test in real machine
The speed becomes faster and the transmission capacity is greatly increased
6.tomcat combined with memcache to realize session cross storage
Session: in computers, especially in network applications, it is called "session control". The session object stores the properties and configuration information required for a specific user session. When the user jumps between Web pages of the application, the variables stored in the session object will not be lost, but will exist throughout the user session.
In order to save the data more reliably, we choose the method of cross storing sessions, that is, the data accessing tomcat1 is stored in memcache2, and the data accessing tomcat2 is stored in memcache1. In this way, when a Tomcat service is disconnected, the client session accessing it will not disappear, but will be stored in the opposite Memcache. If the session is stored in the Memcache If the cache is broken, its data will be immediately switched to another memcached
tomcat download address: https://bitbucket.org/nginx-goodies/nginx-sticky-module-ng/src/master/
In server2 and server3 hosts:
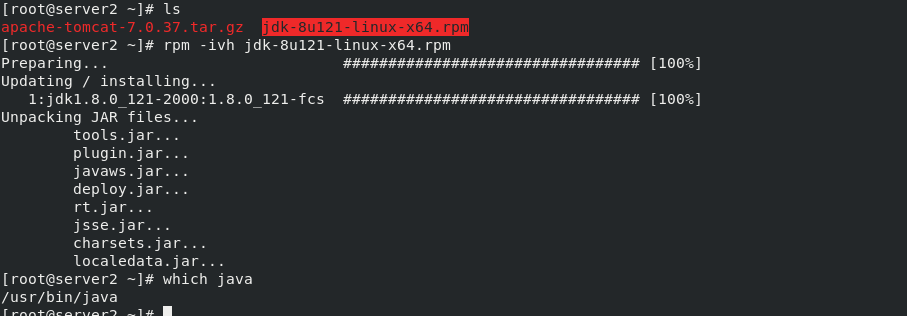
Download the apache-tomcat-7.0.37.tar.gz and jdk-8u121-linux-x64.rpm packages
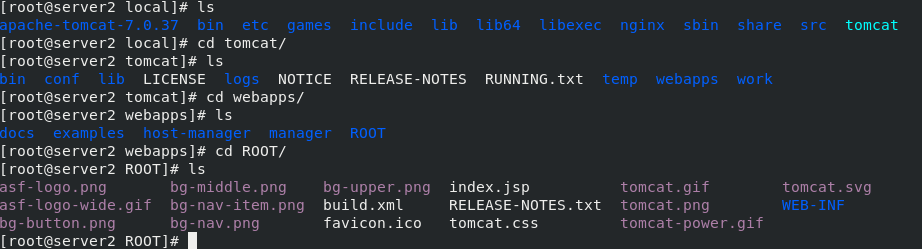
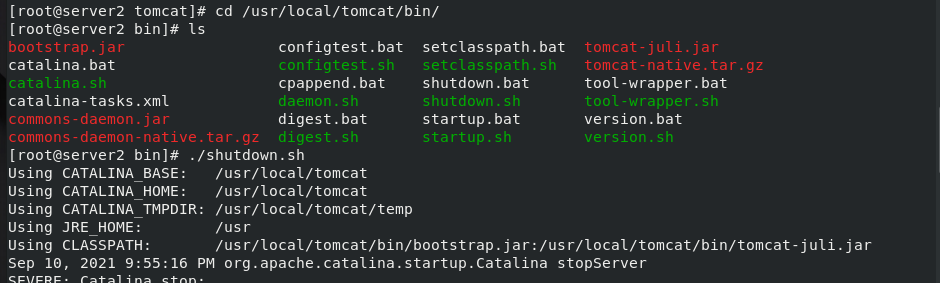
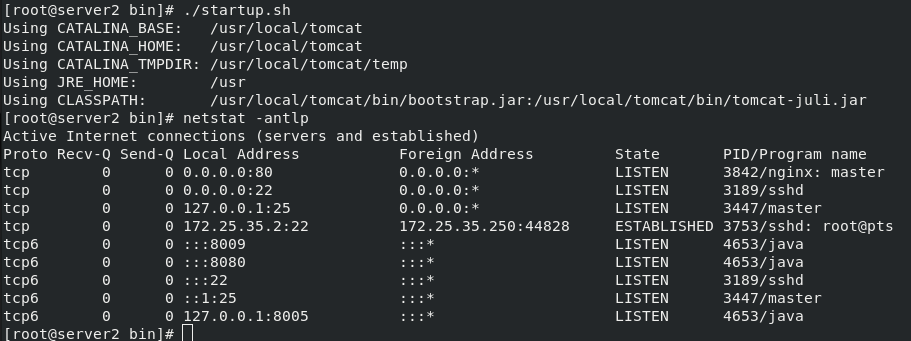
stay server2 Medium:///
tar zxf apache-tomcat-7.0.37.tar.gz  #decompression
rpm -ivh  jdk-8u121-linux-x64.rpm  #Install rpm package
mv apache-tomcat-7.0.37 /usr/local/ #Move directory to specified path
cd /usr/local/
ln -s apache-tomcat-7.0.37/ tomcat  #For convenience, establish a tomcat soft connection
cd /usr/local/tomcat/webapps/ROOT/
lftp 172.25.254.250  #Connect to the server to download files
cd /pub/docs/lamp
get test.jsp    #Download a. jsp file for later testing
cd /usr/local/tomcat/bin
ls    #There are scripts to start and stop tomcat in the bin directory
./startup.sh  #Start tomcat
\\\
stay server3 Can be downloaded directly from server2 in scp Transmission is enough
 Same operation, final start tomcat

 The general steps are operated on server3
 Access server1 on the real machine
Configure the nginx.conf configuration file in the server1 host
vim /usr/local/nginx/conf/nginx.conf
Using sticky module, write port 8080 of server2 and Server3 to


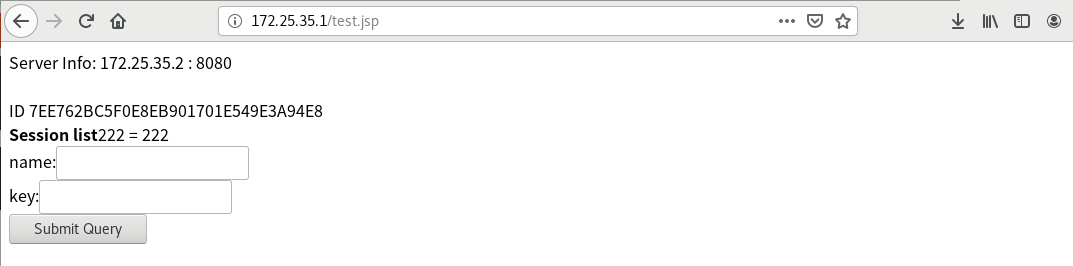
 At this point, you can access 172.25.7.1/test.jsp in the browser
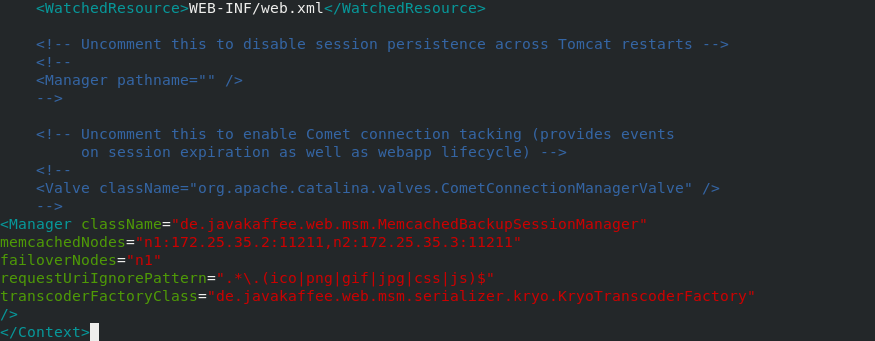
In server2, configure tomcat
Cross storage, so our two tomcat (server2 and server3) correspond to memcache (n2 and n1) respectively
cd /usr/local/tomcat/conf
vim context.xml
During normal operation, tomcat in server2 is stored in n2 and tomcat in server3 is stored in n1. As shown in the following figure, the storage policy in server2 failoverNodes = "n1" when cross storage fails, server2 is connected to n1
cd /usr/local/tomcat/lib lower
lftp 172.25.254.250
cd /pub/docs/lamp/jar
mget *      #Download all jar packages matching tomcat
exit
ls
rm -fr memcached-session-manager-tc6-1.6.3.jar    #Delete version 6 of memcache
cd /usr/local/tomcat/bin
./startup.sh    #start-up

Restart tomcat and access it in the browser (the U SB flash disk is damaged and the data is lost. The following experimental results use another ip)
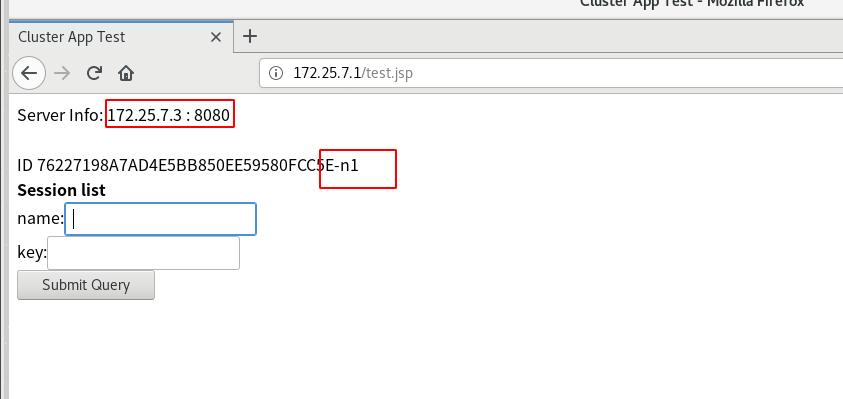
The browser displays tomcat2 in server3. Because we use the sticky module, that is, when tomcat2 in server3 goes down, tomcat1 in server2 will take over
Here we can stop tomcat in serve3
/usr/local/tomcat/bin/shutdown.sh #Close tomcat2
Configure tomcat in server3 as in server2
Download telnet.x86 in both server2 and server3_ sixty-four yum install telnet.x86_64 -y
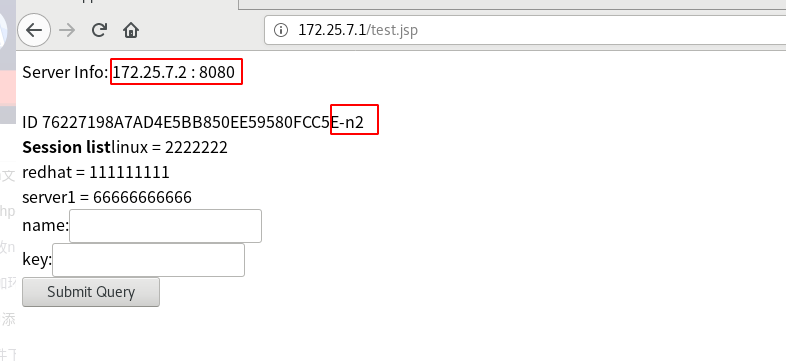
Enter several groups of names and passwords in the browser
Use the tenet command to view on the corresponding tomcat
The tomcat of server3 accessed here is stored in n1 by default. The memcache of n1 is the device in server2, so we can view the two sets of data we entered in server2

#Here, we enter instructions in servre2 server3 to view
telnet localhost 11211
get 76227198A7AD4E5BB850EE59580FCC5E-n1    #The id number here is displayed in the browser
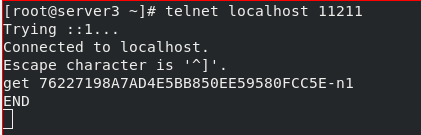
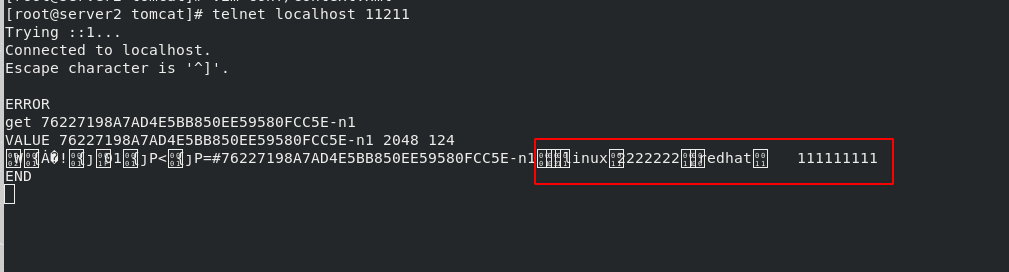
The results can only be viewed in server2
Stop Memcache in server2 systemctl stop memcache.service
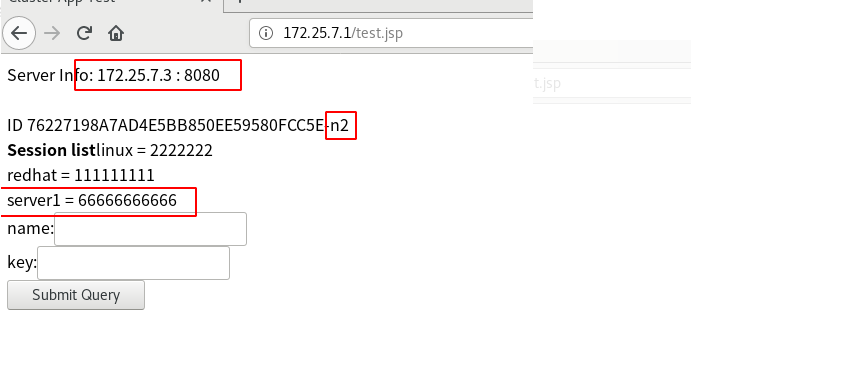
The device of server3 in the browser is automatically changed to n2. At this time, we can see that when the cross storage of server3 fails, it will be stored in n2 and Memcache in its own host
The information at this time should be accessed in memcache in server3
 Successfully found the newly entered data
This is the principle of nginx+tomcat+memcache to realize session cross storage
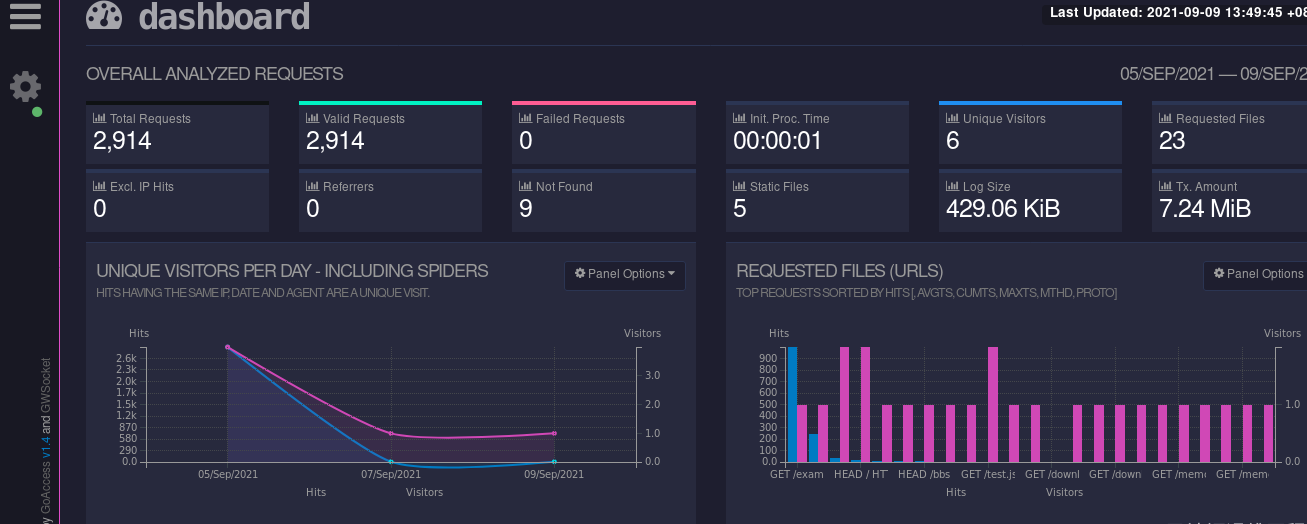
7.goaccess log visualization
Download address: http://tar.goaccess.io/goaccess-1.4.tar.gz
lftp 172.25.254.250
cd pub/docs/lamp
get goaccess-1.4.tar.gz\
tar zxf goaccess-1.4.tar.gz   #decompression
./configure --enable-utf8 --enable-geoip=legacy   #Installation test
 Two plug-ins are missing from the test and need to be installed
lftp 172.25.254.250
cd pub/docs/lamp
get GeoIP-devel-1.5.0-13.el7.x86_64.rpm
exit
rpm -ivh  GeoIP-devel-1.5.0-13.el7.x86_64.rpm
yum install ncurses-devel.x86_64    ##Install the two missing plug-ins
 again configure
make
make install

cd /usr/local/nginx/logs
ls
goaccess access.log -o /usr/local/nginx/html/report.html --log-format=COMBINED --real-time-html   ##Monitor access.log log

Real machine pressure test, increase request
ab -c10 -n 1000 http://172.25.7.1/index.html # add 1000 accesses
 Refresh
Visit 172.25.35.1/report.html to see the visual log