Why did you write this article
Since I wrote my first Python series column on June 13, 2021, I have successively updated 27 Python series articles. Here, I would like to thank readers for their support and reading, especially the little partners of one button three company.
This column is named [Python from introduction to mastery], which is mainly divided into two parts: basic knowledge and project practice. At present, the basic knowledge has been completely introduced. The next stage is to write Python project practice and crawler related knowledge points.
In order to summarize the basic Python knowledge learned in the early stage, so as to help readers better learn the practical knowledge points of the next part, I write this article here to encourage and advance together.
At the same time, in order to facilitate communication and learning, I have also established a Python learning group. The group is a group of small partners who love learning, and there is no lack of some big men. I believe that the little friends in the group will go faster and fly higher.

What does this column write
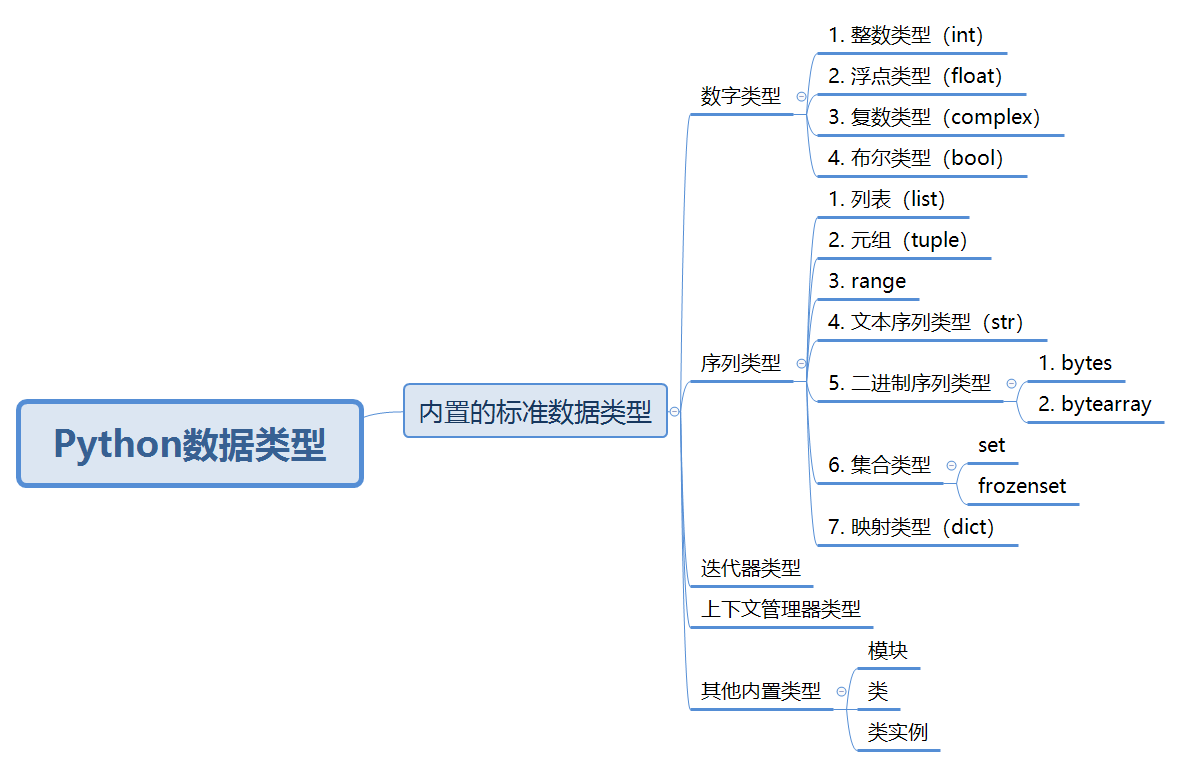
The following is a mind map to show the overview of Python basics in this column.
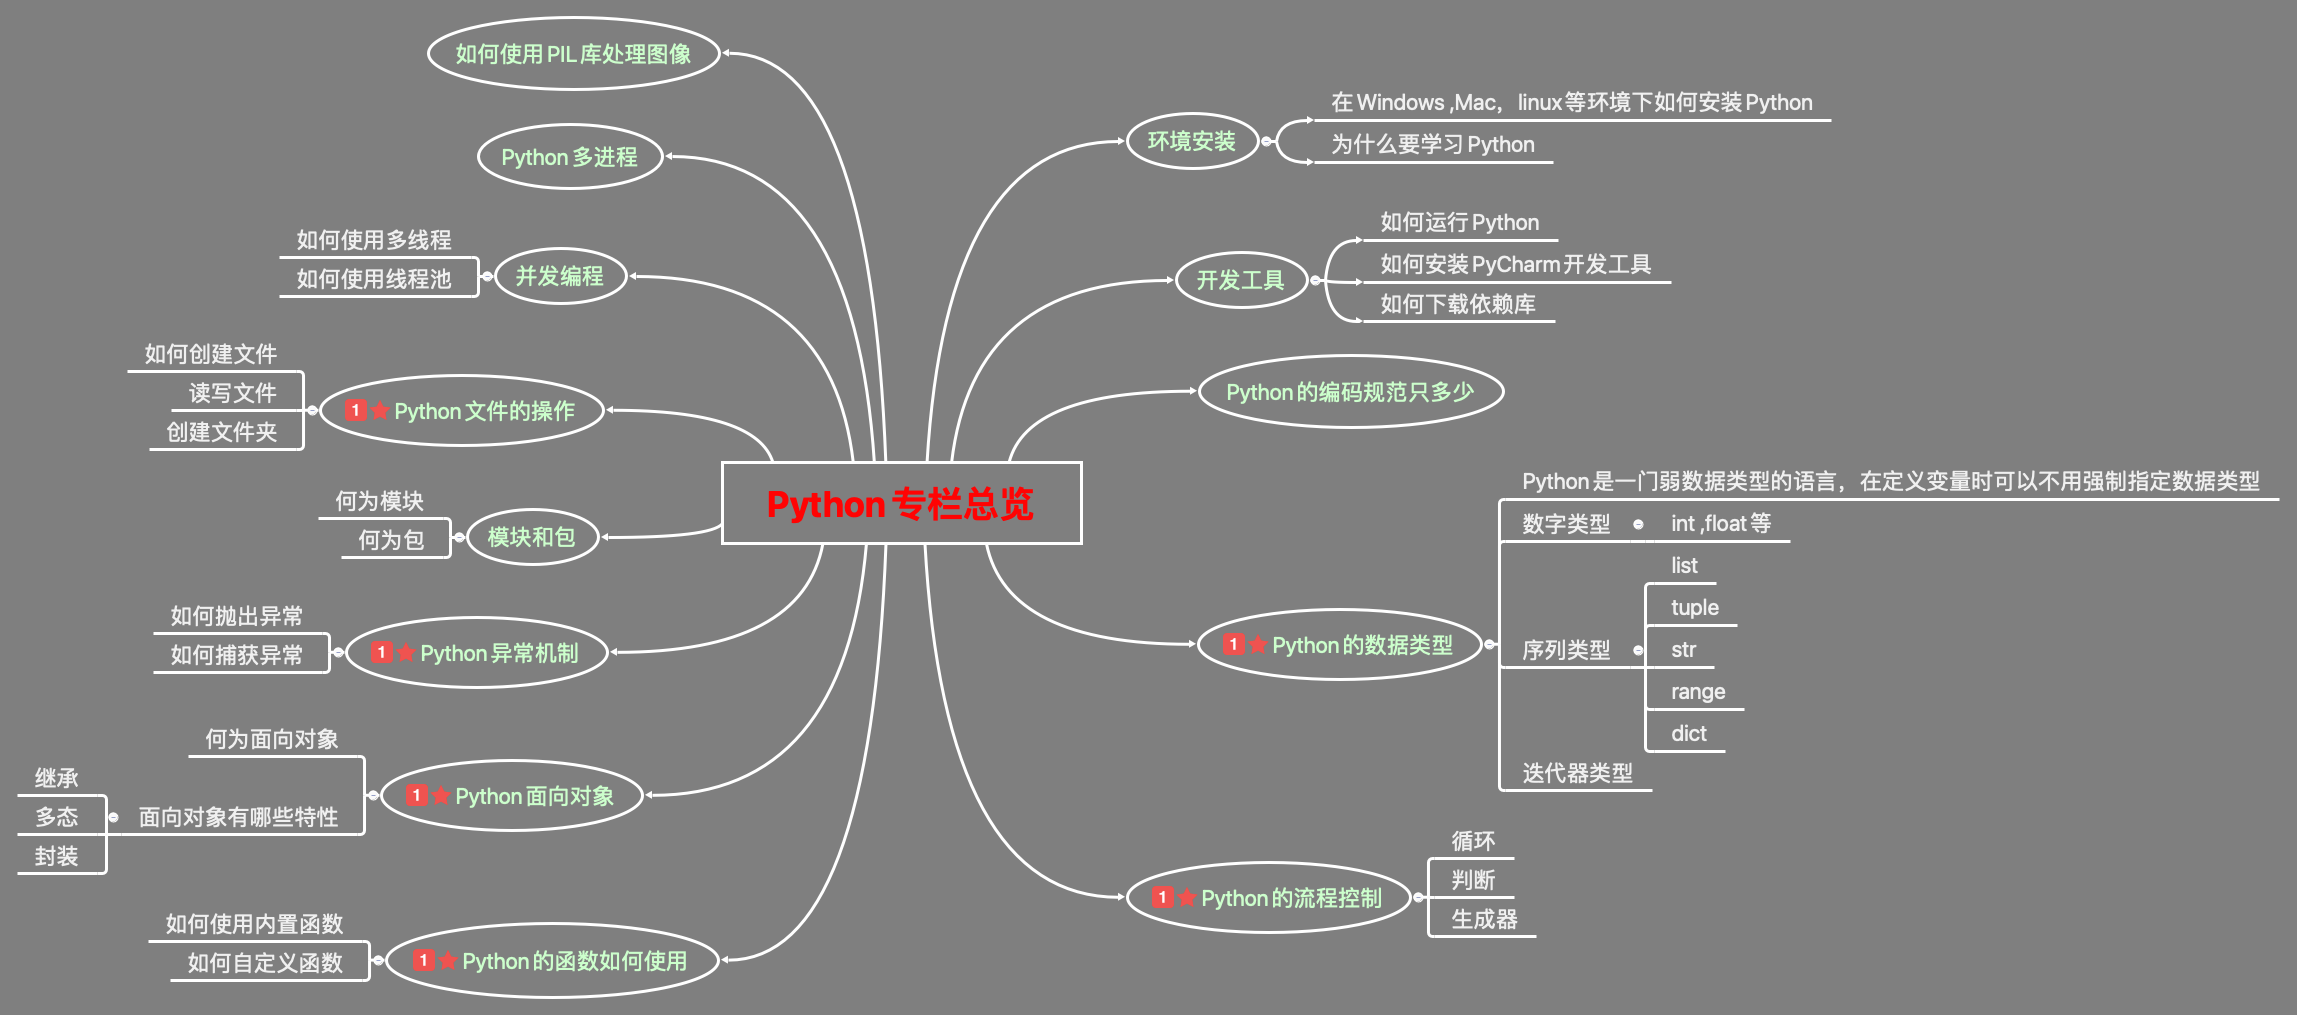
This column starts from zero foundation, from the construction of the environment to the learning of advanced knowledge points, step by step. I believe all readers have already mastered the relevant knowledge points. Next, let's do a detailed review.
0. What is Python
Python is an open source, free, general-purpose scripting language. It needs to parse the code line by line into the machine code recognized by the CPU at run time. It is an analytical language. What is an analytical language? It is to parse the source code into machine code line by line through the parser at run time. C language and C + + are compiled languages, that is, all source code is compiled into binary instructions at one time by the compiler to generate an executable program. The advantage of analytical language over compiled language is that it naturally has the characteristics of cross platform. It can be coded once and run everywhere.
1. Development environment configuration
- Download Python interpreter
Just as Java needs to install the JDK compiler, python also needs to install an interpreter to run Python programs.
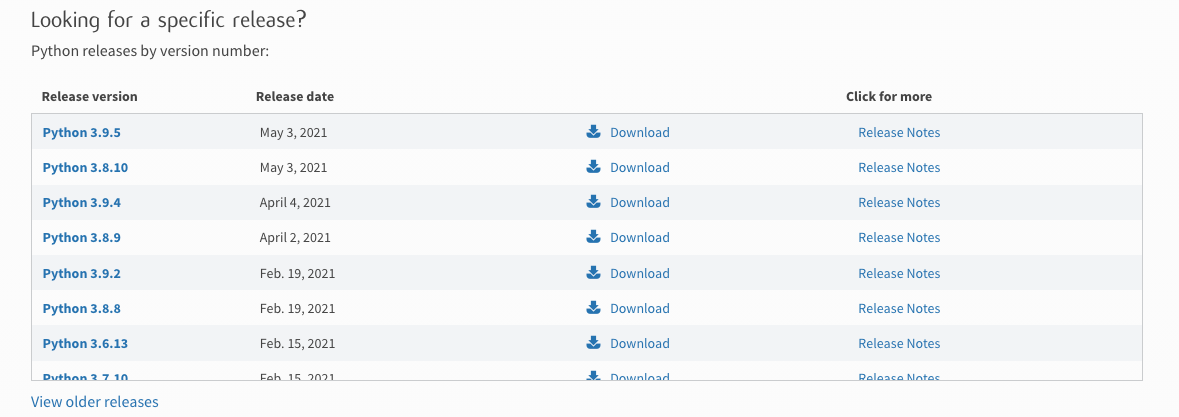
The official download website is: https://www.python.org/downloads/ , you can see the latest release version. If you want to download other versions, you can find the information shown in the figure below. The current latest version is Python version 3.9.5. Select the installation package of different systems according to the system you develop.

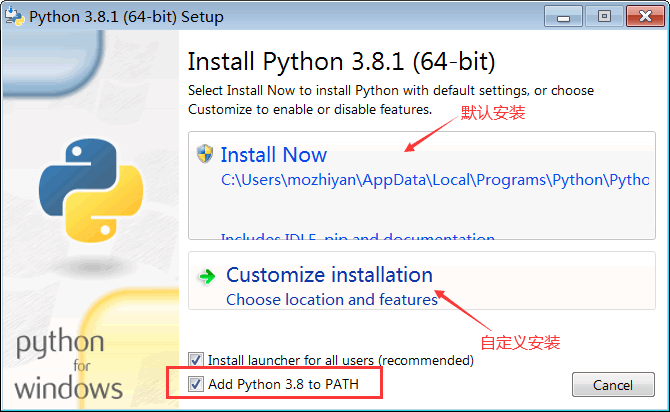
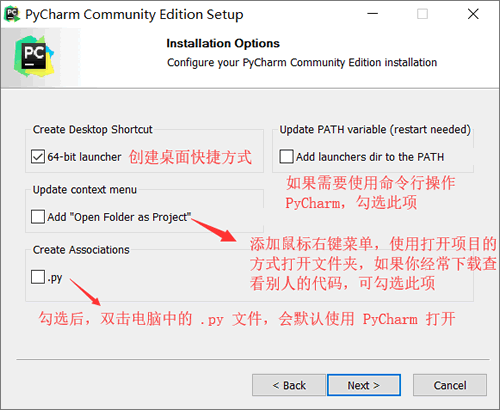
After downloading the installation package, double-click run to install. It should be noted that Add Python 3.8 to PATH needs to be checked for installation under Window, as shown in Figure 1.2 below
After the installation is completed, enter Python 3 in the command line to verify the installation results. If the following results appear, the python compiler installation is successful.

Details can be viewed [Python from introduction to mastery] (I) let's take a simple look at python
2. Tool installation
2.1. Install PyCharm development tool
If you want to do a good job, you must first use its tools. In actual development, we code through IDE (integrated development environment). Why use ide? This is because ide integrates language editor, automatic creation tool, debugger and other tools, which can greatly facilitate our rapid development. For example, we can imagine an integrated development environment as a desktop. Although it only needs the host to run, it still needs the monitor, keyboard and so on.
PyCharm is such a cool IDE development tool. Here is a brief introduction to its installation process
Download installation package
Click the link https://www.jetbrains.com/pycharm/download/
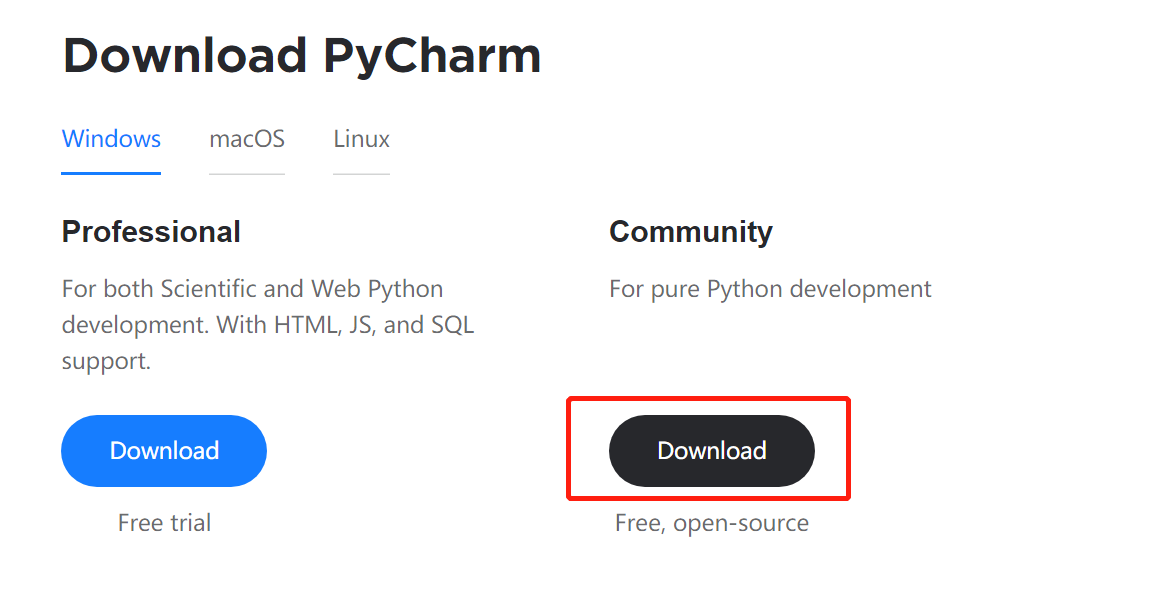
On the next page, PyCharm has professional version and community version. Among them, the professional version needs to be purchased to use, while the community version is free. The Community Edition is fully adequate for daily Python development. So we choose the community version of PyCharm for download and installation. Click the button shown in the figure below to download the installation package.
install
After the installation package is downloaded, we can double-click the installation package to install. The installation process is relatively simple. Basically, we only need to install the default settings. Click the Next button at each step, but it needs to be set when the window shown in the figure below appears.
After setting, click Next to enter the Next installation until all the installation is completed.
use
Only one thing to note when using here is to set the interpreter. By default, No interpreter is prompted in the selection box of Project Interpreter, that is, No interpreter is selected, so we need to add it manually.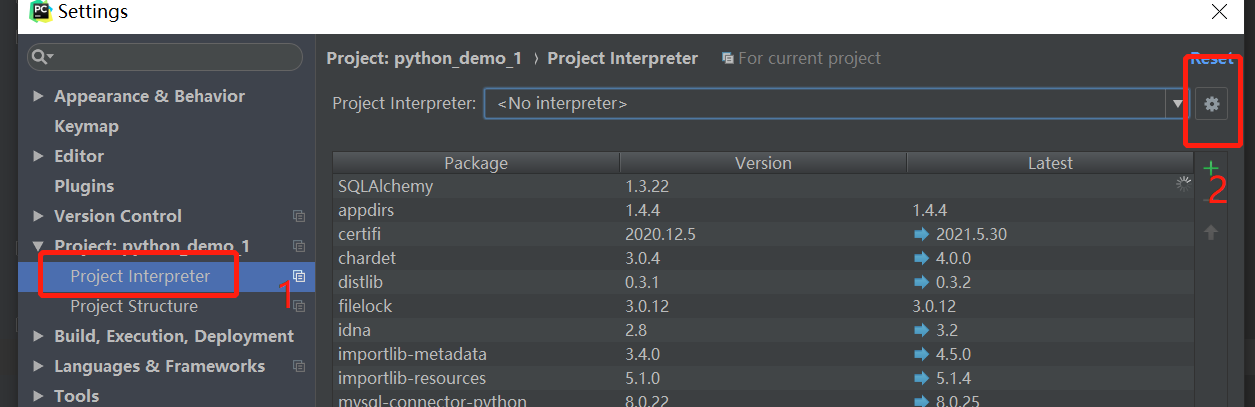
Therefore, you need to click the setting button to set the interpreter. Here, select Add Local to set the local interpreter.

After opening the settings page of the interpreter, the Virtualenv Environment tab is selected by default,
Here, Location is used to set the virtual environment of the project. For details, please refer to Summary of the use of pycharm, setting up the virtual environment and changing the image source
The Base interpreter is used to set the path of the interpreter.

So far, the scaffold for developing Python has been completed, and the next step is coding.
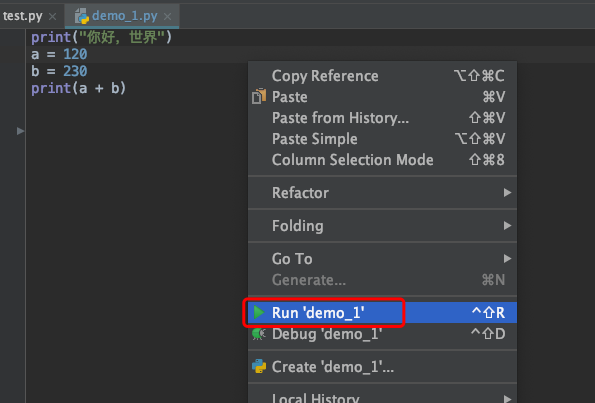
A demo is created as follows_ 1. Py, and then write the following lines of code in the file
print("Hello, world")
a = 120
b = 230
print(a + b)
To run this code, simply right-click and select Run 'demo_1 'or Debug' demo_1 ', the difference between the two is Run demo_1 is to run the code in normal mode, and Debug 'demo_1 'is to run the code in Debug mode.
The operation result is:

Details can be viewed [Python from introduction to mastery] (II) how to run Python? What are the good development tools
3. Coding specifications & Notes
3.1. Notes
First, python comments are introduced. Python comments are divided into two types: single line comments and multi line comments.
- Single-Line Comments
Python uses the # sign as the symbol of a single line comment. Its syntax format is: # all contents of the comment content from the # sign to the end of the line are comments. For example:
# This is a single line comment
- multiline comment
Multiline annotation refers to annotating multiple lines of content (including one line) in a program at a time. Python uses three consecutive single quotation marks' 'or three consecutive double quotation marks "" "to annotate multiple lines of content. Its syntax format is as follows:
'''
Multiline comment with three consecutive single quotes
 Comment multiline content
'''
perhaps
"""
Multiline comment with three consecutive double quotes
 Comment multiline content
"""
Multiline comments are usually used to add copyright or function description information (i.e. document comments) to Python files, modules, classes or functions
3.2. Indentation rules
Unlike other programming languages (such as Java or C), which use braces {} to split code blocks, Python uses code indentation and colon: to distinguish the levels between code blocks, as shown in the following code:
a = -100
if a >= 0:
    print("Output positive number" + str(a))
    print('test')
else:
    print("Output negative" + str(a))
The first line of code a = -100 and the second line of code if a > = 0: are in the same scope (that is, the scope is the same), so the two lines of code are side by side. The scope of the third line of code print("output positive number" + str(a)) is in the second line of code, so it needs to be indented. The same is true for the fifth line of code. The second line of code distinguishes the two code blocks by the indentation of the colon and the third line of code.
Python indentation can be achieved by using space or Tab key. Usually, the length of 4 spaces is used as an indentation.
It should be noted here that the indent amount of the code in the same scope should be the same, otherwise it will lead to an abnormal error of indexerror and prompt that the indent amount is wrong, as shown in the following code: the second line of code print("output positive number" + str(a)) is indented by 4 spaces, while the third line of code print('test ') is indented by only 2 spaces.
if a >= 0:
    print("Output positive number" + str(a))
  print('test')
In Python, for class definitions, function definitions and process control statements, such as if a > = 0:, exception handling statements, etc., the colon at the end of the line and the indentation of the next line represent the beginning of the next code block, and the end of the indentation represents the end of the code.
Details can be viewed [from introduction to mastery of Python] (III) how much do you know about Python coding specifications and identifiers?
4. Data type
4.1. Overview of various data types
4.2. Integer (int)
The integers in Python 3 are of no type, that is, there are no Long or short integers. Its value range is unlimited, that is, python can easily deal with no matter how large or small numbers. Here are two maximal or minimal integers.
>>> 100000-0000000000000000000000000000000000000000
1000000000000000000000000000000000000000000000
>>> print(-1000000000000000000000000000000000000000000000)
-1000000000000000000000000000000000000000000000
It can be seen that no matter how large or small the number is, there will be no overflow, which shows that Python has a very strong ability to handle integers.
Different base numbers of integers
Python can use a variety of hexadecimal to represent integers.
- Decimal form
The common integer we usually use is the decimal form, which is composed of ten numbers from 0 to 9.
Note that integers in decimal form cannot start with 0 unless the value itself is 0. - Binary form
It consists of two numbers: 0 and 1. It starts with 0b or 0b when writing. For example, 1001 corresponds to a decimal number of 9. - Octal form
Octal integer consists of eight digits from 0 to 7, starting with 0O or 0O. Note that the first symbol is the number 0 and the second symbol is the upper or lower case letter O. - Hexadecimal form
It is composed of ten numbers 0 ~ 9 and six letters a ~ f (or a ~ F). It starts with 0x or 0x when writing.
# Binary
a=0b1001
print('a=',a)
# octal number system
b=0o207
print('b=',b)
# hexadecimal
c=0x45
print('c=',c)
The operation result is:
a= 9
b= 135
c= 69
Python 3.x allows underscores_ As a separator for numbers (including integers and decimals), an underscore is usually added every three numbers, such as Click = 1_ 301_ five hundred and forty-seven
4.3. Floating point number / decimal
In programming languages, decimals are usually stored in the form of floating-point numbers, which are relative to fixed-point numbers; If the decimal point moves in the stored procedure, it is called a floating point number; If the decimal point does not move, it is called a fixed point number.
Writing form of decimals
Decimals in Python can be written in two forms:
- Decimal form
This is the decimal form we often see, such as 101.1; 234.5; zero point two three - Exponential form
Python decimal point exponential form is written as AEN or AEN
A is the mantissa part, which is a decimal system, n is the exponential part, which is a decimal system, and E or E is a fixed character. It is used to divide the mantissa part and the exponential part. The true expression is a × 10n.
For example, chestnuts:
2.3e5 = the 5th power of 2.3x10
Still another Chestnut:
x=10.01
print('x=',x)
y=-0.031
print('y=',y)
z=2.3E10
print('z=',z)
w=-0.00000001
print('w=',w)
The operation result is:
x= 10.01
y= -0.031
z= 23000000000.0
w= -1e-08
4.4. Boolean type (bool)
Boolean type is used to represent True (right) or False (wrong). For example, the common 3 > 2 Comparison formula is correct. Python uses True to represent it; Another example is the comparison formula of 2 > 3. This is wrong and is represented by False.
print(3>2)
print(2>3)
print('True==1 The result is:',True==1)
print('False==0 The result is:',False==0)
The operation result is:
True
False
True==1 The result is: True
False==0 The result is: True
Details can be viewed [Python from introduction to mastery] (IV) what are the built-in data types of Python? Figure out
5. Sequence
Sequence refers to a memory space that can hold multiple elements, which are arranged in a certain order. Each element has its own location (index), which can be used to find the specified element. If the sequence is imagined as a hotel, each room in the hotel is equivalent to each element in the sequence, and the room number is equivalent to the element index. The specified room (element) can be found through the number (index).
5.1. What sequence types are there?
After understanding the basic concept of sequence, what are the sequence types in Python? As shown in the figure below:
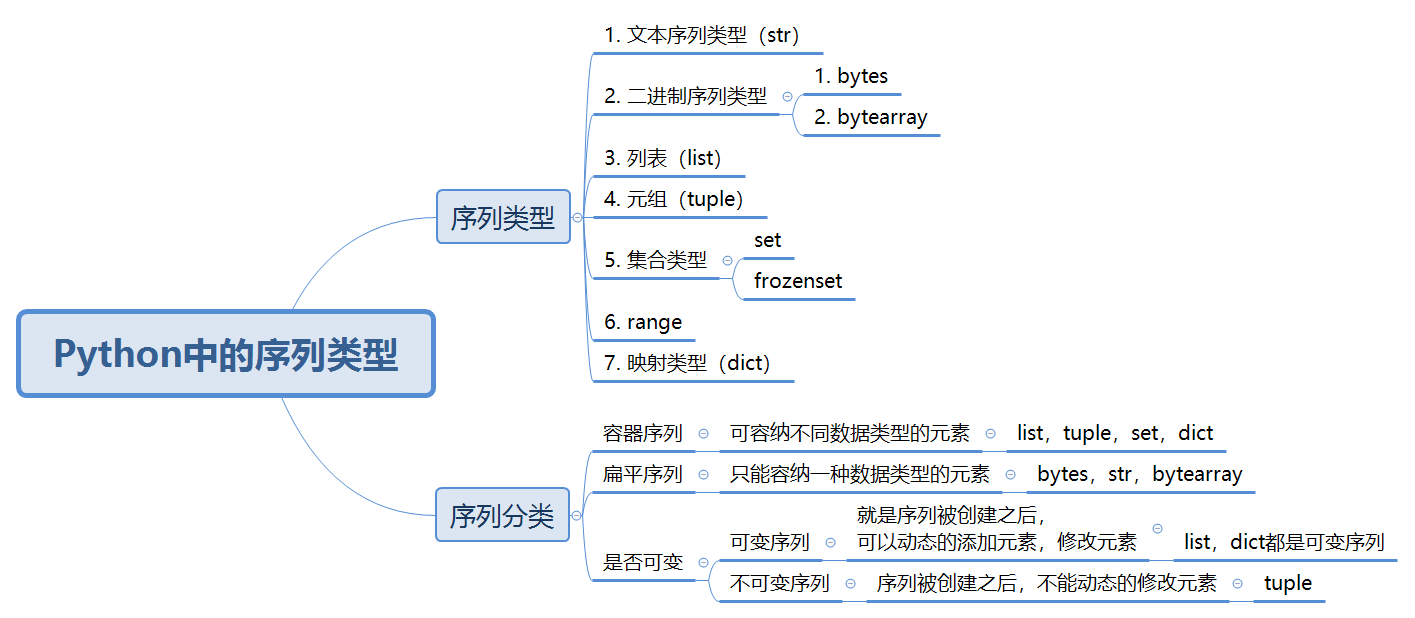
As can be seen from the figure, there are seven sequence types in Python, namely text sequence type (str); Binary sequence types bytes and byte array; list; tuple; Set type (set and frozenset); Scope type (range) and dictionary type (dict).
5.2. Divide according to the elements that can be stored
According to the elements that can be stored, the sequence types can be divided into two categories: container sequence and flat sequence
Container sequence: a sequence that can hold elements of different data types; There is a list; tuple; set; dict
For example, chestnuts:
list=['runoob',786,2.23,'john',70.2]
The elements stored in the list here have a variety of data types, including strings, decimals and integers.
Flat sequence: a sequence that can only hold elements of the same data type; There are bytes; str; bytearray. Take STR as an example. The same STR can only store characters.
5.2. Classification by variable or not
According to whether the sequence is variable or not, it can be divided into variable sequence and immutable sequence.
Variable here means: after the sequence is created successfully, whether it can be modified, such as insertion, modification, etc. if it can, it is a variable sequence; if not, it is an immutable sequence.
The variable sequence has a list; Dictionary (dict), etc,
The immutable sequence includes tuple, and these data types will be introduced in detail in the following articles.
5.3. Index of sequence
When introducing the concept of sequence, we talked about the index of elements in the sequence, so what is the index of sequence? It's actually the subscript of the position. If we know about arrays in C language, we know that the index subscripts of arrays are positive numbers that increase successively from 0, that is, the index subscript of the first element is 0 and the index subscript of the nth element is n-1. The index of a sequence is the same. By default, the index is recorded from left to right, and the index value increases from 0, that is, the index value of the first element is 0, and the index value of the nth element is n-1. As shown in the figure below:

Of course, unlike arrays in C language, Python also supports that the index value is negative, and the index of this class is counted from right to left. In other words, count from the last element and decrease from the index value of - 1, that is, the index value of the nth element is - 1 and the index value of the first element is - n, as shown in the following figure:

5.4. Sequence slicing
Slicing is another way to access sequence elements. It can access elements in a certain range. Through slicing, a new sequence can be generated. The syntax format of slicing operation is:
sname[start : end : step]
The meanings of each parameter are:
- sname: indicates the name of the sequence
- Start: indicates the start index position of the slice (including this position). This parameter can also be unspecified. If it is not specified, it will default to 0, that is, the slice will start from the beginning of the sequence.
- End: indicates the end index position of the slice (excluding this position). If it is not specified, it defaults to the length of the sequence.
- Step: indicates the step size, that is, during the slicing process, the element is taken every few storage locations (including the current location). That is, if the value of step is greater than 1, for example, when step is 3, the next element will be taken every two locations.
Let's take a chestnut as an example:
str1='study hard and make progress every day'
# Fetch the value with index subscript 7
print(str1[7])
# The value is taken from subscript 0 to the index value with subscript 7 (excluding)
print(str1[0:7])
# The value is taken from subscript 1 to the index value with subscript 4 (excluding). Because step is equal to 2, the value will be taken every other element
print(str1[1:4:2])
# Take out the last element
print(str1[-1])
# Take the value from the subscript - 9 to the index value with the subscript - 2 (excluding)
print(str1[-9:-2])
The result of the run is:
towards
 Study hard and work hard every day
 Easy to learn
 upper
 Study hard and work hard every day
5.5. Sequence addition
Python supports two sequences of the same type. It uses the "+" operator to do the addition operation. It will connect the two sequences, but will not remove the duplicate elements, that is, it will only make a simple splicing.
str='His name is Xiao Ming'
str1='He is very clever'
print(str+str1)
The result is: his name is Xiao Ming. He is very smart
5.6. Sequence multiplication
Python supports multiplying the number n by a sequence, which will generate a new sequence. The content of the new sequence is the result of the original sequence being repeated N times.
str2='How do you do'
print(str2*3)
The running result is: Hello, Hello, Hello, the content of the original sequence has been repeated three times.
5.7. Check whether the element is included in the sequence
In Python, you can use the in keyword to check whether an element is a member of a sequence. Its syntax format is:
value in sequence
Where value represents the element to be checked and sequence represents the specified sequence.
Take chestnuts for example: find whether Tianzi is in the string str1.
str1='study hard and make progress every day'
print('day' in str1)
The running result is: True
6. String
*A set of several characters is a string (str) * *. Strings in Python must be surrounded by double quotation marks' 'or single quotation marks''. Its syntax format is:
"String content"
'String content'
If the string contains single quotation marks, special processing is required. For example, now there is such a string
Str4 ='I'm a great coder 'it's a problem to write this directly.
There are two ways to process:
- Escape quotation marks by escape symbol \:
str4='I\'m a greate coder'
- Enclose the string with different quotation marks
str4="I'm a greate coder"
Double quotation marks are used to wrap the single quotation marks in the string.
6.1. String splicing
By + operator
The existing string code nongfeige is good. It is required to splice the string code nongfeige Niu force behind it to generate a new string code nongfeige good and code nongfeige Niu force
for instance:
str6 = 'Hello, brother Manon Fei,'
# Use + operation symbol
print('+Result of operator splicing=',(str6 + 'Manon Feige cow force'))
The operation result is:
+Result of operator splicing= Man Nong Feige is good. Man Nong Feige is awesome
6.2. String interception (string slicing)
Slicing is another way to access a string. It can access a certain range of elements. Through slicing, a new string can be generated. The syntax format of slicing operation is:
sname[start : end : step]
The meanings of each parameter are:
- sname: represents the name of the string
- Start: indicates the start index position of the slice (including this position). This parameter can also be unspecified. If it is not specified, it will default to 0, that is, the slice will start from the beginning of the sequence.
- End: indicates the end index position of the slice (excluding this position). If it is not specified, it defaults to the length of the sequence.
- Step: indicates the step size, that is, during the slicing process, the element is taken every few storage locations (including the current location). That is, if the value of step is greater than 1, for example, when step is 3, the next element will be taken every two locations.
Let's take a chestnut as an example:
str1='study hard and make progress every day'
# Fetch the value with index subscript 7
print(str1[7])
# The value is taken from subscript 0 to the index value with subscript 7 (excluding)
print(str1[0:7])
# The value is taken from subscript 1 to the index value with subscript 4 (excluding). Because step is equal to 2, the value will be taken every other element
print(str1[1:4:2])
# Take out the last element
print(str1[-1])
# Take the value from the subscript - 9 to the index value with the subscript - 2 (excluding)
print(str1[-9:-2])
The result of the run is:
towards
 Study hard and work hard every day
 Easy to learn
 upper
 Study hard and work hard every day
6.3. Split string
Python provides a split() method to split a string. The split() method can cut a string into multiple substrings according to the specified separator. These substrings will be saved in the list (excluding the separator) and fed back as the return value of the method. The basic syntax format of this method is as follows:
str.split(sep,maxsplit)
The meanings of parameters in this method are:
- str: represents the string to be split
- sep: used to specify the separator, which can contain multiple characters. This parameter defaults to None, indicating all empty characters, including spaces, newline "\ n", tab "\ t", etc
- Maxplit: optional parameter, used to specify the number of splits. The maximum number of substrings in the last list is maxplit + 1. If it is not specified or specified as - 1, it means that there is no limit on the number of splits.
In the split method, if you do not specify the sep parameter, you cannot specify the maxplit parameter.
For example:
str = 'https://feige.blog.csdn.net/'
print('Do not specify the number of divisions', str.split('.'))
print('The specified number of divisions is 2',str.split('.',2))
The operation result is:
Do not specify the number of divisions ['https://feige', 'blog', 'csdn', 'net/']
The specified number of divisions is 2 ['https://feige', 'blog', 'csdn.net/']
6.4. Merge strings
Merging strings is just the opposite of split. Python provides a join() method to connect multiple strings contained in a list (or tuple) into one string. Its syntax structure is:
newstr = str.join(iterable)
The parameter meanings of each part of this method are:
- newstr: represents the new string generated after merging
- str: used to specify the separator when merging
- iterable: source string data for merge operation. It can be provided in the form of list, tuple, etc.
Still an example:
list = ['Mainong Feige', 'study hard', 'excellent']
print('adopt.To splice', '.'.join(list))
print('adopt-To splice', '-'.join(list))
The operation result is:
adopt.Come on, brother Nongfei.study hard.excellent
 adopt-Come on, brother Nongfei-study hard-excellent
6.5. Retrieve whether the string starts with the specified string (startswitch())
The startswitch () method is used to retrieve whether the string starts with the specified string. If so, it returns True; Otherwise, False is returned. Its syntax structure is:
str.startswith(sub[,start[,end]])
The meaning of each parameter of this method is:
- str: represents the original string
- sub: substring to retrieve‘
- Start: Specifies the starting position index of the retrieval start. If not specified, the retrieval will start from scratch by default
- End: Specifies the end location index of the retrieval. If it is not specified, the retrieval will continue until the end by default.
Take a chestnut to illustrate:
str1 = 'https://feige.blog.csdn.net/'
print('Is it based on https start', str1.startswith('https'))
print('Is it based on feige start', str1.startswith('feige', 0, 20))
The operation result is:
Is it based on https start True
 Is it based on feige start False
6.6. Retrieve whether the string ends with the specified string (endswitch())
The endswitch () method is used to retrieve whether the string ends with the specified string. If so, it returns True, otherwise, it returns False. Its syntax structure is:
str.endswith(sub[,start[,end]])
The meaning of each parameter of this method is the same as that of the startswitch method. I won't repeat it here.
6.7. String case conversion (3) functions and usage
Python provides three methods for string case conversion
- The title() method is used to convert the first letter of each word in the string to uppercase and all other letters to lowercase. After the conversion, this method returns the converted string. If there are no characters in the string to be converted, this method returns the string intact. Its syntax structure is str.title()
- Lower() is used to convert all uppercase letters in the string into lowercase letters. After the conversion, the method will return the newly obtained substring. If the string is originally lowercase, the method returns the original string. Its syntax structure is str.lower()
- Upper() is used to convert all lowercase letters in the string into uppercase letters. If the conversion is successful, a new string is returned; Otherwise, the original string is returned. Its syntax structure is: str.upper().
For example:
str = 'feiGe Fly bravely'
print('title case', str.title())
print('All lowercase', str.lower())
print('All caps', str.upper())
The operation result is:
title case Feige Fly bravely
 All lowercase feige Fly bravely
 All caps FEIGE Fly bravely
6.8. Three methods to remove spaces (delete special characters) from strings
Python provides three methods to remove spaces in strings (delete special characters). Special characters here refer to table characters (\ t), carriage return characters (\ r), line feed characters (\ n), etc.
- strip(): delete spaces or special characters before and after the string (left and right sides)
- lstrip(): delete spaces or special characters in front of (to the left of) the string
- rstrip(): removes spaces or special characters after (to the right of) the string
Python's str is immutable, so these three methods only return a copy of the string after the white space in front of or after the string is deleted, and do not change the string itself
For example:
str = '\n Man Nong Feige flies bravely '
print('Remove front and back spaces(Special string)', str.strip())
print('Remove left space(Special string)', str.lstrip())
print('Remove right space(Special string)', str.rstrip())
The operation result is:
Remove front and back spaces(Special string) Man Nong Feige flies bravely
 Remove left space(Special string) Man Nong Feige flies bravely
Remove right space(Special string)
Man Nong Feige flies bravely
6.9.encode() and decode() methods: string encoding conversion
The earliest string encoding is ASCll encoding, which only encodes 10 numbers, 26 uppercase and lowercase English letters and some special characters. ASCII code can only represent 256 characters at most, and each character only needs to occupy 1 byte. In order to be compatible with the characters of various countries, GBK, GB2312 and UTF-8 codes have appeared one after another. UTF-8 is an international coding format, which contains the characters needed by all countries in the world. It stipulates that English characters occupy one byte and Chinese characters occupy three bytes.
- The encode() method is a method provided for string type (STR) to convert STR type to bytes type. This process is also called "encoding". Its syntax structure is: str.encode([encoding="utf-8"][,errors="strict"])
- Converts binary data of type bytes to str. This process is also called "decoding", and its syntax structure is bytes.decode([encoding="utf-8"][,errors="strict"])
For example:
str = 'Manon Feige, come on'
bytes = str.encode()
print('code', bytes)
print('decode', bytes.decode())
The operation result is:
code b'\xe7\xa0\x81\xe5\x86\x9c\xe9\xa3\x9e\xe5\x93\xa5\xe5\x8a\xa0\xe6\xb2\xb9'
Decoding code, Nong Feige, come on
The default encoding format is UTF-8. The encoding and decoding formats should be the same, otherwise decoding will fail.
6.9. Serialization and deserialization
In practice, we often serialize a data object into a string, and also deserialize a string into a data object. Python's own serialization module is the json module.
- The json.dumps() method converts Python objects into strings
- The json.loads() method decodes the encoded JSON string into a Python object
For example:
import json

dict = {'Student number': 1001, 'name': "Zhang San", 'score': [{'chinese': 90, 'mathematics': 100}]}
str = json.dumps(dict,ensure_ascii=False)
print('Serialize to string', str, type(str))
dict2 = json.loads(str)
print('Deserialization object', dict2, type(dict2))
The operation result is:
Serialize to string {"name": "Zhang San", "score": [{"mathematics": 100, "chinese": 90}], "Student number": 1001} <class 'str'>
Deserialization object {'name': 'Zhang San', 'score': [{'mathematics': 100, 'chinese': 90}], 'Student number': 1001} <class 'dict'>
Details can be viewed
[Python from introduction to mastery] (V) Python's built-in data types - sequences and strings. They have no girlfriend, not a nanny, and can only be used as dry goods
[from introduction to mastery of Python] (IX) are you familiar with all kinds of string operations in Python? [it's good to collect it]
7. List & tuple
7.1. Introduction to list
As one of Python sequence types, list is also a memory space for storing multiple elements, which are arranged in a certain order. Its data structure is:
[element1, element2, element3, ..., elementn]
element1~elementn represent the elements in the list. There are no restrictions on the data format of elements. As long as it is a data format supported by Python, you can go inside. At the same time, because the list supports automatic capacity expansion, it can change the sequence, that is, the list can be dynamically modified, that is, the list elements can be modified, added and deleted. Look at a cool picture!
7.2. List operation
First of all, it introduces the operation of the list: including the creation and deletion of the list! There are two ways to create a list:
The first way:
The elements in the list are wrapped by [] and separated by commas. There is no limit to element types, and the types of each element in the same list can be different, but this is not recommended, because it is very inconvenient to traverse and parse the list if the data types of each element are different. Therefore, it is recommended that only elements of the same type be stored in a list.
list=[element1, element2, element3, ..., elementn]
For example: test_list = ['test', 2, ['code Nong Feige', 'Xiao Wei'], (12, 23)]
PS: the definition of an empty list is list = []
The second way:
Create a list through the list(iterable) function, which is a built-in function in Python. The parameters passed in by this function must be iteratable sequences, such as strings, lists, tuples, etc. if iterable is null, an empty list will be created. iterable cannot pass only one number.
classmates1 = list('Mainong Feige')
print(classmates1)
The generated list is: [code ',' Nong ',' Fei ',' GE ']
7.3. Add an element to the list
There are four ways to add elements to the list:
The first method: use the * * + operator to connect multiple lists * *. It is equivalent to adding another list at the end of the first list. The syntax format is listname1+listname2
name_list = ['Mainong Feige', 'Xiao Wei', 'Xiao Wei']
name_list2 = ['python', 'java']
print(name_list + name_list2)
The output result is: ['Kenong Feige', 'Xiaowei', 'Xiaowei', 'python', 'java'], you can see that the name_ Each element in List2 is added to name_ The end of the list.
The second is to add elements using the append() method
The append() method is used to add elements to the end of the list. Its syntax format is: listname.append(p_object), where listname represents the list of elements to be added, P_ Object represents the element to be added to the end of the list. It can be a string, a number, or a sequence. For example, chestnuts:
name_list.append('Adam')
print(name_list)
name_list.append(['test', 'test1'])
print(name_list)
The operation result is:
['Mainong Feige', 'Xiao Wei', 'Xiao Wei', 'Adam']
['Mainong Feige', 'Xiao Wei', 'Xiao Wei', 'Adam', ['test', 'test1']]
It can be seen that the elements to be added have been successfully added to the end of the original list. And when the added element is a sequence, the sequence will be regarded as a whole.
Third: use the extend() method
The extend() method is the same as the append() method, adding elements to the end of the list. The type of element only needs the data type supported by Python. However, unlike the append() method, when the added elements are sequences, the extend() method does not treat the list as a whole, but adds each element to the end of the list. The same example above:
name_list = ['Mainong Feige', 'Xiao Wei', 'Xiao Wei']
name_list.extend('Adam')
print(name_list)
name_list.extend(['test', 'test1'])
print(name_list)
The operation result is:
['Mainong Feige', 'Xiao Wei', 'Xiao Wei', 'A', 'd', 'a', 'm']
['Mainong Feige', 'Xiao Wei', 'Xiao Wei', 'A', 'd', 'a', 'm', 'test', 'test1']
It can be seen from the results that when adding a string, each character in the string will be added to the end of the list as an element, and when adding a new list, each element in the list will be added to the end.
The fourth is to use the insert() method
The previous insertion methods can only insert elements at the end of the list. There is nothing you can do if you want to insert elements at the specified position in the list. The insert() method is formally used to deal with this problem. Its syntax structure is listname.insert(index, p_object), where index represents the index value of the specified location, and insert() will_ Object is inserted into the index element of the listname list. The same as the append() method is that if the element to be added is a sequence, insert() will insert the sequence as a whole at the specified position in the list. For example, chestnuts:
name_list = ['Mainong Feige', 'Xiao Wei', 'Xiao Wei']
name_list.insert(1, 'Jack')
print(name_list)
name_list.insert(2, ['test', 'test1'])
print(name_list)
The operation result is:
['Mainong Feige', 'Jack', 'Xiao Wei', 'Xiao Wei']
['Mainong Feige', 'Jack', ['test', 'test1'], 'Xiao Wei', 'Xiao Wei']
7.4. Modify elements in the list
After that, let's take a look at the methods related to modifying the elements in the list. There are two ways to modify list elements:
First: modify a single element:
The way to modify a single element is to reassign the element on an index. Its syntax structure is: listname[index]=newValue, which is to replace the element at the position where the index value in the list listname is index with newValue.
For example, chestnuts:
name_list = ['Mainong Feige', 'Xiao Wei', 'Xiao Wei']
name_list[1] = 'Sarah'
print(name_list)
Running result: [code Nong Feige ',' Sarah ',' Xiaowei '] it can be seen from the result that the element value at index 1 has been successfully modified to Sarch.
The second is to modify a set of elements through slicing syntax
A group of elements can be modified through slicing syntax. Its syntax structure is: listname[start:end:step], where listname represents the list name, start represents the start position, end represents the end position (excluding), and step represents the step size. If the step size is not specified, Python does not require that the number of newly assigned elements is the same as the number of original elements, which means that, This operation can add elements to the list or delete elements for the list. For example, chestnuts:
name_list = ['Mainong Feige', 'Xiao Wei', 'Xiao Wei']
name_list[0:1] = ['Feige', 'fucking great']
print(name_list)
The running result is: ['Feige', 'Niubi', 'Xiaowei', 'Xiaowei']. It can be seen from the result that the element value with index 0 in the original list has been replaced by Feige, and Niubi has been inserted.
7.5. Delete elements in the list
There are four ways to delete elements from a list.
The first method: delete the del keyword of the element according to the index value
There are two types of del keywords for deleting elements according to the index value. One is to delete a single element, del listname[index], and the other is to delete multiple elements according to the slice. Del listname [start: end], where listname represents the list name, start represents the start index, end represents the end index, and del will delete the elements from the index start to end, However, the element at the end position is not included. Or chestnuts:
name_list = ['Mainong Feige', 'Xiao Wei', 'Xiao Wei', 'superman']
name_list2 = name_list
print('original name_list={0}'.format(name_list))
print('original name_list2={0}'.format(name_list2))
# Delete the elements between index 0 and 2, that is, delete the elements at index 0 and index 1
del name_list[0:2]
print('use del After deleting an element name_list={0}'.format(name_list))
print('use del After deleting an element name_list2={0}'.format(name_list2))
del name_list
print('use del After deleting the list name_list2={0}'.format(name_list2))
The operation result is:
original name_list=['Mainong Feige', 'Xiao Wei', 'Xiao Wei', 'superman']
original name_list2=['Mainong Feige', 'Xiao Wei', 'Xiao Wei', 'superman']
use del After deleting an element name_list=['Xiao Wei', 'superman']
use del After deleting an element name_list2=['Xiao Wei', 'superman']
use del After deleting the list name_list2=['Xiao Wei', 'superman']
It can be seen that when del is used to delete the list element, the memory data is actually deleted, but when del is used to delete the list, only the variable name is deleted_ The memory data pointed to by List2 still exists.
The second is the pop() method of deleting elements according to the index value
The syntax structure of the pop() method for deleting elements according to the index value is: listname.pop(index), where listname represents the list name and index represents the index value. If the index parameter is not written, the last element in the list will be deleted by default, similar to the stack operation in the data structure. for instance:
name_list = ['Mainong Feige', 'Xiao Wei', 'Xiao Wei', 'superman']
# Delete the element at the end of the list
name_list.pop()
print(name_list)
# Delete the element at the specified position and use the pop(i) method, where i is the index position
name_list.pop(1)
print(name_list)
The operation result is:
['Mainong Feige', 'Xiao Wei', 'Xiao Wei']
['Mainong Feige', 'Xiao Wei']
The third is the remove() method that deletes according to the element value
The syntax structure of the remove() method for deleting according to the element value is: listname.remove(object), where listname represents the name of the list and object represents the name of the element to be deleted. It should be noted that if the element does not exist in the list, a ValueError error will be reported. For example, chestnuts:
name_list = ['Mainong Feige', 'Xiao Wei', 'Xiao Wei', 'superman']
name_list.remove('Xiao Wei')
print(name_list)
The running result is: ['man Nong Feige', 'Xiao Wei', 'Superman'].
The fourth method: delete all the elements in the list. clear() method
All elements in the list can be deleted through the clear() method. Its syntax structure is: listname.clear(), where listname represents the name of the list. Let's take chestnuts for example:
name_list = ['Mainong Feige', 'Xiao Wei', 'Xiao Wei', 'superman']
name_list.clear()
print(name_list)
The running result is [], and it can be seen that all the elements in the list have been cleared.
7.6. Search and access of elements in the list
Having finished the deletion of the fifth shallow list element, I felt a little tired. Go on to the sixth shallow! Look at the search and access of elements in the list. After reading this, the relevant contents of the list will come to an end.
Accessing elements in a list
There are two ways to access the elements in the list, one is to access a single element through index positioning, and the other is to access multiple elements through slicing.
The first is to access a single element through index location. Its syntax structure is: listname[index], where listname represents the name of the list and index represents the index value of the element to be searched.
The second way is to access multiple elements by slicing. Its syntax structure is: listname[start:end:step]. Where, listname represents the name of the list, start represents the start index, end represents the end index (excluding the end position), and step represents the step size. The same example is chestnuts:
list2 = ['Mainong Feige', 'Xiao Wei', 'Xiao Wei',123]
print(list2[0])  # The first element of the output list
print(list2[1:3])  # Output the second to third elements
print(list2[2:])  # Outputs all elements from the third to the end of the list
The operation result is:
Mainong Feige
['Xiao Wei', 'Xiao Wei']
['Xiao Wei', 123]
Find where an element appears in the list index()
The indext() method is used to find the position of an element in the list (that is, the index). If the element does not exist in the list, a ValueError error will be reported. Its syntax structure is: listname.index(object, start, end), where listname represents the name of the list, object represents the element to be found, start represents the start index, and end represents the end index (excluding).
name_list = ['Mainong Feige', 'Xiao Wei', 'Xiao Wei', 'superman']
print(name_list.index('Xiao Wei', 0, 2))
The running result is: 1
7.8. Differences among methods in Python's new elements
As mentioned earlier, using the + operator, the append method and the extend method can add new elements. What are the differences between them? Let's give an example;
name_list = ['Mainong Feige', 'Xiao Wei', 'Xiao Wei', 'superman']
name_list2 = ['Ox demon king']
name_list3 = name_list + name_list2
print("original name_list Value of={0};Memory address={1}".format(name_list, id(name_list)))
print("use+After operator name_list3 Value of={0};Memory address={1}".format(name_list3, id(name_list3)))
print("use+After operator name_list Value of{0};Memory address={1}".format(name_list, id(name_list)))
name_list4 = name_list.append('Ox demon king')
print('use append After method name_list4 Value of={0};Memory address={1}'.format(name_list4, id(name_list4)))
print("use append After method name_list Value of{0};Memory address={1}".format(name_list, id(name_list)))
name_list5 = name_list.extend('Ox demon king')
print('use extend After method name_list5 Value of={0};Memory address={1}'.format(name_list4, id(name_list4)))
print("use extend After method name_list Value of{0};Memory address={1}".format(name_list, id(name_list)))
The operation result is:
original name_list Value of=['Mainong Feige', 'Xiao Wei', 'Xiao Wei', 'superman'];Memory address=2069467533448
 use+After operator name_list3 Value of=['Mainong Feige', 'Xiao Wei', 'Xiao Wei', 'superman', 'Ox demon king'];Memory address=2069467533896
 use+After operator name_list Value of['Mainong Feige', 'Xiao Wei', 'Xiao Wei', 'superman'];Memory address=2069467533448
 use append After method name_list4 Value of=None;Memory address=2012521616
 use append After method name_list Value of['Mainong Feige', 'Xiao Wei', 'Xiao Wei', 'superman', 'Ox demon king'];Memory address=2069467533448
 use extend After method name_list5 Value of=None;Memory address=2012521616
 use extend After method name_list Value of['Mainong Feige', 'Xiao Wei', 'Xiao Wei', 'superman', 'Ox demon king', 'cattle', 'magic', 'king'];Memory address=2069467533448
The following points can be seen from the operation results:
- The + operator is used to create a new list. The address of the new list is different from that of the original list, and the content of the original list will not change.
- Both the append method and the extend method modify the contents of the original list, and neither of them returns a value, so neither of them can use chained expressions.
- When the element to be added is a list, the append method will treat the list as a whole, and extend will not.
8. tuple
8.1. Introduction to tuple s
After finishing the list, let's take a look at another important sequence - tuples. Similar to the list, tuples are also composed of a series of elements sorted according to a specific book order. The most important difference from the list is that tuples belong to an immutable sequence, that is, once a tuple is created, its elements cannot be changed.
8.2. Tuple creation method
The first is to create directly using ()
The syntax structure for creating tuples using () is tuplename = (element1, Element2,..., elementn), where tuplename represents the variable name of the tuple and element1~elementn represent the elements in the tuple. Parentheses are not required, and Python treats elements as tuples as long as they are separated by commas. Or chestnuts:
#Create tuple
tuple_name = ('Mainong Feige', 'Xiao Wei', 'Xiao Wei', 'superman')
print(tuple_name)
#Remove parentheses to create tuples
tuple2 = 'Mainong Feige', 'Xiao Wei', 'Xiao Wei', 'superman'
print(type(tuple2))
The operation result is:
('Mainong Feige', 'Xiao Wei', 'Xiao Wei', 'superman')
<class 'tuple'>
The second is to use the tuple() function to create
Similar to the list, we can use the tuple(iterable) function to create tuples. If the iterable is null, an empty tuple will be created. The iterable parameter must be an iterative sequence, such as string, list, tuple, etc. The same iterable cannot pass in a number. For example, chestnuts:
name_list = ['Mainong Feige', 'Xiao Wei', 'Xiao Wei', 'superman']
print(tuple(name_list))
print(tuple('Mainong Feige'))
The operation result is:
('Mainong Feige', 'Xiao Wei', 'Xiao Wei', 'superman')
('code', 'agriculture', 'fly', 'brother')
Because tuples are immutable sequences, there is no method to modify elements, and only the elements in tuples can be viewed. The way to view elements is also similar to the list. There are two ways:
The first one is to access elements in tuples through index. Its syntax structure is tuplename[index]
The second way is to access by slicing. Its syntax structure is tuplename[start:end:step]
The description of relevant parameters will not be repeated here. Still an example:
tuple_name = ('Mainong Feige', 'Xiao Wei', 'Xiao Wei', 'superman')
# Gets the element value with index 1
print(tuple_name[1])
#Gets the element value between index 1 and index 2, excluding index 2 itself
print(tuple_name[0:2])
The operation result is:
Xiao Wei
('Mainong Feige', 'Xiao Wei')
The elements in a tuple cannot be modified, but a new tuple can be generated through +.
Details can be viewed [Python from introduction to mastery] (VI) Python's built-in data types - list and tuple, nine shallow and one deep, ten chapters, I don't believe you can't use them
9. Dictionary
9.1. Create a dictionary
There are many ways to create a dictionary. Here are some common methods.
The first method uses the {} symbol to create a dictionary. Its syntax structure is dictname = {key1 ':'value1','key2 ':'value2',...,'keyn ': valuen}
The second is to use the fromkeys method. Its syntax structure is dictname = dict.fromkeys(list, value=None). The list parameter represents the list of all keys in the dictionary, and the value parameter represents the default value. If it is not written, all values are null and None.
The third is to use the dict method, which can be divided into four cases:
- Dict() - > create an empty dictionary
- Dict (mapping) - > create a dictionary. During initialization, its key values are from the key and value in mapping.
- Dict (iterable) - > create a dictionary. During initialization, it will traverse iterable to get its key value.
for k, v in iterable:
                d[k] = v
- Dict (* * kwargs) - > * * kwargs is a variable function, and its calling syntax format is dict(key1=value1,key2=value2,...keyn=valuen), for example: dict(name = 'code farmer flying brother', age=17, weight=63)
The three methods of creating dictionaries have been introduced. Let's take a look at the examples below:
#1. Create a dictionary
d = {'name': 'Mainong Feige', 'age': 18, 'height': 185}
print(d)
list = ['name', 'age', 'height']
# 2. fromkeys method
dict_demo = dict.fromkeys(list)
dict_demo1 = dict.fromkeys(list, 'test')
print(dict_demo)
print(dict_demo1)
# Create a dictionary through dict() mapping and pass in a list or tuple
demo = [('name', 'Mainong Feige'), ('age', 19)]
dict_demo2 = dict(demo)
print(dict_demo2)
dict_demo21 = dict(name='Mainong Feige', age=17, weight=63)
print(dict_demo21)
The operation result is:
{'name': 'Mainong Feige', 'age': 18, 'height': 185}
{'name': None, 'age': None, 'height': None}
{'name': 'test', 'age': 'test', 'height': 'test'}
{'name': 'Mainong Feige', 'age': 19}
{'name': 'Mainong Feige', 'age': 17, 'weight': 63}
9.2. Access to dictionaries
After the creation of the dictionary, let's take a look at the access of the dictionary. Dictionaries are different from lists and tuples. The elements in the dictionary are not stored in the memory area in turn; Therefore, the elements in the dictionary cannot be accessed through the index, but can only find the corresponding value through the key, There are two different ways to write it.
- The syntax format of the first method is dictname[key], where dictname represents the name of the dictionary and key represents the specified key. If the specified key does not exist, a KeyError error will be reported.
- The syntax format of the second method is dictname.get(key), where dictname represents the name of the dictionary and key represents the specified key. If the specified key does not exist, it returns None.
Take chestnuts as an example. The following code means to find the corresponding value according to the key name name.
dict_demo5 = {'name': 'Mainong Feige', 'age': 18, 'height': 185}
print(dict_demo5['name'])
print(dict_demo5.get('name'))
print('Returns a result if the key does not exist=',dict_demo5.get('test'))
The operation result is:
Mainong Feige
 Mainong Feige
 Returns a result if the key does not exist= None
9.3. Adding and modifying key value pairs
The method of adding key value pairs is very simple. Its syntax structure is dictname[key]=value. If the key does not exist in the dictionary, a key value pair will be added. If the key exists in the dictionary, the value corresponding to the original key will be updated. Still for example: the result of the code in this example is to increase the key value pair sex = 'male', and change the value corresponding to the key height to 190.
# Add key value pair
dict_demo6 = {'name': 'Mainong Feige', 'age': 18, 'height': 185}
dict_demo6['sex'] = 'male'
print('Results of adding key value pairs={0}'.format(dict_demo6))
# Modify key value pair
dict_demo6['height'] = 190
print('Modify the result of key value pair={0}'.format(dict_demo6))
The operation result is:
Results of adding key value pairs={'age': 18, 'name': 'Mainong Feige', 'height': 185, 'sex': 'male'}
Modify the result of key value pair={'age': 18, 'name': 'Mainong Feige', 'height': 190, 'sex': 'male'}
Of course, modifying and deleting key value pairs can also be realized through the update method. Its specific syntax format is dictname.update(dict), where dictname is the name of the dictionary and dict is the value of the dictionary to be modified. This method can add or modify key value pairs. This method has no return value, that is, it modifies the element on the original dictionary. In the following example, the value of the key name is changed to Feifei 1024, and the value corresponding to the key age is changed to 25. And added the key value pair like = learning.
# update method
dict_demo7 = {'name': 'Mainong Feige', 'age': 18, 'height': 185, 'width': 100}
dict_demo7.update({'name': 'Feifei 1024', 'age': 25, 'like': 'study'})
print('update Method returns the result={}', dict_demo7)
The operation result is:
update Method returns the result={} {'height': 185, 'like': 'study', 'width': 100, 'name': 'Feifei 1024', 'age': 25}
9.4. Delete key value pairs
There are three ways to delete key value pairs:
- The first is del dictname[key], which uses the Del keyword, where dictname is the name of the dictionary and key is the key to be deleted. If the key does not exist, a KeyError error will be reported.
- The second method is through the pop method, and its syntax structure is dictname.pop(key). This method is used to delete the specified key value pair. There is no return value. If the key does not exist, no error will be reported.
- The third way is through the popitem method, and its syntax structure is: dictname.popitem(). This method is used to delete the last key value pair in the dictionary. For example:
dict_demo10 = {'name': 'Mainong Feige', 'age': 18, 'height': 185, 'width': 100}
# Delete key value pair
del dict_demo6['height']
print('Delete key height Yes, the results after=', dict_demo6)
# pop() method and popitem() method
dict_demo10.pop('width')
print('pop Method call delete key width Subsequent results=', dict_demo10)
dict_demo10 = {'name': 'Mainong Feige', 'age': 18, 'height': 185, 'width': 100}
dict_demo10.popitem()
print('popitem Result after method call=', dict_demo10)
The operation result is:
Delete key height Yes, the results after= {'name': 'Mainong Feige', 'sex': 'male', 'age': 18}
pop Method call delete key width Subsequent results= {'name': 'Mainong Feige', 'height': 185, 'age': 18}
popitem Result after method call= {'name': 'Mainong Feige', 'age': 18, 'height': 185}
You can see that the key deleted by the popitem method is the last key width.
Details can be viewed [Python from introduction to mastery] (VII) Python Dictionary (dict) enables everyone to find their other half (key value pairs, pairs)
10. Derivation & generator
10.1.range fast generation list derivation
The syntax format of list derivation is
[expression for Iterative variable in Iteratable object [if Conditional expression] ]
In this format, [if conditional expression] is not required and can be used or omitted. The following is an example of the product of the output list of 1 ~ 10:
L = [x * x for x in range(1, 11)]
print(L)
This expression is equivalent to
L = []
for x in range(1, 11):
    L.append(x * x)
print(L)
The operation result is:
[1, 4, 9, 16, 25, 36, 49, 64, 81, 100]
Let's make it a little more complicated. Here's the output
print([x for x in range(1, 11) if x % 2 == 0])
The operation result is [2, 4, 6, 8, 10]
More complex, use multiple loops to generate a derivation.
d_list = [(x, y) for x in range(5) for y in range(4)]
print(d_list)
The operation result is:
[(0, 0), (0, 1), (0, 2), (0, 3), (1, 0), (1, 1), (1, 2), (1, 3), (2, 0), (2, 1), (2, 2), (2, 3), (3, 0), (3, 1), (3, 2), (3, 3), (4, 0), (4, 1), (4, 2), (4, 3)]
In the above code, X is the iteration variable (counter) traversing range(5), so x can iterate 5 times, and Y is the counter traversing range(4), so y can iterate 4 times. Therefore, the (x,y) expression is iterated a total of 20 times. It is equivalent to the following nested expression.
dd_list = []
for x in range(5):
    for y in range(4):
        dd_list.append((x, y))
print(dd_list)
10.2.range fast generation tuple derivation
Tuple derivation is similar to list derivation. Its syntax structure is:
(expression for Iterative variable in Iteratable object [if Conditional expression] )
In this format, [if conditional expression] is not required and can be used or omitted. The following is an example of outputting the product of tuples of 1 ~ 10:
d_tuple = (x * x for x in range(1, 11))
print(d_tuple)
The operation result is:
<generator object <genexpr> at 0x103322e08>
As can be seen from the above execution results, the result generated by using tuple derivation is not a tuple, but a generator object.
Using the tuple() function, you can directly convert the generator object to tuples. For example:
d_tuple = (x * x for x in range(1, 11))
print(tuple(d_tuple))
The output results are (1, 4, 9, 16, 25, 36, 49, 64, 81, 100)
10.4. Dictionary derivation
The grammatical structure of dictionary derivation is:
{expression for Iterative variable in Iteratable object [if Conditional expression]}
Where [if conditional expression] can be used or omitted. for instance:
key_list = ['full name:Mainong Feige', 'Age:18', 'hobby:Blog']
test_dict = {key.split(':')[0]: key.split(':')[1] for key in key_list}
print(test_dict)
The operation result is:
{'hobby': 'Blog', 'Age': '18', 'full name': 'Mainong Feige'}
10.5. Another method of generator yield
You can make a generator by using the yield keyword with a loop, as shown below
def generate():
    a = 2
    while True:
        a += 1
        yield a

b = generate()
print(b)
print(next(b))
print(next(b))
print(next(b))
Operation results
<generator object generate at 0x7fc01af19b30>
3
4
5
Here, the generate method returns a generator object generator, because it uses the yield keyword internally,
Calling the next() method once returns the result in a generator. This is much like the lazy mode in the singleton mode. It does not generate the list data in advance like the hungry mode.
11. Judgment and circulation
11.1. Process control
There are three structures of process control, one is sequential structure, one is selection (Branch) structure and the other is circular structure.
Sequential structure: let the program execute the code from beginning to end without repeating any line of code or skipping any line of code. That's what step by step means.
Select (Branch) structure: let the program execute different codes according to different conditions. For example, judge whether a person is an adult according to age.
Loop structure: it is to let the program execute a piece of code in a loop. The sequential process is not introduced here.
11.2. Select structure (if,else):
if statement
Using only if statements is the simplest form in Python. If the condition is met, the expression is executed. The execution of the expression is skipped. The pseudo code is:
if Condition is true:
   Code block
If the condition after if is true, the code block is executed. Otherwise, code execution is skipped.
The flow chart is:
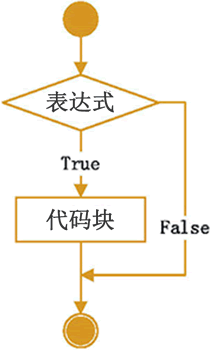
That is, if only if is used, the code block will be executed if the expression is true, and it will end if it is not true.
The following is a simple example. If the condition of a==1 is met, print a, otherwise skip the statement.
a = 1
if a == 1:
    print(a)
if else statement
if else statement is a variant of if. If the conditions are met, code block 1 will be executed; otherwise, code block 2 will be executed. The pseudo code is:
if Condition is true:
   Code block 1
else
   Code block 2
The flow chart is:
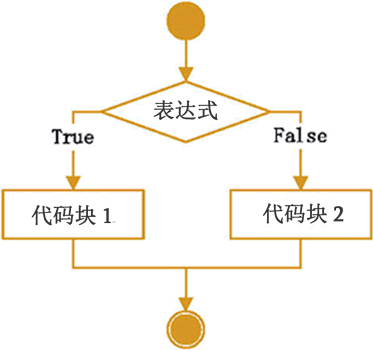
If both if and else are used, one code block will be executed if the expression is valid, and another code block will be executed if the expression is not valid.
Take a simple example.
age = 3
if age >= 18:
    print('your age is', age)
    print('adult')
else:
    print("your age is", age)
    print('kid')
Judge whether someone is an adult according to the entered age. If age is greater than or equal to 18 years old, adult is output; otherwise, kid is output.
if elif else statement
The if elif else statement is aimed at the judgment of multiple conditions. If the if conditions are not met, the elif conditions will be executed. If the elif conditions are not met, the expressions in else will be executed. The pseudo code is:
if Condition is true:
   expression a
elif Condition is true:
   expression b
....
elif Condition is true:
   Expression is n-1
else
   expression n
There can be more than one elif, but elif cannot be used alone. It must be used together with if and else.
It should be noted that the code blocks behind if,elif and else must be indented, and the indent amount must be greater than if,elif and else itself. The recommended indent amount is 4 spaces. All statements in the same code should have the same indentation. Still an example:
bmi = 80.5 / (1.75 * 1.75)
if bmi < 18.5:
    print('Too light')
elif 18.5 <= bmi < 25:
    print('normal')
elif 25 <= bmi < 28:
    print('overweight')
elif 28 <= bmi < 32:
    print('Obesity')
else:
    print('Severe obesity')
pass
The following is to judge whether a person is too light, normal or obese according to bmi standards. pass is a keyword in Python that allows the interpreter to skip here and do nothing.
11.3. Detailed explanation of while loop statement
while is a keyword used as a loop. The pseudo code is:
while Conditional expression:
    Code block
It must be ensured that the cycle condition becomes false, otherwise the cycle will become an dead cycle, that is, the cycle cannot end. The flow chart is:
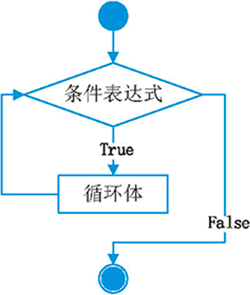
If the expression in while is true, the loop body will be executed; otherwise, it will end directly.
Take chestnuts for example: calculate the sum from 1 to 100, which is a classic scenario using loops
sum = 0
n = 1
while n <= 100:
    sum = sum + n
    n = n + 1
print('sum=', sum)
The running result is sum= 5050. The end condition of this cycle is n > 100, that is, when n > 100, it will jump out of the cycle.
11.4.for loop
The for keyword is used when introducing the range function. Here is an introduction to the use of the for keyword. Its syntax structure is:
for Iterative variable in character string|list|tuple|Dictionaries|Set:
    Code block
Strings, lists, Yuanzu, dictionaries, collections can also be iterated with for. The flow chart is:
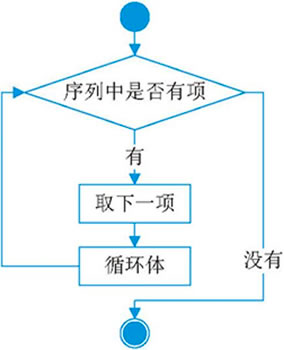
The for loop is to first judge whether there is an item in the sequence according to the in keyword, if so, take down an item, and then execute the loop body. If not, end the loop directly.
Details can be viewed [Python from introduction to mastery] (x) how to use the keyword of Python process control? List derivation, generator [collect, often read, often new]
12. Function
12.1. Function definition
Functions are reusable code segments that are packaged and organized in a fixed format. It can improve the modularity of application and the reuse rate of code.
The syntax format of the function definition is:
def  Function name (parameter list):
	 Code block
	[return [Return value]]
Function name: in fact, it is an identifier conforming to Python syntax. The function name should better reflect the function of the function, such as save_user.
Formal parameter list: sets how many parameters the function can receive. Multiple parameters are separated by commas (,). It should be noted that if there are no parameters, a pair of empty ()
[return]]: as an optional parameter of the function, the whole is used to set the return value of the function. That is, a function,
You can have a return value or no return value.
12.2 function call
The syntax format of the calling function is:
[Return value]=Function name([Formal parameter value])
The function name refers to the name of the function to be called, and the formal parameter value refers to the value of each formal parameter required to be passed in when creating the function.
If the function has a return value, we can receive the value through a variable or not. It should be noted that the number of formal parameters of a function depends on the number of values to be passed in when calling,
And the order must be the same as when creating the function. Even if the function has no parameters, the parentheses after the function name cannot be omitted.
Take chestnuts for example:
def my_abs(x):
    """
    Return absolute value
    :param x:
    :return:
    """
    if not isinstance(x, (int, float)):
        raise TypeError('The data type passed in is incorrect')
    if x >= 0:
        return x
    else:
        return -x
The calling code is:
    x = my_abs(-3)
    print(x)
    print(my_abs.__doc__)
The operation result is:
3

    Return absolute value
    :param x:
    :return:
This is a function to get the absolute value, and its function name is my_abs, you can roughly understand the function through the function name. The formal parameter is x. Pass__ doc__ You can view the documentation of the function. The return value is the processed value.
12.3 function value transfer and reference transfer (Introduction to formal parameters and arguments)
Before introducing function value passing and reference passing, you need to understand two concepts.
- Formal parameters (formal parameters for short): when defining a function, the parameters in parentheses after the function name are formal parameters, which can be imagined as roles in the script.
- Actual parameters (hereinafter referred to as actual parameters): when calling a function, the parameters in parentheses after the function name are called actual parameters, that is, the parameters given to the function by the caller of the function. The actual parameters can be imagined as actors playing roles.
There are two transfer methods of function parameters: value transfer and reference transfer: - Value Passing: applicable to immutable argument types (string, number, tuple)
- Reference (address) passing: applicable to variable type (list, dictionary) with argument type
The difference between value passing and reference passing is that if the formal parameter changes during value passing of function parameters, the value of the actual parameter will not be affected. If the application passes, changing the value of the formal parameter will change the value of the argument. Still an example:
Function param_test will change the formal parameter obj to obj+obj. In case of value passing, the function param is called_ After test, the value of the argument remains unchanged. If it is passed by reference, param is called_ After test, the value of the argument will also become obj+obj.
def param_test(obj):
    obj += obj
    print('The formal parameter value is:', obj)


print('*******pass by value*****')
a = 'Mainong Feige'
print('a The value of is:', a)
param_test(a)
print('The value of the argument is:', a)

print("*******Reference passing*****")
b = [1, 2, 3]
print('b The value of is:', b)
param_test(b)
print('The value of the argument is:', b)
The operation result is:
*******pass by value*****
a The value of is: Code Nong Feige
 The formal parameter value is: Manon Feige Manon Feige
 The value of the argument is: Mainong Feige
*******Reference passing*****
b The value of is: [1, 2, 3]
The formal parameter value is: [1, 2, 3, 1, 2, 3]
The value of the argument is: [1, 2, 3, 1, 2, 3]
12.4. Python position parameters
Positional parameters, sometimes referred to as mandatory parameters, mean that arguments must be passed to the function in the correct order. In other words, the number and position of arguments passed in when calling the function must be consistent with that when defining the function. If it is inconsistent, the Python interpreter will report a TypeError exception when the program is running. As an example, the following shows that the number of event parameters passed in by the calling function is incorrect.
def girth(width , height):
    return 2 * width+height
#When calling a function, you must pass 2 parameters, otherwise an error will be raised
print(girth(3))
A Traceback error is reported directly after running.
Traceback (most recent call last):
  File "/Volumes/Develop/Python_learn/PycharmProjects/python_demo_1/demo/function/locate_fun.py", line 6, in <module>
    print(girth(3))
TypeError: girth() missing 1 required positional argument: 'height'
If the position of the passed in parameter is incorrect, in this example, the value of name to be passed in is code Nong Feige, and the value of age is 18. Incorrect input sequence of results leads to incorrect results.
def print_info(name, age):
    print('full name=' + name + " Age=" + str(age))

print_info(18,'Mainong Feige')
So how to deal with this situation? There are two ways:
- Enter parameters in strict accordance with the number and position of formal parameters.
- Enter parameters according to keyword parameters. The so-called keyword parameters refer to using the name of the formal parameter to determine the input parameter value. When formulating function arguments in this way, it is no longer necessary to be completely consistent with the position of formal parameters, as long as the parameter name is written correctly. Take the above function as an example:
If you call a function using keyword parameters, it is written as follows:
def print_info(name, age):
    print('full name=' + name + " Age=" + str(age))
print_info(age=18,name='Mainong Feige')
The operation result is:
full name=Manon Feige's age=18
It can be seen that when keyword parameters are entered into parameters, it is not necessary to ensure that the order of entering parameters is consistent with that of formal parameters.

12.5. Default parameter setting
The positional parameter described earlier means that it must be passed in when calling a function. But in some scenarios, we don't want to pass in all the parameters. In this case, you can use the default parameters. However, it should be noted that formal parameters with default values must be at the end of all parameters without default values, otherwise syntax errors will occur. Its syntax format is:
def Function name(...,Parameter name=Default value):
    Code block
The following is an example. The function records the information of students. There are two parameters with default values, age and city. They are placed at the end of the function's formal parameter list.
def enroll(name, gender, age=6, city='Beijing'):
    print('name:', name)
    print("gender:", gender)
    print("age:", age)
    print("city:", city)

print(enroll('Zhang San', 'first grade'))
print('************************** ')
print(enroll('Li Si', 'second grade', 7))
The operation result is:
name: Zhang San
gender: first grade
age: 6
city: Beijing
None
**************************
name: Li Si
gender: second grade
age: 7
city: Beijing
None
As can be seen from the above code: 1. You don't need to pass in parameters with default values. 2. If the default parameter is passed in, the default value will be overwritten.
12.5. Variable parameters
Python function variable parameters (* args,**kwargs), also known as variable length parameters, that is, the actual parameters in the incoming function can be any number. Python definition can change parameters, mainly in the following two forms:
- Add a * before the formal parameter in the format of * args. Means to create an empty tuple named args, which can accept any number of non keyword arguments passed in from the outside. Ordinary parameters must be passed values in the form of non keyword parameters, otherwise the Python interpreter will give priority to all parameters to variable parameters.
- **Kwargs means to create an empty dictionary named kwargs, which can accept any number of arguments assigned with keyword parameters. For example 🌰, The following is the sum based on the passed in value.
def calc(*numbers):
    sum = 0
    for n in numbers:
        sum = sum + n
    return sum

print(calc(10, 9))
The result of the operation is: 19.
Another example:
def record(str, **kwargs):
    print('str=', str)
    print('kwargs=', kwargs)


record('test', name='Mainong Feige', age=20)
record('Test 2')
The operation result is:
str= test
kwargs= {'age': 20, 'name': 'Mainong Feige'}
str= Test 2
kwargs= {}
As can be seen from the above code, variable parameters can not be passed in. If they are not passed in, an empty tuple or empty dictionary will be created.
12.6. Reverse parameter collection
Python not only has variable parameters and packs multiple parameters into a tuple or dictionary, but also supports reverse parameter collection, that is, lists, tuples and dictionaries are directly used as function parameters. However, when calling a function, you should put an * sign on the actual participation. As follows:
def param_test(name, age):
    print('name=', name)
    print('age=', age)

data = ['Mainong Feige', 18]
param_test(*data)
The operation result is:
name= Mainong Feige
age= 18
12.7. return function return value
A function can have a return value or no return value. The syntax structure of a return value is:
return [Return value]
The return value can be specified or omitted. If it is not written, it defaults to None, which is a null value.
12.8. Method for Python function to return multiple values
Usually, a function has only one return value, and so does Python,
However, Python functions can save multiple values to be returned to the sequence by returning lists or tuples, so as to indirectly realize the purpose of returning multiple values.
- In a function, multiple values to be returned are stored in a list or tuple in advance, and then the function returns the list or tuple
- Function directly returns multiple values separated by commas (,), Python will automatically encapsulate multiple values into a tuple, and its return value is still a tuple. The following is an example:
def multi_return():
    return_tuple = ('Zhang San', 12)
    return return_tuple


def multi_return2():
    return 'Zhang San', 12


print(multi_return())

result = multi_return2()
print('multi_return2 The return value is=,Type is=', result, type(result))
The result is
('Zhang San', 12)
multi_return2 The return value is=,Type is= ('Zhang San', 12) <class 'tuple'>
12.9 Python function parameter passing mechanism
There are two kinds of Python function parameter passing mechanisms: Value Passing and reference passing. So what's the difference between the two methods? What is the specific parameter transfer mechanism? This chapter will answer these two questions in the future. First, let's look at value passing. The following code defines a swap function with two input parameters a and b. The job of this function is to exchange the values of parameters a and b.
def swap(a, b):
    a, b = b, a
    print("Formal parameter a=", a, 'b=', b)
    return a, b

a, b = 'Mainong Feige', 'come on.'
print("Of arguments before calling a function a=", a, 'b=', b)
swap(a, b)
print("Argument after function call a=", a, 'b=', b)
The operation result is:
Of arguments before calling a function a= Mainong Feige b= come on.
Formal parameter a= come on. b= Mainong Feige
 Argument after function call a= Mainong Feige b= come on.
It can be seen that the formal parameters were successfully changed, but did not affect the arguments. Why on earth is this? This is actually because the values of formal parameters a and b in the swap function are copies of the values of actual parameters a and b respectively, that is, after calling swap, python will copy a formal parameter of input parameters a and b to the swap function respectively. Of course, the change to the copy does not affect the original value. The description of language is empty. Draw a diagram to illustrate: in Python, a method corresponds to a stack frame, and the stack is a last in first out structure. The above process can be represented by the following call graph:
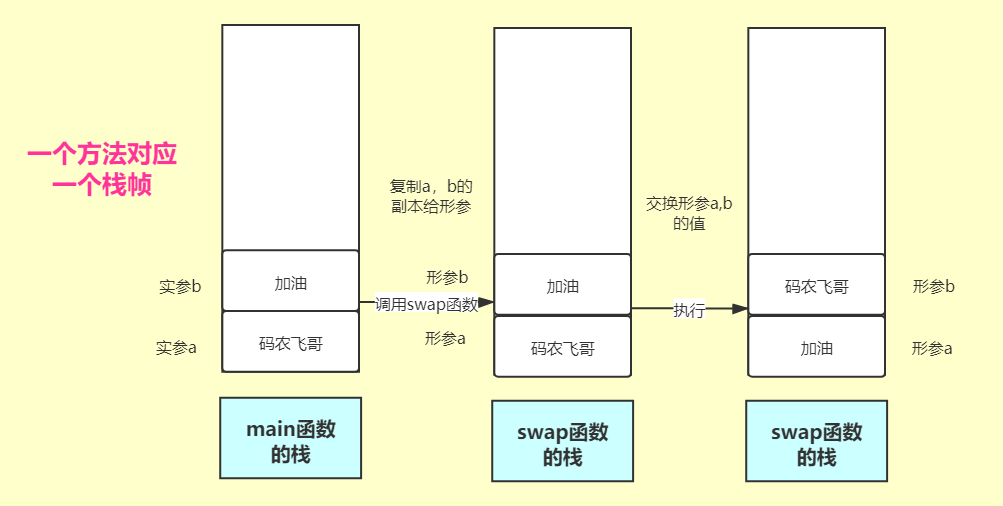
It can be seen that when executing a,b = 'code Nong Feige', and the 'refueling' code, Python will initialize the values of a and b in the main function stack. When the swap function is called, copy the values of a and b in the main function to the swap function stack. When the swap function exchanges the values of a and b, it only affects the copies of a and b, but has no effect on a and b itself.
However, for the data types of list and dictionary, since the data is stored in the heap and only references are stored in the stack, the actual participation will change when modifying the formal parameter data.. The following code demonstrates:
def swap(dw):
    # The following code implements the value exchange of a and b elements of dw
    dw['a'], dw['b'] = dw['b'], dw['a']
    print("swap In the function, a =", dw['a'], " b =", dw['b'])


dw = {'a': 'Mainong Feige', 'b': 'come on.'}
print("External before calling function dw In the dictionary, a =", dw['a'], " b =", dw['b'])
swap(dw)
print("External after function call dw In the dictionary, a =", dw['a'], " b =", dw['b'])
The operation result is:
External before calling function dw In the dictionary, a = Mainong Feige  b = come on.
swap In the function, a = come on.  b = Mainong Feige
 External after function call dw In the dictionary, a = come on.  b = Mainong Feige
It can be clearly seen that the value of the argument dw passed in after calling the function has indeed changed. This shows that it is passed by reference. What is the difference between reference passing and value passing?
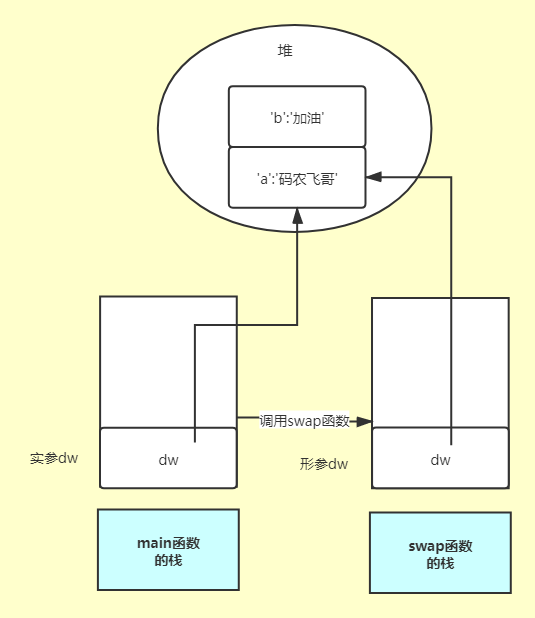
As can be seen from the above figure, the data of the dictionary is stored in the heap. In the stack of the main function, the reference points to the memory area stored in the dictionary. When the swap function is called, python will copy the reference of dw to the formal parameter. Of course, the copied reference points to the memory area stored in the same dictionary. When a dictionary is manipulated through a copy reference, the data of the dictionary certainly changes. To sum up: reference passing is essentially value passing, but this value refers to the reference pointer itself, not the value pointed to by the reference. To verify this conclusion, we can slightly modify the above code:
def swap(dw):
    # The following code implements the value exchange of a and b elements of dw
    dw['a'], dw['b'] = dw['b'], dw['a']
    print("swap In the function, a =", dw['a'], " b =", dw['b'])
    dw = None
    print("Delete the reference of formal parameter to dictionary",dw)

dw = {'a': 'Mainong Feige', 'b': 'come on.'}
print("External before calling function dw In the dictionary, a =", dw['a'], " b =", dw['b'])
swap(dw)
print("External after function call dw In the dictionary, a =", dw['a'], " b =", dw['b'])
The result of the run is:
External before calling function dw In the dictionary, a = Mainong Feige  b = come on.
swap In the function, a = come on.  b = Mainong Feige
 Delete the reference of formal parameter to dictionary
 External after function call dw In the dictionary, a = come on.  b = Mainong Feige
After deleting the reference of the formal parameter to the dictionary, the argument can still get the value of the dictionary. This fully shows that what is passed to the formal parameter is a copy of the reference of the argument.
Details can be viewed: [from introduction to mastery of Python] (XI) all aspects of Python functions [collect it to ensure its usefulness!!!]
[from introduction to mastery of Python] (XII) advanced knowledge points of Python functions, more in-depth absorption of knowledge, not making toothpicks for knowledge (not just a taste) [collection is guaranteed to be useful!!!]
13. Object oriented development
13.1. Object oriented concept
The idea of Object-oriented Programming (OOP) is essentially an idea of abstract encapsulation of things.
Encapsulation is to hide the specific details, just as users can realize some functions by simply operating the keyboard and mouse. Without knowing how it is implemented inside the computer.
The object-oriented encapsulation in Python language encapsulates the data (attributes) describing characteristics and the behavior (Methods).
For example, if we want to describe a person now, we will first describe it from two aspects:
- Describe from surface features: for example: skin color, height, weight, age
- From the Behavior Description: for example: can eat, can walk, can speak.
If implemented by code, its surface features can be expressed by variables, and its behavior can be expressed by various methods.
class Person:
    # skin colour
    colour = 'yellow'
    # height
    height = '180cm'
    # weight
    weight = '60KG'
    # Age
    age = 18

    def eat(self):
        print('having dinner')

    def walk(self):
        print('walk')

    def speak(self):
        print('speak')

zhangsan=Person()
lisi=Person()
wanger=Person()
By building a Person class, you can encapsulate human characteristics and behavior. People have something in common, that is, they can create different objects through this class. Here we have to say several core concepts in object-oriented.
13.2. Type
A class can be understood as a template. Many concrete objects can be created according to this template. You can imagine a class as a template or a drawing.
13.3. Object
Classes cannot be used directly. Only concrete instances (also known as objects) created through classes can be used. This is like the relationship between the drawing of the car and the car itself. In most cases, drawings cannot be used by ordinary people, but a car created from drawings can be used. Just like the Person class above, you can create Zhang San, Li Si and Wang Er Mazi.
zhangsan=Person()
lisi=Person()
wanger=Person()
13.4. Properties
All variables in the class are attributes of the class, such as height, weight and other attributes above.
13.5. Method
All functions in a class are called methods, but unlike functions, class methods must contain at least one self parameter (described in detail later). Like the eat method and walk method of the Person class above. In addition, the methods in the class cannot be used alone and must be called through the object created by the class.
13.5. Definition of class
The definition of a class must be modified by the class keyword. It is recommended that the first letter of each word be uppercase and the other letters be lowercase.
class Class name:
      Multiple(>=0)Class properties
	  Multiple(>=0)Class method
Just like the Person class above, it has several attributes such as height and weight, as well as multiple methods such as eat and walk.
13.6. Construction method
However, there is a hidden method, that is, the class constructor__ init__ (). This method is a special class instance method. Python uses this method to create an instance of a class. The method name of this method is fixed, with 2 underscores at the beginning and end, and no spaces in the middle.
After creating the class, Python creates a default constructor__ init__ (). If not added manually__ init__ () method, the default constructor method is used to create an instance of the class (that is, an object)__ init__ The syntax structure of () method is:
def __init__(self,...):
     Code block
__ init__ () method can have multiple parameters, but it must contain a parameter named self, and the parameter of self must be the first parameter. If there are no other parameters, it is the default construction method. Take the Person class above as an example, you can manually add a Person with other parameters__ init__ () method.
    def __init__(self, head):
        self.hand = head
If you manually add other__ init__ () method, the default construction method will be overwritten. When you create an object, it will use the information you added manually__ init__ () method.
13.7. Creation and use of class objects
The process of creating a class object is called class instantiation. Its syntax structure is the class name (parameter). When the default constructor is used or added__ init__ If there is only one self parameter in the () method, the parameter may not be written when creating a class object.
But if__ init__ () if there are other parameters in the method besides the self parameter, the parameter must be passed. Otherwise, an error similar to the following will be reported.
Traceback (most recent call last):
  File "/Python_learn/PycharmProjects/python_demo_1/demo/oop/person.py", line 15, in <module>
    person = Person()
TypeError: __init__() missing 1 required positional argument: 'head'
Here, you must pass in the head parameter.
person = Person('head')
person.eat()
13.8. Detailed explanation of self parameter
We mentioned the self parameter many times in the previous chapters, so what is the function of this parameter? We know that a class is a template through which many objects can be created. So how to distinguish these objects? Just as everyone has his own name, the instantiated object also has its own code (its own reference) in Python. Python binds the calling object itself through the self parameter. To put it bluntly, you can know who called the current method through the self parameter. A professional explanation is that when an object calls a class method, the method will automatically pass its own reference to the method as the first parameter.
class Person:
    def __init__(self):
        print('Executing construction method')

    def eat(self):
        print(self, 'I am eating')

zhangsan = Person()
zhangsan.eat()
lisi = Person()
lisi.eat()
The operation result is:
Executing construction method
<__main__.Person object at 0x1031cd0f0> I am eating
 Executing construction method
<__main__.Person object at 0x103338da0> I am eating
Two objects, zhangsan and lisi, are instantiated here. When they call the eat method at the same time, Python will bind its own reference to the self parameter. It can be clearly seen that different callers have different self parameters. The self parameter here is equivalent to the this parameter in Java.
13.9. Variables of class
There are three kinds of class variables: class variables, instance variables and local variables. Let's take an example! The following code defines a Person class, which defines three variables and two methods.
class Person:
    name = 'Zhang San'

    def __init__(self):
        self.age = 18

    def get_info(self):
        sex = 'male'
        print('local variable sex=', sex)
        return sex

print('Class properties name=', Person.name)
person = Person()
print('Instance properties age=', person.age)
person.get_info()
The operation result is:
Class properties name= Zhang San
 Instance properties age= 18
 local variable sex= male
Here, name, age and sex are three different variables respectively. Let's introduce them respectively
It is defined in the class body, except all functions; The variables defined in this range are called class variables, just like the name variable in the code above. Class variables belong to the entire class. You can get it directly through class name and variable name, just like Person.name above. In actual development, class variables are rarely used.
Variables defined in the class body, inside the function and defined with the name of self. Variable are called instance variables. Just like the age variable in the code above. Instance variables only act on the object calling the method, and can only be accessed through the object name, not through the class name. The calling method is like person.age in the above example.
Defined in the class body, the variables inside the function defined in the way of "variable name = variable value" are called local variables. Like the sex variable in the above code, local variables can only be used inside functions.
For details, please refer to:
[Python from introduction to mastery] (XIII) how can Python develop without objects?
[Python from introduction to mastery] (XIV) Python object-oriented development 2, encapsulation, multi inheritance and polymorphism. Do you understand
14. Abnormal mechanism
14.1. Inheritance relationship between exception classes
There are many types and numbers of exception classes. However, these exception classes are not independent of each other. Their inheritance relationship is shown in the following figure:
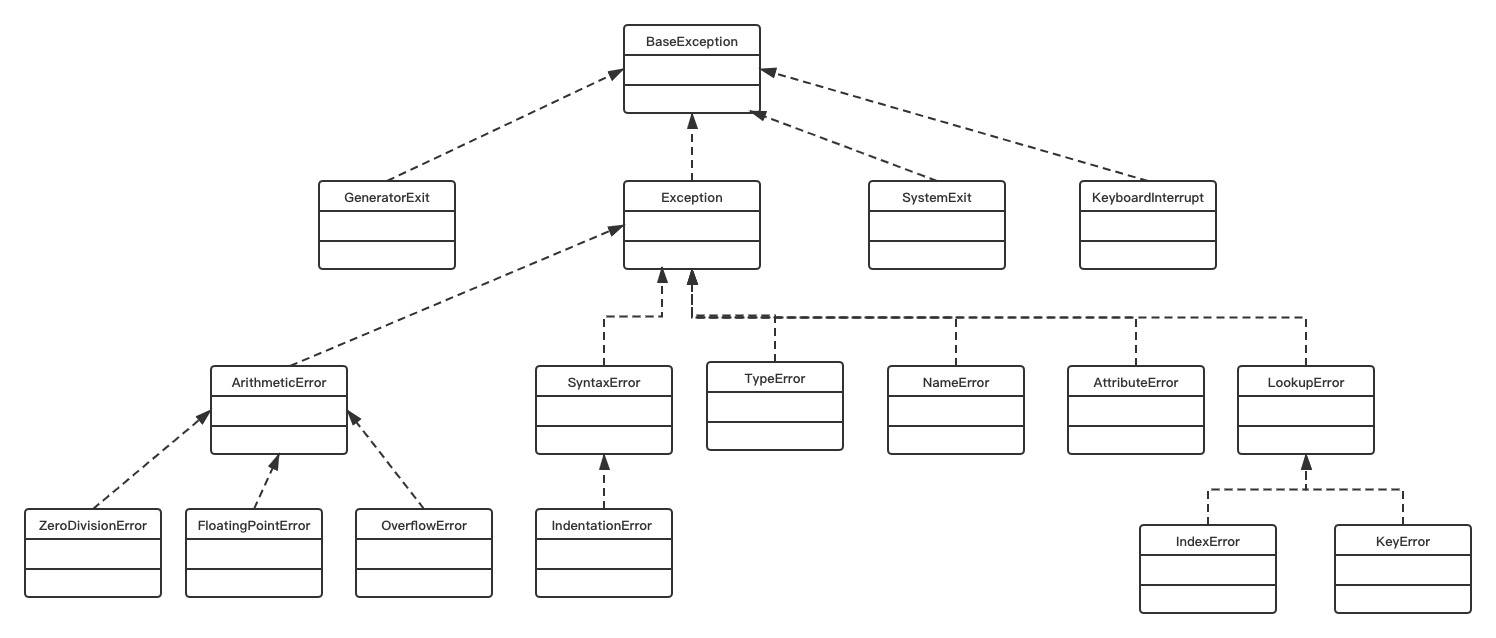
All Exception classes inherit from the base class BaseException class. The parent class of this base class BaseException class is the object class. The base class BaseException class has four subclasses. They are GeneratorExit class, Exception class, SystemExit class and KeyboardInterrupt class. The Exception class is the Exception class most often encountered in actual development. Various exceptions that may appear in the program are inherited from Exception. It and its subclasses constitute the basis of Python Exception class structure. The other three Exception classes are rare.
Exception class also has three subclasses. ArithmeticError class is used to handle numeric exceptions and BufferError class is used to handle character exceptions. LookupError is used to record keyword exceptions,
- Syntax error is a syntax error. To put it bluntly, the code written does not conform to the syntax format
- Indentation error: indentation error. Python determines the scope of code based on indentation.
- TypeError: type error. This error will be reported if the data type is used incorrectly.
- NameError: the variable name is wrong. If you forget to define the variable, this error will be reported
- AttributeError: attribute error. Attribute error will be caused by invalid attribute reference and assignment
- IndexError: index error, the index used does not exist, or the index is out of range of the sequence.
- KeyError: keyword error, which is caused when a keyword (key) that does not exist in the mapping is used.
14.2. Use of exception mechanism
After introducing the inheritance relationship of various exception classes, we will then introduce the use of exception classes. The function of exception class is to catch all kinds of exceptions when the program is running. If you don't catch exceptions manually, the Python program will throw an exception and stop the program after encountering an exception. The syntax structure for catching exceptions is as follows:
try:
    Code blocks that may cause exceptions
except [ (Error1, Error2, ... ) [as e] ]:
    Code block 1 for handling exceptions
except [ (Error3, Error4, ... ) [as e] ]:
    Code block 2 for handling exceptions
except  [Exception]:
    Handle other exceptions
The parts enclosed by brackets [] can be used or omitted. Of which:
- (Error1, Error2,...), (Error3, Error4,...): Error1, Error2, Error3 and Error4 are specific exception types. Obviously, an exception block can handle multiple exceptions at the same time.
- [as e]: as an optional parameter, it represents an alias e for the exception type. The advantage of this is that it is convenient to call the exception type in the except block.
Its execution process is:
- First, execute the code block in the try. If an exception occurs during execution, the system will automatically generate an exception type and submit the exception to the Python interpreter. This process is called catching an exception.
- When the Python interpreter receives an exception object, it will look for an exception block that can handle the object. If an appropriate exception block is found, it will hand the exception to the exception block for processing. This process is called exception handling. If the Python interpreter cannot find the exception block to handle the exception, the program will terminate and the Python interpreter will exit.
Let's take a simple example:
try:
    print('try....')
    r = 10 / 0
    print('result', r)
except ZeroDivisionError as e:
    print('ZeroDivisionError', e)
except Exception as e:
    print('Exception', e)
print('END')
The operation result is:
try....
ZeroDivisionError division by zero
END
It can be seen that when the ZeroDivisionError Exception can match the Exception automatically generated by the Python interpreter, the program will enter the Exception block. It should be noted here that if the Exception block of Exception is written in front of the Exception block of ZeroDivisionError, the running result will become the following result. that is because
ZeroDivisionError is a subclass of the Exception class.
try....
Exception division by zero
END
14.3. Obtaining specific exception information
Each exception type provides the following properties and methods. You can get the relevant information of the current exception type by calling them.
- args: returns the error number and description symbol of the exception
- str(e): returns exception information, but does not include the type of exception information.
- repr(e): returns complete exception information, including the type of exception information.
try:
    print('try....')
    r = 10 / 0
    print('result', r)
except ZeroDivisionError as e:
    print('', e.args)
    print('', str(e))
    print('', repr(e))
The operation result is:
try....
 ('division by zero',)
 division by zero
 ZeroDivisionError('division by zero')
14.4. finally
Finally, no matter whether the try block has an exception or not, it will eventually enter the finally statement and execute the code block. In the actual development, the work of resource recovery can be put into the finally block. This can ensure that resources can be recycled normally when unpredictable exceptions occur. Resources here refer to database connection, file stream closure, etc.
Take the above code as an example:
try:
    print('try....')
    r = 10 / 0
    print('result', r)
except Exception as e:
    print('Exception', e)
except ZeroDivisionError as e:
    print('ZeroDivisionError', e)
finally:
    print('When an exception occurs finally Statement block execution...')
print('END')


try:
    print('try....')
    r = 10 / 1
    print('result', r)
except Exception as e:
    print('Exception', e)
except ZeroDivisionError as e:
    print('ZeroDivisionError', e)
finally:
    print('When no exception occurs finally Statement block execution...')
print('END')
The operation result is:
try....
Exception division by zero
 When an exception occurs finally Statement block execution...
END
try....
result 10.0
 When no exception occurs finally Statement block execution...
END
As you can see, the code in the finally block will execute regardless of whether an exception occurs in the try. Of course, the finally block only needs to be used with the try block.
14.5. raise usage
Sometimes we customize a business exception class and throw the exception to its caller when the exception is triggered. Or when we catch an unknown exception, we need to encapsulate the exception and throw it to its caller. At this time, you can use the raise keyword. Its syntax structure is:
raise [exceptionName [(reason)]]
There are three uses:
- Raise: a separate raise. This statement raises an exception caught in the current context (such as in the except block) or raises a RuntimeError exception by default.
- Raise exception Name: raise is followed by an exception class name, indicating that an exception of execution type is thrown.
- raise exception class name (description): when an exception of the specified type is thrown, the description of the exception is attached.
try:
    a = input("Enter a number:")
    # Judge whether the user input is a number
    if (not a.isdigit()):
        raise ValueError("a Must be a number")
except ValueError as e:
    print("Exception thrown:", repr(e))
When a letter or Chinese character is input, a ValueError exception will be thrown.
Of course, you can also use raise in except to re throw the exception.
For details, please refer to:
[Python from getting started to mastering] (XV) Python exception mechanism, add safe TAO to the code, and don't let go of an exception
[Python from introduction to mastery] (XVI) Python exception mechanism 2. What is the posture for correctly using Python exception mechanism
15. Modules and packages
15.1. Module introduction
What is a module? Simply understand: a module is a template file with the suffix. Py. Modules are mainly used to encapsulate functions and variables. We can encapsulate all functions that implement a function in the same. Py file to provide it to other modules as a module. For example, the module time of the operation date. The corresponding template file is time.py.
15.2. Import module
There are two ways to import modules:
- import module name 1 [as alias 1], module name 2 [as alias 2]
Using the import statement in this format, all members (including variables, functions, classes, etc.) in the specified module will be imported - from module name import member name 1 [as alias 1], member name 2 [as alias 2]
Using the import statement in this format, only the members specified in the module will be imported, not all members.
Import the time module in the first way, and you can use all the functions under the module
import time

# Records the current number of milliseconds
start_time = time.time()
print(start_time)
# Sleep for 4 seconds
time.sleep(4)
# Calculation time
print(time.time() - start_time)
You can see that after importing time, you can use all members in its module
If the sleep function in the time module is imported in the second way, the time function cannot be used.
from time import sleep

print(sleep())
PS: if there are spaces in the module name, you can't use import to import the module. This is because Python uses spaces to isolate different elements in a line of statements. For the import of module names with spaces, you can__ import__ Function to import. For example, there is a template file called hello test.py, which can be__ import__("hello test") is imported in this way.
15.3. User defined module
To put it bluntly, a user-defined module is to create a template file by itself, and then use its file name as the module name to import it into other template files. Define a template file named hello, and then_ Import from the test.py file.
hello.py file
def say():
    print('Forcing programmers to sing hard songs')
say()
print(__name__)
Note that the hello.py file is placed in the root directory of the Python project.
hello_test.py file
import hello
hello.say()
Run hello_ After test, the output result is:
Forcing programmers to sing hard songs
hello
 Forcing programmers to sing hard songs
We saw the output twice, which is obviously not the result we want. What we expect is that the say function is executed only once, that is, in hello_test is executed where called. Instead of doing it again in the hello.py file. So how to deal with this problem?
[Python from getting started to mastering] (XVII) basic use of Python modules and packages, a simple article, read it in one minute
16. Basic operation of documents
16.1. open function
Python is convenient for file operation. There are not as many IO operation classes as Java. First of all, welcome to the open function, which is mainly used to create or open files. Its syntax format is:
file=open(filename, mode='r', buffering=None, encoding=None, errors=None, newline=None, closefd=True)
File: represents the file object to be created.
file_name: the file name of the file to be created or opened. The name should be enclosed in quotation marks. Note that if the file to be opened and the currently executed code file are in the same directory, you can write the file name directly. Otherwise, this parameter needs to specify the full path where the open file is located.
Mode: optional parameter, used to specify the opening mode of the file. The optional opening modes are shown in the table below. If you do not write, the file is opened in read-only (r) mode by default.
Buffering: optional parameter, used to specify whether to use buffer when reading and writing files. If the value of the buffering parameter is 0 (or False), it means that the buffer is not used when opening the specified file; If the buffering parameter value is an integer greater than 1, the integer is used for the size of the buffer (in bytes); If the value of the buffering parameter is negative, the default buffer size is used. By default, the open function opens the buffer.
Encoding: manually set the encoding format used when opening files. The ecoding parameter values of different platforms are also different. Take Windows as an example, its default GBK encoding.
Table 1. File opening modes supported by the open function
| pattern | meaning | matters needing attention |
|---|---|---|
| r | When you open a file in read-only mode, the pointer to read the contents of the file will be placed at the beginning of the file | The file for the operation must exist |
| rb | In binary format, the file is opened in read-only mode. The pointer to read the file content is located at the beginning of the file. It is generally used for non text files, such as picture files and audio files | The file for the operation must exist |
| r+ | After opening the file, you can either read the file content from the beginning or write new content to the file from the beginning. The written new content will overwrite the original content of the medium length of the file | The file for the operation must exist |
| rb+ | Open the file in binary format and in read-write mode. The pointer to the read-write file will be placed at the beginning of the file, usually for non text files (such as audio files) | The file for the operation must exist |
| w | Open the file in write only mode. If the file exists, the original contents of the file will be cleared during clock out | If the file exists, its original contents will be emptied (overwriting the file); Otherwise, a new file is created. |
| wb | Open the file in binary format and write only mode. It is generally used for non text files (such as audio files) | If the file exists, its original contents will be emptied (overwriting the file); Otherwise, a new file is created. |
| w+ | After opening the file, the original content will be emptied and the file has read-write permission | If the file exists, its original contents will be emptied (overwriting the file); Otherwise, a new file is created. |
| wb+ | Open the file in binary format and read-write mode, which is generally used for non text files | |
| a | Open a file in append mode and only have write permission for the file. If the file already exists, the file pointer will be placed at the end of the file (that is, the newly written content will be after the existing content); Otherwise, a new file is created | |
| ab | Open the file in binary format and use the append mode. You only have write permission for the file. If the file already exists, the file pointer is at the end of the file (the newly written file will be after the existing content); Otherwise, a new file is created | |
| a+ | Open the file in read-write mode. If the file exists, the file pointer is placed at the end of the file (the newly written file will be after the existing content); Otherwise, a new file is created | |
| ab+ | Open the file in binary mode and use the append mode to have read-write permission for the file. If the file exists, the file pointer is at the end of the file (the newly written file will be after the existing content); Otherwise, a new file is created |
From the above table, we can draw the following conclusions:
- The mode with b is to open the file in binary format, such as mode rb;wb;ab
- The mode with + is to open the file in read-write mode. In other words, you can read and write files, such as mode r+;w+;a+;rb+;wb+;ab+
- Modes without b or + are read-only in r mode, write only in w mode, and append only in a mode.
16.2. File reading
There are three ways to read files:
- The file.read(size) method reads the contents of the file byte by byte or character by character. File represents the open file object. Size is an optional parameter, which is used to specify the maximum number of characters (bytes) that can be read at one time. If omitted, all contents are read at one time by default.
- file.readline(size) method: read the contents of the file line by line. File refers to the open file object. Size is an optional parameter. It is used to specify the maximum number of characters (bytes) to be read at one time when reading each line. All contents in the file can be read in a circular way
- file.readlines() method: read multiple lines in the file at one time, and the read results are returned in the form of a list.
Take an example! Now create a file named my_file.txt, which contains the following contents:
The same name in the whole network: man Nong Feige
 This is Python The eighteenth article in the series
https://feige.blog.csdn.net/
The following three methods are used to read all the contents of the file:
# Read text file
print("*********read Method to read all the contents**********")
f = open('my_file.txt', encoding='utf-8')
print(f.read())
f.close()

print("*********readline Method to read all the contents**********")
f = open('my_file.txt', encoding='utf-8')
line_txt = f.readline()
while line_txt:
    print(line_txt)
    line_txt = f.readline()
f.close()

print("*********readline Method to read all the contents**********")
f = open('my_file.txt', encoding='utf-8')
print(f.readlines())
The result of the run is:
*********read Method to read all the contents**********
The same name in the whole network: man Nong Feige
 This is Python The eighteenth article in the series
https://feige.blog.csdn.net/
*********readline Method to read all the contents**********
The same name in the whole network: man Nong Feige

This is Python The eighteenth article in the series

https://feige.blog.csdn.net/
*********readline Method to read all the contents**********
['The same name in the whole network: man Nong Feige\n', 'This is Python The eighteenth article in the series\n', 'https://feige.blog.csdn.net/']
Generally speaking, the readline function and readlines function are used to read text files, while the read function can read text files and non text files.
16.3. File writing
Existing file write_file.txt. There are the following two lines in the file.
Mainong Feige
 This is Python The 19th article in the series
- file.write(str): where file represents the file object that has been opened; str represents the string to be written to the file (or byte string, applicable only to binary files)
It should be noted that when using write() to write data to a file, it is necessary to ensure that the open() function is used to open the file in r +, w, w +, a or a + mode, otherwise executing write() function will throw io.UnsupportedOperation error.
file = open('write_file.txt', mode='w', encoding='utf-8')
file.write('A pawn in the sun')
file.close()
After the write method is executed in w mode, the original contents of the file are cleared. Note that the encoding should be utf-8, because the default encoding format specified by the default open function of the file under window is gbk. Opening a file in utf-8 format may cause garbled code.
- file.writelines(str):
Where, file represents the file object that has been opened, str represents the content of the file to be written, and multiple lines of data can be written.
file = open('write_file.txt', mode='w', encoding='utf-8')
file2 = open("my_file.txt", encoding='utf-8')
file.writelines(file2.read())
file.close()
Here, the code of the read file and the code of the written file need to be consistent. Otherwise, a Unicode decodeerror encoding error will be reported. After writing, the original contents of the file will be emptied.
16.4. Introduction of various modes
Read only mode (read only data r)
Create a file named my_file.txt. The file contains the following contents:
The same name in the whole network: man Nong Feige
 This is Python The eighteenth article in the series
https://feige.blog.csdn.net/
- Open pictures in binary mode (rb). For binary files (pictures, videos, etc.), you can only use rb to read files.
f = open('my_file.txt', 'rb')
f_bytes = f.read()
print(f_bytes)
print(f_bytes.decode('utf-8'))
f.close()
The operation result is:
b'\xe5\x85\xa8\xe7\xbd\x91\xe5\x90\x8c\xe5\x90\x8d\xef\xbc\x9a\xe7\xa0\x81\xe5\x86\x9c\xe9\xa3\x9e\xe5\x93\xa5\n\xe8\xbf\x99\xe6\x98\xafPython\xe7\xb3\xbb\xe5\x88\x97\xe7\x9a\x84\xe7\xac\xac\xe5\x8d\x81\xe5\x85\xab\xe7\xaf\x87\xe6\x96\x87\xe7\xab\xa0\nhttps://feige.blog.csdn.net/'
The same name in the whole network: man Nong Feige
 This is Python The eighteenth article in the series
https://feige.blog.csdn.net/
*********readline Method to read all the contents**********
The same name in the whole network: man Nong Feige
 This is Python The eighteenth article in the series
Write only mode (overwrite data w)
- Write data in binary mode
The following code is to write the contents of the picture demo.jpg into the picture demo1.jpg. If the demo1.jpg file does not exist, a file will be created first.
write_file = open('demo1.jpg', mode='wb')
read_file = open('demo.jpg', mode='rb')
write_file.write(read_file.read())
read_file.close()
write_file.close()
- Write only mode append data
The following is in append_ Add data to the file.txt file. If a is in write only mode
append_file = open('append_file.txt', mode='a', encoding='utf-8')
append_file.write("\n Come on")
append_file.close()
Read / write mode (append data a)
The mode starting with w described earlier will be overwritten if the original data in the written file. If you do not want the original data to be overwritten, you can use the method of adding write data.
In the read-write mode, you can call the read() method to read or the write method to write.
read_write_file = open('append_file.txt', mode='r+', encoding='utf-8')
print(read_write_file.read())
read_write_file.write('\n Strive upward,make progress every day')
print(read_write_file.read())
read_write_file.close()
The operation result is:
The same name in the whole network: man Nong Feige
 This is Python The eighteenth article in the series
https://feige.blog.csdn.net/
Note that the read method can only be called once. The read function can only read the data before writing. If you want to read the data after writing, you need to call the open function again.
16.5. with as usage
We note that after the file operation, we need to manually call the close() method to close the file stream. In actual development, it is recommended to put the code block calling the close function in the finally block to prevent the file stream from being closed due to exceptions. The standard is used in the following ways:
f = open('my_file.txt', encoding='utf-8')
try:
    print(f.read())
finally:
    f.close()
So, is there a more convenient way? The answer is yes: that is to operate the file through the with as statement. Its syntax format is:
with expression [as target]:
    Code block
In this format, the part enclosed by [] can be used or omitted. The target parameter is used to specify a variable, and the statement will save the result specified by the expression to the variable. If the code block in the with as statement does not want to execute any statement, you can directly use the pass statement instead.
Using with as to transform the above code is:
with open('my_file.txt', encoding='utf-8') as f:
    print(f.read())
You don't have to close the file stream manually.
[Python from getting started to mastering] (XVIII) Python folder operation, creating folders, copying files, etc
[Python from introduction to mastery] (XIX) list of Python's reading and writing operations on files, which is very practical and simple
17. Thread
17.1. Processes and threads
What is the process? A process is simply an execution instance of an application. You listen to songs on the computer, tap the code and hang wechat. These tasks are performed by different applications. The operating system assigns different processes to each application. These actions can be carried out "simultaneously" through the scheduling of the CPU. It is said here that they are carried out at the same time. In fact, it is not because the CPU can only execute one instruction at the same time, but because the execution speed of the CPU is too fast, it gives the user the feeling that they are carried out at the same time. Processes can occupy physical memory.
Thread is a part of a process. A process can have multiple threads. The minimum granularity of CPU scheduling process is thread. The main thread completes all operations from start to end. Other threads are created or terminated when the main thread is running.
The main thread is created after the program is initialized. If a program has only one main thread, it is called single thread. If there are multiple threads, it is called multithreading. After creating multiple threads, the execution of each thread is independent.
17.2. Thread creation
Python can create threads in two ways: creating threads requires the introduction of threading module. First, let's take a look at the construction method of the Thread class.
__init__(self, group=None, target=None, name=None,
                 args=(), kwargs=None, *, daemon=None):
In this construction method, all the above parameters are optional parameters, which can be used or ignored.
The meanings of each parameter are as follows:
- Group: specifies which thread group the created thread belongs to.
- Target: Specifies the target method to be called by the created thread.
- args: pass parameters for the method specified by target in tuple mode. If multiple parameters in tuple are passed in, the pass in mode is (arg1,arg2,....argn,)
- kwargs: pass parameters for the method specified by target with dictionary method.
- daemon: Specifies whether the created thread is a background thread.
- Name: Specifies the name of the thread
- The first way is to directly call the constructor of Thread class to create an instance of Thread.
import threading

# Defines the method to be called by the thread
def async_fun(*add):
    for arc in add:
        print(threading.current_thread().getName() + " " + arc)


my_tuple = ("Mainong Feige", "study hard", "Break through the career bottleneck as soon as possible")

# Create thread
thread = threading.Thread(target=async_fun, args=my_tuple)
# Start thread
thread.start()

for i in range(4):
    print(threading.current_thread().getName() + "implement" + str(i)+ "second")
The operation result is:
Thread-1 Mainong Feige MainThread Execute 0 times
MainThread Execute once

MainThread Execute twice
MainThread 3 times
Thread-1 study hard
Thread-1 Break through the career bottleneck as soon as possible
The above method is to instantiate a thread Thread-1 to call async asynchronously_ Fun method. It can be seen that the main thread MainThread and Thread-1 are called alternately (each execution result is different). This shows that the two threads obtain the execution permission of the CPU alternately. It should be noted that the thread must call the start() method to execute.
2. The second method is to inherit threading.Thread. Then, override the run method.
import threading

class MyThread(threading.Thread):
    def __init__(self, add):
        threading.Thread.__init__(self)
        self.add = add
        # Override the run() method

    def run(self):
        for arc in self.add:
            print(threading.current_thread().getName() + " " + arc)


my_tuple = ("Mainong Feige", "study hard", "Break through the career bottleneck as soon as possible")

thread = MyThread(my_tuple)
thread.start()

for i in range(4):
    print(threading.current_thread().getName() + "implement" + str(i)+ "second")
The operation result is:
Thread-1 Mainong Feige MainThread Execute 0 times
MainThread Execute once

Thread-1 study hard
Thread-1 Break through the career bottleneck as soon as possible
MainThread Execute twice
MainThread 3 times
Here, the MyThread class is defined and the run method is rewritten. The run method is the task that the thread really wants to perform. It is equivalent to async in the above example_ The contents of the fun function are moved to the run method.
17.3. Thread life cycle
Having finished creating a thread, let's take a look at the thread life cycle. A thread has a total of five states.
They are new state (initialization state), ready state, running state, blocking state and death state. The relationship between States is as follows:
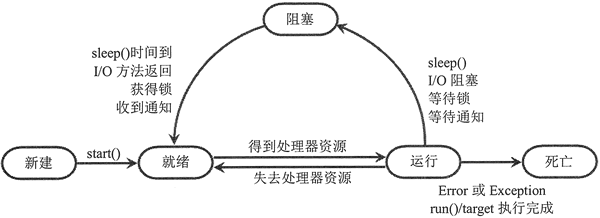
- New state: the state when the thread has just been created and the start() method is not called. That is, the thread state of threading.Thread(target=async_fun, args=my_tuple) above.
- Ready state: after the start() method is called, the thread will change from the new state to the ready state. The ready state means that the thread can be ready to obtain the CPU at any time.
The thread will enter the ready state in the following cases: 1. The time specified by the sleep () method has passed. 2. The notify() method or notify() method is called_ The all () method sends a notification. 3. The synchronization lock is released by other threads and obtained by this thread. - Running state: when the thread in ready state obtains the CPU usage right and starts to execute the target function or run() method executed by the target parameter, it indicates that the thread is in running state.
- Blocking status: the thread that gets the CPU's schedule but does not finish executing the task
In the following cases: the thread will enter the blocking state: 1. The sleep() method is called. 2. Call the wait() method and wait for the condition to be met. 3. When a thread attempts to obtain the synchronization lock of an object, if the lock is occupied by other threads, the current thread enters the blocking state. - Thread dead state: when the task execution of a thread is completed or an exception occurs during program execution, the thread will enter the dead state.
17.4. Detailed usage of thread. Join().
The function of the join() method is to give priority to the caller of the method to use CPU resources at the specified position of the program, that is, the calling thread can continue to run after waiting for the thread to complete.
The syntax format of this method is as follows: thread. Join ([timeout])
Thread is the instantiation object of thread class or its subclass; The timeout parameter is optional,
Its function is to specify the time that the thread can occupy the CPU resources at most. If omitted, the CPU resources will not be released until the thread execution is completed by default.
import threading


# Defines the method to be called by the thread
def async_fun(*add):
    for arc in add:
        print(threading.current_thread().getName() + " " + arc)


my_tuple = ("Mainong Feige", "study hard", "Break through the career bottleneck as soon as possible")

# Create thread
thread = threading.Thread(target=async_fun, args=my_tuple, name="Thread 1")
thread2 = threading.Thread(target=async_fun, args=my_tuple, name='Thread 2')
# Start thread
thread.start()
# Wait for thread 1 to finish executing
thread.join()
# Start thread 2 after thread 1 executes
thread2.start()
thread2.join()
The operation result is:
Thread 1 code Nong Feige
 Thread 1 study hard
 Thread 1 break through the career bottleneck as soon as possible
 Thread 2 code Nong Feige
 Thread 2 study hard
 Thread 2 break through the career bottleneck as soon as possible
As above, there are two threads: thread 1 and thread 2. After thread 1 called thread.join(), the execution of thread 1 and thread 2 changed from parallel to serial. That is, thread 2 cannot be started until thread 1 has finished executing. Now remove the statement and change it to the following:
# Start thread
thread.start()
# Start thread 2 after thread 1 executes
thread2.start()
thread2.join()
The operation result is:
Thread 1 code Nong Feige
 Thread 2 code Nong Feige
 Thread 2 study hard
 Thread 2 break through the career bottleneck as soon as possible
 Thread 1 study hard
 Thread 1 break through the career bottleneck as soon as possible
It can be seen that thread 1 and thread 2 run in parallel.
17.5. Usage of sleep function
The sleep(secs) function in the time module can make the currently executing thread pause for secs and then continue to execute. The so-called pause means that the current thread enters the blocking state. When the time specified by the sleep() function is reached,
Then it changes from blocking state to ready state and waits for CPU scheduling.
# Defines the method to be called by the thread
def async_fun(*add):
    for arc in add:
        start_time = time.time()
        time.sleep(2)
        print(str((time.time() - start_time)) + " second " + threading.current_thread().getName() + " End call" + arc)


my_tuple = ("Mainong Feige", "study hard", "Break through the career bottleneck as soon as possible")

# Create thread
thread = threading.Thread(target=async_fun, args=my_tuple)
# Start thread
thread.start()
The operation result is:
2.0052337646484375 second Thread-1 End calling code: brother Nongfei
2.004210948944092 second Thread-1 End the call and study hard
2.002394199371338 second Thread-1 End the call and break through the career bottleneck as soon as possible
It can be seen that each execution of the thread takes 2 seconds.
[Python from introduction to mastery] (XX) basic concepts of Python concurrent programming - thread use and life cycle
18. Thread pool
18.1. Why use thread pool?
The threads described in the previous articles are created manually through code. After the thread executes the task, it will be destroyed by the system and created the next time it executes the task. There is no logical problem with this approach. However, the cost of starting a new thread is relatively high, because it involves interaction with the operating system, and the operating system needs to allocate resources to the new thread. Let's make an analogy! Just like a software company recruits employees to work. When there is work, hire an outsourcer to work. When the work is finished, dismiss the worker. Do you think the time cost and communication cost in this process are very large. Then the general practice of the company is to determine how many developers are needed when the project is approved, and then match them. Then these personnel will stay in the project team, do whatever they have and fish when they don't. The same is true for thread pools. The thread pool can define the maximum number of threads. These threads execute tasks when they have tasks, and enter the thread pool to rest when they have no tasks.
18.2. How to use thread pool?
The base class of thread pool is the Executor class in the concurrent.futures module, and the Executor class provides two subclasses, ThreadPoolExecutor class and ProcessPoolExecutor class. Where ThreadPoolExecutor is used to create a thread pool and ProcessPoolExecutor is used to create a process pool. This article focuses on the use of the ThreadPoolExecutor class. First, let's look at the constructor of the ThreadPoolExecutor class. The Python version used here is: 3.6.7.
      def __init__(self, max_workers=None, thread_name_prefix=''):
        """Initializes a new ThreadPoolExecutor instance.

        Args:
            max_workers: The maximum number of threads that can be used to
                execute the given calls.
            thread_name_prefix: An optional name prefix to give our threads.
        """
        if max_workers is None:
            # Use this number because ThreadPoolExecutor is often
            # used to overlap I/O instead of CPU work.
            max_workers = (os.cpu_count() or 1) * 5
        if max_workers <= 0:
            raise ValueError("max_workers must be greater than 0")

        self._max_workers = max_workers
        self._work_queue = queue.Queue()
        self._threads = set()
        self._shutdown = False
        self._shutdown_lock = threading.Lock()
        self._thread_name_prefix = (thread_name_prefix or
                                    ("ThreadPoolExecutor-%d" % self._counter()))
His constructor has only two parameters: one is max_ The workers parameter is used to specify the maximum number of threads in the thread pool. If it is not specified, it is 5 times the number of CPU cores by default. Another parameter is thread_name_prefix, which is used to specify the name prefix of threads in the thread pool. Other parameters:
- _ The initial value of shutdown is False. By default, the thread pool is not destroyed, that is, the life cycle of the thread pool is consistent with that of the project.
- self._work_queue = queue.Queue() generates a buffer queue.
- _ Threads when no task is submitted, the number of threads is set to 0.
- _ shutdown_lock specifies that the lock of the thread pool is a lock lock.
After finishing the creation of thread pool, let's take a look at some common methods in thread pool. - submit(self, fn, *args, **kwargs):
This method uses the submit task, that is, the fn function is submitted to the thread pool, * args represents the parameters passed to the fn function, and * * kwargs represents the parameters passed to the fn function in the form of keyword parameters. - shutdown(self, wait=True):
Close thread pool - map(func, *iterables, timeout=None, chunksize=1):
This function is similar to the global function map(func,*iterables), except that it will start multiple threads to immediately execute map processing on iterables asynchronously.
After the program submits the task function to the thread pool through the submit method, the thread pool will return a future object, which is mainly used to obtain the return value of the thread task function. Future provides the following methods.
- cancel(): cancels the thread task represented by the Future. If the task is executing and cannot be cancelled, the method returns False; Otherwise, the program cancels the task and returns True.
- result(timeout=None): get the last result returned by the thread task represented by the Future. If the thread task represented by Future has not been completed, the method will block the current thread, and the timeout parameter specifies the maximum number of seconds to block.
- add_done_callback(fn): register a "callback function" for the thread task represented by the Future. When the task is successfully completed, the program will automatically trigger the fn function.
- done(): this method returns True if the thread task represented by the Future is successfully cancelled or executed.
18.3. Give a simple example
In this example, a thread pool with a maximum number of threads of 2 is created to execute async_add function.
from concurrent.futures import ThreadPoolExecutor
import threading
import time


def async_add(max):
    sum = 0
    for i in range(max):
        sum = sum + i
    time.sleep(1)
    print(threading.current_thread().name + "The sum obtained by performing the sum operation is=" + str(sum))
    return sum


# Create two threads
pool = ThreadPoolExecutor(max_workers=2, thread_name_prefix='Test thread')
# Submit a task to the thread pool, 20 as async_ Parameters of the add() function
future1 = pool.submit(async_add, 20)
# Submit another task to the thread pool
future2 = pool.submit(async_add, 50)
# Judge whether the tasks represented by future1 have been completed
time.sleep(2)
print(future1.done())
print(future2.done())
# View the results returned by the tasks represented by future1
print('The execution result of thread 1 is=' + str(future1.result()))
# View the returned results of the tasks represented by future2
print('The execution result of thread 2 is=' + str(future2.result()))
print("----" + threading.current_thread().name + "----End of main thread execution-----")
The operation result is:
Test thread_0 The sum obtained by performing the sum operation is=190
 Test thread_1 The sum obtained by performing the sum operation is=1225
True
True
 The execution result of thread 1 is=190
 The execution result of thread 2 is=1225
----MainThread----End of main thread execution-----
In this example, a thread pool with a maximum number of threads of 2 is defined, and two tasks are submitted to the thread pool, including async_ The add function is the task to perform. In Async_ Adding time.sleep(1) to the add function to sleep for one second is to verify the result returned by the done() method. Finally, the end of the main thread execution is printed, indicating that the result() method is blocked. If result() is masked.
Change to the following form:
# Create two threads
pool = ThreadPoolExecutor(max_workers=2, thread_name_prefix='Test thread')
# Submit a task to the thread pool, 20 as async_ Parameters of the add() function
future1 = pool.submit(async_add, 20)
# Submit another task to the thread pool
future2 = pool.submit(async_add, 50)
# Judge whether the tasks represented by future1 have been completed
print(future1.done())
print(future2.done())
print("----" + threading.current_thread().name + "----End of main thread execution-----")
Then the running result is:
False
False
----MainThread----End of main thread execution-----
Test thread_0 The sum obtained by performing the sum operation is=190
 Test thread_1 The sum obtained by performing the sum operation is=1225
Details can be viewed
[Python from introduction to mastery] (XXII) correct posture of Python thread pool
19.Pil Library
PIL library Python Imaging Library is already the de facto image processing standard library of Python platform. PIL is very powerful, but the API is very simple and easy to use. However, the PIL library only supports Python 2.7. In order to be compatible with Python 3.x, the open source community provides a compatible version of pilot. Through pilot, you can happily use the PIL library on Python 3.x.
19.1. Install pilot and version compatibility
It is very convenient to install pilot through the pip command. You can use one line of command
Install the latest version of the command
pip install Pillow
Install the command PIP install pilot = = {version} for the specified layout, the version here needs to be replaced with the specified version number, such as downloading version 8.3.0.
pip install Pillow==8.3.0
If you don't know which versions are available, you can view them through PIP install pilot = =.
The following table shows the corresponding versions of pilot and Python.
19.2. Introduction to common modules
PIL library has many modules. Here we focus on some common modules. First of all, overall, the role of each module.
| Module name | Main role |
|---|---|
| Image | The image module provides a class with the same name to represent the image object of PIL. It has many factory classes, including loading an image from a file and creating a new image |
| ImageColor | The ImageColor module contains color tables and converters from color specifiers in CSS3 to RGB tuples. This module is used in PIL.Image.new() and ImageDraw modules and other modules |
| ImageFont | ImageFont is used to set the font. It is mainly used in the PIL.ImageDraw.ImageDraw.text() method. |
| ImageDraw | ImageDraw module provides simple 2D graphics for Image module. Using this module, you can create new graphics, decorate existing graphics, and then generate new graphics for use |
The details of each module are described below
19.3. Image
Image is the core module of PIL library. Most image operations are inseparable from it. It can be used to load Images from files and create new Images. And save Images as pictures.
- Load picture file
PIL.Image.open(fp, mode='r', formats=None)
Where fp is the name of the picture file, mode represents the reading mode of the picture path, and the default is the 'r' module. Return Image object
try:
    img = Image.open("img1.jpeg")
finally:
    # This opening method requires you to manually close the file stream
    img.close()
Here, the Image needs to be closed manually after use. The following wording of with... as... Is recommended
with Image.open('img1.jpeg') as img:
The img listed below are all the Image objects obtained through open.
2. Get the width and height of the picture. The width and height of the picture can be obtained through img.size. i
width, height = img.size
- Show pictures
img.show()
- Rotate the picture. Rotate the picture through the rotate method. The following is the display of rotating the picture 45 degrees.
img.rotate(45).show()
- Image scaling can be achieved through the thumbnail method.
img.thumbnail((width / 2, height / 2))
- Save picture
save(self, fp, format=None, **params)
This method can save the Image object as a picture file. Where: fp is the path to save the picture** params is a variable parameter, usually the suffix of the incoming picture.
img.save('thumbnail.jpeg')
- Create a new Image
PIL.Image.new(mode, size, color=0)
This method has three parameters. mode is used to specify whether the generated picture is RGB or RGBA. Here, RGBA letters mean: r means red, g means green, B means blue, and a means alpha transparency. Generally speaking, you only need to specify RGB. If you need to create a picture with a transparent background, you need to pass in RGBA.
size is used to specify the width and height of the picture. A tuple is passed in.
Color is used to specify the color of the picture. If RGB is passed in the previous mode, this parameter needs to pass in a tuple containing three elements. For example: (255, 0, 0). If RGBA is passed in the previous mode, the parameter needs to pass in an element containing four elements, such as: (255, 0, 0204).
The following code is to create a picture with width and height of 500 and background color of red.
 newImg = Image.new('RGB', (500, 500), (255, 0, 0))
 newImg.save('newImg.png')
- Copy an image. You can copy an image through the copy() method.
  # Copy picture
    copyImg = img.copy()
    newImg.save(op.join(base_path, 'copyImg.png'))
- Paste picture: paste one picture onto another through the paste method.
ImageColor
This module mainly obtains the RGB value from the color specifier in CSS3. Here is a method: getrgb method is to obtain RGB value.
# Gets the RBGA value of the color
rgb_tup = ImageColor.getrgb("#ff0000cc")
print(rgb_tup)
The running result is (255, 0, 0, 204)
19.4. ImageFont
ImageFont is used to set the font. It is mainly used in the PIL.ImageDraw.ImageDraw.text() method. First, here are the most commonly used methods
PIL.ImageFont.truetype (font = None , size = 10 , index = 0 , encoding = '' , layout_engine = None )
Loads TrueType or OpenType fonts from a file or class file object and creates a font object. This function loads a font object from a given file or class file object and creates a font object for a font of a given size.
Pilot opens a font file using FreeType. If you open multiple fonts simultaneously on Windows, note that Windows limits the number of files that can be opened simultaneously in C to 512. If this limit is approached, OSError may throw an an and report that FreeType "cannot open resource".
This feature requires_ imagingft service.
parameter
Font – file name containing TrueType font or object of similar file. If the file is not found in this file name, the loader may also search in other directories, such as fonts/ Windows or directories / Library/Fonts /, / System/Library/Fonts / and ~ / Library/Fonts/macOS.
Size – the size of the request, in points.
index – the font to load (the default is the first available font).
Encoding - the font encoding to use (Unicode by default). Possible encodings include (for more information, see the FreeType documentation):
This specifies the character set to use. It does not change the encoding of any text provided in subsequent operations.
layout_engine the layout engine to use (if available): ImageFont.LAYOUT_BASIC or ImageFont.LAYOUT_RAQM.
Return value
A font object.
img_font = ImageFont.truetype('simsun.ttf', size=20)
The code here means to create a Song typeface with a font size of 20.
19.5. ImageDraw
Finally speaking of the ImageDraw module, this module is also a very important module, which can add text and lines to pictures.
- Draw method
PIL.ImageDraw.Draw(im, mode=None)
Creates a draw object for the specified Image object.
Parameters:
im: image object to be painted
Mode: optional mode for color value. For RGB image, this parameter can be RGB or RGBA (mixing drawing into image). For all other modes, this parameter must be the same as the image mode. If omitted, the mode defaults to the image mode.
2. text method
ImageDraw.text(xy, text, fill=None, font=None, anchor=None, spacing=4, align='left', direction=None, features=None, language=None, stroke_width=0, stroke_fill=None, embedded_color=False)
Adds text at a given location
Parameters:
xy – anchor coordinates of the text.
Text – the string to draw. If it contains any line breaks, the text is passed to multiline_text().
fill - the color used for text.
font - an ImageFont instance.
Anchor -- Text anchor alignment. Determines the relative position of the anchor point to the text. The default alignment is the upper left corner. For valid values, see Text anchor . This parameter is ignored for non TrueType fonts.
This parameter exists in previous versions of pilot, but is only implemented in version 8.0.0.
spacing – if text is passed to multiline_text(), the number of pixels between rows.
align - if text is passed to multiline_text(), "left", "center" or "right". Determines the relative alignment of lines. Use the anchor parameter to specify the alignment to xy.
Direction -- the direction of the text. It can be "rtl" (right to left), "ltr" (left to right), or "ttb" (top to bottom). libraqm is required.
Features -- a list of OpenType font features to use during text layout. This is usually used to turn on optional font features that are not enabled by default, such as "dlig" or "ss01", but it can also be used to turn off default font features, such as "- liga" to disable hyphenation or "- kern" to disable spacing. For all supported features, refer to the OpenType documentation. libraqm is required.
Language -- the language of the text. Different languages may use different font shapes or ligatures. This parameter tells the font the language to use for the text and applies the correct substitution, if available, as needed. It should be BCP 47 language code. libraqm is required.
stroke_width – the width of the text stroke.
stroke_fill – the color used for text strokes. If not, it defaults to the fill parameter.
embedded_color – whether font is used to embed color glyphs (COLR, CBDT, SBIX). New features in version 8.0.0.
# Add text to the picture
with Image.open(op.join(base_path, 'img4.jpeg')) as im:
    font = ImageFont.truetype(op.join(base_path, 'simsun.ttf'), size=80)
    rgb_tup = ImageColor.getrgb("#ff0000cc")
    draw = ImageDraw.Draw(im)
    text = "Maserati"
    draw.text((650, 550), text, fill=rgb_tup, font=font)
    im.save(op.join(base_path, 'Maserati.png'), 'png')
The operation result is:

19.6. Merge beauty photos
Now there are two beautiful photos: img2.jpeg and img3.png. I want to paste img3.png onto img2.jpeg. How to operate? Img3.png is also transparent.

- Direct paste method
# Paste up the two pictures
img2 = Image.open('img2.jpeg')
img3 = Image.open('img3.png')
img2.paste(img3)
img2.save('beautiful_paste.jpeg')
The operation result is:

After the img3.png picture was pasted on img2, the background color turned black, which obviously did not meet our expectations. How to deal with this?
It's not a big problem. You just need to modify the code a little
3. Make a small change to change the background to transparent background
# Transparent bottom
img2 = Image.open('img2.jpeg').convert('RGBA')
img3 = Image.open('img3.png').convert('RGBA')
# Get the values of r,g,b,a
r, g, b, a = img3.split()
# Pass in transparent value
img2.paste(img3, box=(0, 0), mask=a)
img2.save('beautiful_paste2.png')
The operation result is:

Now it becomes a transparent bottom. Both beauties can enjoy it.
Details can be viewed
❤️ [Python from introduction to mastery] (XXVI) it's really handy to process images with Python's PIL library ❤️
❤️ [Python from introduction to mastery] (XXVII) learn more about pilot!
summary
So far, all the basic contents of Python have been introduced.
There are too many dry goods. The editor is a little stuck.
Still that sentence, collecting it has taken the first step in learning.
The little sister of station B reads it a thousand times or someone else's, and the article of station C reads it once is her own.
Hold the dry goods in your hand and the sister will go with you.
Python knowledge map
In order to better help more children learn about Python from the beginning to the end, I got a set of "Python stack knowledge atlas" from CSDN officials, with a size of 870mm x 560mm. After expansion, it can be the size of a desk or folded into the size of a book. Interested children can learn about it - scan the QR code in the figure below to buy it.
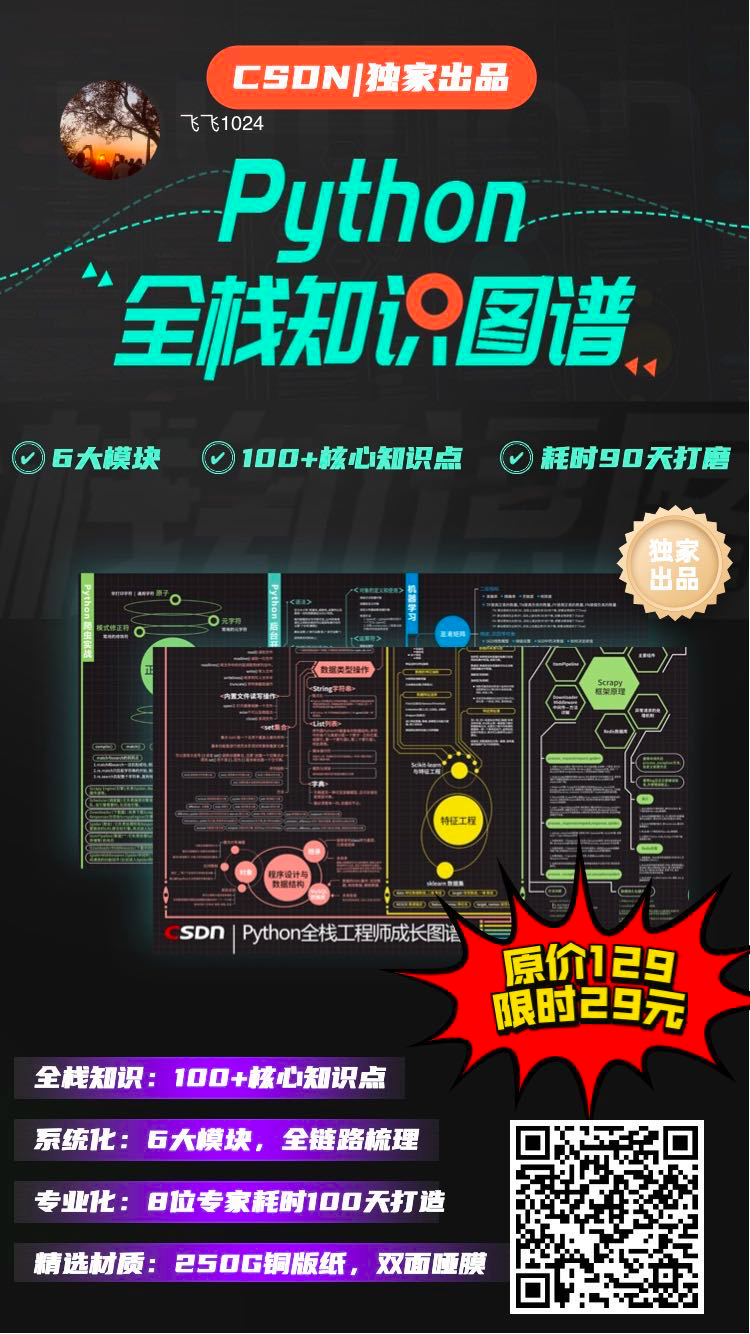
I've used it myself. It feels very easy to use. Put the manual on the table and keep knowledge in your heart.
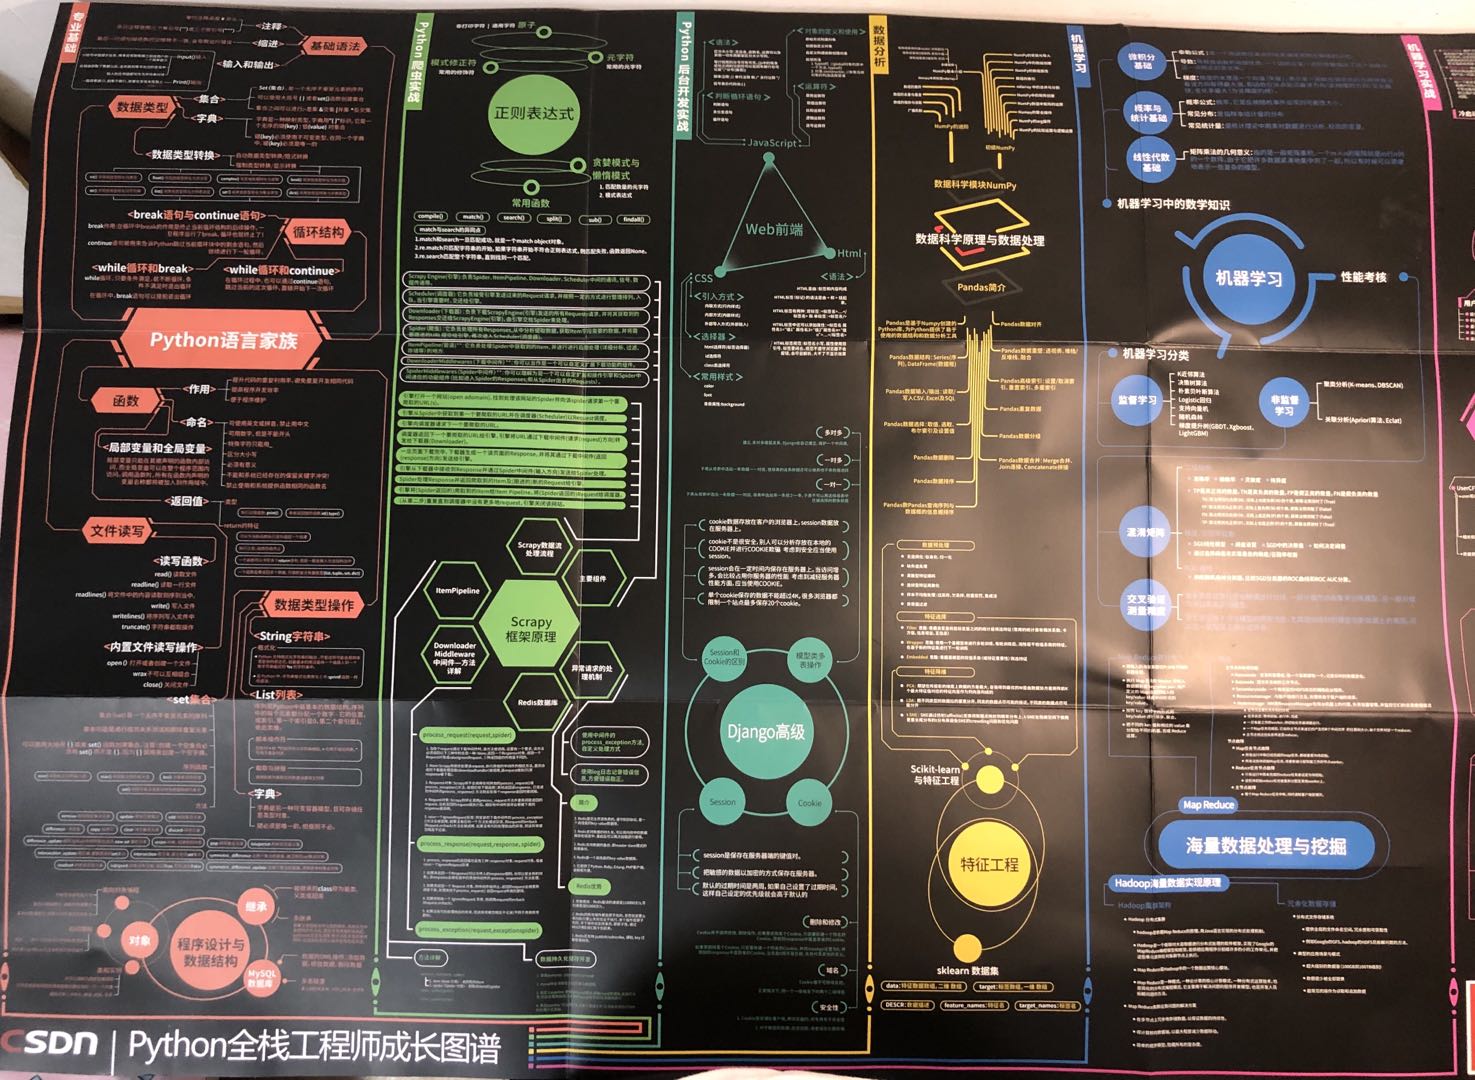
I'm brother Manon Feige. Thank you again for reading this article.
Little buddy who needs source code is concerned about the official account below, huof