Nginx supports https access (change the web address from http to https access)
Note: after the development of the applet phase I is completed, when it is about to go online, the wechat applet prompts that you can only use https to complete online access, and then you need to modify your nginx configuration.
https certificate is required first
The certificate of our project applet development is supported by the company, and the company project assigns ssl certificate. What we assign is the password of a jks file and ssl certificate. The certificate application of Tencent cloud or Alibaba cloud needs to be queried officially. There are detailed tutorials. Then, the alicloud certificate gives you a compressed file package (pem file and key file). This compressed file package is your public and private key and needs to be configured in nginx.
centos7 supports SSL
- Download the SSL module first
-y This means that dependency relationships are handled automatically and all dependent packages are installed at one time without manual confirmation each time
yum install -y gcc
yun install -y openssl openssl-devel
- The SSL module is verified. If the version information appears, the installation is successful

Nginx supports ssl modules
By default, nginx does not support SSL, and the module is not installed. We need to specify - with HTTP_ ssl_ Module configuration.
- Let's go to the nginx folder. My path is / home/okwzh/install/nginx-1.20.1/
cd /home/okwzh/install/nginx-1.20.1/
- Modify nginx configuration information
./configure --prefix=Yours nginx route --with-http_stub_status_module --with-http_ssl_module
- Make. I think all online blogs are make. Don't make install. The configuration file needs to be overwritten. Do not recompile. Then I recompile without error. I haven't tried to overwrite it. https://blog.csdn.net/duyusean/article/details/79348613,https://www.cnblogs.com/mingyue5826/p/10782950.html This is the blog that I see others cover. You can try this.
make
- My words are to make and install directly, and then there is no error. Recompiling will not change your previous nginx configuration file.
make install
- Restart nginx
./nginx -s reload # Restart nginx
- This is the details of my nginx version, which supports SSL.

Put the certificate files of Alibaba cloud or Tencent cloud in the nginx configuration folder
- Here, you can use the xftp or lrzsz command to upload the two files to your server and put them in the conf configuration folder,
yum install -y lrzsz
# rz upload local files
# sz download files locally
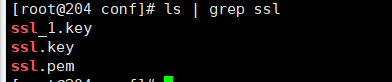
- Here is my configuration folder. pem and key files are alicloud certificate files. pem is the public key and key is the private key. ssl_1.key is my private key backup file.
Change the http server service in nginx.conf of nginx configuration file to https server service
- Modify the nginx.conf file to configure ssl information
#ssl file address
ssl_certificate /home/okwzh/install/nginx-1.20.1/conf/ssl.pem; #Here is your pem public key file. Write the absolute path
ssl_certificate_key /home/okwzh/install/nginx-1.20.1/conf/ssl.key; #Here is your key private key file. The path should be an absolute path

#ssl on; # Turn on ssl support. It will be turned on by default after version 1.15. No configuration is required
#ssl related configuration
ssl_session_timeout  5m; # Cache validity
ssl_prefer_server_ciphers  on; # If off is not specified by default, when on, the server encryption algorithm will be better than the client encryption algorithm when using SSLv3 and TLS protocols.
ssl_protocols SSLv2 SSLv3 TLSv1.2; # Secure connection optional encryption protocol
ssl_ciphers ECDHE-RSA-AES128-GCM-SHA256:ECDHE:ECDH:AES:HIGH:!NULL:!aNULL:!MD5:!ADH:!RC4;      # Configure ssl encryption algorithm
ssl_session_cache shared:SSL:1m;
- Change the previous http server service to https server service
http {
    server {
         #http service
    }
    #HTTPS server
    server {
         # Using nginx https service
    }
}
- configuration file
http {
    server {
		#Modify the previous http service configuration to https.
    }

    #HTTPS server
    #
    server {
        #Listening port
        listen       8071 ssl;
        #Listening address, written as domain name or ip address
        server_name  101.89.119.204;
        #ssl on; # nginx 1.15 and later versions no longer support ssl on; How to write it

        #ssl file address
        ssl_certificate /home/okwzh/install/nginx-1.20.1/conf/ssl.pem;
        ssl_certificate_key /home/okwzh/install/nginx-1.20.1/conf/ssl.key;

        #ssl related configuration
        ssl_session_timeout  5m; # Cache validity
        ssl_prefer_server_ciphers  on; # Use the preferred algorithm on the server side
        ssl_protocols SSLv2 SSLv3 TLSv1.2; # Secure connection optional encryption protocol
        ssl_ciphers ECDHE-RSA-AES128-GCM-SHA256:ECDHE:ECDH:AES:HIGH:!NULL:!aNULL:!MD5:!ADH:!RC4;
        ssl_session_cache shared:SSL:1m;

        # Static file address in the project (django project)
        location /static {
            alias /home/iptv_application_install_applet/static/;
        }
        # The request from port 8080 jumps to this address (this is an http request, and the socket is not configured)
        location / {
            #root   html;
            #index  index.html index.htm;
	        include	uwsgi_params;
            #Remember to keep consistent with the port in uwsgi, otherwise you cannot access the service started by uwsgi
            proxy_pass	http://127.0.0.1:8000/;
        }
        client_max_body_size  75M;
        client_header_timeout 10s;
        client_body_timeout 20s;
        send_timeout 30s;
        client_body_buffer_size 8k;

        add_header X-Content-Type-Options nosniff;
        add_header 'Referrer-Policy' 'origin';
        add_header X-Download-Options "noopen" always;
        add_header Strict-Transport-Security "max-age=63072000; includeSubdomains; preload";
        add_header Strict-Transport-Security value;
        add_header X-Permitted-Cross-Domain-Policies  "master-only";
        add_header X-Frame-Options SAMEORIGIN;
        add_header Content-Security-Policy "default-src  'unsafe-inline' 'unsafe-eval' mediastream: ";
        add_header X-Content-Type-Options: nosniff;
        add_header X-XSS-Protection "1; mode=block";
    }
}
- Check nginx configuration file
cd sbin
./nginx -t

5. Restart nginx
/home/okwzh/install/nginx-1.20.1/sbin/nginx -c /home/okwzh/install/nginx-1.20.1/conf/nginx.conf
nginx command
nginx -V # View nginx version details
nginx -s stop # Stop nginx service
nginx -s reload # Restart nginx service
nginx Absolute path -c nginx configuration file # Start nginx service
ps -ef | grep nginx # View nginx process
kill -9 nginx_PID # Turn off nginx for service