catalogue
We use spring MVC and MyBatis framework to make a simple check-in program. Our front-end uses ajax to transfer values to the background. The background spring MVC uses annotation for development (annotation development is more convenient). The final check-in data will be stored in the MySQL database through the MyBatis framework.
Environment construction
database
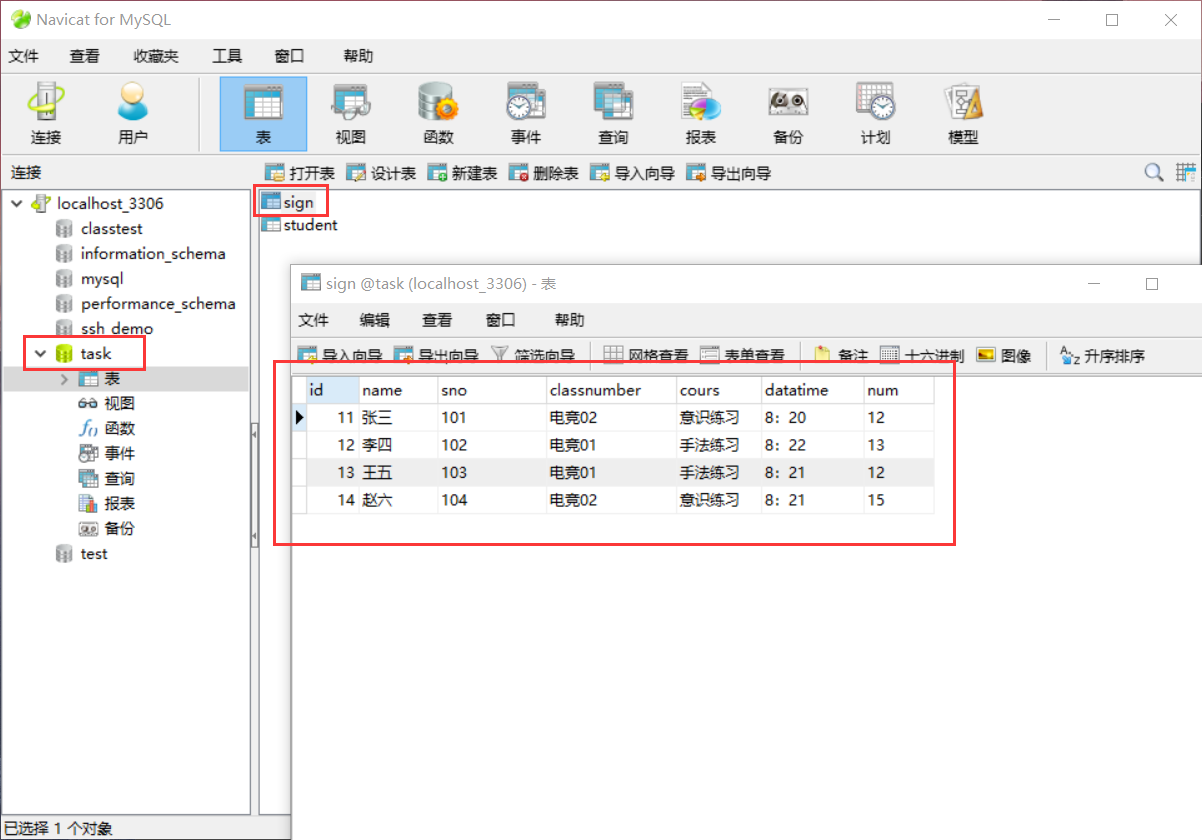
We use MySQL database for final saving value. You need to create a new one named Task database (check whether the database already exists), create a new table named sign data table in the task database, and then add data in the table appropriately.
The sql file for creating tables and adding data is shown below. You can put the following sql statements in a. sql file, and then select the database to run the sql file.
SET FOREIGN_KEY_CHECKS=0;
-- ----------------------------
-- Table structure for `sign`
-- ----------------------------
DROP TABLE IF EXISTS `sign`;
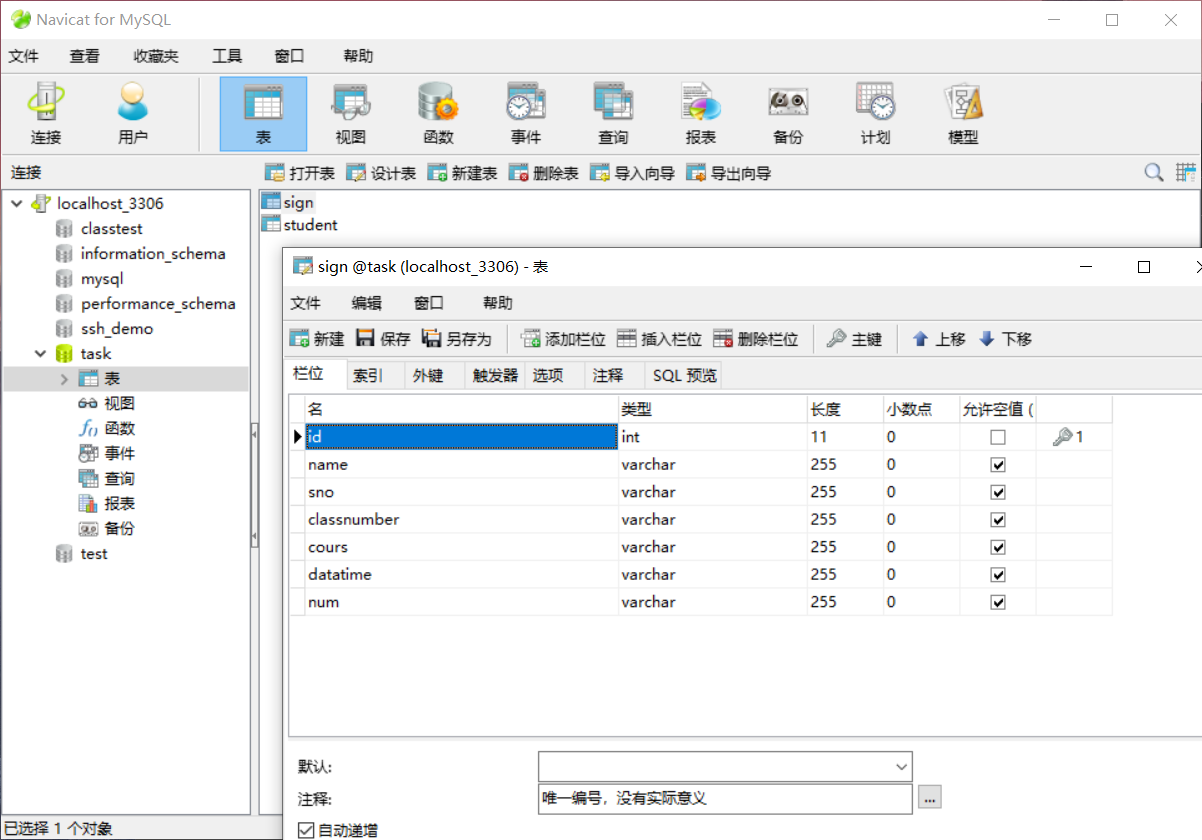
CREATE TABLE `sign` (
`id` int(11) NOT NULL AUTO_INCREMENT COMMENT 'Unique number, no practical significance',
`name` varchar(255) DEFAULT NULL COMMENT 'Student's name',
`sno` varchar(255) DEFAULT NULL COMMENT 'Student number',
`classnumber` varchar(255) DEFAULT NULL COMMENT 'Class number',
`cours` varchar(255) DEFAULT NULL COMMENT 'Course name',
`datatime` varchar(255) DEFAULT NULL COMMENT 'Check in time',
`num` varchar(255) DEFAULT NULL COMMENT 'Seat number',
PRIMARY KEY (`id`)
) ENGINE=InnoDB AUTO_INCREMENT=15 DEFAULT CHARSET=utf8;
-- ----------------------------
-- Records of sign
-- ----------------------------
INSERT INTO `sign` VALUES ('11', 'Zhang San', '101', 'E-sports 02', 'Consciousness practice', '8: 20', '12');
INSERT INTO `sign` VALUES ('12', 'Li Si', '102', 'E-sports 01', 'Manipulation practice', '8: 22', '13');
INSERT INTO `sign` VALUES ('13', 'Wang Wu', '103', 'E-sports 01', 'Manipulation practice', '8: 21', '12');
INSERT INTO `sign` VALUES ('14', 'Zhao Liu', '104', 'E-sports 02', 'Consciousness practice', '8: 21', '15');
After creation, see the figure.
Create Maven project
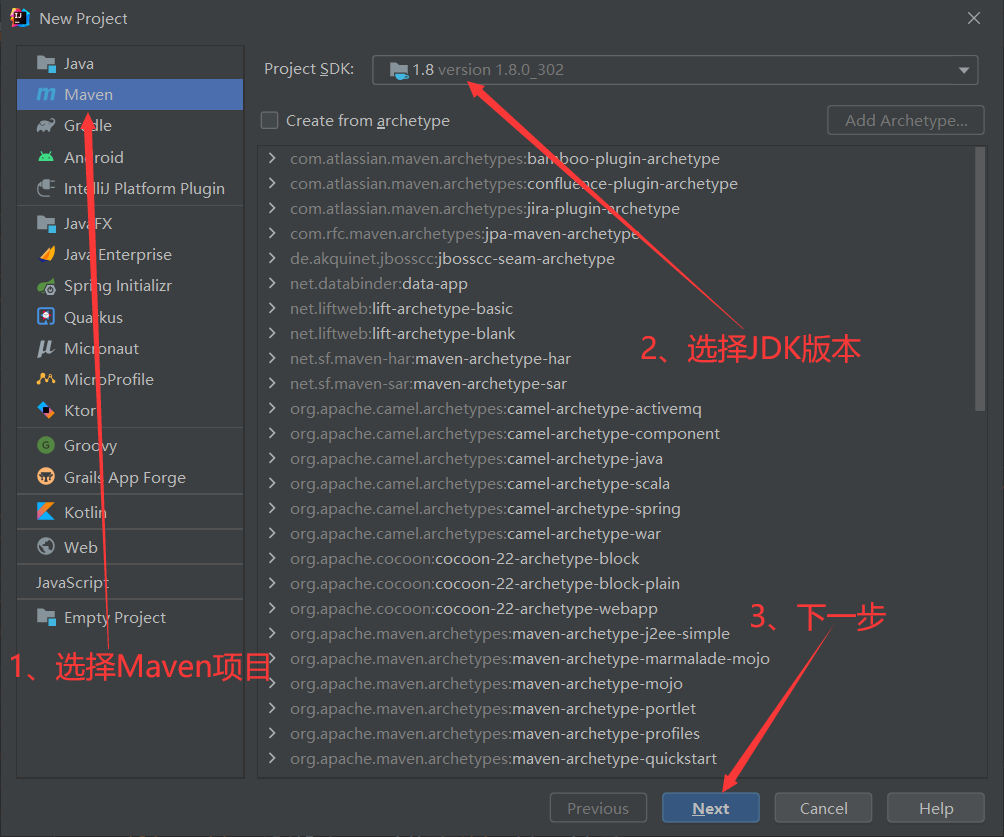
Use IDEA to create Maven project, select the JDK version you need, and enter the next step. We recommend using version 1.8 JDK here.
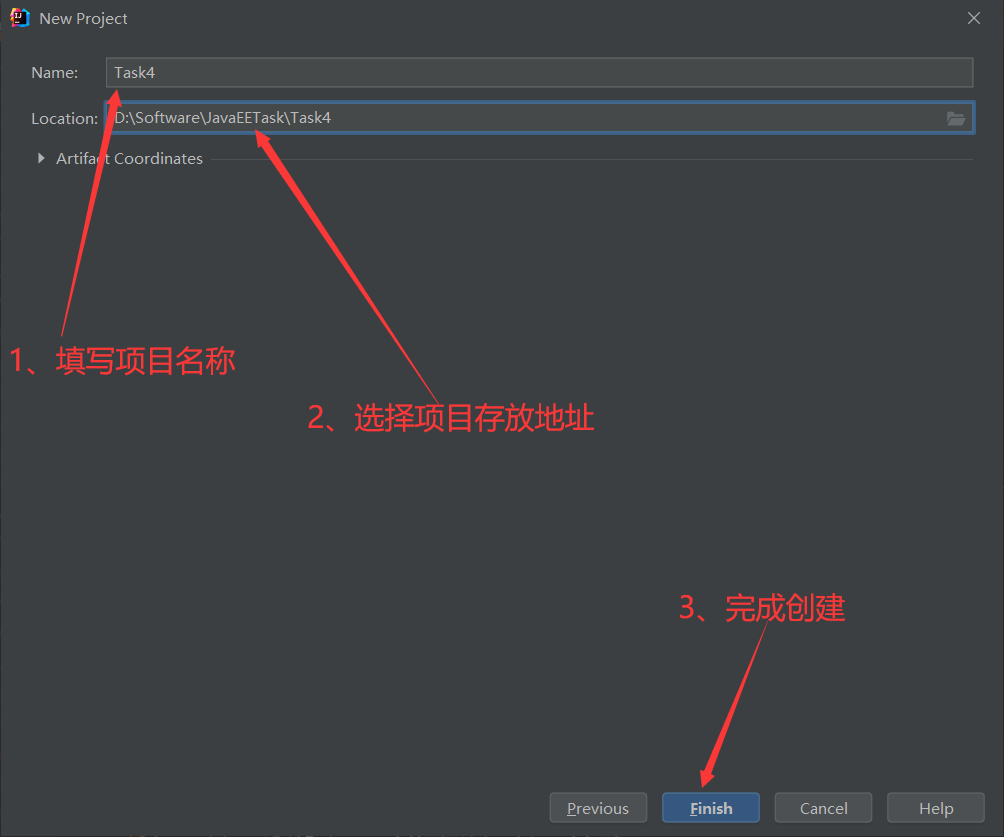
Fill in the name and storage address of the project, and click Finish to complete the creation of Mavne project.
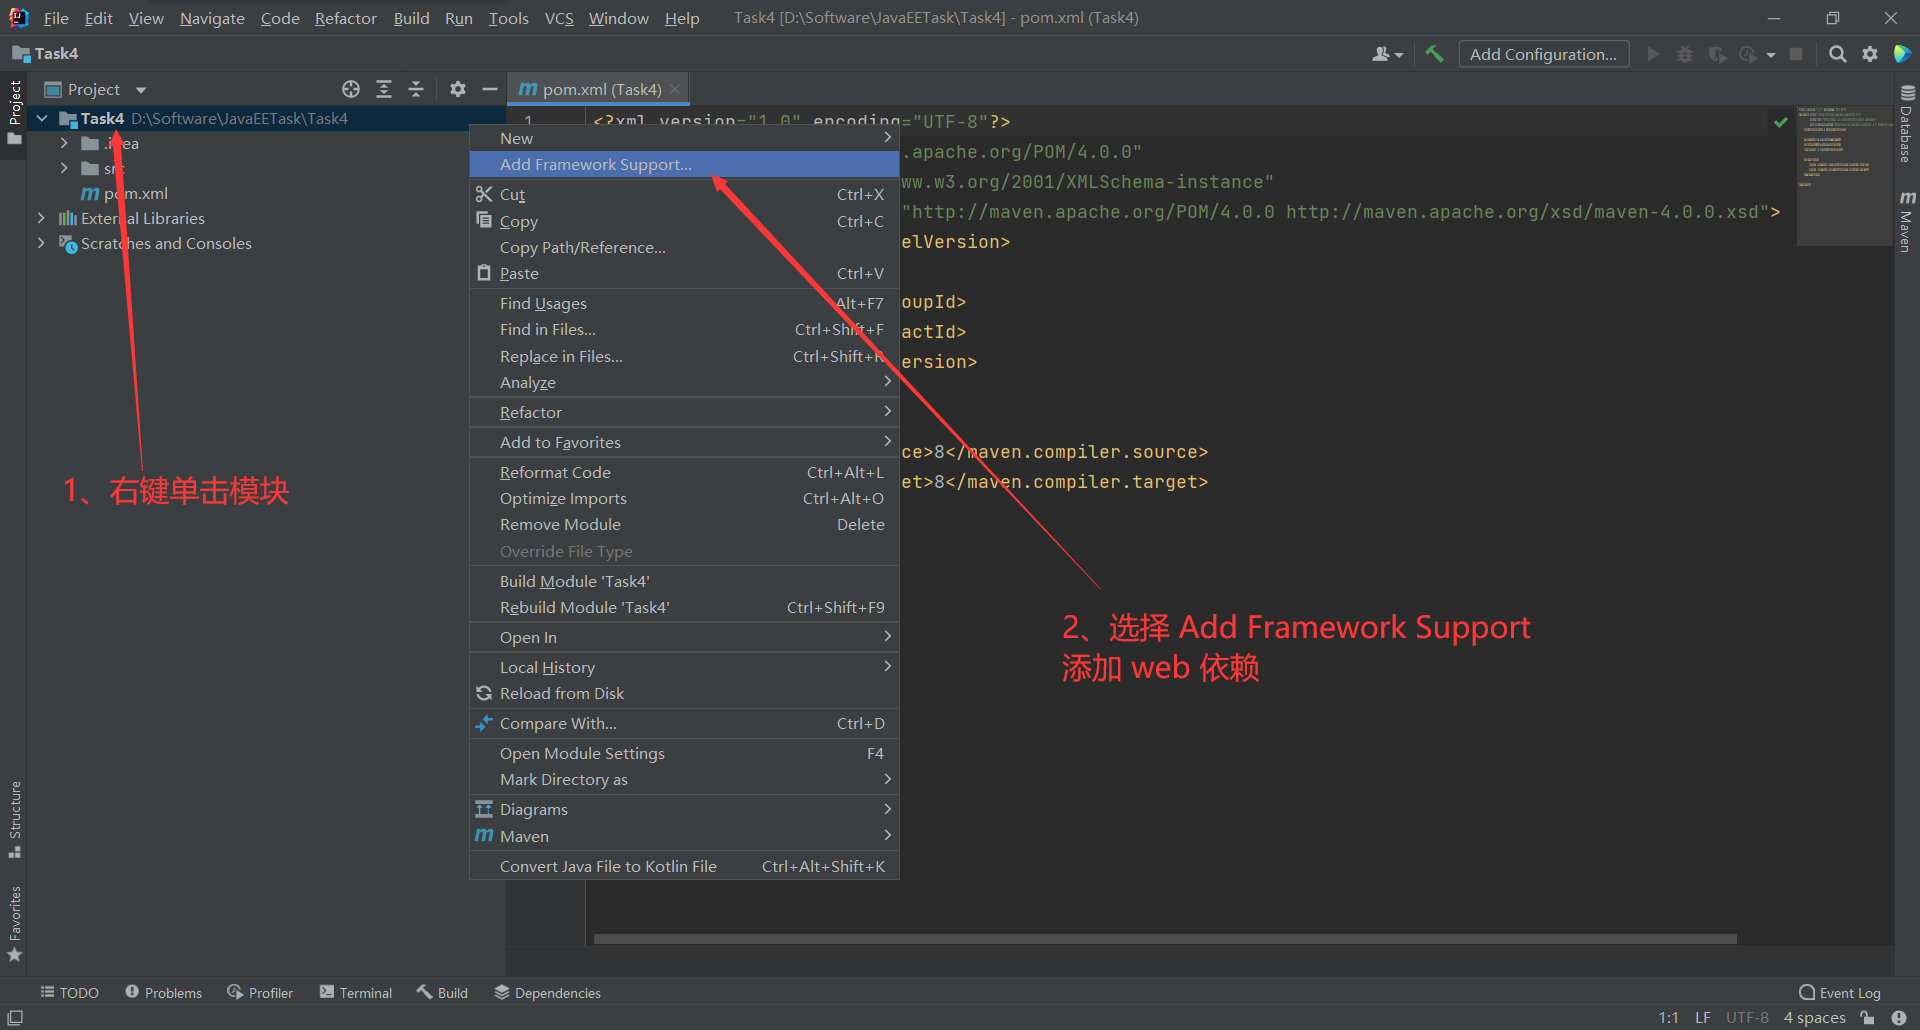
Add Framework Support. You need to upgrade the normal Maven project to a web project. Right click the module. Select Add Framework Support to add a web framework.
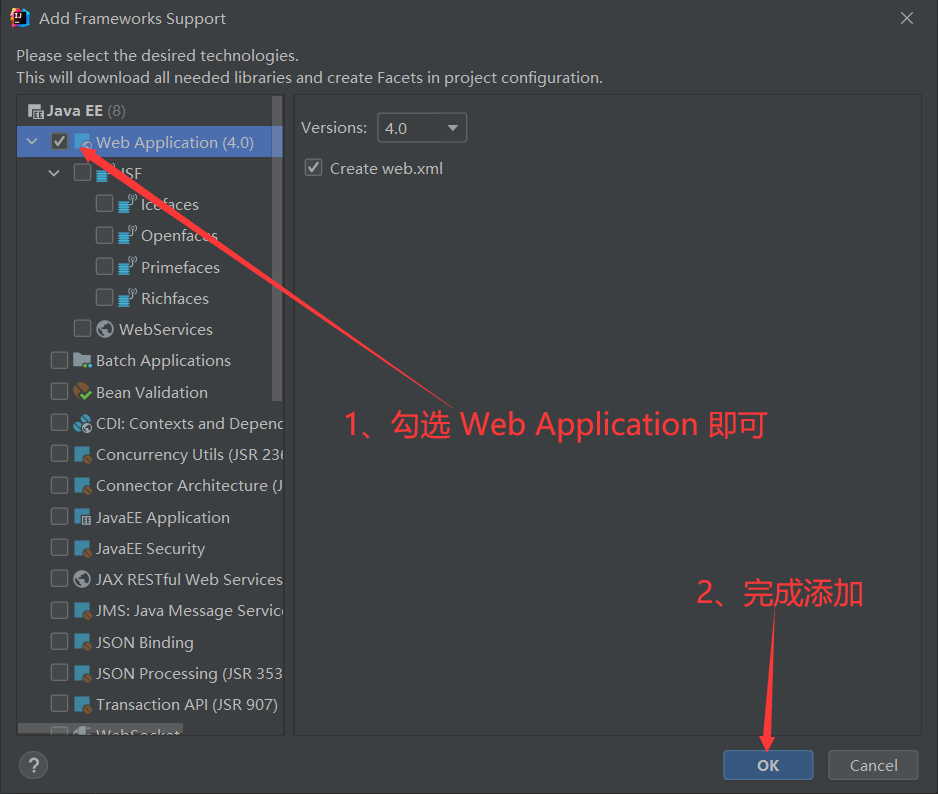
Select Web Application and click OK to add Web framework support.
Configuration item
We need to add the required dependency code in the pom.xml configuration file. We need to add dependencies on spring MVC, mysql, MyBatis, json, junit and other frameworks. The dependency code is shown below.
    <dependencies>

        <!--introduce SpringMVC(Spring Web MVC) Framework dependency-->
        <dependency>
            <groupId>org.springframework</groupId>
            <artifactId>spring-webmvc</artifactId>
            <version>5.1.9.RELEASE</version>
        </dependency>

        <!--introduce MySQL Database JDBC rely on-->
        <dependency>
            <groupId>mysql</groupId>
            <artifactId>mysql-connector-java</artifactId>
            <version>8.0.26</version>
        </dependency>

        <!--introduce Mybatis Framework dependency-->
        <dependency>
            <groupId>org.mybatis</groupId>
            <artifactId>mybatis</artifactId>
            <version>3.5.7</version>
        </dependency>

        <!--json rely on-->
        <!-- https://mvnrepository.com/artifact/org.json/json -->
        <dependency>
            <groupId>org.json</groupId>
            <artifactId>json</artifactId>
            <version>20210307</version>
        </dependency>

        <!-- junit unit testing -->
        <!-- https://mvnrepository.com/artifact/org.junit.jupiter/junit-jupiter-api -->
        <dependency>
            <groupId>org.junit.jupiter</groupId>
            <artifactId>junit-jupiter-api</artifactId>
            <version>5.8.1</version>
            <scope>test</scope>
        </dependency>

    </dependencies>


    <!--stay build Medium configuration resources,To prevent resource export failure-->
    <build>
        <resources>
            <resource>
                <directory>src/main/resources</directory>
                <includes>
                    <include>**/*.properties</include>
                    <include>**/*.xml</include>
                </includes>
                <filtering>true</filtering>
            </resource>
            <resource>
                <directory>src/main/java</directory>
                <includes>
                    <include>**/*.properties</include>
                    <include>**/*.xml</include>
                </includes>
                <filtering>true</filtering>
            </resource>
        </resources>
    </build>
We pass MyBatis framework to connect to MySQL database. Let's first add the MyBatis configuration file named mybatis-config.xml. We need to create it under the resources package mybatis-config.xml configuration file. (there may be a red explosion because no resources are found. We will deal with it later)
<?xml version="1.0" encoding="UTF-8" ?>
<!DOCTYPE configuration
        PUBLIC "-//mybatis.org//DTD Config 3.0//EN"
        "http://mybatis.org/dtd/mybatis-3-config.dtd">
<configuration>

    <!--Import external profile-->
    <properties resource="databaseconfig.properties"/>

    <environments default="development">
        <environment id="development">
            <transactionManager type="JDBC"/>
            <dataSource type="POOLED">
                <property name="driver" value="${driver}"/>
                <property name="url" value="${url}"/>
                <property name="username" value="${username}"/>
                <property name="password" value="${password}"/>
            </dataSource>
        </environment>
    </environments>

    <mappers>
        <mapper resource="com/kid/serviceimpl/SignServiceImpl.xml"/>
    </mappers>

</configuration>
We also need to create one under the resources package The databaseconfig.properties resource file is used to save the connection information of the database. (note that you need to replace it with your own information. My password is empty, and the password item is empty without spaces)
driver=com.mysql.cj.jdbc.Driver
url=jdbc:mysql://localhost:3306/task?useSSL=true&useUnicode=true&characterEncoding=UTF-8&serverTimezone=Asia/Shanghai
username=root
password=
We also need to create the springmvc-config.xml configuration file under the resources package. Automatically scan the package and automatically scan all annotations under the specified path (the path may be red because we have not created the specified path, which will be processed later).
<?xml version="1.0" encoding="UTF-8"?>
<beans xmlns="http://www.springframework.org/schema/beans"
       xmlns:xsi="http://www.w3.org/2001/XMLSchema-instance"
       xmlns:context="http://www.springframework.org/schema/context"
       xmlns:mvc="http://www.springframework.org/schema/mvc"
       xsi:schemaLocation="http://www.springframework.org/schema/beans
       http://www.springframework.org/schema/beans/spring-beans.xsd
       http://www.springframework.org/schema/context
       https://www.springframework.org/schema/context/spring-context.xsd
       http://www.springframework.org/schema/mvc
       https://www.springframework.org/schema/mvc/spring-mvc.xsd">

    <!-- Automatically scan the package to make the annotations under the specified package effective,from IOC Unified container management -->
    <context:component-scan base-package="com.kid.controller"/>

    <!-- Give Way Spring MVC Do not process static resources -->
    <mvc:default-servlet-handler/>
    <!--
    support mvc Annotation driven
        stay spring Generally used in@RequestMapping Annotation to complete the mapping relationship
        To make@RequestMapping Note effective
        You must register with the context DefaultAnnotationHandlerMapping
        And one AnnotationMethodHandlerAdapter example
        These two instances are handled at the class level and method level, respectively.
        and annotation-driven Configuration helps us automatically complete the injection of the above two instances.
     -->
    <mvc:annotation-driven/>


</beans>
We need to register the dispatcher Servlet of spring MVC, that is, the view parser, in the web.xml configuration file. Dispatcher Servlet is essentially a Servlet. We have directly added the spring MVC official coding filter here, which can solve most of the garbled code problems. (after the code is added, the pop-up may occur because we did not create the springmvc-servlet.xml configuration file. There is no need to deal with the pop-up error first. We will create the corresponding configuration file later.)
    <!--1.register servlet-->
    <!--DispatcherServlet It's actually a Servlet-->
    <servlet>
        <servlet-name>SpringMVC</servlet-name>
        <servlet-class>org.springframework.web.servlet.DispatcherServlet</servlet-class>
        <!--Specified by initialization parameters SpringMVC The location of the configuration file is associated-->
        <init-param>
            <param-name>contextConfigLocation</param-name>
            <param-value>classpath:springmvc-config.xml</param-value>
        </init-param>
        <!-- Start sequence: the smaller the number, the earlier the start -->
        <load-on-startup>1</load-on-startup>
    </servlet>

    <!--All requests will be rejected springmvc intercept -->
    <servlet-mapping>
        <servlet-name>SpringMVC</servlet-name>
        <url-pattern>/</url-pattern>
    </servlet-mapping>

    <!--SpringMVC The official garbled code filter can solve most of the garbled code problems-->
    <filter>
        <filter-name>encoding</filter-name>
        <filter-class>org.springframework.web.filter.CharacterEncodingFilter</filter-class>
        <init-param>
            <param-name>encoding</param-name>
            <param-value>utf-8</param-value>
        </init-param>
    </filter>
    <filter-mapping>
        <filter-name>encoding</filter-name>
        <url-pattern>/*</url-pattern>
    </filter-mapping>
Write project
Create package structure
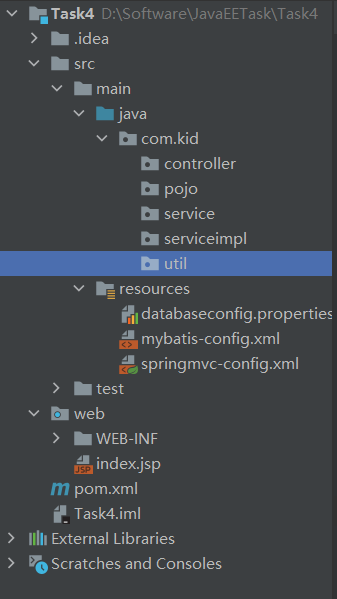
We create the package structure according to the MVC layered coding specification. Create com package under java package, kid package under com package and controller, pojo, service, serviceimpl and util package under kid package. The pojo package stores the required entity classes; The utility class of MyBatis is stored in the util package, which can facilitate the operation of the database; Service interfaces are stored in the service package, that is, interfaces that define all functions that may be needed; The serviceimpl package stores the implementation class of the interface. The MyBatis framework we use here does not have an implementation class. Instead, the configuration file is used to correspond to the interface one by one; The controller package stores the control class, which is used to receive the value from the front end and call the service interface. An example of package structure is shown in the figure.
Writing back-end code
pojo package
The pojo package stores the required entity classes. We just complete the relatively simple check-in function, so we only need to create a Sign class. Create a Sign class.
package com.kid.pojo;

/**
 * Entity class for student check-in
 */
public class Sign {
    private Integer id;//Unique number, no practical significance
    private String name;//full name
    private String sno;//Student number
    private String classnumber;//Class number
    private String cours;//Course name
    private String datatime;//Check in time
    private String num;//Seat number

    public Sign() {
    }

    public Sign(Integer id, String name, String sno, String classNumber, String cours, String datatime, String num) {
        this.id = id;
        this.name = name;
        this.sno = sno;
        this.classnumber = classNumber;
        this.cours = cours;
        this.datatime = datatime;
        this.num = num;
    }

    public Integer getId() {
        return id;
    }

    public void setId(Integer id) {
        this.id = id;
    }

    public String getName() {
        return name;
    }

    public void setName(String name) {
        this.name = name;
    }

    public String getSno() {
        return sno;
    }

    public void setSno(String sno) {
        this.sno = sno;
    }

    public String getClassnumber() {
        return classnumber;
    }

    public void setClassnumber(String classnumber) {
        this.classnumber = classnumber;
    }

    public String getCours() {
        return cours;
    }

    public void setCours(String cours) {
        this.cours = cours;
    }

    public String getDatatime() {
        return datatime;
    }

    public void setDatatime(String datatime) {
        this.datatime = datatime;
    }

    public String getNum() {
        return num;
    }

    public void setNum(String num) {
        this.num = num;
    }

    @Override
    public String toString() {
        return "Sign{" +
                "id=" + id +
                ", name='" + name + '\'' +
                ", sno='" + sno + '\'' +
                ", classNumber='" + classnumber + '\'' +
                ", cours='" + cours + '\'' +
                ", datatime='" + datatime + '\'' +
                ", num='" + num + '\'' +
                '}';
    }
}
util package
The utility classes stored in the util package are the utility classes of the MyBatis framework connecting to the MySQL database, which are used to obtain the SqlSession object and release the SqlSession object. Create the MyBatisUtil class.
package com.kid.util;


import org.apache.ibatis.io.Resources;
import org.apache.ibatis.session.SqlSession;
import org.apache.ibatis.session.SqlSessionFactory;
import org.apache.ibatis.session.SqlSessionFactoryBuilder;

import java.io.IOException;
import java.io.InputStream;

/**
 * Mybatis A tool class that can be used to obtain and release SqlSession objects
 */
public class MyBatisUtil {

    String resource = "mybatis-config.xml";
    InputStream inputStream = null;
    SqlSessionFactory sqlSessionFactory = null;
    SqlSession sqlSession = null;

    {
        try {
            inputStream = Resources.getResourceAsStream(resource);
            sqlSessionFactory = new SqlSessionFactoryBuilder().build(inputStream);
        } catch (IOException e) {
            e.printStackTrace();
        }
    }

    /**
     * The SqlSession object can be obtained through the SqlSessionFactory class
     * @return SqlSession Object of
     */
    public SqlSession getSqlSession() {
        return sqlSession = sqlSessionFactory.openSession(true);
    }

    /**
     * Close the SqlSession object
     */
    public void closeSession() {
        sqlSession.close();
    }

}
service package
The serviceinpl package stores the interface of specific business. During student check-in, you need to add check-in information to the database. You can query all check-in information or view a specific check-in information (the function is not perfect, and it will be updated in GitHub later). Create SignService interface.
package com.kid.service;

import com.kid.pojo.Sign;
import org.apache.ibatis.annotations.Param;

import java.util.List;

/**
 * Interface of student check-in service
 */
public interface SignService {

    //Find all check ins
    public List<Sign> queryAll();

    //Find check-in information according to unique number
    public Sign queryOne(@Param("id") Integer id);

    //Add a sign in message
    public void addSign(Sign sign);

}
serviceimpl package
The serviceimpl package stores the implementation class of the interface, but the MyBatis framework does not use the implementation class, but the configuration file corresponding to the interface. Create the SignServiceImpl.xml configuration file.
<?xml version="1.0" encoding="UTF-8" ?>
<!DOCTYPE mapper
        PUBLIC "-//mybatis.org//DTD Mapper 3.0//EN"
        "http://mybatis.org/dtd/mybatis-3-mapper.dtd">
<mapper namespace="com.kid.service.SignService">


    <!--Find all check-in information-->
    <select id="queryAll" resultType="com.kid.pojo.Sign">
        select *
        from sign
    </select>

    <!--By unique number id Check in information-->
    <select id="queryOne" resultType="com.kid.pojo.Sign">
        select *
        from sign
        where #{id} = id
    </select>

    <!--Add sign in information-->
    <insert id="addSign" parameterType="com.kid.pojo.Sign">
        insert into sign (name, sno, classnumber, cours, datatime, num)
        values (#{name}, #{sno}, #{classnumber}, #{cours}, #{datatime}, #{num})
    </insert>

</mapper>
controller package
In the controller package, the control class is stored, receiving the sign in information of the front end student, then calling the service interface, and storing the information in the database. Create the SignController class.
package com.kid.controller;

import com.kid.util.MyBatisUtil;
import com.kid.pojo.Sign;
import com.kid.service.SignService;
import org.json.JSONArray;
import org.json.JSONObject;
import org.springframework.stereotype.Controller;
import org.springframework.web.bind.annotation.RequestMapping;
import org.springframework.web.bind.annotation.ResponseBody;

import java.util.List;

@Controller
public class SignController extends MyBatisUtil {

    SignService signService = null;

    //No view parser
    @ResponseBody
    //Request address
    @RequestMapping(value = "/add", produces = "text/html;charset=UTF-8;")
    public String add(Sign sign) {

        signService = getSqlSession().getMapper(SignService.class);

        System.out.println("Here is SignController Class add method");//Test information
        System.out.println("sign = " + sign);//Test information

        signService.addSign(sign);

        closeSession();

        return "1";
    }

    //No view parser
    @ResponseBody
    //Request address
    @RequestMapping(value = "/queryAll", produces = "text/html;charset=UTF-8;")
    public String queryAll() {
        //Test information
        System.out.println("Here is SignController Class queryAll method");

        signService = getSqlSession().getMapper(SignService.class);

        List<Sign> signList = signService.queryAll();

        signList.toString();

        JSONArray jsonArray = new JSONArray(signList);

        closeSession();

        return jsonArray.toString();
    }

    @ResponseBody
    @RequestMapping(value = "queryOne", produces = "text/html;charset=UTF-8;")
    public String queryOne(String index) {
        //Test information
        System.out.println("Here is SignController Class queryOne method");
        System.out.println("index = " + index);

        signService = getSqlSession().getMapper(SignService.class);
        Sign sign = signService.queryOne(Integer.parseInt(index));

        System.out.println("sign = " + sign);

        JSONObject jsonObject = new JSONObject(sign);

        return jsonObject.toString();
    }

}
Create front-end display page
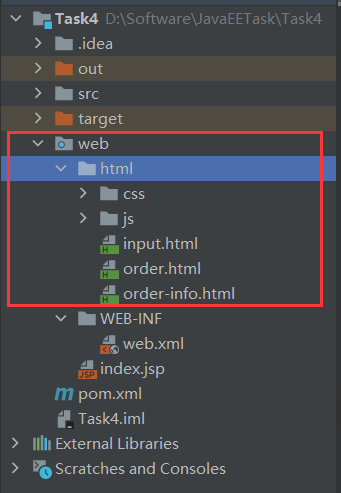
We create an html package under the web package. The package structure is shown in the figure below (without css files and js files, the function implementation will not be affected).
Create an input.html file and add login information.
<!DOCTYPE html>
<html lang="zh-cn">
<head>
<meta charset="utf-8">
<meta http-equiv="X-UA-Compatible" content="IE=edge">
<meta name="viewport" content="width=device-width, initial-scale=1">
<title>Check in system</title>
<link href="css/style.css" rel="stylesheet"/>
<link href="css/response.css" rel="stylesheet"/>
</head>
<body class="bg">
<div class="content">
<div class="header">
<div class="header-nei">
<h2 class="header-title">Sign in</h2>
</div>
</div>
<!--head/-->
<div class="head-height"> </div>
<div class="login-reg" style="padding-top:16px;">
<form id="form1">
<div class="log-reg-list"><input type="text" name="name" class="log-reg-text2 order-txm"
placeholder="Please enter your name"/><span>*Required</span></div>
<div class="log-reg-list"><input type="text" name="sno" class="log-reg-text2 order-sj"
placeholder="Please enter student number"/><span>*</span></div>
<div class="log-reg-list"><input type="text" name="classnumber" class="log-reg-text2 order-phone"
placeholder="Please enter class"/><span>*</span></div>
<div class="log-reg-list"><input type="text" name="cours" class="log-reg-text2 order-sj-name"
placeholder="Course name"/><span>*</span></div>
<div class="log-reg-list"><input type="text" name="datatime" class="log-reg-text2 order-user"
placeholder="Class time"/><span>*</span></div>
<div class="log-reg-list"><input type="text" name="num" class="log-reg-text2 order-phone"
placeholder="Seat number"/><span>*</span></div>
</form>
<div class="log-reg-sub">
<a href="javascript:tijiao();" class="log-reg-btn">Submit</a>
</div>
</div>
</div>
<script src="js/jquery.min.js"></script>
<script src="js/style.js"></script>
</body>
<!--jquery Lightweight front end framework ajax Asynchronous request combination strut2(spring mvc) -->
<!--json object -->
<script type="text/javascript">
function tijiao() {
$.ajax({
type: "post",
url: "/Task4_war_exploded/add",
data: $('#form1').serialize(),
dataType: "json",
success: function (res) {
if (res == 1) {
alert("Check in succeeded!");
window.location.href = "order.html";
} else {
alert("Check in failed!!!");
}
},
error: function (data) {
alert("System exception!!!!");
}
});
}
</script>
</html>Create an order.html file to display all the information.
<!DOCTYPE html>
<html lang="zh-cn">
<head>
<meta charset="utf-8">
<meta http-equiv="X-UA-Compatible" content="IE=edge">
<meta name="viewport" content="width=device-width, initial-scale=1">
<title>Information entry system</title>
<link href="css/style.css" rel="stylesheet"/>
<link href="css/response.css" rel="stylesheet"/>
</head>
<body class="bg">
<div class="content">
<div class="header">
<div class="header-nei">
<a href="javascript:;" onclick="javascript:history.back(-1);" class="back-up"><i
class="iconfont"></i></a>
<h2 class="header-title">order list </h2>
</div>
</div>
<!--head/-->
<div class="head-height"> </div>
<div class="nav" id="nav"></div>
<div class="loading" id="morediv"><a href="javascript:more()">Load all information...</a></div>
</div>
<!--content/-->
<div class="bg100"></div>
<script src="js/jquery.min.js"></script>
<script src="js/style.js"></script>
</body>
<!-- Display the function page, which should be triggered when the page is loaded ajax event -->
<script type="text/javascript">
var _dl = '';
var data;
var flag = false;
$(function () {
//ajax for query
$.ajax({
type: "post",
url: "/Task4_war_exploded/queryAll",
data: $('#form').serialize(),
dataType: "json",
success: function (res) {
data = res;//Expand the scope of the queried data to view more usage
//All the data is in the json array in res
//How query traverses json arrays
if (res != null && res.length > 0 && flag == false) {
flag = true;
// var _dl = '';
$("#nav").empty(); / / empty the list first
$.each(res, function (i, v) { //Each time the array is cycled, a piece of html is spliced
if (i <= 5) {
_dl = _dl + //Replace the data you want to display in the array
'<dl>' +
'<a href="order-info.html?' + v.id + '">' +
'<dt>' + (i + 1) + '</dt>' +
'<dd>' + v.cours + ' ' + v.datatime + '</dd>' +
'<i class="iconfont"></i>' +
'<div class="clears"></div>' +
'</a>' +
'</dl>';
}
});
$("#nav").append(_dl); // Append the spliced html to the root node (list) after the loop
}
},
error: function (res) {
alert("System exception");
}
});
})
function more() {
$("#nav").empty(); / / empty the list first
$.each(data, function (i, v) { //Each time the array is cycled, a piece of html is spliced
if (i > 5) {
_dl = _dl + //Replace the data you want to display in the array
'<dl>' +
'<a href="order-info.html?' + v.id + '">' +
'<dt>' + (i + 1) + '</dt>' +
'<dd>' + v.cours + ' ' + v.datatime + '</dd>' +
'<i class="iconfont"></i>' +
'<div class="clears"></div>' +
'</a>' +
'</dl>';
}
});
$("#nav").append(_dl); // Append the spliced html to the root node (list) after the loop
document.getElementById("morediv").style.display = "none";//When all are displayed, hide show more buttons
}
</script>
</html>Create an order-info.html file to display details.
<!DOCTYPE html>
<html lang="zh-cn">
<head>
<meta charset="utf-8">
<meta http-equiv="X-UA-Compatible" content="IE=edge">
<meta name="viewport" content="width=device-width, initial-scale=1">
<title>Information entry system</title>
<link href="css/style.css" rel="stylesheet"/>
<link href="css/response.css" rel="stylesheet"/>
</head>
<body class="bg">
<div class="content">
<div class="header">
<div class="header-nei">
<a href="javascript:;" onclick="javascript:history.back(-1);" class="back-up"><i
class="iconfont"></i></a>
<h2 class="header-title">Check in details</h2>
</div>
</div>
<!--head/-->
<div class="head-height"> </div>
<div class="order-info">
<table>
<tr>
<th>full name</th>
<td id="name">Loading</td>
</tr>
<tr>
<th>Student number</th>
<td id="sno">Loading</td>
</tr>
<tr>
<th>class</th>
<td id="classnumber">Loading</td>
</tr>
<tr>
<th>curriculum</th>
<td id="cours">Loading</td>
</tr>
<tr>
<th>time</th>
<td id="datatime">Loading</td>
</tr>
<tr>
<th>Seat number</th>
<td id="num">Loading</td>
</tr>
</table>
</div>
</div>
<!--content/-->
<div class="bg100"></div>
<script src="js/jquery.min.js"></script>
<script src="js/style.js"></script>
</body>
<script type="text/javascript">
$(function () {
//Get the subscript i passed from order.html
//http://localhost:8080/ssh_sign/html/order-info.html?0
var i = (window.location.href).split("?")[1];
//Pass i to the background through an ajax to obtain a piece of data and display it in the corresponding position
$.ajax({
type: "post",
url: "/Task4_war_exploded/queryOne",
data: {'index': i}, //--->Index is the same as the variable index in the control class
dataType: "json",
success: function (res) {
$("#name").text(res.name);
$("#sno").text(res.sno);
$("#classnumber").text(res.classnumber);
$("#cours").text(res.cours);
$("#datatime").text(res.datatime);
$("#num").text(res.num);
},
error: function (data) {
alert("The system is abnormal")
}
});
})
</script>
</html>Possible problems
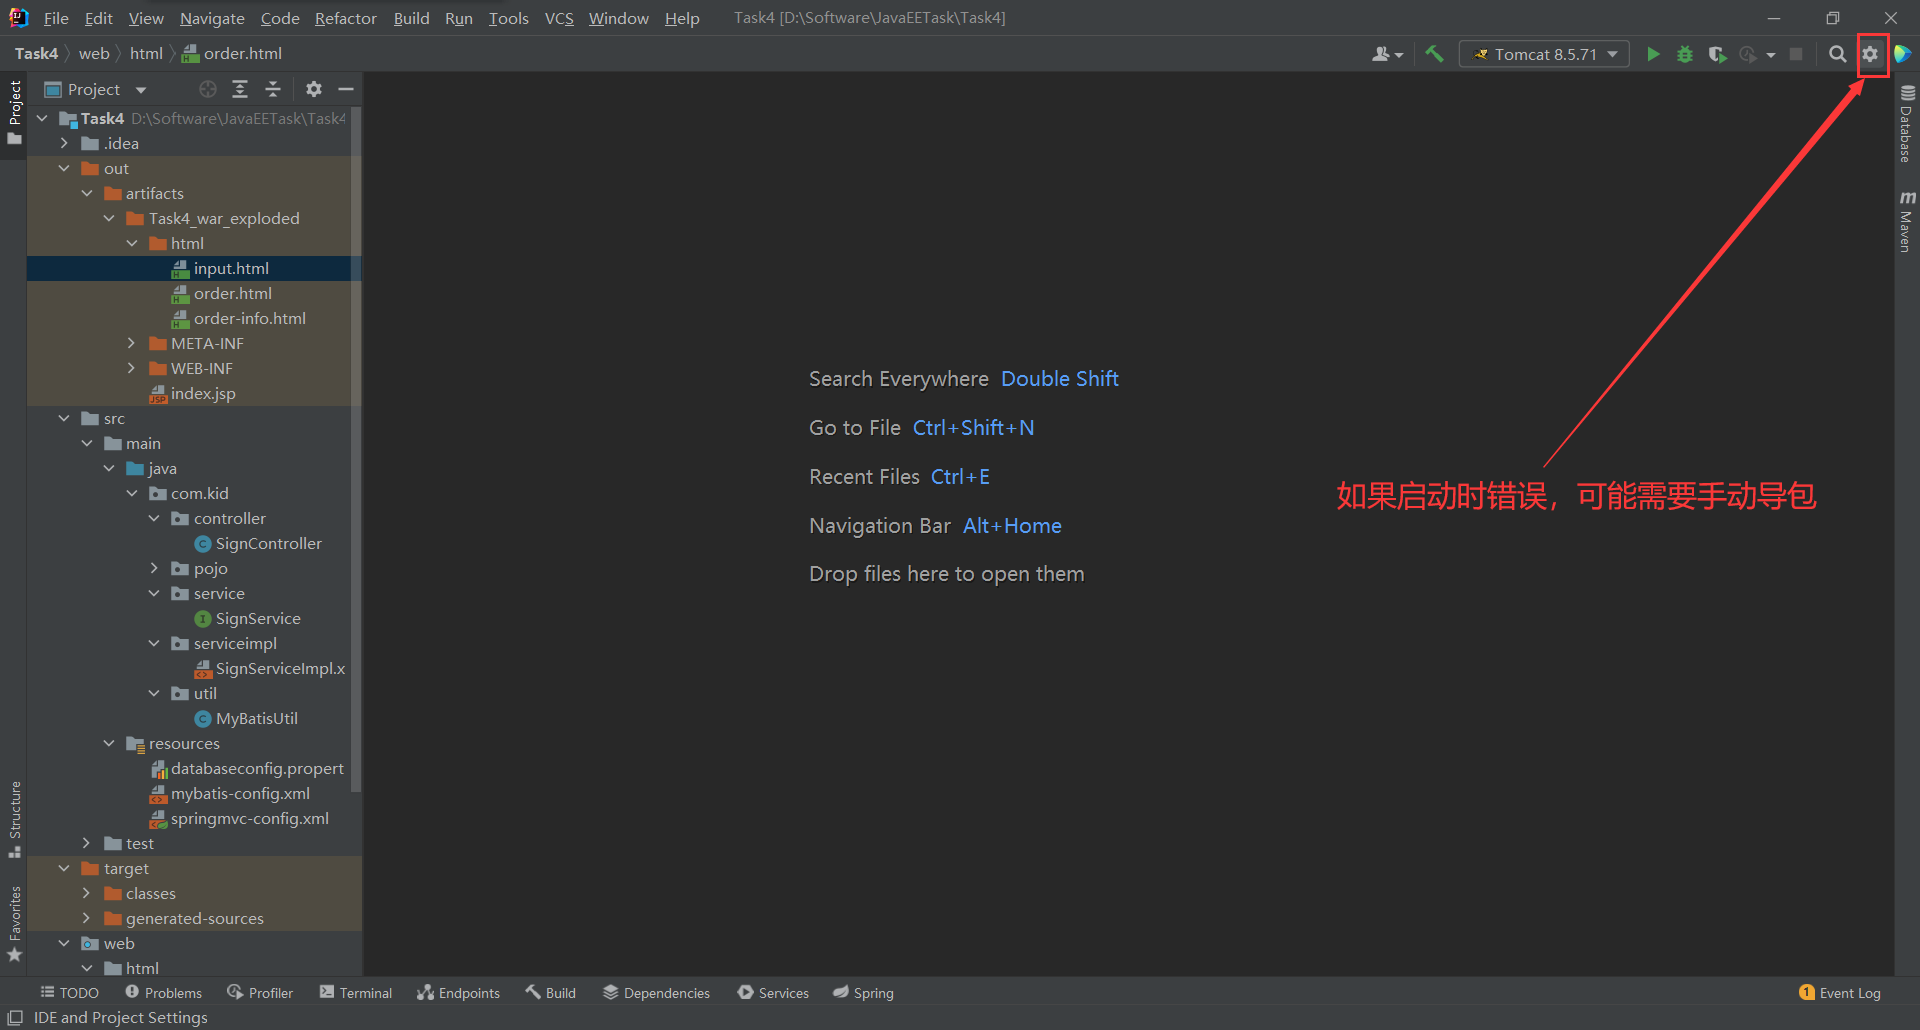
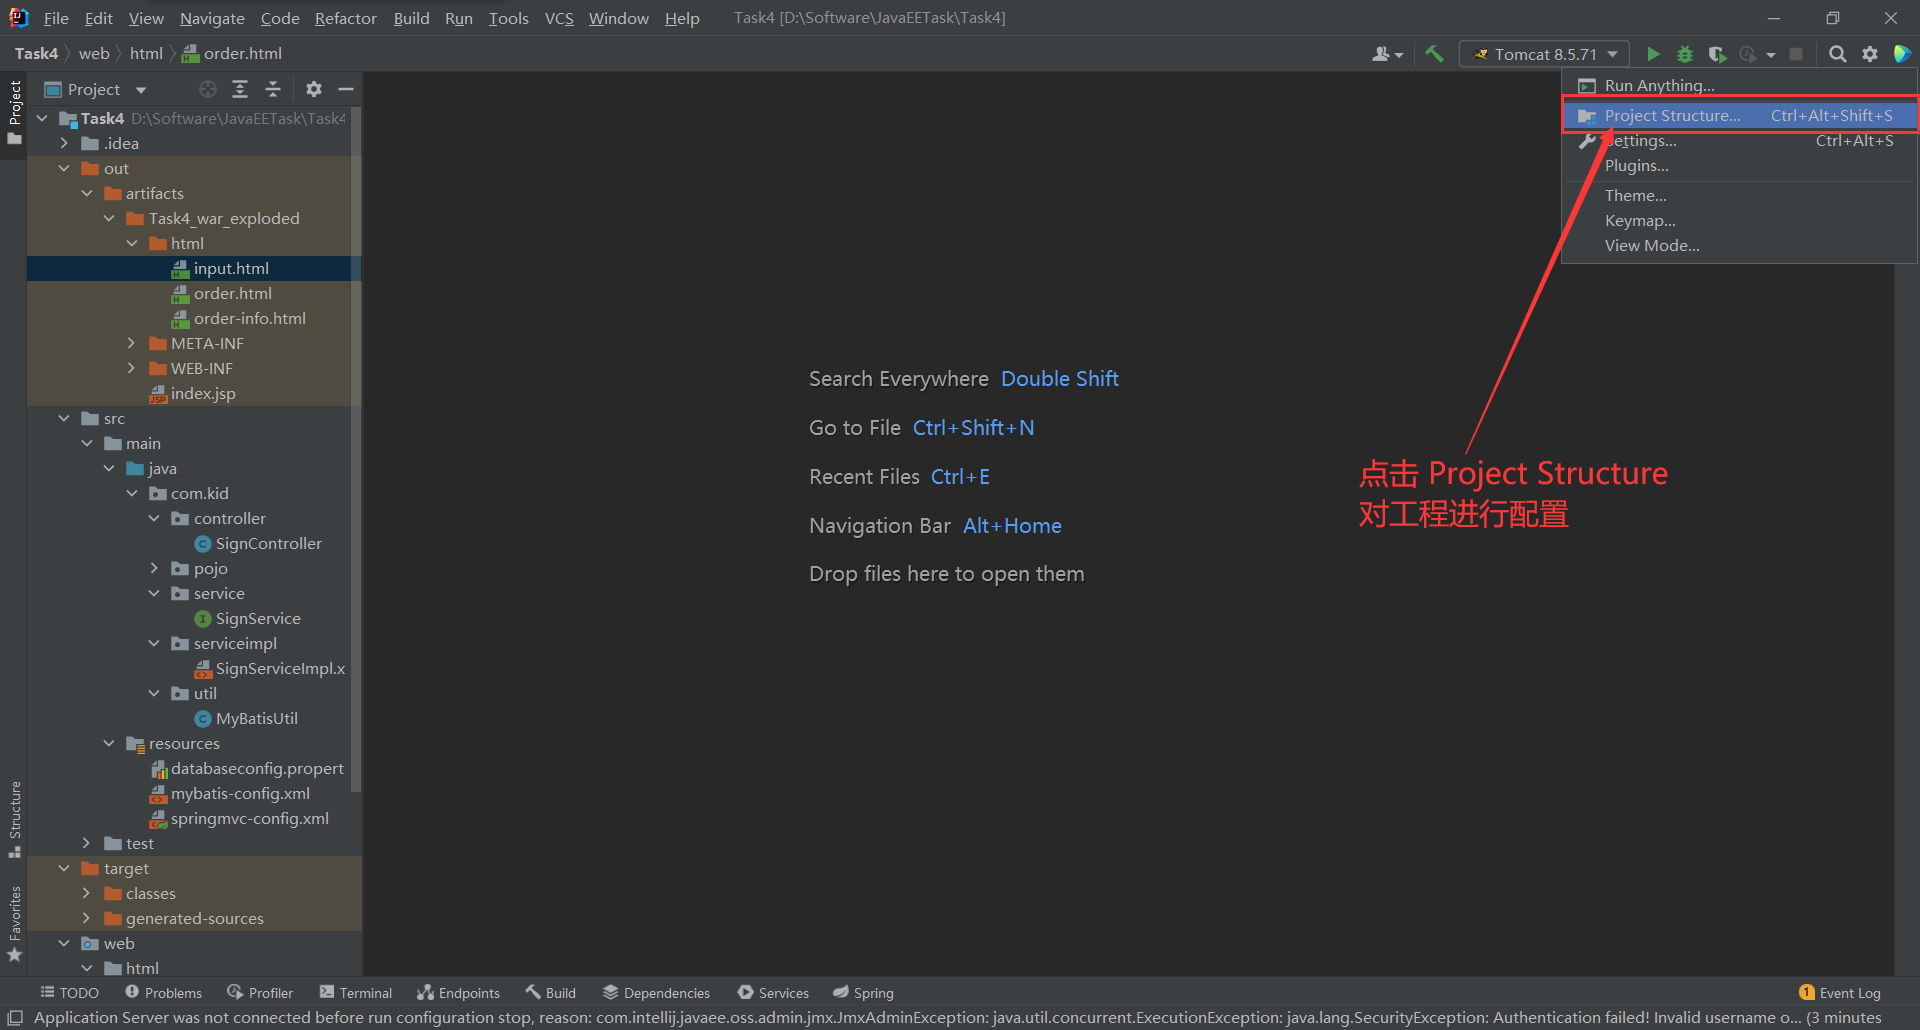
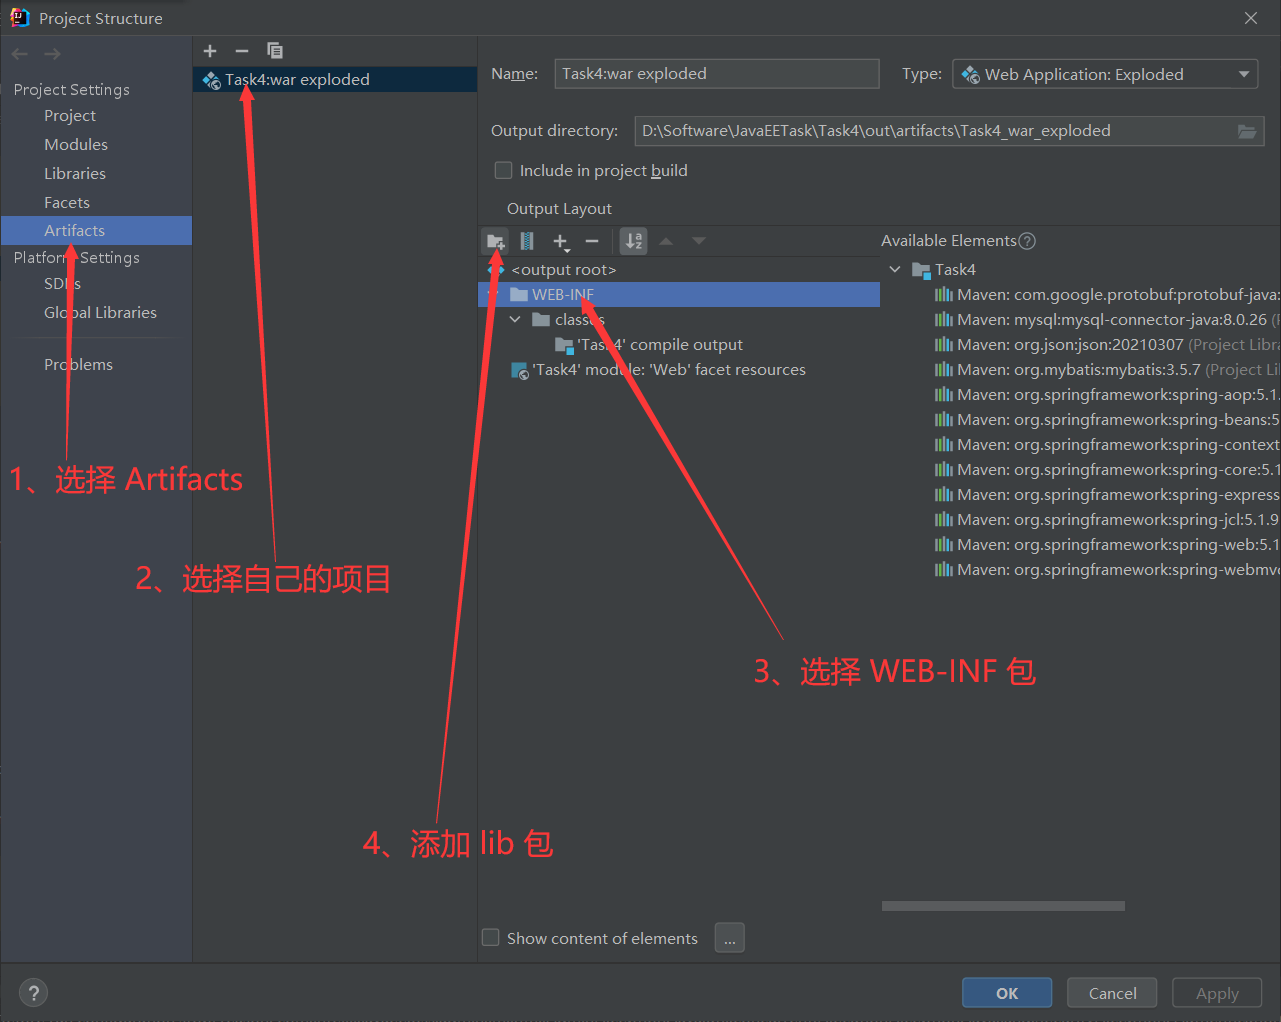
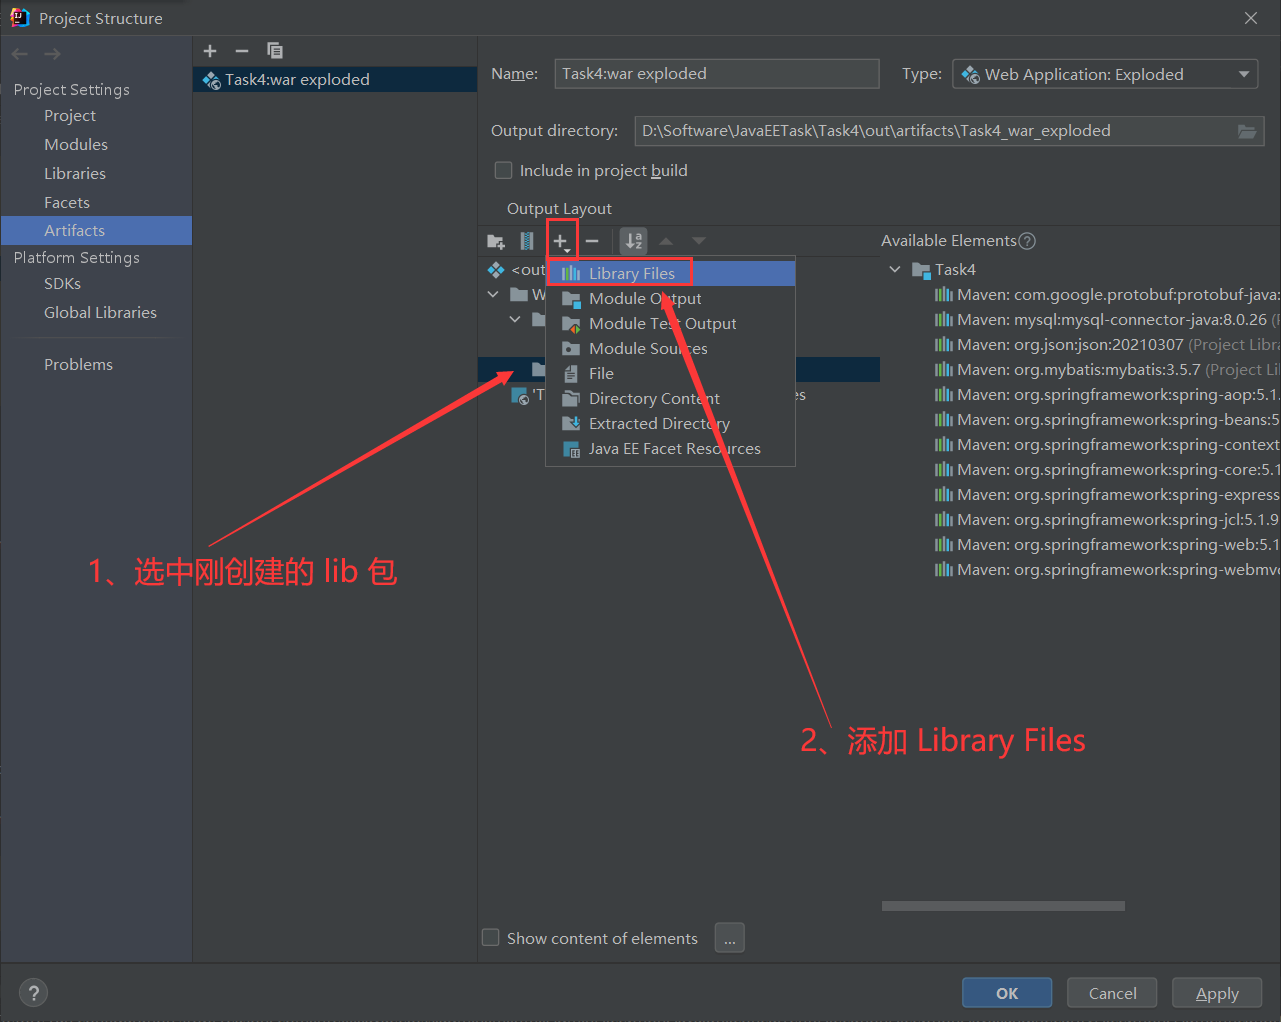
Tomcat startup failed.
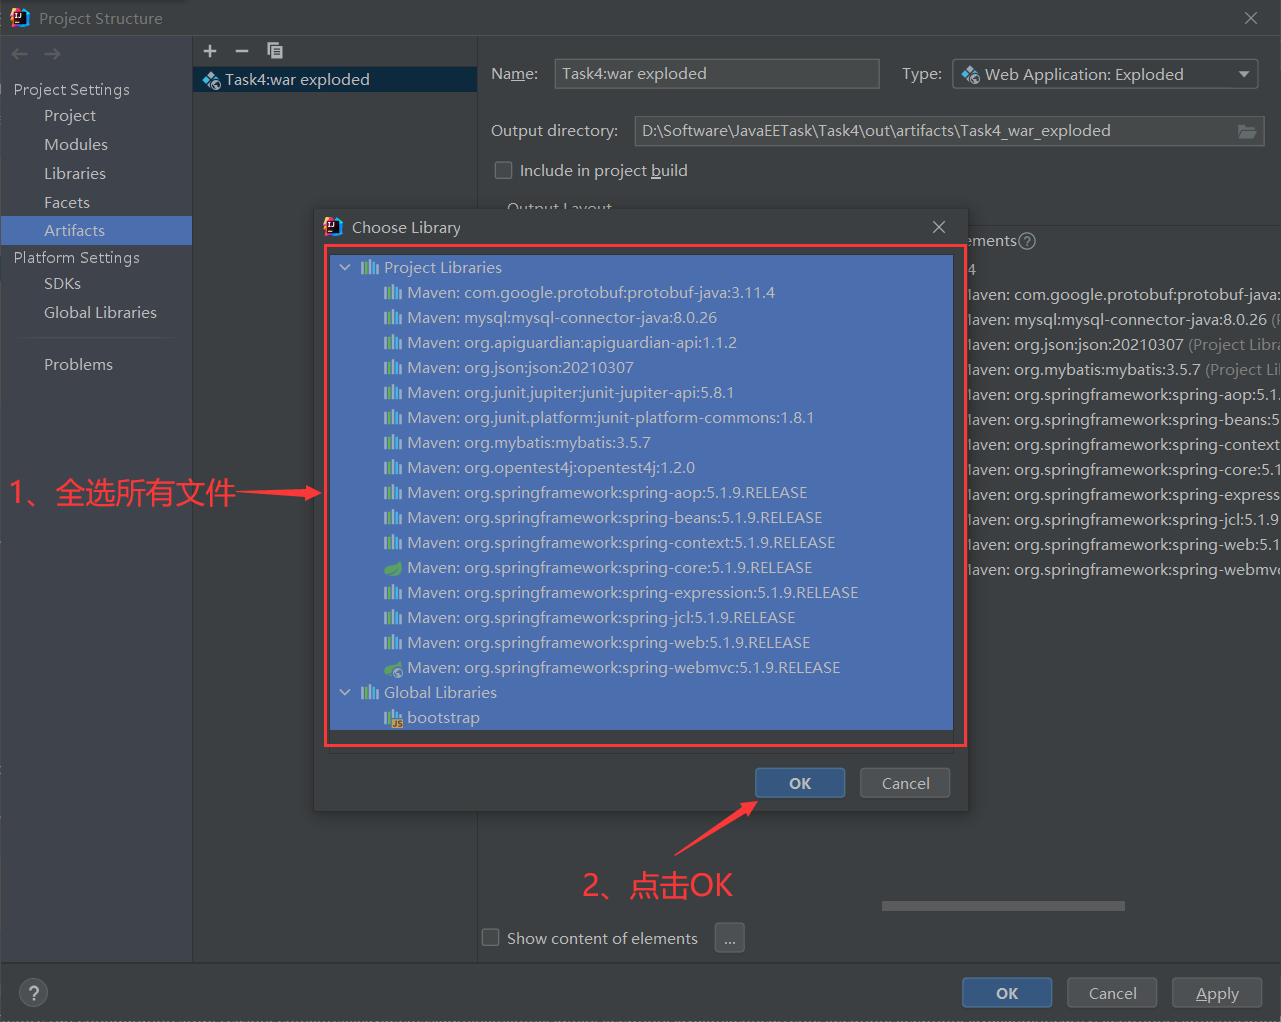
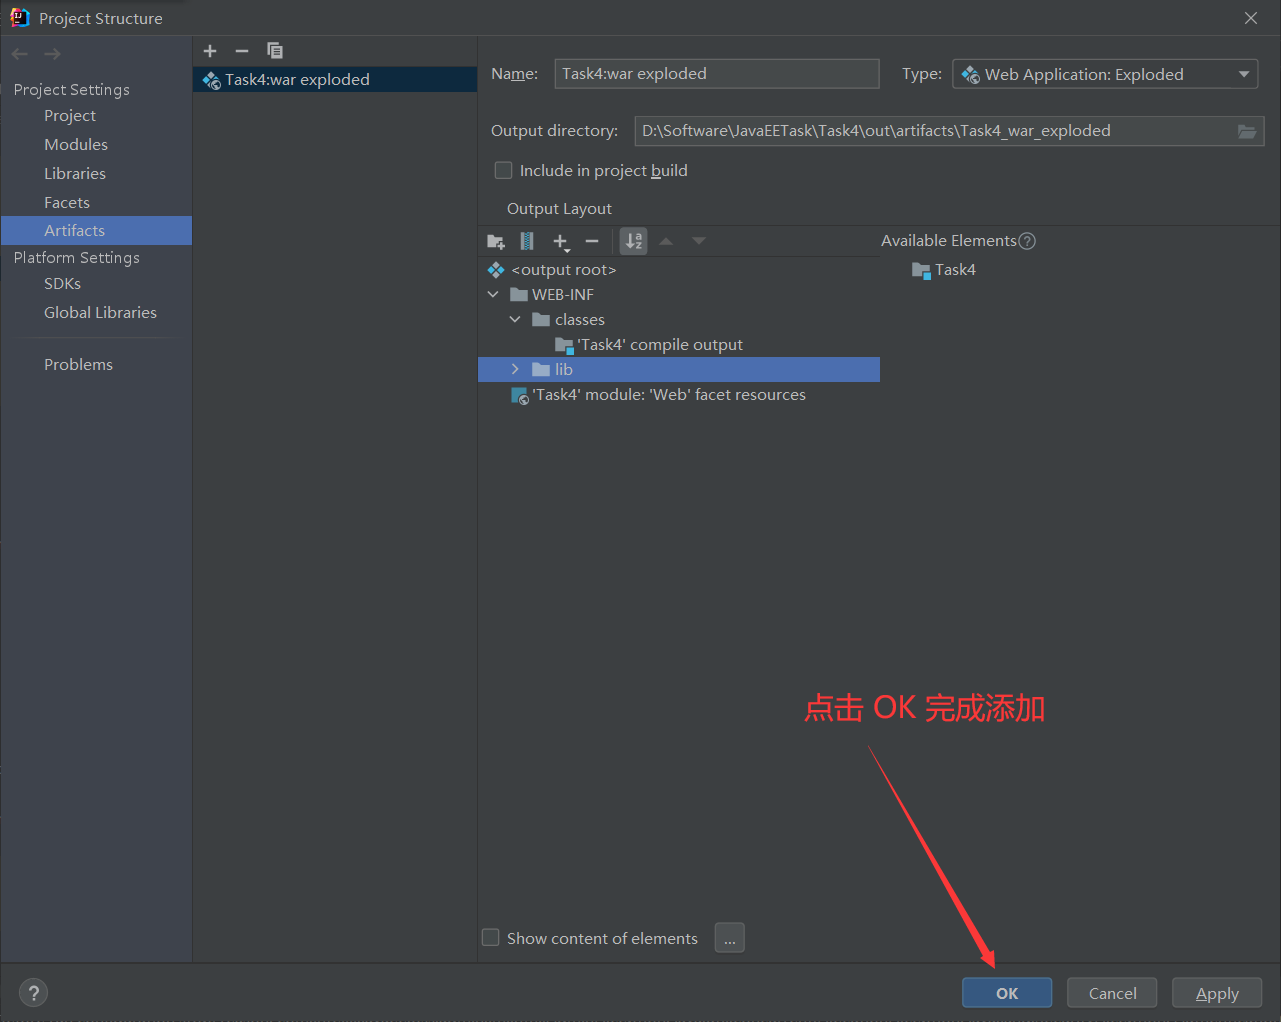
You may need to manually guide the package because the resource is not found.
Garbled code problem
You can set the character set using spring MVC's official filters. Add the following code to the web.xml configuration file (note that the following code has been added to this project).
    <!--SpringMVC The official garbled code filter can solve most of the garbled code problems-->
    <filter>
        <filter-name>encoding</filter-name>
        <filter-class>org.springframework.web.filter.CharacterEncodingFilter</filter-class>
        <init-param>
            <param-name>encoding</param-name>
            <param-value>utf-8</param-value>
        </init-param>
    </filter>
    <filter-mapping>
        <filter-name>encoding</filter-name>
        <url-pattern>/*</url-pattern>
    </filter-mapping>