2, MySQL Cluster Construction
2.1 cluster requirements
- Build a master-N-slave MySQL Cluster;
- The slave node can be expanded horizontally;
- All write operations can only be performed on the Master node;
- All read operations can be performed on all nodes;
2.2 build clusters in physical machine environment
Next, let's look at a schematic diagram of MySQL master-slave replication:
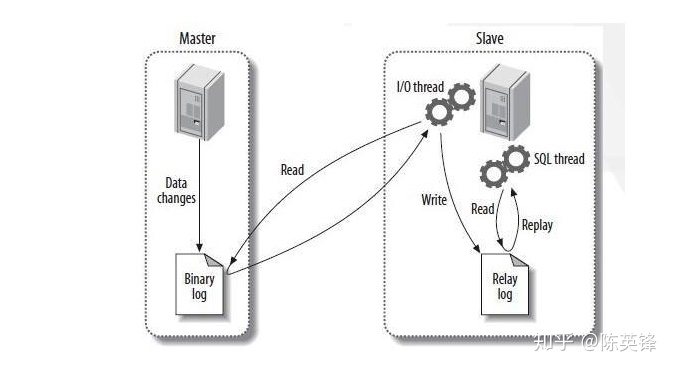
The above schematic diagram tells us that the key to deploying such a Master-Slave MySQL Cluster is to configure the replication and synchronization of the Master node and the Slave node.
Next, we describe the key steps of deploying such a cluster on the physical machine in natural language;
1. Configure and install MySQL of Master node;2. Back up the data of the Master node to the specified directory through XtraBackup;
3. Copy the directory backed up in step 2, together with the backup information file, to Slave /var/lib/mysql, and then execute CHANGE MASTER TO instruction;
4. Start the Slave node and execute START SLAVE command;
5. Add more Slave nodes to the cluster;
2.3 build a master-slave MySQL Cluster on kubernetes
2.3.1 difficulties
Different from the physical machine, build a master-slave MySQL Cluster on Kubernetes. Combined with the technical characteristics of the container, we think about the following difficulties to be solved:
- Master node and Slave node need different configuration files;
- Master node and Slave node need to be able to transmit backup information files;
- To start the Slave node for the first time, you need to perform some SQL initialization operations;
2.3.2 using cephfs for persistent storage
Prepare external ceph storage, deploy ceph CSI, and the storage name of storageclass, which is needed to deploy nacos
ceph storage: ceph v15.2.13 [octopus] distributed cluster deployment
CEPH CSI deployment: K8S uses CEPH CSI persistent storage for cephfs deployment verification snapshot
2.3.3 ConfigMap assigns different configuration files to the Master/Slave node
According to the concept of ConfigMap introduced at the beginning, using ConfigMap can solve the problem of inconsistency between Master and Slave node configuration files in MySQL Cluster. The configuration information of ConfigMap is as follows:
[root@master mysql]# cat configmap.yaml
---
apiVersion: v1
kind: ConfigMap
metadata:
  name: mysql
  namespace: mysql
  labels:
    app: mysql
data:
  master.cnf: |
    # Master configuration
    [mysqld]
    log-bin
  slave.cnf: |
    # Slave configuration
    [mysqld]
    super-read-only
Here we define master.cnf and slave.cnf MySQL configuration files.
- master.cnf enables log bin, that is, master-slave replication using binary log files.
- slave.cnf enables super read only, which means that the slave node rejects all write operations except the data synchronization operation of the master node, that is, it is read-only to the user.
Create ConfigMap and view status
[root@master mysql]# kubectl apply -f configmap.yaml
configmap/mysql created

[root@master mysql]# kubectl get configmap -n mysql
NAME    DATA   AGE
mysql   2      31d
2.3.4 Secret configure password for cluster
[root@master mysql]# cat secret.yaml
---
# Secret configure password for mysql Cluster
apiVersion: v1
kind: Secret
metadata:
  name: mysql-secret
  namespace: mysql
  labels:
    app: mysql
type: Opaque
data:
  password: dVVOMzgjJXBx # echo -n 'uUN38#%pq' |base64
Create and view secret
[root@master mysql]# kubectl create -f secret.yaml
secret/mysql-secret created

[root@master mysql]# kubectl get secret -n mysql
NAME                  TYPE                                  DATA   AGE
default-token-847k8   kubernetes.io/service-account-token   3      36d
mysql-secret          Opaque                                1      31d
2.3.5 Service provides service discovery for StatefulSet and users
Here we need to create two services. The configurations of the two services are as follows:
[root@master mysql]# cat mysql-service.yaml
---
#Create services. The master and slave are mysql and mysql read
apiVersion: v1
kind: Service
metadata:
  name: mysql
  namespace: mysql
  labels:
    app: mysql
spec:
  ports:
  - name: mysql
    port: 3306
  clusterIP: None
  selector:
    app: mysql
---
apiVersion: v1
kind: Service
metadata:
  name: mysql-read
  namespace: mysql
  labels:
    app: mysql
spec:
  ports:
  - name: mysql
    port: 3306
  selector:
    app: mysql
Configuration introduction:
- Both services proxy all pods with app=mysql tag, that is, all MySQL pods. Port mapping uses the 3306 port of the Service to correspond to the 3306 port of the Pod
- A Service called "MySQL" is Headless Service (i.e. clusterIP=None). Its function is to fix the Pod cluster by assigning DNS records to the Pod, such as DNS names such as "mysql-0. MySQL" and "mysql-1.mysql". The node of "mysql-0.mysql" is our master node; The Service named "MySQL read" is a regular Service
- It stipulates that all users' read requests must access the DNS record assigned by the Service named "MySQL read", so that the read requests can be forwarded to any MySQL master node or slave node; For write requests from all users, you must access the master node of MySQL, the DNS record "mysql-0.mysql"
Create and view services
[root@master mysql]# kubectl apply -f mysql-service.yaml
service/mysql created
service/mysql-read created

[root@master mysql]# kubectl get svc -n mysql
NAME         TYPE        CLUSTER-IP      EXTERNAL-IP   PORT(S)          AGE
mysql        ClusterIP   None            <none>        3306/TCP         31d
mysql-read   NodePort    10.102.155.63   <none>        3306:30306/TCP   31d
2.3.6 using StatefulSet to build MySQL Cluster
[root@master mysql]# cat mysql-statefulset.yaml
---
apiVersion: apps/v1
kind: StatefulSet
metadata:
  name: mysql
  namespace: mysql
  labels:
    app: mysql
spec:
  selector:
    matchLabels:
      app: mysql
  serviceName: mysql
  replicas: 3
  template:
    metadata:
      labels:
        app: mysql
    spec:
      initContainers:
      - name: init-mysql
        image: jinyuyun.top/mysql:8.0
        env:
        - name: MYSQL_ROOT_PASSWORD
          valueFrom:
            secretKeyRef:
              name: mysql-secret
              key: password
        command:
        - bash
        - "-c"
        - |
          set -ex
          # Generate the server ID from the serial number of the Pod
          [[ $(hostname) =~ -([0-9]+)$ ]] || exit 1
          ordinal=${BASH_REMATCH[1]}
          echo [mysqld] > /mnt/conf.d/server-id.cnf
          # Since the server ID cannot be 0, add 100 to the ID to avoid it
          echo server-id=$((100 + $ordinal)) >> /mnt/conf.d/server-id.cnf
          # If the serial number of Pod is 0, it indicates that it is a Master node. Copy the Master configuration file from ConfigMap to the / mnt/conf.d directory
          # Otherwise, copy the Slave configuration file in ConfigMap
          if [[ ${ordinal} -eq 0 ]]; then
            cp /mnt/config-map/master.cnf /mnt/conf.d
          else
            cp /mnt/config-map/slave.cnf /mnt/conf.d
          fi
        volumeMounts:
        - name: conf
          mountPath: /mnt/conf.d
        - name: config-map
          mountPath: /mnt/config-map
      - name: clone-mysql
        image: jinyuyun.top/xtrabackup:2.3
        env:
        - name: MYSQL_ROOT_PASSWORD
          valueFrom:
            secretKeyRef:
              name: mysql-secret
              key: password
        command:
        - bash
        - "-c"
        - |
          set -ex
          # The copy operation only needs to be started for the first time, so if the data already exists, it will be skipped
          [[ -d /var/lib/mysql/mysql ]] && exit 0
          # The Master node (with sequence number 0) does not need this operation
          [[ $(hostname) =~ -([0-9]+)$ ]] || exit 1
          ordinal=${BASH_REMATCH[1]}
          [[ $ordinal == 0 ]] && exit 0
          # Use the ncat instruction to remotely copy data from the previous node to the local node
          ncat --recv-only mysql-$(($ordinal-1)).mysql 3307 | xbstream -x -C /var/lib/mysql
          # Execute -- prepare so that the copied data can be used for recovery
          xtrabackup --prepare --target-dir=/var/lib/mysql
        volumeMounts:
        - name: data
          mountPath: /var/lib/mysql
          subPath: mysql
        - name: conf
          mountPath: /etc/mysql/conf.d
      containers:
      - name: mysql
        image: jinyuyun.top/mysql:8.0
        env:
#        - name: MYSQL_ALLOW_EMPTY_PASSWORD
#          value: "1"
        - name: MYSQL_ROOT_PASSWORD
          valueFrom:
            secretKeyRef:
              name: mysql-secret
              key: password
        ports:
        - name: mysql
          containerPort: 3306
        volumeMounts:
        - name: data
          mountPath: /var/lib/mysql
          subPath: mysql
        - name: conf
          mountPath: /etc/mysql/conf.d
        resources:
          requests:
            cpu: 500m
            memory: 1Gi
        # livenessProbe:
          # exec:
            # command: ["mysqladmin", "ping", "-uroot", "-p${MYSQL_ROOT_PASSWORD}"]
          # initialDelaySeconds: 30
          # periodSeconds: 10
          # timeoutSeconds: 5
        # readinessProbe:
          # exec:
            # command: ["mysqladmin", "ping", "-uroot", "-p${MYSQL_ROOT_PASSWORD}"]
          # initialDelaySeconds: 5
          # periodSeconds: 2
          # timeoutSeconds: 1
      - name: xtrabackup
        image: jinyuyun.top/xtrabackup:2.3
        ports:
        - name: xtrabackup
          containerPort: 3307
        env:
        - name: MYSQL_ROOT_PASSWORD
          valueFrom:
            secretKeyRef:
              name: mysql-secret
              key: password
        command:
        - bash
        - "-c"
        - |
          set -ex
          cd /var/lib/mysql
          # Read Master from backup information file_ LOG_ File and master_ LOG_ The values of the two POS fields are used to assemble the cluster and initialize SQL
          if [[ -f xtrabackup_slave_info ]]; then
            # If xtrabackup_ Slave_ The info file exists, indicating that the backup data comes from another Slave node
            # In this case, the XtraBackup tool has automatically generated the "CHANGE MASTER TO" SQL statement in this file during backup
            # So, just rename the file change_master_to.sql.in, which can be used directly later
            mv xtrabackup_slave_info change_master_to.sql.in
            # Therefore, there is no need for xtrabackup_binlog_info
            rm -f xtrabackup_binlog_info
          elif [[ -f xtrabackup_binlog_info ]]; then
            # If only xtrabackup exists_ binlog_ Info file, indicating that the backup comes from the Master node, you need to parse the backup information file and read the values of the two required fields
            [[ $(cat xtrabackup_binlog_info) =~ ^(.*?)[[:space:]]+(.*?)$ ]] || exit 1
            rm xtrabackup_binlog_info
            # Assemble the values of the two fields into SQL and write them to change_master_to.sql.in file
            echo "CHANGE MASTER TO MASTER_LOG_FILE='${BASH_REMATCH[1]}',\
                  MASTER_LOG_POS=${BASH_REMATCH[2]}" > change_master_to.sql.in
          fi
          # If change exists_ master_ To.sql.in, which means cluster initialization is required
          if [[ -f change_master_to.sql.in ]]; then
            # However, you must wait for the MySQL container to start before you can connect to MySQL in the next step
            echo "Waiting for mysqld to be ready(accepting connections)"
            until mysql -h 127.0.0.1 -uroot -p${MYSQL_ROOT_PASSWORD} -e "SELECT 1"; do sleep 1; done
            echo "Initializing replication from clone position"
            # Change file_ master_ Change the name of to.sql.in
            # Prevent the Container from restarting because change is found again_ master_ To.sql.in to repeat the initialization process
            mv change_master_to.sql.in change_master_to.sql.orig
            # Using change_ master_ The contents of to.sql.orig, that is, the SQL assembled earlier, form a complete SQL statement for initializing and starting Slave
            mysql -h 127.0.0.1 -uroot -p${MYSQL_ROOT_PASSWORD} << EOF
          $(< change_master_to.sql.orig),
            MASTER_HOST='mysql-0.mysql.mysql',
            MASTER_USER='root',
            MASTER_PASSWORD='${MYSQL_ROOT_PASSWORD}',
            MASTER_CONNECT_RETRY=10;
          START SLAVE;
          EOF
          fi
          # Use ncat to listen on port 3307.
          # Its function is to directly execute xtrabackup --backup command to back up MySQL data and send it to the requester when receiving the transmission request
          exec ncat --listen --keep-open --send-only --max-conns=1 3307 -c \
            "xtrabackup --backup --slave-info --stream=xbstream --host=127.0.0.1 --user=root --password=${MYSQL_ROOT_PASSWORD}"
        volumeMounts:
        - name: data
          mountPath: /var/lib/mysql
          subPath: mysql
        - name: conf
          mountPath: /etc/mysql/conf.d
      volumes:
      - name: conf
        emptyDir: {}
      - name: config-map
        configMap:
          name: mysql
  volumeClaimTemplates:
  - metadata:
      name: data
    spec:
      accessModes:
      - "ReadWriteMany"
      storageClassName: jyy-cephfs-sc
      resources:
        requests:
          storage: 3Gi
Creating and viewing statefullset deployments
[root@master mysql]# kubectl apply -f mysql-statefulset.yaml

[root@master mysql]# kubectl get statefulset -n mysql
NAME    READY   AGE
mysql   3/3     31d
[root@master mysql]# kubectl get pod -n mysql
NAME      READY   STATUS    RESTARTS   AGE
mysql-0   2/2     Running   4          31d
mysql-1   2/2     Running   6          31d
mysql-2   2/2     Running   11         31d