1, Introduction to SpringCloud Alibaba Nacos
The full name of Nacos is Naming Configuration Service. Taking the first two letters of Naming and Configuration and s of Service, it is the Configuration management and Service management center.
In short, Nacos = Eureka + Config + Bus, that is, the combination of registry + configuration center. Replace Eureka as the service registration center and Config as the service configuration center.
Nacos download and startup error handling method
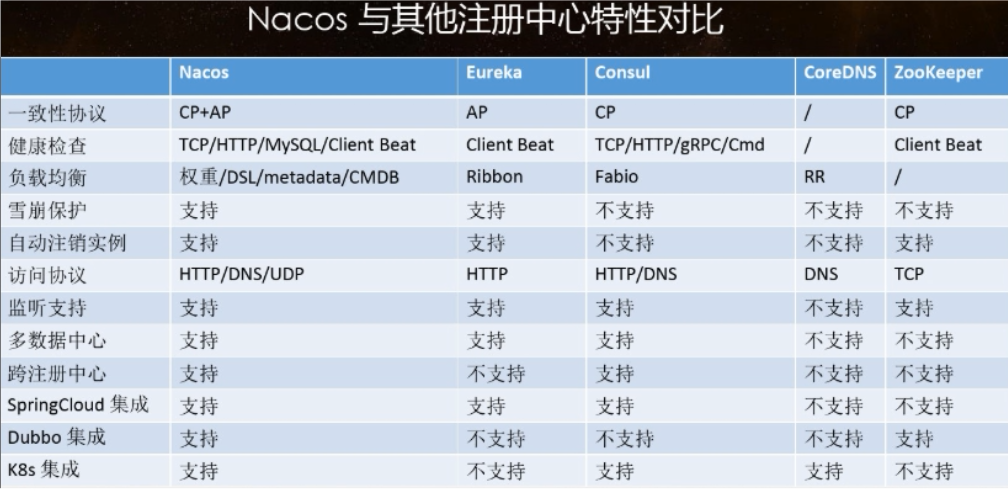
Comparison of various registries
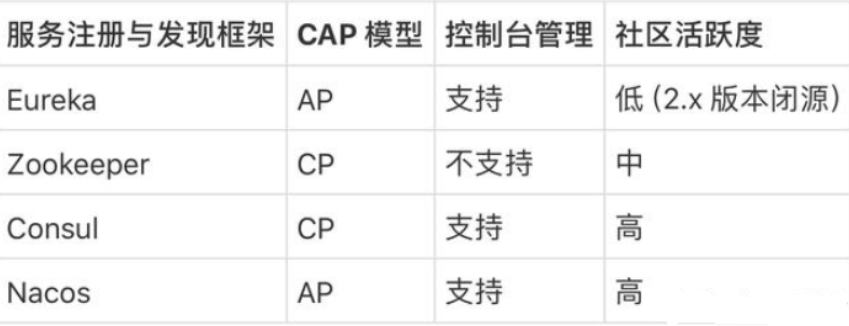
CAP principle, also known as CAP theorem, refers to Consistency, Availability and Partition tolerance in a distributed system. CAP principle means that these three elements can only achieve two points at most, and it is impossible to give consideration to the three.
- Consistency (C): whether all data backups in a distributed system have the same value at the same time. (equivalent to all nodes accessing the same latest data copy)
- Availability (A): whether the whole cluster can respond to read and write requests from clients after some nodes in the cluster fail. (high availability for data updates)
- Partition tolerance (P): in terms of practical effect, partition is equivalent to the time limit requirement for communication. If the system cannot reach data consistency within the time limit, it means that partition occurs, and it must choose between C and A for the current operation.
For example:
If there is no copy of data in a distributed system, the system must meet the strong consistency condition, because there is only one data, and there will be no data inconsistency. At this time, C and P elements are available. However, if the system has network partition or downtime, some data will not be accessible, and the availability condition cannot be met, That is, in this case, the CP system is obtained, but the CAP cannot be satisfied at the same time.
Therefore, in the design of distributed architecture, we must make trade-offs. At present, the system performance is generally improved by the final consistency of each node in the distributed cache, and the clustered data consistency is realized by using the data asynchronous replication technology between multiple nodes.
2, Introduction to current project structure
The current project contains nine modules:
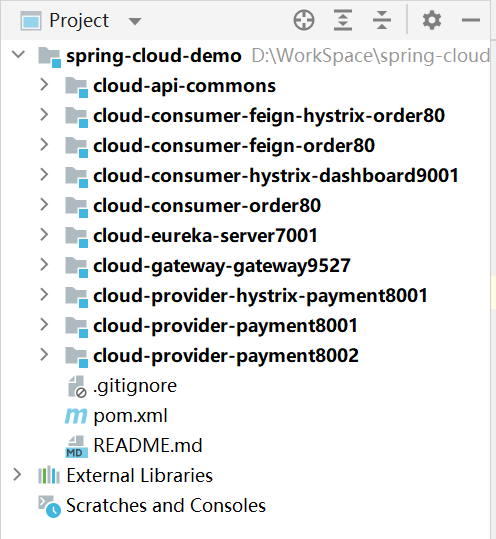
- Public API: cloud API Commons
- Service provider: cloud provider payment8001 (add Sleuth) / 8002 (port numbers 8001 and 8002)
- Service consumer (restTemplate): cloud-consumer-order80 (port number 80, Sleuth added)
- Service consumer (OpenFeign): cloud consumer feign order80 (port number 80)
- Registration Center Eureka: cloud Eureka server7001 (port number 7001)
- Service provider (Hystrix) implemented with circuit breaker: cloud provider hystrix payment8001 (port number 8001)
- Hystrix implemented with circuit breaker: cloud consumer feign hystrix order80 (port number 80)
- Service monitoring (hystrix dashboard): cloud consumer hystrix dashboard 9001 (Port No. 9001)
- Gateway: cloud-gateway-gateway9527 (port number 9527)
Previous link: https://blog.csdn.net/weixin_42547014/article/details/120334570
Project source code: https://gitee.com/zhangchouchou/spring-cloud-demo
3, Build a Nacos service registry
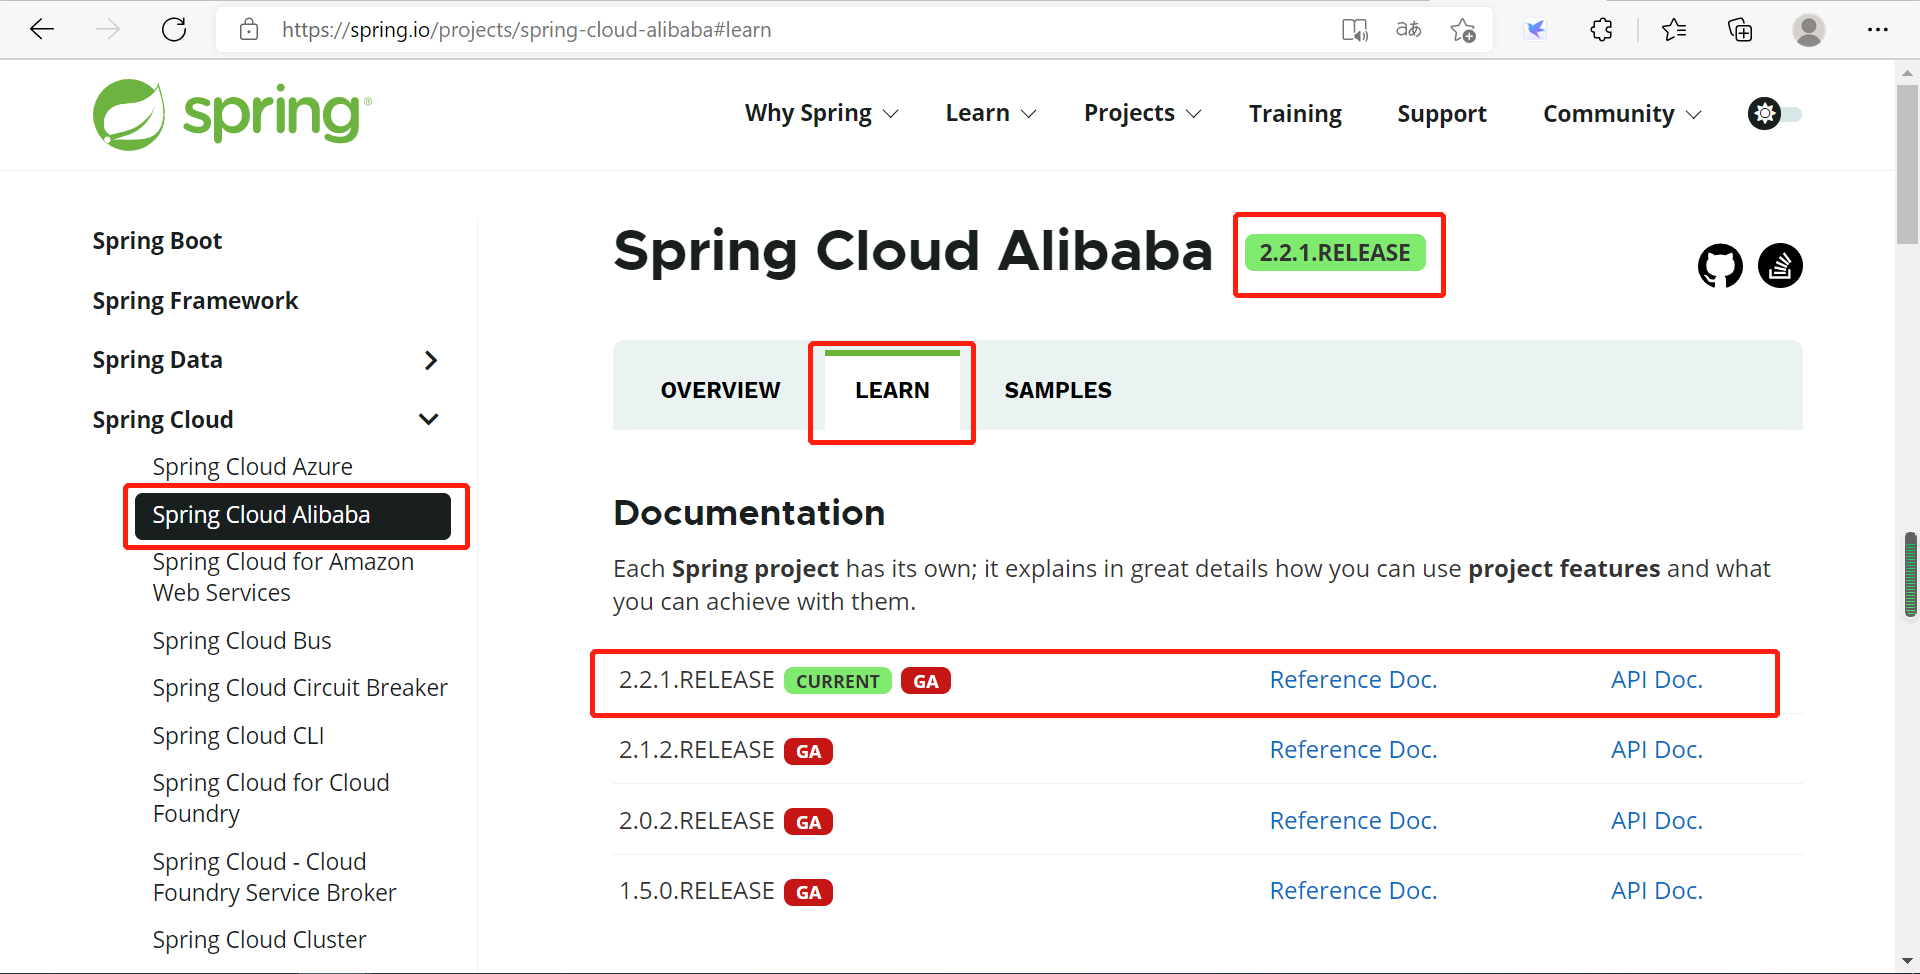
View Spring Cloud Alibaba version
visit Spring official website , check the version information of Spring Cloud Alibaba. The latest stable version is 2.2.1
1. Nacos based service providers
1) . add Alibaba to parent project
 <!--spring cloud alibaba 2.2.1.RELEASE-->
<dependency>
	<groupId>com.alibaba.cloud</groupId>
	<artifactId>spring-cloud-alibaba-dependencies</artifactId>
	<version>2.2.1.RELEASE</version>
	<type>pom</type>
	<scope>import</scope>
</dependency>
2) . create a new Module and add a reference to POM
Similarly, create the module cloudalibaba provider payment9001 in maven mode
Add reference in pom after creation
	<dependencies>
        <!--alibaba nacos-->
        <dependency>
            <groupId>com.alibaba.cloud</groupId>
            <artifactId>spring-cloud-starter-alibaba-nacos-discovery</artifactId>
        </dependency>

        <dependency>
            <groupId>org.springframework.boot</groupId>
            <artifactId>spring-boot-starter-web</artifactId>
        </dependency>

        <dependency>
            <groupId>org.springframework.boot</groupId>
            <artifactId>spring-boot-starter-actuator</artifactId>
        </dependency>

        <dependency>
            <groupId>org.springframework.boot</groupId>
            <artifactId>spring-boot-devtools</artifactId>
            <scope>runtime</scope>
            <optional>true</optional>
        </dependency>

        <dependency>
            <groupId>org.projectlombok</groupId>
            <artifactId>lombok</artifactId>
            <optional>true</optional>
        </dependency>

        <dependency>
            <groupId>org.springframework.boot</groupId>
            <artifactId>spring-boot-starter-test</artifactId>
            <scope>test</scope>
        </dependency>
	</dependencies>
3) . add YML
server:
  port: 9001

spring:
  application:
    name: nacos-payment-provider
  cloud:
    nacos:
      discovery:
        server-addr: localhost:8848 #Configure Nacos address

management:
  endpoints:
    web:
      exposure:
        include: '*'  #Only the / health and / info endpoints are exposed by default. To expose all endpoints, you only need to set them to asterisks
4) . add startup class
The package name remains the same as the other modules org.zjh.springcloud
@EnableDiscoveryClient
@SpringBootApplication
public class AlibabaPaymentApplication {
    public static void main(String[] args) {
        SpringApplication.run(AlibabaPaymentApplication.class,args);
    }
}
5) . add Controller
@RestController
public class AlibabaPaymentController {
    @Value("${server.port}")
    private String serverPort;

    @GetMapping(value = "/payment/nacos/{id}")
    public String getPayment(@PathVariable("id") Long id) {
        return "nacos registry, serverPort: "+ serverPort+"\t id"+id;
    }
}

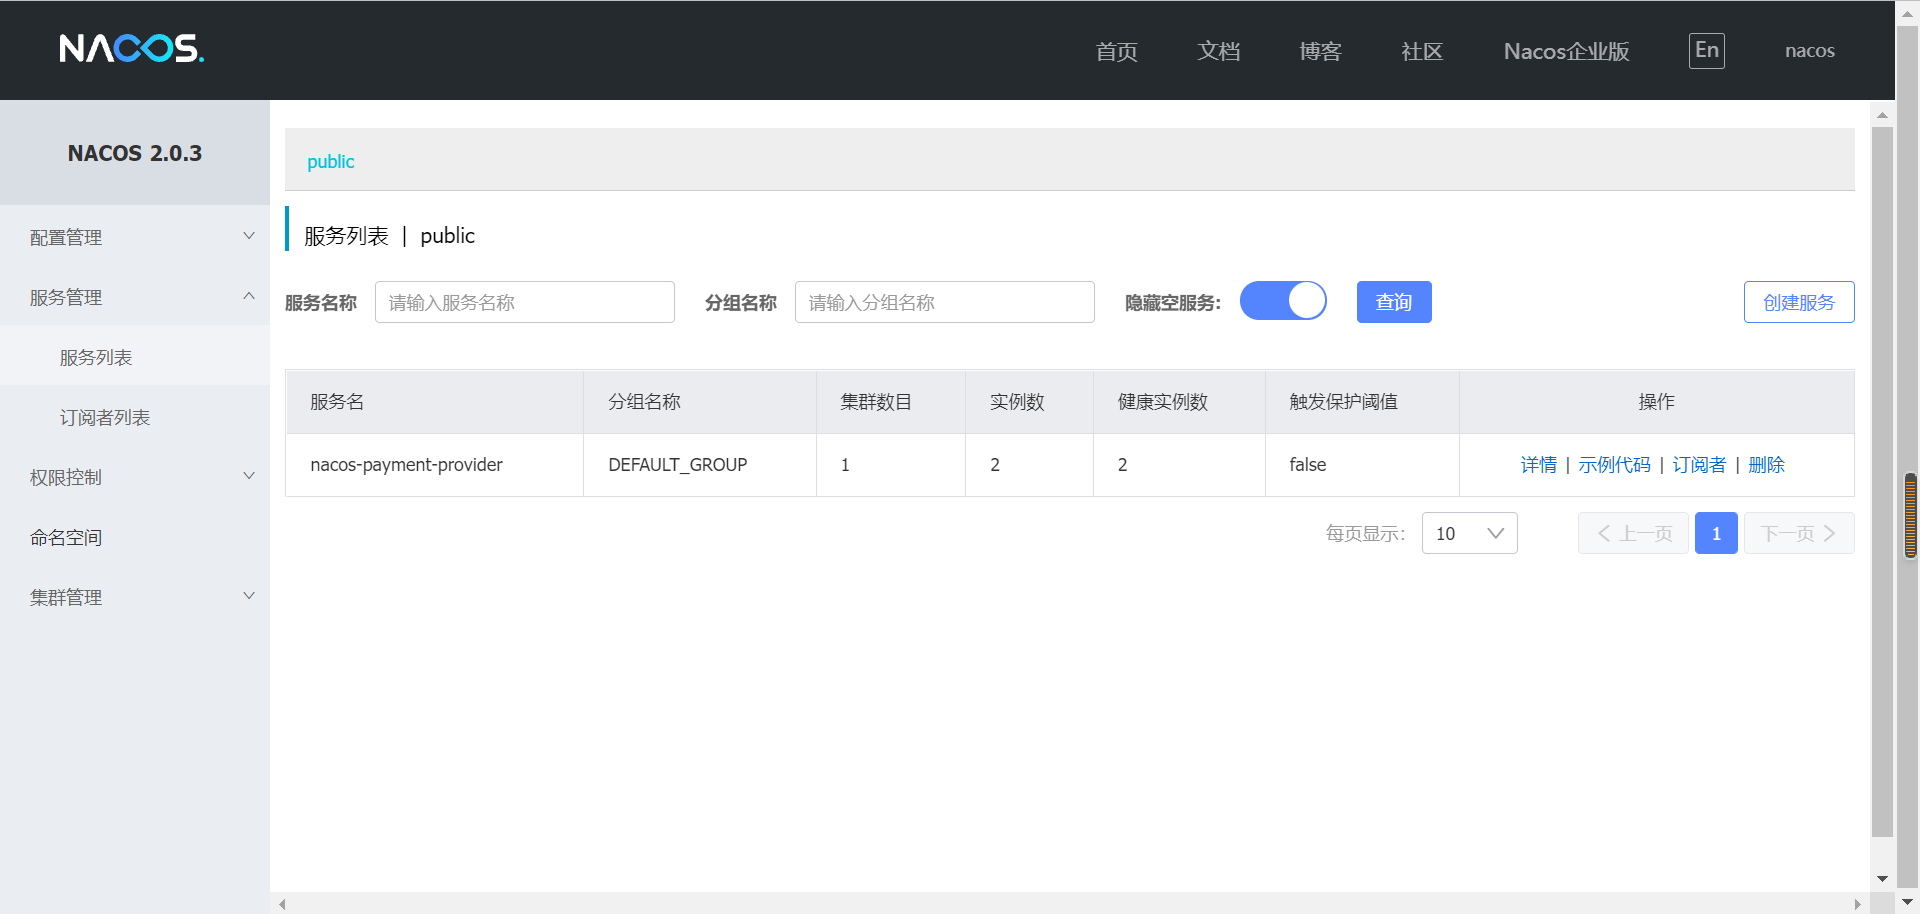
6) . testing
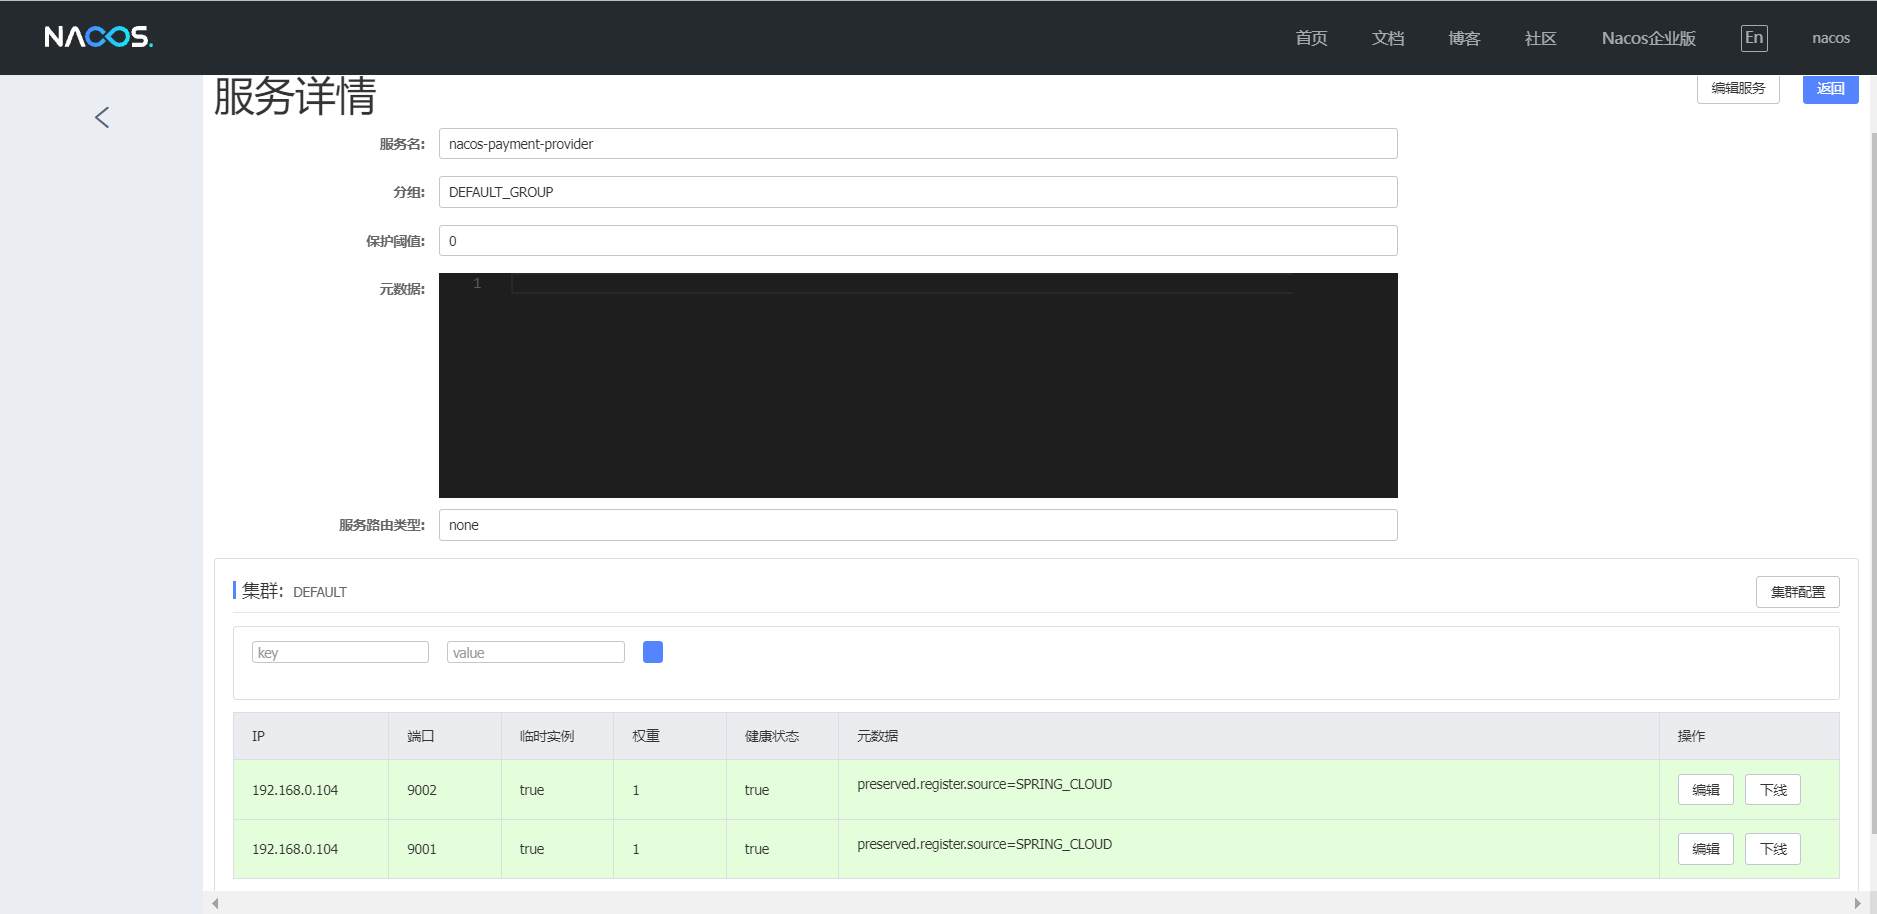
After starting 9001, visit Nacos to see the service just started.
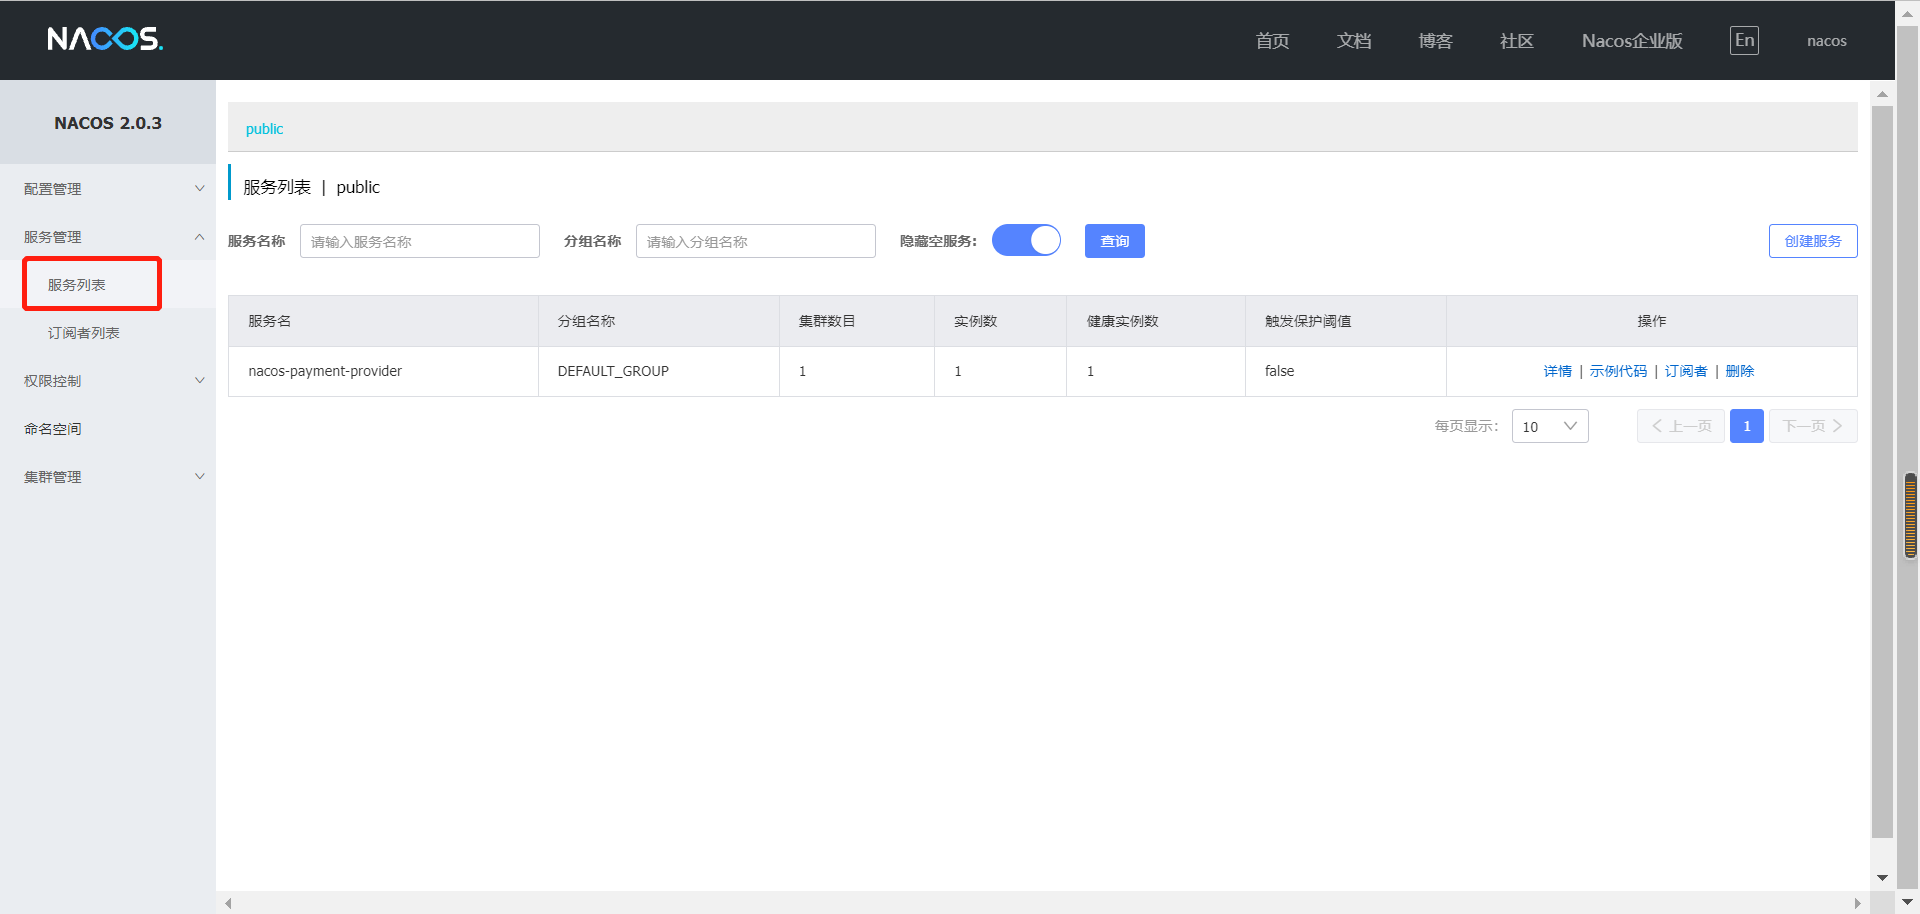
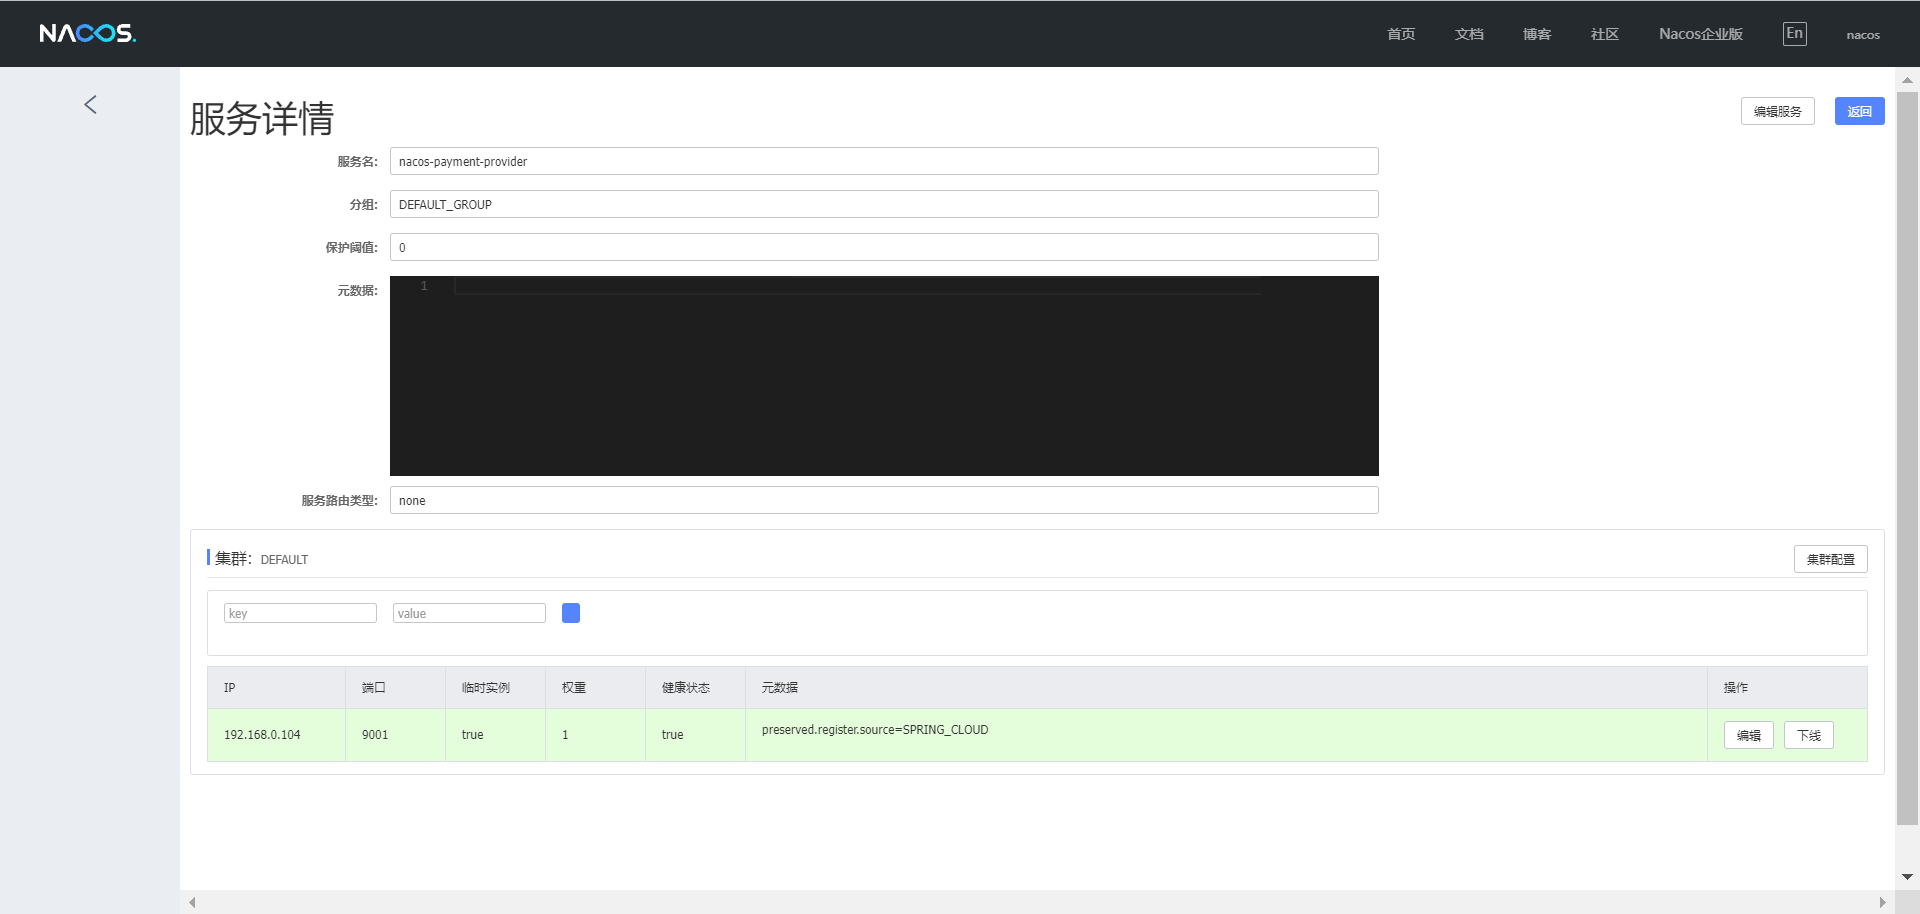
View service details
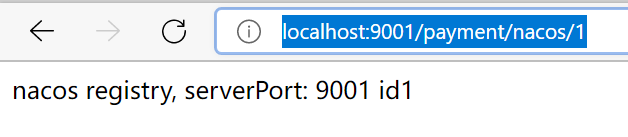
Access services http://localhost:9001/payment/nacos/1 , the test passed.
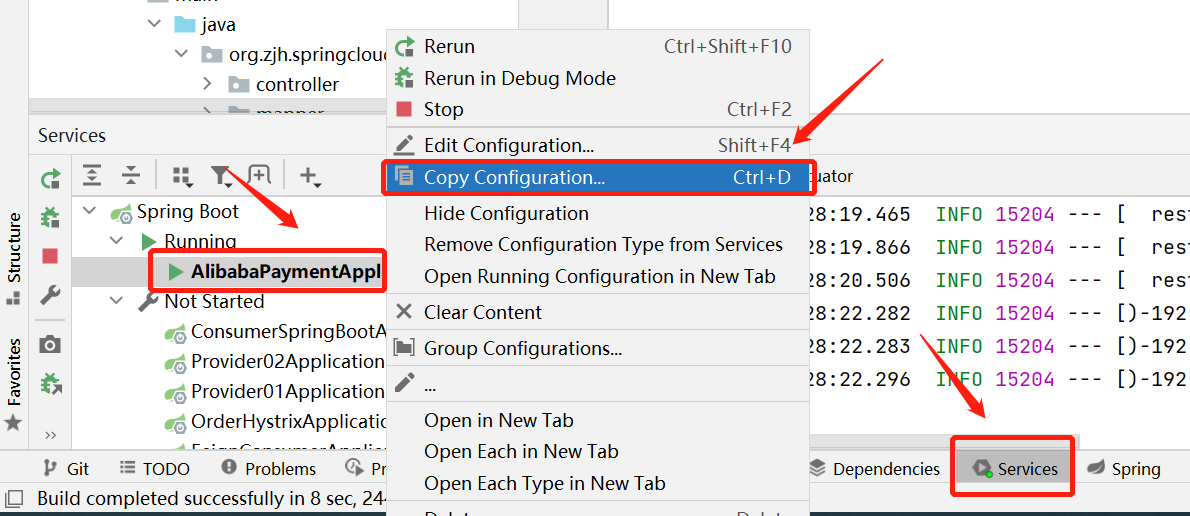
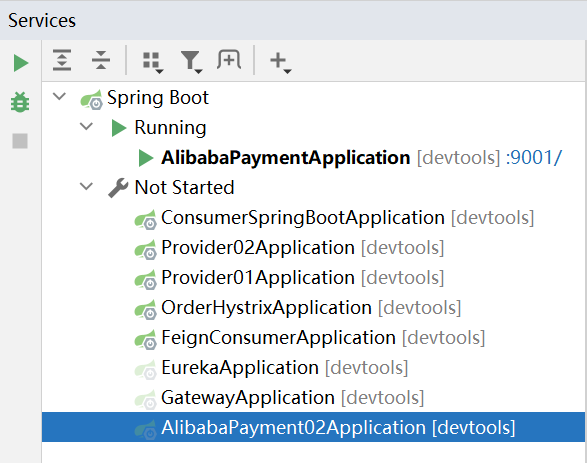
7) . create a new 9002 port
To demonstrate load balancing, create a 9002 port by referring to the 9001 port. Here, you can directly create a new port by copying the virtual port mapping.
Copy 9001 in the Services panel
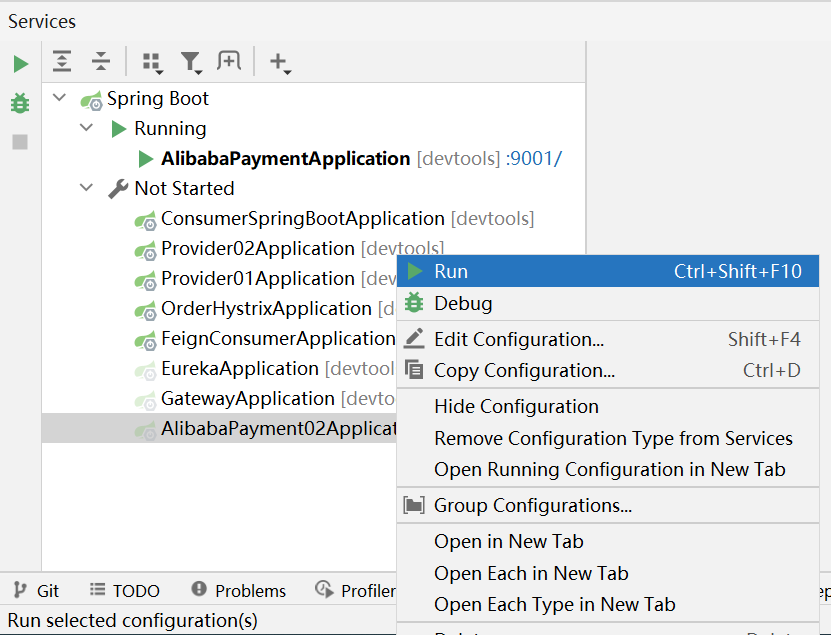
Modify the startup class name, configure the port number - DServer.port=9002, and click ok
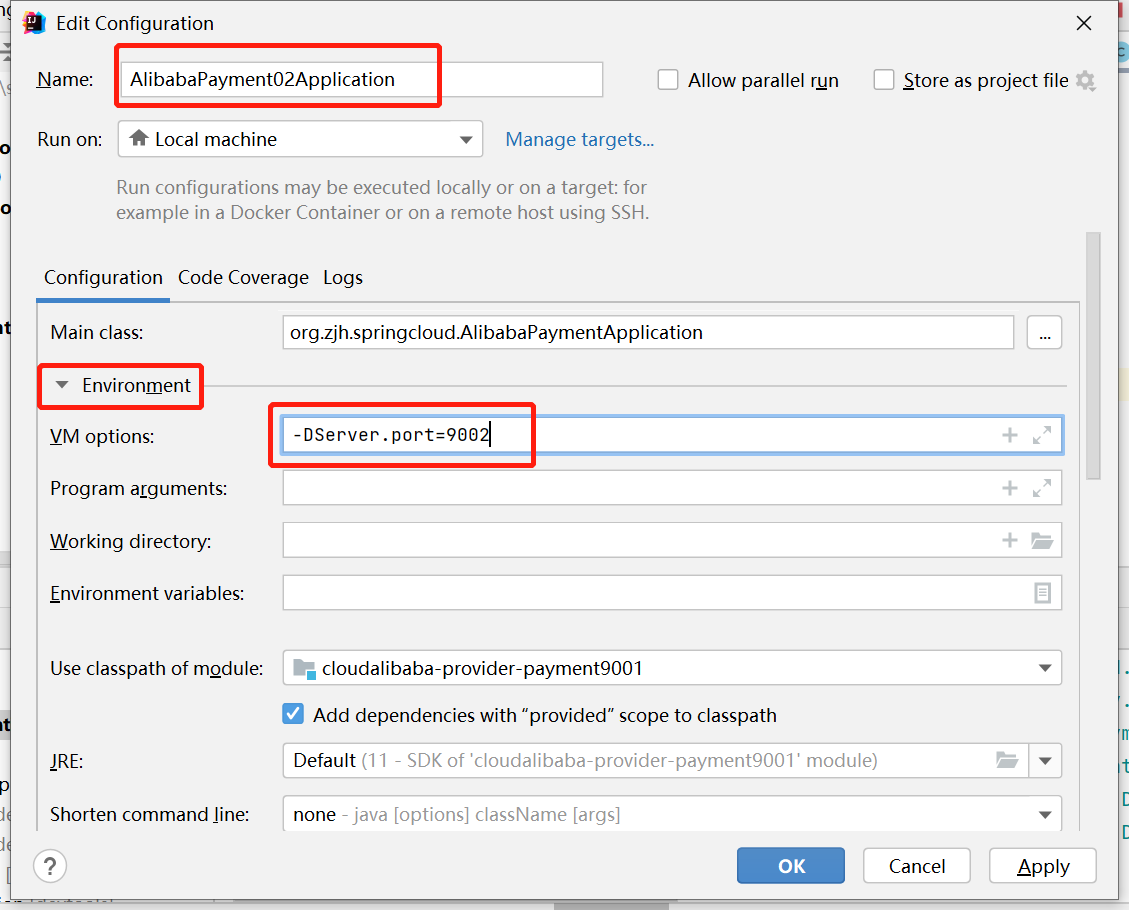
Right click Start
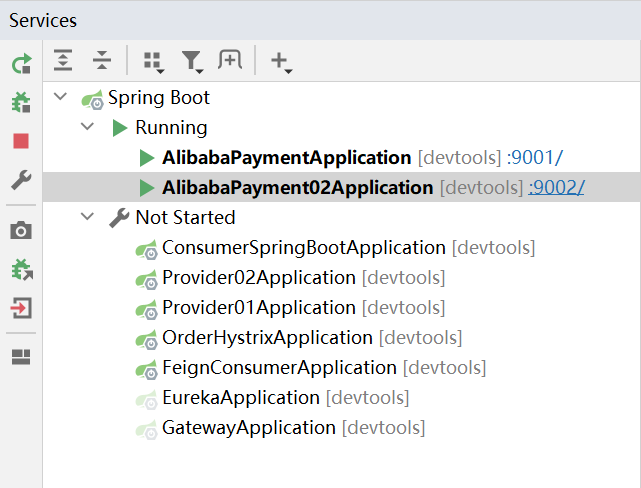
8) . testing
Refresh the Nacos page and increase the number of services
Access port 9002 http://localhost:9002/payment/nacos/1

Check the 9001 port again
The test passed.
2. Nacos based service consumers
1) . create a new Module
Create a new module cloudalibaba-consumer-nacos-order83 in the form of maven
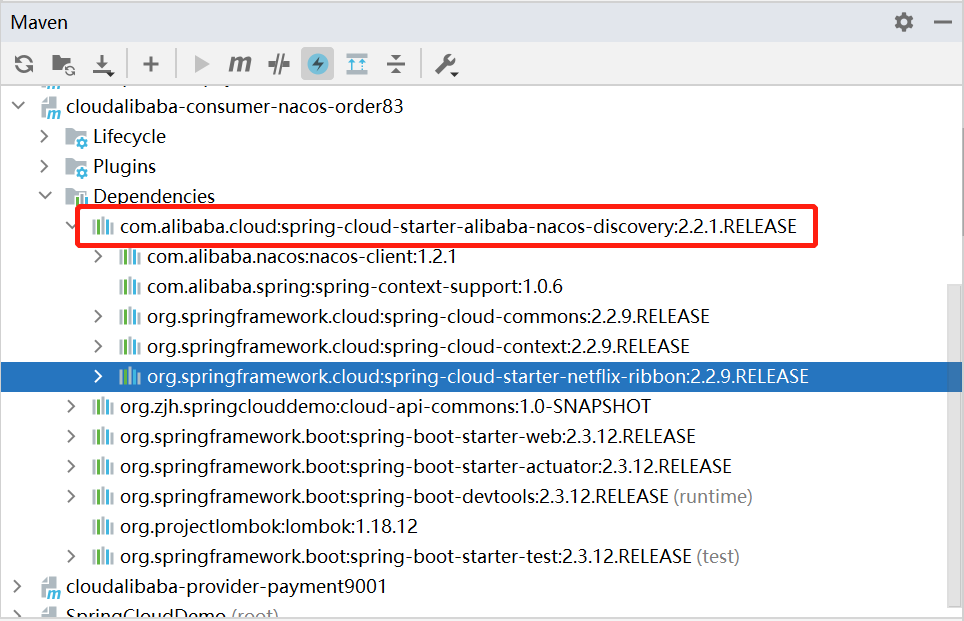
2) . new reference in POM
	<dependencies>
        <!--SpringCloud ailibaba nacos -->
        <dependency>
            <groupId>com.alibaba.cloud</groupId>
            <artifactId>spring-cloud-starter-alibaba-nacos-discovery</artifactId>
        </dependency>
        <dependency>
            <groupId>org.zjh.springclouddemo</groupId>
            <artifactId>cloud-api-commons</artifactId>
            <version>${project.version}</version>
        </dependency>
        <dependency>
            <groupId>org.springframework.boot</groupId>
            <artifactId>spring-boot-starter-web</artifactId>
        </dependency>
        <dependency>
            <groupId>org.springframework.boot</groupId>
            <artifactId>spring-boot-starter-actuator</artifactId>
        </dependency>
        <dependency>
            <groupId>org.springframework.boot</groupId>
            <artifactId>spring-boot-devtools</artifactId>
            <scope>runtime</scope>
            <optional>true</optional>
        </dependency>
        <dependency>
            <groupId>org.projectlombok</groupId>
            <artifactId>lombok</artifactId>
            <optional>true</optional>
        </dependency>
        <dependency>
            <groupId>org.springframework.boot</groupId>
            <artifactId>spring-boot-starter-test</artifactId>
            <scope>test</scope>
        </dependency>
    </dependencies>
Why does nacos support load balancing
3) . add YML
server:
  port: 83

spring:
  application:
    name: nacos-order-consumer
  cloud:
    nacos:
      discovery:
        server-addr: localhost:8848
#The name of the micro service that the consumer will access (the micro service provider successfully registered with nacos [optional], note: the nacos payment provider contains IP and port)
service-url:
  nacos-user-service: http://nacos-payment-provider
4) . add startup class
The package name is the same as the other modules
package org.zjh.springcloud;

import org.springframework.boot.SpringApplication;
import org.springframework.boot.autoconfigure.SpringBootApplication;
import org.springframework.cloud.client.discovery.EnableDiscoveryClient;

@EnableDiscoveryClient
@SpringBootApplication
public class OrderNacosApplication {
    public static void main(String[] args){
        SpringApplication.run(OrderNacosApplication.class,args);
    }
}
5) . calling between modules in resttemplate mode
Create configuration class
@Configuration   // Claim configuration
public class ApplicationContextConfig{
    @Bean
    @LoadBalanced   // Claim to use load balancing
    public RestTemplate getRestTemplate(){
        return new RestTemplate();
    }
}
Create Controller
@RestController
@Slf4j
public class OrderNacosController{
    @Resource
    private RestTemplate restTemplate;

    @Value("${service-url.nacos-user-service}")
    private String serverURL;

    @GetMapping(value = "/consumer/payment/nacos/{id}")
    public String paymentInfo(@PathVariable("id") Long id){
        return restTemplate.getForObject(serverURL+"/payment/nacos/"+id,String.class);
    }
}
test
Refresh Nacos
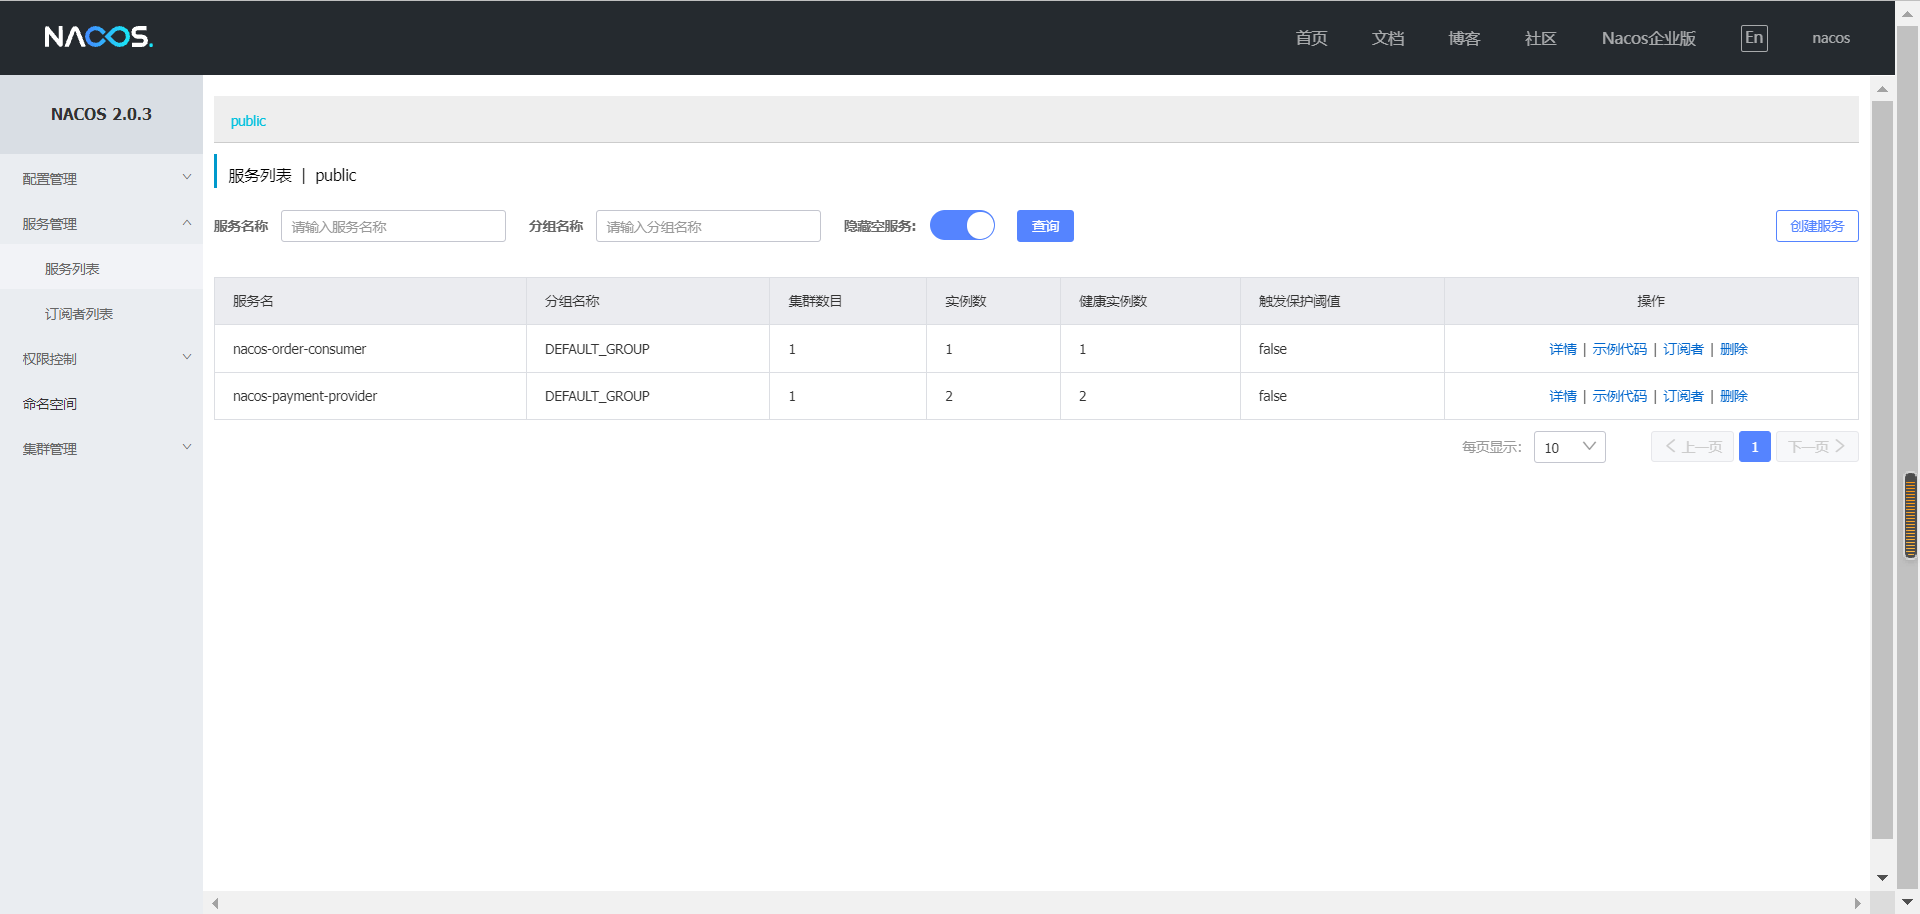
visit http://localhost:83/consumer/payment/nacos/1 Load balancing test


4, Nacos service configuration center
1. Basic configuration
1) . create a Module and add a reference to the POM
Create a new module cloudalibaba config Nacos client3377 as Maven
<dependencies>
    <!--nacos-config-->
    <dependency>
        <groupId>com.alibaba.cloud</groupId>
        <artifactId>spring-cloud-starter-alibaba-nacos-config</artifactId>
    </dependency>
    <!--nacos-discovery-->
    <dependency>
        <groupId>com.alibaba.cloud</groupId>
        <artifactId>spring-cloud-starter-alibaba-nacos-discovery</artifactId>
    </dependency>
    <!--web + actuator-->
    <dependency>
        <groupId>org.springframework.boot</groupId>
        <artifactId>spring-boot-starter-web</artifactId>
    </dependency>
    <dependency>
        <groupId>org.springframework.boot</groupId>
        <artifactId>spring-boot-starter-actuator</artifactId>
    </dependency>
    <!--General basic configuration-->
    <dependency>
        <groupId>org.springframework.boot</groupId>
        <artifactId>spring-boot-devtools</artifactId>
        <scope>runtime</scope>
        <optional>true</optional>
    </dependency>
    <dependency>
        <groupId>org.projectlombok</groupId>
        <artifactId>lombok</artifactId>
        <optional>true</optional>
    </dependency>
    <dependency>
        <groupId>org.springframework.boot</groupId>
        <artifactId>spring-boot-starter-test</artifactId>
        <scope>test</scope>
    </dependency>
</dependencies>
2) . add YML profile
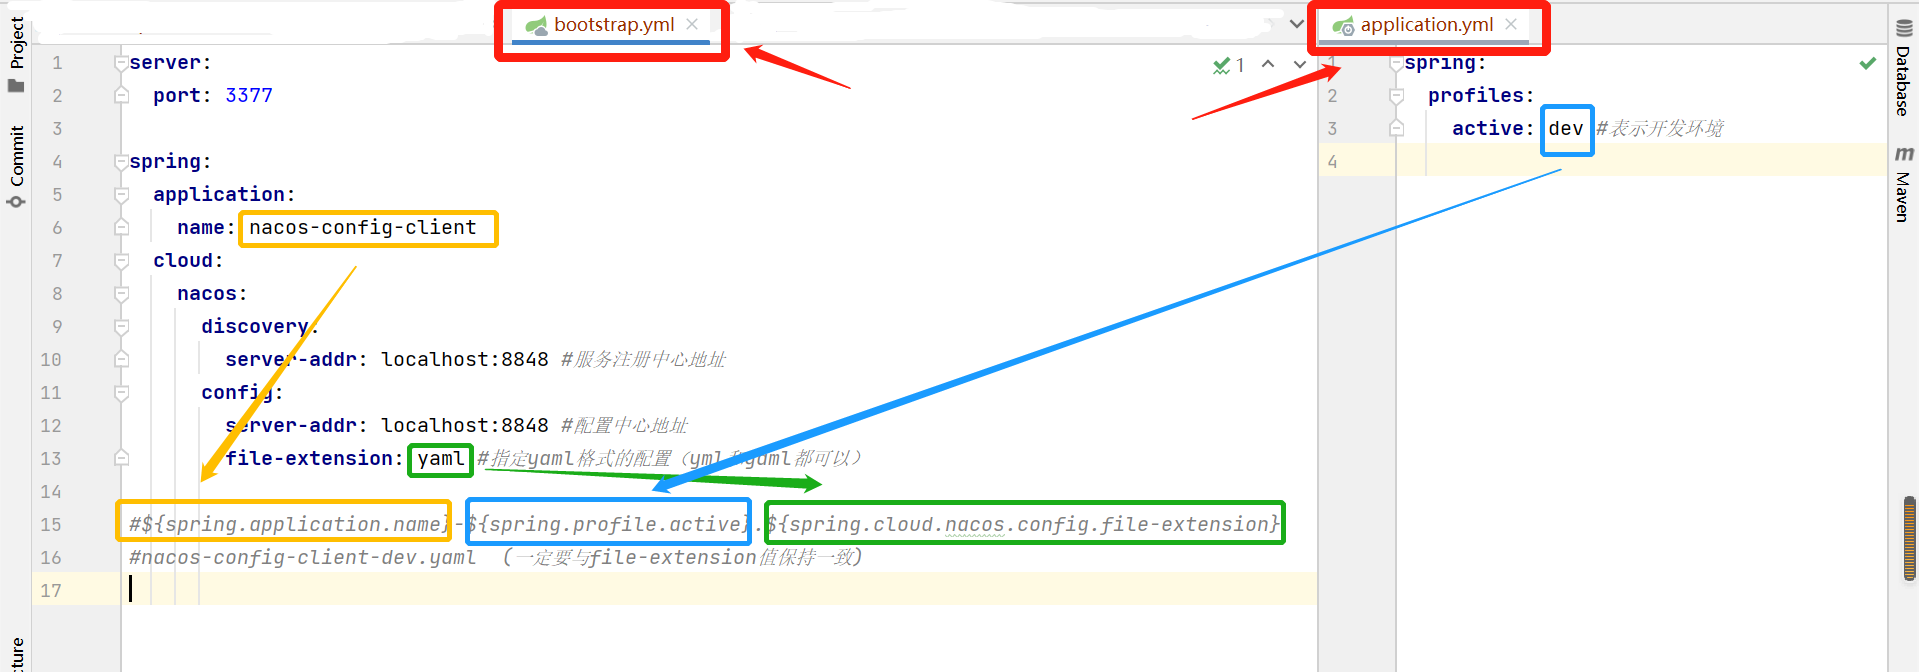
Nacos is the same as spring cloud config. During project initialization, it is necessary to pull the configuration from the configuration center. After pulling the configuration, the project can be started normally
There is a priority order for loading configuration files in spring boot, and the priority of bootstrap is higher than that of application
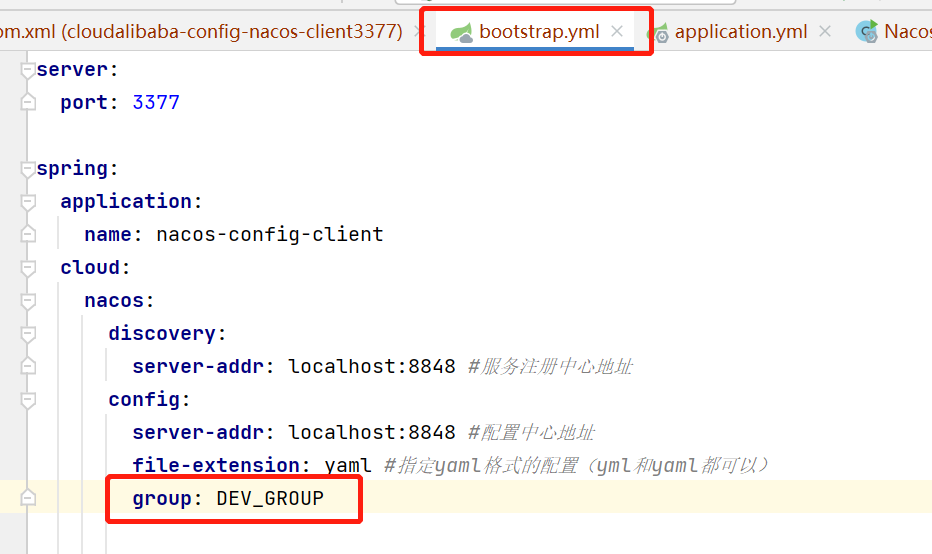
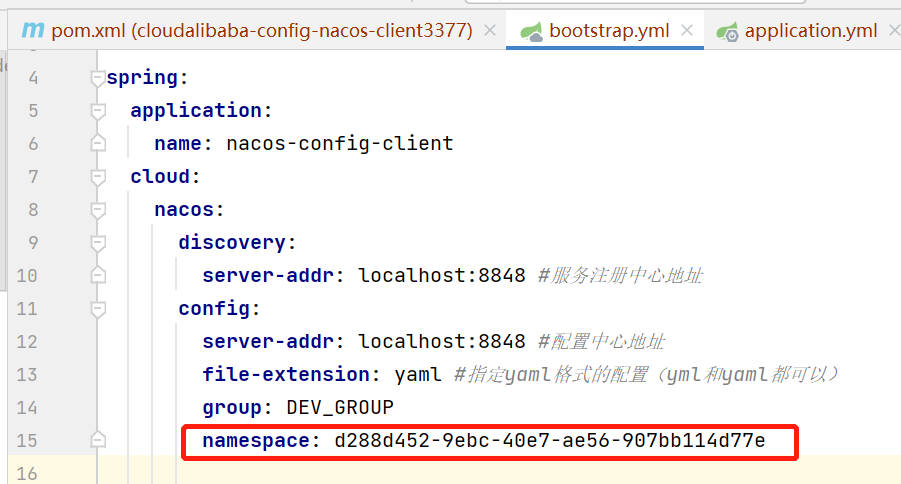
bootstrap.yml
server:
  port: 3377

spring:
  application:
    name: nacos-config-client
  cloud:
    nacos:
      discovery:
        server-addr: localhost:8848 #Service registry address
      config:
        server-addr: localhost:8848 #Configuration center address
        file-extension: yaml #Specify the configuration of yaml format (both yml and yaml can be used)

#${spring.application.name}-${spring.profile.active}.${spring.cloud.nacos.config.file-extension}
#nacos-config-client-dev.yaml (must be consistent with the file extension value)
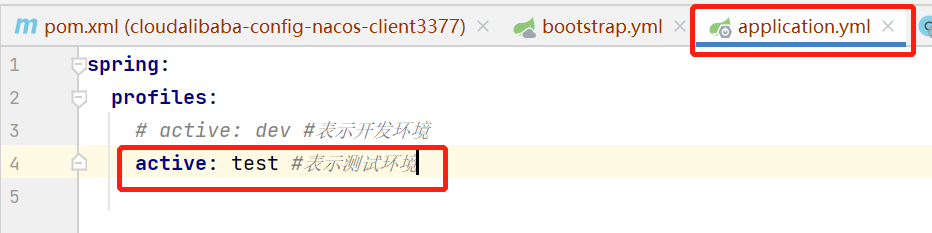
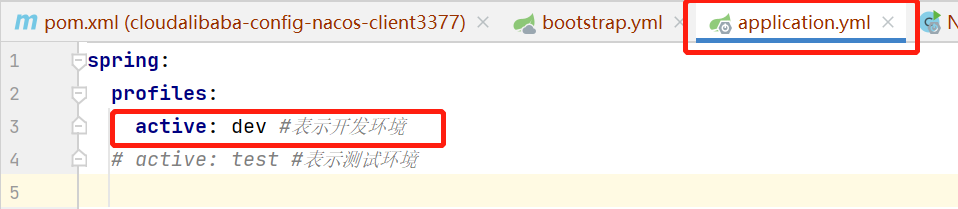
application.yml
spring:
  profiles:
    active: dev #Represents the development environment
3) . add main startup class
package org.zjh.springcloud;

import org.springframework.boot.SpringApplication;
import org.springframework.boot.autoconfigure.SpringBootApplication;
import org.springframework.cloud.client.discovery.EnableDiscoveryClient;

@EnableDiscoveryClient
@SpringBootApplication
public class NacosConfigClientApplication {
    public static void main(String[] args) {
        SpringApplication.run(NacosConfigClientApplication.class, args);
    }
}
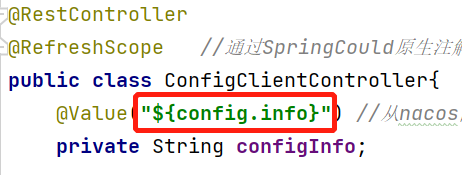
4) . add Controller
@RestController
@RefreshScope   //Automatic configuration update via springcourse native annotation @ RefreshScope
public class ConfigClientController{
    @Value("${config.info}") //Get the configuration information from the Nacos configuration center, corresponding to the Nacos configuration: nacos-config-client-dev.yaml
    private String configInfo;

    @GetMapping("/config/info")
    public String getConfigInfo() {
        return configInfo;
    }
}
5) . add configuration
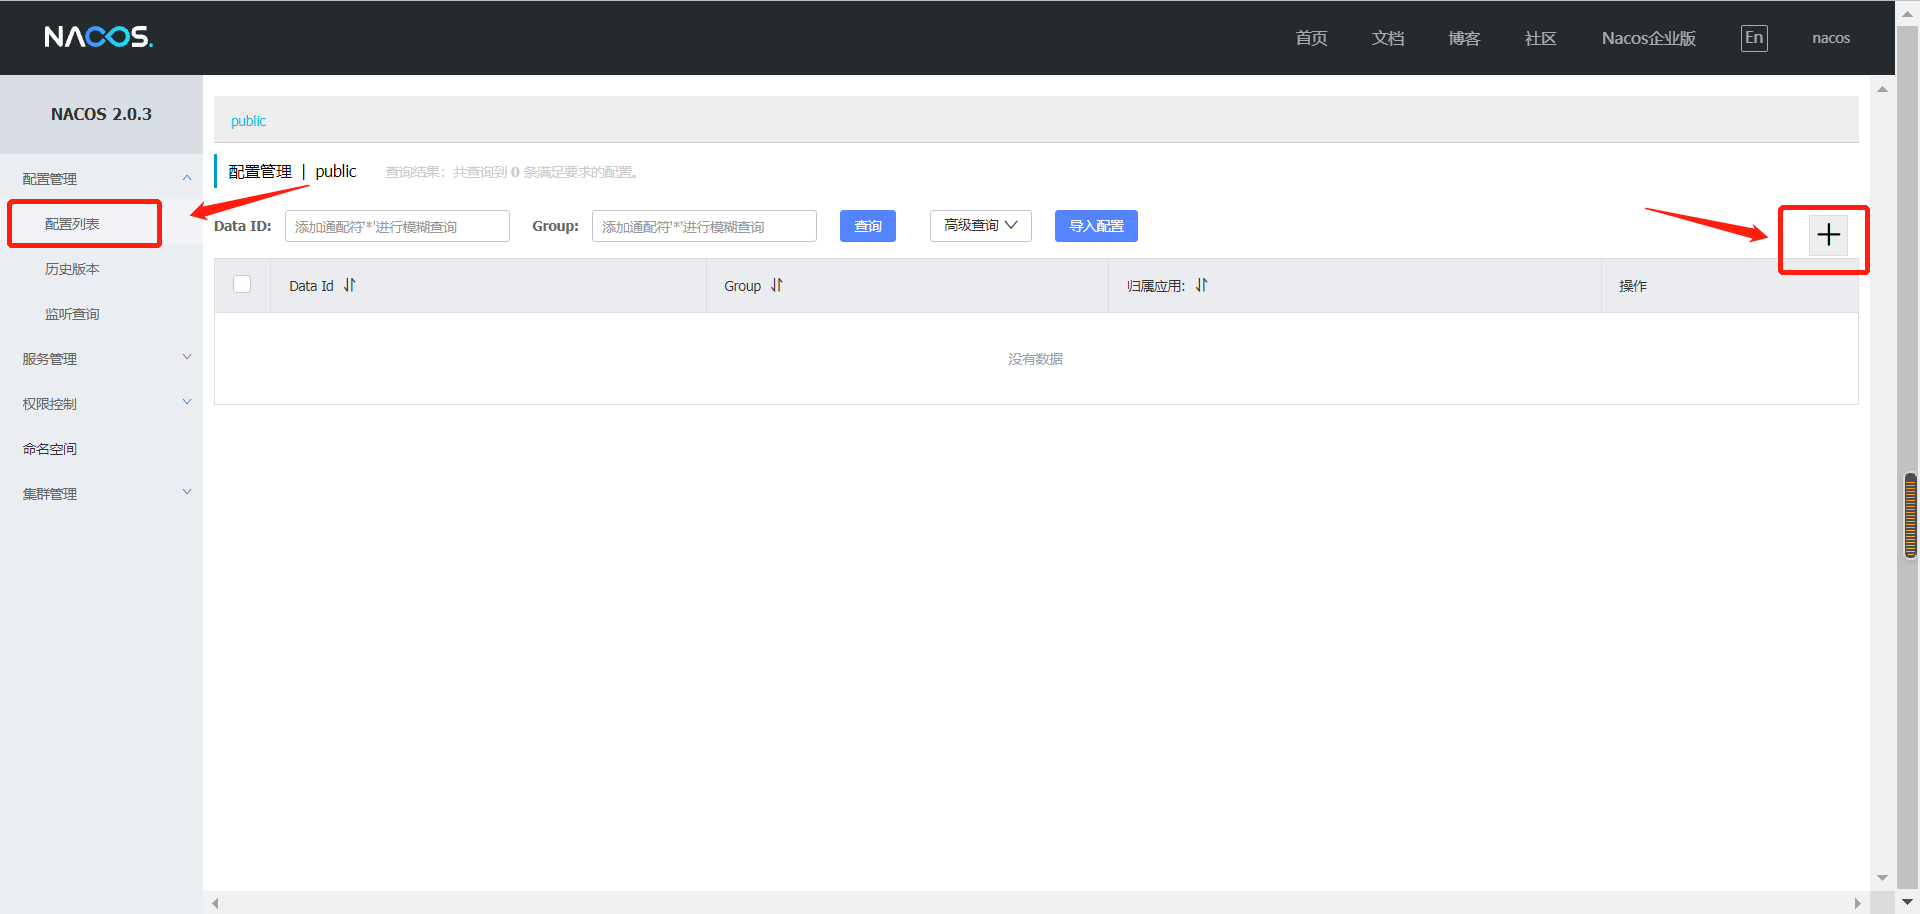
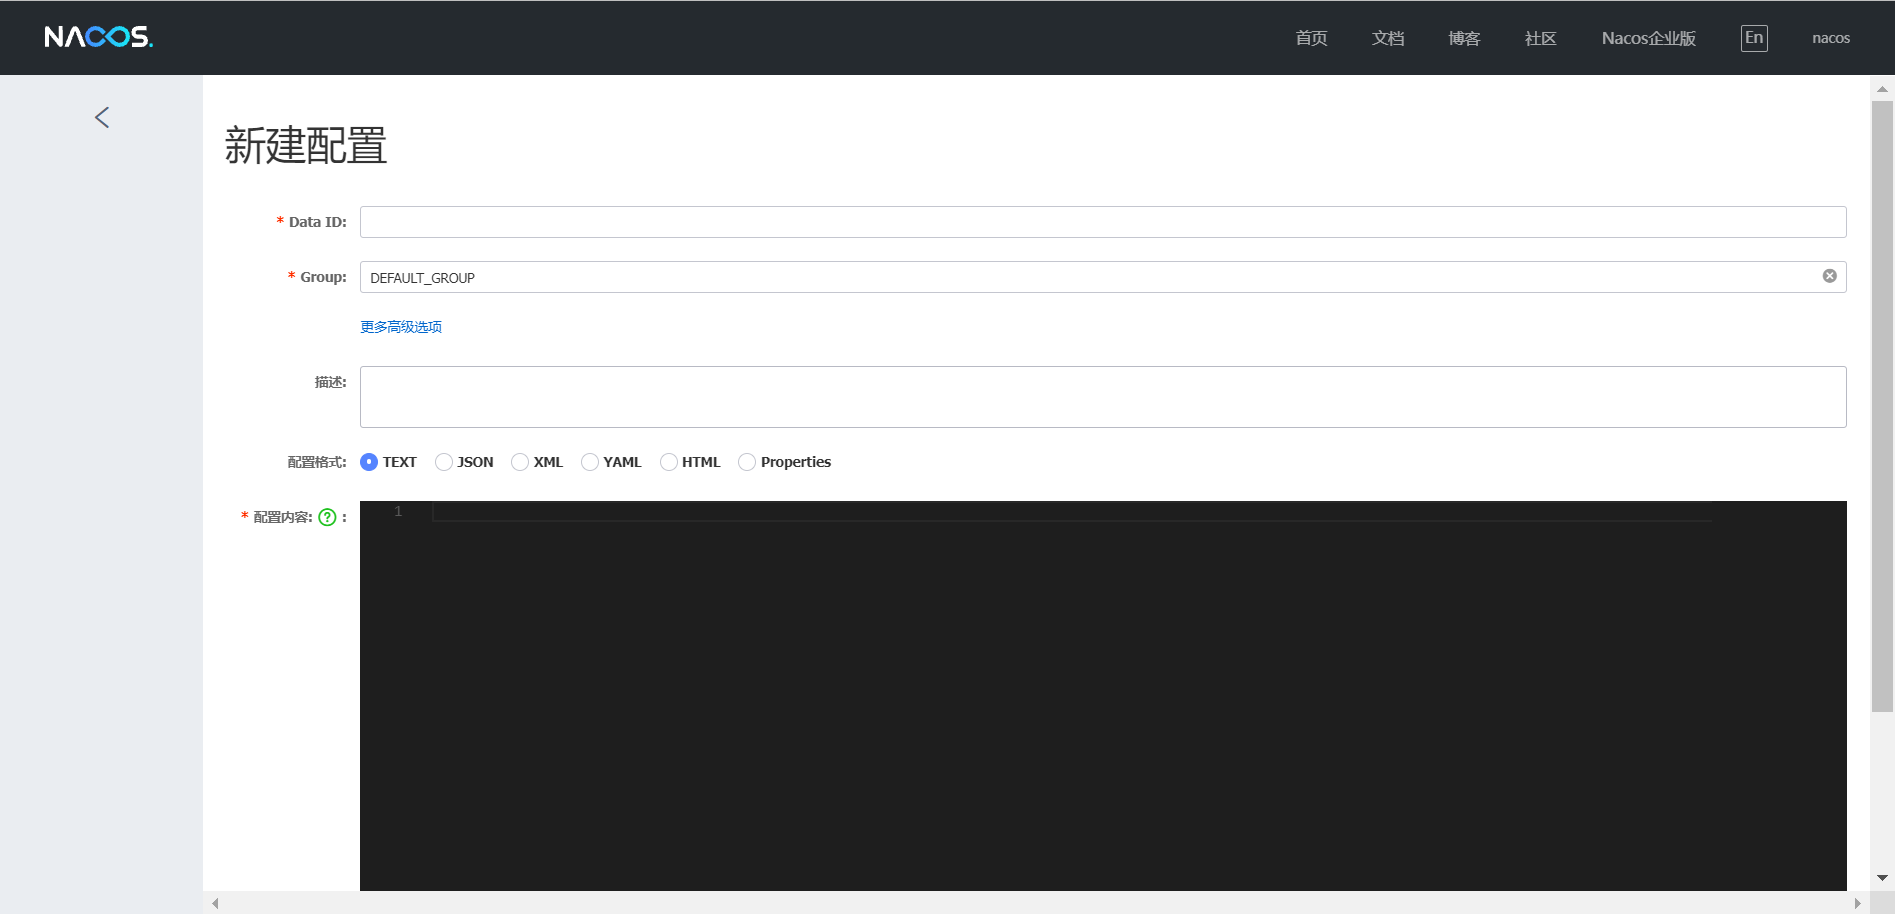
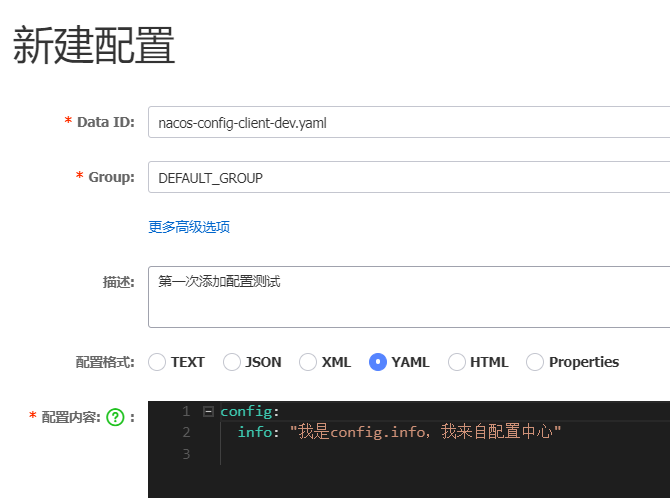
Access the Nacos interface and add configuration
Nacos Data ID naming rules
The Data ID in the figure above is the identification of the configuration and needs to be named according to the specification.
Naming formula: ${spring. Application. Name} - ${spring. Profiles. Active}. ${spring. Cloud. Nacos. Config. File extension}
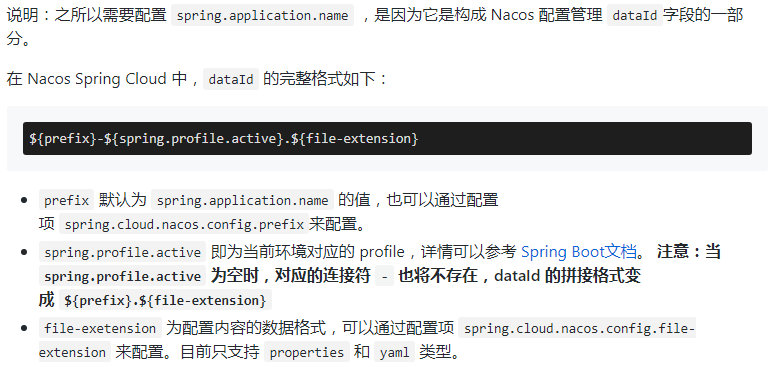
So it is finally named: nacos-config-client-dev.yaml
Nacos Group
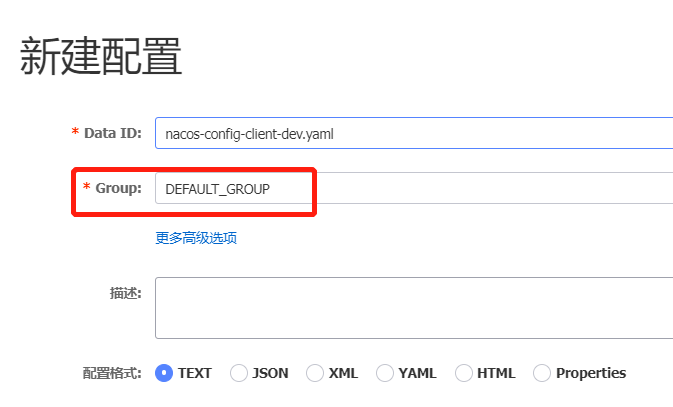
group refers to grouping. The configuration information can be divided into different groups according to items, such as e-commerce projects, medical projects, online education, etc.
Nacos configuration format
The format in the Data ID is selected in the configuration format
Nacos configuration content
It has been written in the previous Controller to get config.info
Therefore, add the following content to the configuration content and pay attention to the configuration format
config:
  info: "I am config.info,I'm from the configuration center"
Click publish after filling in all the information
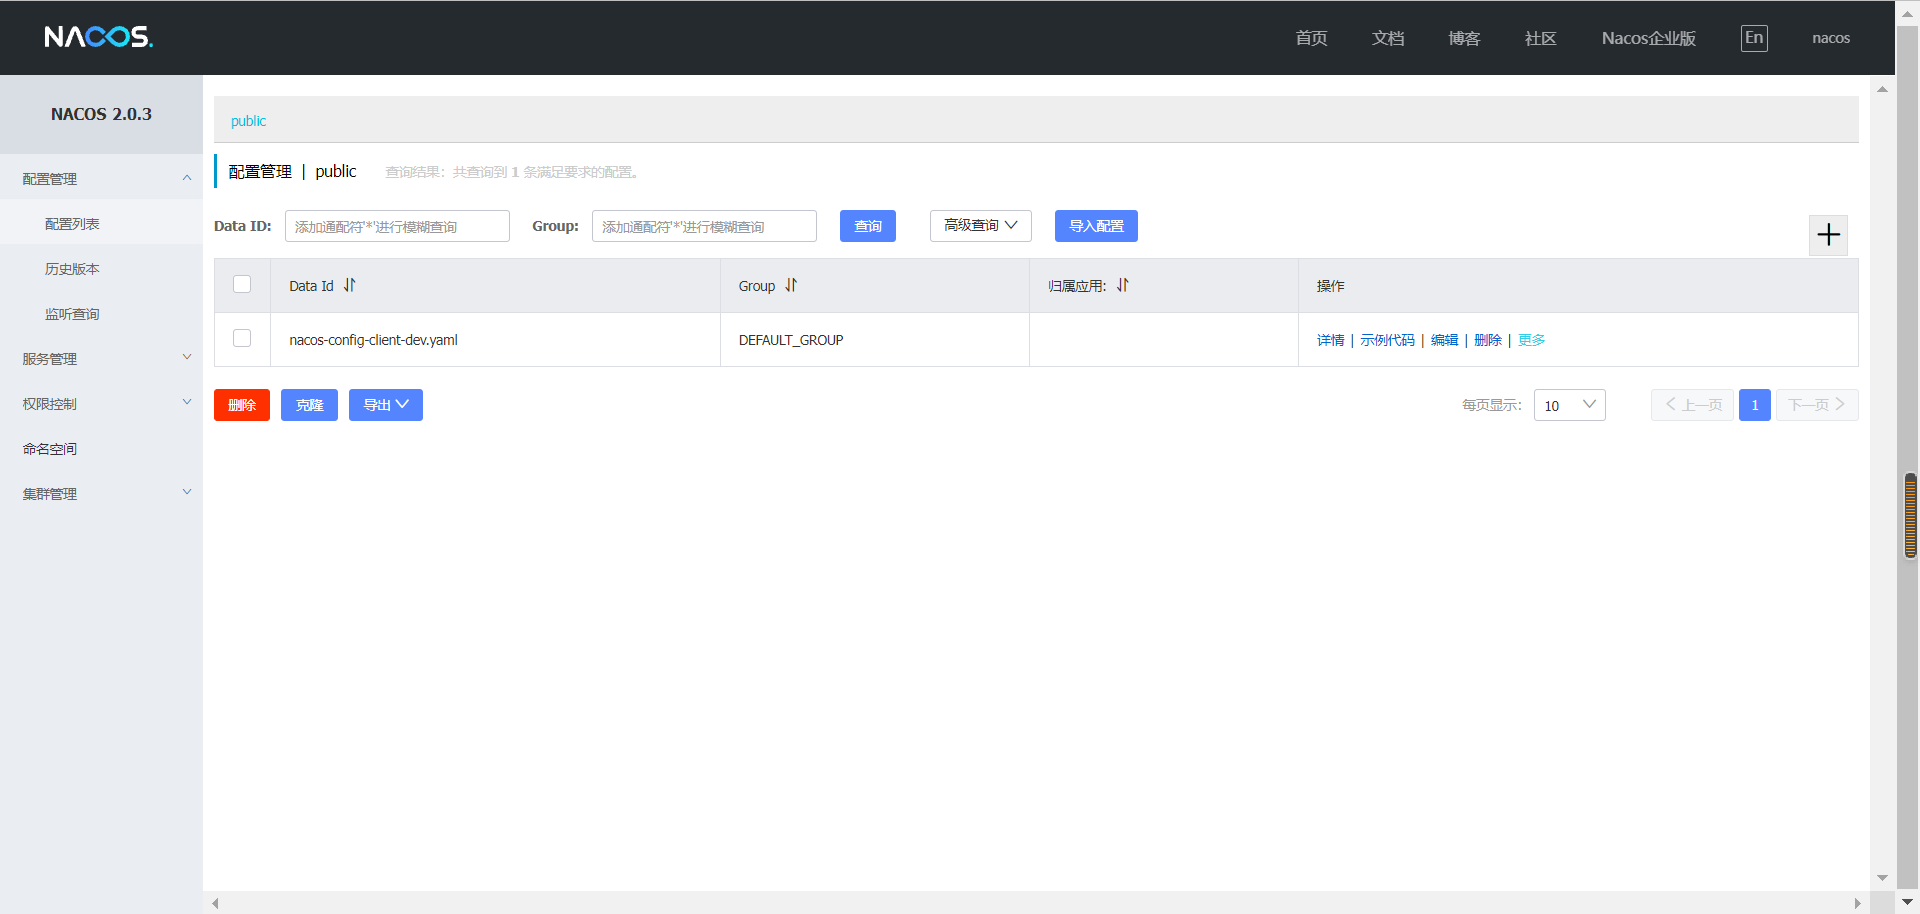
6) . testing
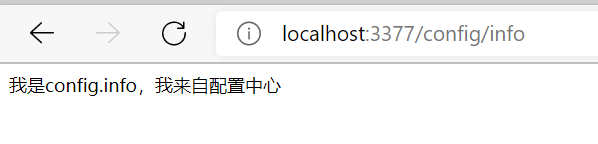
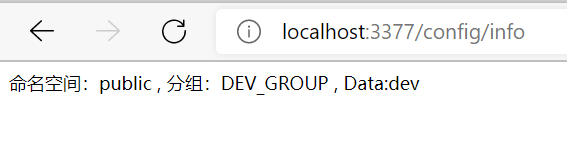
Start service, access http://localhost:3377/config/info Test
7) . automatic refresh configuration test
Enter Nacos to modify the configuration
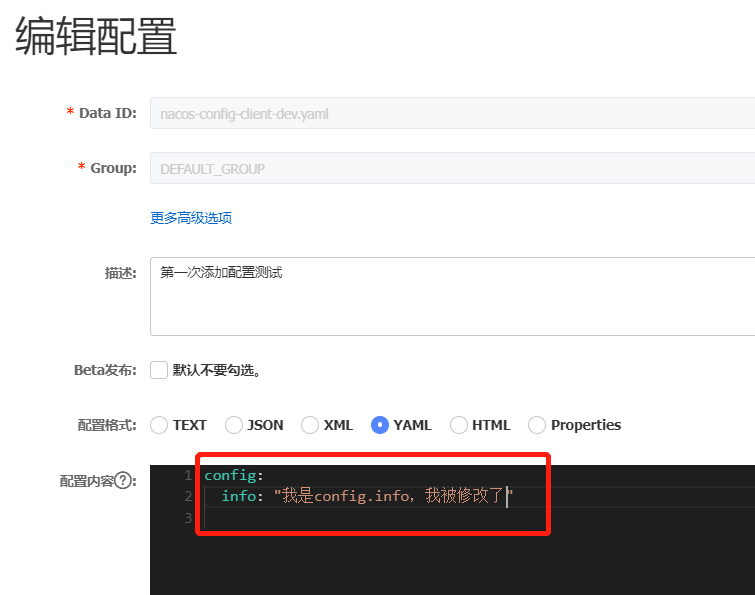
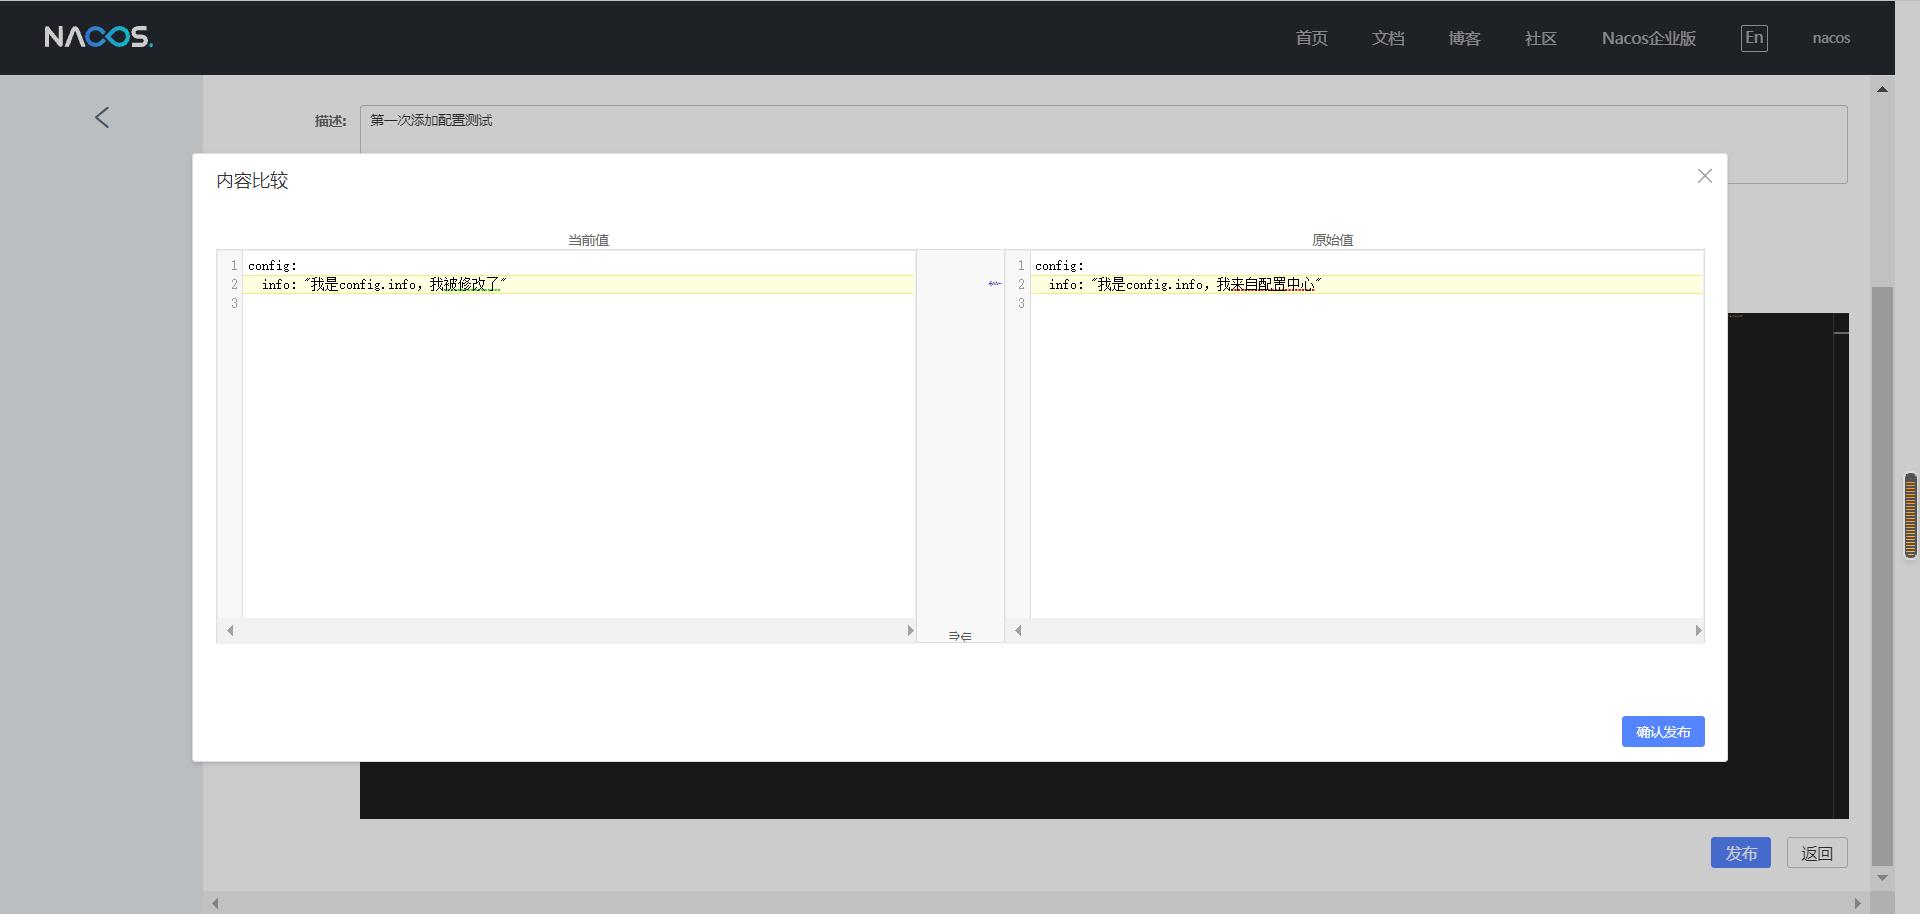
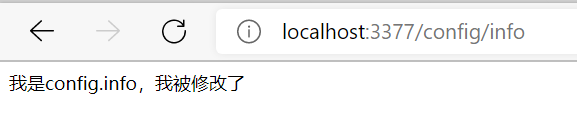
After modification, refresh the access interface and pass the test.
2. Classification configuration
Many problems may be encountered in the actual development process, such as:
- Usually, a system will prepare - dev development environment, test test environment and prod production environment. How to ensure that the service can correctly read the configuration file of the corresponding environment on Nacos when the specified environment is started?
- A large-scale distributed microservice system will have many microservice sub projects, and each microservice project will have corresponding development environment, test environment, advance environment and formal environment... How to manage these microservice configurations?
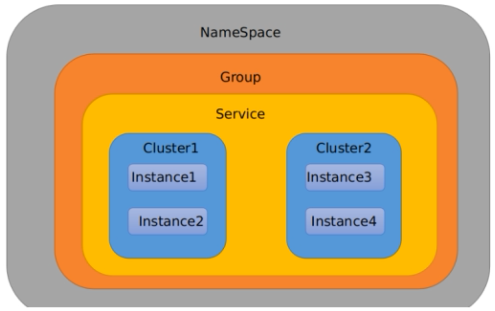
In order to cope with this situation, Nacos adopts the methods of Namespace, Group and Data ID for management.

The relationship between them is shown in the figure below:
-
The default namespace of Nacos is public, which is mainly used to realize isolation.
For example, we now have three environments: development, testing and production. We can create three namespaces. Different namespaces are isolated. -
Group defaults to DEFAULT_GROUP and group can divide different micro services into the same group. Service is a micro service; A service can contain multiple clusters. The DEFAULT Cluster of Nacos is DEFAULT, and the Cluster is a virtual partition of the specified micro service.
For example, for disaster recovery, Service microservices are deployed in Hangzhou machine room and Guangzhou machine room respectively. At this time, a cluster name (HZ) can be given to the Service microservices in Hangzhou machine room and a cluster name (GZ) can be given to the Service microservices in Guangzhou machine room. Microservices in the same machine room can also be called to each other as much as possible to improve performance. -
Instance is an instance of a micro service.
Next, test
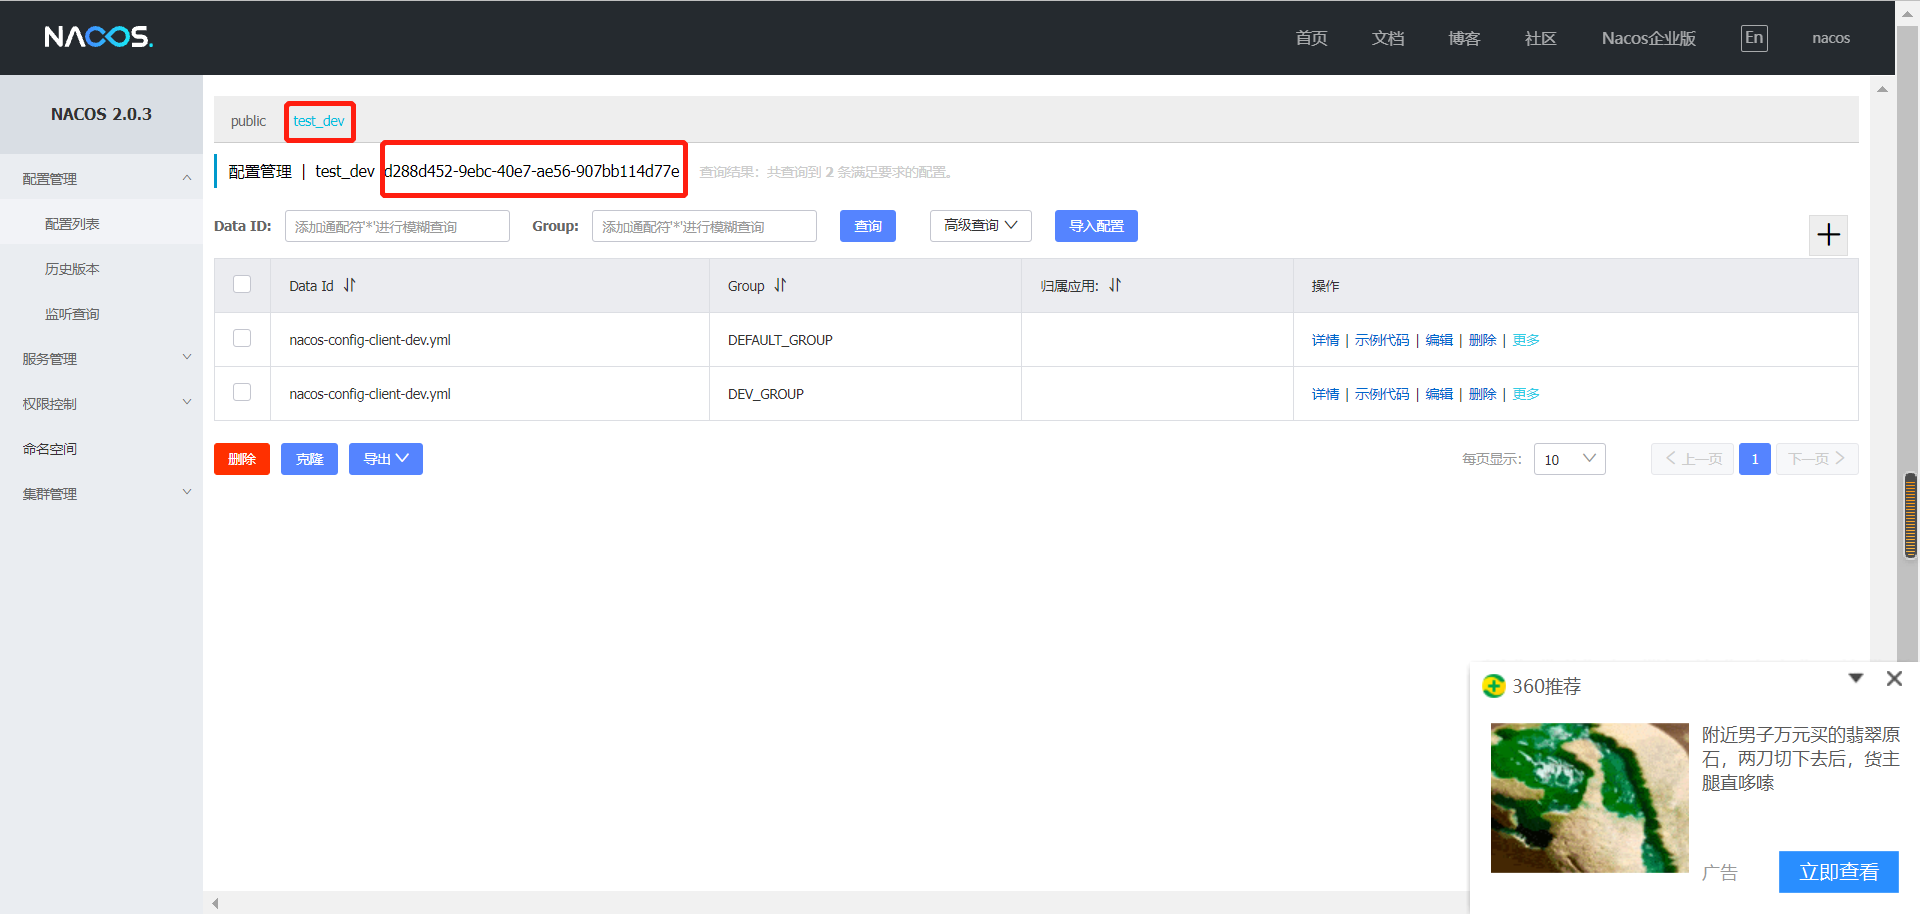
1) . create a new namespace
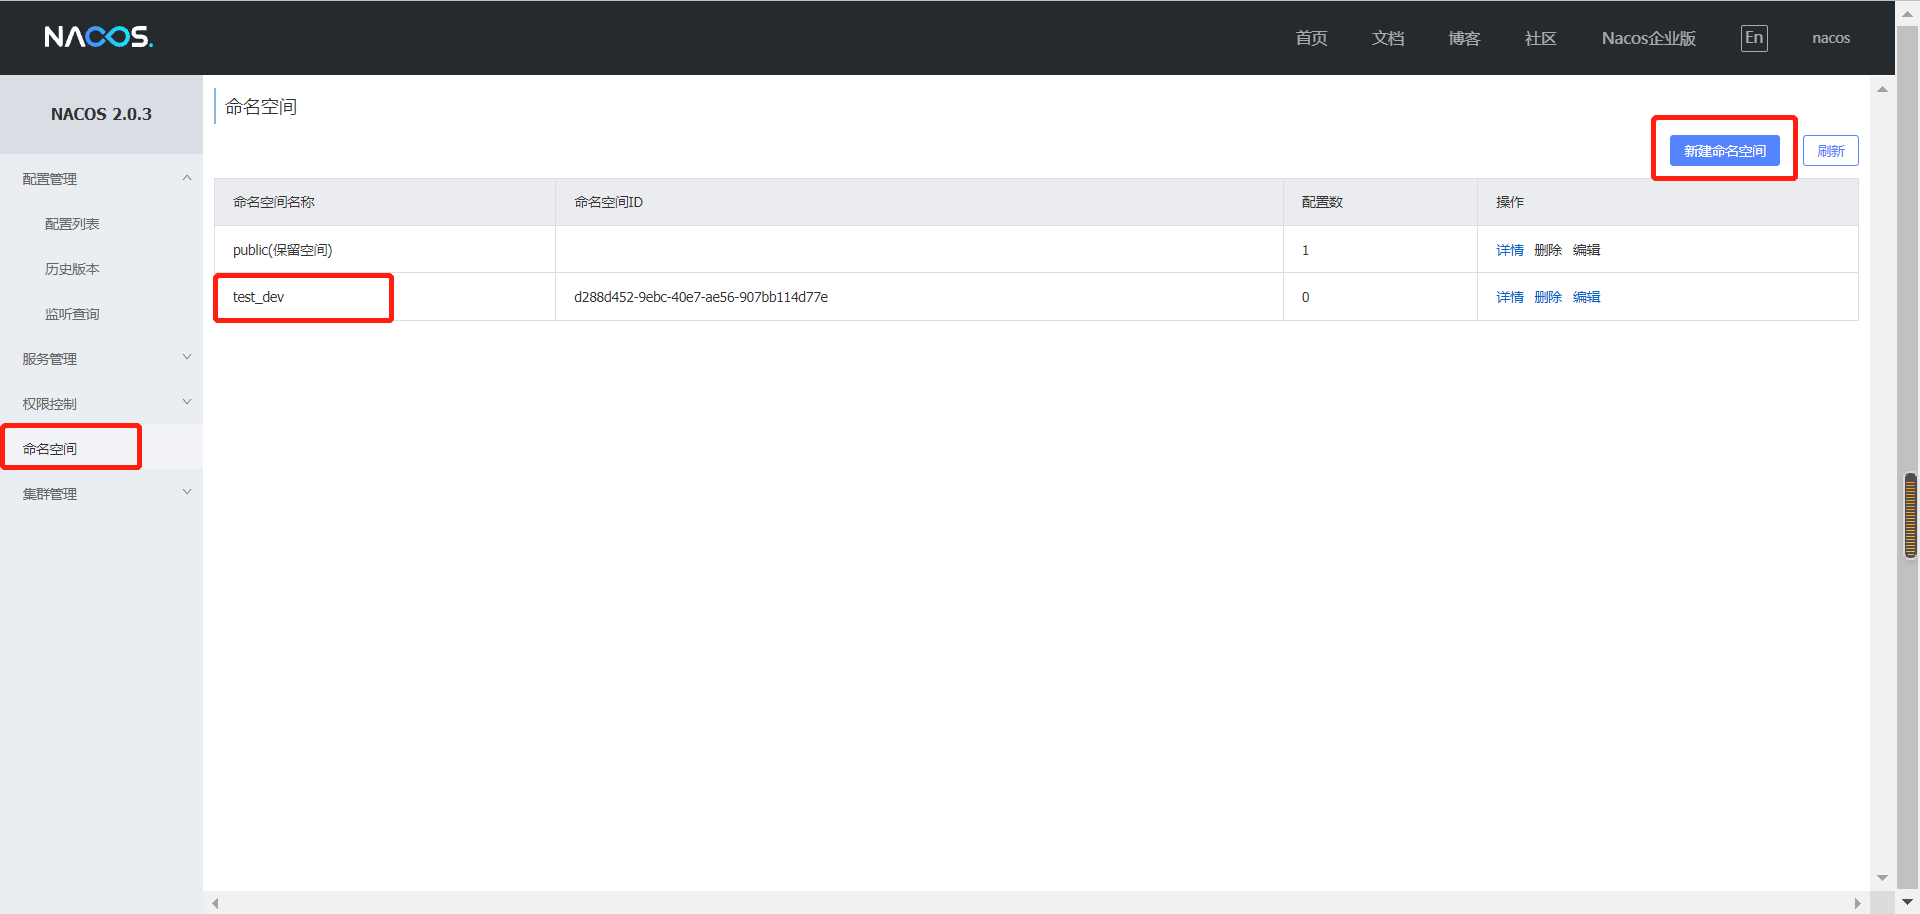
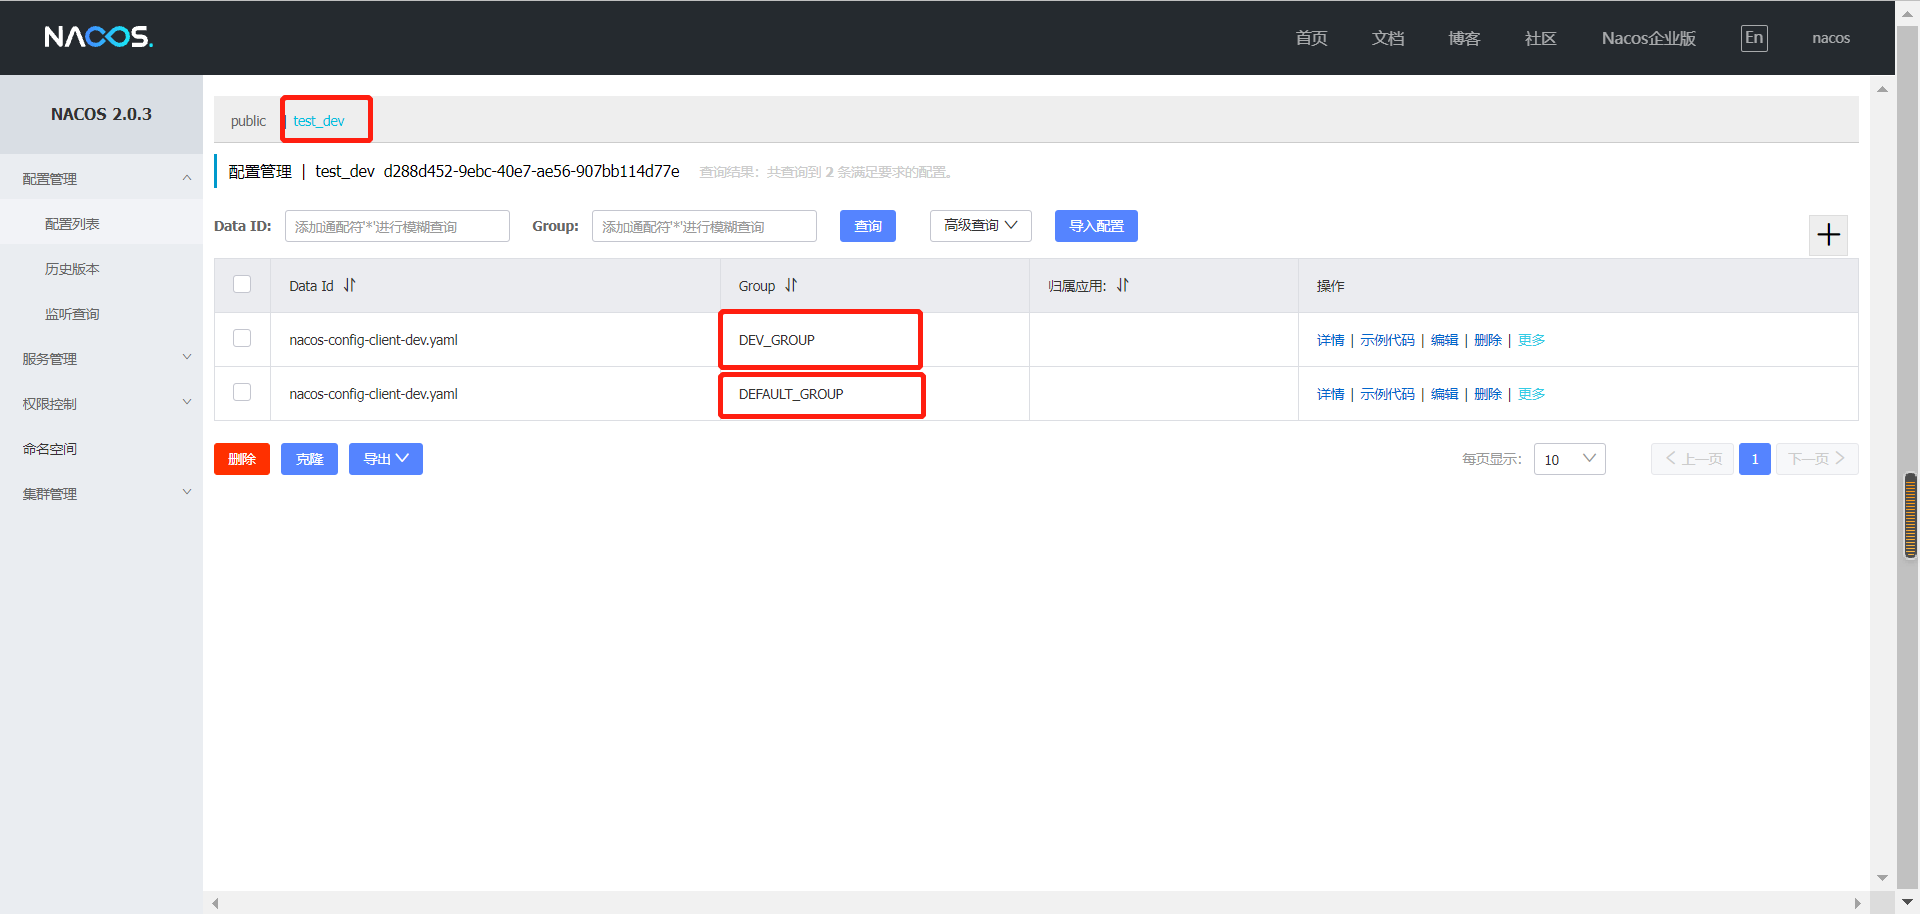
2) . add new groups and configurations to their respective namespaces
Under public
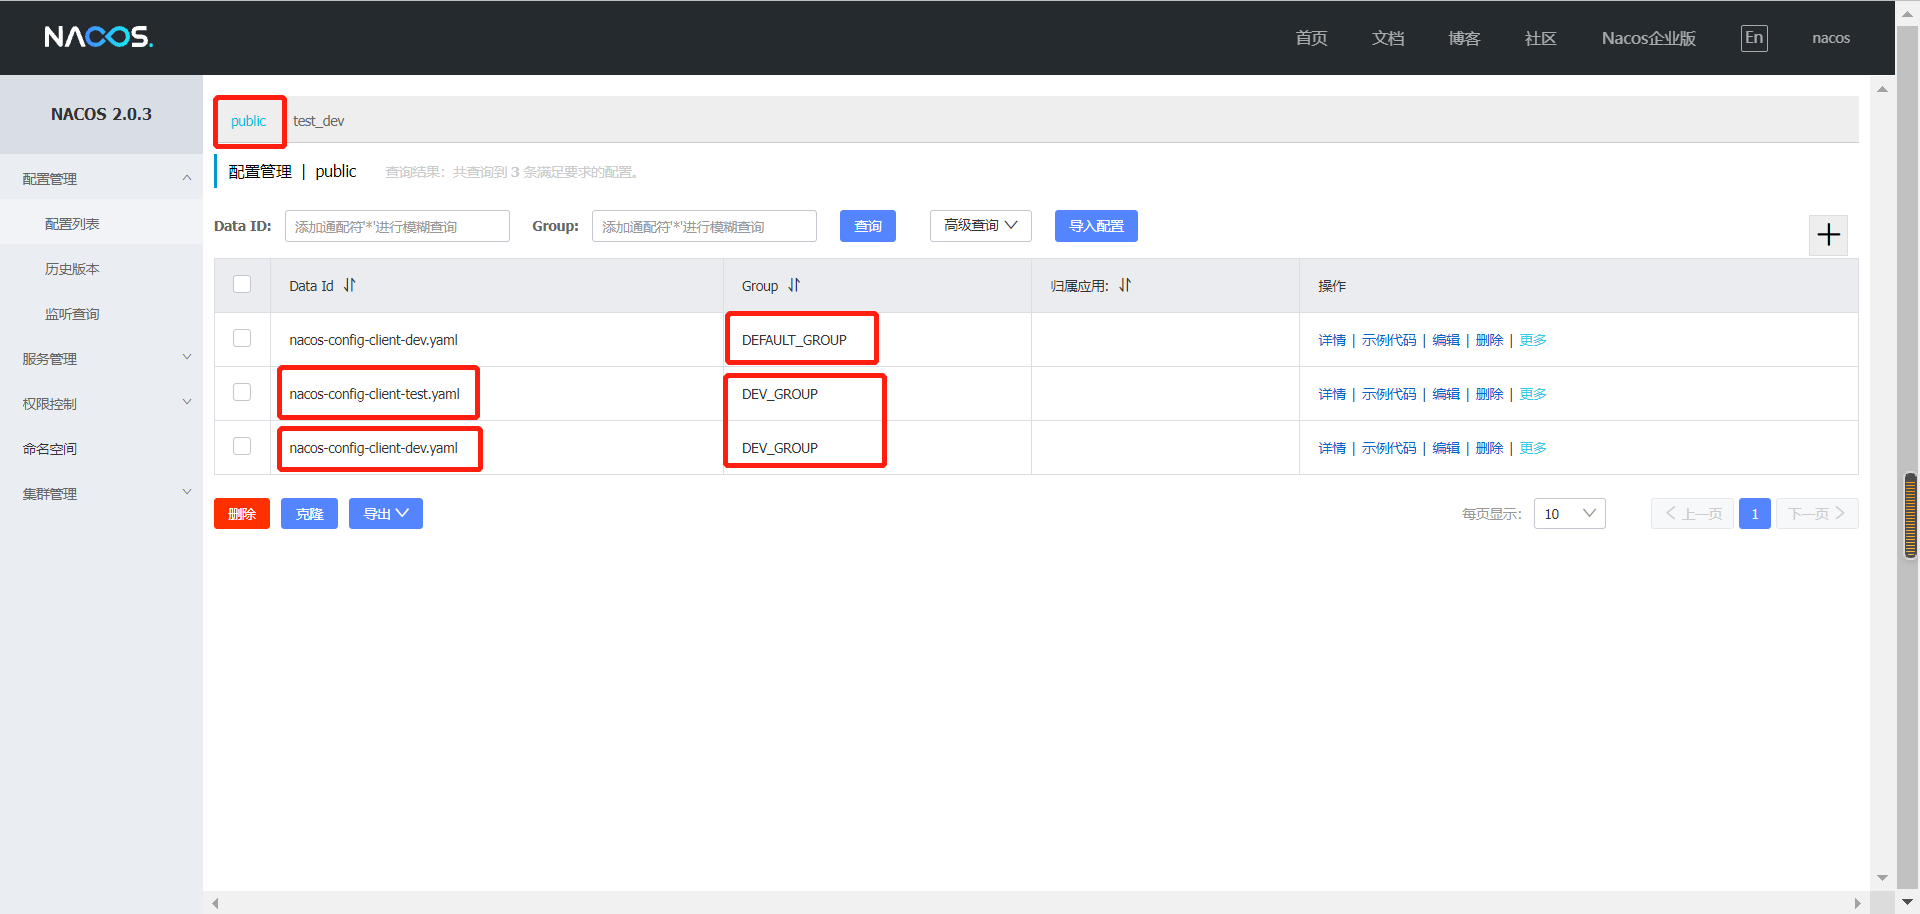
test_dev down
3) 2. Switching groups
No namespace changes, no deployment environment changes (dev)
Add a group configuration under config to limit the group.
Restart service, access http://localhost:3377/config/info Test
4) . switch Data ID
On the basis of limiting the Group, the deployment environment is switched to test
You can read configuration files in multiple environments through the spring.profile.active attribute

5) . switch Namespace
Now restrict access to test_dev in dev space_ Configuration of dev development environment grouped by group
Add Namespace ID to configuration file

5, Nacos cluster and persistence configuration
1. Cluster deployment architecture
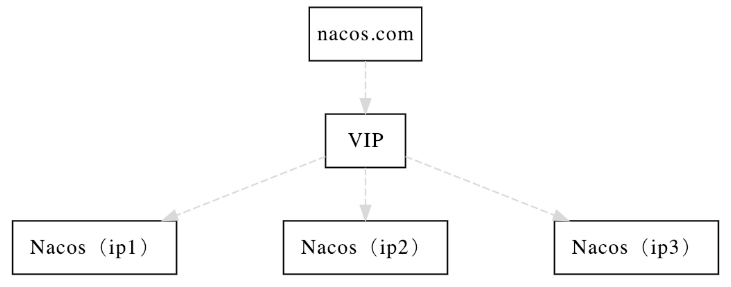
vip: proxy server
It is recommended that the user put the list of all services under a vip, bind the vip (proxy server) through the domain name, and send the request to Nacos1, Nacos2 and Nacos3 through the proxy server
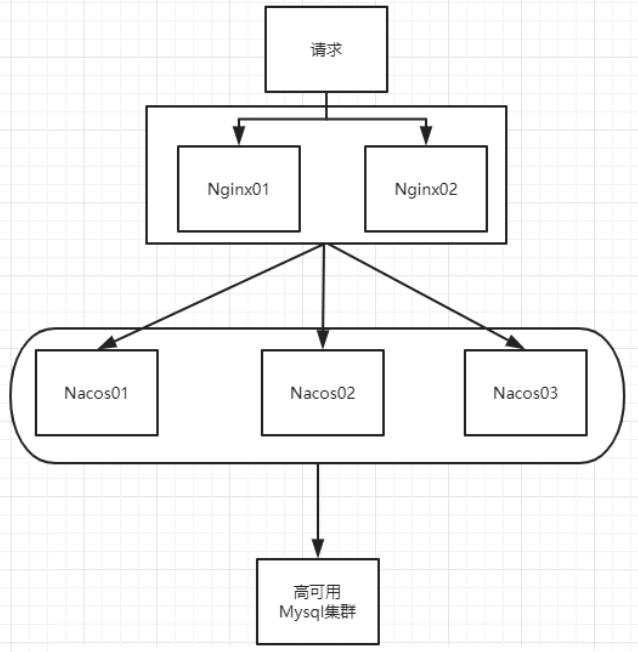
2. Actual cluster deployment
Nacos uses embedded database to store data by default. Therefore, if multiple Nacos nodes in the default configuration are started, there is a consistency problem in the data storage.
In order to solve this problem, Nacos adopts centralized storage to support cluster deployment. At present, it only supports MySQL storage. In other words, Nacos deployment information persistence can only be stored in MySQL database
3. Nacos persistence configuration
The method of persisting Nacos configuration information to MySQL database has been described in the previous connection of downloading and installing Nacos. The specific location is in the solution to the Unable to start embedded Tomcat error in the startup times
Portal: Nacos download and startup error handling method
4. Build Nacos cluster
Start the virtual machine and open the Linux system
- Virtual machine installation tutorial
- Linux system installation tutorial
- JDK11 configuration tutorial
- Maven configuration tutorial
- MySQL installation tutorial
- nacos configuration tutorial
We are studying why nacos can't start. We haven't started to build clusters yet....