[JUnit] JUnit 5 Foundation 3 - dependency injection, assume, enable / disable testing and nested testing
Dependency Injection
Before Junit 5, Junit did not support passing parameters in test constructors or methods very well, but Junit 5 allows metadata to be passed into constructors and methods, so dependency injection can also be used in test methods / constructors.
For example, the built-in TestInfo object in Junit5 can be obtained at runtime through DI:
package com.example;

import org.junit.jupiter.api.BeforeAll;
import org.junit.jupiter.api.BeforeEach;
import org.junit.jupiter.api.DisplayName;
import org.junit.jupiter.api.Test;
import org.junit.jupiter.api.TestInfo;

@DisplayName("App Test with spaces")
public class AppTest
{
    @BeforeAll
    public static void beforeAll(TestInfo testInfo){
        System.out.println("********* execute beforeAll() *********");
        System.out.println("Display name - " + testInfo.getDisplayName());
        System.out.println("Test Class   - " + testInfo.getTestClass());
        System.out.println("Test Method  - " + testInfo.getTestMethod());
        System.out.println("****************************************");
    }

    public AppTest(TestInfo testInfo) {
        System.out.println("********* execute constructor **********");
        System.out.println("Display name - " + testInfo.getDisplayName());
        System.out.println("Test Class   - " + testInfo.getTestClass());
        System.out.println("Test Method  - " + testInfo.getTestMethod());
        System.out.println("****************************************");
    }

    @BeforeEach
    public void BeforeEach(TestInfo testInfo) {
        System.out.println("********* execute beforeEach() *********");
        System.out.println("Display name - " + testInfo.getDisplayName());
        System.out.println("Test Class   - " + testInfo.getTestClass());
        System.out.println("Test Method  - " + testInfo.getTestMethod());
        System.out.println("****************************************");
    }

    @Test
    public void testOne(TestInfo testInfo) {
        System.out.println("********* execute testOne() ***********");
        System.out.println("Display name - " + testInfo.getDisplayName());
        System.out.println("Test Class   - " + testInfo.getTestClass());
        System.out.println("Test Method  - " + testInfo.getTestMethod());
        System.out.println("****************************************");
    }
}
The operation result is:
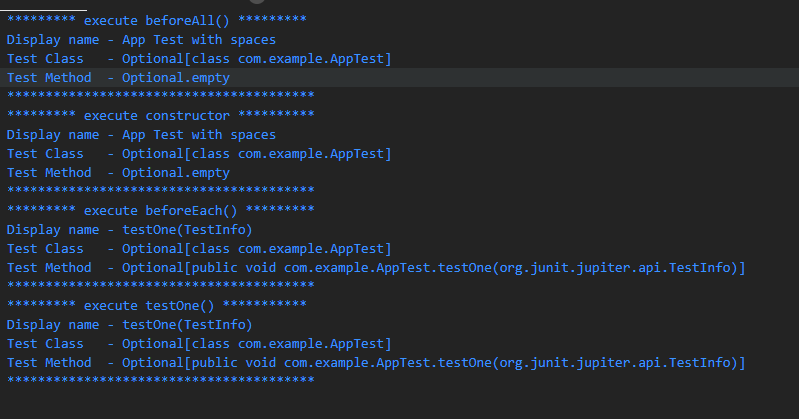
Through dependency injection, TestInfo can judge different display names and methods at run time, rather than manually declared by the user.
Assume
In addition to assertions, Junit5 can also judge values through assumptions.
assumeTrue & assumeFalse
package com.example;

import static org.junit.jupiter.api.Assumptions.assumeFalse;
import static org.junit.jupiter.api.Assumptions.assumeTrue;

import org.junit.jupiter.api.Test;

public class AppTest
{
    @Test
    void testAssumeTrue() {
        int num1 = 1, num2 = 1;
        assumeTrue(num1 == num2);
    }

    @Test
    void testAssumeTrueFail() {
        int num1 = 1, num2 = 1;
        assumeTrue(num1 != num2, "assumption fail");
    }

    @Test
    void testAssumeFalse() {
        int num1 = 1, num2 = 1;
        assumeFalse(num1 != num2);
    }
}
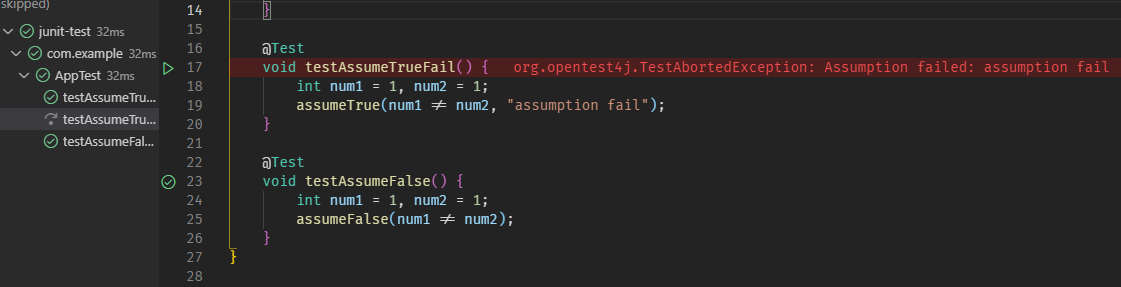
Operation results:
assumeThat
package com.example;

import static org.junit.jupiter.api.Assumptions.assumingThat;

import org.junit.jupiter.api.Test;

public class AppTest
{
    @Test
    void testAssumeThat1() {
        int val1 = 1, val2 = 0;
        assumingThat(val1 == val2, () -> {
            System.out.println("working on this part");
        });
    }

    @Test
    void testAssumeThat2() {
        int val1 = 1, val2 = 0;
        assumingThat(val1 != val2, () -> {
            System.out.println("will skip this part");
        });

        System.out.println("still print this line");
    }
}
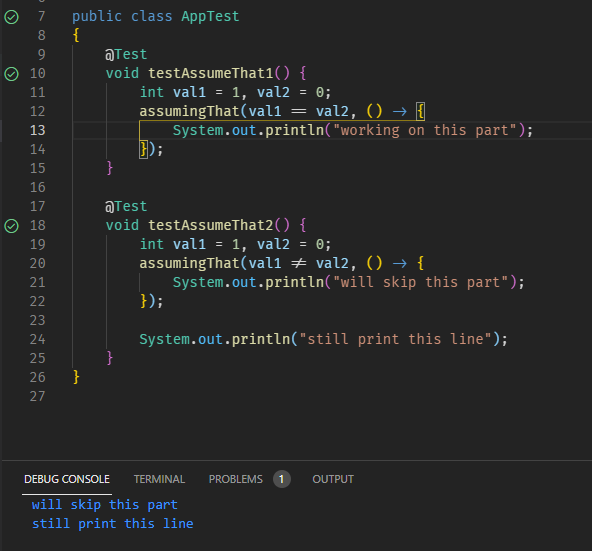
Operation results:
Application scenario of assume
At first glance, there seems to be no difference between assume and assert, but in assumeTrue and assumeFalse, there is not one next to the testAssumeTrueFail() function ❌, But a ❔, This is because Junit5 skips this method and goes directly to the next test method. If assert is used, Junit5 will judge that the test method fails and return it directly ❌.
In the assumpingthat method, the difference is more obvious. Although the judgment of assumpingthat in testAssumeThat2() is wrong, the test method does not terminate, but skips the contents of assumpingthat, directly jumps to the next line of code and outputs.
This also makes the application scenario of assume clear: it can be used for testing in different environments, such as:
package com.example;

import static org.junit.jupiter.api.Assumptions.assumingThat;

import org.junit.jupiter.api.Test;

public class AppTest
{
    @Test
    void testAssumeTha2() {
        System.setProperty("ENV", "DEV");
        assumingThat("DEV".equals(System.getProperty("ENV")), () -> {
            // Test with assert
        });

        System.out.println("Run tests that you want to run in all environments");
    }
}
Enable and disable tests
Disable test
@The Disabled annotation can be used to disable testing:
package com.example;

import static org.junit.jupiter.api.Assertions.assertTrue;

import org.junit.jupiter.api.Disabled;
import org.junit.jupiter.api.Test;

@Disabled
public class AppTest
{
    @Test
    void test1() {
        assertTrue(1 == 2);
    }

    @Test
    void test2() {
        assertTrue(1 == '1');
    }
}
The operation results are as follows:

As can be seen from the test interface on the left, Junit directly skipped all tests, neither indicating success nor failure.
Similarly, @ Disabled can also be used on the method. When it is mounted on the method, it will skip the current test method and proceed to the next test.
Enable / disable OS
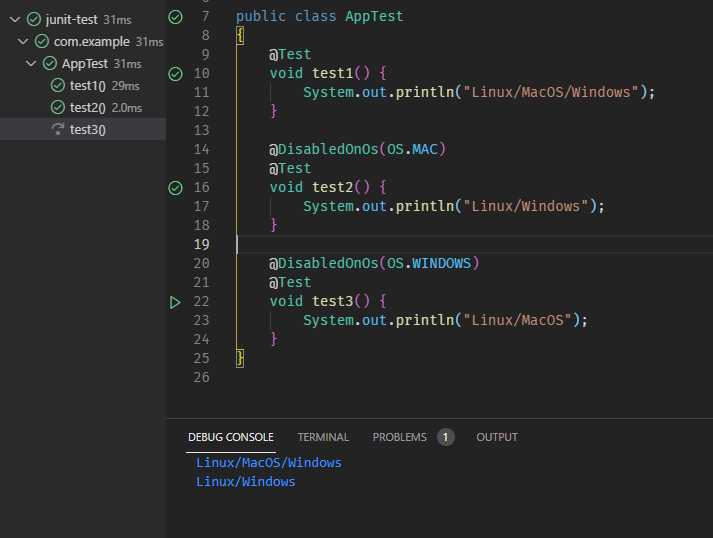
This method can make the test method not run on a specific OS, such as:
package com.example;

import org.junit.jupiter.api.Test;
import org.junit.jupiter.api.condition.DisabledOnOs;
import org.junit.jupiter.api.condition.OS;

public class AppTest
{
    @Test
    void test1() {
        System.out.println("Linux/MacOS/Windows");
    }

    @DisabledOnOs(OS.MAC)
    @Test
    void test2() {
        System.out.println("Linux/Windows");
    }

    @DisabledOnOs(OS.WINDOWS)
    @Test
    void test3() {
        System.out.println("Linux/MacOS");
    }
}
My system is Windows, so test3() will be disabled:
There is @ DisabledOnOs() and @ EnabledOnOs().
Turn JRE on / off
This is similar to the configuration of enabling and disabling OS. It allows the test method to run in the specified JRE environment.
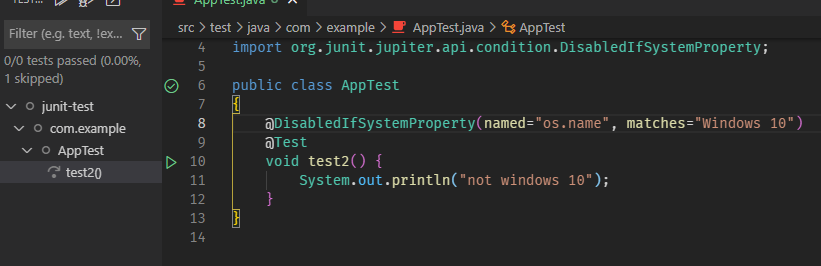
System attribute conditions
This refers to the SystemProperty variable, and the corresponding annotations are @ DisabledIfSystemProperty and @ EnabledIfSystemProperty.
package com.example;

import org.junit.jupiter.api.Test;
import org.junit.jupiter.api.condition.DisabledIfSystemProperty;

public class AppTest
{
    @DisabledIfSystemProperty(named="os.name", matches="Windows 10")
    @Test
    void test2() {
        System.out.println("not windows 10");
    }
}
Operation results:
Environmental variable conditions
Similar to the usage of system attribute conditions, its annotations are @ DisabledIfEnvironmentVariable and @ enabledifienvironmentvariable.
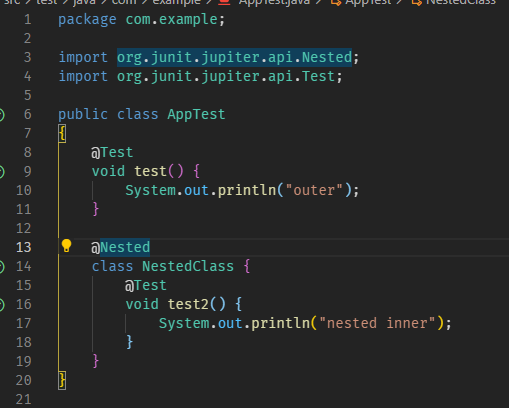
Nested test
Nested testing, that is, nested testing using anonymous classes.
package com.example;

import org.junit.jupiter.api.Nested;
import org.junit.jupiter.api.Test;

public class AppTest
{
    @Test
    void test() {
        System.out.println("outer");
    }

    @Nested
    class NestedClass {
        @Test
        void test2() {
            System.out.println("nested inner");
        }
    }
}
The operation results are as follows: