Vue quick start (Part 2) (for emergency use)
8, Asynchronous communication using Axios (emphasis)
8.1 what is Axios
Axios is an open source asynchronous communication framework that can be used in browser and Nodejs. Its main function is to realize Ajax asynchronous communication. Its functional features are as follows:
- Create XMLHttpRequests from the browser
- Create http request from node.js
- Promise API supported
- Intercept requests and responses
- Convert request data and response data
- Cancel request
- Automatically convert JSON data
- The client supports defense against XSRF (Cross Site Request Forgery)
8.2 first Axios application
First, we must import the relevant js.
<script src="https://unpkg.com/axios/dist/axios.min.js"></script>
Then we write the label we want to display: (the data is taken from our database. By accessing an interface under RestController in my previous SpringBoot+MyBatisPlus project, remember to add the annotation @ CrossOrigin under RestController)

The code displayed is as follows:
    <ul id="studentList">
        <li v-for="item in students">{{item.id}}--{{item.name}}--{{item.email}}--{{item.age}}</li>
    </ul>
Then the most important thing is to write our axios:
Our axios can refer to the life cycle section. He asked us to write it in the mounted framework. We can write it as we are told. In fact, the get request is. Get, the post request is. Post, and then. Then means how to execute if the acquisition is successful, and. catch means how to execute if the acquisition fails. (RES = > {...} It's the syntax of ES6. You can't be proficient, but you should be able to use it)
new Vue({
   el:"#studentList",
   data:{
       students: []
   },
   mounted(){
       axios.get("http://localhost:8080/list")
           .then(res => {
               this.students = res.data
           })
           .catch(function (err) {
               console.log(err)
           });
   }
});
The complete code is as follows:
<!DOCTYPE html>
<html lang="en">
<head>
    <meta charset="UTF-8">
    <title>obtain Json data</title>
    <script type="text/javascript" src="../js/vue.js"></script>
    <script src="https://unpkg.com/axios/dist/axios.min.js"></script>
</head>
<body>
    <h1>test</h1>
    <ul id="studentList">
        <li v-for="item in students">{{item.id}}--{{item.name}}--{{item.email}}--{{item.age}}</li>
    </ul>
</body>
    <script type="text/javascript">
        new Vue({
           el:"#studentList",
           data:{
               students: []
           },
           mounted(){
               axios.get("http://localhost:8080/list")
                   .then(res => {
                       this.students = res.data
                   })
                   .catch(function (err) {
                       console.log(err)
                   });
           }
        });

    </script>
</html>
result:

If it's a post request, it's a little troublesome, but take a look at the following code. Basically, it should also be imitated:
<!DOCTYPE html>
<html lang="en">
<head>
    <meta charset="UTF-8">
    <title>add to Json data</title>
    <script type="text/javascript" src="../js/vue.js"></script>
    <script src="https://unpkg.com/axios/dist/axios.min.js"></script>
</head>
<body>
    <h1>test</h1>
    <form id="formDemo">
        full name:<input type="text" v-model="name"><br>
        mailbox:<input type="text" v-model="email"><br>
        Age:<input type="number" v-model="age"><br>
        <input type="submit" value="Submit" v-on:click="addStudent"><br>
    </form>
</body>
    <script type="text/javascript">
        new Vue({
            el:"#formDemo",
            data:{
                name: '',
                email: '',
                age: 0
            },
            methods:{
                addStudent: function () {
                    axios({
                        method: 'post',
                        url: 'http://localhost:8080/list',
                        data:{
                            name: this.name,
                            email: this.email,
                            age: this.age
                        },
                        headers:{
                            'Content-Type': 'application/x-www-form-urlencoded'
                        },
                        transformRequest: function(obj) {
                            var str = [];
                            for(var p in obj){
                                str.push(encodeURIComponent(p) + "=" + encodeURIComponent(obj[p]));
                            }
                            return str.join("&");
                        }
                    }).then( res =>{
                        alert("Insert data succeeded");
                    }).catch( err =>{
                        alert("Failed to insert data");
                    });
                }
            }
        })

    </script>
</html>
9, Form input binding
We can use the v-model instruction to create a two-way data binding on the < input >, < textarea > and < Select > elements of the form. It will automatically select the correct method to update the elements according to the control type. Although it is magical, v-model is essentially a syntax sugar. It is responsible for listening to user input events to update data, and some special processing for some extreme scenarios.
Note: v-model will ignore the initial values of value, checked and selected attribute s of all form elements and always take the data of Vue instances as the data source. We should declare the initial values in the data option of the component through JavaScript.
v-model internally uses different properties for different input elements and throws different events:
- text and textarea elements use value property and input events;
- checkbox and radio use checked property and change events;
- The select field takes value as a prop and change as an event.
For details, click here to see the official website. It's clearly written. I won't list them one by one here. (in fact, several input s in the above form are bound by form, which is very simple, that is, v-model is used to bind a property value under Vue's data, and then they are always consistent.)
10, Component Foundation
What is a component? Simply put, it can also be a component. In fact, we take out the common area and write it separately, and then let the pages that need this component refer to this component. For example, the header menu bar of Vue official website, the navigation bar on the left, and even the search magnifying glass + search box in the header menu can be components.

Defining a component is very simple. You only need to call our Vue.component method. The first parameter is the component name, followed by an object. props is used to associate external data, and template is the detailed code of the component.
 //Define a component
 Vue.component('my-li',{
     props:["prop"],
     template:'<li>{{prop}}</li>'
 });
example:
<!DOCTYPE html>
<html lang="en">
<head>
    <meta charset="UTF-8">
    <title>Component Foundation</title>
    <script type="text/javascript" src="../js/vue.js"></script>
</head>
<body>
    <div id="component-demo">
        <ul>
            <!--there name Bound is prop Back name-->
            <!--porp The binding is in the component props String of( prop You can choose any name item,name...(all right)-->
            <my-li v-for="name in items" v-bind:prop="name"></my-li>
        </ul>
    </div>

    <script type="text/javascript">
        //Define a component
        Vue.component('my-li',{
            props:["prop"],
            //Here, because prop is associated with the external name, you can directly use prop to obtain the value of name
            template:'<li>{{prop}}</li>'
        });
        //Define our Vue objects
        let demo = new Vue({
            el:"#component-demo",
            data:{
                items: ['Zhang San','Li Si','Wang Wu']
            }
        })
    </script>
</body>
</html>
11, Vue cli build demo
So what is Vue cli? It is actually a scaffold (pre-defined directory structure and basic code) officially provided to quickly generate a Vue project template.
Main functions:
- Unified directory structure
- Local debugging
- Hot deployment
- unit testing
- Integrated packaging Online
Environment preparation: node. JS (> = 6. X, 8. X preferred) + Git
Then we can download our Vue cli. Enter in cmd: (- g means global installation, which is the abbreviation of global). npm remembers to set the image source of Taobao, which will be faster.
npm install -g @vue/cli
After downloading, we can check whether the installation is completed through the vue list command. If the installation is completed, it will be displayed as follows:

If he tells you that vue is not an internal or external command, it is generally because the system environment variables are not configured properly. What should I do?
npm install -g @vue/cli
Execute the above command again, and he will tell you where you have downloaded this thing and where it is. (although it is a little troublesome, it will take a lost time, because he will find that you have downloaded this thing halfway. But it can solve the problem anyway.)
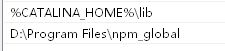
When he tells you that the download failed because you have downloaded it at a certain location, he will tell you the location by the way. You only need to configure this directory (the directory shown below is D:\Program Files\npm_global) into the path of the environment variable of our system.

Next, we can initialize our project through vue. Use the following command line:
vue init webpack [project name]
He'll ask
1. Do we want to call the project name [the project name on the command line just now] and press enter directly
2. Then ask us if we have a project description and enter directly
3. Who's the author? Just enter
4. In the back, just enter directly or ask you Yes/No.
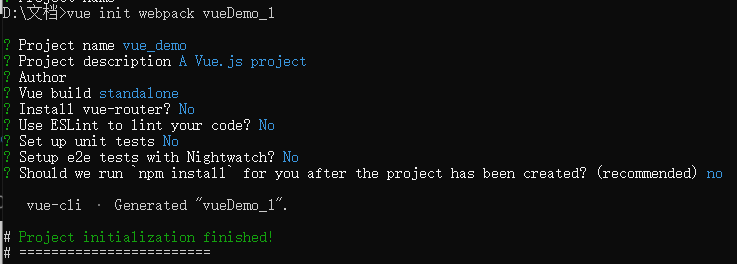
After the project is created, he will tell us to run these three instructions to run our vue project.
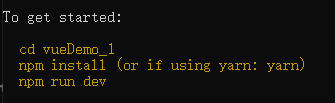
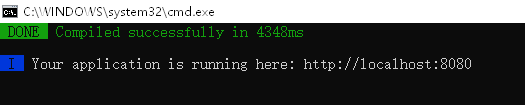
Finally, execute the npm run dev instruction, and he will tell us that the vue project has been running in our local localhost:8080.
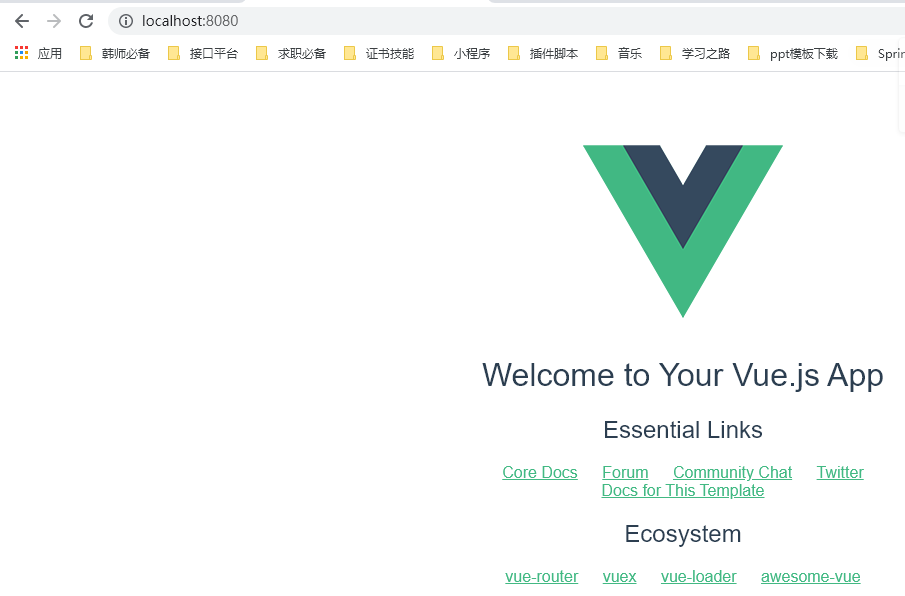
Open and we can see:
12, Vue cli directory structure
Let's open the project just now and talk about its directory structure.
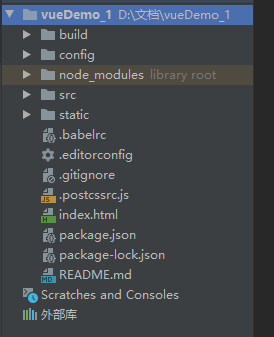
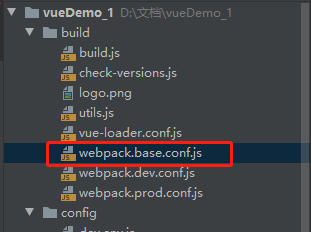
This is our webpack configuration file
This is our source code and static resources
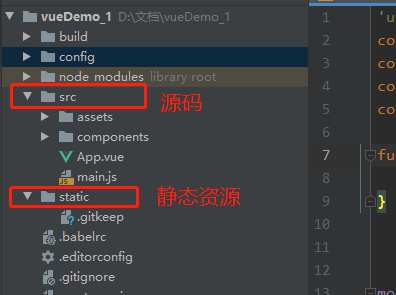
Home page: index.html

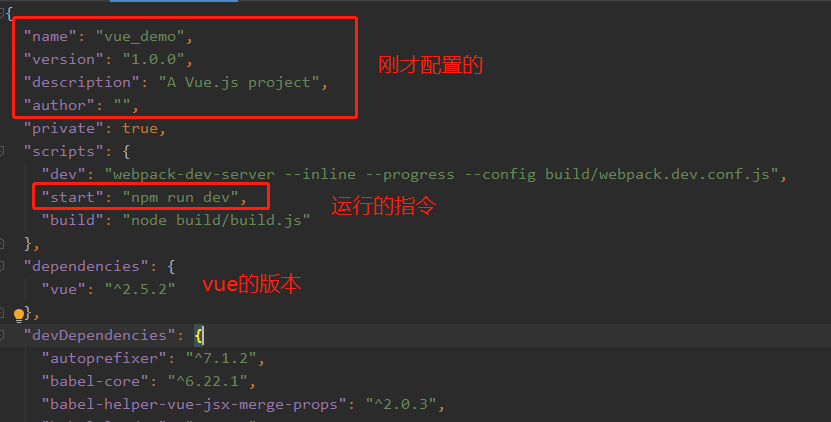
Project configuration file: package.json

Next is our play. Our source code:
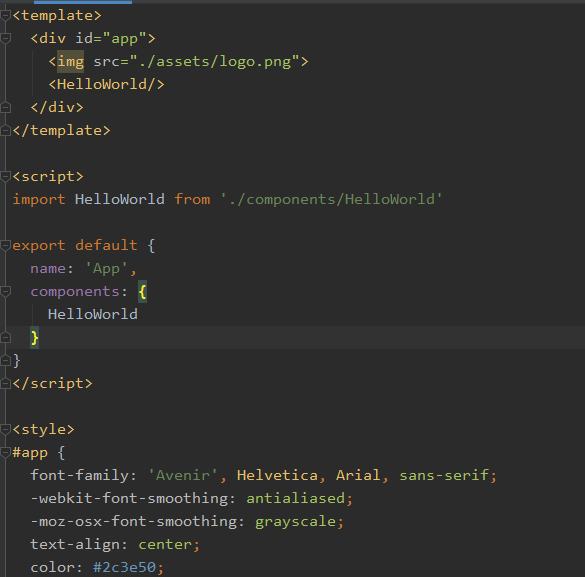
First of all, let's introduce our entry function (that is, where the program starts running first) - main.js, where Vue is introduced. (unlike before, it is no longer imported with our < script >, but imported through import with the syntax of ES6)

Explain that importing Vue is equivalent to importing js files through script tags. Importing this App is actually importing App.vue. Then the following component refers to him.
Let's look at App.vue again
What he introduces here is the HelloWorld.vue file in the components directory, and then exports it through export so that others can reference it. (much like js) the following style should go without saying. In fact, it is just setting the style.
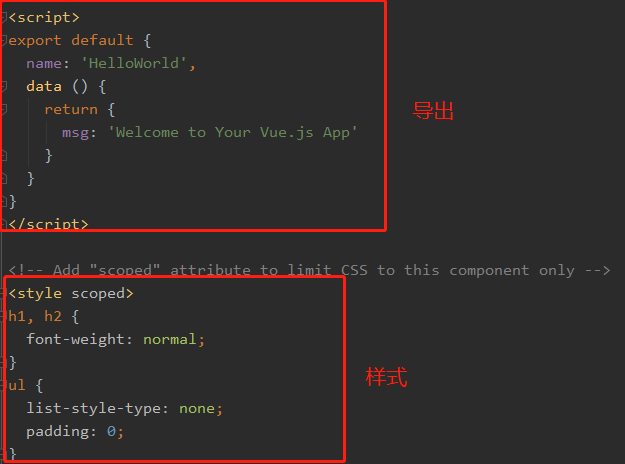
Let's take a look at this HelloWorld.vue file.
It is actually a template, plus an export and some style configurations.

There is a parameter called scoped in the style here, which means that this style only works for the HelloWorld component.
Then we just wrote the following sentence on index.html, that is, our home page, and displayed the whole page. (because of this id=app, he actually wrote everything to us in the vue file. Later, he will write a blog about how to use elementUI, which should be more detailed).
