The problem of user authentication is a cliche.
After a user logs in, many interfaces need to do user information verification. First, let the server know who the user is, and second, for data security reasons.
For example, if you want to see how many friends you have and who they are, you should bring your identity information on the interface of the friends list. Otherwise, the interface ghost knows who you are. How can you return data to you?
When learning java web, you usually use session and cookie to solve this problem. token is recommended here.
This is also a popular way now.
A token is a long string with a certain timeliness. It is useless when it expires. Usually, we encrypt it with a user id. for details, see teacher Ruan Yifeng Introduction to JSON Web Token
Teacher Ruan's articles are usually very simple and easy to understand. It is suggested to have a good look. I won't repeat them here.
We will return a token when the user logs in, and then put a token on the request header when accessing some interfaces that require the user to log in.
For example, on the homepage of an APP, a lot of data on the homepage can be displayed without user login. At this time, the interface can be requested without a token.
However, if you want to view my friends list, these data obviously need to let the server know which user you are. At this time, the request needs to bring a token. If there is no token or the token fails, let the front-end students jump to the login page and ask the user to log in.
Code implementation
First, we need a tool class that generates a token from a user id.
You can also use other, but considering that this is used to identify users, we usually use user id to generate token s.
Introduce the following dependencies:
<!--jwt dependent jar package-->
<dependency>
	<groupId>io.jsonwebtoken</groupId>
	<artifactId>jjwt</artifactId>
	<version>0.9.1</version>
</dependency>
<dependency>
	<groupId>com.auth0</groupId>
	<artifactId>java-jwt</artifactId>
	<version>3.4.0</version>
</dependency>
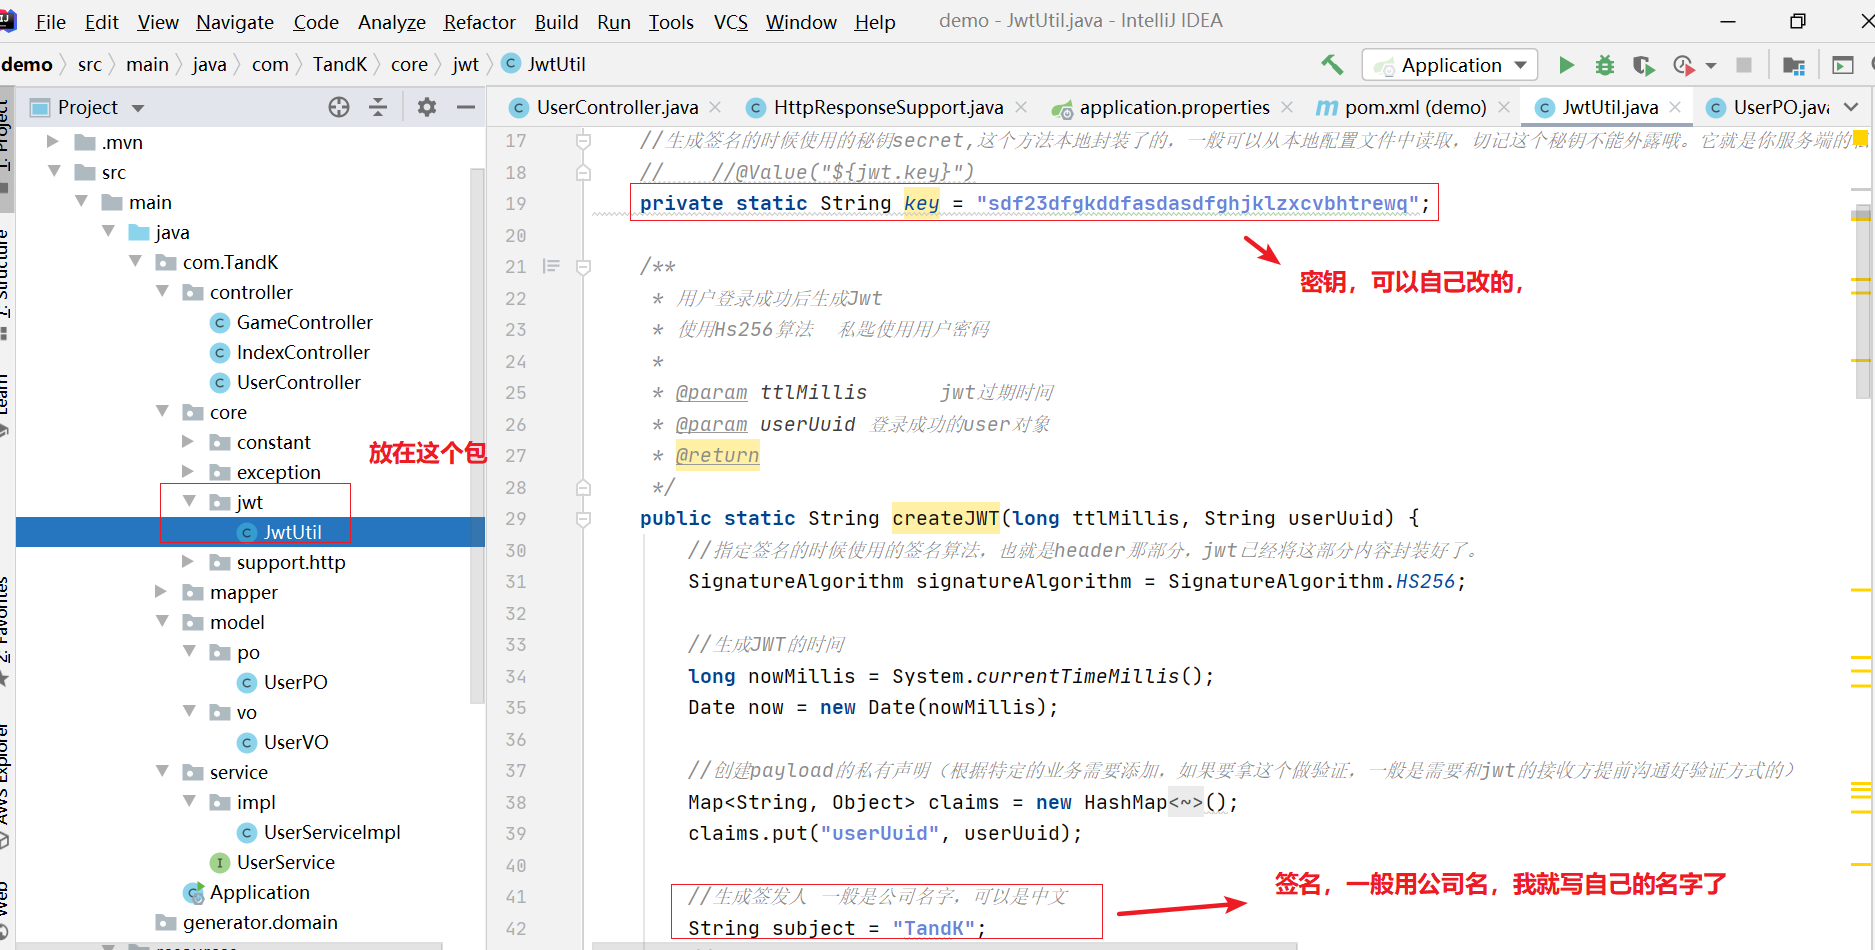
Create a new jwt package under the core package, write a tool class in it, and generate a token with the user id. I also use it directly. This part can be pasted directly:
package com.TandK.turntable.core.jwt;

import io.jsonwebtoken.Claims;
import io.jsonwebtoken.JwtBuilder;
import io.jsonwebtoken.Jwts;
import io.jsonwebtoken.SignatureAlgorithm;
import org.springframework.stereotype.Component;

import java.util.Date;
import java.util.HashMap;
import java.util.Map;
import java.util.UUID;

@Component
public class JwtUtil {

    //The secret key used when generating a signature. This method is encapsulated locally and can generally be read from the local configuration file. Remember that this secret key cannot be exposed. It is the private key of your server and should not be revealed in any scenario. Once the client knows the secret, it means that the client can sign jwt it.
    //    //@Value("${jwt.key}")
    private static String key = "sdf23dfgkddfasdasdfghjklzxcvbhtrewq";

    /**
     * Jwt is generated after the user logs in successfully
     * Use Hs256 algorithm private key to use user password
     *
     * @param ttlMillis      jwt Expiration time
     * @param userUuid user object successfully logged in
     * @return
     */
    public static String createJWT(long ttlMillis, String userUuid) {
        //The signature algorithm used when specifying the signature, that is, the header part, jwt has encapsulated this part.
        SignatureAlgorithm signatureAlgorithm = SignatureAlgorithm.HS256;

        //Time when JWT was generated
        long nowMillis = System.currentTimeMillis();
        Date now = new Date(nowMillis);

        //Create a payload private statement (add it according to specific business needs. If you want to use this for verification, you generally need to communicate the verification method with the jwt receiver in advance)
        Map<String, Object> claims = new HashMap<String, Object>();
        claims.put("userUuid", userUuid);

        //The generated issuer is usually the company name, which can be Chinese
        String subject = "TandK";
        //The following is to add various standard declarations and private declarations for payload
        //This is actually a new JwtBuilder to set jwt's body
        JwtBuilder builder = Jwts.builder()
                //If there is a private declaration, you must first set the private declaration created by yourself. This is to assign a value to the builder's claim. Once it is written after the assignment of the standard declaration, it overwrites those standard declarations
                .setClaims(claims)
                //Set jti(JWT ID): it is the unique ID of JWT. According to business needs, this can be set as a non duplicate value, which is mainly used as a one-time token to avoid replay attacks.
                .setId(UUID.randomUUID().toString())
                //IAT: issuing time of JWT
                .setIssuedAt(now)
                //Represents the main body of the JWT, that is, its owner. This is a string in json format, which can store userid, roldid and so on as the unique flag of what user.
                .setSubject(subject)
                //Set the signature algorithm and secret key used for signature
                .signWith(signatureAlgorithm, key);
        if (ttlMillis >= 0) {
            long expMillis = nowMillis + ttlMillis;
            Date exp = new Date(expMillis);
            //Set expiration time
            builder.setExpiration(exp);
        }

        return builder.compact();
    }


    public static String createJWTBySecond(long seconds, String userUuid) {
        return createJWT(seconds * 1000, userUuid);
    }


    /**
     * Token Decryption of
     *
     * @param token Encrypted token
     * @return
     */
    public Claims parseJWT(String token) {
        //Get DefaultJwtParser
        Claims claims = Jwts.parser()
                //Set secret key for signature
                .setSigningKey(key)
                //Set jwt to resolve
                .parseClaimsJws(token).getBody();
        return claims;
    }


    /**
     * Verification token
     * The official verification can be used here. What I verify here is that if the password carried in the token is consistent with the database, it will pass the verification
     *
     * @param token
     * @param userUuid
     * @return
     */
    public Boolean isVerify(String token, String userUuid) {
        //Get DefaultJwtParser
        Claims claims = Jwts.parser()
                //Set secret key for signature
                .setSigningKey(key)
                //Set jwt to resolve
                .parseClaimsJws(token).getBody();
        if (claims.get("userUuid").equals(userUuid)) {
            return true;
        }
        return false;
    }

}
With the token generator, we can build a table to store the user's token. In this way, we don't have to parse the user's token every time we request, parse the user's id, and then take the user id to the database to find out the user's information.
Directly query the linked table. After checking, find out the user's token. If the token has not expired, you can also find out the user's information by the way.
/*
 Navicat MySQL Data Transfer

 Source Server         : localhost_3306
 Source Server Type    : MySQL
 Source Server Version : 80019
 Source Host           : localhost:3306
 Source Schema         : demo

 Target Server Type    : MySQL
 Target Server Version : 80019
 File Encoding         : 65001

 Date: 29/09/2021 21:46:18
*/

SET NAMES utf8mb4;
SET FOREIGN_KEY_CHECKS = 0;

-- ----------------------------
-- Table structure for user_token
-- ----------------------------
DROP TABLE IF EXISTS `user_token`;
CREATE TABLE `user_token`  (
  `uuid` bigint(19) NOT NULL,
  `user_uuid` bigint(19) NULL DEFAULT NULL,
  `access_token` varchar(255) CHARACTER SET utf8mb4 COLLATE utf8mb4_0900_ai_ci NULL DEFAULT NULL,
  `expire_time` datetime(0) NULL DEFAULT NULL COMMENT 'Expiration time',
  `create_time` datetime(0) NULL DEFAULT CURRENT_TIMESTAMP(0),
  `update_time` datetime(0) NULL DEFAULT CURRENT_TIMESTAMP(0) ON UPDATE CURRENT_TIMESTAMP(0),
  PRIMARY KEY (`uuid`) USING BTREE
) ENGINE = InnoDB CHARACTER SET = utf8mb4 COLLATE = utf8mb4_0900_ai_ci ROW_FORMAT = Dynamic;

SET FOREIGN_KEY_CHECKS = 1;
The structure is as follows. In addition to the basic data, user_uuid is used to combine the user table to find out user information, access_token stores the plaintext of the token. expire_time stores the expiration time of the token.
When a user accesses our interface with a token, you only need to use the following sql to find out whether the token is valid. If it is valid, you can also find out the user information along with it:
SELECT
	u.*
FROM
	user u
   	LEFT JOIN user_token ut ON u.uuid = ut.user_uuid
WHERE
   	ut.access_token = #{token}
	AND expire_time >= NOW()
	AND u.is_delete = 0
After the table is created, the UserTokenPO, the corresponding mapper and service are created.
By the way, paste the following code:
PO:
package com.TandK.model.po;

import com.baomidou.mybatisplus.annotation.TableField;
import com.baomidou.mybatisplus.annotation.TableId;
import com.baomidou.mybatisplus.annotation.TableName;
import lombok.Data;

import java.io.Serializable;
import java.util.Date;

/**
 *
 * @TableName user_token
 */
@TableName(value ="user_token")
@Data
public class UserTokenPO implements Serializable {
    /**
     *
     */
    @TableId(value = "uuid")
    private Long uuid;

    /**
     *
     */
    @TableField(value = "user_uuid")
    private Long userUuid;

    /**
     *
     */
    @TableField(value = "access_token")
    private String accessToken;

    /**
     * Expiration time
     */
    @TableField(value = "expire_time")
    private Date expireTime;

    /**
     *
     */
    @TableField(value = "create_time")
    private Date createTime;

    /**
     *
     */
    @TableField(value = "update_time")
    private Date updateTime;

    @TableField(exist = false)
    private static final long serialVersionUID = 1L;
}
Mapper:
package com.TandK.mapper;

import com.TandK.model.po.UserTokenPO;
import com.baomidou.mybatisplus.core.mapper.BaseMapper;

/**
 * @author TandK
 * @since 2021/9/29 22:37
 */
public interface UserTokenMapper extends BaseMapper<UserTokenPO> {
}
Service interface:
package com.TandK.service;

/**
 * @author TandK
 * @since 2021/9/29 21:57
 */
public interface UserTokenService {
}
Service implementation class:
package com.TandK.service.impl;

import com.TandK.service.UserTokenService;
import org.springframework.stereotype.Service;

/**
 * @author TandK
 * @since 2021/9/29 21:58
 */
@Service
public class UserTokenServiceImpl implements UserTokenService {

}
With the token generator and the corresponding database table, we will consider a problem next.
When is the token verified?
Yes, when to check the token? As mentioned earlier, some interfaces do not need a token, but more often they need to get the token to parse the user information. Do you check every interface?
That's OK, but it's difficult to write.
Repeat things many times.
Spring Boot provides something called interceptor. Through this interceptor, we can intercept the request in the process of each request before entering the controller.
First check whether the interface it accesses needs to bring a token.
-
If not required, release directly.
-
If necessary, check whether there is a token.
- If there is no, it will prompt that authentication fails and let the user log in.
- If there is a tape, check whether it is expired.
- If it doesn't expire, get the user information and release it.
- If it expires, you will be prompted that authentication fails and you need to log in again.
Process is such a process.
Before establishing this interceptor, we can write an @ IgnoreToken annotation, which will be used on the methods of the Controller layer.
After entering the interceptor, if it is checked that the corresponding method has this annotation, it means that it is not necessary to verify whether the request header has a token. If not, it is necessary to verify the token.
Create an annotation package under the core package, where all annotations in our project can be written.
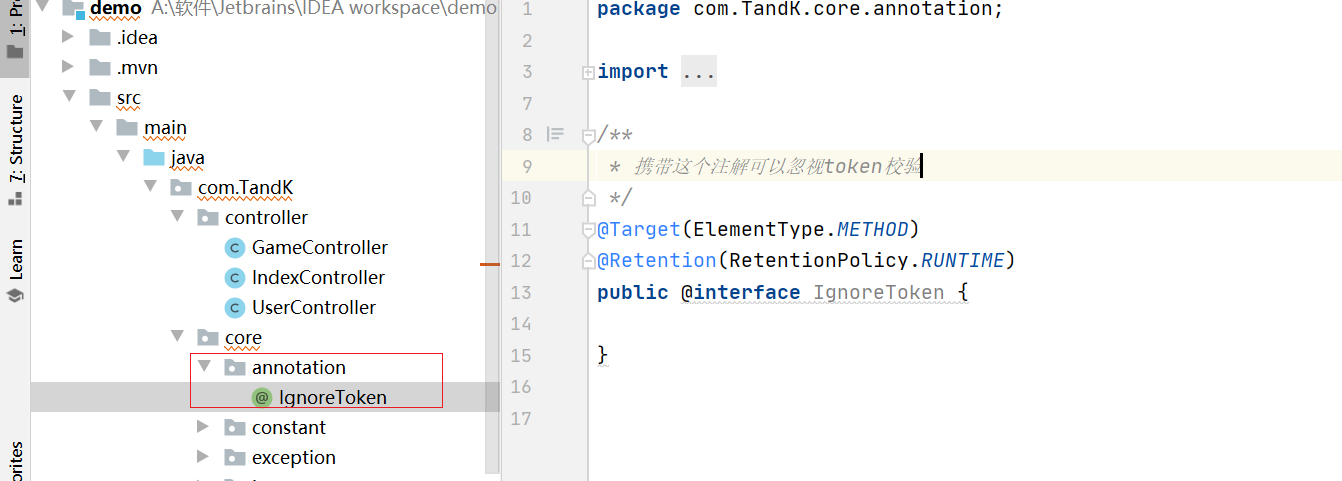
package com.TandK.turntable.core.annotation;

import java.lang.annotation.ElementType;
import java.lang.annotation.Retention;
import java.lang.annotation.RetentionPolicy;
import java.lang.annotation.Target;

/**
 * Carrying this annotation can ignore the token verification
 */
@Target(ElementType.METHOD)
@Retention(RetentionPolicy.RUNTIME)
public @interface IgnoreToken {

}
Next, write interceptors and create a new interceptor package under the core package. All interceptors in the project can be placed in this package.
package com.TandK.core.interceptor;


import org.springframework.web.servlet.HandlerInterceptor;

import javax.servlet.http.HttpServletRequest;
import javax.servlet.http.HttpServletResponse;

/**
 * token Interceptor
 * @author TandK
 */
public class AuthInterceptor implements HandlerInterceptor {

    @Override
    public boolean preHandle(HttpServletRequest request, HttpServletResponse response, Object handler) throws Exception {
        return false;
    }
}
Explain this interceptor. The interceptor in spring boot needs to implement the HandlerInterceptor interface. We can use the method of preHandle first. We can see that this method returns the boolean type. If it is true, it is released so that the request can enter the controller layer. If it is false, it is intercepted, And no data will be returned.
Here, when intercepted, we should also tell the front end that authentication has failed, so that the front end can handle it easily.
Therefore, if authentication fails, we can directly throw away the previously defined business exceptions. Therefore, we need to define an enumeration of authentication failures here.
The details are in the front "Bi set up a sharp tool to teach you to build a standardized spring boot project from zero [3] - processing of returned results and unified exception handling" It was said in the book that if there is anything unclear, you can go and have a look.
The corresponding enumeration is pasted here:
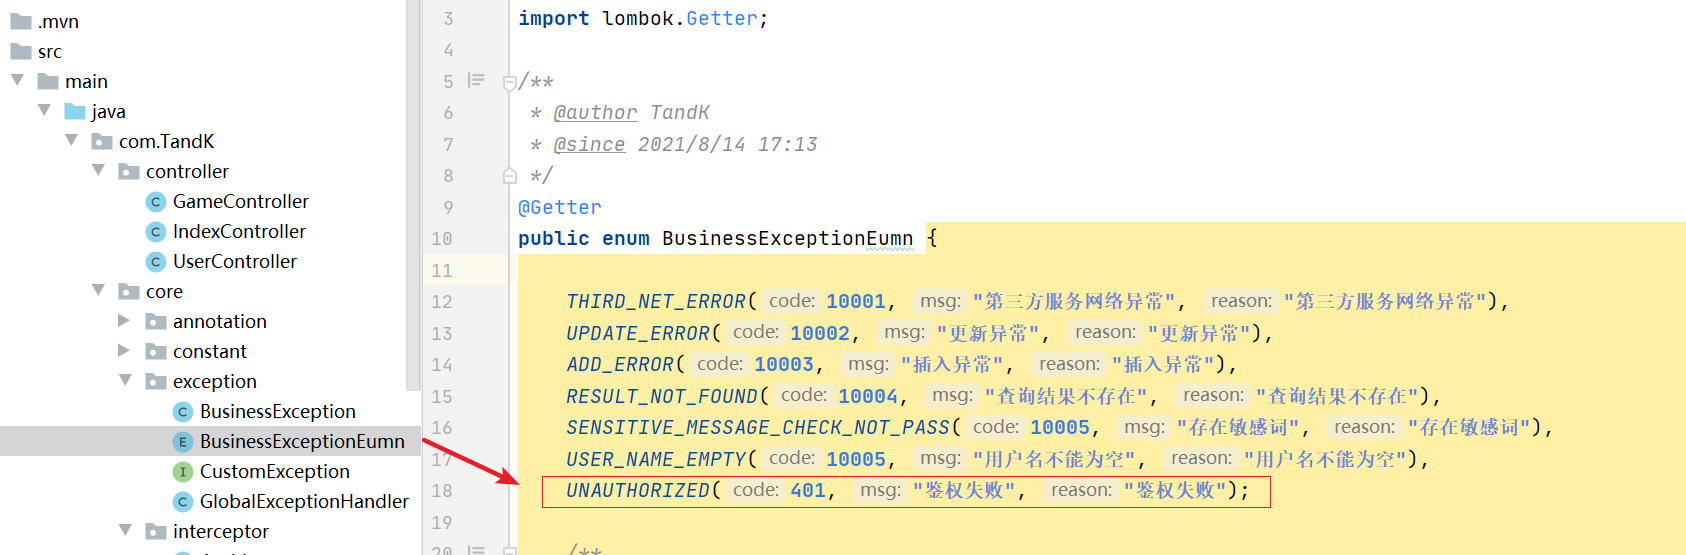
UNAUTHORIZED(401, "Authentication failed", "Authentication failed");
Next, continue to write the interceptor. First, check whether the accessed controller layer method has @ IgnoreToken annotation. If so, release it directly:
@Override
public boolean preHandle(HttpServletRequest request, HttpServletResponse response, Object handler) throws Exception {
	HandlerMethod handlerMethod = (HandlerMethod) handler;
	Method method = handlerMethod.getMethod();
 	// Judge whether there is an IgnoreToken annotation. If so, release it directly
   	if(method.isAnnotationPresent(IgnoreToken.class)){
    	return true;
  	}
    return true;
}
If not, you need to verify whether the token is valid and obtain the token of the request header first.
@Override
public boolean preHandle(HttpServletRequest request, HttpServletResponse response, Object handler) throws Exception {
	HandlerMethod handlerMethod = (HandlerMethod) handler;
	Method method = handlerMethod.getMethod();
 	// Judge whether there is an IgnoreToken annotation. If so, release it directly
   	if(method.isAnnotationPresent(IgnoreToken.class)){
    	return true;
  	}

	// First obtain the token from the front end. Authorization here is the recommended name for the applet, which should be consistent with the variable name from the front end
	String token = request.getHeader("Authrization");
	if(StringUtils.isBlank(token) || token.equals("[object Undefined]")){
		// No token
		throw new BusinessException(BusinessExceptionEumn.UNAUTHORIZED);
	}
    return true;
}
The token placed in the request header at the front end may have different names, generally called token or authorization, or X-Access-Token. It's up to you. If you want to change the name, string token = request.getheader ("authorization"); The authorization in should be changed to the corresponding name.
It can be seen that if there is no token, the business exception will be thrown directly, and the global exception handler will catch the exception here and return it to the front end.
After obtaining the front-end token, we can take this token to find out the user information in the database.
First, write a method to find out user information according to the token in UserTokenService.
Join table query is not recommended to be implemented with mybatis plus, but handwritten. Therefore, the method of mapper layer should be customized:
Mapper layer:
package com.TandK.mapper;

import com.TandK.model.po.UserPO;
import com.TandK.model.po.UserTokenPO;
import com.baomidou.mybatisplus.core.mapper.BaseMapper;

/**
 * @author TandK
 * @since 2021/9/29 22:37
 */
public interface UserTokenMapper extends BaseMapper<UserTokenPO> {

    UserPO selectUserByToken(String token);
}
mapper's custom sql can be implemented with annotations, as follows.
package com.TandK.mapper;

import com.TandK.model.po.UserPO;
import com.TandK.model.po.UserTokenPO;
import com.baomidou.mybatisplus.core.mapper.BaseMapper;
import org.apache.ibatis.annotations.Select;

/**
 * @author TandK
 * @since 2021/9/29 22:37
 */
public interface UserTokenMapper extends BaseMapper<UserTokenPO> {

    @Select("SELECT  u.* FROM user u LEFT JOIN user_token ut ON u.uuid = ut.user_uuid WHERE ut.access_token = #{token} AND expire_time >= NOW() AND u.is_delete = 0")
    UserPO selectUserByToken(String token);
}
You can also use XML. I still like the writing method of XML. In that way, the written sql can be long enough, look structured enough and will not be too messy.
Here you can paste the writing method of XML, XML or annotation. Choose one of these two writing methods.
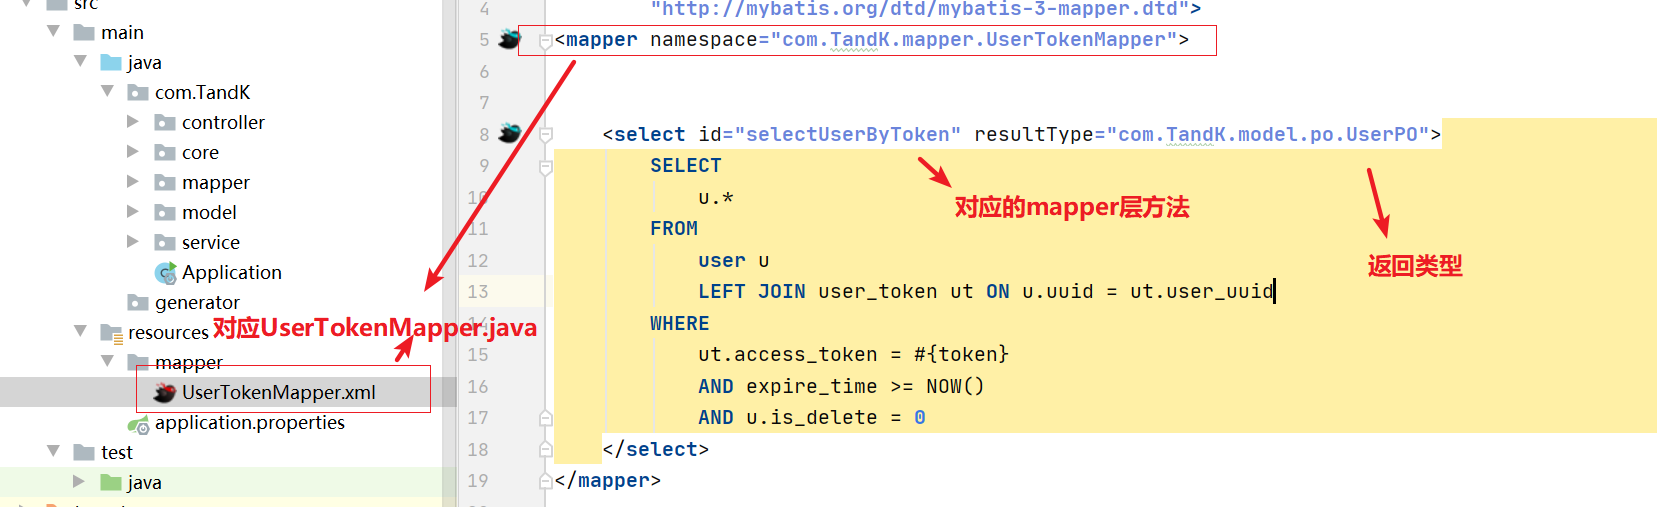
XML needs to create a new XML file and a mapper folder under the resources folder of the project.
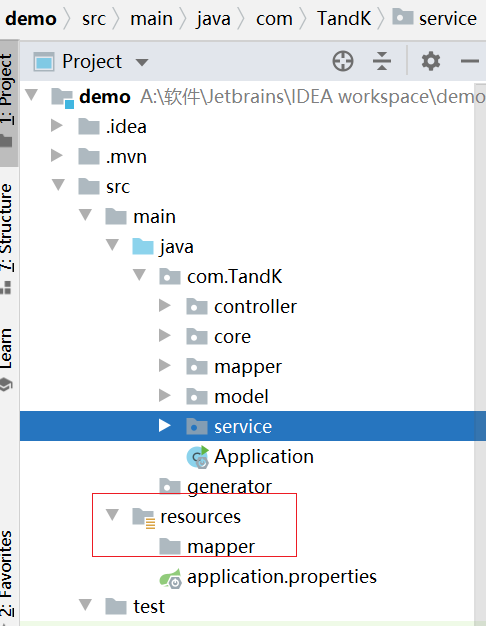
Then create a new XML file with the same name as the corresponding mapper.java.
<?xml version="1.0" encoding="UTF-8"?>
<!DOCTYPE mapper
        PUBLIC "-//mybatis.org//DTD Mapper 3.0//EN"
        "http://mybatis.org/dtd/mybatis-3-mapper.dtd">
<mapper namespace="com.TandK.mapper.UserTokenMapper">


    <select id="selectUserByToken" resultType="com.TandK.model.po.UserPO">
        SELECT
            u.*
        FROM
            user u
            LEFT JOIN user_token ut ON u.uuid = ut.user_uuid
        WHERE
            ut.access_token = #{token}
            AND expire_time >= NOW()
            AND u.is_delete = 0
    </select>
</mapper>
The corresponding description is shown in the figure below:
In the same sentence, just choose one of custom SQL, annotation and XML. I recommend XML. If the project is large, SQL written in XML can sometimes occupy an entire screen. It will be very hot to write in annotation. If XML is used, just delete the annotation.
Next, post the code of the service layer:
package com.TandK.service;

import com.TandK.model.po.UserPO;

/**
 * @author TandK
 * @since 2021/9/29 21:57
 */
public interface UserTokenService {

    /**
     * Get users through token
     * @param token
     * @return
     */
    UserPO getUserByToken(String token);
}
package com.TandK.service.impl;

import com.TandK.mapper.UserTokenMapper;
import com.TandK.model.po.UserPO;
import com.TandK.service.UserTokenService;
import org.springframework.beans.factory.annotation.Autowired;
import org.springframework.stereotype.Service;

/**
 * @author TandK
 * @since 2021/9/29 21:58
 */
@Service
public class UserTokenServiceImpl implements UserTokenService {


    @Autowired
    private UserTokenMapper userTokenMapper;


    @Override
    public UserPO getUserByToken(String token) {
        return userTokenMapper.selectUserByToken(token);
    }
}
After writing the method of querying user information according to the token, you can go back to the interceptor and check it with the obtained token:
package com.TandK.core.interceptor;


import com.TandK.core.annotation.IgnoreToken;
import com.TandK.core.exception.BusinessException;
import com.TandK.core.exception.BusinessExceptionEumn;
import com.TandK.model.po.UserPO;
import com.TandK.service.UserTokenService;
import com.baomidou.mybatisplus.core.toolkit.StringUtils;
import org.springframework.beans.factory.annotation.Autowired;
import org.springframework.web.method.HandlerMethod;
import org.springframework.web.servlet.HandlerInterceptor;

import javax.servlet.http.HttpServletRequest;
import javax.servlet.http.HttpServletResponse;
import java.lang.reflect.Method;

/**
 * token Interceptor
 * @author TandK
 */
public class AuthInterceptor implements HandlerInterceptor {

    @Autowired
    private UserTokenService userTokenService;

    @Override
    public boolean preHandle(HttpServletRequest request, HttpServletResponse response, Object handler) throws Exception {
        HandlerMethod handlerMethod = (HandlerMethod) handler;
        Method method = handlerMethod.getMethod();
        // Judge whether there is an IgnoreToken annotation. If so, release it directly
        if(method.isAnnotationPresent(IgnoreToken.class)){
            return true;
        }

        // First obtain the token from the front end. Authorization here is the recommended name for the applet, which should be consistent with the variable name from the front end
        String token = request.getHeader("Authrization");
        if(StringUtils.isBlank(token) || token.equals("[object Undefined]")){
            // No token
            throw new BusinessException(BusinessExceptionEumn.UNAUTHORIZED);
        }

        // Obtain user information according to the token
        UserPO userPO = userTokenService.getUserByToken(token);
        if(userPO == null){
            // Authentication failed
            throw new BusinessException(BusinessExceptionEumn.UNAUTHORIZED);
        }
        return true;
    }
}
In this way, if you pass the previous multiple checks, return true at the end; You can release it.
However, the found user information can be put into memory to facilitate extraction at any time when needed later.
At this time, we can use SpringBoot's ThreadLocal to store user information.
Briefly explain what ThreadLocal is.
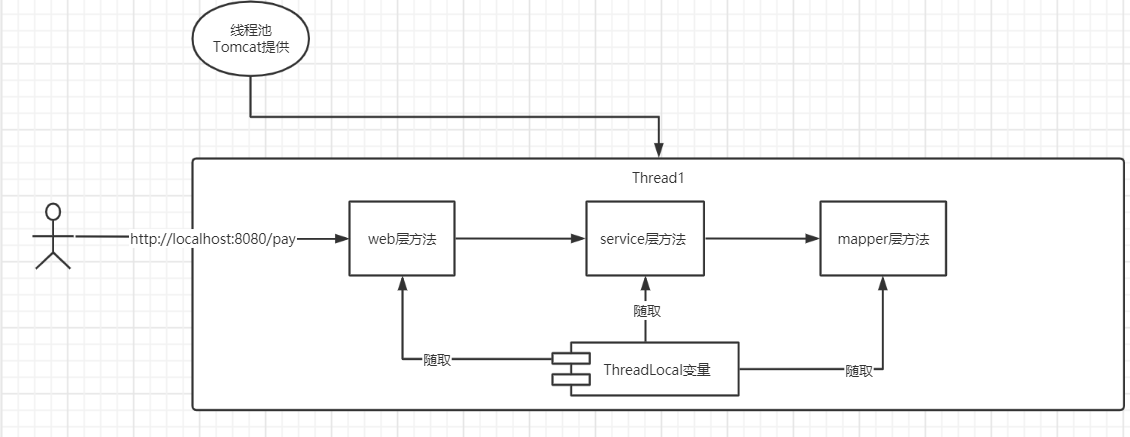
It can be understood that each access will have a thread. ThreadLocal is actually map < K, V >. Each access, we can store things in the Controller layer and take them out in other methods.
Since the life cycle is only within one visit, it is very suitable for our scenario.
We save the user information in the interceptor and can take it out anywhere in this request, including the controller layer and the service layer.
Create a threadlocal package under the previous core.support package:
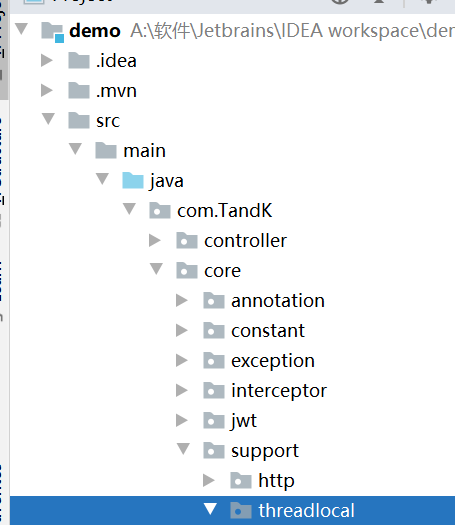
Create a new UserThreadLocal static class. The specific code implementation is as follows:
package com.TandK.core.support.threadlocal;


import com.TandK.model.po.UserPO;

/**
 * @author TandK
 */
public class UserThreadLocal {

    private static ThreadLocal<UserPO> userThreadLocal = new ThreadLocal();

    public static void set(UserPO userPO){
        userThreadLocal.set(userPO);
    }

    public static UserPO get(){
        return userThreadLocal.get();
    }

    public static void remove(){
        userThreadLocal.remove();
    }
}
If you use it, it is nothing more than saving and retrieving user information. We go back to the interceptor and save the verified user information. In this way, the function of the interceptor is complete:
package com.TandK.core.interceptor;


import com.TandK.core.annotation.IgnoreToken;
import com.TandK.core.exception.BusinessException;
import com.TandK.core.exception.BusinessExceptionEumn;
import com.TandK.core.support.threadlocal.UserThreadLocal;
import com.TandK.model.po.UserPO;
import com.TandK.service.UserTokenService;
import com.baomidou.mybatisplus.core.toolkit.StringUtils;
import org.springframework.beans.factory.annotation.Autowired;
import org.springframework.web.method.HandlerMethod;
import org.springframework.web.servlet.HandlerInterceptor;

import javax.servlet.http.HttpServletRequest;
import javax.servlet.http.HttpServletResponse;
import java.lang.reflect.Method;

/**
 * token Interceptor
 * @author TandK
 */
public class AuthInterceptor implements HandlerInterceptor {

    @Autowired
    private UserTokenService userTokenService;

    @Override
    public boolean preHandle(HttpServletRequest request, HttpServletResponse response, Object handler) throws Exception {
        HandlerMethod handlerMethod = (HandlerMethod) handler;
        Method method = handlerMethod.getMethod();
        // Judge whether there is an IgnoreToken annotation. If so, release it directly
        if(method.isAnnotationPresent(IgnoreToken.class)){
            return true;
        }

        // First obtain the token from the front end. Authorization here is the recommended name for the applet, which should be consistent with the variable name from the front end
        String token = request.getHeader("Authrization");
        if(StringUtils.isBlank(token) || token.equals("[object Undefined]")){
            // No token
            throw new BusinessException(BusinessExceptionEumn.UNAUTHORIZED);
        }

        // Obtain user information according to the token
        UserPO userPO = userTokenService.getUserByToken(token);
        if(userPO == null){
            // Authentication failed
            throw new BusinessException(BusinessExceptionEumn.UNAUTHORIZED);
        }

        // Store user information
        UserThreadLocal.set(userPO);
        return true;
    }
}
If you need to take out the user information at any time, just write it as follows:
UserPO userPO = UserThreadLocal.get();
In this way, you can take out the user information of the current interface.
The above describes the verification of token and the access of user information.
Next, let's talk about the creation and update of token. Generally, we are when the user logs in.
First, write @ IgnoreToken annotation on the login interface and ignore the verification of token.
Then check whether the user logs in for the first time. Check whether there is the user's account and password.
If you log in for the first time, generate a token. If not, refresh the token and the effective time of the token.
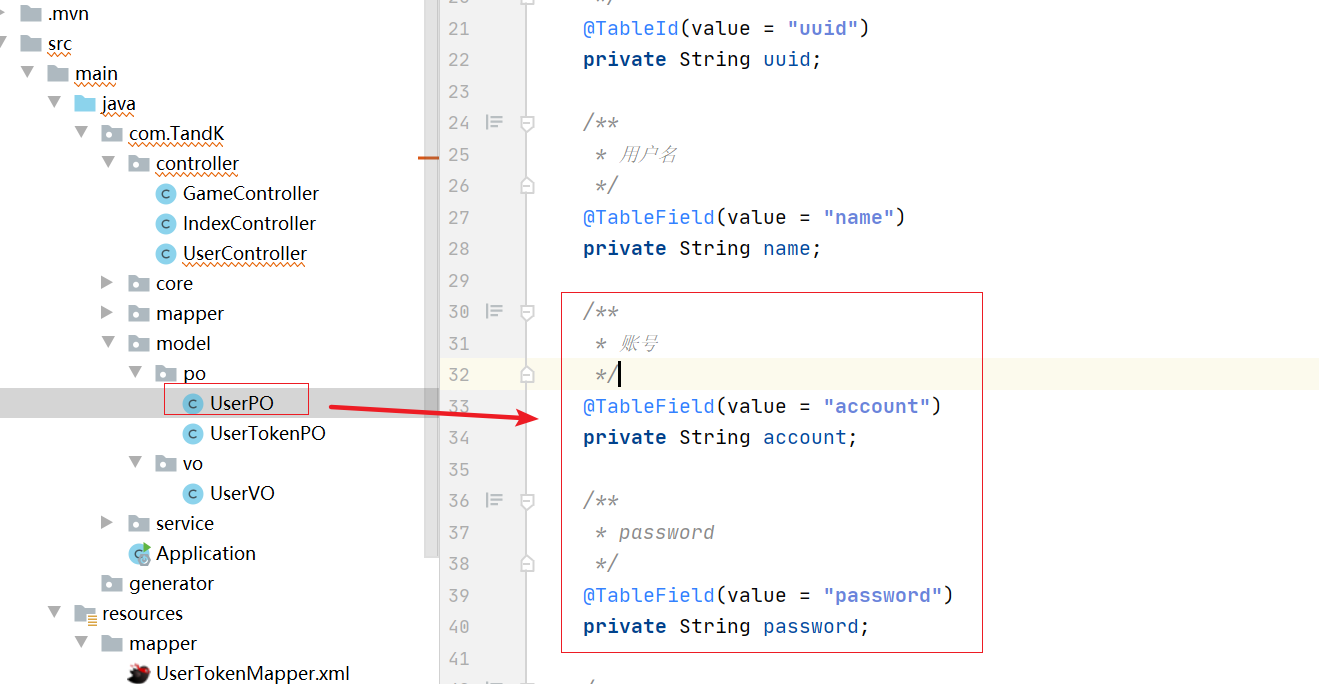
To write a login interface, first go back to the user table built before, and add the fields of account and password.
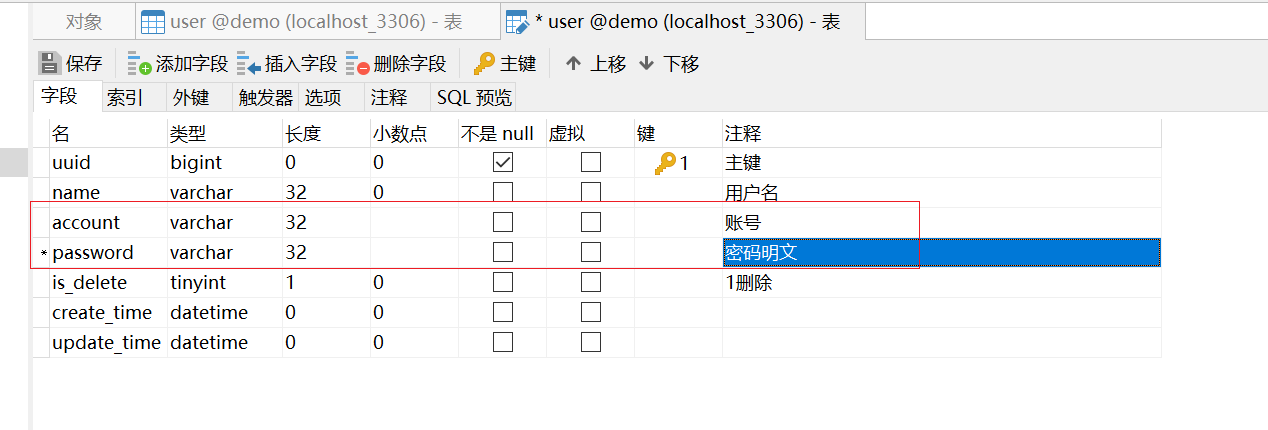
The registration interface will not be written. The account and password can be directly inserted from the database.

Fields are added to the database, and fields should also be added to the corresponding po, otherwise some problems may occur later:
Establish a LoginVO to receive the parameters of the login interface and verify:
package com.TandK.model.vo;

import lombok.Data;

import javax.validation.constraints.NotBlank;

/**
 * @author TandK
 * @since 2021/10/2 14:20
 */
@Data
public class LoginVO {

    @NotBlank(message = "Account number cannot be empty")
    private String account;

    @NotBlank(message = "Password cannot be empty")
    private String password;
}
Code of controller layer:
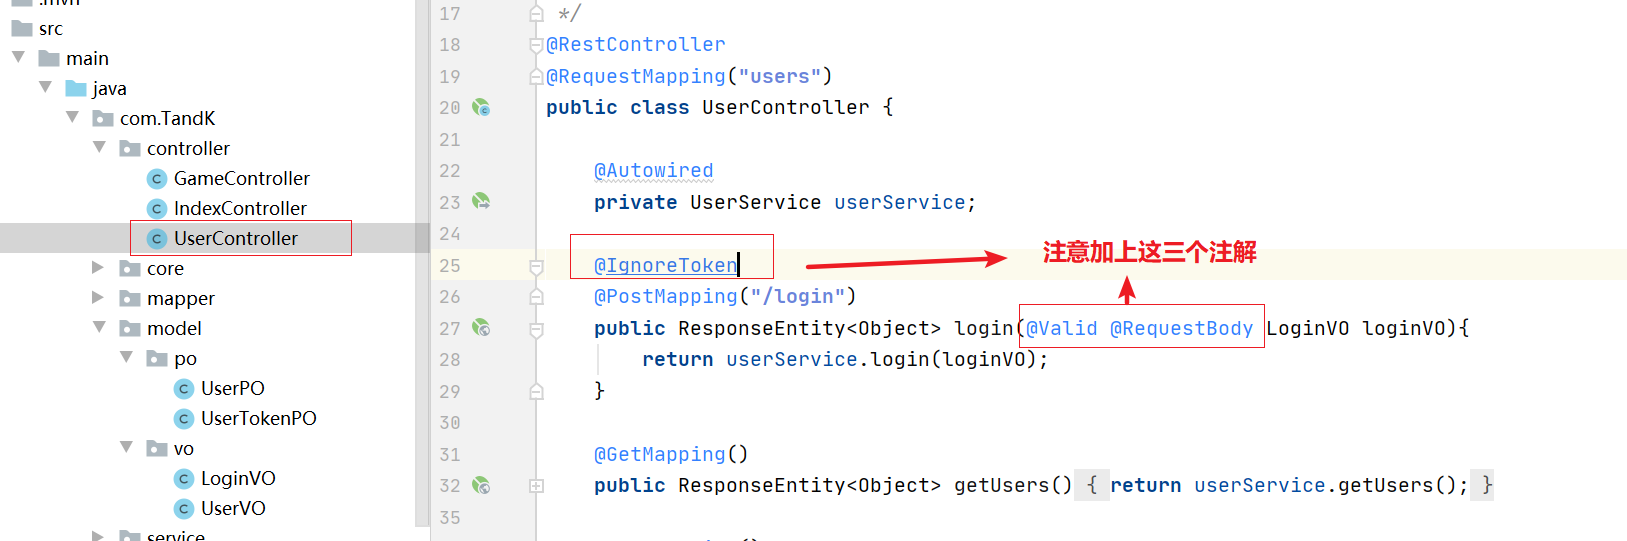
The login logic here is written in the notes. You can have a good look:
package com.TandK.service.impl;

import com.TandK.core.exception.BusinessException;
import com.TandK.core.exception.BusinessExceptionEumn;
import com.TandK.core.jwt.JwtUtil;
import com.TandK.core.support.http.HttpResponseSupport;
import com.TandK.mapper.UserMapper;
import com.TandK.model.po.UserPO;
import com.TandK.model.vo.LoginVO;
import com.TandK.model.vo.UserVO;
import com.TandK.service.UserService;
import com.TandK.service.UserTokenService;
import com.baomidou.mybatisplus.core.conditions.query.QueryWrapper;
import com.baomidou.mybatisplus.core.toolkit.StringUtils;
import org.springframework.beans.BeanUtils;
import org.springframework.beans.factory.annotation.Autowired;
import org.springframework.http.HttpStatus;
import org.springframework.http.ResponseEntity;
import org.springframework.stereotype.Service;

import java.util.*;
import java.util.stream.Collectors;

/**
 * @author TandK
 * @since 2021/9/8 22:07
 */
@Service
public class UserServiceImpl implements UserService {

    @Autowired
    private UserMapper userMapper;

    @Autowired
    private UserTokenService userTokenService;

    @Override
    public ResponseEntity<Object> login(LoginVO loginVO) {
        // Query whether to log in for the first time
        QueryWrapper<UserPO> wrapper = new QueryWrapper<>();
        wrapper.eq("account", loginVO.getAccount())
                .eq("password", loginVO.getPassword())
                .eq("is_delete", 0);
        UserPO userPO = userMapper.selectOne(wrapper);

        if(userPO == null){
            // First login, save user information
            userPO = new UserPO();
            // Copy the value of loginVO account password to userPO
            BeanUtils.copyProperties(loginVO, userPO);
            // Save user information
            userMapper.insert(userPO);
        }

        // Generate token information
        String token = JwtUtil.createJWTBySecond(1000 * 60 * 60 * 24 * 30, userPO.getUuid());
        userTokenService.saveToken(userPO.getUuid(), token);
        return HttpResponseSupport.success(token);
    }
}
package com.TandK.turntable.service.impl;

import cn.hutool.core.date.DateUtil;
import com.TandK.turntable.mapper.UserTokenMapper;
import com.TandK.turntable.model.po.UserPO;
import com.TandK.turntable.model.po.UserTokenPO;
import com.TandK.turntable.service.UserTokenService;
import com.baomidou.mybatisplus.core.conditions.query.QueryWrapper;
import org.springframework.beans.factory.annotation.Autowired;
import org.springframework.stereotype.Service;
import org.springframework.transaction.annotation.Transactional;

import java.util.List;
import java.util.Date;

/**
 * @author TandK
 * @since 2021/8/15 13:56
 */
@Service
public class UserTokenServiceImpl implements UserTokenService {

    @Autowired
    private UserTokenMapper userTokenMapper;

    @Transactional(rollbackFor = Throwable.class)
    @Override
    public void saveToken(String uuid, String token) {

        // Find out the previously useful token
        QueryWrapper<UserTokenPO> wrapper = new QueryWrapper();
        wrapper.eq("user_uuid", uuid)
                .orderByDesc("update_time")
                .last("LIMIT 1");
        UserTokenPO oldToken = userTokenMapper.selectOne(wrapper);

		// I set the valid time of the token as one month. There are post dependencies under the tool class DateUtil
        Date nextMonth = DateUtil.nextMonth();
        if(oldToken == null){
            // No new token is generated
            UserTokenPO userTokenPO = new UserTokenPO();
            userTokenPO.setUserUuid(uuid);
            userTokenPO.setAccessToken(token);
            userTokenPO.setExpireTime(nextMonth);
            userTokenMapper.insert(userTokenPO);
            return;
        }

        // Update as soon as possible
        oldToken.setAccessToken(token);
        oldToken.setExpireTime(nextMonth);
        userTokenMapper.updateById(oldToken);

    }
}
The dependencies of the above DateUtil tool classes are as follows:
<!-- Hutool It's a small and comprehensive one Java Tool class library, encapsulated by static methods,-->
<dependency>
	<groupId>cn.hutool</groupId>
	<artifactId>hutool-all</artifactId>
	<version>5.1.0</version>
</dependency>
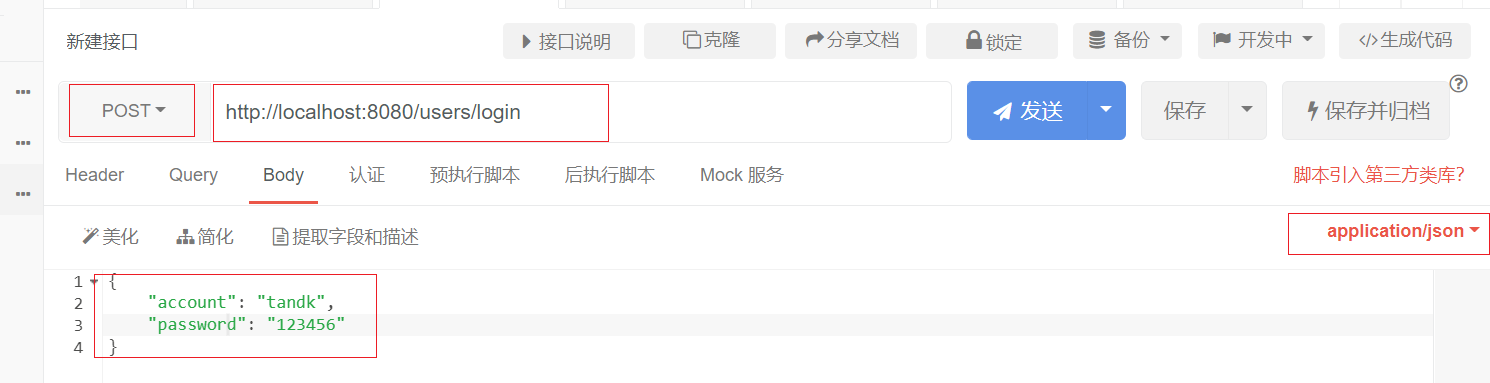
Since the interface is post, you need to use debugging tools (it doesn't matter if you don't have tools. Swagger in the next article can provide debugging functions, and you don't need to install debugging software):
The return interface is as follows. The value of token is circled:
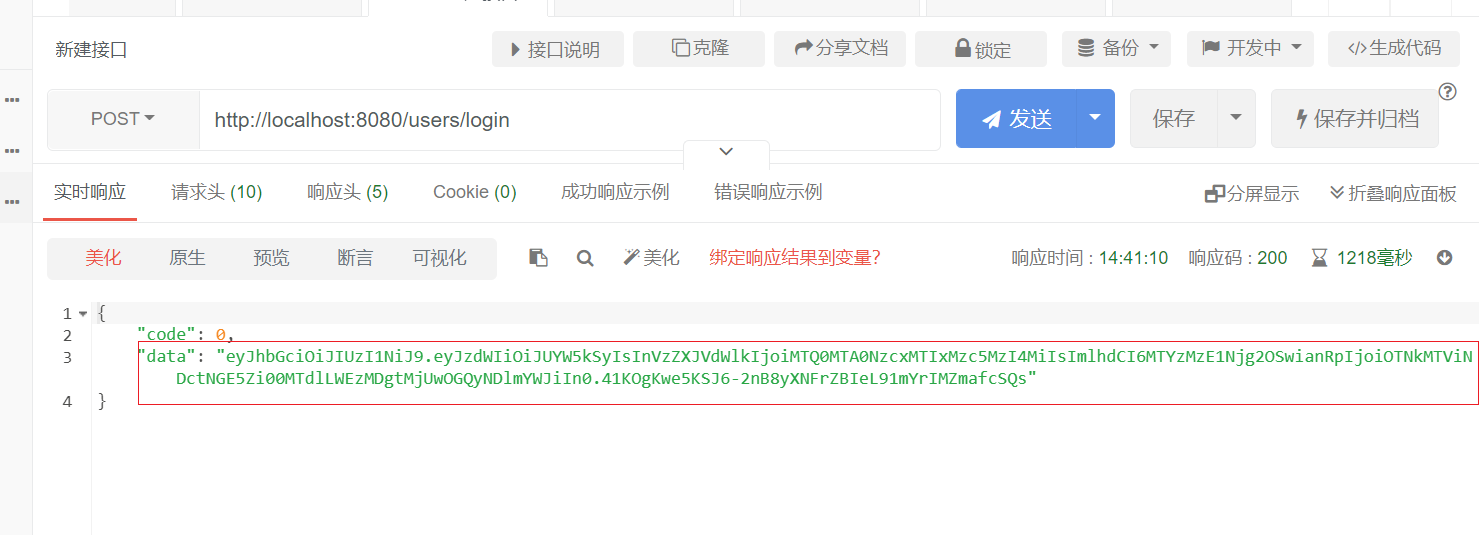
The front-end students need to save the token, and then bring the token to the request header every time they request.
So that's all for the token verification process. You can try some details. For example, when accessing the interface that needs token verification, you don't need a token. For example, you can use UserThreadLocal to obtain user information in the code. You can try them yourself.
If you have any problems, you can leave a message. If you see them, you will try your best to help solve them.