Detailed explanation of ansible automatic operation and maintenance tools
About the author
-
Author introduction
🍊 Blog home page: Author URI
🍊 Introduction: high quality creators in the field of cloud computing 🏆, The it story of the school's official account Creator 🎓, At school, he participated in many computer related provincial and national competitions and won a series of honors. Obtain a series of certifications such as Huawei senior engineer and red hat engineer.🍊 ** Pay attention to me: pay attention to my resume template, learning materials, document download and technical support
Let life be like a burning fire that cannot be extinguished until death
preface
Recently, old fellow railway letters were sent to me, and I was asked to publish a blog of ansible. Today, Xiaobian and I have the idea of learning new knowledge and review the automation operation and maintenance tools together with everyone. Among the early automatic operation and maintenance tools, the common ones are puppet, saltstack, ansible and other software. At present, ansible and saltstack are commonly used. Saltstack and puppet work based on C/S mode. They need to install the server and client, write based on Python, and add MQ message synchronization. They can execute commands and return execution results efficiently, but the execution process needs to wait for the client to return. Therefore, if the client does not return or respond in time, some machines may not execute the results. At present, it is less used.
Today, I will mainly share the ansible automated operation and maintenance tool. I will go from concept to basic to advanced level in detail, so that you can easily master ansible automatic operation and maintenance
Of course, every article is not 100% complete. What I can do is to share what I will with you to the greatest extent so that you can master it.
1, ansible overview
1.1 ansible overview
-
Ansible is an automatic operation and maintenance tool, which is developed based on Python. It integrates the advantages of many operation and maintenance tools (puppet, cfengine, chef, func, fabric), and realizes the functions of batch system configuration, batch program deployment, batch operation command and so on.
-
Ansible is an agent-free automation tool installed on the control node. Ansible remotely manages machines and other devices from the control node (by default, through SSH protocol). Ansible and Saltstack are developed based on Python language. Ansible only needs to run on an ordinary server without installing the client on the client server. Because ansible is based on SSH Remote management, and most Linux servers are inseparable from SSH, ansible does not need to add additional support for configuration.
-
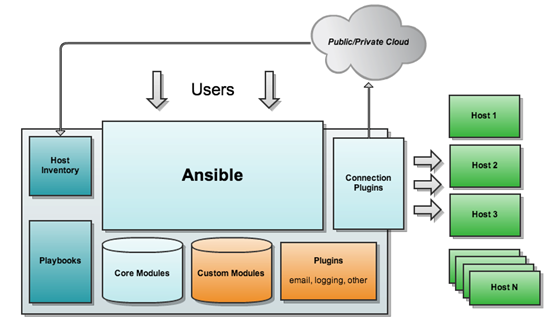
Ansible works based on modules and has no batch deployment capability. The real batch deployment is the modules run by ansible, which only provides a framework. It mainly includes:
- (1) connection plugins: responsible for communication with the monitored end;
(2) host inventory: Specifies the host of the operation, which is the host of monitoring defined in a configuration file;
(3) Various modules: core module, command module and user-defined module;
(4) With the help of plug-in, it can complete the functions of recording log mail and so on;
(5) playbook: when the script executes multiple tasks, it is not necessary to let the node run multiple tasks at one time
- (1) connection plugins: responsible for communication with the monitored end;
-
Architecture diagram
-
1.2 what is ansible
- Improve work efficiency
- Improve work accuracy
- Reduce maintenance costs
- Reduce repetitive work
1.3 ansible function
- Batch system operation configuration can be realized
- Batch software service deployment can be realized
- Batch file data distribution can be realized
- Batch system information collection can be realized
1.4 ansible advantages
- The management side does not need to start the service program (no server)
- The management side does not need to write a configuration file (/ etc/ansible/ansible.cfg)
- The controlled end does not need to install software programs (libselinux Python)
- The controlled end does not need to start the service program (no agent)
- There are many service program management and operation module s
- Using script writing to achieve automation (playbook)
- Support sudo ordinary users
1.5 ansible working mechanism
-
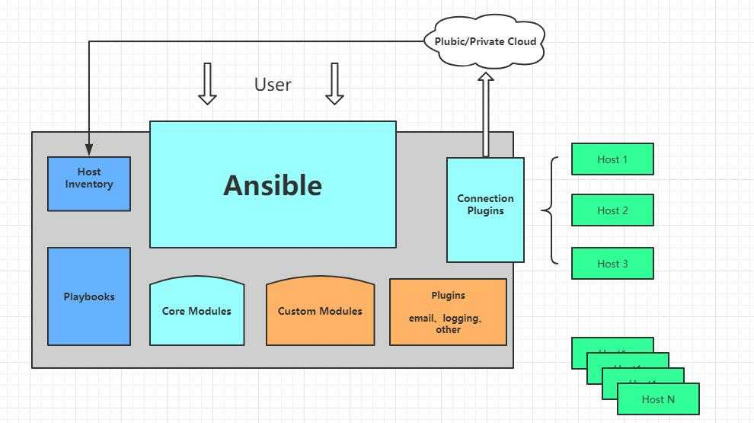
# As can be seen from the above figure, Ansible consists of five parts:

#Ansible: ansible core
#Modules: including Ansible's own core modules and custom modules
#Plugins: complete the supplement of module functions, including connection plug-ins, mail plug-ins, etc
#Playbooks: script; Define Ansible multitasking configuration file, which is automatically executed by Ansible
#Inventory: defines the list of Ansible management hosts[ ˈɪ nv ə ntri] list
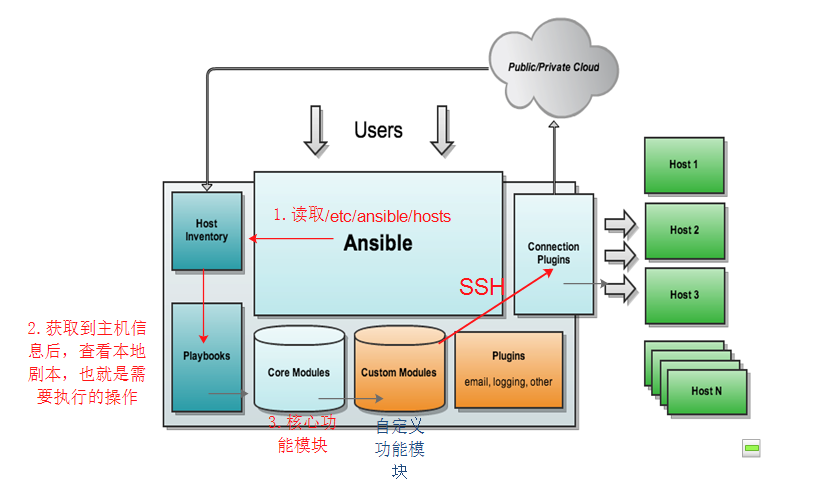
1.6 ansible working principle / flow chart
2, ansible batch management service deployment
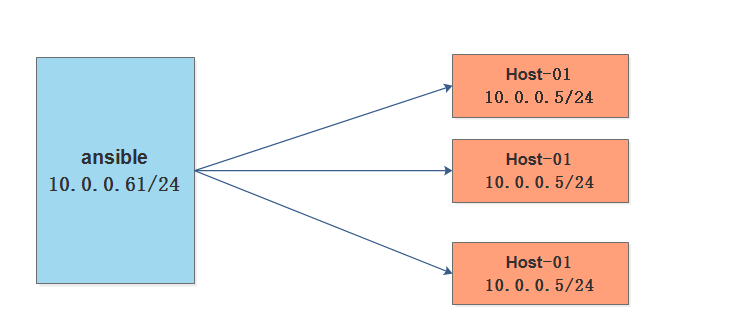
2.1 experimental environment
-
Experimental environment
name system ip address ansible_server Centos 7.6 10.0.0.61 Host-01 Centos 7.6 10.0.0.5 Host-02 Centos 7.6 10.0.0.6 Host-03 Centos 7.6 10.0.0.7 -
Experimental topology
-
2.2 official website installation tutorial
2.2.1 ansible installation
-
Installation steps of official website
# Centso needs to set up EPEL warehouse
[root@ansible_server~]# yum install epel-release

# Install ansible using yum or up2date
[root@ansible_server~]# yum install ansible

# View the installed version of ansible
[root@ansible_server~]# ansible --version
ansible 2.9.25
  config file = /etc/ansible/ansible.cfg
  configured module search path = [u'/root/.ansible/plugins/modules', u'/usr/share/ansible/plugins/modules']
  ansible python module location = /usr/lib/python2.7/site-packages/ansible
  executable location = /usr/bin/ansible
  python version = 2.7.5 (default, Oct 30 2018, 23:45:53) [GCC 4.8.5 20150623 (Red Hat 4.8.5-36)]
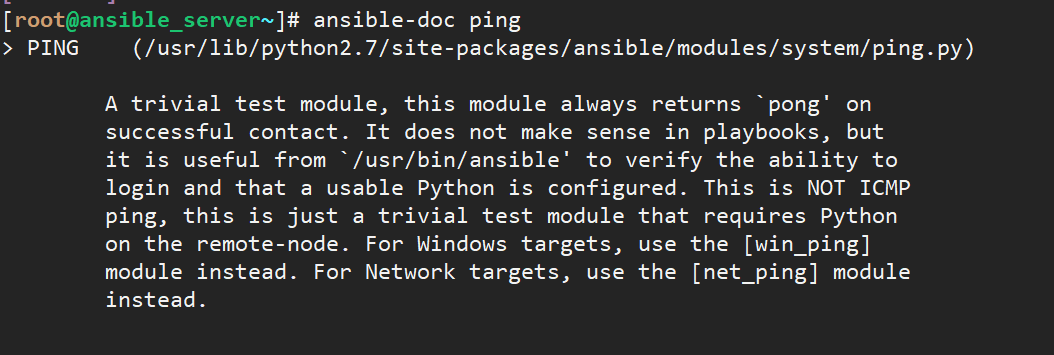
2.2.2 introduction to ansible command parameters
-
ansible common parameters
# ansible command parameters

# anisble command syntax: ansible [-i host file] [- f batch] [- group name] [- m module name] [- a module parameter]
ansible Detailed parameters:
 -v,-verbose            # Detailed mode. If the command is executed successfully, detailed results will be output (- vv – VVV - vvvvv)
 -i PATH, -inventory=PATH  #  Specify the path of the host file, which is in / etc/ansible/hosts by default
inventory  [ˈɪnvəntri]  stock
 -f NUM,-forks=NUM      # NUM specifies an integer. The default value is 5. It specifies the number of synchronization processes that fork starts.
 -m NAME,-module-name=NAME    #   Specify the module name to use. The command module is used by default
 -a,MODULE_ARGS         #Specify the parameters of the module
 -k,-ask-pass           #Prompt for an ssh password instead of Using ssh based key authentication
 -sudo                  # Specifies that sudo is used to obtain root privileges
 -K,-ask-sudo-pass      #Prompt for sudo password for use with - sudo
 -u USERNAME,-user=USERNAME          # Specify the execution user of the mobile terminal
 -C,-check             #Test what will be changed by the execution of this command, and will not really execute it

# Ansible doc detailed parameters:
	ansible-doc -l          #List all modules
	ansible-doc -s Module name    #View the parameters of the specified module - s, snippet[ ˈ sn ɪ p ɪ t] Fragment

 [root@ansible_server~]#  ansible-doc -s service

#List the module introduction
 [root@ansible_server~]# ansible-doc -l

# Specify a detailed description of the module
 [root@ansible_server~]# ansible-doc -s fetch

 # Application method of query module in script
 [root@ansible_server~]# ansible-doc fetch
-
Ansible is based on multi module management. Common ansible tool management modules include: command, shell, script, yum, copy, File, async, docker, cron and mysql_user,ping,sysctl,user,acl,add_host,easy_install,haproxy_ Wait.
-
command does not support pipe characters. You can use shell module
-
You can use ansible doc - L more to view the modules supported by ansible. You can also view the help documents for each module, ansible doc module name
-
2.2.3 define host list
-
Define host list
[root@ansible_server~]# cd /etc/ansible/
[root@ansible_server/etc/ansible]# ll
total 24
-rw-r--r-- 1 root root 19985 Aug 22 04:07 ansible.cfg
-rw-r--r-- 1 root root  1016 Aug 22 04:07 hosts
drwxr-xr-x 2 root root     6 Aug 22 04:07 roles

# It is customary to back up the configuration file before operating it
[root@ansible_server/etc/ansible]# cp -f hosts hosts.backup
[root@ansible_server/etc/ansible]# ll
total 28
-rw-r--r-- 1 root root 19985 Aug 22 04:07 ansible.cfg
-rw-r--r-- 1 root root  1016 Aug 22 04:07 hosts
-rw-r--r-- 1 root root  1016 Sep 14 15:34 hosts.backup
drwxr-xr-x 2 root root     6 Aug 22 04:07 roles

# For the contents of the hosts configuration file, write the hosts file
[root@ansible_server/etc/ansible]# cat /dev/null > hosts
[root@ansible_server/etc/ansible]# cat hosts

# Write to the host IP. These are grouped, such as [webserver], [docker], and can not be written (this is inconvenient for management)
[root@ansible_server/etc/ansible]# cat hosts
[webserver]
10.0.0.5
10.0.0.6

# Manage 10.0.0.7 docker server
[docker]
10.0.0.7

# This machine can also manage itself
[manager]
10.0.0.61
[root@ansible_server/etc/ansible]#
2.2.4 ssh based secret free login
-
ssh password free login
# The first process: create a secret key pair (management server)
	sh-keygen -t Type of secret key(dsa|rsa)
#The second process: distribute the public key (managed server)
    ssh-copy-id -i /root/.ssh/id_dsa.pub root@10.0.0.5

# Locally generated rsa key pair
[root@ansible_server~]# ssh-keygen
Generating public/private rsa key pair.
Enter file in which to save the key (/root/.ssh/id_rsa):    # Direct enter
Enter passphrase (empty for no passphrase):                 # Direct enter
Enter same passphrase again:                                # Direct enter
Your identification has been saved in /root/.ssh/id_rsa.
Your public key has been saved in /root/.ssh/id_rsa.pub.
The key fingerprint is:
SHA256:HhsjmGY6DJoSREojVpJmSI63vuoXKy6sK2ESh/eQJr0 root@ansible_server
The key's randomart image is:
+---[RSA 2048]----+
|+Bo.             |
|X+o              |
|==..             |
|=.B. o           |
|o*.+= . S        |
|+BE=.  o =       |
|B.= o   o        |
|+o =             |
|X=+              |
+----[SHA256]-----+

# Upload to managed end
[root@web01_server~]# ssh-copy-id root@10.0.0.5
[root@web01_server~]# ssh-copy-id root@10.0.0.6
[root@web01_server~]# ssh-copy-id root@10.0.0.7
2.2.5 running command test of management end
-
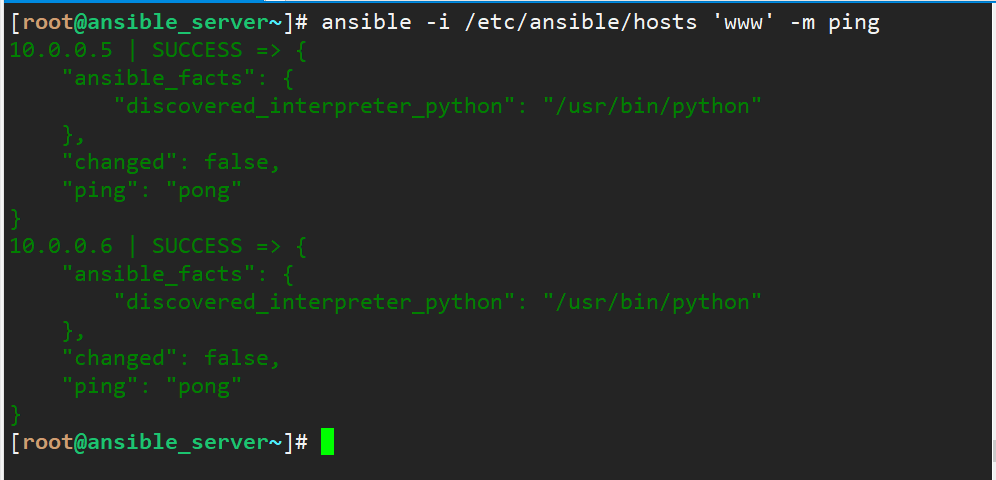
ping module checks network connectivity
# Common parameters -i # Specify the path of the host file. The default is / etc/ansible/hosts. It can be omitted when using -m # Specify the ping module to use [root@ansible_server~]# ansible -i /etc/ansible/hosts 'www' -m ping 10.0.0.5 | SUCCESS => { "ansible_facts": { "discovered_interpreter_python": "/usr/bin/python" }, "changed": false, "ping": "pong" } 10.0.0.6 | SUCCESS => { "ansible_facts": { "discovered_interpreter_python": "/usr/bin/python" }, "changed": false, "ping": "pong" } [root@ansible_server~]# -
3, ansible batch management service application
3.1 practice of ansible Ping module
3.1.0 introduction to Ping module parameters
-
Module introduction
Ansible The most basic module is ping Module, which is mainly used to judge whether the remote client is online ping The server itself, the return value is changed,ping.
3.1.1 ansible implements self-management
-
Manage yourself
# ansible can also write port, user and password based on the remote host specified after ssh connection - i (inventory) parameter.
Format: ansible_ssh_port:appoint ssh port   ansible_ssh_user:appoint ssh user ansible_ssh_pass:appoint ssh User login is an authentication password (plaintext password is not secure)  ansible_sudo_pass:to specify sudo Time password

[root@ansible_server~]# cat /etc/ansible/hosts
[www]
10.0.0.5
10.0.0.6

[docker]
10.0.0.7

[manager]
10.0.0.61  ansible_ssh_port=22  ansible_ssh_user=root  ansible_ssh_pass=123456
[root@ansible_server~]#


# At the same time, you can also log in without secret based on SSH, and choose one of the two methods.
# Copy your own key to the local, and then ssh connect.

[root@web01_server~]# ssh-copy-id root@10.0.0.61
3.1.2 ansible matches a network segment machine for management
-
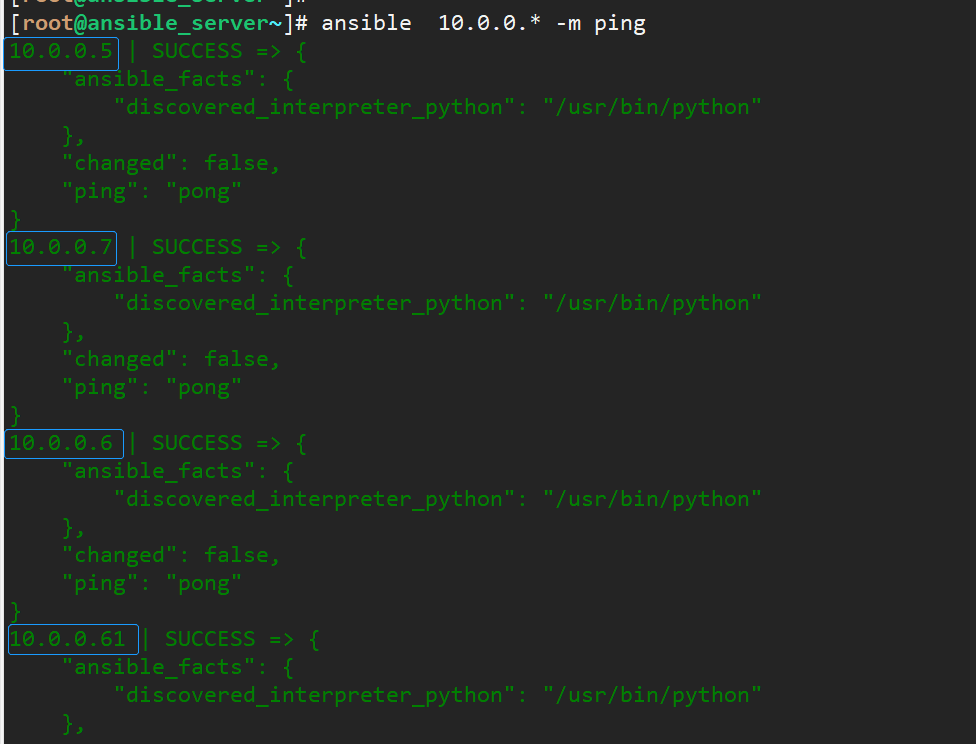
ping network segment connectivity
# ping a network segment [root@ansible_server~]# ansible 10.0.0.* -m ping # The path can be omitted -i, because the default path is / etc/ansible/hosts [root@ansible_server~]# ansible -i /etc/ansible/hosts "docker" -m ping 10.0.0.7 | SUCCESS => { "ansible_facts": { "discovered_interpreter_python": "/usr/bin/python" }, "changed": false, "ping": "pong" } [root@ansible_server~]# -
3.2 practice of ansible shell module
3.2.0 shell module introduction
-
Module introduction
# The Ansible shell module is mainly used to execute various Shell commands or run scripts on the remote client. The remote execution commands are executed through the / bin/sh environment and support more instructions than the command. Details of the use of the Shell module:

# Common parameters
chdir					Before executing the command, switch to the directory;
creates					When the file exists, this step is not performed;
executable				Swap shell Environmental execution order;
free_form				Scripts to be executed;
removes					When the file does not exist, this step is not performed;
warn					If in ansible.cfg There is an alarm in, if set False,This line will not be warned.
3.2.1 create / view directories on docker server through ansible
-
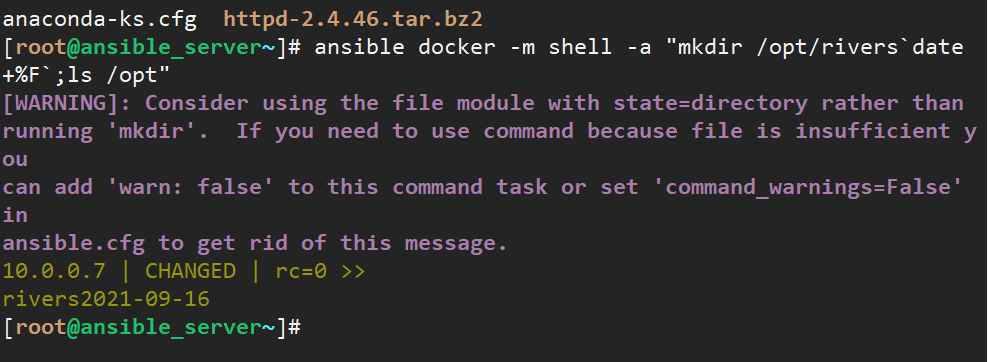
Create / view directory
# On the docker server, create a directory named rivers + current time under the / opt directory
[root@ansible_server~]# ansible docker -m shell -a "mkdir /opt/rivers`date +%F`;ls /opt"
[WARNING]: Consider using the file module with state=directory rather than
running 'mkdir'.  If you need to use command because file is insufficient you
can add 'warn: false' to this command task or set 'command_warnings=False' in
ansible.cfg to get rid of this message.
10.0.0.7 | CHANGED | rc=0 >>
rivers2021-09-16


# Use ls to see if it is created
[root@ansible_server~]# ansible docker -m shell -a "ls /opt"
10.0.0.7 | CHANGED | rc=0 >>
rivers2021-09-16
[root@ansible_server~]#
-
3.2.2 remotely check whether the nginx service is started through the ansible shell module
-
View nginx service status remotely
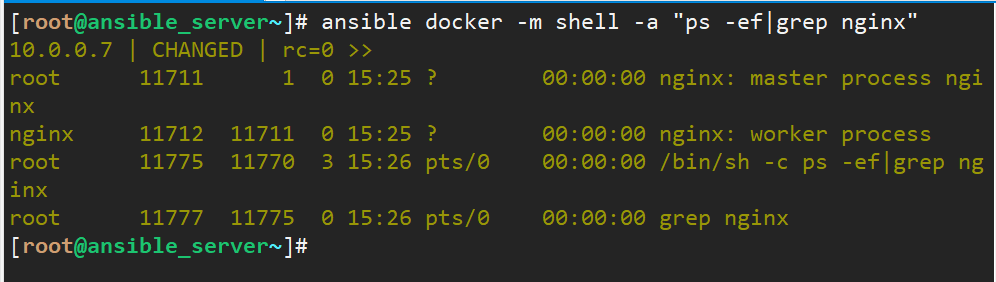
# View nginx process information on docker server remotely
[root@ansible_server~]# ansible docker -m shell -a "ps -ef|grep nginx"
10.0.0.7 | CHANGED | rc=0 >>
root      11711      1  0 15:25 ?        00:00:00 nginx: master process nginx
nginx     11712  11711  0 15:25 ?        00:00:00 nginx: worker process
root      11775  11770  3 15:26 pts/0    00:00:00 /bin/sh -c ps -ef|grep nginx
root      11777  11775  0 15:26 pts/0    00:00:00 grep nginx
[root@ansible_server~]#
-
3.2.3 remote viewing of firewall status through ansible shell module
-
View firewall status on docker server remotely
# Remotely check whether the firewall status of the dockerf server line is running on the ansible server

[root@ansible_server~]# ansible docker -m shell -a "firewall-cmd --state"
10.0.0.7 | CHANGED | rc=0 >>
running
[root@ansible_server~]#
-

3.2.4 batch modification of user passwords through ansible
-
Batch modify user password
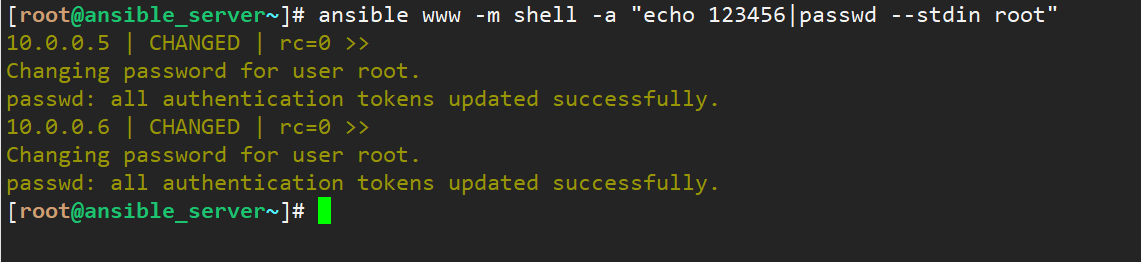
# Remote batch password modification through shell
[root@ansible_server~]# ansible www -m shell -a "echo 123456|passwd --stdin root"
10.0.0.5 | CHANGED | rc=0 >>
Changing password for user root.
passwd: all authentication tokens updated successfully.
10.0.0.6 | CHANGED | rc=0 >>
Changing password for user root.
passwd: all authentication tokens updated successfully.
-
3.3 practice of ansible command module
3.3.0 introduction to command module
-
Introduction to command module
# Ansible command module is an ansible default module, which is mainly used to execute basic Linux commands, and can perform remote server command execution, task execution and other operations. Command module usage details:

Chdir					Before executing the command, switch to the directory;
Creates					When the file exists, this step is not performed;
Executable				Swap shell Environmental execution order;
Free_form				Scripts to be executed;
Removes					When the file does not exist, this step is not performed;
Warn					If in ansible.cfg There is an alarm in, if set False,This line will not be warned.
3.3.1 using df -h via ansible to view disk space usage information
-
View disk space
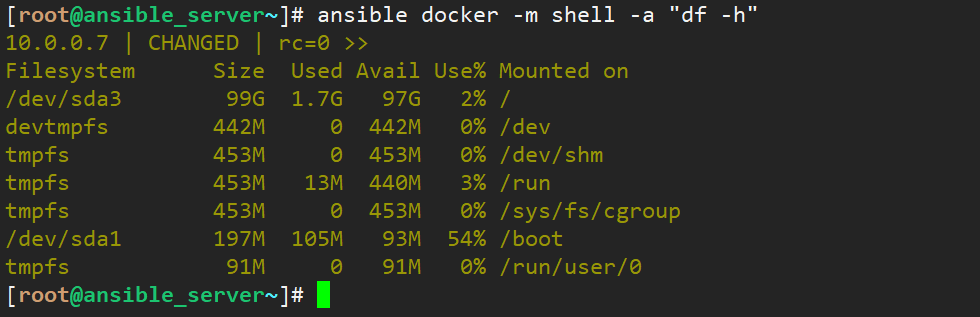
# Use df -h to view the disk usage of the machines in the docker group
[root@ansible_server~]# ansible -i /etc/ansible/hosts 10.0.0.7 -m command -a "df -h"
10.0.0.7 | CHANGED | rc=0 >>
Filesystem      Size  Used Avail Use% Mounted on
/dev/sda3        99G  1.7G   97G   2% /
devtmpfs        442M     0  442M   0% /dev
tmpfs           453M     0  453M   0% /dev/shm
tmpfs           453M  7.2M  446M   2% /run
tmpfs           453M     0  453M   0% /sys/fs/cgroup
/dev/sda1       197M  105M   93M  54% /boot
tmpfs            91M     0   91M   0% /run/user/0
[root@ansible_server~]#

# Easy way to write (same effect)
[root@ansible_server~]# ansible docker -m command -a "df -h"


# Can I use the shell to view it?
[root@ansible_server~]# ansible docker -m shell -a "df -h"

# Answer: you can see that the shell is essentially no different from the command, and the knowledge supports more commands
-
3.3.2 ansible remote viewing system time
-
Use the date command to view the time
# View time on docker server
[root@ansible_server~]# ansible docker -m command -a "date %F"
10.0.0.7 | FAILED | rc=1 >>
date: invalid date '%F'non-zero return code
[root@ansible_server~]#
-

3.3.3 Ansible remote execution download http installation package
-
Remote download
# First, check the docker server remotely to see if there is an httpd installation package
[root@ansible_server~]# ansible docker -m command -a "ls"
10.0.0.7 | CHANGED | rc=0 >>
anaconda-ks.cfg


# Remotely download httpd-2.4.46.tar.bz2 on the docker server
[root@ansible_server~]# ansible docker -m command -a "wget https://downloads.apache.org/httpd/httpd-2.4.46.tar.bz2"
-

3.4 practice of ansible copy module
3.4.0 introduction to copy module
-
Module introduction
# The Ansible copy module is mainly used to copy files or directories. It supports the functions of files, directories, permissions and user groups. The use of the copy module is explained in detail:

# Common parameters
src		 	 	Ansible End source files or directories, empty folders are not copied;
content		 	To replace src,It is used to copy the contents of the specified file to the remote file;
dest			    The client target directory or file requires an absolute path;
backup			# Before copying, back up the original files on the remote node; backup=yes
directory_mode	Used to copy folders. New files will be copied, while old files will not be copied;
follow			support link Copy of documents;
force			Overwrite the inconsistent contents of the remote host;
group		 	Set the group name of the remote host folder;
mode		 	Specify the permissions of remote host files and files;
owner		 	Set the user name and owner of the remote host folder.
3.4.1 remotely test the httpd installation package on the ansible server to the server with ip 10.0.0.5
-
Remote copy
#Remotely copy the http installation package on the ansible server to the 10.0.0.5 server with the permission set to 755
[root@ansible_server~]# ansible -i /etc/ansible/hosts 10.0.0.5 -m command -a "ls"
10.0.0.5 | CHANGED | rc=0 >>
anaconda-ks.cfg
[root@ansible_server~]# ansible -i /etc/ansible/hosts 10.0.0.5 -m copy -a "src=/root/httpd-2.4.46.tar.bz2 dest=/root mode=755"
10.0.0.5 | CHANGED => {
    "ansible_facts": {
        "discovered_interpreter_python": "/usr/bin/python"
    },
    "changed": true,
    "checksum": "1b7cd10ff3a2a07a576d77e34f0204d95fa4aceb",
    "dest": "/root/httpd-2.4.46.tar.bz2",
    "gid": 0,
    "group": "root",
    "md5sum": "7d661ea5e736dac5e2761d9f49fe8361",
    "mode": "0755",
    "owner": "root",
    "size": 7187805,
    "src": "/root/.ansible/tmp/ansible-tmp-1631779035.15-12735-92572188724853/source",
    "state": "file",
    "uid": 0
}
[root@ansible_server~]#

# Check whether the 10.0.0.5 file is copied successfully
[root@ansible_server~]# ansible -i /etc/ansible/hosts 10.0.0.5 -m command -a "ls"
10.0.0.5 | CHANGED | rc=0 >>
anaconda-ks.cfg
httpd-2.4.46.tar.bz2
[root@ansible_server~]#

# Check whether 10.0.0.6 in the same www group also has
[root@ansible_server~]# ansible -i /etc/ansible/hosts 10.0.0.6 -m command -a "ls"
10.0.0.6 | CHANGED | rc=0 >>
anaconda-ks.cfg
[root@ansible_server~]#
3.5 practice of ansible Yum module
3.5.0 introduction to Yum module
-
yum module introduction
#Ansible yum module is mainly used for software installation, upgrade and uninstall. It supports the management of red hat. rpm software. Detailed instructions for the use of YUM module:
# Common parameters
conf_file					    Set remote yum Execution dependent yum configuration file
disable_gpg_check			    Do you insist before installing the package gpg  key;
name						    The name of the software to be installed, which supports software group installation;
update_cache				    Update the cache before installing the software;
enablerepo					    appoint repo Source name;
skip_broken      			    Skip the abnormal software node;
state						    #Software package status, including: installed, present, latest, absent and removed.
3.5.1 install / start / uninstall httpd service remotely on 10.0.0.6 server on ansible server
-
Remote Install / uninstall
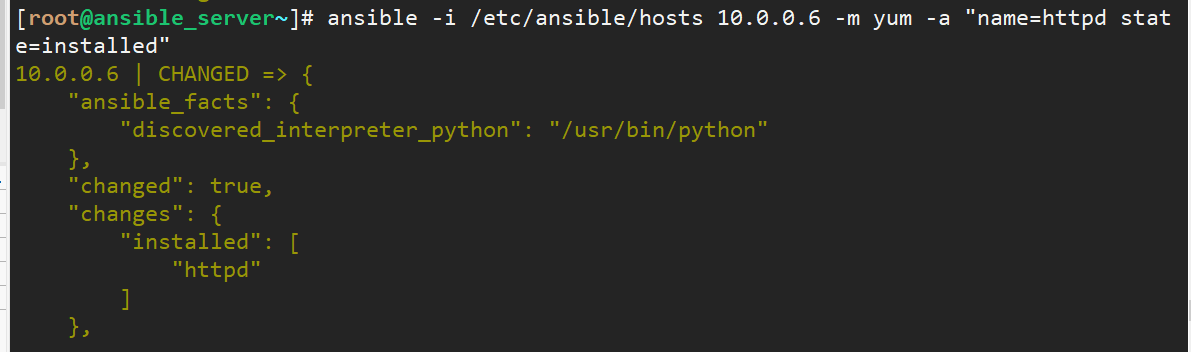
# Installing the httpd service on a remote 10.0.0.6 server
[root@ansible_server~]# ansible -i /etc/ansible/hosts 10.0.0.6 -m yum -a "name=httpd state=installed"

# Start httpd service remotely
[root@ansible_server~]# ansible -i /etc/ansible/hosts 10.0.0.6 -m command -a "systemctl start httpd"
10.0.0.6 | CHANGED | rc=0 >>


# View http service process remotely
[root@ansible_server~]# ansible -i /etc/ansible/hosts 10.0.0.6 -m shell -a "ps -ef|grep httpd"
10.0.0.6 | CHANGED | rc=0 >>
root      10924      1  0 16:11 ?        00:00:00 /usr/sbin/httpd -DFOREGROUND
apache    10925  10924  0 16:11 ?        00:00:00 /usr/sbin/httpd -DFOREGROUND
apache    10926  10924  0 16:11 ?        00:00:00 /usr/sbin/httpd -DFOREGROUND
apache    10928  10924  0 16:11 ?        00:00:00 /usr/sbin/httpd -DFOREGROUND
apache    10929  10924  0 16:11 ?        00:00:00 /usr/sbin/httpd -DFOREGROUND
apache    10930  10924  0 16:11 ?        00:00:00 /usr/sbin/httpd -DFOREGROUND
root      11066  11061  0 16:12 pts/0    00:00:00 /bin/sh -c ps -ef|grep httpd
root      11068  11066  0 16:12 pts/0    00:00:00 grep httpd


# Stop httpd service
[root@ansible_server~]# ansible -i /etc/ansible/hosts 10.0.0.6 -m command -a "systemctl stop httpd"
10.0.0.6 | CHANGED | rc=0 >>

# Remote uninstall httpd
[root@ansible_server~]# ansible -i /etc/ansible/hosts 10.0.0.6 -m yum -a "name=httpd state=removed"
-
3.5.2 kill all yum processes in the www group server
-
Stop the yum process
# Stop the working yum process
[root@ansible_server~]# ansible www -m shell -a "pkill -yum"

# View process
[root@ansible_server~]# ansible www -m shell -a "ps -ef|grep yum"
10.0.0.6 | CHANGED | rc=0 >>
root      12032  12027  0 09:12 pts/1    00:00:00 /bin/sh -c ps -ef|grep yum
root      12034  12032  0 09:12 pts/1    00:00:00 grep yum
10.0.0.5 | CHANGED | rc=0 >>
root      12260  12255  0 09:12 pts/0    00:00:00 /bin/sh -c ps -ef|grep yum
root      12262  12260  0 09:12 pts/0    00:00:00 grep yum
[root@ansible_server~]#
3.6 practice of ansible file module (maintenance and management of creation, deletion, modification, permission and attribute)
3.6.0 introduction to ansible file module
-
file module introduction
# The Ansible file module is mainly used to create, delete, modify, maintain and manage permissions and attributes of files. Details of the use of the File module:

# Introduction to common parameters
src					   Ansible End source files or directories;
follow				   support link Copy of documents;
force				   Overwrite the inconsistent contents of the remote host;
group				   Set the group name of the remote host folder;
mode				   Specify the permissions of remote host files and files;
owner				   Set the user name of the remote host folder;
path				   The target path can also be used dest,name Replace;
state				  #The status includes: file, link, directory, hard, touch, absent;
attributes			   Special attributes of files or directories.
3.6.1 create a rivers directory under the / usr/local directory on the docker server
-
Create a directory using the file module
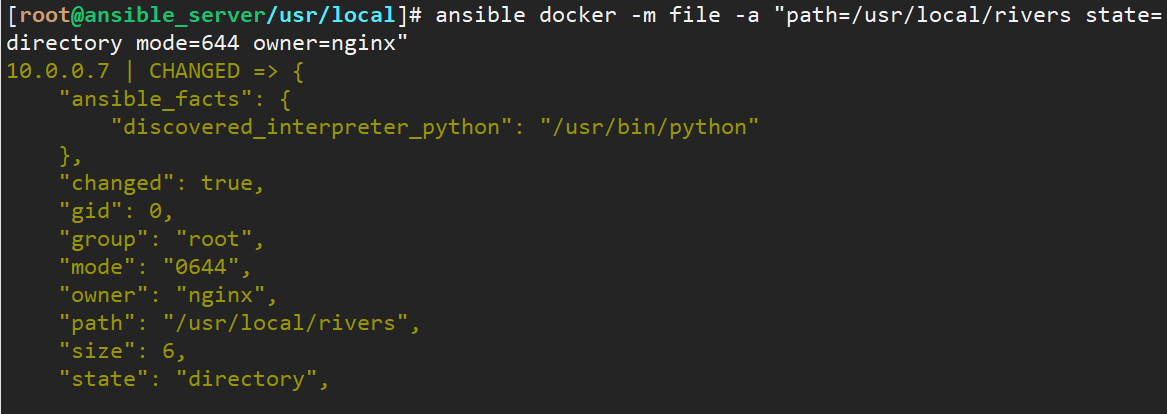
# Create a rivers directory under the / usr/local directory on the docker server. The name is rivers and the owner is nginx [root@ansible_server~]# ansible docker -m file -a "path=/usr/local/rivers state=directory mode=644 owner=nginx" 10.0.0.7 | CHANGED => { "ansible_facts": { "discovered_interpreter_python": "/usr/bin/python" }, "changed": true, "gid": 0, "group": "root", "mode": "0644", "owner": "nginx", "path": "/usr/local/rivers", "size": 6, "state": "directory", "uid": 998 } # View common directories [root@ansible_server~]# ansible docker -m command -a "ls /usr/local/rivers" 10.0.0.7 | FAILED | rc=2 >> # Path indicates the name and path of the directory, and state=directory indicates the creation of the directory -
3.6.2 create a script file remotely on the docker server
-
Create files remotely
#In the / usr/local/rivers/script.sh file [root@ansible_server~]# ansible docker -m file -a "path=/usr/local/rivers/script.sh state=touch mode=777" 10.0.0.7 | CHANGED => { "ansible_facts": { "discovered_interpreter_python": "/usr/bin/python" }, "changed": true, "dest": "/usr/local/rivers/script.sh", "gid": 0, "group": "root", "mode": "0777", "owner": "root", "size": 0, "state": "file", "uid": 0 } [root@ansible_server~]# # Path indicates the name and path of the directory, and state=touch indicates the creation of the file -

3.7 practical operation of ansible cron module
3.7.0 introduction to cron module
-
Introduction to cron module
# The Ansible cron module is mainly used to add, delete and update the cronab task plan of the operating system. The usage details of the Cron module are as follows:

# Common parameters
name      					Task plan name;
cron_file 					Replace the file of the user's task plan on the client;
minute    					Minutes (0)-59 ,* ,*/2 );
hour      					Time (0)-23 ,* ,*/2 );
day       					Day (1)-31 ,* ,*/2 );
month     					Month (1)-12 ,* ,*/2 );
weekday   					Week (0)-6 Or 1-7 ,* );
job       					Any planned order, state To be equal to present;
backup    					Whether to back up the previous task plan;
user      					User who creates a new task plan;
state     					Specify task schedule present,absent.
3.7.1 create / delete scheduled tasks using the cron module - time synchronization (alicloud)
-
Basic synchronization usage
# The docker server automatically synchronizes alicloud
[root@ansible_server~]# ansible 10.0.0.7 -m cron -a "minute=0 hour=2 job='/usr/sbin/ntpdate ntp1.aliyun.com >/dev/null 2>&1'"
[DEPRECATION WARNING]: The 'name' parameter will be required in future releases.. This
feature will be removed in version 2.12. Deprecation warnings can be disabled by setting
 deprecation_warnings=False in ansible.cfg.
10.0.0.7 | CHANGED => {
    "ansible_facts": {
        "discovered_interpreter_python": "/usr/bin/python"
    },
    "changed": true,
    "envs": [],
    "jobs": [
        "None"
    ]
}

# How to delete a scheduled task

[root@ansible_server~]# ansible docker -m cron -a "name='#Ansible' state=absent"
3.7.2 setting annotation information for scheduled tasks
-
Add scheduled task name comment
# Add comment information
[root@ansible_server~]# ansible 10.0.0.6 -m cron -a "name='time sync' minute=0 hour=2 job='/usr/sbin/ntpdate ntp1.aliyun.com >/dev/null 2>&1'"
10.0.0.6 | CHANGED => {
    "ansible_facts": {
        "discovered_interpreter_python": "/usr/bin/python"
    },
    "changed": true,
    "envs": [],
    "jobs": [
        "time sync"
    ]
}

#How to view scheduled tasks on 10.0.0.6 this server
[root@ansible_server~]# ansible 10.0.0.6 -m shell -a "cat /var/spool/cron/root"
10.0.0.6 | CHANGED | rc=0 >>
#time sync by lidao at 2017-03-08
*/5 * * * * /usr/sbin/ntpdate ntp.aliyun.com >/dev/null 2>&1
#Ansible: time sync
0 2 * * * /usr/sbin/ntpdate ntp1.aliyun.com >/dev/null 2>&1
3.8 practice of ansible user module
3.8.0 module introduction
-
user module introduction
# The Ansible user module is mainly used for operating system user, group, permission, password and other operations. The user module is used in detail:
system          				    It is created as an ordinary user by default yes Create a system user;
append							    Add a new group;
comment 						    Add description information;
createhome 						    Create home directory for users;
force							    Used to delete a forced user;
group							    Create user master group;
groups							    Add users to groups or affiliated groups;
home							    Specify the user's home directory;
name							    Indicates status, yes no create,remove,modify;
password						    Specify the password of the user, here is the encryption password;
remove							    Delete user;
shell							    Set user's shell Login environment;
uid								    Set user id;
update_password 				    Modify user password;
state           				    User status, default to present Indicates a new user. absent Indicates deletion
3.8.1 create a user name dock general management user for the docker server
-
Create normal user
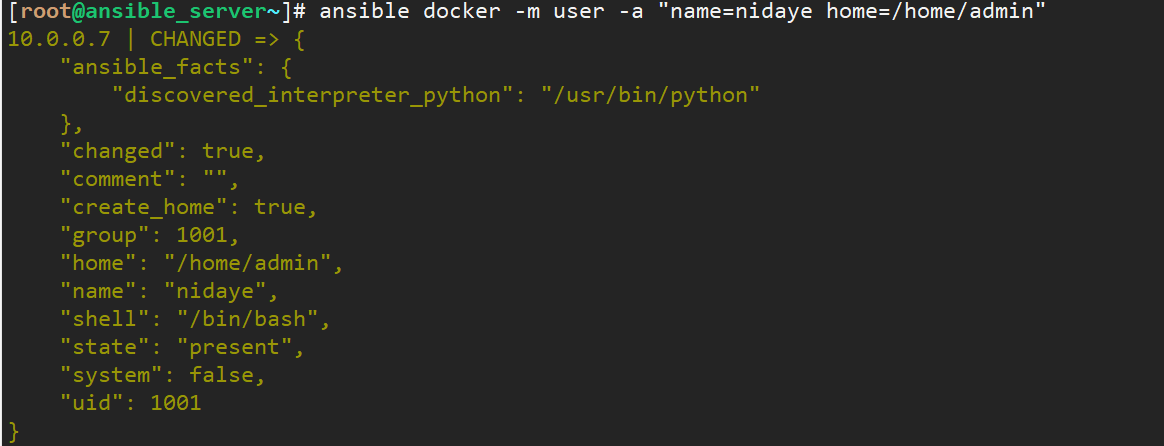
# Create a common user nidaye on the docker server. Name = user name, home = user home directory [root@ansible_server~]# ansible docker -m user -a "name=nidaye home=/home/admin" 10.0.0.7 | CHANGED => { "ansible_facts": { "discovered_interpreter_python": "/usr/bin/python" }, "changed": true, "comment": "", "create_home": true, "group": 1001, "home": "/home/admin", "name": "nidaye", "shell": "/bin/bash", "state": "present", "system": false, "uid": 1001 } # View the newly created user nidaye [root@ansible_server~]# ansible docker -m shell -a "id nidaye" 10.0.0.7 | CHANGED | rc=0 >> uid=1001(nidaye) gid=1001(nidaye) groups=1001(nidaye) [root@ansible_server~]# -
3.8.2 create / delete an apache user for the apache service on the web server
-
Create apache user
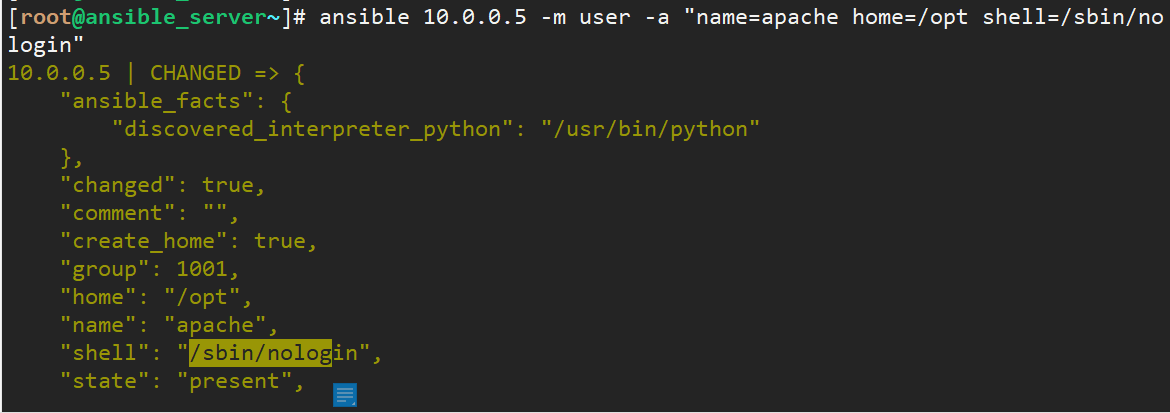
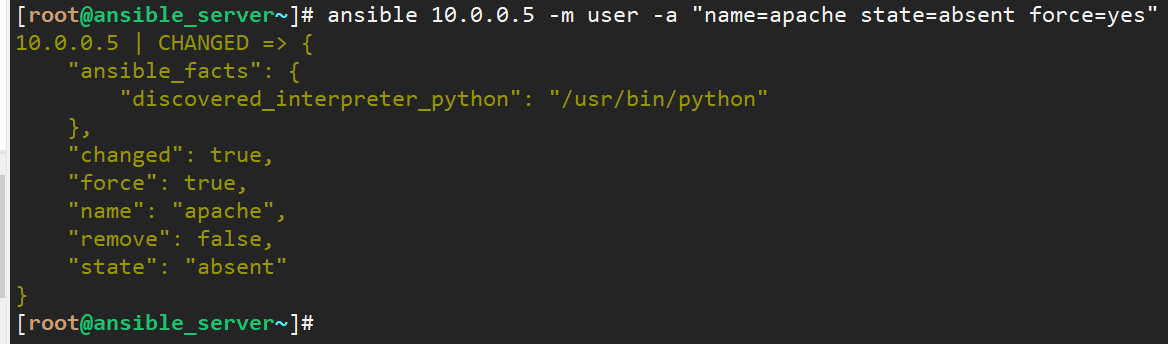
# Create a name apache on the 10.0.0.5 server, and the shell /sbin/nologin home directory is / opt [root@ansible_server~]# ansible 10.0.0.5 -m user -a "name=apache home=/opt shell=/sbin/nologin" 10.0.0.5 | CHANGED => { "ansible_facts": { "discovered_interpreter_python": "/usr/bin/python" }, "changed": true, "comment": "", "create_home": true, "group": 1001, "home": "/opt", "name": "apache", "shell": "/sbin/nologin", "state": "present", # Delete apache user [root@ansible_server~]# ansible 10.0.0.5 -m user -a "name=apache state=absent force=yes" 10.0.0.5 | CHANGED => { "ansible_facts": { "discovered_interpreter_python": "/usr/bin/python" }, "changed": true, "force": true, "name": "apache", "remove": false, "state": "absent" } [root@ansible_server~]# -
-
3.9 practical operation of ansible service module
3.9.0 introduction to service module
-
Introduction to service module
# The Ansible service module is mainly used for various service management of remote clients, including start, stop, restart, reload, etc. the detailed use of the service module is as follows:

# Common parameters
enabled				Whether to start the service;
name				Service name;
runlevel			    Service startup level;
arguments			Service command line parameter transfer;
state				    Service operation status, including started, stopped, restarted, reloaded.
3.9.1 restart the firewall service on the web server remotely
-
Remote restart / shutdown of firewalld service
# Remotely restart firewalld server on 10.0.0.5 server
[root@ansible_server~]# ansible 10.0.0.5  -m service -a "name=firewalld state=restarted"
10.0.0.5 | CHANGED => {
    "ansible_facts": {
        "discovered_interpreter_python": "/usr/bin/python"
    },
    "changed": true,
    "name": "firewalld",
    "state": "started",
    "status": {
        "ActiveEnterTimestampMonotonic": "0",
        "ActiveExitTimestampMonotonic": "0",
        "ActiveState": "inactive",
      ......
[root@ansible_server~]#
# Remote shutdown firewall
[root@ansible_server~]# ansible 10.0.0.5  -m service -a "name=firewalld state=stopped"
3.9.2 remote restart eht0 network card (smooth start)
-
Smoothly start the network card on the 10.0.0.5 server
# Remote boot eht0 network card
[root@ansible_server~]# ansible 10.0.0.5 -m service -a "name=network args=eth0 state=restarted"
[WARNING]: Ignoring "args" as it is not used in "systemd"
10.0.0.5 | CHANGED => {
    "ansible_facts": {
        "discovered_interpreter_python": "/usr/bin/python"
    },
    "changed": true,
    "name": "network",
    "state": "started",
    "status": {
        "ActiveEnterTimestamp": "Fri 2021-08-27 16:30:41 CST",
        ......
3.9.3 remotely set nfs to enable self startup, with startup levels of 3 and 5
-
Remote setting startup and self startup
# Start the nfs service remotely and set the level 3 and 5 auto start
root@ansible_server~]# ansible -k all -m service  -a  "name=nfs  enabled=yes  runlevel=3,5"
SSH password:
[WARNING]: Ignoring "runlevel" as it is not used in "systemd"
[WARNING]: Ignoring "runlevel" as it is not used in "systemd"
[WARNING]: Ignoring "runlevel" as it is not used in "systemd"
3.10 ansible synchronize actual combat module
3.10.0 introduction to synchronize module
-
Module introduction
# The Ansible synchronize module is mainly used for directory and file synchronization. It synchronizes directories based on Rsync command. Details of the use of the Synchronize module:

# Common parameters
compress        			    Enable compression, which is enabled by default;
archive         				Whether archive mode synchronization is adopted to ensure that the attributes of source and target files are consistent;
checksum        			    Whether it is valid;
dirs            				Transfer directories in a non recursive manner;
links           				Synchronize linked files;
recursive       				Recursive yes/no;
rsync_opts      				use rsync Parameters of;
copy_links      				Whether to copy the connection during synchronization;
delete          				Delete files that do not exist in the source but exist in the target;
src                          Source directory and documents;
dest	        				Target directory and documents;
dest_port       				The port accepted by the target;
rsync_path      				Service path, specifying rsync Command to run on the remote server;
rsync_timeout   				appoint rsync Operational IP Timeout;
set_remote_user 			    Set the remote user name;
--exclude=.log  				Ignore synchronization.log Ending documents;
mode            			Synchronous mode, rsync Synchronization mode PUSH,PULL,The default is push push.
3.10.1 synchronize source directory to target directory (incremental synchronization)
-
Synchronize source directory to destination directory (incremental synchronization)
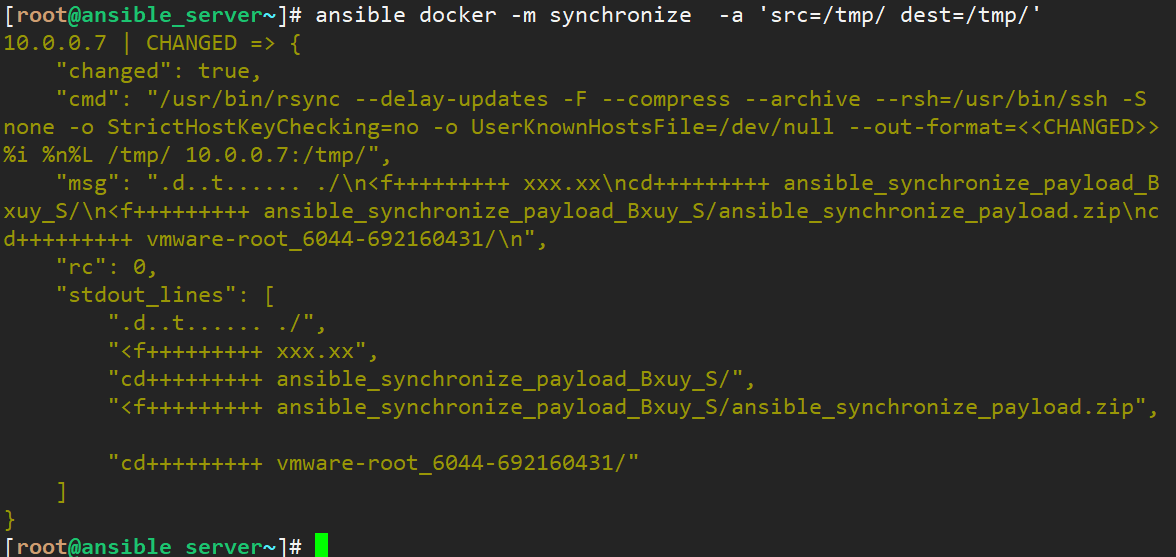
# Remotely synchronize the local / tmp directory to the docker server (incremental synchronization) [root@ansible_server~]# ansible docker -m synchronize -a 'src=/tmp/ dest=/tmp/' 10.0.0.7 | CHANGED => { "changed": true, "cmd": "/usr/bin/rsync --delay-updates -F --compress --archive --rsh=/usr/bin/ssh -S none -o StrictHostKeyChecking=no -o UserKnownHostsFile=/dev/null --out-format=<<CHANGED>>%i %n%L /tmp/ 10.0.0.7:/tmp/", "msg": ".d..t...... ./\n<f+++++++++ xxx.xx\ncd+++++++++ ansible_synchronize_payload_Bxuy_S/\n<f+++++++++ ansible_synchronize_payload_Bxuy_S/ansible_synchronize_payload.zip\ncd+++++++++ vmware-root_6044-692160431/\n", "rc": 0, "stdout_lines": [ ".d..t...... ./", "<f+++++++++ xxx.xx", "cd+++++++++ ansible_synchronize_payload_Bxuy_S/", "<f+++++++++ ansible_synchronize_payload_Bxuy_S/ansible_synchronize_payload.zip", "cd+++++++++ vmware-root_6044-692160431/" ] } [root@ansible_server~]# -
3.10.2 synchronize the source directory to the target directory (full synchronization)
-
Synchronize source directory to destination directory (incremental synchronization)
# Complete synchronization, add delete=yes after the tail
[root@ansible_server/tmp]# ansible docker -m synchronize  -a 'src=/tmp/ dest=/tmp/ delete=yes'
4, ansible batch management service
4.1 introduction to ansible script
4.1.0 script introduction and basic instructions of ansible Playbook
-
Script introduction
# Through the Playbook task, it can centrally manage multiple tasks and associate multiple tasks, so as to achieve more complex work, meet various needs of the production environment and improve the efficiency of operation and maintenance personnel in managing the server

# YAML file, the product of Playbook script, is similar to XML interface (Tomcat) file. It has fixed syntax and parameters. You should master the common YAML syntax and the syntax that meets the direction of operation and maintenance management
-
playbook syntax
# yaml format syntax

# PlayBook is a text file written in YAML format and usually saved with the extension yml. Playbook uses space character indentation to represent its data structure. YAML has no strict requirements on the number of spaces used for indentation, but there are two basic rules:

	Data elements at the same level in the hierarchy, such as items in the same list, must have the same amount of indentation.
	If an item is a child of another item, its indent must be greater than the parent item
# Only space characters can be used for indentation, and tab key is not allowed. The conventional indentation is generally two spaces at one level.
# The first line of the Playbook consists of three dashes (- --), which is the document start tag. It may end with three dots (...) as the document end tag, although this is usually omitted in practice.
-
playbook run / syntax check
# Run lnmp file
[root@ansible_server~]# ansible-playbook lnmp.yml

# Check lnmp syntax
[root@ansible_server~]# ansible-playbook --syntax-check lnmp.yml


playbook Is a different from using ansible The command line execution mode is more powerful and flexible.
1,stay playbooks Common definition tasks in:
	name:  task description     #Task description information
	module_name: module_args    #Module name to be used: module parameter
    files: Store source files and configuration files that need to be synchronized to remote servers;
	handlers: Operations to be performed when the service configuration file changes, such as restarting the service, reloading the configuration file,		 	 handlers
	meta: Role definition; can be left blank;
	tasks: Tasks to be performed;
	templates: For execution lamp The installed template file is generally a script
	vars: Variables defined in this installation


#A playbook is a list of one or more "plays". The main function of play is to dress up hosts that are grouped in advance as roles defined in advance through task s in ansible.
#GitHub provides a large number of examples for your reference https://github.com/ansible/ansible-examples
4.1.1 common components and functions of Playbook
-
playbook component
-
Target defines the remote host group of playbook;
-
Common parameters:
-
hosts defines the remote host group;
-
User the user performing the task;
-
When sudo is set to yes, the root permission is used when executing tasks;
-
sudo_user specifies sudo ordinary user;
-
Connection is based on SSH connection client by default;
-
gather_ Facts gets the basic information of remote host facts.
-
-
-
Variable defines the variables used by playbook;
- Common parameters:
- vars definition format, variable name: variable value;
- vars_files specifies the variable file;
- vars_prompt user interaction mode user defined variable;
- The value of the setup module to the remote host;
- Common parameters:
-
Task defines the task list executed on the remote host;
- Common parameters:
- Name task display name, i.e. screen display information;
- Action defines the action to be executed;
- Copy copy local files to remote host;
- template copies local files to remote hosts, and local variables can be referenced;
- Service defines the state of the service.
- Common parameters:
-
Handler the operations that need to be performed when the service configuration file changes, such as restarting the service and reloading the configuration
-
4.1.2 remote host installation httpd-2.4.46.tar.bz2 web service case demonstration
-
Remote installation demo
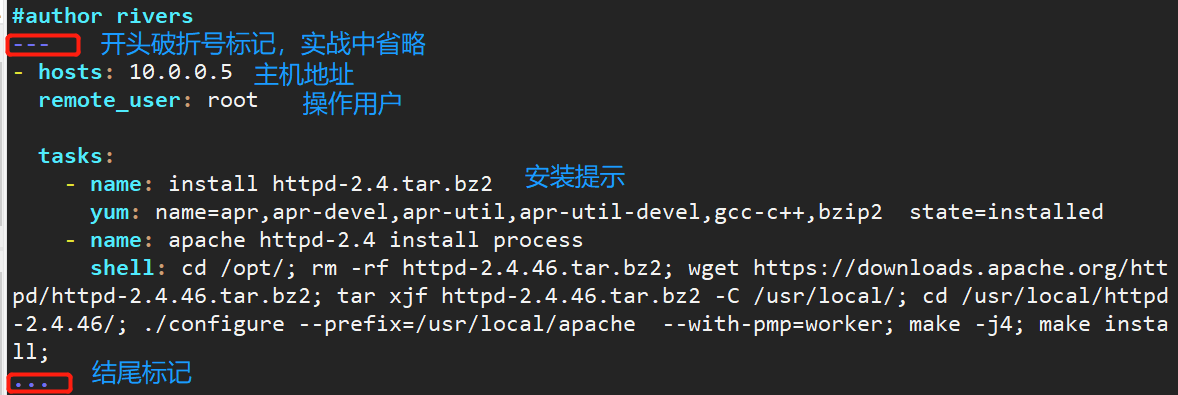
# Install the httpd-2.4.46.tar.bz2 service for the 10.0.0.5 server in the www group through ansible [root@ansible_server~]# cat httpd_install.yaml #author rivers --- - hosts: 10.0.0.5 remote_user: root tasks: - name: install httpd-2.4.tar.bz2 yum: name=apr,apr-devel,apr-util,apr-util-devel,gcc-c++,bzip2 state=installed - name: apache httpd-2.4 install process shell: cd /opt/; rm -rf httpd-2.4.46.tar.bz2; wget https://downloads.apache.org/httpd/httpd-2.4.46.tar.bz2; tar xjf httpd-2.4.46.tar.bz2 -C /usr/local/; cd /usr/local/httpd-2.4.46/; ./configure --prefix=/usr/local/apache --with-pmp=worker; make -j4; make install; ... -
-
Check httpd_install.yaml syntax file
# Check httpd_install.yaml syntax, the following is the correct one [root@ansible_server~]# ansible-playbook --syntax-check httpd_install.yaml playbook: httpd_install.yaml # Common error reporting tips [root@ansible_server~]# ansible-playbook --syntax-check httpd_install.yaml ERROR! We were unable to read either as JSON nor YAML, these are the errors we got from each: JSON: No JSON object could be decoded Syntax Error while loading YAML. mapping values are not allowed in this context The error appears to be in '/root/httpd_install.yaml': line 8, column 10, but may be elsewhere in the file depending on the exact syntax problem. The offending line appears to be: -name: install httpd-2.4.tar.bz2 yum: name=apr apr-devel apr-util apr-util-devel gcc-c++ bzip2 state=installed ^ here -

-
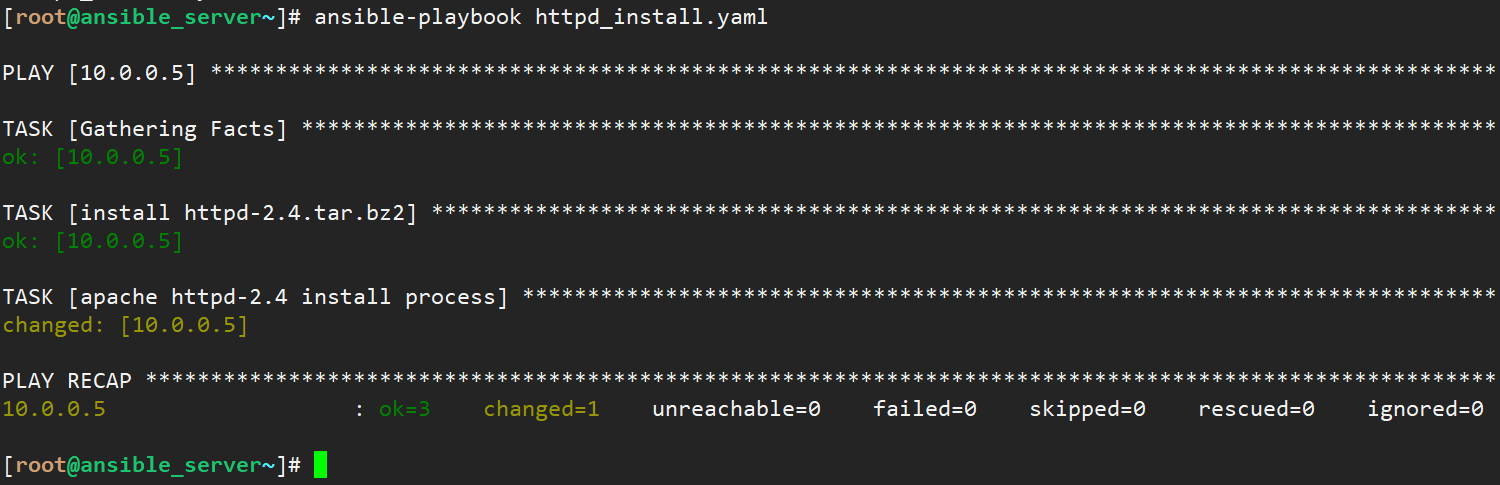
Installation succeeded
-
4.2 playbook enterprise case list and actual combat
4.2.0 install nginx WEB service with ansible playbook, and start Nginx actual combat after installation
-
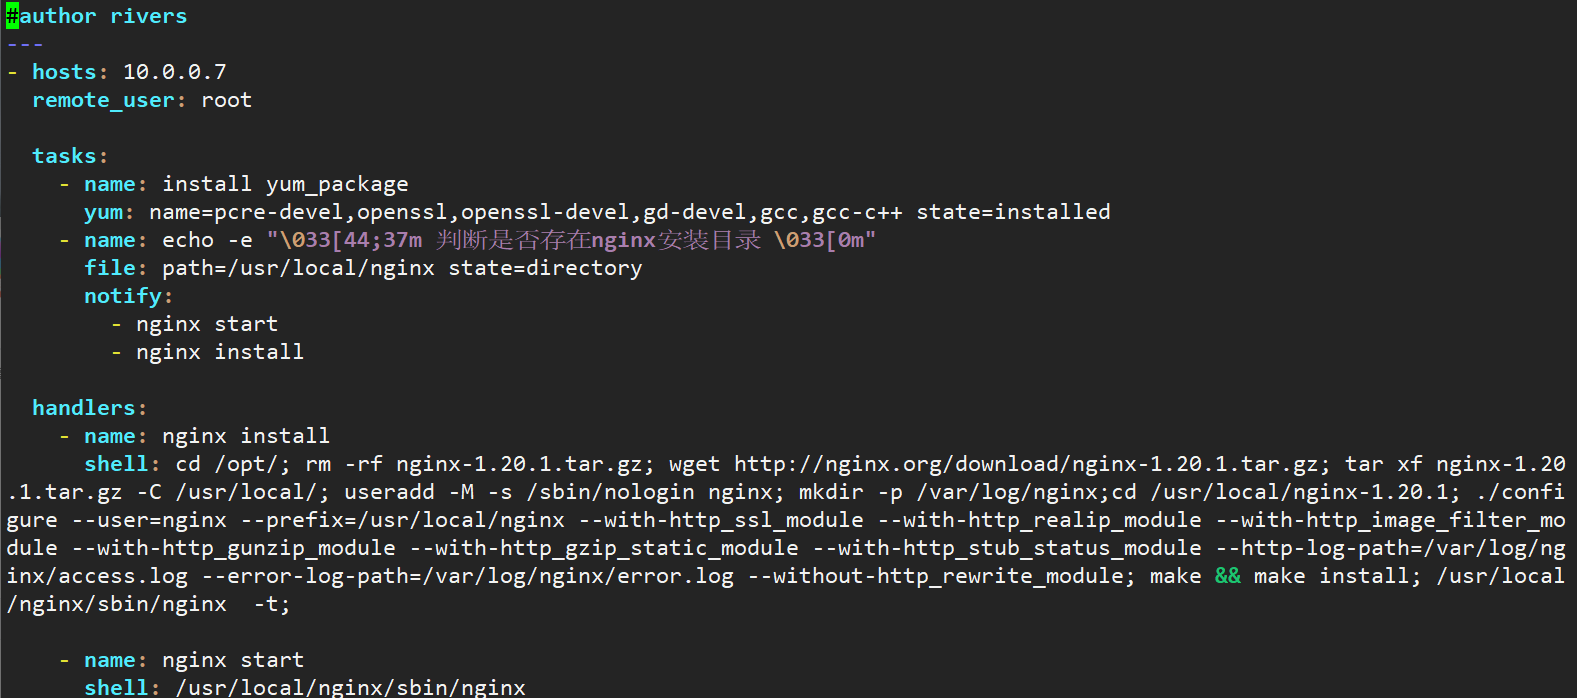
playbook script
# Judge whether the installed nginx directory is installed. If so, start it directly. If nginx is not installed
#author rivershosts: 10.0.0.7
remote_user: root
tasks:

  - name: install yum_package
    yum: name=pcre-devel,openssl,openssl-devel,gd-devel,gcc,gcc-c++ state=installed
  - name: echo -e "\033[44;37m Judge whether it exists nginx Installation directory \033[0m"
    file: path=/usr/local/nginx state=directory
    notify:
      - nginx start
      - nginx install

handlers:

  - name: nginx install
    shell: cd /opt/; rm -rf nginx-1.20.1.tar.gz; wget http://nginx.org/download/nginx-1.20.1.tar.gz; tar xf nginx-1.20
      .1.tar.gz -C /usr/local/; useradd -M -s /sbin/nologin nginx; mkdir -p /var/log/nginx;cd /usr/local/nginx-1.20.1; ./confi
      gure --user=nginx --prefix=/usr/local/nginx --with-http_ssl_module --with-http_realip_module --with-http_image_filter_mo
      dule --with-http_gunzip_module --with-http_gzip_static_module --with-http_stub_status_module --http-log-path=/var/log/ng
      inx/access.log --error-log-path=/var/log/nginx/error.log --without-http_rewrite_module; make && make install; /usr/local
      /nginx/sbin/nginx  -t;

  - name: nginx start
    shell: /usr/local/nginx/sbin/nginx
4.2.1 batch creation of system users using ansible playbook
-
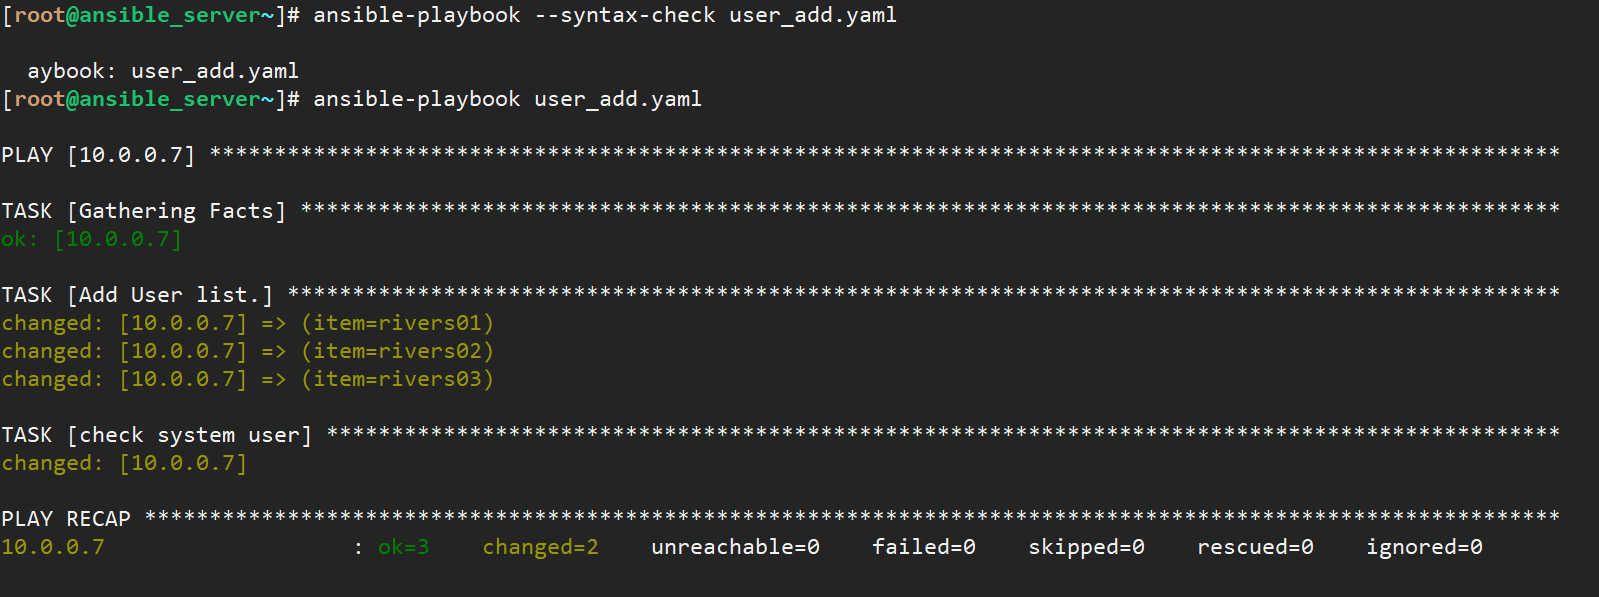
Batch create system user
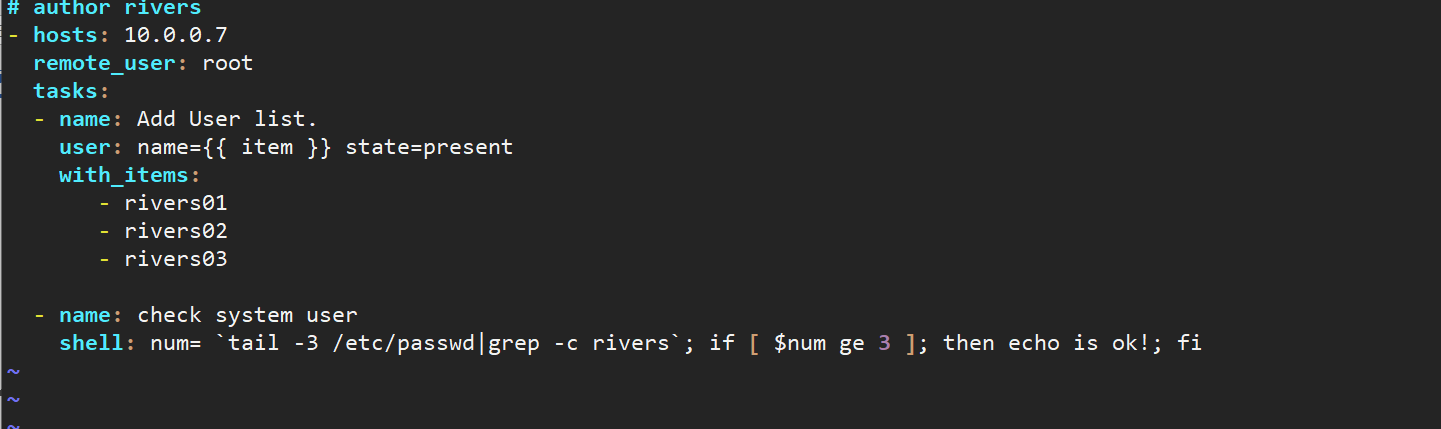
# Use the user module to create rivers01, 02 and 03 users in batches # author rivers - hosts: 10.0.0.7 remote_user: root tasks: - name: Add User list. user: name={{ item }} state=present with_items: - rivers01 - rivers02 - rivers03 - name: check system user shell: num= `tail -3 /etc/passwd|grep -c rivers`; if [ $num ge 3 ]; then echo is ok!; fi -
-
5, ansible integrated application practice - deploy lnmp architecture
5.1 introduction to experimental environment
-
Introduction to experimental environment
name system ip address Deployment Services ansible_server Centos 7.6 10.0.0.61 ansible Host01 Centos 7.6 10.0.0.5 nginx+php Host02 Centos 7.6 10.0.0.6 mysql
5.1.1 build a one click deployment lnmp architecture using an ansible playbook
-
Distributed deployment lnmp architecture
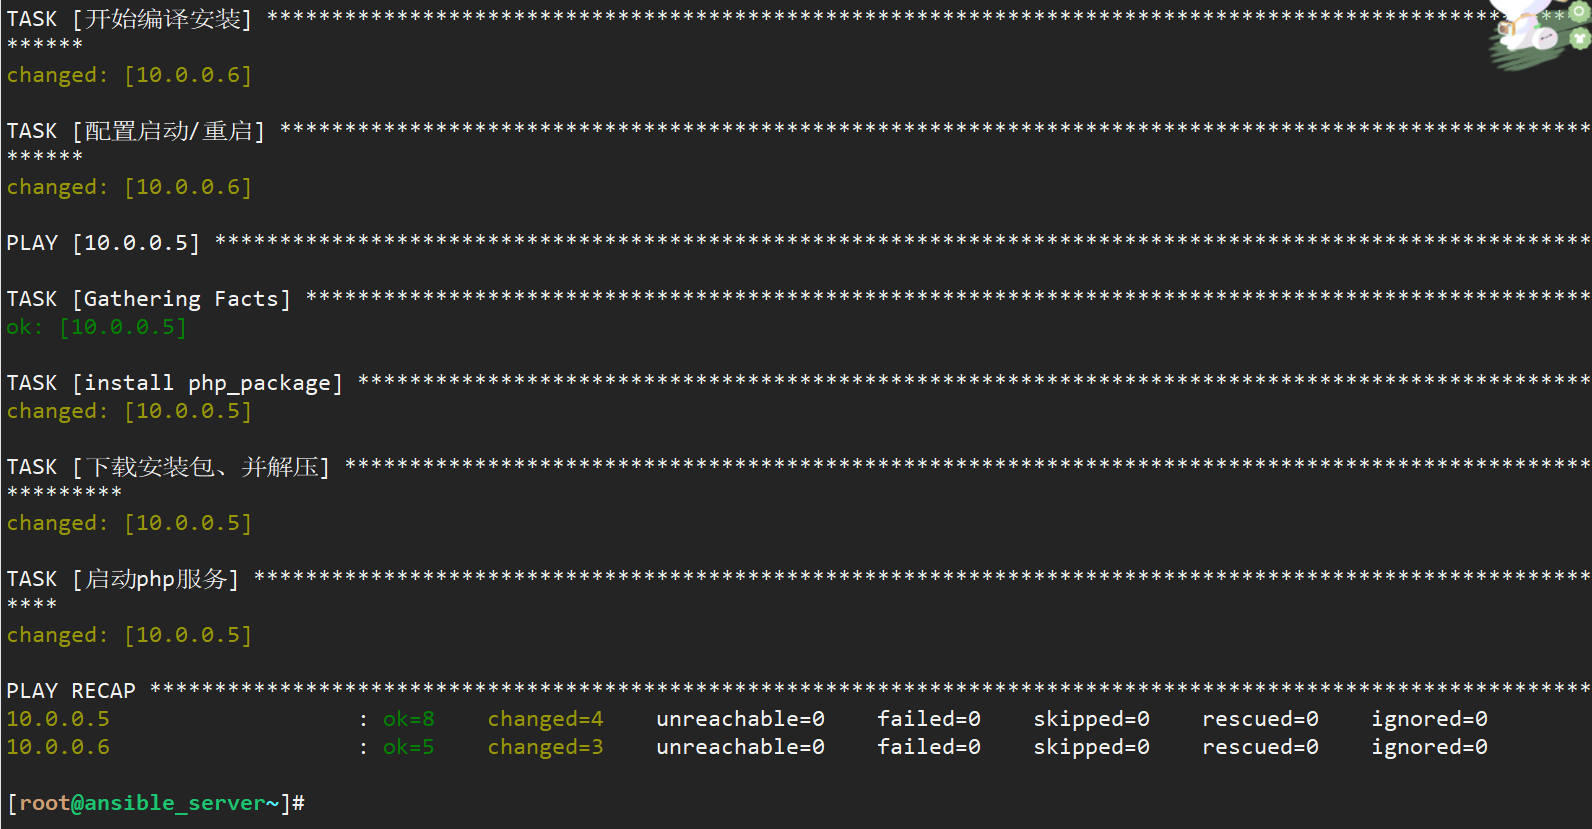
#Write ansible playbook lnmp.yaml script [root@ansible_server~]# cat lnmp_install.yaml # author # Task 1: install nginx - hosts: 10.0.0.5 remote_user: root tasks: - name: Modify host name,Judgment and installation/start-up nginx shell: hostnamectl set-hostname Hosts-01 - name: install yum_package yum: name=pcre-devel,openssl,openssl-devel,gd-devel,gcc,gcc-c++ state=installed - name: echo -e "\033[44;37m Judge whether it exists nginx Installation directory \033[0m" file: path=/usr/local/nginx state=directory notify: - nginx start - nginx install handlers: - name: nginx install shell: cd /opt/; rm -rf nginx-1.20.1.tar.gz; wget http://nginx.org/download/nginx-1.20.1.tar.gz; tar xf nginx-1.20.1.tar.gz -C /usr/local/; useradd -M -s /sbin/nologin nginx; mkdir -p /var/log/nginx;cd /usr/local/nginx-1.20.1; ./configure --user=nginx --prefix=/usr/local/nginx --with-http_ssl_module --with-http_realip_module --with-http_image_filter_module --with-http_gunzip_module --with-http_gzip_static_module --with-http_stub_status_module --http-log-path=/var/log/nginx/access.log --error-log-path=/var/log/nginx/error.log --without-http_rewrite_module; make && make install; /usr/local/nginx/sbin/nginx -t; - name: nginx start shell: /usr/local/nginx/sbin/nginx # Task 2 install mysql - hosts: 10.0.0.6 remote_user: root tasks: - name: install yum_package yum: name=pcre-devel,openssl,openssl-devel,gd-devel,gcc,gcc-c++,ncurses-devel state=installed - name: Download the installation package and unzip it shell: cd /opt/; tar -xf mysql-5.1.63.tar.gz -C /usr/local/ - name: Start compilation and installation shell: cd /usr/local/mysql-5.1.63/; ./configure --prefix=/usr/local/mysql --enable-assembler; make -j8&&make -j8 install; \cp /usr/local/mysql/share/mysql/my-medium.cnf /etc/my.cnf; \cp /usr/local/mysql/share/mysql/mysql.server /etc/rc.d/init.d/mysqld; - name: Configuration startup/restart shell: chkconfig --add mysqld;chkconfig --level 35 mysqld on; service mysqld restart # Task 3 install php - hosts: 10.0.0.5 remote_user: root tasks: - name: install php_package yum: name=libxml2,libxml2-devel,openssl,openssl-devel,bzip2,bzip2-devel,libcurl,libcurl-devel,libjpeg,libjpeg-devel,libpng,libpng-devel,freetype,freetype-devel,gmp,gmp-devel,libmcrypt,libmcrypt-devel,readline,readline-devel,libxslt,libxslt-devel,pcre-devel,ncurses,ncurses-devel,bison,cmake state=installed - name: Download the installation package and unzip it shell: cd /opt/; wget http://mirrors.sohu.com/php/php-7.2.10.tar.gz; tar xf php-7.2.10.tar.gz -C /usr/local/; cd /usr/local/php-7.2.10/; ./configure --prefix=/usr/local/php --disable-fileinfo --enable-fpm --with-config-file-path=/etc --with-config-file-scan-dir=/etc/php.d --with-openssl --with-zlib --with-curl --enable-ftp --with-gd --with-xmlrpc --with-jpeg-dir --with-png-dir --with-freetype-dir --enable-gd-native-ttf --enable-mbstring --with-mcrypt=/usr/local/libmcrypt --enable-zip --enable-mysqlnd --with-mysqli=mysqlnd --with-pdo-mysql=mysqlnd --with-mysql-sock=/var/lib/mysql/mysql.sock --without-pear --enable-bcmath; make && make install; ln -s /usr/local/php/bin/* /usr/local/bin/; \cp php.ini-production /etc/php.ini; \cp /usr/local/php/etc/php-fpm.conf.default /usr/local/php/etc/php-fpm.conf; \cp /usr/local/php/etc/php-fpm.d/www.conf.default /usr/local/php/etc/php-fpm.d/www.conf; \cp sapi/fpm/init.d.php-fpm /etc/init.d/php-fpm; chmod +x /etc/init.d/php-fpm; chkconfig --add php-fpm - name: start-up php service shell: systemctl start php-fpm -
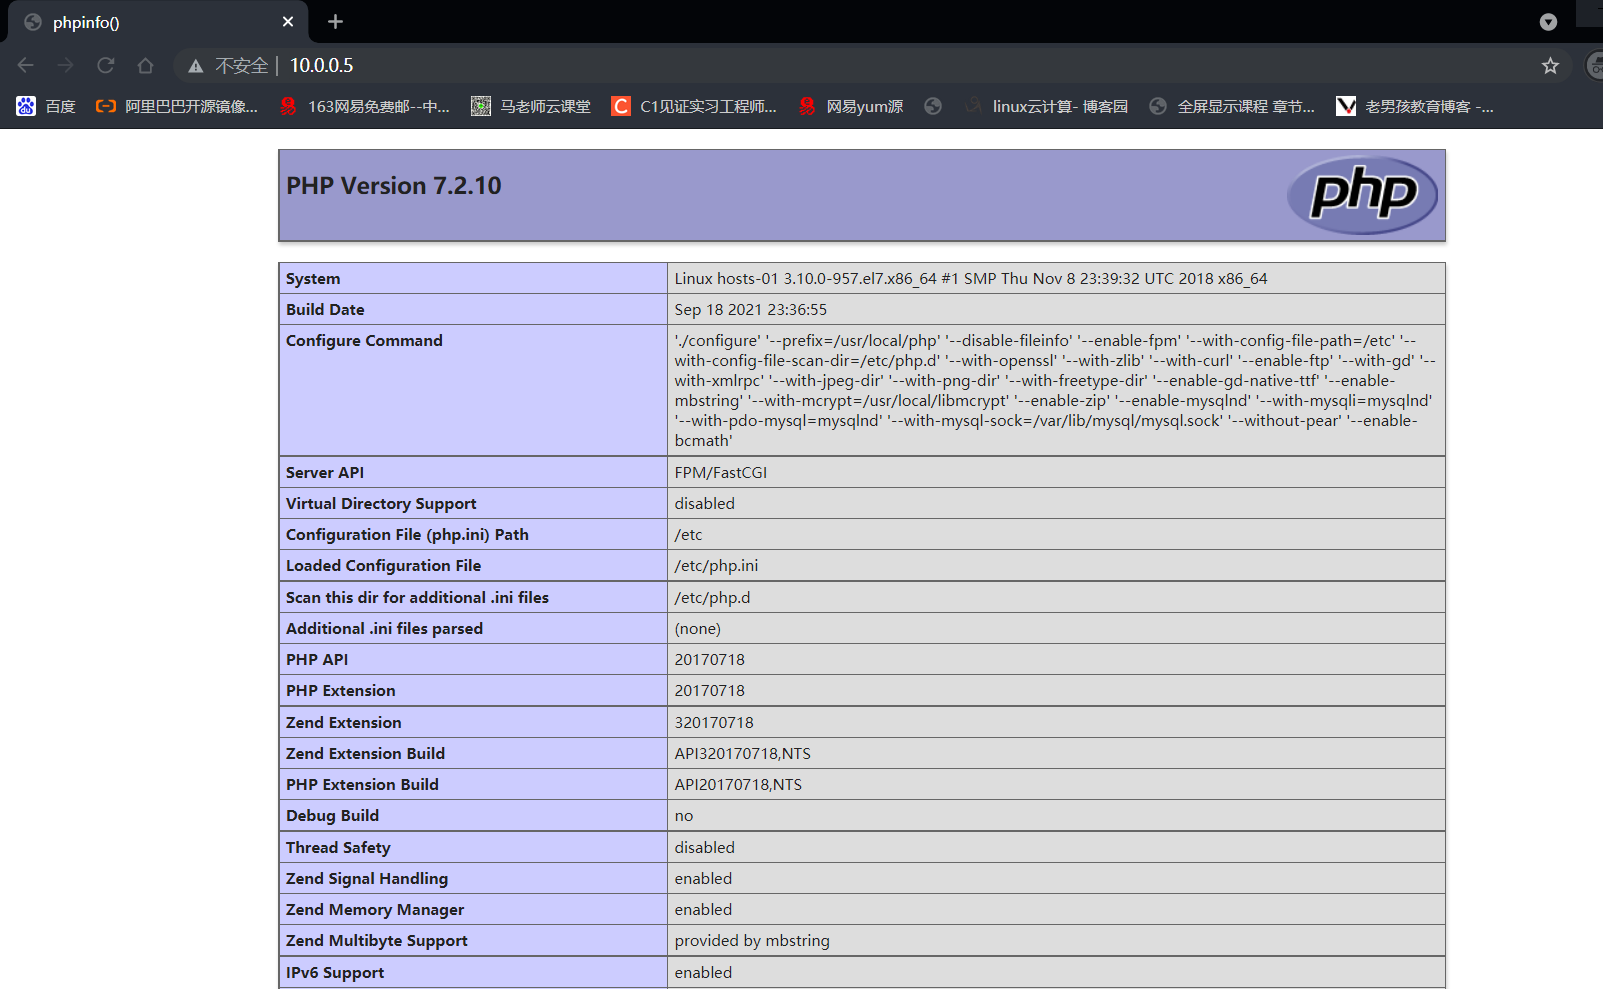
5.1.2 integrate lnmp architecture and test
-
Modify nginx configuration file
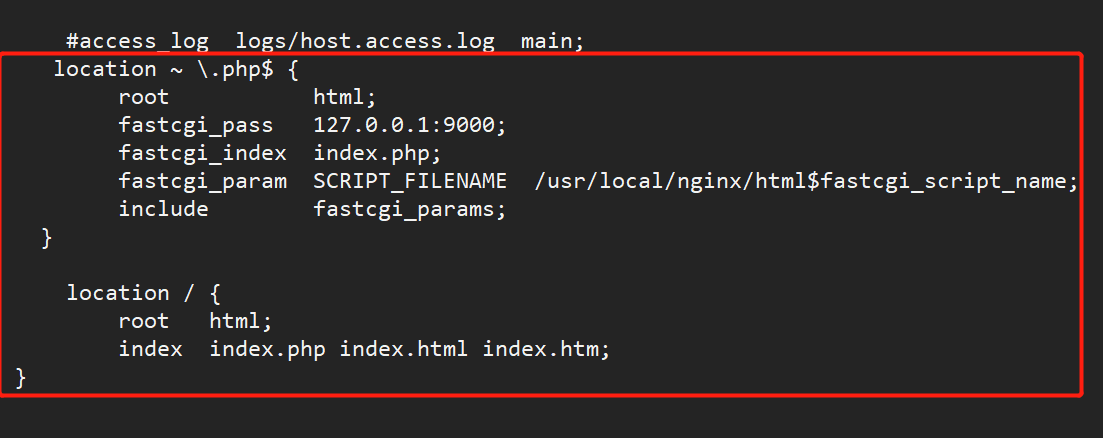
# Modify the / usr/local/nginx/conf/nginx.conf file # 1. Change user to nginx # 2. Add the following location / { root html; index index.php index.html index.htm; } location ~ \.php$ { root html; fastcgi_pass 127.0.0.1:9000; fastcgi_index index.php; fastcgi_param SCRIPT_FILENAME /usr/local/nginx/html$fastcgi_script_name; include fastcgi_params; } # Set php Web site file vim /usr/local/nginx/html/index.php [root@hosts-01/usr/local/nginx/html]# cat index.php <?php phpinfo(); ?> [root@hosts-01/usr/local/nginx/html]# # Restart nginx service /usr/local/nginx/sbin/nginx -

-
-
Browser input 10.0.0.5 access test
-
6, ansible tuning
6.1 detailed explanation of ansible configuration file
-
Profile description
# Ansible's default configuration file is / etc/ansible/ansible.cfg. In the configuration file, you can adjust various parameters of ansible, including concurrent threads, users, module paths, configuration optimization, etc. the following is a detailed explanation of the common parameters of Ansible.cfg:

[defaults]   								General default configuration section;
inventory      = /etc/ansible/hosts     	    Controlled end IP perhaps DNS List;
library        = /usr/share/my_modules/ 	    Ansible Default location of search module;
remote_tmp     = $HOME/.ansible/tmp       Ansible Remote execution of temporary files;
pattern        = *    				    Communicate with all hosts;
forks          = 5    					Number of parallel processes;
poll_interval  = 15    					    Return frequency or rotation interval;
sudo_user      = root   					sudo Remote execution user name;
ask_sudo_pass = True   					use sudo,Whether the password needs to be entered;
ask_pass      = True    					Whether the password needs to be entered;
transport      = smart   				    Communication mechanism;
remote_port    = 22    					long-range SSH Port;
module_lang    = C   					Language for communication between modules and systems;
gathering = implicit   					    Control default facts Collection (remote system variables);
roles_path= /etc/ansible/roles 			    be used for playbook search Ansible roles;
host_key_checking = False    				Check the remote host key;
#sudo_exe = sudo      					     Sudo remote execution command;
#sudo_flags = -H 							 Pass parameters other than sudo;
timeout = 10								SSH Timeout;
remote_user = root   					    Remote login user name;
log_path = /var/log/ansible.log     		    Log file storage path;
module_name = command 				    Ansible Command execution default module;
#executable = /bin/sh      				     Shell environment for execution, user shell module;
#hash_behaviour = replace     				 Specific priority override variables;
#jinja2_extensions 	    				     Allow to open Jinja2 expansion module;
#private_key_file = /path/to/file        	     Storage location of private key file;
#display_skipped_hosts = True      			 Display the status of any skipped tasks;
#system_warnings = True     				 Disable the system running ansible potential problem warning;
#deprecation_warnings = True  				 Playbook output disables the "not recommended" warning;
#command_warnings = False     			     The command module Ansible sends a warning by default;
#nocolor = 1   							 Color difference on output band, on / off: 0 / 1;
pipelining = False							open pipe SSH Channel optimization;
[accelerate]								accelerate Cache acceleration.
accelerate_port = 5099
accelerate_timeout = 30
accelerate_connect_timeout = 5.0
accelerate_daemon_timeout = 30
accelerate_multi_key = yes
6.2 introduction to ansible common optimization
6.1.1 turn off ssh key detection
-
Turn off ssh detection key
# Add the following code to the ansible configuration file:
host_key_checking = False
6.1.2 openssh connection optimization
-
Turn off DNS resolution
# When using OpenSSH service, the default server-side configuration file is UseDNS=YES. This option will cause the server to conduct DNS PTR reverse resolution according to the client's IP address to obtain the client's host name, and then conduct DNS forward A record query according to the obtained host name to verify whether the IP is consistent with the original IP. Turn off DNS resolution

sed  -i  '/^GSSAPI/s/yes/no/g;/UseDNS/d;/Protocol/aUseDNS no' /etc/ssh/sshd_config
/etc/init.d/sshd restart
6.1.3 accelerating ansible optimization
-
SSH pipelining acceleration Ansible
# SSH pipelining is a simple method to speed up Ansible execution. SSH pipelining is turned off by default to be compatible with different sudo configurations, mainly the requiretty option.
If not used Sudo It is recommended to turn this option on. Turning this option on can reduce Ansible When no file transfer is performed, SSH The number of connections that perform tasks on the controlled machine. use Sudo When operating, The profile must be on all managed hosts/etc/sudoers in requiretty Option disabled.


sed    -i    '/^pipelining/s/False/True/g'    /etc/ansible/ansible.cfg
summary
In Xiaobian, I want to say that ansible is not difficult, and the tools are relatively simple. The shell module is a universal module. Therefore, if other modules are not well mastered, use the shell to implement it. Xiaobian spent about 3 days writing this article, and walked through it completely through conception and practice. If you read this article, please read it carefully, Because this is a necessary skill for operation and maintenance.
In daily operation and maintenance, there are still many details to pay attention to. There is not too much description here. Of course, the introduction here is not very complete. In future learning, you should check the description documents on the official website. The above introduction is the most detailed and authoritative. Learning is a long process. If you want to engage in the operation and maintenance industry, it's best to participate in a better training institution. If the economy is limited and you don't want to spend money, you can also study by yourself, buy a better book, watch a complete set of videos, then do experiments and practice repeatedly. At the same time, if you are interested in my cloud computing column, you can also subscribe to my column to learn.
Dream as a horse, live up to youth, fleeting years laugh, the future can be expected!
- Dusk