Vue3 Official Web-In-depth Components (2) props (one-way data flow, validation), Attribute s (inheritance prohibited) for non-Prop, $attrs, custom events (use v-model, emits on components)
Summary:
-
supplement
- Vue (pronunciation/vju/, similar to view) is a progressive framework for building user interfaces. Unlike other large frameworks, Vue is designed to be applied layer by layer from bottom to top. Vue's core library focuses only on the view layer, making it easy to get started and integrate with third-party libraries or existing projects.
- truthy: in JavaScript truthy refers to Boolean Value In the context, the converted values are true values. All values are true unless they are defined as False Value (True except false, 0, "", null, undefined, and NaN). False values are in parentheses.
- The.prevent modifier tells the v-on directive to call event.preventDefault() for the triggered event
- ==Event.preventDefault method cancels the default behavior of the browser for the current event. ===For example, after clicking a link, the browser will jump to another page by default and will not jump after using this method. For example, by pressing the space key, the page will scroll down a certain distance and will not scroll after using this method. The precondition for this method to work is that the event objectThe cancelable property of is true, and if false, calling this method has no effect.
- vue: Build a template with components (app.component) and use the template repeatedly
-
props
-
Basics
- Prop passes data to subcomponents, and it is some custom attribute that you can register on the components.
- Reference to the chapter Component Foundation
- v-bind is required to bind numbers, array objects to tell Vue
-
One-way Data Flow
- Parent prop updates flow down to the child components, but not vice versa. This prevents accidental changes in the state of the parent components from the child components, which can make the data flow of your application difficult to understand.
- Every time a parent component changes, all props in the child component refresh to the latest value. This means that you should not change props within a child component. If you do, Vue will warn you in the browser's console.
-
prop validation
-
app.component('my-component', {
  props: {
    // Basic type checks (`null` and `undefined` pass any type validation)
    propA: Number,
    // Multiple possible types
    propB: [String, Number],
    // Required string
    propC: {
      type: String,
      required: true
    },
    ......
-
-
-
Attribute of non-Prop
-
Attribute Inheritance
-
Prop is some custom attribute s that you can register on your components
-
Disable Attribute Inheritance
-
If you don't want the root element of a component (see the example below, the root element refers to
) inherit the attribute, which you can set in the component's options inheritAttrs: false. -
By setting the inheritAttrs option to false, you can access the component's $attrs property, which includes all the properties not included in the component props and emits properties (for example, class, style, v-on listener, and so on).
-
app.component('date-picker', {
  inheritAttrs: false,
  template: `
    <div class="date-picker">
      <input type="datetime-local" v-bind="$attrs" />
    </div>
  `
})
-
-
-
$attrs
- Links:https://blog.csdn.net/qq_43456781/article/details/120368155
- Includes feature bindings (except classes and styles) that are not considered (and are not expected to) props in the parent scope. When a component does not declare any props, this includes bindings for all parent scopes (except classes and styles) and can be passed in to internal components via v-bind="$attrs" - useful for creating higher-level components.
-
Custom Events
-
Events emitted are defined on the component with the emits option.
app.component('custom-form', { emits: ['inFocus', 'submit'] }) -
Verify thrown events
-
Using v-model on components
-
Reference Chapter 1:https://blog.csdn.net/qq_43456781/article/details/120356193?spm=1001.2014.3001.5501
-
Using modelValue as prop, modelValue is customizable and placed in prop {}
-
Use update:modelValue as an event (the event is thrown by emits) and update:modelValue is placed in emits.
-
Finally, add a template
-
app.component('my-component', {
  props: {
    title: String
  },
  emits: ['update:title'],
  template: `
    <input
      type="text"
      :value="title"
      @input="$emit('update:title', $event.target.value)">
  `
})
-
-
1. Props
This page assumes you have read it Component Foundation If you are still not familiar with the component, it is recommended that you read it first.
Prop Type
Here, we only see prop listed as a string array:
props: ['title', 'likes', 'isPublished', 'commentIds', 'author']
Usually, however, you want each prop to have a specified value type. In this case, you can list props as objects with their respective names and values:
props: {
  title: String,
  likes: Number,
  isPublished: Boolean,
  commentIds: Array,
  author: Object,
  callback: Function,
  contactsPromise: Promise // Or any other constructor
}
This not only provides documentation for your components, but also prompts the user from the browser's JavaScript console when they encounter the wrong type. You'll see it later on this page Type checking and other prop validation.
Pass static or dynamic Prop
So you already know that you can pass a static value to prop like this:
<blog-post title="My journey with Vue"></blog-post>
You also know that prop s can be assigned dynamically by v-bind or abbreviation: for example:
<!-- Dynamic assignment of values to a variable -->
<blog-post :title="post.title"></blog-post>

<!-- Dynamic assignment of values to a complex expression -->
<blog-post :title="post.title + ' by ' + post.author.name"></blog-post>
In both examples above, the values we passed in are of string type, but in fact any type of value can be passed to a prop.
Pass in a number
<!-- even if `42` Is static, we still need `v-bind` To tell Vue     -->
<!-- This is a JavaScript The expression is not a string.             -->
<blog-post :likes="42"></blog-post>

<!-- Dynamic assignment with a variable.-->
<blog-post :likes="post.likes"></blog-post>
Pass in a Boolean value
<!-- Include this prop If there is no value, it means `true`.           -->
<blog-post is-published></blog-post>

<!-- even if `false` Is static, we still need `v-bind` To tell Vue  -->
<!-- This is a JavaScript The expression is not a string.             -->
<blog-post :is-published="false"></blog-post>

<!-- Dynamic assignment with a variable.                                -->
<blog-post :is-published="post.isPublished"></blog-post>
Pass in an array
<!-- Even if the array is static, we still need to `v-bind` To tell Vue        -->
<!-- This is a JavaScript The expression is not a string.             -->
<blog-post :comment-ids="[234, 266, 273]"></blog-post>

<!-- Dynamic assignment with a variable.                                -->
<blog-post :comment-ids="post.commentIds"></blog-post>
Pass in an object
<!-- Even if the object is static, we still need to `v-bind` To tell Vue        -->
<!-- This is a JavaScript The expression is not a string.             -->
<blog-post
  :author="{
    name: 'Veronica',
    company: 'Veridian Dynamics'
  }"
></blog-post>

<!-- Dynamic assignment with a variable.                                 -->
<blog-post :author="post.author"></blog-post>
All properties passed in an object
If you want to pass in all the properties of an object as props, you can use v-bind without parameters instead of v-bind:prop-name. For example, for a given object post:
post: {
  id: 1,
  title: 'My Journey with Vue'
}
The following template:
<blog-post v-bind="post"></blog-post>
Equivalent to:
<blog-post v-bind:id="post.id" v-bind:title="post.title"></blog-post>
One-way Data Flow
All props result in a single downward binding between their parent and child props: updates to the parent prop flow down to the child components, but not vice versa. This prevents accidental changes to the state of the parent component from the child components, which can make the data flow of your application difficult to understand.
In addition, every time a parent component changes, all props in the child component refresh to the latest value. This means that you should not change props within a child component. If you do, Vue will warn you in the browser's console.
There are two common scenarios where you try to change a prop:
- This prop is used to pass an initial value; this sub-component next wants to use it as a local prop data. In this case, it is best to define a local data property and use this prop as its initial value:
props: ['initialCounter'],
data() {
  return {
    counter: this.initialCounter
  }
}
- This prop is passed in as an original value and needs to be converted. In this case, it is best to use this prop value to define a calculation property:
props: ['size'],
computed: {
  normalizedSize() {
    return this.size.trim().toLowerCase()
  }
}
Tips
Note that objects and arrays are passed in by reference in JavaScript, so for prop of an array or object type, changing the object or array itself in a child component will affect the state of the parent component.
Prop Validation
We can specify validation requirements for a component's prop, such as those you know. If a requirement is not met, the Vue will warn you in the browser console. This is especially helpful when developing a component that will be used by others.
To customize how props are validated, you can provide an object with validation requirements for values in props instead of an array of strings. For example:
app.component('my-component', {
  props: {
    // Basic type checks (`null` and `undefined` pass any type validation)
    propA: Number,
    // Multiple possible types
    propB: [String, Number],
    // Required string
    propC: {
      type: String,
      required: true
    },
    // Numbers with default values
    propD: {
      type: Number,
      default: 100
    },
    // Objects with default values
    propE: {
      type: Object,
      // Object or array defaults must be obtained from a factory function
      default() {
        return { message: 'hello' }
      }
    },
    // Custom Validation Functions
    propF: {
      validator(value) {
        // This value must match one of the following strings
        return ['success', 'warning', 'danger'].includes(value)
      }
    },
    // Functions with default values
    propG: {
      type: Function,
      // Unlike object or array defaults, this is not a factory function -- it is a function used as default
      default() {
        return 'Default function'
      }
    }
  }
})
Vue will generate a console warning when prop validation fails.
Tips
Note that props are validated before a component instance is created, so the property of the instance (such as data, computed, and so on) is not available in the default or validator functions.
Type Check
A type can be one of the following native constructors:
- String
- Number
- Boolean
- Array
- Object
- Date
- Function
- Symbol
In addition, type can be a custom constructor and checked by instanceof. For example, given the following ready-made constructors:
function Person(firstName, lastName) {
  this.firstName = firstName
  this.lastName = lastName
}
You can use:
app.component('blog-post', {
  props: {
    author: Person
  }
})
Used to verify that the value of author prop was created through new Person.
Uppercase Naming of Prop (camelCase vs kebab-case)
attribute names in HTML are case insensitive, so browsers interpret all uppercase characters as lowercase characters. This means that when you use a template in the DOM, the prop name of the camelCase (hump nomenclature) needs to be named with its equivalent kebab-case (short horizon separated nomenclature):
const app = Vue.createApp({})

app.component('blog-post', {
  // camelCase in JavaScript
  props: ['postTitle'],
  template: '<h3>{{ postTitle }}</h3>'
})
<!-- kebab-case in HTML -->
<blog-post post-title="hello!"></blog-post>
Again, if you use string templates, this limitation does not exist.
2.Attribute of non-Prop
This page assumes you have read it Component Foundation If you are still not familiar with the component, it is recommended that you read it first.
A non-prop attribute is passed to a component that does not correspond props or emits Common examples include class, style, and id attribute s.
Attribute Inheritance
When a component returns a single root node, non-prop attribute s are automatically added to the attributes of the root node. For example, in an instance of a <date-picker>component:
app.component('date-picker', {
  template: `
    <div class="date-picker">
      <input type="datetime-local" />
    </div>
  `
})
If we need to define the state of the <date-picker>component through the data-status attribute s, it will be applied to the root node (that is, div.date-picker).
<!-- Has Not prop attribute Of Date-picker assembly-->
<date-picker data-status="activated"></date-picker>

<!-- Rendering date-picker assembly -->
<div class="date-picker" data-status="activated">
  <input type="datetime-local" />
</div>
The same rules apply to event listeners:
<date-picker @change="submitChange"></date-picker>
app.component('date-picker', {
  created() {
    console.log(this.$attrs) // { onChange: () => {}  }
  }
})
This may be helpful when there is an HTML element with a change event that will be the root element of the date-picker.
app.component('date-picker', {
  template: `
    <select>
      <option value="1">Yesterday</option>
      <option value="2">Today</option>
      <option value="3">Tomorrow</option>
    </select>
  `
})
In this case, the change event listener passes from the parent component to the child component, which triggers on the change event of the native select. We do not need to explicitly issue events from the date-picker:
<div id="date-picker" class="demo">
  <date-picker @change="showChange"></date-picker>
</div>
const app = Vue.createApp({
  methods: {
    showChange(event) {
      console.log(event.target.value) // The value of the selected option will be recorded
    }
  }
})
Disable Attribute Inheritance
If you do not want the root element of a component to inherit attribute s, you can set inheritAttrs: false in the component's options. For example:
A common case where attributes inheritance is disabled is when attributes need to be applied to elements other than the root node.
By setting the inheritAttrs option to false, you can access the component's $attrs property, which includes all the properties not included in the component props and emits properties (for example, class, style, v-on listener, and so on).
Use Previous Section The date-picker component example in can be accomplished using the v-bind abbreviation if all non-prop attribute s need to be applied to the input element instead of the root div element.
app.component('date-picker', {
  inheritAttrs: false,
  template: `
    <div class="date-picker">
      <input type="datetime-local" v-bind="$attrs" />
    </div>
  `
})
With this new configuration, the data-status attribute s will be applied to the input element!
<!-- Date-picker Component uses non prop attribute -->
<date-picker data-status="activated"></date-picker>

<!-- Rendering date-picker assembly -->
<div class="date-picker">
  <input type="datetime-local" data-status="activated" />
</div>
Attribute inheritance on multiple root nodes
Unlike a single root node component, components with multiple root nodes do not have automatic attribute s fallthrough Behavior. Runtime warnings will be issued if $attrs is not explicitly bound.
<custom-layout id="custom-layout" @click="changeValue"></custom-layout>
// This will issue a warning
app.component('custom-layout', {
  template: `
    <header>...</header>
    <main>...</main>
    <footer>...</footer>
  `
})

// No warning, $attrs was passed to the <main>element
app.component('custom-layout', {
  template: `
    <header>...</header>
    <main v-bind="$attrs">...</main>
    <footer>...</footer>
  `
})
3.Custom Events
This page assumes you have read it Component Foundation If you are still not familiar with the component, it is recommended that you read it first.
Event Name
Like components and prop s, event names provide automatic case conversions. If an event is triggered in a subcomponent named by the hump, you will be able to add a kebab-case (short horizon separated naming) listener to the parent component.
this.$emit('myEvent')
<my-component @my-event="doSomething"></my-component>
and Naming of props Similarly, when you use a DOM template, we recommend using the kebab-case event listener. If you use a string template, this restriction does not apply.
Define custom events
Watch a free video on Vue School defining custom events.
Events emitted can be defined on the component through the emits option.
app.component('custom-form', {
  emits: ['inFocus', 'submit']
})
When native events, such as clicks, are defined in the emits option, the native event listener is replaced with events from the component.
TIP
It is recommended that all emitted events be defined to better record how the component should work.
Verify thrown events
Similar to prop type validation, an event emitted can be validated if it is defined using object syntax instead of array syntax.
To add validation, events are assigned a function that receives the parameters passed to the $emit call and returns a Boolean value indicating whether the event is valid.
app.component('custom-form', {
  emits: {
    // No validation
    click: null,

    // Verify submit events
    submit: ({ email, password }) => {
      if (email && password) {
        return true
      } else {
        console.warn('Invalid submit event payload!')
        return false
      }
    }
  },
  methods: {
    submitForm(email, password) {
      this.$emit('submit', { email, password })
    }
  }
})
v-model parameter
By default, v-models on components use modelValue as prop and update:modelValue as events. We can modify these names by passing parameters to v-model:
<my-component v-model:title="bookTitle"></my-component>
1
In this example, the subcomponent will need a title prop and issue an event for update:title to synchronize:
app.component('my-component', {
  props: {
    title: String
  },
  emits: ['update:title'],
  template: `
    <input
      type="text"
      :value="title"
      @input="$emit('update:title', $event.target.value)">
  `
})
<my-component v-model:title="bookTitle"></my-component>
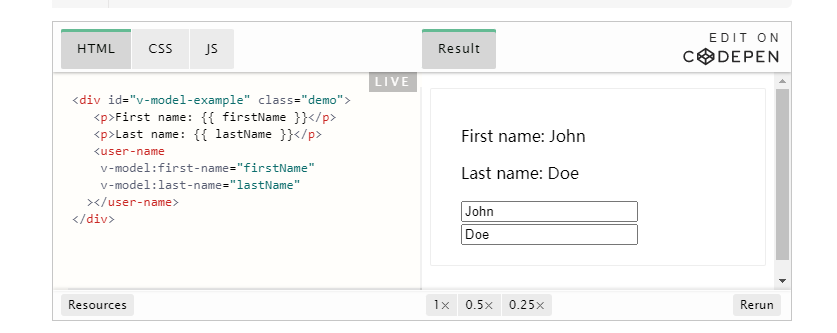
Multiple v-model bindings
By leveraging the ability to target specific prop s and events, as we did before v-model parameter As you learned in, we can now create multiple v-model bindings on a single component instance.
Each v-model will be synchronized to a different prop without adding additional options to the component:
<user-name
  v-model:first-name="firstName"
  v-model:last-name="lastName"
></user-name>
app.component('user-name', {
  props: {
    firstName: String,
    lastName: String
  },
  emits: ['update:firstName', 'update:lastName'],
  template: `
    <input
      type="text"
      :value="firstName"
      @input="$emit('update:firstName', $event.target.value)">

    <input
      type="text"
      :value="lastName"
      @input="$emit('update:lastName', $event.target.value)">
  `
})
Processing v-model modifiers
In 2.x, we have hard-coded support for modifiers such as.trim on the component v-model. However, it is more useful if the component can support custom modifiers. In 3.x, modifiers added to the component V-model are provided to the component through the modelModifiers prop:
When we learn form input binding, we see that the v-model has Built-in modifiers -.trim,.Numberand.lazy. However, in some cases, you may also need to add your own custom modifiers.
Let's create an example custom modifier capitalize that capitalizes the first letter of the string provided by the v-model binding.
Modifiers added to the component v-model will be provided to the component through the modelModifiers prop. In the following example, we created a component that contains the modelModifiers prop of an empty object by default.
Note that when the component's created life cycle hook triggers, the modelModifiers prop contains capitalize and its value is true because capitalize is set on a V-model binding written as v-model.capitalize="myText". (Detailed procedure is in the code below)
<my-component v-model.capitalize="myText"></my-component>
app.component('my-component', {
  props: {
    modelValue: String,
    modelModifiers: {
      default: () => ({})
    }
  },
  emits: ['update:modelValue'],
  template: `
    <input type="text"
      :value="modelValue"
      @input="$emit('update:modelValue', $event.target.value)">
  `,
  created() {
    console.log(this.modelModifiers) // { capitalize: true }
  }
})
Now that we have set prop, we can check the modelModifiers object key and write a processor to change the emitted value. In the code below, we capitalize the string whenever the <input/>element triggers an input event.
<div id="app">
  <my-component v-model.capitalize="myText"></my-component>
  {{ myText }}
</div>
const app = Vue.createApp({
  data() {
    return {
      myText: ''
    }
  }
})

app.component('my-component', {
  props: {
    modelValue: String,
    modelModifiers: {
      default: () => ({})
    }
  },
  emits: ['update:modelValue'],
  methods: {
    emitValue(e) {
      let value = e.target.value
      if (this.modelModifiers.capitalize) {
        value = value.charAt(0).toUpperCase() + value.slice(1)
      }
      this.$emit('update:modelValue', value)
    }
  },
  template: `<input
    type="text"
    :value="modelValue"
    @input="emitValue">`
})

app.mount('#app')
For v-model bindings with parameters, the generated prop name will be arg + "Modifiers":
<my-component v-model:description.capitalize="myText"></my-component>
app.component('my-component', {
  props: ['description', 'descriptionModifiers'],
  emits: ['update:description'],
  template: `
    <input type="text"
      :value="description"
      @input="$emit('update:description', $event.target.value)">
  `,
  created() {
    console.log(this.descriptionModifiers) // { capitalize: true }
  }
})
```xxxxxxxxxx12 1app.component('my-component', {2  props: ['description', 'descriptionModifiers'],3  emits: ['update:description'],4  template: `5    <input type="text"6      :value="description"7      @input="$emit('update:description', $event.target.value)">8  `,9  created() {10    console.log(this.descriptionModifiers) // { capitalize: true }11  }12})js