Preface
In the last chapter, one brotherExplains how to implement authentication authorization based on the default database model, in which the user's information is stored in the database, but there are many limitations! Because we have to build the database and build tables according to the source code, there is a lack of flexibility. When we really develop, tables such as user roles must be based on their own projects.Requirements are designed separately, so it is necessary to customize the user and role tables.
So in this article, I will take you with me to design a database and tables customized according to your actual project needs, and then authenticate and authorize user information in this customized database.
1.Introduction to Core API Source
1.UserDetailsService Source
In the previous chapter, I introduced you to a JdbcUserDetailsManager class whose structure is as follows:

The JdbcUserDetailsManager class implements authentication based on the default database model, but if we want a more flexible way to implement authentication authorization based on a custom database model, we need to use the UserDetailsService interface.
First follow one to see the source code of the UserDetailsService interface and get a brief understanding of the role of this class.
public interface UserDetailsService {

	/**
	 * Locates the user based on the username.
	 */
	UserDetails loadUserByUsername(String username) throws UsernameNotFoundException;
}
As you can see from the source code, we can use the loadUserByUsername() method to query the corresponding UserDetails information based on the user name, so what is UserDetails?
2.UserDetails Source
public interface UserDetails extends Serializable {

	Collection<? extends GrantedAuthority> getAuthorities();

	String getPassword();

	String getUsername();

	boolean isAccountNonExpired();

	boolean isAccountNonLocked();

	boolean isCredentialsNonExpired();

	boolean isEnabled();
}
From the source code of UserDetails, we know that UserDetails is actually a class that contains User information, including user name, password, role and account status.
With the above two core API s, we can do authentication and authorization work based on a custom database model, because no matter how the database structure of authentication and authorization changes in our project, as long as we construct a UserDetails class, then use UserDetails Service to load user information.
2.Implementing authorization based on a custom database model
1.Create a database
Before you start today's code, follow one brother to create a database and create a user role table in it. The table building script is as follows:
CREATE TABLE `users` (`id` bigint(20) NOT NULL AUTO_INCREMENT,
						  `username` varchar(50) NOT NULL,
						  `password` varchar(60) NOT NULL,
						  `enable` tinyint(4) NOT NULL DEFAULT `1`,
						  `roles` text character set utf8,
						  PRIMARY KEY (`id`),
						  KEY `username` (`username`)
						  ) ENGINE=InnoDB DEFAULT CHARSET=utf8 COLLATE=utf8_bin;
The table contains information such as user name, password, role, available status, and so on. Then we add some test data to the table, as shown in the following figure:

2.Create Project
Once we have the database ready, we will continue to build on the previous project by creating a new model module with the basic configuration information as before. The creation process is omitted. Please refer to the previous chapter for project creation!
3.Create User Entity Class
In the previous module, we first create a User entity class, which implements the UserDetails interface and the methods in the interface.
/**
 * User Action Entity Class
 */
public class User implements UserDetails {

    private Long id;

    private String username;

    private String password;

    private String roles;

    private boolean enable;

    private List<GrantedAuthority> authorities;

    public String getRoles() {
        return roles;
    }

    public void setRoles(String roles) {
        this.roles = roles;
    }

    public Long getId() {
        return id;
    }

    public void setId(Long id) {
        this.id = id;
    }

    public boolean isEnable() {
        return enable;
    }

    public void setEnable(boolean enable) {
        this.enable = enable;
    }

    @Override
    public String getUsername() {
        return username;
    }

    public void setUsername(String username) {
        this.username = username;
    }

    @Override
    public boolean isAccountNonExpired() {
        return true;
    }

    @Override
    public boolean isAccountNonLocked() {
        return true;
    }

    @Override
    public boolean isCredentialsNonExpired() {
        return true;
    }

    @Override
    public boolean isEnabled() {
        return this.enable;
    }

    public void setAuthorities(List<GrantedAuthority> authorities) {
        this.authorities = authorities;
    }

    @Override
    public Collection<? extends GrantedAuthority> getAuthorities() {
        return this.authorities;
    }

    @Override
    public String getPassword() {
        return password;
    }

    public void setPassword(String password) {
        this.password = password;
    }

    @Override
    public boolean equals(Object obj) {

        return obj instanceof User?this.username.equals(((User)obj).username):false;
    }

    @Override
    public int hashCode() {
        return this.username.hashCode();
    }

}
Core Methodologies:
- The four attributes accountNonExpired, accountNonLocked, credentialsNonExpired, enabled are used to describe the status of the user, indicating whether the account has not expired, whether the account has not been locked, whether the password has not expired, and whether the account is available.
- The roles attribute represents the user's role;
- The getAuthorities method returns the user's Role information. A user may have more than one Role, so the return value here is a collection type. In this method, we can transform our Role slightly.
4.Define Mapper Interface
Once the data model is ready, let's define a UserMapper interface, where we use Mybatis for specific database queries and just annotate them.
/**
 * @Mapper Notes can be taken or not, since there is a MapperScan scan.
 */
@Mapper
public interface UserMapper {

    @Select("SELECT * FROM users WHERE username=#{username}")
    User findByUserName(@Param("username") String username);

}
5.Implement UserDetailsService interface
Next at the service level, define a UserDetailsService subclass, implement the UserDetailsService interface, and then implement the loadUserByUsername() method in that interface. The parameters of this method are the user name passed in by the user at the time of login, and then query the user information based on the user name (after it is discovered, the system automatically performs password comparison).
@Service
public class MyUserDetailsService implements UserDetailsService {

    @Autowired
    private UserMapper userMapper;

    @Override
    public UserDetails loadUserByUsername(String username) throws UsernameNotFoundException {
        // Attempting to read the user from the database
        User user = userMapper.findByUserName(username);

        // User does not exist, throw exception
        if (user == null) {
            throw new UsernameNotFoundException("user does not exist");
        }

        // Resolve roles in the form of databases to the permission set for UserDetails
        // AuthorityUtils.commaSeparatedStringToAuthorityList is Spring Security
        //Provided method for cutting comma-separated permission set strings into a list of available permission objects
        // You can also do this yourself, such as separating them with semicolons, by referring to generateAuthorities
        user.setAuthorities(AuthorityUtils.commaSeparatedStringToAuthorityList(user.getRoles()));
        return user;
    }

}
In the implementation method, the setAuthorities() method of the user object is used to associate all the role information of the user. Otherwise, the user will have no role in the login authentication and the authentication will fail.
6.Configure SecurityConfig class
After writing the UserDetailsService interface above, let's create the SecurityConfig configuration class, which we associate with a custom UserService object in the configure method.
@EnableWebSecurity(debug = true)
public class SecurityConfig extends WebSecurityConfigurerAdapter {

    @Override
    protected void configure(HttpSecurity http) throws Exception {
        http.authorizeRequests()
                .antMatchers("/admin/**")
                .hasRole("ADMIN")
                .antMatchers("/user/**")
                .hasRole("USER")
                .antMatchers("/visitor/**")
                .permitAll()
                .anyRequest()
                .authenticated()
                .and()
                .formLogin()
                .permitAll();
    }

    /***************************************Create users and roles in a database****************************************************************/

    @Autowired
    private MyUserDetailsService userDetailsService;

    @Override
    protected void configure(AuthenticationManagerBuilder auth) throws Exception {
        //Associate UserDetailsService Objects
        auth.userDetailsService(userDetailsService)
                //Temporarily do not configure passwords for encryption
                .passwordEncoder(NoOpPasswordEncoder.getInstance());
    }

}
7.Configure Entry Class
Since we are using Mybatis for database operations, we must use the @MapperScan annotation in the entry class to scan the Mapper components.
@SpringBootApplication
@MapperScan("com.yyg.security.mapper")
public class Demo03Application {

    public static void main(String[] args) {

        SpringApplication.run(Demo03Application.class, args);
    }

}
8.Add Database Configuration
Next we configure the database connection in the application.yml file, associating the configuration with your own database information.
spring:
  datasource:
    url: jdbc:mysql://localhost:3306/db-security?useUnicode=true&characterEncoding=utf-8&useSSL=false&serverTimezone=GMT
    username: root
    password: syc
So far, I've written the core code of this case for you!
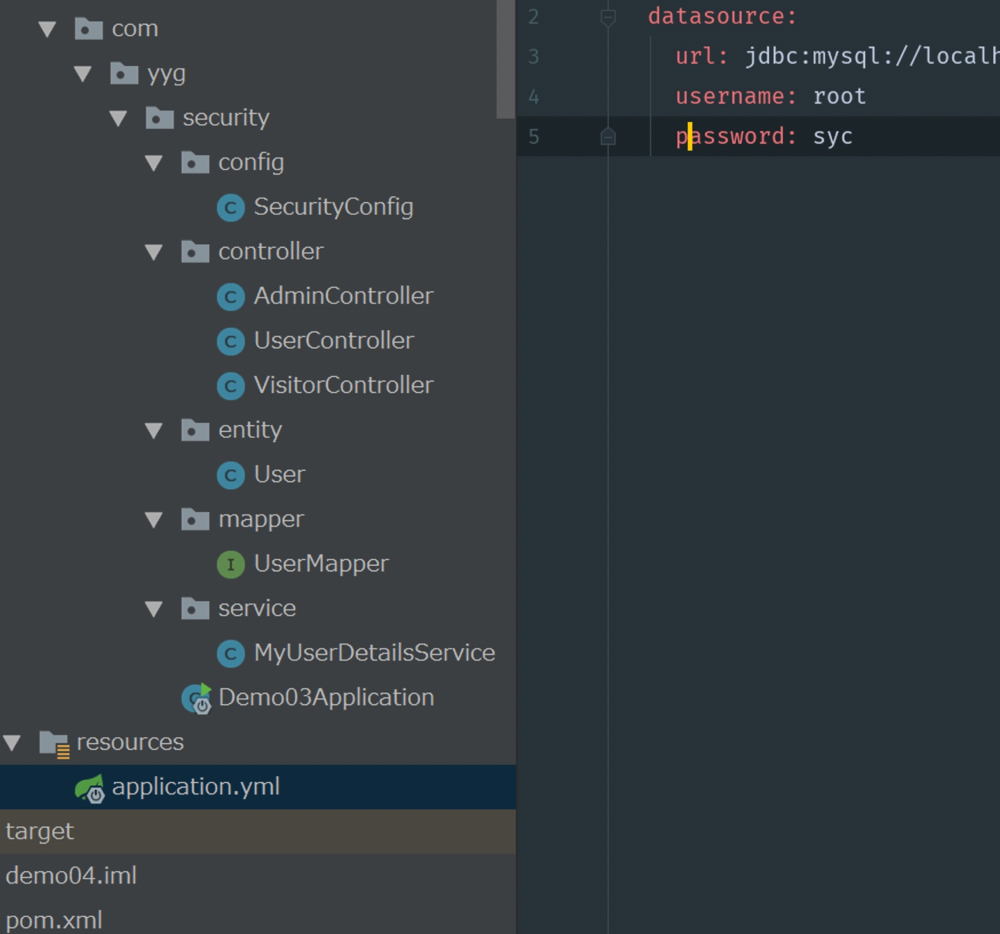
9.Code structure
Now the code structure of our entire project is as follows, so you can refer to creating your own project:
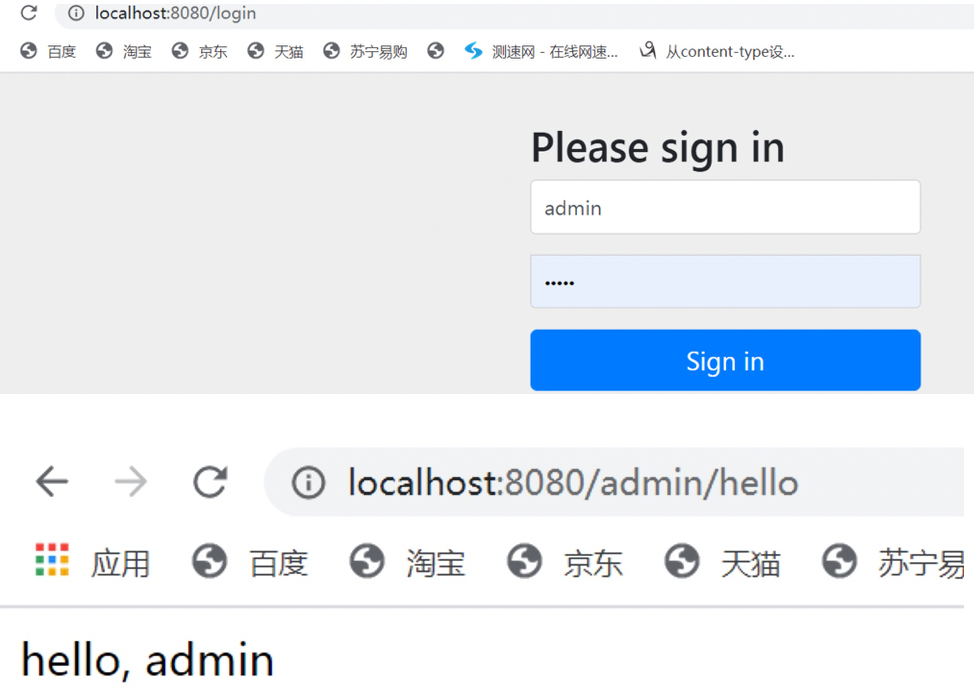
3.Start project testing
Once we've written the code, we'll start the project and test it, and the effect will be the same as the authorization implementation based on the memory model, which we won't show anymore.
When accessing interfaces such as / admin/**, /user/**, you will jump to the following login interface. After successful login authentication, you will jump to the corresponding interface access page.
Okay, we've learned how to authenticate and authorize based on a custom database model again today, isn't it easy? If you don't understand something, remember to leave a comment!