- Installation of simulator
- Run the fluent project to the simulator and real machine
- Flutter common commands
Construction of development environment
1. Download the fluent SDK
The fleet SDK consists of two parts, one is the Dart SDK, and the other is the fleet SDK, because the fleet is based on Dart. You can download it in two ways: one is Git download; The other is to directly download the SDK compressed package.
In Git mode, we can download it by pulling the shuttle branch on the official Github. The branch classification is as follows:
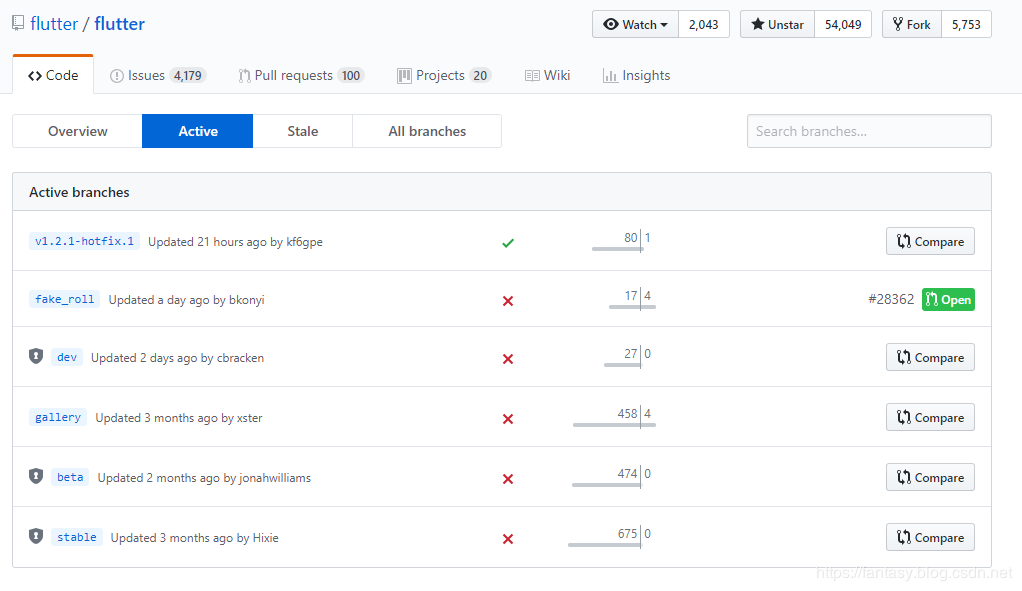
You can see that there are three official branches: dev, beta and stable. If it is officially developed here, you can download the stable version of stable. Download the stable branch with Git command:
git clone -b stable https://github.com/flutter/flutter.git
The other is to download the SDK compressed package directly from the official website. The official download address is:
https://storage.googleapis.com/flutter_infra/releases/stable/windows/flutter_windows_v1.0.0-stable.zip
2. Configure environment variables
After downloading the SDK, we can unzip it into the specified folder, and then configure the SDK environment variable, so that we can execute relevant commands in the required directory. If it is slow to update and download the SDK on the official website, you can set the domestic image proxy address, so that the download will be faster. The following domestic Download Image addresses can be added to the environment variable:
Variable name: PUB_HOSTED_URL,Variable value: https://pub.flutter-io.cn
 Variable name: FLUTTER_STORAGE_BASE_URL,Variable value: https://storage.flutter-io.cn
For the environment variable of the Flutter SDK, add the environment variable to the bin directory of the flutter:
[Yours Flutter Folder path]\flutter\bin
In this way, the environment variables of our Flutter SDK are configured. Next, enter the command in the command prompt window:
flutter doctor
It can help us check whether the Flutter environment variable is successfully set, whether the Android SDK is downloaded and configured, etc. If there are relevant error prompts, repair, install and set them according to the prompts. Each time you run this command, it will help you check whether the necessary dependencies are missing. Verify that you have set it correctly by running the fluent doctor command, and you can automatically update and download related dependencies. If all configurations are correct, the following similar detection information will appear:
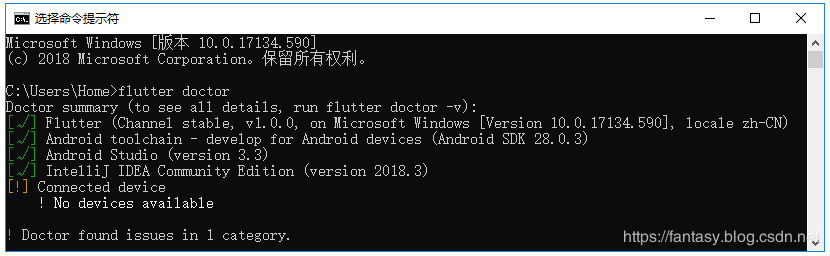
The main detection information is: shuttle, Android toolchain and Connected device.
3. Install the required plug-ins for Visual Studio Code
Search and install Dart and fluent Extensions in the Extensions of Visual Studio Code:
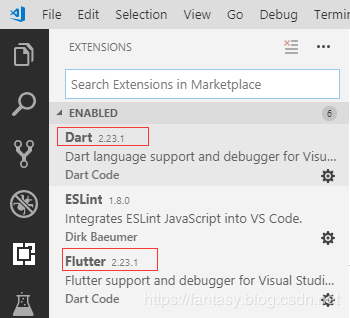
After installing the plug-in, restart the Visual Studio Code editor.
4. Create the shuttle project
Next, create a new shuttle project. You can open the command panel through the command panel or the shortcut key Ctrl + ship + P to find the shuttle: New Project:

Click New Project and enter the project name:

Press enter, and then select the storage location of the project. In this way, the new Flutter project is completed.
The whole creation process log is as follows:
[undefined] flutter create .
Waiting for another flutter command to release the startup lock...
Creating project ....
  .gitignore (created)
  .idea\libraries\Dart_SDK.xml (created)
  .idea\libraries\Flutter_for_Android.xml (created)
  .idea\libraries\KotlinJavaRuntime.xml (created)
  .idea\modules.xml (created)
  .idea\runConfigurations\main_dart.xml (created)
  .idea\workspace.xml (created)
  .metadata (created)
  android\app\build.gradle (created)
  android\app\src\main\java\com\example\fluttersamples\MainActivity.java (created)
  android\build.gradle (created)
  android\flutter_samples_android.iml (created)
  android\app\src\main\AndroidManifest.xml (created)
  android\app\src\main\res\drawable\launch_background.xml (created)
  android\app\src\main\res\mipmap-hdpi\ic_launcher.png (created)
  android\app\src\main\res\mipmap-mdpi\ic_launcher.png (created)
  android\app\src\main\res\mipmap-xhdpi\ic_launcher.png (created)
  android\app\src\main\res\mipmap-xxhdpi\ic_launcher.png (created)
  android\app\src\main\res\mipmap-xxxhdpi\ic_launcher.png (created)
  android\app\src\main\res\values\styles.xml (created)
  android\gradle\wrapper\gradle-wrapper.properties (created)
  android\gradle.properties (created)
  android\settings.gradle (created)
  ios\Runner\AppDelegate.h (created)
  ios\Runner\AppDelegate.m (created)
  ios\Runner\main.m (created)
  ios\Runner.xcodeproj\project.pbxproj (created)
  ios\Runner.xcodeproj\xcshareddata\xcschemes\Runner.xcscheme (created)
  ios\Flutter\AppFrameworkInfo.plist (created)
  ios\Flutter\Debug.xcconfig (created)
  ios\Flutter\Release.xcconfig (created)
  ios\Runner\Assets.xcassets\AppIcon.appiconset\Contents.json (created)
  ios\Runner\Assets.xcassets\AppIcon.appiconset\Icon-App-1024x1024@1x.png (created)
  ios\Runner\Assets.xcassets\AppIcon.appiconset\Icon-App-20x20@1x.png (created)
  ios\Runner\Assets.xcassets\AppIcon.appiconset\Icon-App-20x20@2x.png (created)
  ios\Runner\Assets.xcassets\AppIcon.appiconset\Icon-App-20x20@3x.png (created)
  ios\Runner\Assets.xcassets\AppIcon.appiconset\Icon-App-29x29@1x.png (created)
  ios\Runner\Assets.xcassets\AppIcon.appiconset\Icon-App-29x29@2x.png (created)
  ios\Runner\Assets.xcassets\AppIcon.appiconset\Icon-App-29x29@3x.png (created)
  ios\Runner\Assets.xcassets\AppIcon.appiconset\Icon-App-40x40@1x.png (created)
  ios\Runner\Assets.xcassets\AppIcon.appiconset\Icon-App-40x40@2x.png (created)
  ios\Runner\Assets.xcassets\AppIcon.appiconset\Icon-App-40x40@3x.png (created)
  ios\Runner\Assets.xcassets\AppIcon.appiconset\Icon-App-60x60@2x.png (created)
  ios\Runner\Assets.xcassets\AppIcon.appiconset\Icon-App-60x60@3x.png (created)
  ios\Runner\Assets.xcassets\AppIcon.appiconset\Icon-App-76x76@1x.png (created)
  ios\Runner\Assets.xcassets\AppIcon.appiconset\Icon-App-76x76@2x.png (created)
  ios\Runner\Assets.xcassets\AppIcon.appiconset\Icon-App-83.5x83.5@2x.png (created)
  ios\Runner\Assets.xcassets\LaunchImage.imageset\Contents.json (created)
  ios\Runner\Assets.xcassets\LaunchImage.imageset\LaunchImage.png (created)
  ios\Runner\Assets.xcassets\LaunchImage.imageset\LaunchImage@2x.png (created)
  ios\Runner\Assets.xcassets\LaunchImage.imageset\LaunchImage@3x.png (created)
  ios\Runner\Assets.xcassets\LaunchImage.imageset\README.md (created)
  ios\Runner\Base.lproj\LaunchScreen.storyboard (created)
  ios\Runner\Base.lproj\Main.storyboard (created)
  ios\Runner\Info.plist (created)
  ios\Runner.xcodeproj\project.xcworkspace\contents.xcworkspacedata (created)
  ios\Runner.xcworkspace\contents.xcworkspacedata (created)
  lib\main.dart (created)
  flutter_samples.iml (created)
  pubspec.yaml (created)
  README.md (created)
  test\widget_test.dart (created)
Running "flutter packages get" in flutter_samples...            11.8s
Wrote 64 files.

All done!
[√] Flutter is fully installed. (Channel stable, v1.0.0, on Microsoft Windows [Version 10.0.17134.590], locale zh-CN)
[√] Android toolchain - develop for Android devices is fully installed. (Android SDK 28.0.3)
[√] Android Studio is fully installed. (version 3.3)
[√] IntelliJ IDEA Community Edition is fully installed. (version 2018.3)
[!] Connected device is not available.

Run "flutter doctor" for information about installing additional components.

In order to run your application, type:

  $ cd .
  $ flutter run

Your application code is in .\lib\main.dart.

exit code 0
The structure of the Flutter project is as follows:
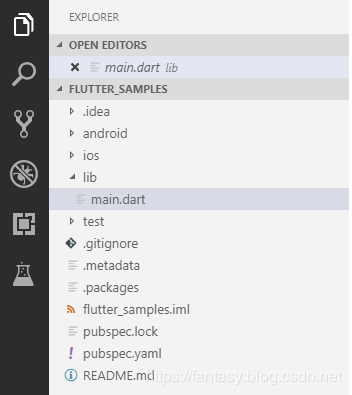
Among them, Android related modifications and configurations are in the Android directory, and the structure is the same as that of Android application project; IOS related modifications and configurations are in the IOS directory, and the structure is the same as that of the IOS application project. The most important fluent code file is in the lib directory. The class file ends with. Dart and the syntax structure is dart syntax structure. Roughly as follows:
import 'package:flutter/material.dart';
void main() => runApp(MyApp());
class MyApp extends StatelessWidget {
// This widget is the root of your application.
@override
Widget build(BuildContext context) {
return MaterialApp(
title: 'Flutter Demo',
theme: ThemeData(
// This is the theme of your application.
//
// Try running your application with "flutter run". You'll see the
// application has a blue toolbar. Then, without quitting the app, try
// changing the primarySwatch below to Colors.green and then invoke
// "hot reload" (press "r" in the console where you ran "flutter run",
// or simply save your changes to "hot reload" in a Flutter IDE).
// Notice that the counter didn't reset back to zero; the application
// is not restarted.
primarySwatch: Colors.blue,
),
home: MyHomePage(title: 'Flutter Demo Home Page'),
);
}
}
class MyHomePage extends StatefulWidget {
MyHomePage({Key key, this.title}) : super(key: key);
// This widget is the home page of your application. It is stateful, meaning
// that it has a State object (defined below) that contains fields that affect
// how it looks.
// This class is the configuration for the state. It holds the values (in this
// case the title) provided by the parent (in this case the App widget) and
// used by the build method of the State. Fields in a Widget subclass are
// always marked "final".
final String title;
@override
_MyHomePageState createState() => _MyHomePageState();
}
class _MyHomePageState extends State<MyHomePage> {
int _counter = 0;
void _incrementCounter() {
setState(() {
// This call to setState tells the Flutter framework that something has
// changed in this State, which causes it to rerun the build method below
// so that the display can reflect the updated values. If we changed
// _counter without calling setState(), then the build method would not be
// called again, and so nothing would appear to happen.
_counter++;
});
#### last
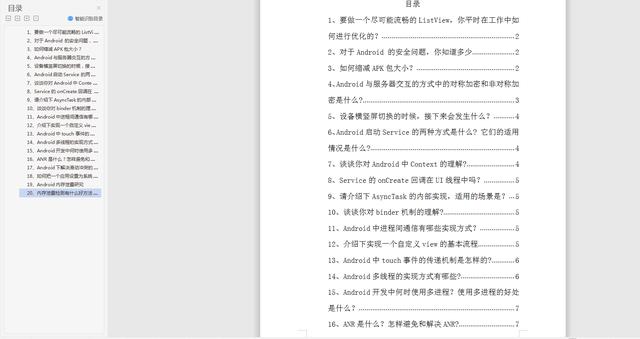
Considering the length of the article, I have made these questions and answers, as well as the problems I have encountered in my interview for many years and some interview materials PDF file
**[CodeChina Open source projects:< Android Summary of study notes+Mobile architecture video+Real interview questions for large factories+Project practice source code](https://codechina.csdn.net/m0_60958482/android_p7)**
It's done PDF file
**[CodeChina Open source projects:< Android Summary of study notes+Mobile architecture video+Real interview questions for large factories+Project practice source code](https://codechina.csdn.net/m0_60958482/android_p7)**
[External chain picture transfer...(img-b4rj9mcb-1630845135580)]
[External chain picture transfer...(img-peLYhAlN-1630845135581)]
Like friends can follow, forward, like, thank you!