We have learned how to use the Spring Security framework. In this chapter, we need to apply the Spring Security framework to the background system for permission control. Its essence is authentication and authorization.
To carry out authentication and authorization, we need to support the seven tables involved in the permission model mentioned in the previous course, because user information, permission information, menu information, role information, and association information are all stored in these seven tables, which means that the data in these tables are the basis for our authentication and authorization. Therefore, before authentication and authorization, we need to manage these data, that is, we need to develop the following functions:
1. Authority data management (add, delete, modify and query)
2. Menu data management
3. Role data management (add, delete, modify, query, role associated permissions, role context menu)
4. User data management (add, delete, modify and query, user association role)
In view of the time relationship, we no longer implement these data management code development. We can directly import the data into the database.
1, Applying Spring Security in the project
1.1 import Spring Security environment
Step 1: in health_parent parent project pom.xml Import maven coordinates of Spring Security in (imported when building the project environment)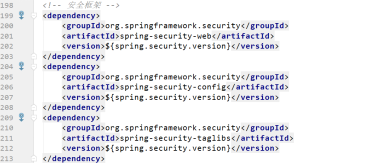
Step 2: in health_backend project web.xml The DelegatingFilterProxy is configured in the file to integrate the Spring Security framework
<!--Delegate filters for integrating other frameworks-->
<filter>
  <!--integration spring security When, the name of this filter is fixed springSecurityFilterChain-->
  <filter-name>springSecurityFilterChain</filter-name>
  <filter-class>org.springframework.web.filter.DelegatingFilterProxy</filter-class>
</filter>
<filter-mapping>
  <filter-name>springSecurityFilterChain</filter-name>
  <url-pattern>/*</url-pattern>
</filter-mapping>
1.2 achieve certification and authorization
Step 1: in health_ In the backend project, Spring Security user service is provided according to the requirements of Spring Security framework, and the user details service interface is implemented.
package com.oracle.service;

import com.alibaba.dubbo.config.annotation.Reference;
import com.oracle.pojo.Permission;
import com.oracle.pojo.Role;
import com.oracle.pojo.User;
import org.springframework.security.core.GrantedAuthority;
import org.springframework.security.core.authority.SimpleGrantedAuthority;
import org.springframework.security.core.userdetails.UserDetails;
import org.springframework.security.core.userdetails.UserDetailsService;
import org.springframework.security.core.userdetails.UsernameNotFoundException;

import java.util.ArrayList;
import java.util.List;

public class SpringSecurityUserService implements UserDetailsService {

    @Reference
    UserService userService;

    @Override
    public UserDetails loadUserByUsername(String username) throws UsernameNotFoundException {
        //1. Search user information according to user name
        User user = userService.findUserByUsername(username);
        if(user==null){
            return null;
        }
        //2. Encapsulate the permissions and roles found from the database into the spring security framework and return them
        List<GrantedAuthority> list=new ArrayList<>();
        for (Role role : user.getRoles()) {
            list.add(new SimpleGrantedAuthority(role.getKeyword()));
            for (Permission permission : role.getPermissions()) {
                list.add(new SimpleGrantedAuthority(permission.getKeyword()));
            }
        }
        return new org.springframework.security.core.userdetails.User(username,user.getPassword(),list);
    }
}
Step 2: create user service interface, service implementation class, Dao interface, Mapper mapping file, etc
//In health_ Create an interface under the interface project
package com.oracle.service;

import com.oracle.pojo.User;

public interface UserService {
    //Find user information based on user name
    User findUserByUsername(String username);
}
//UserServiceIpml
package com.oracle.service;

import com.alibaba.dubbo.config.annotation.Service;
import com.oracle.dao.PermissionDao;
import com.oracle.dao.RoleDao;
import com.oracle.dao.UserDao;
import com.oracle.pojo.Permission;
import com.oracle.pojo.Role;
import com.oracle.pojo.User;
import org.springframework.beans.factory.annotation.Autowired;
import org.springframework.transaction.annotation.Transactional;

import java.util.Set;

@Service(interfaceClass = UserService.class)
@Transactional
public class UserServiceImpl implements UserService {

    @Autowired
    UserDao userDao;

    @Autowired
    RoleDao roleDao;

    @Autowired
    PermissionDao permissionDao;

    @Override
    public User findUserByUsername(String username) {
        //Find basic user information based on user name
        User user = userDao.findByUsername(username);
        if(user==null){
            return null;
        }
        //Get the user role information according to the user id
        Set<Role> roles=roleDao.findRoleByUserId(user.getId());
        //If the user role is not empty, traverse the role to get the permission information of the corresponding role and encapsulate it in the role
        if(roles!=null||roles.size()>0){
            for (Role role : roles) {
                Set<Permission> permissions=permissionDao.findPermissionByRoleId(role.getId());
                if(permissions!=null||permissions.size()>0){
                    role.setPermissions(permissions);
                }
            }
            user.setRoles(roles);
        }
        return user;
    }
}
//UserDao and corresponding Mapper files
public interface UserDao {
     User findByUsername(String username);
}
//UserDao and corresponding Mapper files
<mapper namespace="com.bianyi.dao.UserDao">
    <select id="findByUsername" parameterType="String" resultType="com.bianyi.pojo.User">
          select * from t_user where username = #{username}
    </select>
</mapper>
//RoleDao and corresponding Mapper file
public interface RoleDao {
    Set<Role> findByUserId(int id);
}
//RoleDao and corresponding Mapper files
<mapper namespace="com.bianyi.dao.RoleDao">
    <select id="findByUserId" parameterType="int" resultType="com.bianyi.pojo.Role">
        SELECT *  FROM t_role WHERE  id  IN(
              SELECT role_id  FROM t_user_role WHERE user_id=#{userId})
    </select>
</mapper>
//PermissionDao and corresponding Mapper file
public interface PermissionDao {
    Set<Permission> findByRoleId(int roleId);
}
//PermissionDao and corresponding Mapper files
<mapper namespace="com.bianyi.dao.PermissionDao">
    <select id="findByRoleId" parameterType="int" resultType="com.bianyi.pojo.Permission">
        SELECT *  FROM t_permission WHERE id IN(
              SELECT  permission_id FROM t_role_permission WHERE role_id=#{roleId}
    )
    </select>
</mapper>
Step 3: modify health_ In backend project springmvc.xml File, modify the package path of dubbo batch scan
<!--Batch scan-->
<dubbo:annotation package="com.oracle" />
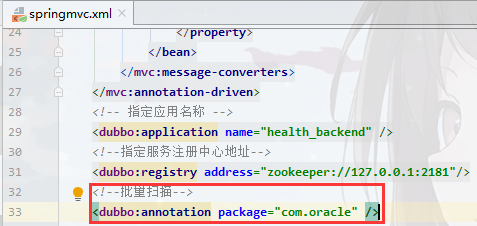
Note: the original package scanned here is com.oracle.controller The purpose of the com. oracle package is to scan the spring securityuservice defined above, because the service named UserService needs to be called remotely through dubbo in the loadUserByUsername method of spring securityuservice.
Step 4: in health_ Provide spring in backend project- security.xml configuration file
<?xml version="1.0" encoding="UTF-8"?>
<beans xmlns="http://www.springframework.org/schema/beans"
       xmlns:xsi="http://www.w3.org/2001/XMLSchema-instance"
       xmlns:context="http://www.springframework.org/schema/context"
       xmlns:dubbo="http://code.alibabatech.com/schema/dubbo"
       xmlns:mvc="http://www.springframework.org/schema/mvc"
       xmlns:security="http://www.springframework.org/schema/security"
       xsi:schemaLocation="http://www.springframework.org/schema/beans
       http://www.springframework.org/schema/beans/spring-beans.xsd
       http://www.springframework.org/schema/mvc
       http://www.springframework.org/schema/mvc/spring-mvc.xsd
       http://code.alibabatech.com/schema/dubbo
       http://code.alibabatech.com/schema/dubbo/dubbo.xsd
       http://www.springframework.org/schema/context
       http://www.springframework.org/schema/context/spring-context.xsd
       http://www.springframework.org/schema/security
       http://www.springframework.org/schema/security/spring-security.xsd">

    <!--Configure which resources can be accessed anonymously (without logging in)-->
    <security:http security="none" pattern="/login.html"></security:http>
    <security:http security="none" pattern="/css/**"></security:http>
    <security:http security="none" pattern="/img/**"></security:http>
    <security:http security="none" pattern="/js/**"></security:http>
    <security:http security="none" pattern="/plugins/**"></security:http>
    <!--
        auto-config:Automatic configuration, if set to true,Indicates that some default configurations are automatically applied. For example, the framework will provide a default login page
        use-expressions:Use or not spring security Provides an expression to describe permissions
    -->
    <security:http auto-config="true" use-expressions="true">
        <security:headers>
            <!--Settings in the page can be accessed through iframe Access to the protected page is not allowed by default-->
            <security:frame-options policy="SAMEORIGIN"></security:frame-options>
        </security:headers>
        <!--Configure interception rules,/** Indicates that all requests are blocked-->
        <!--
            pattern:Describe interception rules
            asscess:Specify the required access roles or permissions
        -->
        <!--As long as the authentication is passed, you can access it-->
        <security:intercept-url pattern="/pages/**"  access="isAuthenticated()" />

        <!--If we want to use the page specified by ourselves as the login page, we must configure the login form.The login form request submitted by the page is handled by the framework-->
        <!--
            login-page:Specify login page access URL
        -->
        <security:form-login
                login-page="/login.html"
                username-parameter="username"
                password-parameter="password"
                login-processing-url="/login.do"
                default-target-url="/pages/main.html"
                authentication-failure-url="/login.html"></security:form-login>

        <!--
          csrf: corresponding CsrfFilter filter
          disabled: Enable CsrfFilter Filter, if you use a custom login page, you need to turn this off, otherwise the login operation will be disabled (403)
        -->
        <security:csrf disabled="true"></security:csrf>

        <!--
          logout: Log out
          logout-url: Request path corresponding to logout operation
          logout-success-url: Exit the jump page after login
        -->
        <security:logout logout-url="/logout.do"
                         logout-success-url="/login.html" invalidate-session="true"/>

    </security:http>

    <!--Configure authentication manager-->
    <security:authentication-manager>
        <!--Configure authentication provider-->
        <security:authentication-provider user-service-ref="springSecurityUserService">
            <!--The object that specifies the degree password to encrypt-->
            <security:password-encoder ref="passwordEncoder"></security:password-encoder>
        </security:authentication-provider>
    </security:authentication-manager>

    <!--Configure password encryption object-->
    <bean id="passwordEncoder"
          class="org.springframework.security.crypto.bcrypt.BCryptPasswordEncoder" />

    <!--Enable annotation mode permission control-->
    <security:global-method-security pre-post-annotations="enabled" />

    <bean id="springSecurityUserService" class="com.oracle.service.SpringSecurityUserService"></bean>
</beans>
Step 5: in springmvc.xml Introducing spring into the file- security.xml file
<import resource="spring-security.xml"></import>
Step 6: add a permission control annotation to the Controller method. Here, take CheckItemController as an example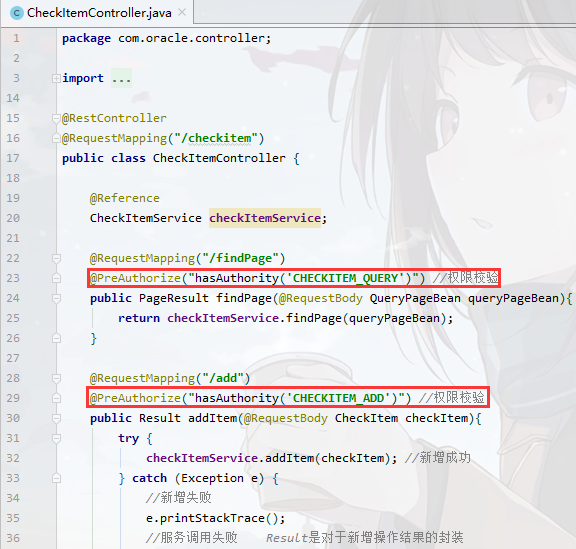
Step 7: modify the page. If you do not have permission, you will be prompted to set the information checkitem.html For example, handleDelete method in
//Insufficient permission prompt
showMessage(r){
    if(r == 'Error: Request failed with status code 403'){
        //Insufficient authority
        this.$message.error('No access');
        return;
    }else{
        this.$message.error('unknown error');
        return;
    }
},

1.3 display user name
Previously, we have completed the authentication and authorization operations. If the user authentication is successful, the user name of the current user needs to be displayed on the page. After successful authentication, Spring Security will save the user information to the context object provided by the framework, so here we can call the API provided by the Spring Security framework to obtain the current user's username and display it on the page.
Implementation steps:
Step 1: in main.html Modify the page, define the user name model data, display the user name based on VUE data binding, and send an ajax request to get the user name.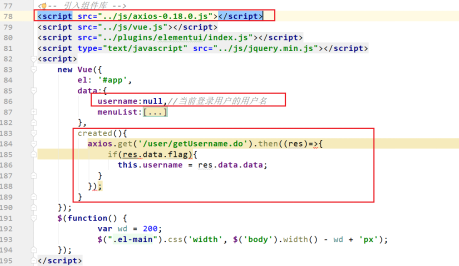
Step 2: create UserController and provide getUsername method
package com.oracle.controller;

import com.oracle.constant.MessageConstant;
import com.oracle.entity.Result;
import org.springframework.security.core.context.SecurityContextHolder;
import org.springframework.security.core.userdetails.User;
import org.springframework.web.bind.annotation.RequestMapping;
import org.springframework.web.bind.annotation.RestController;

@RestController
@RequestMapping("/user")
public class UserController {
    //Get the user's login name
    @RequestMapping("getUserName")
    public Result getUserName(){
        //When Spring security completes authentication, it will save the current user information to the context object provided by the framework
        User user = (User) SecurityContextHolder.getContext().getAuthentication().getPrincipal();
        if(user!=null){
            String username = user.getUsername();
            return new Result(true, MessageConstant.GET_USERNAME_SUCCESS,username);
        }
        return new Result(false, MessageConstant.GET_USERNAME_FAIL);
    }
}
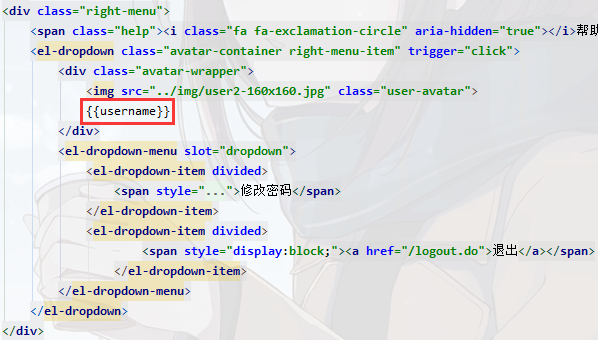
1.4 user exit
Step 1: in main.html Add a hyperlink to the Exit menu provided in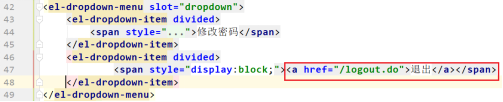
Step 2: in spring-security.xml Configuration in file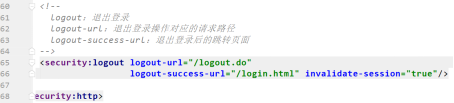
2, Graphic report ecarts
3.1 introduction to echarts
ECharts, abbreviated from Enterprise Charts, is an open source data visualization tool implemented by JavaScript from Baidu. It can run smoothly on PC and mobile devices. It is compatible with most of the current browsers (IE8/9/10/11, Chrome, Firefox, Safari, etc.), and the underlying layer relies on Lightweight vector graphics library ZRender provides intuitive, interactive and highly personalized data visualization chart.
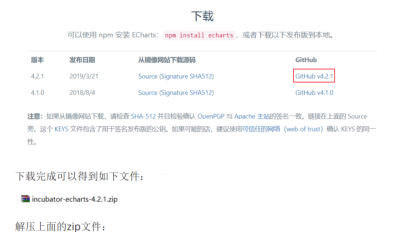
Official website: https://echarts.baidu.com/
Download address: https://echarts.baidu.com/download.html
We just need to change the echarts.js The file is imported into the page and can be used
2.2 five minutes to start ECharts
We can refer to the official 5-minute echarts document to experience the usage of echarts. The address is as follows: https://www.echartsjs.com/tutorial.html#5%20%E5%88%86%E9%92%9F%E4%B8%8 A%E6%89%8B%20ECharts
Step 1: create html page and import echarts.js file
<!--introduce ECharts file-->
<script src="echarts.js"></script>
Step 2: prepare a DOM container with width and height in the page.
<body>
  	<!--by ECharts Prepare one with size (width and height) DOM-->
	<div id="main" style="width: 600px;height:400px;"></div>
</body>
Step 3: Pass echarts.init Method to initialize an ecrats instance and generate a simple histogram through setOption method
<script>
    // Initialize the echarts instance based on the prepared dom
    var myChart = echarts.init(document.getElementById('main'));
    // Specify configuration items and data for the chart
    var option = {
        title: {
            text: 'ECharts Introductory examples'
        },
        tooltip: {},
        legend: {
            data:['sales volume']
        },
        xAxis: {
            data: ["shirt","cardigan","Chiffon shirt","trousers","high-heeled shoes","Socks"]
        },
        yAxis: {},
        series: [{
            name: 'sales volume',
            type: 'bar',
            data: [5, 20, 36, 10, 10, 20]
        }]
    };
    // Use the configuration items and data you just specified to display the chart.
    myChart.setOption(option);
</script>
The results are as follows: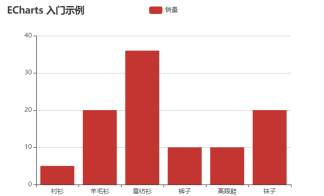
2.3 view the official example of ECharts
Ecarts provides many official examples, which can be used to check the display effect and usage. Official address: https://www.echartsjs.com/examples/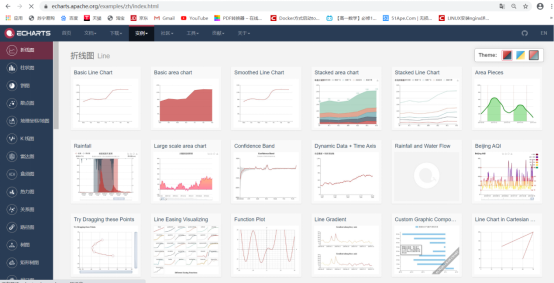
You can click a specific figure to jump to the editing page. The source code (js part of the source code) is displayed on the left side of the editing page, and the chart effect is displayed on the right side, as follows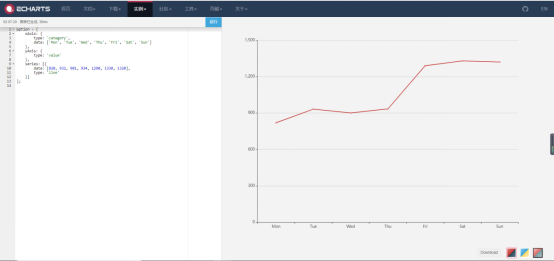
To view the full code, click the Download button in the lower right corner to Download the full page locally. Through the official case, we can find that the key point of using ECharts to display the chart effect is to determine the data format required by the chart, and then provide data according to the data format. We don't need to pay attention to how the effect is rendered. In practical application, the data we want to show is often stored in the database, so we can send ajax request to get the data in the database and turn it into the data needed by the chart.
3, Broken line chart of number of members
Membership information is the core data of medical institutions, and the number of members and growth can reflect part of the operation of the organization. Through the line chart, we can directly reflect the growth trend of the number of members. In this chapter, we need to show the total number of members in each month in the past year. The display effect is as follows: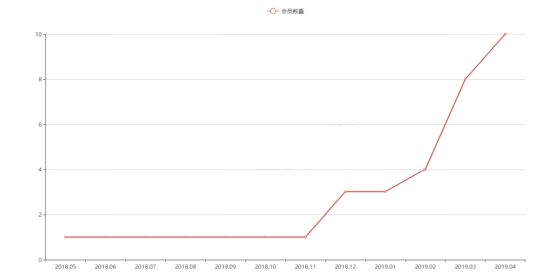
3.2 improve the page
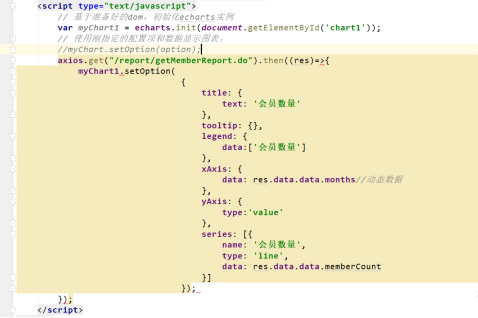
The page corresponding to the broken line chart of the number of members is / pages/report_member.html .
<!DOCTYPE html>
<html>
    <head>
        <!-- page meta -->
        <meta charset="utf-8">
        <meta http-equiv="X-UA-Compatible" content="IE=edge">
        <title>Mental health</title>
        <meta name="description" content="Health transmission">
        <meta name="keywords" content="Mental health">
        <meta content="width=device-width,initial-scale=1,maximum-scale=1,user-scalable=no" name="viewport">
        <!-- Introducing styles -->
        <link rel="stylesheet" href="../css/style.css">
        <script src="../plugins/echarts/echarts.js"></script>
    </head>
    <body class="hold-transition">
        <div id="app">
            <div class="content-header">
                <h1>statistical analysis<small>Number of members</small></h1>
                <el-breadcrumb separator-class="el-icon-arrow-right" class="breadcrumb">
                    <el-breadcrumb-item :to="{ path: '/' }">home page</el-breadcrumb-item>
                    <el-breadcrumb-item>statistical analysis</el-breadcrumb-item>
                    <el-breadcrumb-item>Number of members</el-breadcrumb-item>
                </el-breadcrumb>
            </div>
            <div class="app-container">
                <div class="box">
                    <!-- by ECharts Prepare one with size (width and height) DOM -->
                    <div id="chart1" style="height:600px;"></div>
                </div>
            </div>
        </div>
    </body>
    <!-- Import component library -->
    <script src="../js/vue.js"></script>
    <script src="../js/axios-0.18.0.js"></script>
    <script type="text/javascript">
        // Initialize the echarts instance based on the prepared dom
        var myChart1 = echarts.init(document.getElementById('chart1'));
        // Use the configuration items and data you just specified to display the chart.
        //myChart.setOption(option);
        axios.get("/report/getMemberReport.do").then((res)=>{
	        myChart1.setOption(
	          {
	                title: {
	                    text: 'Number of members'
	                },
	                tooltip: {},
	                legend: {
	                    data:['Number of members']
	                },
	                xAxis: {
	                    data: res.data.data.months//dynamic data
	                },
	                yAxis: {
	                    type:'value'
	                },
	                series: [{
	                    name: 'Number of members',
	                    type: 'line',
	                    data: res.data.data.memberCount
	                }]
	            });
        });
    </script>
</html>
3.3 import ecarts Library
Step 1: Set echarts.js Copy file to health_ Under the plugins directory of the backend project
Step 2: in report_member.html Page import echarts.js file
<script src="../plugins/echarts/echarts.js"></script>
3.4 import the broken line chart according to the official example

According to the data format requirements of the line chart, we send an ajax request, and the server needs to return the data in the following format: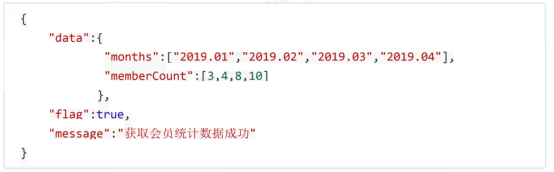
3.5 background code
1.Controller
In health_ Create ReportController and provide getMemberReport method in backend project
@RestController
@RequestMapping("/report")
public class ReportController {

    @Reference
    MemberService memberService;

    @RequestMapping("/getMemberReport")
    public Result getMemberReport(){
        //Gets the calendar instance of the current date
        Calendar calendar = Calendar.getInstance();
        calendar.add(Calendar.MONTH,-12);//Gets the date of the first 12 months of the current date
        List<String> list = new ArrayList<>();
        for(int i = 0;i<12;i++){
            calendar.add(Calendar.MONTH,1);
            list.add(new SimpleDateFormat("yyyy-MM").format(calendar.getTime()));
        }
        Map<String,Object> map = new HashMap<>();
        map.put("months",list);
        List<Integer> memberCount = memberService.findMemberCountByMonth(list);
        map.put("memberCount",memberCount);
        return  new Result(true, MessageConstant.GET_MEMBER_NUMBER_REPORT_SUCCESS,map);
    }

    public static void main(String[] args) throws Exception{
        Calendar calendar = Calendar.getInstance();
        calendar.add(Calendar.MONTH,-12);//Gets the date of the first 12 months of the current date
        String time = DateUtils.parseDate2String(calendar.getTime());
        System.out.println(time);
    }
}
2. Service interface
Extend the method findMemberCountByMonth in the MemberService service interface
List<Integer> findMemberCountByMonth(List<String> list);
3. Service implementation class
Implementation of findMemberCountByMonth method in MemberServiceImpl service implementation class
@Override
public List<Integer> findMemberCountByMonth(List<String> month) {
    List<Integer> list = new ArrayList<>();
    for(String m : month){
        m = m + "-31";//Format: April 31, 2019
        Integer count = memberDao.findMemberCountBeforeDate(m);
        list.add(count);
    }
    return list;
}
4.Dao interface
Extending the method findMemberCountBeforeDate in the MemberDao interface
Integer findMemberCountBeforeDate(String m);
5.Mapper mapping file
stay MemberDao.xml SQL statements are provided in the mapping file
<!--
Count the number of members according to the date, count the number of members before the specified date
-->
<select id="findMemberCountBeforeDate" parameterType="string"
resultType="int">
select count(id) from t_member where regTime <= #{m}
</select>