The biggest advantage of PyQt5 is that the interface can be made intuitively using qtdesigner, and then the code can be read directly, which saves the tedious steps of typesetting and so on, and the beauty of the interface is also beyond tk's reach.
When using QTdesigner, it's better to layout the interface after making the interface. Of course, you can run without using the layout, but in other computers, the resolution is different, which will lead to software display problems, and can't be solved according to the interface stretching. If you have laid out the layout, you can use the expansion and contraction of the interface to rearrange the layout of the interface. As for layout, you can select the target you want to layout and click layout. In layout, you can use more Horizontal Spacer and vertical spacer. Generally, I will make horizontal layout line by line and then make vertical layout as a whole.
First, you need to make a ui interface with QTdesigner, and then read the interface through python code.
1, Visual operation of UI file
The first method -- Reading UI files created by QTDesigner directly on python files
Direct read ui File, assume my ui The file name is"SL_manage.ui",So mine python The code should be:
#MainUi.py
from PyQt5 import QtWidgets, uic,QtCore,QtGui
import os
path = os.getcwd()
qtCreatorFile = path +os.sep+"ui"+os.sep+"SL_manage.ui"  # Enter file here.
Ui_MainWindow, QtBaseClass = uic.loadUiType(qtCreatorFile)
#_translate = QtCore.QCoreApplication.translate#
_translate = QtCore.QCoreApplication.translate This is mainly used for later UI Convenient change of font and color of interface text
//Create an object that is your entire form:
class MainUi(QtWidgets.QMainWindow, Ui_MainWindow):
#The first variable here is your window type, and the second is the window object.
#Here is the main window type. So set it to when QtWidgets.QMainWindow .
#When your window is a conversation box, you need to set it to: QtWidgets.QDialog
   def __init__(self):
       QtWidgets.QMainWindow.__init__(self)
       Ui_MainWindow.__init__(self)
       self.setupUi(self)
At this point, the form object has been created. Then, we need to use a function to create the object and display it. Then we need the following code:
#File name: ShowUi.py
from PyQt5 import QtWidgets, uic,QtCore,QtGui

if __name__ == "__main__":
    app = QtWidgets.QApplication(sys.argv)
    window = MainUi()   #Create form object
    window.show()    #Form display
    sys.exit(app.exec_())
If your program still has new windows, you can continue to write a form object in the same way, and then in your ShowUi.py We can create objects in, even in our MainUi.
The second way is to convert UI files directly into py files
Convert the UI file to a python file and make the same object call. The method is actually the same as the former. Here's how to convert the UI file:
The compiler I use is pycharm. There is an external tool in pycharm's toolbar class. You can fill the instructions into the external tool. In this way, you only need to drag the UI file into pacharm and run your tool to automatically generate python files, which can save the trouble of repeatedly typing instructions. The configuration is shown in the external tool of the toolbar.
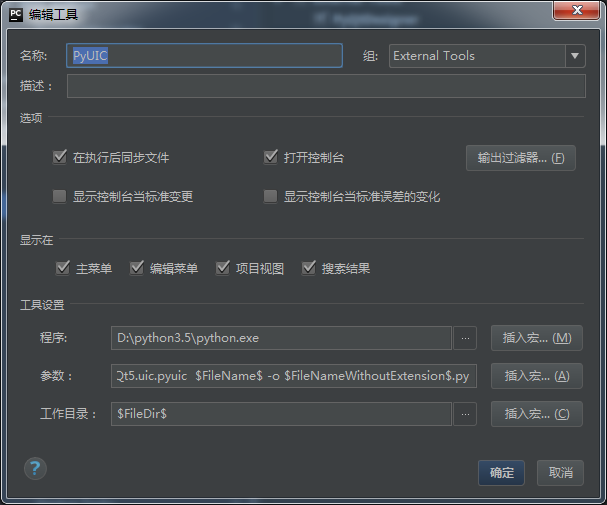
The configuration is as shown in the figure above. Name: user defined.
Write the program bar to the python.exe Documents. The parameter is: - M pyqt5 uic.pyuic $FileName$ -o $FileNameWithoutExtension$.py
It is to generate a python file with the same name as the current operation file.
The working directory is $FileDir $, which means the directory where the current file is located
Of course, if you don't want to use this tool, you like to manually tap the command, then you can open your cmd, or terminal, and enter
python -m path + pyqt5 uic.pyuic UI file path + name - o output py file path plus name
You will generate a python file here, but the python file can't actually generate a window directly. You need to perform code visualization operations as follows:
Let's say I've generated a main_menu.py "The content of the python file is basically as follows:
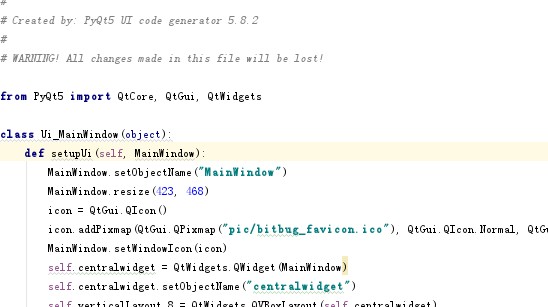
Here we can see that the python file creates a UI called_ The object of MainWindow, as you should have guessed, is exactly the interface we made. That is to say, our UI file is translated into a python object by a component of QT. What we need to do next is to reference this object in the python file as follows:
#First, you need to import the file of the object in the referenced python file, that is, main_menu.py
import main_menu   #Import the file of the object
Ui_MainWindow = main_menu.Ui_MainWindow#Specify Ui_MainWindow is main_ UI under menu file_ MainWindow object.

class CoperQt(QtWidgets.QMainWindow,Ui_MainWindow):#Create a Qt object
#The first variable here is your window type, and the second is the window object.
#Here is the main window type. So set it to when QtWidgets.QMainWindow .
#When your window is a conversation box, you need to set it to: QtWidgets.QDialog
    def __init__(self):
        QtWidgets.QMainWindow.__init__(self)  # Create main interface object
        Ui_MainWindow.__init__(self)#Main interface object initialization
        self.setupUi(self)  #Configure main interface objects

if __name__ == "__main__":
    app = QtWidgets.QApplication(sys.argv)
    window = CoperQt()#Create QT object
    window.show()#QT object display
    sys.exit(app.exec_())
In this way, your python project can be used directly without the UI file. The advantage is that you don't need to match the UI file with the EXE file when packaging it. For Qt operation, I'm going to talk about a few common and typical ones here. If you need to go deep, you need to consult relevant manuals and documents. I'm basically qualified for this kind of tools, not my main business.
2, Common controls and methods
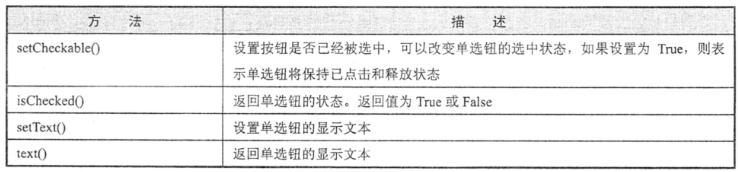
(1) Button
Common button classes include: QPushButton, QToolButton, QRadioButton, QCheckBox, all of which are inherited from the QAbstractButton class;
Status provided by QAbstractButton:
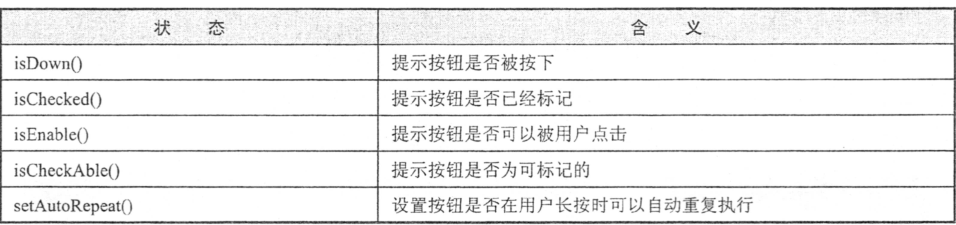
Signals provided:

a. QPushButton
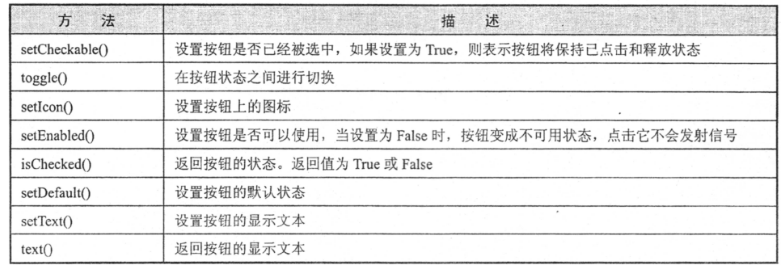
Common methods of QPushButton:
 Button
Button triggering uses the concept of slot and signal in QT, which we don't need to think of as complicated as it is. It just binds the event of button to a function. When the event is triggered, the function runs. The template code is as follows:
self.Button0 . clicked.connect ( self.start_find) Click event binding start of button 0_ Find function
 In addition to global variables, you can also use python's lambda to pass parameters to bind functions. For example, I want to pass in x:
self.Button0.clicked.connect(command=lambda:button_process(x))
b. QRadioButton
It also inherits from QAbstracButton Class, which provides a group of buttons and text labels for selection. The user can select one item, and the label user displays the corresponding text information. You can switch on or off, i.e. checked or unchecked. Multiple qradiobuttons are a button combination. If multiple exclusive buttons are combined, they need to be placed in the QGrouopBox or QButtonGroup. When switching on or off, they will send toggled Signal, bind this signal, when the button state changes, trigger the corresponding behavior;
Common methods are as follows:
The clicked signal will send this signal every time the button is clicked. Generally, only the state change is triggered, so the toggled signal is more suitable for the monitoring of this state;
 Radio
Radio
The radio box is often used in practice. For example, when writing a software login interface, the radio box can be set to auto login, remember password, etc
The usage of radio box is as follows:
self.radioButton.clicked.connect(self.change_radio)  # Radio button select binding function
self.radioButton.hide()  # Radio box 2 hidden
self.radioButton.setChecked(True)#Check the radio box, otherwise False
self.radioButton.isChecked()   #If the radio box is checked, check to return True or False
Radio box supplement
Note here for the radio box: the single radio box cannot be used normally. Suppose I create a radio box to use as the password remembering button. In fact, if I click the radio box once, I will select the password remembering button. However, if I click the radio box again, it is still in the selected state and will not be cancelled, because the system default requires that only one radio box be selected. So here's a trick: create one more radio box and hide it, so that the two can be selected alternately, so as to achieve the effect of clicking to select and then clicking to cancel. In addition, a better way is to use the check box instead of the radio box
 check box
In QTdesigner, right-click the radio box and choose to change it into a check box. The operation of the check box is basically the same as that of the radio box. The only difference is that the check box can allow no one in an interface to be selected, or all of them to be selected. The check box is also square and the radio box is round.
(2) Timer QTimer
Then there is the Qt timer. This component is also very practical. It allows your interface to execute a function at a fixed time. The concept is basically the same as the interrupt of a single-chip microcomputer.
For example, when I display a time in the window, I need him to update the time information of the window every second. Then I need to set a window timer. The code is as follows:
    self.testTimer = QtCore.QTimer()  # Create timer
    self.testTimer.timeout.connect(self.show_time)  # Timing timeout event binding show_time function
    self.testTimer.start(1000)          #Timer every second
Here is show_time function:
    def show_time(self):
        self.time_now = time.strftime('%Y-%m-%d %H:%M:%S', time.localtime(time.time()))#
In the same way, we can also bind other functions to timers to let them run regularly. The same is true.
(3) Drop down options bar to configure comboBox
 Drop down options bar
The drop-down option bar is also very common when making UI, and its configuration is not difficult. Suppose the drop-down option bar is self.comboBox , the code is as follows:
The options bar has two identifications, one is the number index of each column (starting from 0), the other is the text content of each column text:
    self.comboBox.insertItem(0, self.tr("None")) ා the first option is inserted empty
    self.comboBox.insertItem(0, "x") the first option inserts the x character
    self.comboBox.currentText() read options bar text:
    self.comboBox.currentIndex() read option bar number:
    self.comboBox.setCurrentIndex() set current option bar display position: (by number)
    self.comboBox.setCurrentText() set current option bar display position: (through text)
    self.comboBox.clear() clear the elements in the current option box
Here's a tip on how to trigger an event without pressing a button when the options bar is selected. In fact, it is applied to the above timer. You can bind the timer to the option bar reading function. This function reads the value of the option bar every 200MS or 1s. In this way, the user can make a response as soon as he changes the option.
(4) Session window QMessager
Here is the simplest session window code:
header:Session window title
info: Session window content
def show_message(self,header = "explain",info = "nothing"):
        QtWidgets.QMessageBox.information(self,header,info,QtWidgets.QMessageBox.Yes | QtWidgets.QMessageBox.No)
# Using the information box

#Judge button (two buttons are displayed, yes or no)
QtWidgets.QMessageBox.Yes|QtWidgets.QMessageBox.No)
#OK key (display a key, OK)
# QtWidgets.QMessageBox.Ok
(5) File operation QFileDialog
In fact, file operation is basically similar to TK, which is to call the window to read the file path and name selected by the user, and then the user calls the os function to perform file operation. First, open the file. The basic code is as follows:
    def open_file(self):
        fileName1, filetype =QtWidgets.QFileDialog.getOpenFileName(self,
                                "Please open EXCEL file", path,"Text Files (*.xlsx;*.xls)")  # Set file extension filtering,
        # Pay attention to double semicolon interval
        if len(fileName1) == 0:
            return
        fileName1 = fileName1.replace('/', "\\")#File separator conversion required under win
        my_excel = EasyExcel(filename=fileName1)#This is my own excel reader. Create an excel reader here
        self.data_list = my_excel.get_content()#Read the contents of excel and return a list of dictionaries
        QtWidgets.QMessageBox.information(self,  # Using the information box
                                          "explain", "Data loaded successfully", QtWidgets.QMessageBox.Ok)
#The session window reminds you that the data is read successfully
Next, save the file:
    def save_file(self):  #Just get the path, the actual save needs to call the OS module
        fileName2, ok2 = QtWidgets.QFileDialog.getSaveFileName(self,
                            "file save","C:/","Text Files (*.xlsx);;Text Files (*.xls);;All Files (*)")
        #The address separator is changed. The address separator obtained by QT is /, while python is \ \, which needs to be replaced
        if not fileName2:
            return
        fileName2 = fileName2.replace('/',"\\")
        #Get the file path, and you need to fill in the next operation
(6) Table QtableWidget
 form
form
As a component that can be input and output, table is also very practical when it is used as a tool. Its basic usage is as follows:
self.tableWidget.setHorizontalHeaderLabels(key_list)#Set table header data
self.tableWidget.setColumnCount(x)           #Set the number of columns in the table
self.tableWidget.setRowCount(x)           #Set the number of rows in the table
self.tableWidget.horizontalHeader().setSectionResizeMode(QtWidgets.QHeaderView.ResizeToContents)   #Table size changes with content
self.tableWidget.setEditTriggers(QtWidgets.QAbstractItemView.NoEditTriggers)  # Table set to read only
self.tableWidget.setSelectionBehavior(QTableWidget.SelectRows)#Select row
self.table.setSelectionMode(QTableWidget.SingleSelection)#Select a single row
self.tableWidget.setAlternatingRowColors(True)#Alternate colors
self.tableWidget.verticalHeader().sectionClicked.connect(self.VerSectionClicked)  # Header click signal
self.tableWidget.horizontalHeader().sectionClicked.connect(self.HorSectionClicked)  # Header click signal
self.tableWidget.rowCount()#Returns the number of rows in the table
self.tableWidget.columnCount()#Returns the number of columns in the table
self.tableWidget.item(row,clo ).text()#Get the table data of row row row and clo column, starting from 0
self.tableWidget.clear()#If the form is empty, it will remain forever
QTableWidget.clearContents() Clear only table items, not headers.
self.tableWidget.setItem(row,col, QTableWidgetItem("content"))#Set the table content to the string "content"
self.tableWidget.insertColumn(self, int column) Insert a new column in a column.
self.tableWidget.insertRow(self, int row)Insert a new row in a row.
self.tableWidget.removeColumn(self, int column) remove column Column and its contents.
QTableWidget.removeRow(self, int row)Remove section row Lines and their contents.
QTableWidget.setShowGrid(False)#Don't show split lines
QTableWidget.hideRow(),hideColumn(),showRow(),showColumn()#Hide the corresponding row or column
How can I add other components to a TableWidget?
The following routine is to add the timeEdit component to the TableWidget
self.timeEdit = QtWidgets.QTimeEdit(Dialog)#Create a timeEdit
self.tableWidget.setCellWidget(0, 0, self.timeEdit)#Add timeedit to tableWidget
(7) Input box
The input box is mainly used to input human instructions or text in human-computer interaction. Its basic operation method is as follows:
 Input box
self.lineEdit.returnPressed.connect(self.check_info)  # Text bar carriage return binding function
self.lineEdit.setEchoMode(QtWidgets.QLineEdit.Password)#Set to password mode, that is, the input is displayed as a solid circle
self.lineEdit.setEchoMode(QtWidgets.QLineEdit.Normal)#Set to normal mode (default)
self.lineEdit.setText("hello world")      # Set input text
self.lineEdit.text()#Return the text content of the input box
self.lineEdit.show()#Show text box
self.lineEdit.hide()#Hide text box
self.lineEdit.clear()#Empty text box
(8) Progress bar
 progress bar
The progress bar is generally used together with the timer. Use the timer to bind a function to get the progress and then change the value of the progress bar, as follows:
self.pbar.setValue(self.step) #Set progress bar progress 1 to 1%
(9) Menu bar
The main functions of the menu bar are triggered by binding functions:
#Open_file is oepn in the menu bar_ File button
self.Open_file.triggered.connect(self.open_file)
(10) Title, label
 label
label
Title label is mainly used for text title or description on software
self.label.setText(
translate("MainWindow","<html><head/><body><p><span style="
                        "\" font-size:18pt; color:#0000ff;\">
{}
</span></p></body></html>"
).format(self.time_now))
Tag addition: Here's the function of translate function. In fact, I'm not familiar with QT and I'm not going to learn more about it. So when I update the Label in the program, I copy the font type originally set in QTdesigner directly and write it into this function. Otherwise, you will find that the font format originally set is complete after you directly use setText function You can also use pyqt5's built-in Font modification function to modify it without using the translate function.
timeEdit&&dateEdit&&datetimeEdit
self.timeEdit.setDisplayFormat('hh:mm')#set time format
now_day = time.strftime("%Y-%m-%d", time.localtime())
self.dateEdit.setDate(QDate.fromString(now_day, 'yyyy-MM-dd'))
time = QtCore.QTime.toString(self.timeEdit.time(),"hh:mm")#Get the time and convert it to a string
now_time = time.strftime("%Y-%m-%d %H:%M:%S", time.localtime())
self.dateTimeEdit.setDateTime(QDateTime.fromString(now_time, 'yyyy-MM-dd hh:mm:ss'))#
time = int(QtCore.QDateTime.toTime_t(self.dateTimeEdit.dateTime()))#Get time and convert to timestamp
self.dateTimeEdit.setDateTime(QtCore.QDateTime.fromTime_t(time stamp))#Set the time displayed by timeedit through time stamp
self.dateTimeEdit.setMaximumDateTime(QtCore.QDateTime(QtCore.QDate(2106, 2, 7), QtCore.QTime(14, 28, 15)))#Set maximum time
(11) Create a thread in pyqt
Threads are often used in pyqt programming, because some time-consuming operations, if not put into the thread, will cause the qt interface to refresh and jam, or even no response.
(I'd like to remind you that you can also use the thread module of python for multithreading, but because of gil lock, you can only use a single core. However, qthread is implemented in c + +, so it is recommended to use qthread to write multithreading (if conditions permit)
from PyQt5.QtCore import QThread
class newThread(QtCore.QThread):
    def __init__(self,parent=None):
        super(readThread, self).__init__(parent)

    def run(self):
        while True:
            print("hello")
            time.sleep(10)
#The above operation creates a new thread,
The job is to print a hello every ten seconds.
Of course, if you want to enable the thread, you need to perform the following operations in the qt main program:

self.new_thread = newThread() -- create thread object
 self.new_thread.start() on.
#When it is turned on, your qt will start a thread,
And run within the while loop of run.
If you want to interrupt this thread.
Then you can break out of while(1) in the form of flag bits.
To add a callback function to a thread in qt:
def updateFigure():
    try:
        GetLastStatus = getLastStatus()#
        GetLastStatus.finished_signal.connect(success)#Callback bind success function
        GetLastStatus.error_signal.connect(error)#Callback binding failure function
        GetLastStatus.start()#Program start
    except Exception as e:
        print(e)

def success()
    print("Success")

def error()
    print("error")

class getLastStatus(QThread):
    finished_signal = pyqtSignal(str)#Create completion signal
    error_signal = pyqtSignal(str)#Create error signal
    def __init__(self, parent=None):
        super().__init__(parent)

    def run(self):#Override built-in run functions
        if self._test() == True:
            self.finished_signal.emit('done')
            #Send completion signal if complete
        else:
            self.error_signal.emit("error")
            #If there is an error, send an error signal

    def _test(self):
        #return True
          return False
(12) Embed Matplotlib in pyqt
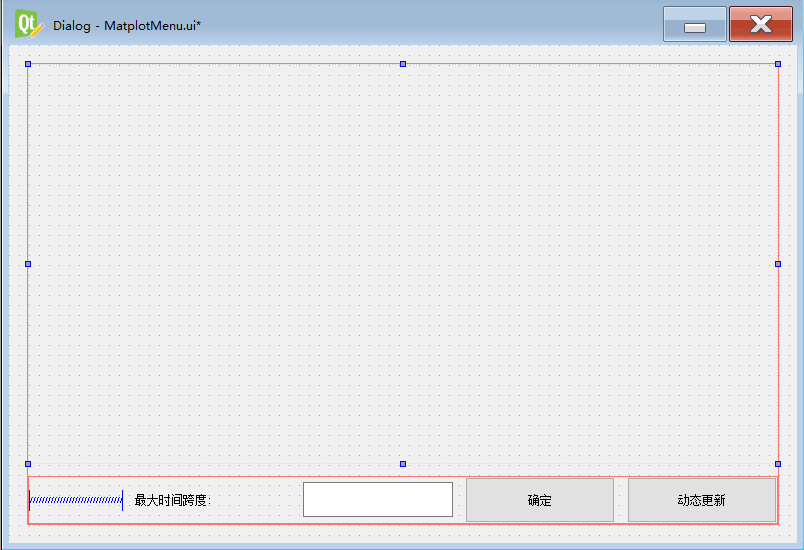
First, create a UI file called MatplotMenu, add a QFrame component to the file, and then create a LineEdit and two buttons. The effect is shown in the following figure. Then, using the above method, generate PY file.
Next, create a file named MatplotObject.py Fill in the following code.
from  PyQt5.QtWidgets import *
from PyQt5.QtCore import *
import Ui.MatplotMenu as MatplotMenu #MatplotMenu in the UI directory
import matplotlib
matplotlib.use("Qt5Agg")  # Claim to use QT5
from matplotlib.backends.backend_qt5agg import FigureCanvasQTAgg as FigureCanvas
from matplotlib.figure import Figure
import matplotlib.dates as mdate
import datetime

Ui_MainDialog = MatplotMenu.Ui_Dialog


class MatplotMenu(QDialog,Ui_MainDialog):#Create a session box object
    def __init__(self):
        super(MatplotMenu,self).__init__(parent)
        self.title = 'Matplot test'#Set form title
        self.setupUi(self)
        self._createCanvas()#Create canvas
        self._createLayouts()#Configuration components
        self.show()#Display components
        self._updateFigure()#Update graph
        self.timer = QTimer(self)#Create timer for timing update
        self.timer.timeout.connect(self._updateFigure)#Bind update function
        self.pushButton_2.clicked.connect(self._reFresh)#Button 2 bind start update function

    def closeEvent(self, event):#Rewrite session box turn off signal generation function
        reply = QMessageBox.question(self, 'Message',
                                     "Are you sure to quit?", QMessageBox.Yes, QMessageBox.No)#Generate reminder session interface
        if reply == QMessageBox.Yes:#If confirmed
            if self.timer.isActive():#Timer active
                self.timer.stop()#Stop Timer
                print("Stop Timer ")
            else:
                print("No need to stop timer")
            event.accept()#Close event acceptance
        else:
            event.ignore()#Discard close event

    def _reFresh(self):#Refresh button binding function
        if self.timer.isActive() == True:#If timer is active
            self.timer.stop()#off timer
            self.pushButton_2.setText("Real time update")#Set button character
            print("off timer ......")
        else:
            self._updateFigure()#Refresh interface
            self.timer.start(30000)#Turn on timer
            self.pushButton_2.setText("update paused")#Set button character
            print("Turn on timer......")

    def _updateFigure(self):
        try:
            self._showLine()#Show curves
        except Exception as e:
            print(e)

    def _showLine(self):
        self._canvas.refreshLine()

    def _errorProcess(self):
        pass

    def _createCanvas(self):
        self.setWindowTitle(self.title)#Set title
        # self.setGeometry(self.left, self.top, self.width, self.height)
        self._canvas = PlotCanvas(self, width=5, height=4)#Create a matplot object

    def _createLayouts(self):
        layout = QHBoxLayout(self.frame)#Select frame component
        layout.setContentsMargins(0, 0, 0, 0)
        layout.addWidget(self._canvas) # Add the matplot object to the QT component, which is the most important function for binding matplotlib to QT

class PlotCanvas(FigureCanvas):#Create a matplot object
    def __init__(self, parent=None, width=5, height=4, dpi=100):
        self._Font = {
            'family': 'SimHei',
            'weight': 'bold',
            'size': 15}
        fig = Figure(figsize=(width, height), dpi=dpi)
        FigureCanvas.__init__(self, fig)
        self.setParent(parent)
        FigureCanvas.setSizePolicy(self,QSizePolicy.Expanding,QSizePolicy.Expanding)
        FigureCanvas.updateGeometry(self)
        self._ax = self.figure.add_subplot(111)

    def refreshLine(self):
        x = [];y = []#Create your own data here
        try:
            self._ax.plot(x,y, '--r*', label="Matplot Test")#mapping
            self._ax.set_title('Matplot Test', fontdict=self._Font)
            self._ax.set_xlabel("X axis", fontdict=self._Font)
            self._ax.set_ylabel("Y axis", fontdict=self._Font)
            self._ax.xaxis.grid(True, which='major')  # Use major scale for grid of x axis
            self._ax.yaxis.grid(True, which="major")
            self.draw()
        except Exception as e:
            print(e)
    def plot(self):
        import datetime
        price_list = [
            {
                "PRICE" : "0.0",
                "Time" : "2018-01-22 18:56:00"},
            {
                "PRICE": "0.16461536288261414",
                "Time": "2018-01-22 20:07:18"
            },
            {
                "PRICE": "0.0",
                "Time": "2018-01-22 20:19:30"
            },
            {
                "PRICE": "0.01397849153727293",
                "Time": "2018-01-22 20:31:50"
            }
                    ]
        Font = {'family': 'SimHei',
                'weight': 'bold',
                'size': 15}
        x = []
        y = []  # Define two lists
        for item in price_list:  # Take out all information of a single year every year
            y.append(float(item["PRICE"]))  # Price value added to y list
            x.append(datetime.datetime.strptime(item["Time"], "%Y-%m-%d %H:%M:%S"))
            # print(type(datetime.datetime.strptime(item["Time"], "%Y-%m-%d %H:%M:%S")))

        self._ax = self.figure.add_subplot(111)
        self._ax.plot(x,y, '--r*',label = "NH3")
        self._ax.set_title('Test curve',fontdict = self._Font)
        self._ax.set_xlabel("time(\"year-month-Day hour:branch:second\")",fontdict=self._Font)
        self._ax.set_ylabel("Price($)",fontdict=self._Font)
        self._ax.xaxis.set_major_formatter(mdate.DateFormatter('%Y-%m-%d %H:%M:%S'))
        self._ax.xaxis.grid(True, which='major')  # Use major scale for grid of x axis
        self._ax.yaxis.grid(True, which="major")
        # self._ax.xaxis.set_xticklabels(rotation=75)
        # for label in self._ax.get_xticklabels() + self._ax.get_yticklabels():
        #     label.set_fontsize(6)
            # label.set_bbox(dict(facecolor='green', edgecolor='None', alpha=0.7))

        # self._ax.xticklabels(rotation=75)
        # self.xticks(rotation=75)
        self.draw()

if __name__ == "__main__":
    import sys
    app =QApplication(sys.argv)
    window = App()#Create QT object
    window.show()#QT object display
    sys.exit(app.exec_())