
Author: little potato biubiubiu
Blog Park: https://www.cnblogs.com/HouJiao/
Nuggets: https://juejin.im/user/58c61b4361ff4b005d9e894d
The official account of WeChat: the idea of a broken potato (scanning the code, attracting a cat, listening to stories together, learning front-end technology)
The content of the author's article comes from his own practice. If you think it will help you, you can praise it or leave a valuable comment
preface
In the daily development, the menu bar in the project has been implemented. If you need to add a new menu, you only need to add a new route in the routing configuration to add the menu.
I believe that you and I, sometimes eager to try their own to achieve a menu bar. Today I will share the whole idea and code of my own menu bar.
This article focuses on summarizing and sharing a recursive implementation of the menu bar. Code optimization, menu permissions, etc. are not within the scope of this article, and some tips will be made in the relevant parts of the article. Some writing methods that are not recommended are not recommended for your reference.
At the same time, there may be some details of the function that have not been processed or mentioned and forgotten to know.
Final effect
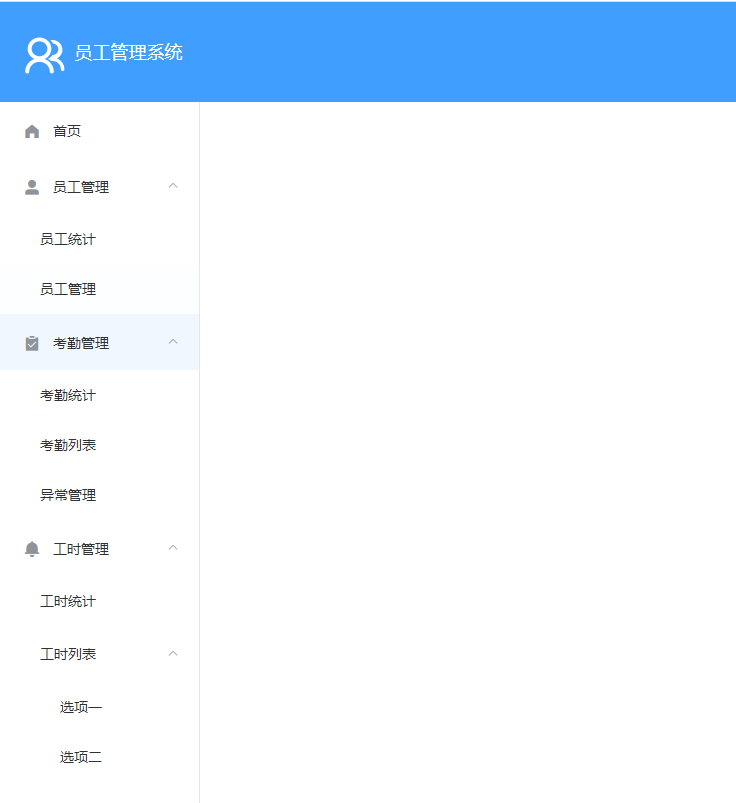
The menu bar in this implementation includes three types: first level menu, second level menu and third level menu, which can basically cover different menu requirements in the project.
Later, the menu will be implemented step by step from easy to difficult.
Simple implementation
We all know that element provides NavMenu Navigation menu component, so we will do a simple implementation of this menu bar directly according to the document.
The basic layout is as follows:
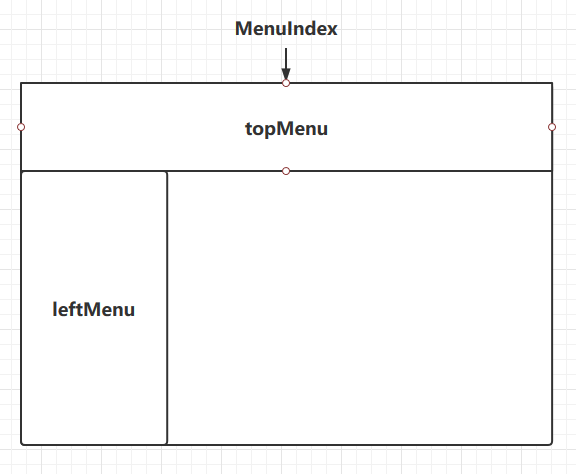
Menu home - menuIndex
The first thing to realize is the component of menu home page, which is very simple to implement according to the previous layout and reference to official documents.
<!-- src/menu/menuIndex.vue -->
<template>
    <div id="menu-index">
        <el-container>
            <el-header>
                <TopMenu :logoPath="logoPath" :name="name"></TopMenu>
            </el-header>
            <el-container id="left-container">
                <el-aside width="200px">
                    <LeftMenu></LeftMenu>
                </el-aside>
                <el-main>
                    <router-view/>
                </el-main>
            </el-container>
        </el-container>
    </div>
</template>
<script>
import LeftMenu from './leftMenu';
import TopMenu from './topMenu';
export default {
    name: 'MenuIndex',
    components: {LeftMenu, TopMenu},
    data() {
        return {
            logoPath:  require("../../assets/images/logo1.png"),
            name: 'Employee management system'
        }
    }
}
</script>
<style lang="scss">
    #menu-index{
        .el-header{
            padding: 0px;
        }
    }
</style>
Top menu bar - topMenu
The top menu bar is mainly a logo and product name.
Logical code is also very simple, I directly paste the code.
<!-- src/menu/leftMenu.vue -->
<template>
    <div id="top-menu">
        <img class="logo" :src="logoPath" />
        <p class="name">{{name}}</p>
    </div>
</template>
<script>
export default {
    name: 'topMenu',
    props: ['logoPath', 'name']
}
</script>
<style lang="scss" scoped>
    $topMenuWidth: 80px;
    $logoWidth: 50px;
    $bg-color: #409EFF;
    $name-color: #fff;
    $name-size: 18px;
    #top-menu{
        height: $topMenuWidth;
        text-align: left;
        background-color: $bg-color;
        padding: 20px 20px 0px 20px;
        .logo {
            width: $logoWidth;
            display: inline-block;
        }
        .name{
            display: inline-block;
            vertical-align: bottom;
            color: $name-color;
            font-size: $name-size;
        }
    }
</style>
This code contains two data passed from the parent component to the child component.
props: ['logoPath', 'name']
This is the two data passed from the parent component menuIndex to the child component topMenu. They are the path of the logo Icon and the product name.
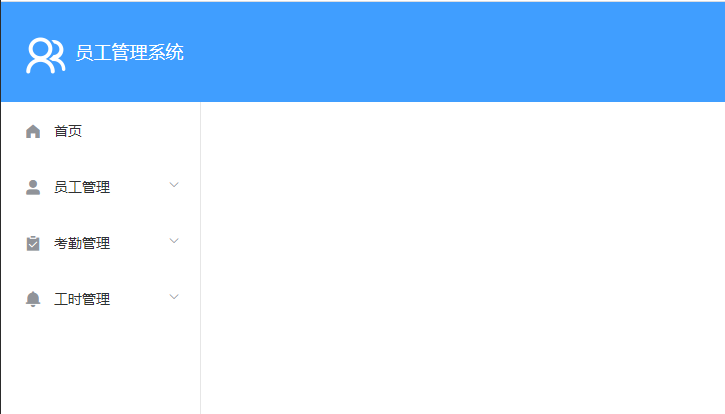
The interface effect after completion is as follows.
Left menu bar - leftMenu
First, implement a simple menu bar according to the official documents.
<!-- src/menu/leftMenu.vue -->
<template>
    <div id="left-menu">
        <el-menu
            :default-active="$route.path"
            class="el-menu-vertical-demo"
            :collapse="false">
            <el-menu-item index="1">
                <i class="el-icon-s-home"></i>
                <span slot="title">home page</span>
            </el-menu-item>
            <el-submenu index="2">
                <template slot="title">
                    <i class="el-icon-user-solid"></i>
                    <span slot="title">Employee management</span>
                </template>
                <el-menu-item index="2-1">Employee statistics</el-menu-item>
                <el-menu-item index="2-2">Employee management</el-menu-item>
            </el-submenu>
            <el-submenu index="3">
                <template slot="title">
                    <i class="el-icon-s-claim"></i>
                    <span slot="title">Attendance management </span>
                </template>
                <el-menu-item index="3-1">Attendance statistics</el-menu-item>
                <el-menu-item index="3-2">Attendance list</el-menu-item>
                <el-menu-item index="3-2">Exception management</el-menu-item>
            </el-submenu>
            <el-submenu index="4">
                <template slot="title">
                    <i class="el-icon-location"></i>
                    <span slot="title">Time management</span>
                </template>
                <el-menu-item index="4-1">Hours statistics</el-menu-item>
                <el-submenu index="4-2">
                    <template slot="title">Work list</template>
                    <el-menu-item index="4-2-1">Option 1</el-menu-item>
                    <el-menu-item index="4-2-2">Option 2</el-menu-item>
                </el-submenu>
            </el-submenu>
        </el-menu>
    </div>
</template>
<script>
export default {
    name: 'LeftMenu'
}
</script>
<style lang="scss">
    // Fill the screen with elements on the outer layer of the menu on the left
    #left-container{
        position: absolute;
        top: 100px;
        bottom: 0px;
        // Fill the screen with menu height
        #left-menu, .el-menu-vertical-demo{
            height: 100%;
        }
    }
</style>
Pay attention to the style code of the menu, set the absolute positioning, and set the top and bottom to make the menu full of screen height.
Now look at the interface effect.

Basically, it realizes a simple menu layout.
However, when the actual project is designed, the content of the menu bar may come from the data returned to us by the backend, including the menu name, menu icon and the hierarchical relationship between menus.
All in all, our menus are dynamically generated, not as fixed as before. So I will implement a dynamically generated menu. The menu data comes from our routing configuration.
Implementation of dynamic menu with routing configuration
Routing configuration
First, I post the routing configuration code of the project.
import Vue from 'vue';
import Router from "vue-router";

// menu
import MenuIndex from '@/components/menu/menuIndex.vue';

// home page
import Index from '@/components/homePage/index.vue';

// Personnel statistics
import EmployeeStatistics from '@/components/employeeManage/employeeStatistics.vue';
import EmployeeManage from '@/components/employeeManage/employeeManage.vue'

// check work attendance
// Attendance statistics
import AttendStatistics from '@/components/attendManage/attendStatistics';
// Attendance list
import AttendList from '@/components/attendManage/attendList.vue';
// Exception management
import ExceptManage from '@/components/attendManage/exceptManage.vue';

// working hours
// Hours statistics
import TimeStatistics from '@/components/timeManage/timeStatistics.vue';
// Work list
import TimeList from '@/components/timeManage/timeList.vue';
Vue.use(Router)


let routes = [
    // Home (dashboard, quick access)
    {
        path: '/index',
        name: 'index',
        component: MenuIndex,
        redirect: '/index',
        meta: {
            title: 'home page',    // menu title
            icon: 'el-icon-s-home',  // Icon
            hasSubMenu: false, // Include submenu or not, false has no submenu; true has submenu

        },
        children:[
            {
                path: '/index',
                component: Index
            }
        ]
    },
    // Employee management
    {
        path: '/employee',
        name: 'employee',
        component: MenuIndex,
        redirect: '/employee/employeeStatistics',
        meta: {
            title: 'Employee management',    // menu title
            icon: 'el-icon-user-solid',  // Icon
            hasSubMenu: true,   // Include submenu or not
        },
        children: [
            // Employee statistics
            {
                path: 'employeeStatistics',
                name: 'employeeStatistics',
                meta: {
                    title: 'Employee statistics',    // Menu title,
                    hasSubMenu: false    // Include submenu or not
                },
                component: EmployeeStatistics,
            },
            // Employee management (add, delete, change and check)
            {
                path: 'employeeManage',
                name: 'employeeManage',
                meta: {
                    title: 'Employee management',    // menu title
                    hasSubMenu: false    // Include submenu or not
                },
                component: EmployeeManage
            }
        ]
    },
    // Attendance management
    {
        path: '/attendManage',
        name: 'attendManage',
        component: MenuIndex,
        redirect: '/attendManage/attendStatistics',
        meta: {
            title: 'Attendance management ',    // menu title
            icon: 'el-icon-s-claim',  // Icon
            hasSubMenu: true, // Include child nodes or not, false has no submenu; true has submenu
        },
        children:[
            // Attendance statistics
            {
                path: 'attendStatistics',
                name: 'attendStatistics',
                meta: {
                    title: 'Attendance statistics',    // menu title
                    hasSubMenu: false    // Include submenu or not
                },
                component: AttendStatistics,
            },
            // Attendance list
            {
                path: 'attendList',
                name: 'attendList',
                meta: {
                    title: 'Attendance list',    // menu title
                    hasSubMenu: false    // Include submenu or not
                },
                component: AttendList,
            },
            // Exception management
            {
                path: 'exceptManage',
                name: 'exceptManage',
                meta: {
                    title: 'Exception management',    // menu title
                    hasSubMenu: false    // Include submenu or not
                },
                component: ExceptManage,
            }
        ]
    },
    // Time management
    {
        path: '/timeManage',
        name: 'timeManage',
        component: MenuIndex,
        redirect: '/timeManage/timeStatistics',
        meta: {
            title: 'Time management',    // menu title
            icon: 'el-icon-message-solid',  // Icon
            hasSubMenu: true, // Include submenu or not, false has no submenu; true has submenu
        },
        children: [
            // Hours statistics
            {
                path: 'timeStatistics',
                name: 'timeStatistics',
                meta: {
                    title: 'Hours statistics',    // menu title
                    hasSubMenu: false    // Include submenu or not
                },
                component: TimeStatistics
            },
            // Work list
            {
                path: 'timeList',
                name: 'timeList',
                component: TimeList,
                meta: {
                    title: 'Work list',    // menu title
                    hasSubMenu: true    // Include submenu or not
                },
                children: [
                    {
                        path: 'options1',
                        meta: {
                            title: 'Option 1',    // menu title
                            hasSubMenu: false    // Include submenu or not
                        },
                    },
                    {
                        path: 'options2',
                        meta: {
                            title: 'Option 2',    // menu title
                            hasSubMenu: false    // Include submenu or not
                        },
                    },
                ]
            }
        ]
    },
];
export default new Router({
    routes
})
At the beginning of this code, we introduce the components that need to be used, and then configure the routing.
The method of directly introducing components is used here, which is not recommended in project development. Lazy loading should be used
In addition to the most basic path, component and children, the routing configuration also configures a meta data item.
meta: {
    title: 'Time management',    // menu title
    icon: 'el-icon-message-solid',  // Icon
    hasSubMenu: true, // Include child nodes or not, false has no submenu; true has submenu
}
meta data contains configurations such as menu title, icon class name, and whether to include a child node (hasSubMenu).
According to the two configuration items title and icon, you can display the title and icon of the current menu.
hasSubMenu indicates whether the current menu item has a submenu. If the current menu contains a submenu (hasSubMenu is true), the label element corresponding to the current menu is El submenu; otherwise, the label element corresponding to the current menu is El menu item.
Whether to include submenu or not is a very critical logic. When I implemented it, I directly configured it to meta.hasSubMenu In this parameter.
Multi level menu based on Routing
After the route configuration is completed, we need to implement the menu according to the route.
Get route configuration
Since we want to implement multi-level menu according to routing configuration, the first step is to obtain our routing data. Here I use a simple and crude way to get route configuration data: this$ router.options.routes .
This method is also not suitable for daily project development, because the route cannot be further processed when it is acquired, such as permission control.
Let's print this data when the component is loaded.
// Code location: src/menu/leftMenu.vue
 mounted(){
    console.log(this.$router.options.routes);
}
The results are as follows.
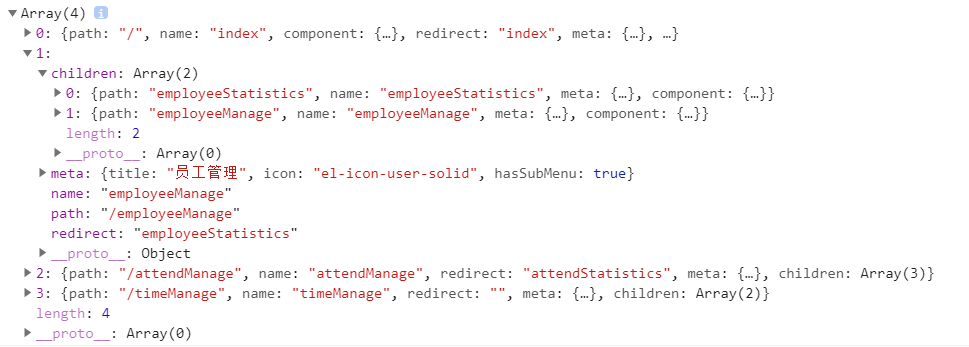
You can see that this data is that we are router.js Routing data configured in.
For ease of use, I define this data into the calculated properties.
// Code location: src/menu/leftMenu.vue
computed: {
    routesInfo: function(){
        return this.$router.options.routes;
    }
}
First level menu
First, let's implement the first level menu.
The main logic is to loop route data routesInfo. When looping, judge whether the current route contains submenus. If yes, the current menu is implemented by El submenu. Otherwise, the current menu is implemented by El menu item.
<!-- src/menu/leftMenu.vue -->
<el-menu
    :default-active="$route.path"
    class="el-menu-vertical-demo"
    :collapse="false">
    <!--  First level menu -->
    <!--  Loop route data  -->
    <!--  Judge the current route route Include submenu or not  -->
    <el-submenu
        v-for="route in routesInfo"
        v-if="route.meta.hasSubMenu"
        :index="route.path">
        <template slot="title">
            <i :class="route.meta.icon"></i>
            <span slot="title">{{route.meta.title}}</span>
        </template>
    </el-submenu>
    <el-menu-item :index="route.path" v-else>
        <i :class="route.meta.icon"></i>
        <span slot="title">{{route.meta.title}}</span>
    </el-menu-item>
</el-menu>
result:
As you can see, our first level menu has been generated. The three menus of employee management, attendance management and work hour management have submenus, so there will be a drop-down button.
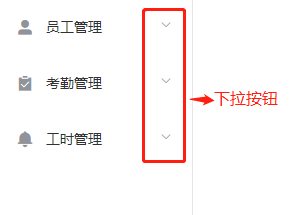
However, there is no content in the current Click to open. Next, we will implement the secondary menu under these three menus.
Secondary menu
The logic of the second level menu is the same as that of the first level menu: loop sub route route.children In the loop, judge whether the child route contains submenus. If it does, the current menu is implemented by El submenu. Otherwise, the current menu is implemented by El menu item.
That's not much to say, go straight to the code.
<!-- src/menu/leftMenu.vue -->
<el-menu
    :default-active="$route.path"
    class="el-menu-vertical-demo"
    :collapse="false">
    <!--  First level menu -->
    <!--  Loop route data  -->
    <!--  Judge the current route route Include submenu or not  -->
    <el-submenu
        v-for="route in routesInfo"
        v-if="route.meta.hasSubMenu"
        :index="route.path">
        <template slot="title">
            <i :class="route.meta.icon"></i>
            <span slot="title">{{route.meta.title}}</span>
        </template>
        <!-- Secondary menu -->
        <!-- Loop sub route`route.children` -->
        <!-- Determine sub route during loop`childRoute`Include submenu or not -->
        <el-submenu
            v-for="childRoute in route.children"
            v-if="childRoute.meta.hasSubMenu"
            :index="childRoute.path">
            <template slot="title">
                <i :class="childRoute.meta.icon"></i>
                <span slot="title">{{childRoute.meta.title}}</span>
            </template>
        </el-submenu>
        <el-menu-item :index="childRoute.path" v-else>
            <i :class="childRoute.meta.icon"></i>
            <span slot="title">{{childRoute.meta.title}}</span>
        </el-menu-item>
    </el-submenu>
    <el-menu-item :index="route.path" v-else>
        <i :class="route.meta.icon"></i>
        <span slot="title">{{route.meta.title}}</span>
    </el-menu-item>
</el-menu>
The results are as follows:
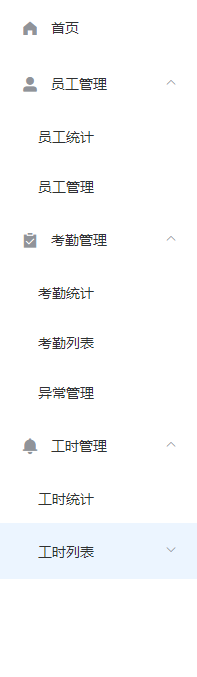
You can see that the secondary menu is successfully implemented.
Three level menu
Needless to say, the three-level menu is the same as the first level and the second level logic, and the code is still directly on here.
<!-- src/menu/leftMenu.vue -->
<el-menu
    :default-active="$route.path"
    class="el-menu-vertical-demo"
    :collapse="false">
    <!--  First level menu -->
    <!--  Loop route data  -->
    <!--  Judge the current route route Include submenu or not  -->
    <el-submenu
        v-for="route in routesInfo"
        v-if="route.meta.hasSubMenu"
        :index="route.path">
        <template slot="title">
            <i :class="route.meta.icon"></i>
            <span slot="title">{{route.meta.title}}</span>
        </template>
        <!-- Secondary menu -->
        <!-- Loop sub route`route.children` -->
        <!-- Determine sub route during loop`childRoute`Include submenu or not -->
        <el-submenu
            v-for="childRoute in route.children"
            v-if="childRoute.meta.hasSubMenu"
            :index="childRoute.path">
            <template slot="title">
                <i :class="childRoute.meta.icon"></i>
                <span slot="title">{{childRoute.meta.title}}</span>
            </template>
            <!-- Three level menu -->
            <!-- Loop sub route`childRoute.children` -->
            <!-- Determine sub route during loop`child`Include submenu or not -->
            <el-submenu
                v-for="child in childRoute.children"
                v-if="child.meta.hasSubMenu"
                :index="child.path">
                <template slot="title">
                    <i :class="child.meta.icon"></i>
                    <span slot="title">{{child.meta.title}}</span>
                </template>
            </el-submenu>
            <el-menu-item :index="child.path" v-else>
                <i :class="child.meta.icon"></i>
                <span slot="title">{{child.meta.title}}</span>
            </el-menu-item>
        </el-submenu>
        <el-menu-item :index="childRoute.path" v-else>
            <i :class="childRoute.meta.icon"></i>
            <span slot="title">{{childRoute.meta.title}}</span>
        </el-menu-item>
    </el-submenu>
    <el-menu-item :index="route.path" v-else>
        <i :class="route.meta.icon"></i>
        <span slot="title">{{route.meta.title}}</span>
    </el-menu-item>
</el-menu>
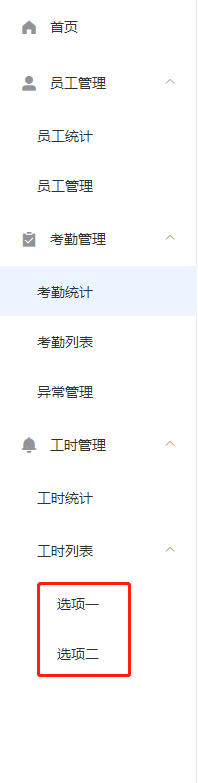
You can see that the three-level menu under the work list has been displayed.
summary
At this time, we have implemented this dynamic menu in combination with routing configuration.
However, such code is logically related to the three-tier nested for loop, which corresponds to the three-tier menu.
If we have four, five or more layers of menus, we have to nest more layers of for loops. Obviously, this way exposes the defects of the previous multi-layer for loop, so we need to improve this writing method.
Recursive implementation of dynamic menu
We have been saying that the implementation logic of level 1, level 2 and level 3 menus is the same: loop sub route. When loop, judge whether sub route contains sub menu. If yes, the current menu is implemented by El submenu. Otherwise, the current menu is implemented by El menu item. The most suitable logic is to use recursion.
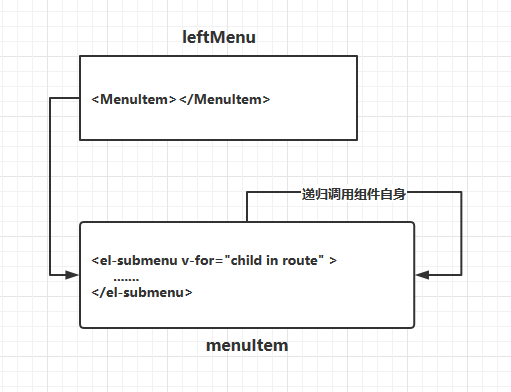
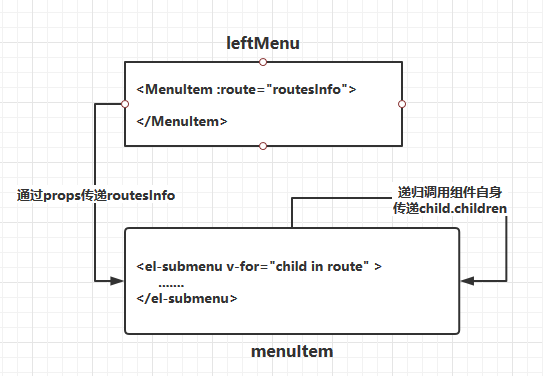
So we need to extract this part of common logic as a separate component, and then call this component recursively.
Logical split
<!-- src/menu/menuItem.vue -->
<template>
    <div>
        <el-submenu
            v-for="child in route"
            v-if="child.meta.hasSubMenu"
            :index="child.path">
            <template slot="title">
                <i :class="child.meta.icon"></i>
                <span slot="title">{{child.meta.title}}</span>
            </template>
        </el-submenu>
        <el-menu-item :index="child.path" v-else>
            <i :class="child.meta.icon"></i>
            <span slot="title">{{child.meta.title}}</span>
        </el-menu-item>
    </div>
</template>
<script>
export default {
    name: 'MenuItem',
    props: ['route']
}
</script>
It should be noted that when the extracted component circulates, it directly circulates the route data. What is the route data.
Let's take a look at the data sources of the previous three loops.
In order to see more clearly, I have deleted some irrelevant content in the previous code.
<!-- src/menu/leftMenu.vue -->

<!--  First level menu -->
<el-submenu
    v-for="route in routesInfo"
    v-if="route.meta.hasSubMenu">
    <!-- Secondary menu -->

    <el-submenu
        v-for="childRoute in route.children"
        v-if="childRoute.meta.hasSubMenu">

        <!-- Three level menu -->
        <el-submenu
            v-for="child in childRoute.children"
            v-if="child.meta.hasSubMenu">

        </el-submenu>

    </el-submenu>
</el-submenu>
From the above code, you can see:
The first level menu circulates' routeInfo ', that is, the route data we obtained at first' this$ router.options.routes `, each item out of the loop is defined as' route`

The second level menu loops` route.children `, each item out of the loop is defined as' childRoute`

The three-level menu cycles` childRoute.children `, each item out of the loop is defined as' child`
According to this logic, we can find that the data sources of the two-level menu and the three-level menu cycle are the same, that is, the children of the previous cycle result item, while the data of the first level menu comes from this$ router.options.routes .
The menuItem component we extracted earlier circulates route data, i.e. whether it is a one-tier menu or a two-tier or three-tier menu, it is the same data source, so we need to unify the data sources. Of course, it's also very easy to implement. When we call a component, we can pass different values to the component.
code implementation
The previous public components have been split, and the later code is very easy to implement.
The first is the extracted meinitem component, which implements logical judgment and recursive call itself.
<!-- src/menu/menuItem.vue -->
<template>
    <div>
        <el-submenu
            v-for="child in route"
            v-if="child.meta.hasSubMenu"
            :index="child.path">
            <template slot="title">
                <i :class="child.meta.icon"></i>
                <span slot="title">{{child.meta.title}}</span>
            </template>
            <!--Recursively calling component itself -->
            <MenuItem :route="child.children"></MenuItem>
        </el-submenu>
        <el-menu-item :index="child.path" v-else>
            <i :class="child.meta.icon"></i>
            <span slot="title">{{child.meta.title}}</span>
        </el-menu-item>
    </div>
</template>
<script>
export default {
    name: 'MenuItem',
    props: ['route']
}
</script>
Next, the leftMenu component calls the menuIndex component to transfer the original route data routesInfo.
<!-- src/menu/leftMenu.vue -->
<template>
    <div id="left-menu">
        <el-menu
            :default-active="$route.path"
            class="el-menu-vertical-demo"
            :collapse="false">
            <MenuItem :route="routesInfo"></MenuItem>
        </el-menu>
    </div>
</template>
<script>
import MenuItem from './menuItem'
export default {
    name: 'LeftMenu',
    components: { MenuItem }
}
</script>
<style lang="scss">
    // Fill the screen with elements on the outer layer of the menu on the left
    #left-container{
        position: absolute;
        top: 100px;
        bottom: 0px;
        // Fill the screen with menu height
        #left-menu, .el-menu-vertical-demo{
            height: 100%;
        }
    }
</style>
The final result is not shown here, which is consistent with the result we need to achieve.
Perfect function
Now, we have basically completed the function of menu bar in combination with routing configuration, but this is a menu bar without soul. Because there is no menu jump set, we can't route to the corresponding component by clicking menu bar, so we will implement this function next.
There are two ways to realize menu jump. The first is the way provided by NavMenu component.

The second is to add router link to the menu to realize jump.
This time, I chose the first way to implement jump, which requires two steps. The first step is to enable router on El menu; the second step is to set the index property of navigation.
Let's implement these two steps.
Enable router on El menu
<!-- src/menu/leftMenu.vue -->
<!-- Omit other unmodified codes-->
<el-menu
    :default-active="$route.path"
    class="el-menu-vertical-demo"
    router
    :collapse="false">
    <MenuItem :route="routesInfo">
    </MenuItem>
</el-menu>
Set the index property of the navigation
First of all, I will list the index property values that need to be set for each menu title.
The index value corresponds to the path value configured in the route of each menu
home page

Employee management
    Employee statisticsindex = "/ employee / employeestatistics"
    Employee managementindex = "/ employee / employeemanage"

Attendance management
    Attendance statistics index="/attendManage/attendStatistics"
    Attendance listindex = "/ attendmanage / attendlist"
    Exception managementindex = "/ attendmanage / exceptmanage"

Employee statistics
    Employee statistics index="/timeManage/timeStatistics"
    Employee statistics index="/timeManage/timeList"
        Option 1 index="/timeManage/timeList/options1"
        Option 2 index="/timeManage/timeList/options2"
Next, I will review the components recursively called before. The index setting of the navigation menu is child.path In order to see clearly child.path I add it to the right side of the menu title to display it on the interface.
<!-- src/menu/menuItem.vue -->
<!-- Omit other unmodified codes-->
<el-submenu
    v-for="child in route"
    v-if="child.meta.hasSubMenu"
    :index="child.path">
    <template slot="title">
        <i :class="child.meta.icon"></i>
        <span slot="title">{{child.meta.title}} | {{child.path}}</span>
    </template>
    <!--Recursively calling component itself -->
    <MenuItem :route="child.children"></MenuItem>
</el-submenu>
<el-menu-item :index="child.path" v-else>
    <i :class="child.meta.icon"></i>
    <span slot="title">{{child.meta.title}} | {{child.path}}</span>
</el-menu-item>
At the same time, set the width of the menu bar from 200px to 400px.
<!-- src/menu/menuIndex.vue -->
<!-- Omit other unmodified codes-->
<el-aside width="400px">
    <LeftMenu></LeftMenu>
</el-aside>
Then let's look at the effect.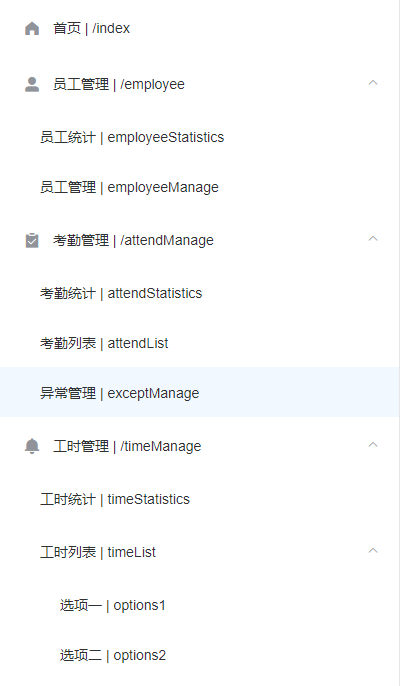
It can be found that, child.path The value of is the path value configured in the route of the current menu( router.js The path value configured in).
So the problem comes. We sorted out the index attribute values that need to be set for each menu title. At present, the index values set now do not meet the requirements. However, carefully observe that the index value of the current menu is a little close to the normal value, but the path value of the previous menu is missing. If you can splice the path value of the previous menu and the path value of the current menu, you can get the correct index value.
The way to realize this idea is still to pass the path of the current menu as a parameter to the menuItem component during recursion.
<!-- src/menu/menuIndex.vue -->
<!--Recursively calling component itself -->
<MenuItem
    :route="child.children"
    :basepath="child.path">
</MenuItem>
After passing the path of the current menu as a parameter to the menuItem component, the path value of the previous menu can be obtained when the next menu is implemented. Then, the component splices the basepath value and the path value of the current menu as the index value of the current menu.
<!-- src/menu/menuIndex.vue -->
<el-menu-item :index="getPath(child.path)" v-else>

</el-menu-item>
<script>
import path from 'path'
export default {
    name: 'MenuItem',
    props: ['route','basepath'],
    data(){
        return {

        }
    },
    methods :{
        // routepath is the path value of the current menu
        // getpath: concatenate the path of the previous menu of the current menu and the path of the current menu
        getPath: function(routePath){
            return path.resolve(this.basepath, routePath);
        }
    }
}
</script>
Take a look at the interface again.
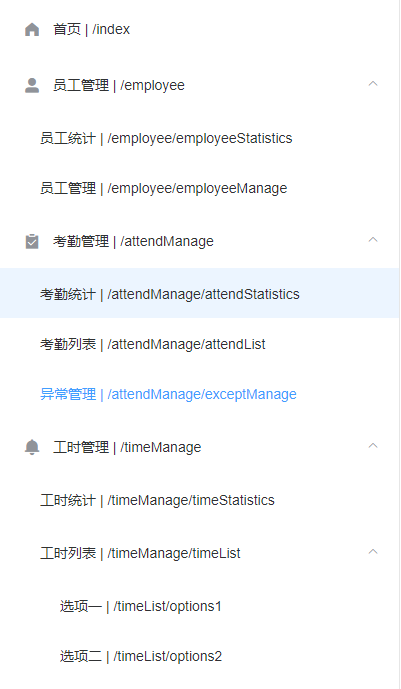
We can see that there is no problem with the index value of the secondary menu, but look carefully and find that there is still a problem with the index value of the two tertiary menus under the man hour management - man hour list. The path of the primary menu of man hour management is missing.
That's because we are calling the basepath passed by the component itself.
<!--Recursively calling component itself -->
<MenuItem
    :route="child.children"
    :basepath="child.path">
</MenuItem>
basepath only transfers the path of the upper level menu. In recursive second level menu, the value of index is the path value of the first level menu + the path value of the second level menu. In recursive third level menu, the value of index is the path value of the second level menu + the path value of the third level menu, which is why there is a problem with the index value of the two third level menus under work management work list.
Therefore, the basepath value here should be accumulated during recursion, not just the path value of the upper level menu. Therefore, with the advantage of recursive algorithm, the value of basepath also needs to be processed by getPath method.
<MenuItem
    :route="child.children"
    :basepath="getPath(child.path)">
</MenuItem>
The final complete code is as follows.
<!-- src/menu/menuIndex.vue -->
<template>
    <div>
        <el-submenu
            v-for="child in route"
            v-if="child.meta.hasSubMenu"
            :key="child.path"
            :index="getPath(child.path)">
            <template slot="title">
                <i :class="child.meta.icon"></i>
                    <span slot="title">
                        {{child.meta.title}}
                    </span>
            </template>
            <!--Recursively calling component itself -->
            <MenuItem
                :route="child.children"
                :basepath="getPath(child.path)">
            </MenuItem>
        </el-submenu>
        <el-menu-item :index="getPath(child.path)" v-else>
            <i :class="child.meta.icon"></i>
            <span slot="title">
                   {{child.meta.title}}
            </span>
        </el-menu-item>

    </div>
</template>
<script>
import path from 'path'
export default {
    name: 'MenuItem',
    props: ['route','basepath'],
    data(){
        return {

        }
    },
    methods :{
        // routepath is the path value of the current menu
        // getpath: concatenate the path of the previous menu of the current menu and the path of the current menu
        getPath: function(routePath){
            return path.resolve(this.basepath, routePath);
        }
    }
}
</script>
Remove the rest of the code for debugging
Final effect
At the end of the article, the final effect of this implementation is shown here.
The three-level menus of option 1 and option 2 have no component set in the routing configuration. These two menus are only used to realize the three-level menu. In the final result demonstration, I have deleted the two three-level menus configured in the routing
Here, unique opened is enabled for El menu in the leftMenu component
In the menuIndex component, change the width of the left menu bar to 200px
about
author
Little potato biubiubiu
A front-end novice who studies hard, knowledge is infinite. I firmly believe that as long as I don't stop learning, I can always reach my expectations
At the same time, he is also a person who likes kittens. There is a beautiful kitten named Tudou at home
Blog Park
https://www.cnblogs.com/HouJiao/
Nuggets
https://juejin.im/user/58c61b4361ff4b005d9e894d
WeChat official account
Mashed potato
WeChat's official account is aimed at keeping track of stories and stories.
Welcome to scan the code and pay attention to it, suck cats together, listen to stories together, and learn front-end technology together
Author's message
Little summary, welcome to guide~