If the article is original, it cannot be reproduced without permission Original blog address: https://blog.csdn.net/qq21497936 Original blogger blog navigation: https://blog.csdn.net/qq21497936/article/details/102478062 Blog address: https://blog.csdn.net/qq21497936/article/details/106755662 Dear readers, knowledge is infinite and manpower is poor. Either we need to change our needs, or we need to find professionals, or we need to do our own research The collection of development technologies (including Qt practical technology, raspberry pie, 3D, OpenCV, OpenGL, ffmpeg, OSG, SCM, software and hardware combination, etc.) is continuously updated (click on the portal)
OpenCV development column (click on the portal)
Previous:< OpenCV Development Notes (62): red fat man takes you 8 minutes to deeply understand sub-pixel corner detection (illustrated + easy to understand + program source code)> Next: continuous supplement
<br>
preface
Red fat man, come! In addition to the traditional template matching, the recognition of .
<br>
Demo
<br>
SIFT feature points
summary
The scale invariant feature transform (SIFT) is a description used in the field of image processing. This description is scale invariant and can detect key points in the image. It is a local feature descriptor.
SIFT algorithm features
- SIFT features are local features, which are invariant to rotation, scale scaling, brightness change, and stable to a certain extent to angle change, affine transformation and noise;
- Good distinguishability and abundant information are suitable for fast and accurate matching in massive feature databases;
- Multiplicity, even a few objects can produce a large number of SIFT eigenvectors;
- High speed, the optimized SIFT matching algorithm can even meet the real-time requirements;
- It can be easily combined with other forms of eigenvectors;
Feature detection steps
Step 1: extreme value detection in scale space
search for image positions on all scales. Gaussian differential functions are used to identify potential points of interest that are invariant to scale and rotation. Understand the process and know the basic principle of implementation, as shown in the following figure:
Step 2: key point positioning
. The selection of key points depends on their stability.
Step 3: determine the direction
based on the gradient direction of the local image, one or more directions are assigned to each key position. All subsequent operations on image data are transformed with respect to the direction, scale and position of key points, so as to provide invariance for these transformations.
Step 4: key point description
measure the local gradient of the image on the selected scale in the neighborhood around each key point. These gradients are transformed into a representation that allows larger local shape deformations and light changes. Each key point has three information: location, scale and direction. Create a descriptor for each key point, and use a set of vectors to describe the key point, so that it does not change with various changes, such as lighting changes, perspective changes, and so on. This descriptor includes not only the key points, but also the pixels around the key points that contribute to it. Moreover, the descriptor should have high uniqueness, so as to improve the probability of correct matching of feature points.
SiftFeatureDetector class
Q Q Q _ contrib (the simplest and the strongest in the whole network, with the highest readability and none of them). When configuring, you need to check the items shown in the following figure additionally: After compiling, replace the header file and the library, reconnect to version 3.4.10, and use sift. header file needs to be added:
#include <opencv2/xfeatures2d.hpp>
Use of the SiftFeatureDetector class
cv::Ptr<cv::xfeatures2d::SIFT> _pSift = cv::xfeatures2d::SiftFeatureDetector::create();
std::vector<cv::KeyPoint> keyPoints1;
//Feature point detection
_pSift->detect(srcMat, keyPoints1);
SIFT macro definition
typedef SIFT SiftFeatureDetector;
typedef SIFT SiftDescriptorExtractor;
SIFT correlation function prototype
static Ptr<xfeatures2d::SIFT> create(int nfeatures = 0,
                                int nOctaveLayers = 3,
                                double contrastThreshold = 0.04,
                                double edgeThreshold = 10,
                                double sigma = 1.6);
- Parameter 1: nfeatures of type int, the default value is 0, and the best feature points to keep for nfeatures. These features are arranged by fraction (SIFT algorithm is used as local contrast);
- Parameter 2: nOctaveLayers of type int, default value 3, number of layers per octave scale. 3 is the value used in D.Lowe paper. The octave is calculated automatically according to the image resolution;
- Parameter 3: double type contrastThreshold, the default value is 0.04, which is used for semi-uniform filtering of weak feature contrast threshold (low contrast) area. The larger the threshold value is, the less the features produced by the detector are;
- Parameter 4: edgeThreshold of double type, default value 10, used to filter the threshold value of edge features. Note that its meaning is different from the contrast threshold, i.e. the larger the edge threshold is, the less features are filtered out (more functions are retained).
- Parameter 5: double type sigma, default value 1.6, Gaussian sigma, applied to the standard deviation of input image.
void xfeatures2d::SIFT::detect( InputArray image,
                          std::vector<KeyPoint>& keypoints,
                          InputArray mask=noArray() );
- Parameter 1: InputArray type image, input cv::Mat;
- Parameter 2: STD:: vector < keypoints > type keypoints, detected key points;
- Parameter 3: the mask of InputArray type, which is empty by default, specifies where to find the key mask (optional). It must be an 8-bit integer matrix with non-zero values in the region of interest.
void xfeatures2d::SIFT::compute( InputArray image,
                            std::vector<KeyPoint>& keypoints,
                            OutputArray descriptors );
- Parameter 1: InputArray type image, input cv::Mat;
- Parameter 2: keypoints of type STD:: vector < keypoint >. Descriptors cannot be deleted. Sometimes you can add new keys, for example: SIFT duplicates keypoint has several main directions (each direction);
- Parameter 3: descriptors of OutputArray type, calculation descriptor;
// This function combines detect and compute, referring to the parameters of detect and compute functions
void xfeatures2d::SIFT::detectAndCompute( InputArray image,
                                     InputArray mask,
                                     std::vector<KeyPoint>& keypoints,
                                     OutputArray descriptors,
                                     bool useProvidedKeypoints=false );
Drawing key function prototype
void drawKeypoints( InputArray image,
                 const std::vector<KeyPoint>& keypoints,
                 InputOutputArray outImage,
                 const Scalar& color=Scalar::all(-1),
                 int flags=DrawMatchesFlags::DEFAULT );
- Parameter 1: image of InputArray type,;
- Parameter 2: STD:: vector < keypoints > type keypoints, key points of the original image;
- Parameter 3: outpumage of InputOutputArray type, whose content depends on the definition of output image. Please refer to flag of parameter 5);
- Parameter 4: cv::Scalar type color, the color for drawing key points, the default is Scalar::all(-1) random color, and each point is this color, so when random, each point is random;
-
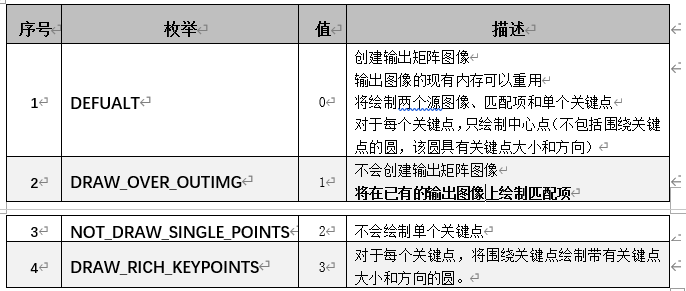
Parameter 5: flags of int type, DEFAULT to DEFAULT. For details, refer to drawmatchsflags enumeration as follows:
<br>
Related blogs
<br>
Demo source code
void OpenCVManager::testSiftFeatureDetector()
{
    QString fileName1 = "16.jpg";
    int width = 400;
    int height = 300;

    cv::Mat srcMat = cv::imread(fileName1.toStdString());
    cv::resize(srcMat, srcMat, cv::Size(width, height));

    cv::String windowName = _windowTitle.toStdString();
    cvui::init(windowName);

    cv::Mat windowMat = cv::Mat(cv::Size(srcMat.cols * 2, srcMat.rows * 3),
                                srcMat.type());

    cv::Ptr<cv::xfeatures2d::SIFT> _pSift = cv::xfeatures2d::SiftFeatureDetector::create();

    int k1x = 0;
    int k1y = 0;
    int k2x = 100;
    int k2y = 0;
    int k3x = 100;
    int k3y = 100;
    int k4x = 0;
    int k4y = 100;
    while(true)
    {
        windowMat = cv::Scalar(0, 0, 0);

        cv::Mat mat;

        // copy the original image to the left
        mat = windowMat(cv::Range(srcMat.rows * 1, srcMat.rows * 2),
                        cv::Range(srcMat.cols * 0, srcMat.cols * 1));
        cv::addWeighted(mat, 0.0f, srcMat, 1.0f, 0.0f, mat);

        {
            std::vector<cv::KeyPoint> keyPoints1;
            std::vector<cv::KeyPoint> keyPoints2;

           cvui::printf(windowMat, 0 + width * 1, 10 + height * 0, "k1x");
           cvui::trackbar(windowMat, 0 + width * 1, 20 + height * 0, 165, &k1x, 0, 100);
           cvui::printf(windowMat, 0 + width * 1, 70 + height * 0, "k1y");
           cvui::trackbar(windowMat, 0 + width * 1, 80 + height * 0, 165, &k1y, 0, 100);

           cvui::printf(windowMat, width / 2 + width * 1, 10 + height * 0, "k2x");
           cvui::trackbar(windowMat, width / 2 + width * 1, 20 + height * 0, 165, &k2x, 0, 100);
           cvui::printf(windowMat, width / 2 + width * 1, 70 + height * 0, "k2y");
           cvui::trackbar(windowMat, width / 2 + width * 1, 80 + height * 0, 165, &k2y, 0, 100);

           cvui::printf(windowMat, 0 + width * 1, 10 + height * 0 + height / 2, "k3x");
           cvui::trackbar(windowMat, 0 + width * 1, 20 + height * 0 + height / 2, 165, &k3x, 0, 100);
           cvui::printf(windowMat, 0 + width * 1, 70 + height * 0 + height / 2, "k3y");
           cvui::trackbar(windowMat, 0 + width * 1, 80 + height * 0 + height / 2, 165, &k3y, 0, 100);

           cvui::printf(windowMat, width / 2 + width * 1, 10 + height * 0 + height / 2, "k4x");
           cvui::trackbar(windowMat, width / 2 + width * 1, 20 + height * 0 + height / 2, 165, &k4x, 0, 100);
           cvui::printf(windowMat, width / 2 + width * 1, 70 + height * 0 + height / 2, "k4y");
           cvui::trackbar(windowMat, width / 2 + width * 1, 80 + height * 0 + height / 2, 165, &k4y, 0, 100);

           std::vector<cv::Point2f> srcPoints;
           std::vector<cv::Point2f> dstPoints;

           srcPoints.push_back(cv::Point2f(0.0f, 0.0f));
           srcPoints.push_back(cv::Point2f(srcMat.cols - 1, 0.0f));
           srcPoints.push_back(cv::Point2f(srcMat.cols - 1, srcMat.rows - 1));
           srcPoints.push_back(cv::Point2f(0.0f, srcMat.rows - 1));

           dstPoints.push_back(cv::Point2f(srcMat.cols * k1x / 100.0f, srcMat.rows * k1y / 100.0f));
           dstPoints.push_back(cv::Point2f(srcMat.cols * k2x / 100.0f, srcMat.rows * k2y / 100.0f));
           dstPoints.push_back(cv::Point2f(srcMat.cols * k3x / 100.0f, srcMat.rows * k3y / 100.0f));
           dstPoints.push_back(cv::Point2f(srcMat.cols * k4x / 100.0f, srcMat.rows * k4y / 100.0f));

           cv::Mat M = cv::getPerspectiveTransform(srcPoints, dstPoints);
           cv::Mat srcMat2;
           cv::warpPerspective(srcMat,
                               srcMat2,
                               M,
                               cv::Size(srcMat.cols, srcMat.rows),
                               cv::INTER_LINEAR,
                               cv::BORDER_CONSTANT,
                               cv::Scalar::all(0));

           mat = windowMat(cv::Range(srcMat.rows * 1, srcMat.rows * 2),
                           cv::Range(srcMat.cols * 1, srcMat.cols * 2));
           cv::addWeighted(mat, 0.0f, srcMat2, 1.0f, 0.0f, mat);

           //Feature point detection
           _pSift->detect(srcMat, keyPoints1);
           //Draw feature points (keys)
           cv::Mat resultShowMat;
           cv::drawKeypoints(srcMat,
                             keyPoints1,
                             resultShowMat,
                             cv::Scalar(0, 0, 255),
                             cv::DrawMatchesFlags::DRAW_RICH_KEYPOINTS);
           mat = windowMat(cv::Range(srcMat.rows * 2, srcMat.rows * 3),
                           cv::Range(srcMat.cols * 0, srcMat.cols * 1));
           cv::addWeighted(mat, 0.0f, resultShowMat, 1.0f, 0.0f, mat);

           //Feature point detection
           _pSift->detect(srcMat2, keyPoints2);
           //Draw feature points (keys)
           cv::Mat resultShowMat2;
           cv::drawKeypoints(srcMat2,
                             keyPoints2,
                             resultShowMat2,
                             cv::Scalar(0, 0, 255),
                             cv::DrawMatchesFlags::DRAW_RICH_KEYPOINTS);
           mat = windowMat(cv::Range(srcMat.rows * 2, srcMat.rows * 3),
                           cv::Range(srcMat.cols * 1, srcMat.cols * 2));
           cv::addWeighted(mat, 0.0f, resultShowMat2, 1.0f, 0.0f, mat);

           cv::imshow(windowName, windowMat);
        }
        // to update
        cvui::update();
        // display
        // esc key exit
        if(cv::waitKey(25) == 27)
        {
            break;
        }
    }
}
<br>
Project template: corresponding version No. v1.57.0
corresponding version number v1.57.0 <br>
Previous:< OpenCV Development Notes (62): red fat man takes you 8 minutes to deeply understand sub-pixel corner detection (illustrated + easy to understand + program source code)> Next: continuous supplement
<br>
Original blog address: https://blog.csdn.net/qq21497936 Original blogger blog navigation: https://blog.csdn.net/qq21497936/article/details/102478062 Blog address: https://blog.csdn.net/qq21497936/article/details/106755662