Page display:
Source code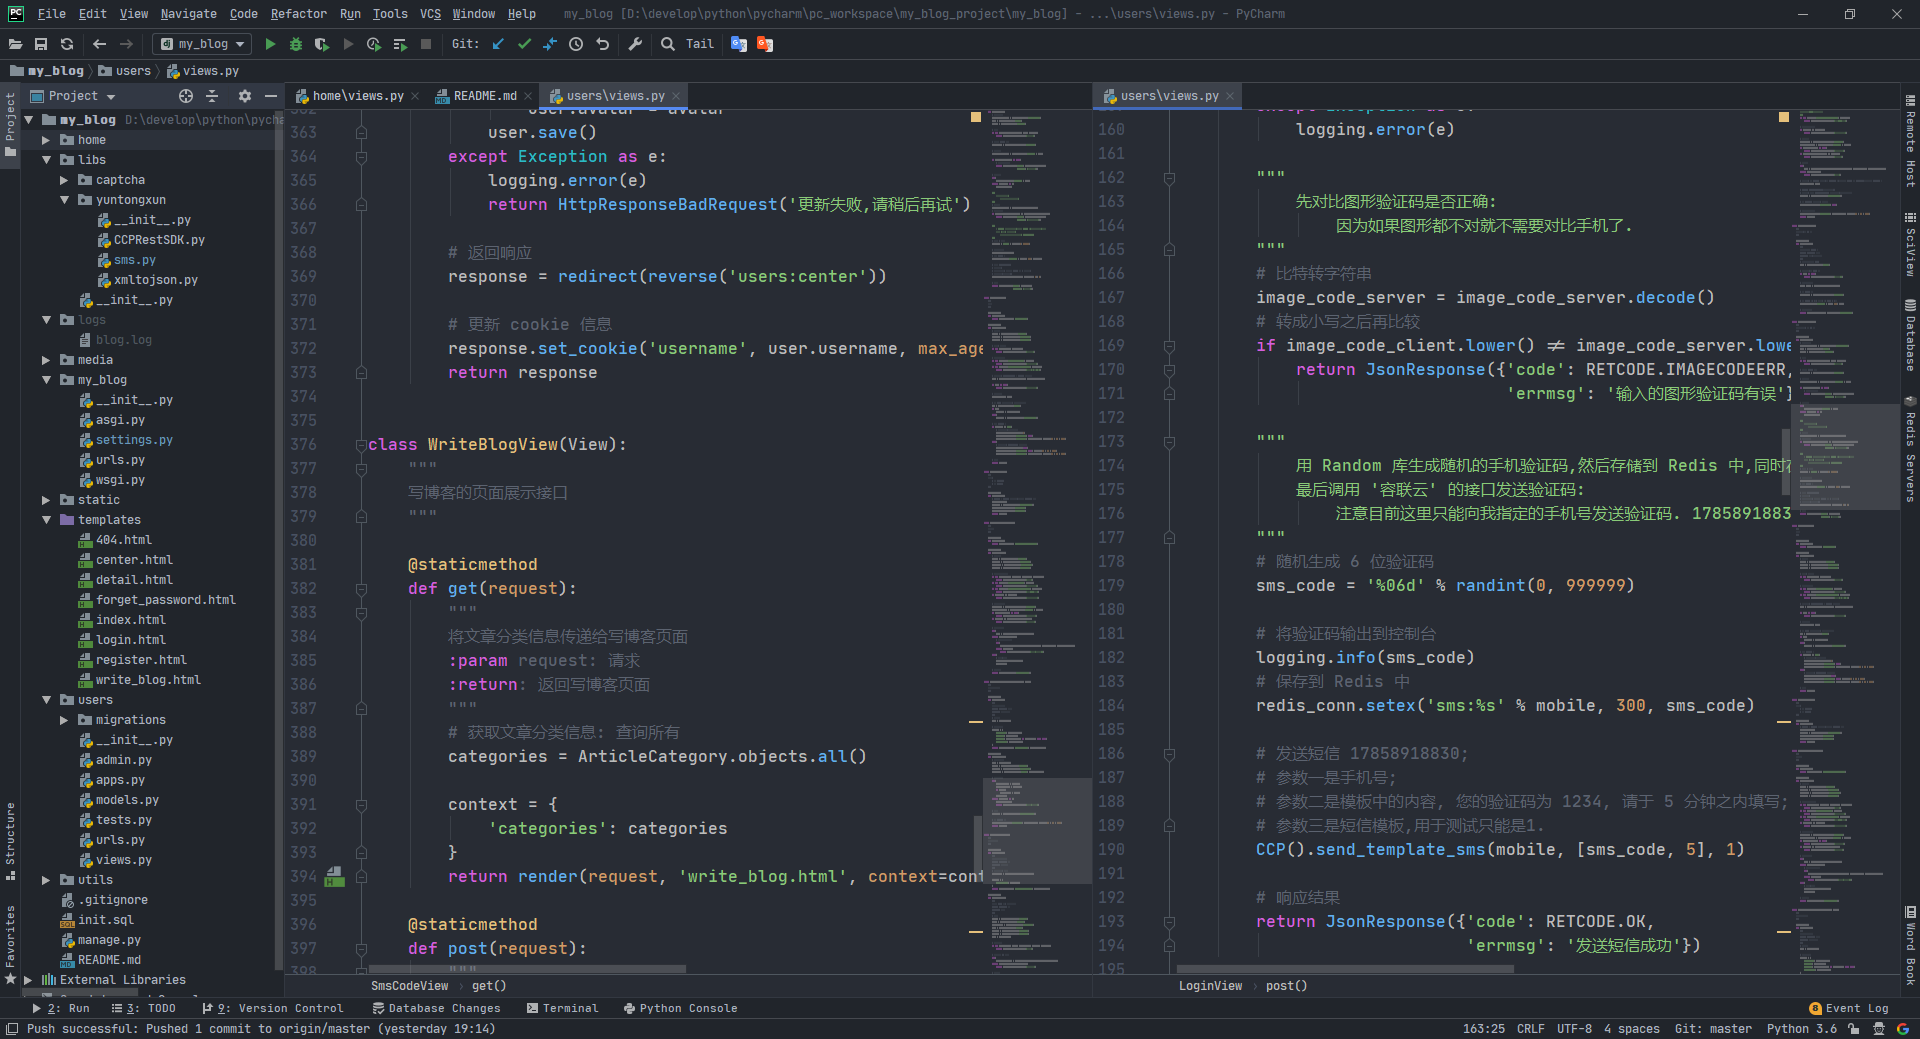
home page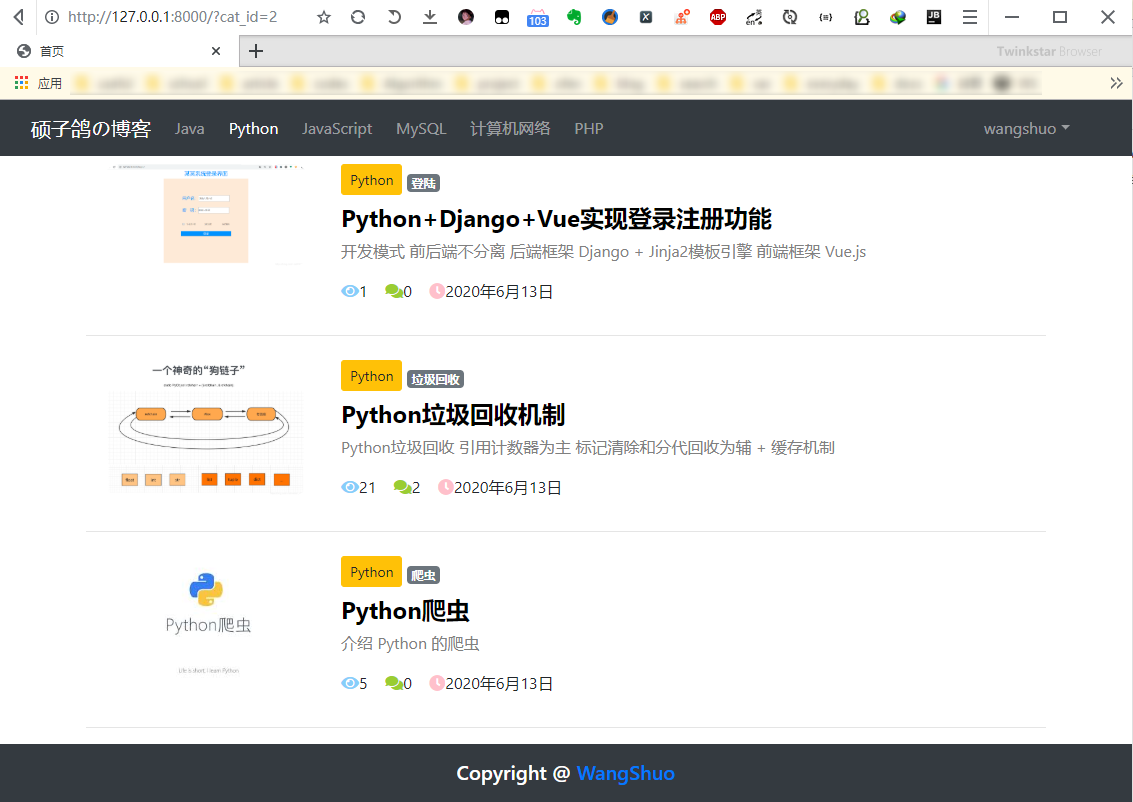
Different plates
Registration page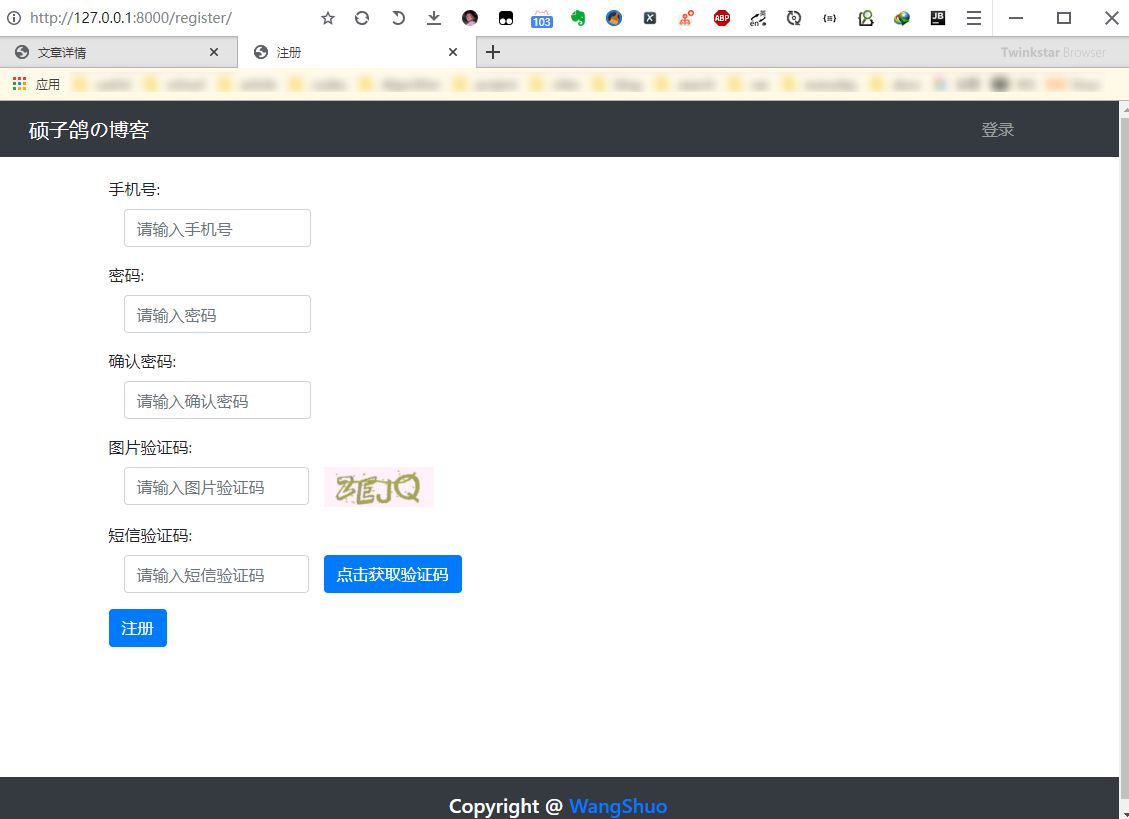
Login page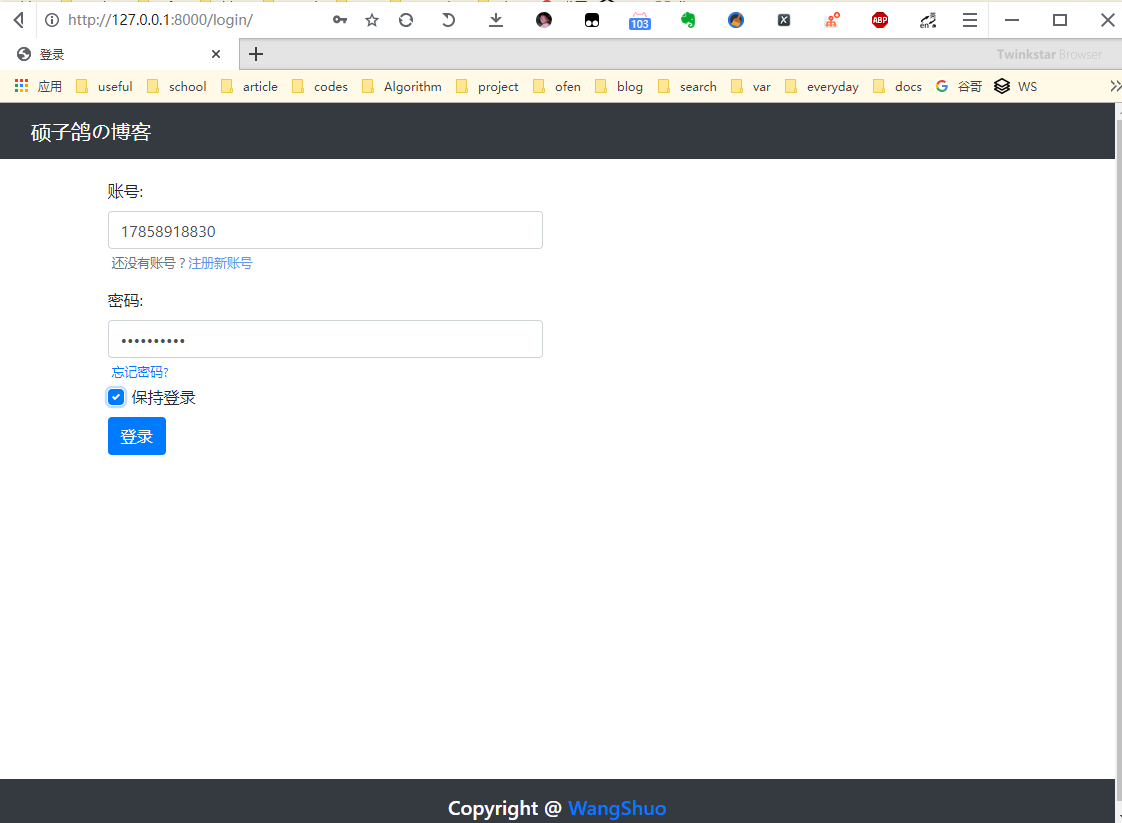
personal information
Write article page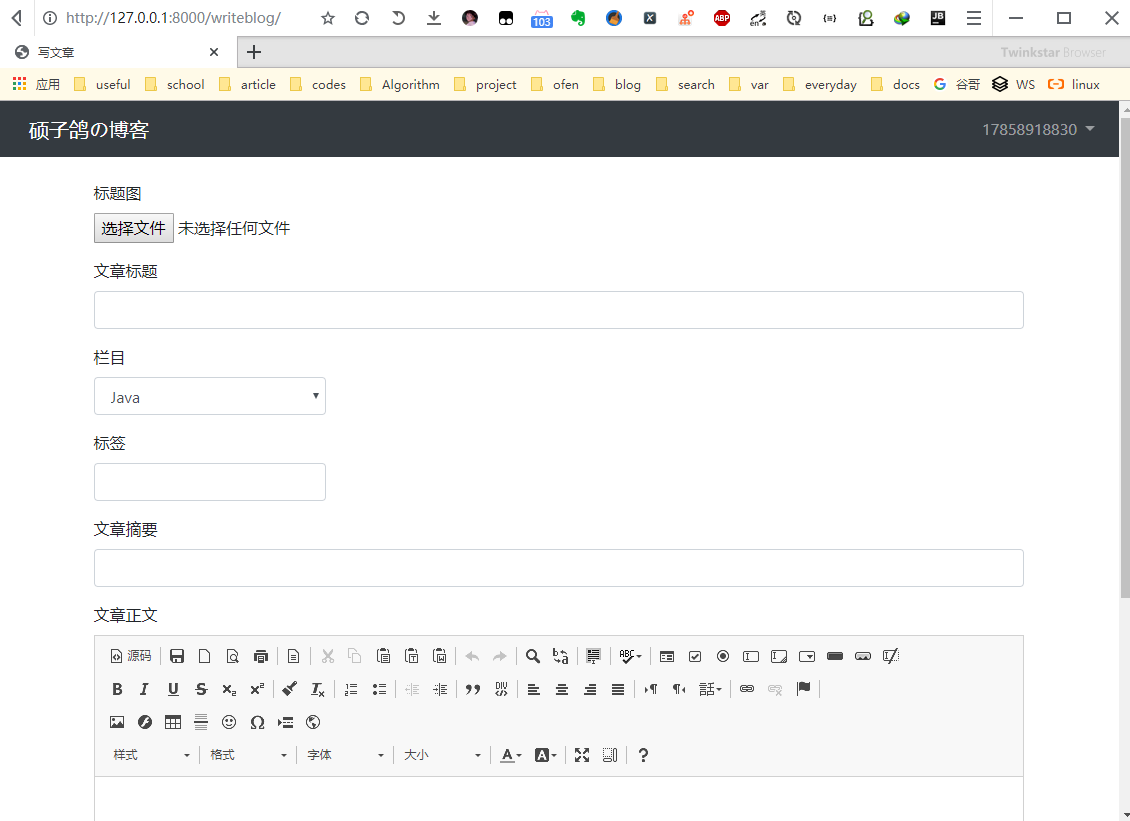
Article details page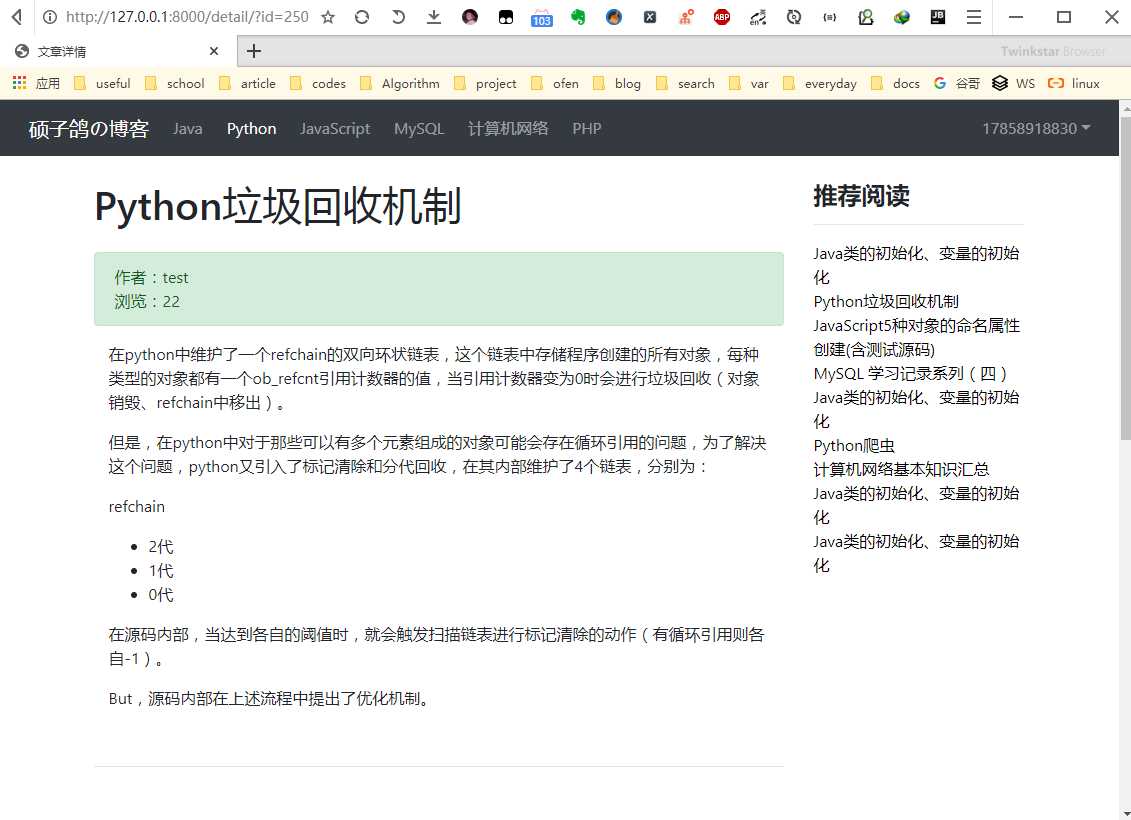
Article review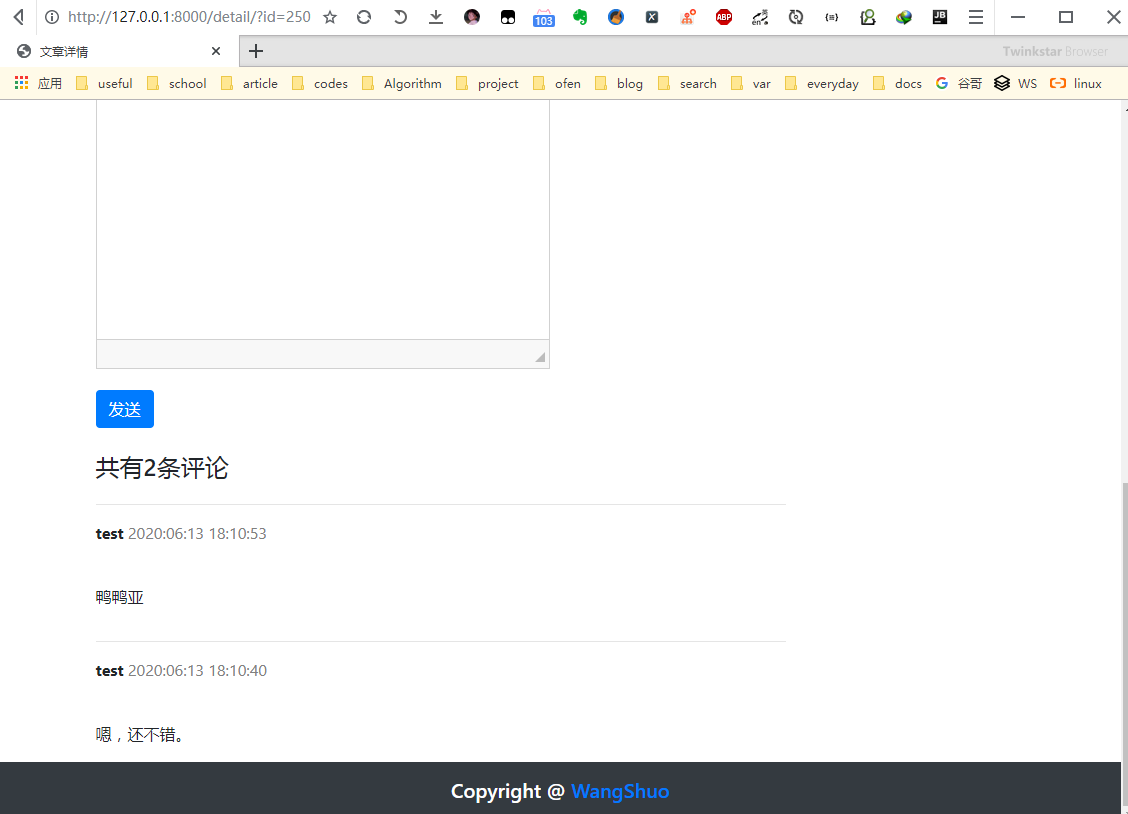
This article focuses on the Python back-end part. Since only using vue as the js framework is not a front-end separation project, the front-end is not introduced separately.
1, Project content (what to do)
This project implements a blog system on the web side, which allows multiple people to register and log in, and users can publish blogs on the website and browse the blogs published by others.
The practical significance is: when a group or a class needs to learn and communicate, it can be used. Everyone can share their learning experience on it, and then learn from each other. Because the project is divided into several parts, it is very convenient to find the relevant technology stack.
Main modules of the project
Demand driven development, first analyze the demand (here refer to the demand of other blog systems on the Internet):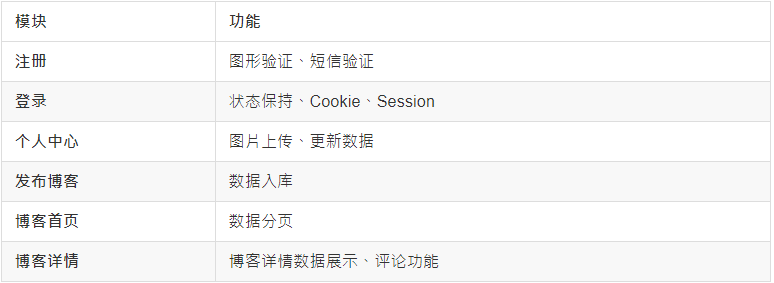
Main functions of the project:
- As long as the user has a mobile number, they can register and log in. When registering, they need picture verification code and SMS verification code;
- Users can choose to remember me after logging in, so that they can automatically log in even if the browser is closed next time;
- Users can modify their personal information, including uploading their avatars, etc;
- Blogs are classified by type. Administrators can modify the specific categories on the background management page;
- Users can write blog online, text editor adopts rich text editor, users can write HTML code and store it in database by using graphical interface;
- Users can view the blogs written by everyone, and comment on them at the same time. The display of blogs and comments use the paging function;
- The number of times users view blogs is recorded as the number of views, and the number of views is recorded as the number of comments. According to these two systems, articles with high popularity are automatically recommended.
2, Project plan (how to do it)
Project development mode
- Development mode: front end and back end are not separated;
- Back end framework: Django + Django template engine;
Language and tool version
- Python 3.6
- MySQL 5.7
- Django 3.0
- Redis 3.2
Database design
There are four main entities involved:
- Article: user: comment: Classification
Their relationship is as follows:
- An article corresponds to a classification, and a classification can have multiple articles, so the relationship between them is many to one;
- One user can publish multiple articles and multiple comments at the same time, and each comment only corresponds to one user, and each article only belongs to one user, so there is one to many between users, articles and comments;
With entities and relationships, the following is represented by ER diagram: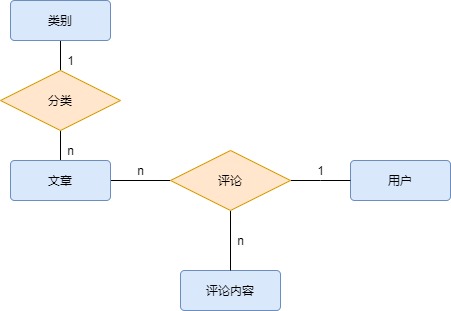
Add attributes (incomplete attributes, which will be supplemented in the conceptual model):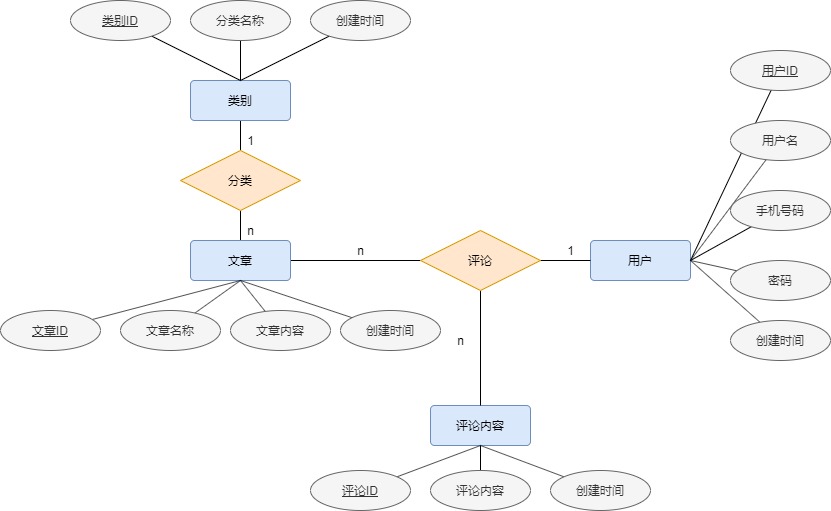
Then design its conceptual model: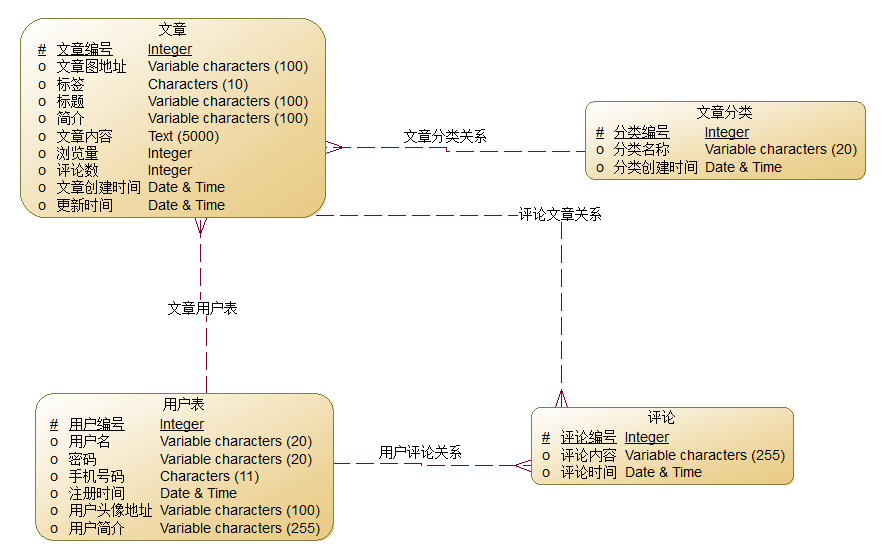
The corresponding physical model is: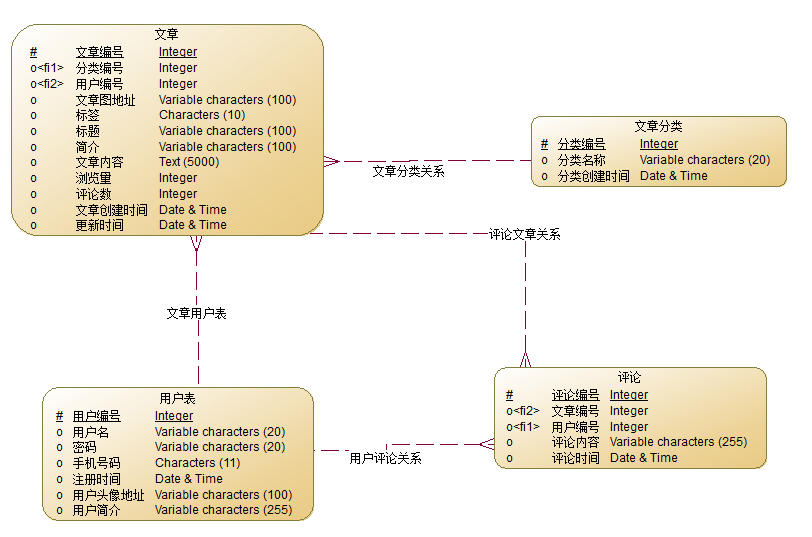
In the physical model, due to the one to many relationship, two foreign key constraints are added to the article table and comment table.
Create data table
Generally, we can directly create databases and tables here, but because Django is used, it integrates ORM framework, namely Object Relation Mapping, so we don't need to write SQL statements directly, but can write entity classes, and then execute Django's file migration command to automatically generate data tables.
Let's first look at the User entity:
class User(AbstractUser):
    # Mobile number (length 11, unique, not empty)
    mobile = models.CharField(max_length=11, unique=True, blank=False)

    # avatar information (picture type, saved in avatar folder under the project directory_ Distinguished by creating folders by date, can be blank)
    avatar = models.ImageField(upload_to='avatar/%Y%m%d/', blank=True)

    # Profile information (maximum length is 500, can be empty)
    user_desc = models.CharField(max_length=500, blank=True)
Three fields are defined here. Why?
Because we have integrated an entity class AbstractUser that comes with Django, which provides us with general information such as user name, name, email address, etc., we do not need to specify it separately.
But to state in the configuration file that you have changed the user class:
# Replace the user model of the system with our customized user model
AUTH_USER_MODEL = 'users.User'
Automatically generated users table: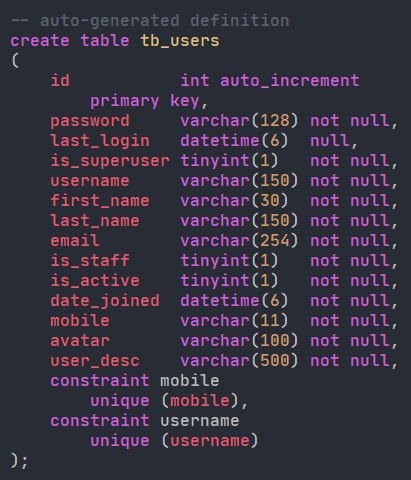
Article classification entity:
class ArticleCategory(models.Model):
    """
    //Article classification entity class
    """
    # Column title
    title = models.CharField(max_length=100, blank=True)
    # Creation time
    created = models.DateTimeField(default=timezone.now)
Article entity class:
class Article(models.Model):
    """
    //Article entity class
    """
    # Foreign key constraint: associated with user table: set cascading deletion: delete the user and delete all articles of the user at the same time
    author = models.ForeignKey(User, on_delete=models.CASCADE)

    # Article title map: picture type, saved to the article folder under the project directory_ Distinguished by creating folders by date, can be blank
    avatar = models.ImageField(upload_to='article/%Y%m%d/', blank=True)

    # Article column is a "one to many" foreign key: one column corresponds to multiple articles
    category = models.ForeignKey(
        ArticleCategory,
        null=True,
        blank=True,
        on_delete=models.CASCADE,
        related_name='article'
    )

    # Article tag
    tags = models.CharField(max_length=20, blank=True)

    # Article title
    title = models.CharField(max_length=100, null=False, blank=False)

    # outline
    summary = models.CharField(max_length=200, null=False, blank=False)

    # Text
    content = models.TextField()

    # Views: positive integer
    total_view = models.PositiveIntegerField(default=0)

    # Number of article comments
    comments_count = models.PositiveIntegerField(default=0)

    # Article creation time: write current time by default
    created = models.DateTimeField(default=timezone.now)

    # Article update time: automatically write the current time
    updated = models.DateTimeField(auto_now=True)
Comment entity class:
class Comment(models.Model):
    """
    //Comment entity class
    """
    # Comments
    content = models.TextField()
    # Articles reviewed
    article = models.ForeignKey(Article, on_delete=models.SET_NULL, null=True)
    # Commenting users
    user = models.ForeignKey('users.User', on_delete=models.SET_NULL, null=True)
    # Comment time
    created = models.DateTimeField(auto_now_add=True)
Project structure and routing settings
The project structure is as follows: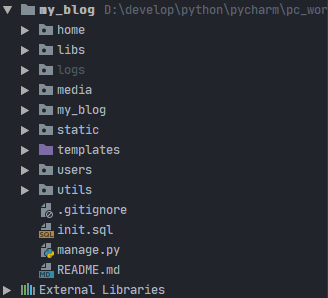
- home as sub app: manage blogs and comments
- libs is a dependent third-party library: picture verification code and mobile phone number SMS verification code;
- logs not delivered: used for log output;
- media resource file: head picture and so on;
- my_blog main application: used to register other applications, set super administrator, etc;
- Static static resource directory: js, css, etc;
- Template template engine folder: several main pages;
- User subapplication: it is used to realize user login and other functions;
- utils tool class package: Custom loading code information;
The routing structure is as follows: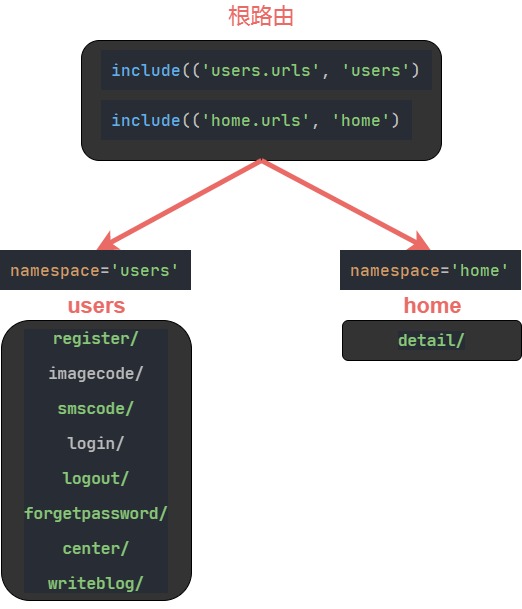
Root route:
urlpatterns = [
    path('admin/', admin.site.urls),

    # include first set a tuple (routing of sub application, name of sub application)
    # Then set the namespace namespace to prevent the problem of duplicate routing names in different applications
    path('', include(('users.urls', 'users'), namespace='users')),
    path('', include(('home.urls', 'home'), namespace='home'))
]
users sub route:
urlpatterns = [

    # Path (route, view function name)
    path('register/', RegisterView.as_view(), name='register'),

    # Route of picture verification code
    path('imagecode/', CaptchaView.as_view(), name='imagecode'),

    # Route of mobile phone verification code
    path('smscode/', SmsCodeView.as_view(), name='smscode'),

    # Route of login
    path('login/', LoginView.as_view(), name='login'),

    # Log out
    path('logout/', LogoutView.as_view(), name='logout'),

    # Forget password
    path('forgetpassword/', ForgetPasswordView.as_view(), name='forgetpassword'),

    # User profile page
    path('center/', UserCenterView.as_view(), name='center'),

    # Route for writing articles
    path('writeblog/', WriteBlogView.as_view(), name='writeblog'),
]
home sub route:
urlpatterns = [
    # The route of the home page means that if you don't write any path, you will jump to the home page
    path('', IndexView.as_view(), name='index'),
    path('detail/', DetailView.as_view(), name='detail'),
]
Here, the route namespace is used to set the route namespace, mainly for the convenience of later reference.
For example, this is often written on the page:
3, Technical points (Key Technologies)
- Using Vue as the front frame;
- Django is used as the back-end framework;
- Using Django template engine;
- Send by SMS of cloud communication;
- Using session technology;
The registration part is too complicated. I don't need SMS verification code for small websites. The main reason I do this is to learn to use SMS verification code for authentication, because I didn't use SMS verification code before development, and I used email verification code. This time, I will be familiar with similar projects after I use it in this project Yes.
Log management
It is worth mentioning that the logging function of Django is used. The configuration in the settings file is as follows:
# Set up log
LOGGING = {
    'version': 1,
    'disable_existing_loggers': False,  # Disable existing loggers or not
    'formatters': {  # Format of log information display
        'verbose': {
            'format': '%(levelname)s %(asctime)s %(module)s %(lineno)d %(message)s'
        },
        'simple': {
            'format': '%(levelname)s %(module)s %(lineno)d %(message)s'
        },
    },
    'filters': {  # Filtering logs
        'require_debug_true': {  # django only outputs logs in debug mode
            '()': 'django.utils.log.RequireDebugTrue',
        },
    },
    'handlers': {  # Log processing method
        'console': {  # Output log to terminal
            'level': 'INFO',
            'filters': ['require_debug_true'],
            'class': 'logging.StreamHandler',
            'formatter': 'simple'
        },
        'file': {  # Output the log to the file. The log will be saved to the logs folder of the project directory in the form of a file;
            'level': 'INFO',
            'class': 'logging.handlers.RotatingFileHandler',
            'filename': os.path.join(BASE_DIR, 'logs/blog.log'),  # Location of log files
            'maxBytes': 300 * 1024 * 1024,
            'backupCount': 10,
            'formatter': 'verbose'
        },
    },
    'loggers': {  # Loggers
        'django': {  # A logger named django is defined
            'handlers': ['console', 'file'],  # You can output logs to both the terminal and the file at the same time
            'propagate': True,  # Continue to deliver log information
            'level': 'INFO',  # The minimum log level received by the logger is INFO
        },
    }
}
Then you can log/ blog.log View the log information under the file: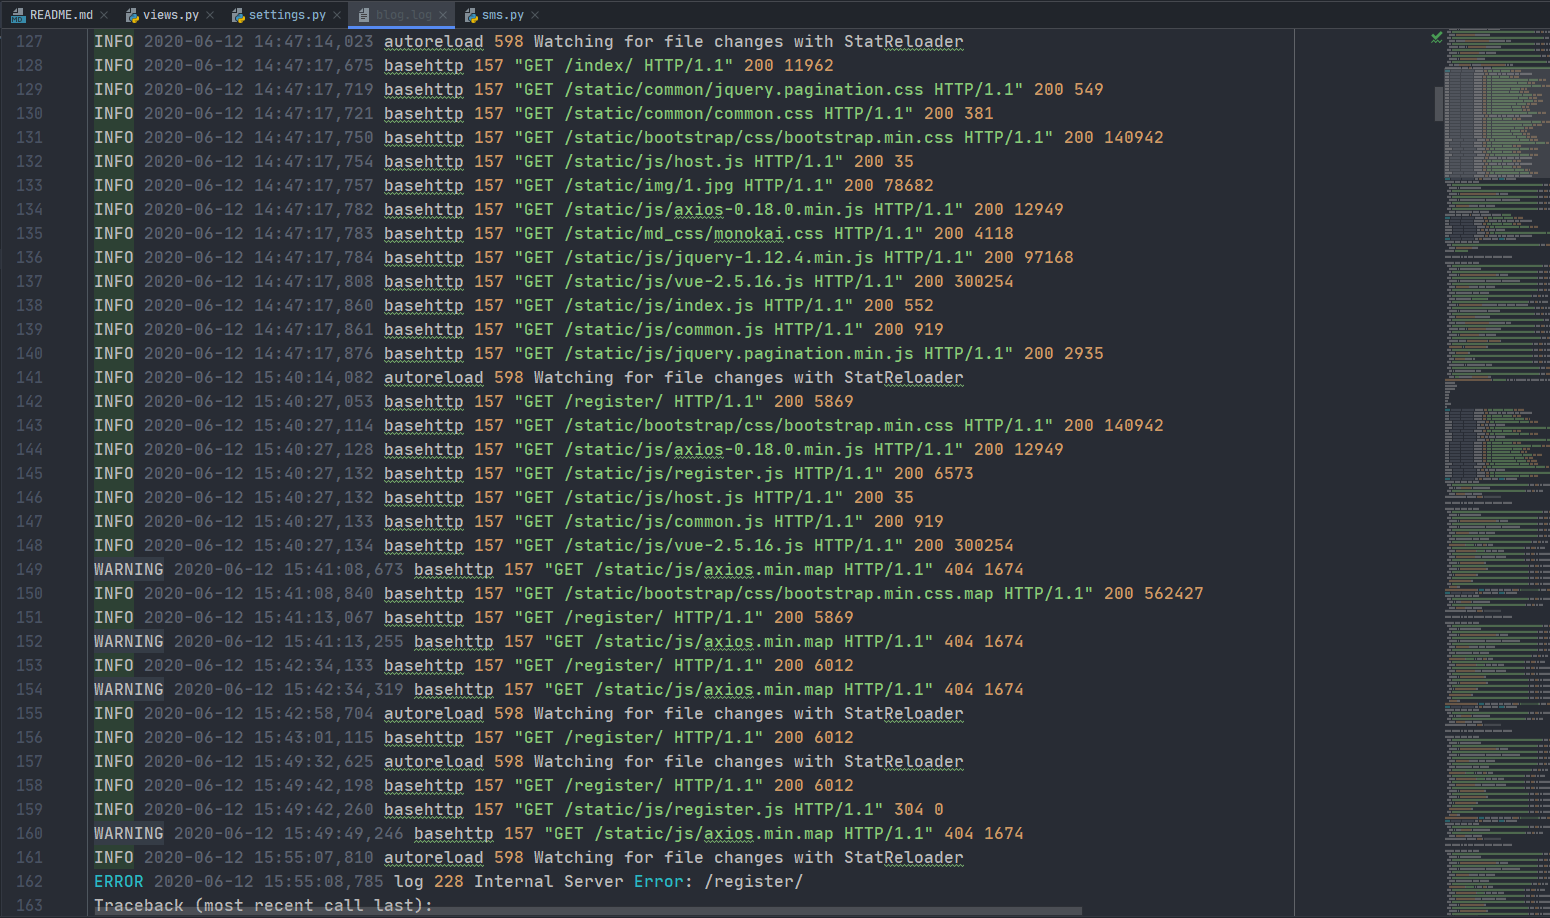
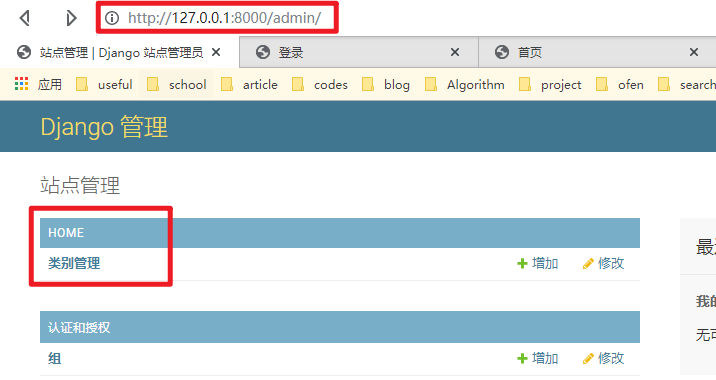
Manage the background through Django's own background management system:
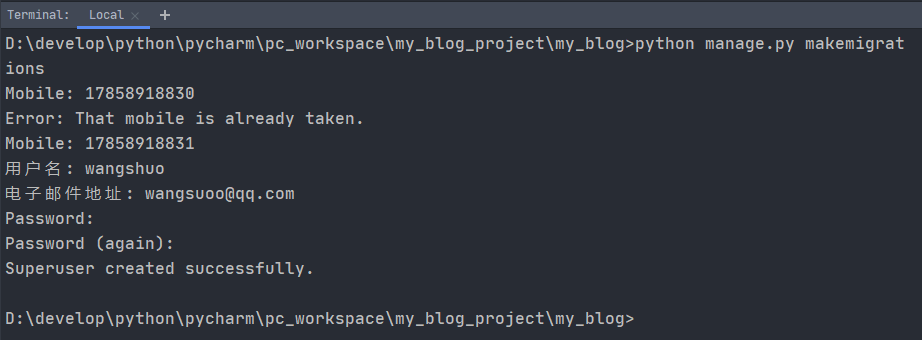
Create user
Create superuser
17858918831
wangshuo
wangsuoo@qq.com
wsuo2821
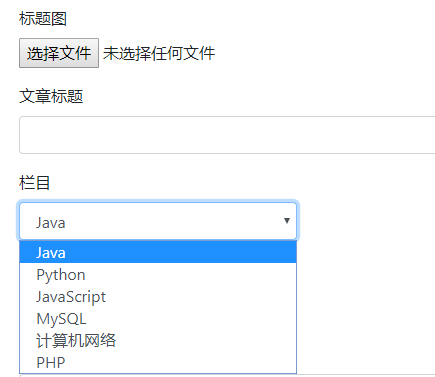
Article classification
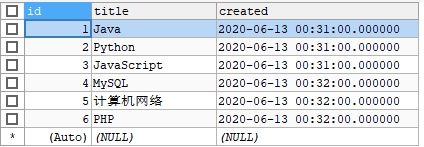
Copy more data through worms:
INSERT INTO tb_article(avatar,tags,title,summary,content,total_view,comments_count,created,updated,author_id,category_id)
SELECT avatar,tags,title,summary,content,total_view,comments_count,created,updated,author_id,category_id FROM tb_article;
4, Difficulties and solutions (all problems encountered, causes and solutions)
1. Picture verification code
Here, a third-party library is used to realize the function. The tool address is: https://bitbucket.org/akorn/wheezy.captcha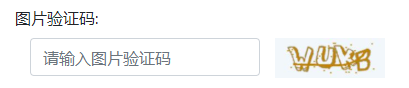
The front-end user can click to switch the verification code. The strategy used here is to write an interface to return the verification code picture. In order to realize the function of timed expiration, I saved it in Redis, so that the verification code will expire after the specified time:
"""
//Generate the verification code and store it in Redis
:param request: Request object
:return: Return value,Here is a response object
"""
# First get the uuid of the verification code from the front end
uuid = request.GET.get('uuid')
# Then make a judgment to ensure the UUID exists
if uuid is None:
    return HttpResponseBadRequest("Wrong verification code!")
# Generate verification code through verification code library
text, image = captcha.generate_captcha()
# Get Redis connection
redis_conn = get_redis_connection("default")
# Stored in Redis, (key, survival time, value) 300s = 5 minutes
redis_conn.setex("img:%s" % uuid, 300, text)
# Return to the front-end verification code picture
return HttpResponse(image, content_type="image/jpeg")
The UUID of the verification code is stored in Redis as the key, and the value of the real verification code is stored as the value, so that it can be directly compared during the later verification. If it is matched, it can be registered, and if it is not matched, an error is reported.
As shown in the figure, the values stored in Redis: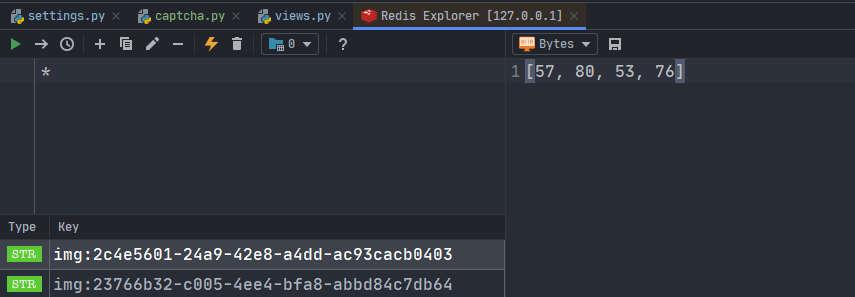
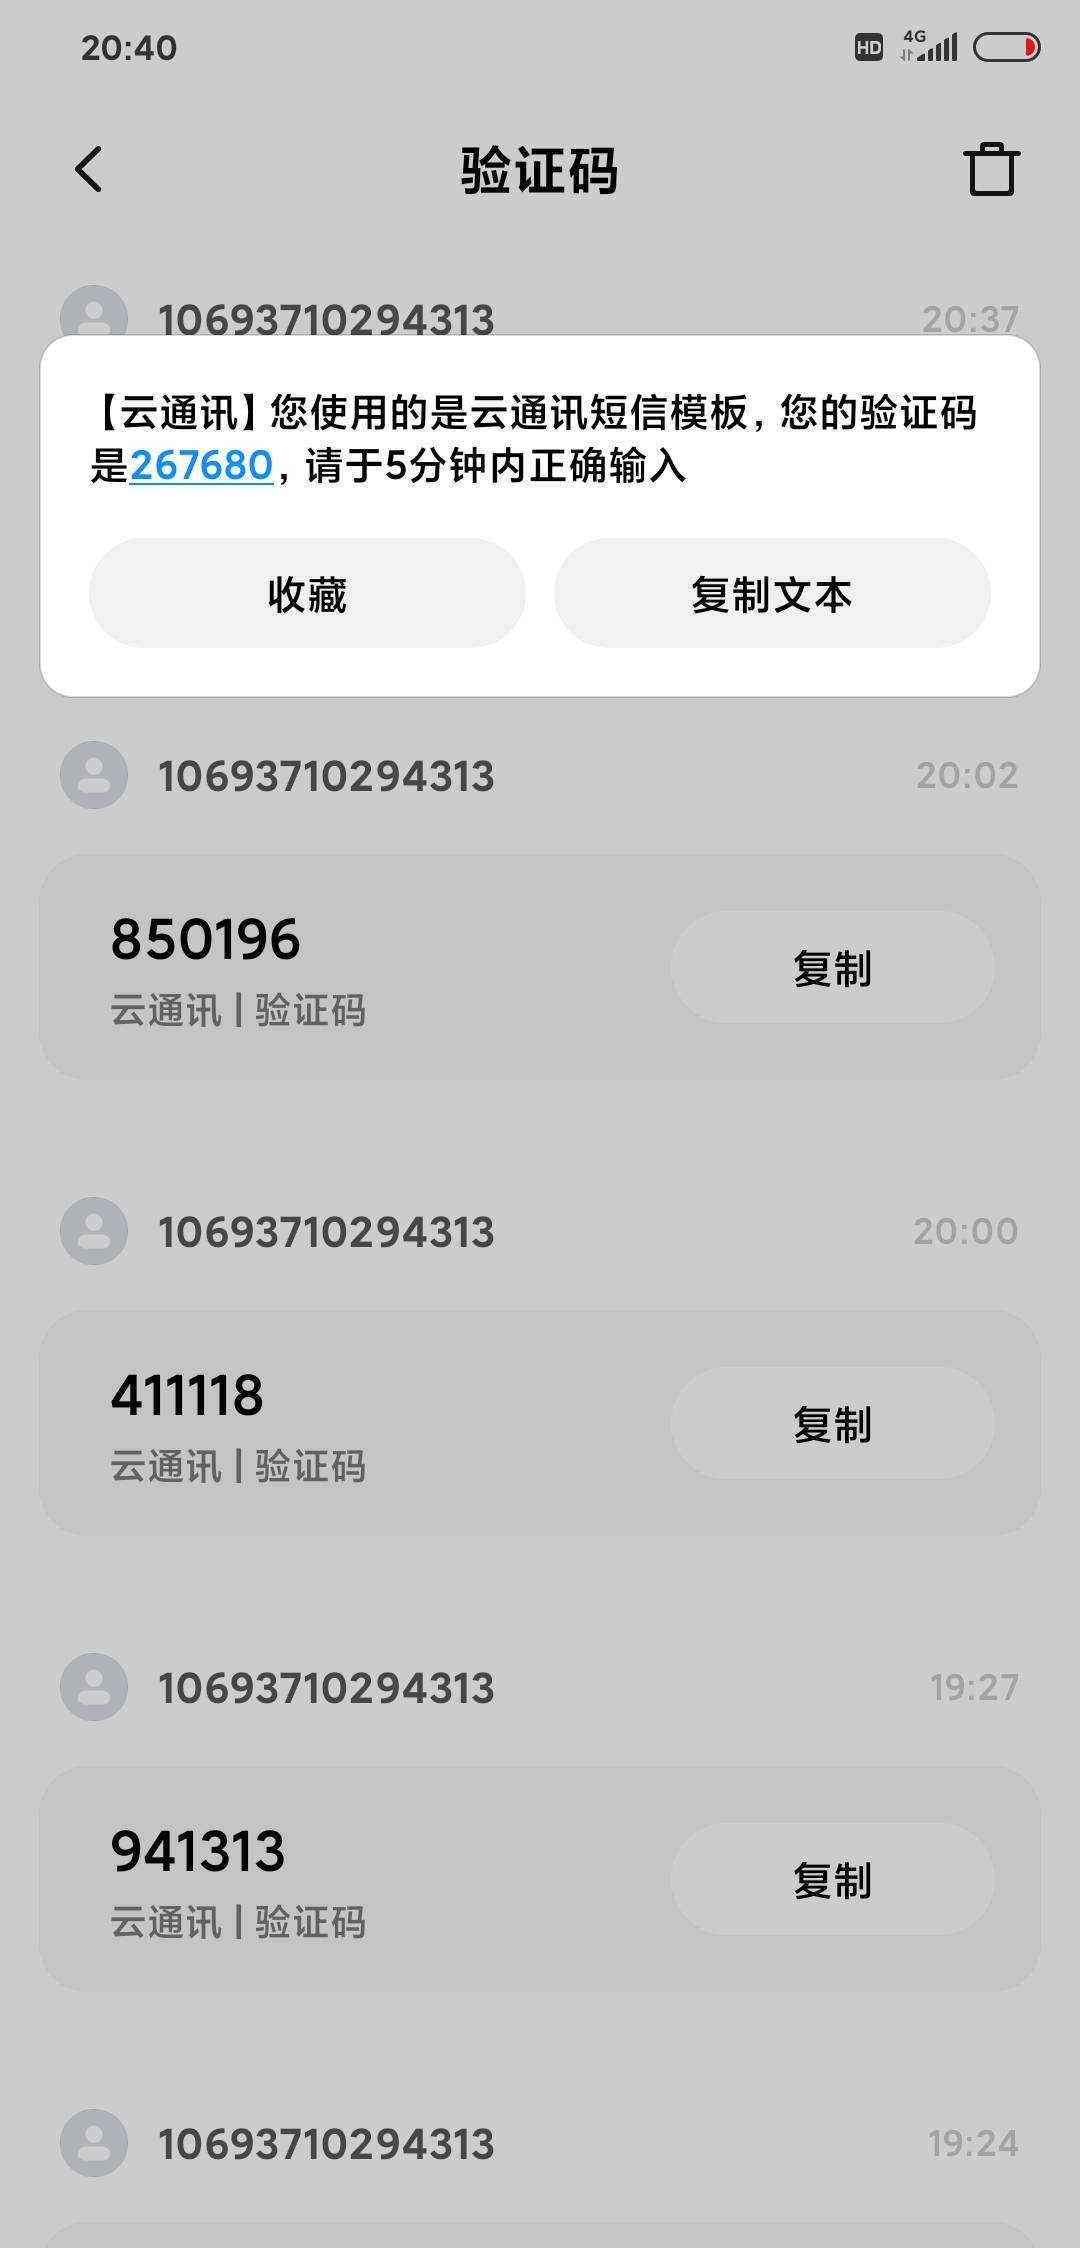
2. SMS verification code
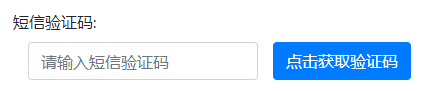
Here is the website of Ronglian cloud communication: https://www.yuntongxun.com/
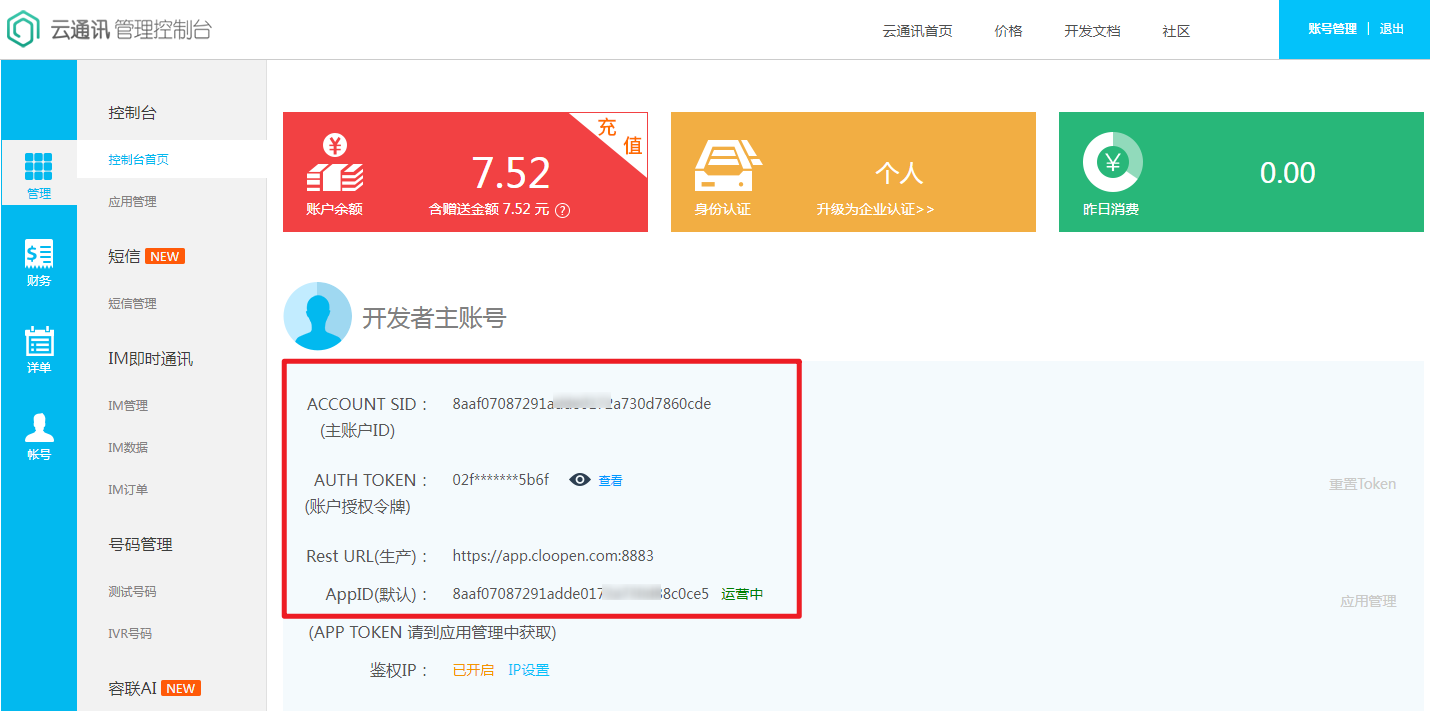
After registration, you can set your phone number as the test account, and only send SMS to your phone number. The successful test page is as follows:
It uses the officially provided interface, which can be used by filling in your own key information in the project file: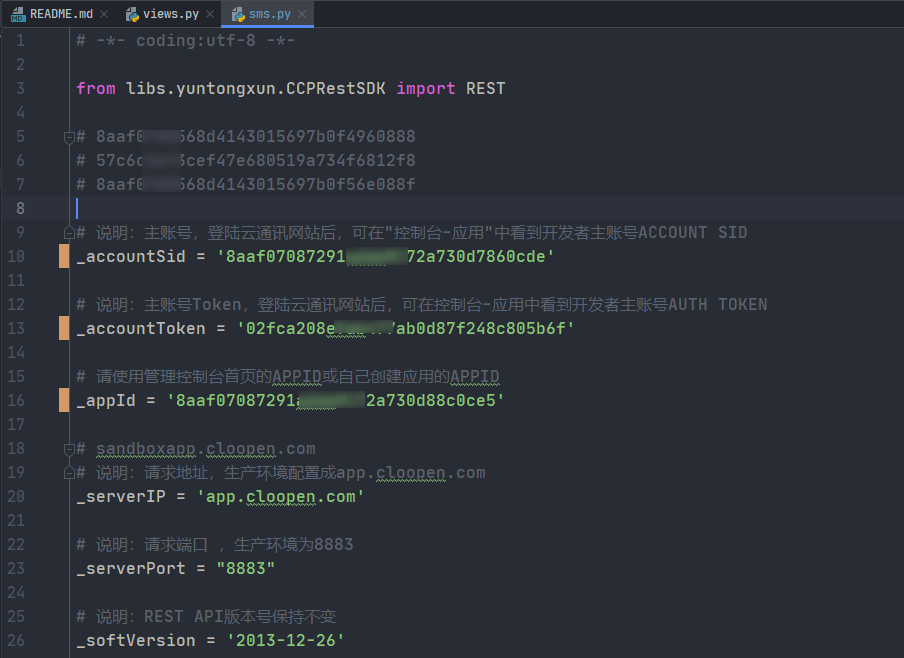
You can use the main function to test:
Interface design:
"""
    Use Random library to generate Random mobile phone verification code, and then store it in Redis. At the same time, print it out on the console for debugging
    Finally, the interface is called "Rong Lian Yun" to send the verification code.
        Note that at present, the verification code can only be sent to my designated mobile number. 17858918830
"""
#Random generation of 6-bit verification code
sms_code = '%06d' % randint(0, 999999)
#Output the verification code to the console
logging.info(sms_code)
#Save to Redis
redis_conn.setex('sms:%s' % mobile, 300, sms_code)
#Send SMS 17858918830;
#Parameter 1 is mobile number;
#Parameter 2 is the content in the template, your verification code is 1234, please fill in within 5 minutes;
#Parameter 3 is short message template, which can only be 1
CCP().send_template_sms(mobile, [sms_code, 5], 1)
#Response results
return JsonResponse({'code': RETCODE.OK,
                     'errmsg': 'send SMS successfully'})
The strategy adopted here is to use random library to generate a 6-bit random number, then save the verification code to Redis, and set the expiration time. In order to facilitate debugging, it is also printed to the console. In the actual test, my mobile phone can receive the verification code, and the registration is successful, that is, the official free interface response is relatively slow.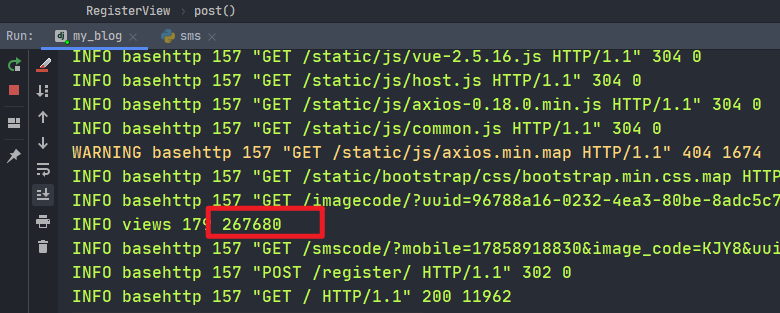
3. Log in status hold
State hold:
-
Write the unique identification information (such as user ID) of the authenticated user into the current session;
-
Django user authentication system provides login() method to encapsulate the operation of writing session, which helps us to maintain state quickly;
-
login() location: django.contrib.auth H. init__ . py file.
At the same time, if the user clicks the remember me button, the login information will be written into the cookie.
# Authentication login user: authentication is the authentication method of Django
user = authenticate(mobile=mobile, password=password)
if user is None:
    return HttpResponseBadRequest('Wrong user name or password')
# Maintain login status
login(request, user)
# Jump the page according to the next parameter: the parameter passed by the user information page
nex = request.GET.get('next')
if nex:
    response = redirect(nex)
else:
    response = redirect(reverse('home:index'))
# Store in Cookie
if remember != 'on':
    # The user didn't choose to remember me. The browsing area will expire when the session ends
    request.session.set_expiry(0)
    response.set_cookie('is_login', True)
    response.set_cookie('username', user.username, max_age=30 * 24 * 3600)
else:
    # Users choose to remember me: set_expiry expires in two weeks by default
    request.session.set_expiry(None)
    response.set_cookie('is_login', True, max_age=14 * 24 * 3600)
    response.set_cookie('username', user.username, max_age=30 * 24 * 3600)
In addition, because the name of Redis is configured as session, it will be automatically stored in Redis for one month. That is to say, you do not need to log in again within one month after the browser is closed.
"session": {  # session
    "BACKEND": "django_redis.cache.RedisCache",
    "LOCATION": "redis://127.0.0.1:6379/1",
    "OPTIONS": {
        "CLIENT_CLASS": "django_redis.client.DefaultClient",
    }
},


# Change session access from database storage to Redis storage
SESSION_ENGINE = "django.contrib.sessions.backends.cache"
SESSION_CACHE_ALIAS = "session"
I tested it two days ago, and now Redis also includes:
To view the Cookie information used: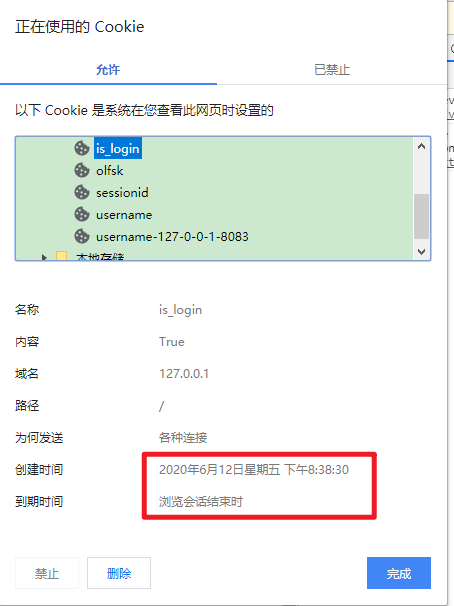
# The default authentication method is to authenticate username. We need to change the authentication field to mobile.
# So we need to modify it in the User's model
USERNAME_FIELD = 'mobile'
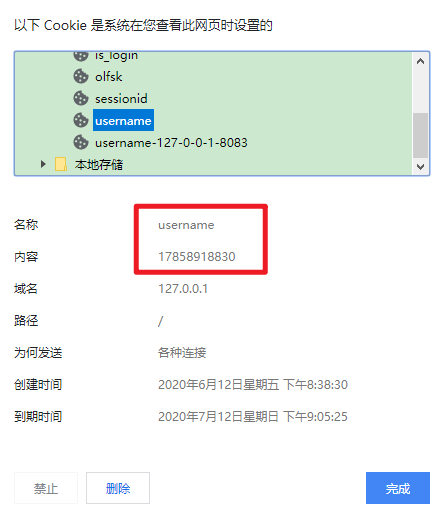
You can see that the phone number has been stored in the cookie as username
4. Log out
Use template language:
<a class="dropdown-item" href='{% url "user:logout" %}'>Sign out</a>
Login is displayed: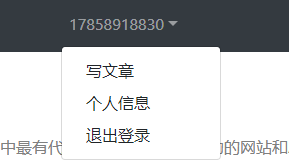
At this time, click exit to log in and find that there is no more: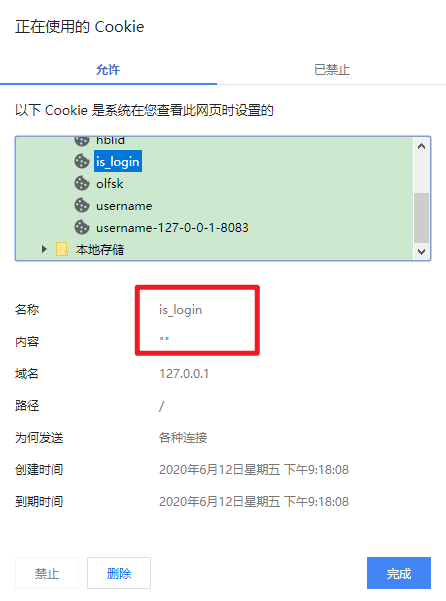
5. Picture upload
Pictures belong to static resources. Before uploading pictures, I'll talk about how to access them. I created a static folder in the root directory, and then configured the following information in settings:
# Routes to static resources
STATIC_URL = '/static/'

# Set the load path of local static resources
STATICFILES_DIRS = [
    os.path.join(BASE_DIR, 'static')
]
After the image upload is encapsulated by Django, it becomes very simple. When I define the user entity, I specify the upload folder:
# avatar information (picture type, saved in avatar folder under the project directory_ Distinguished by creating folders by date, can be blank)
avatar = models.ImageField(upload_to='avatar/%Y%m%d/', blank=True)
But this is not the only way. You need to specify the access path and access route.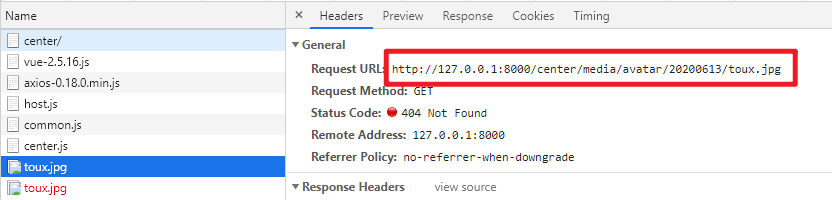
# Set image upload path
MEDIA_ROOT = os.path.join(BASE_DIR, 'media/')

# Unified routing of pictures
MEDIA_URL = '/media/'
# Set picture routing access rules
urlpatterns += static(settings.MEDIA_URL, document_root=settings.MEDIA_ROOT)
After modification: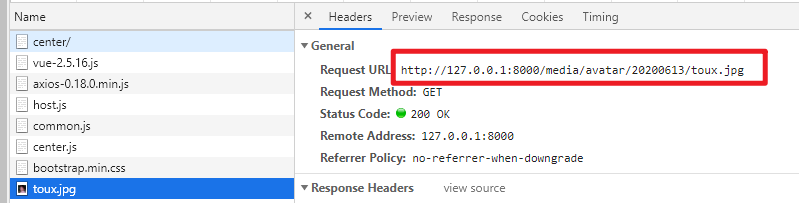
6. Cross domain problem
There is nothing wrong, but I can't access it. The error information is as follows: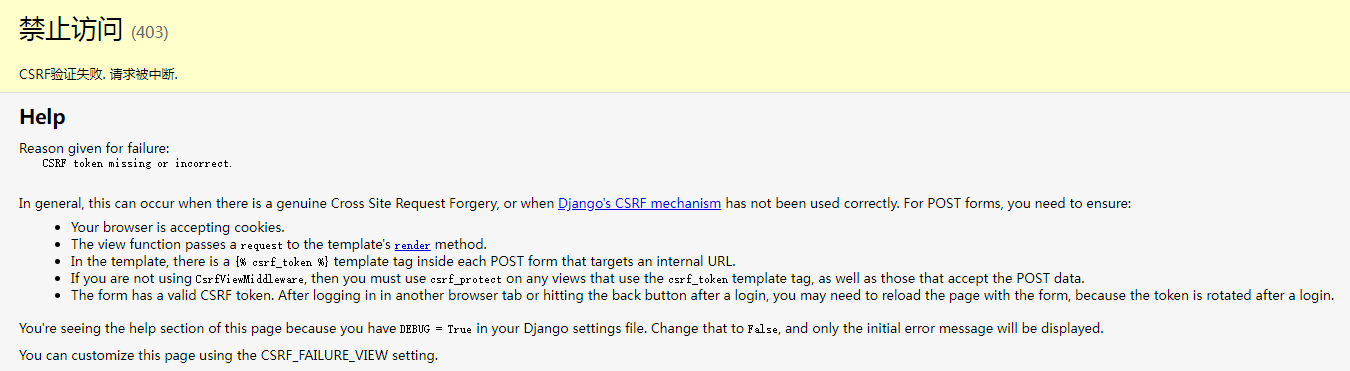
Seeing CSRF brings up the cross domain problem, because similar situations have been encountered in the previous Web development, which can be solved in the front-end or the back-end. Django provides a simpler method: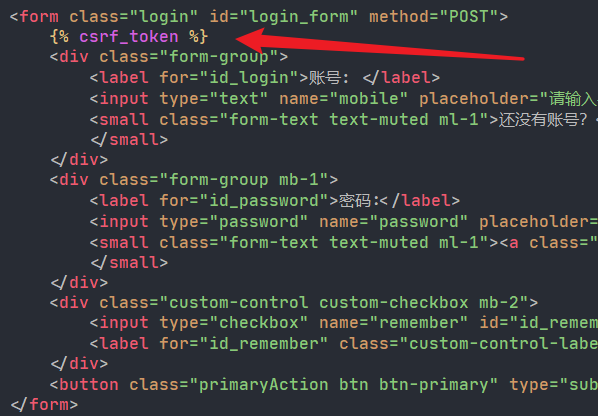
Just add a label directly under the form.
7. User access issues
Classes that come with Django: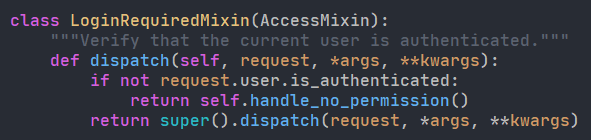
Let our class implement this class: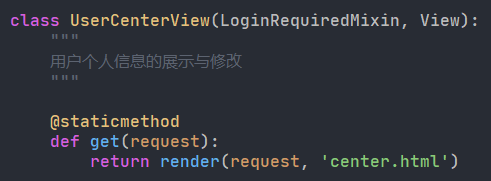
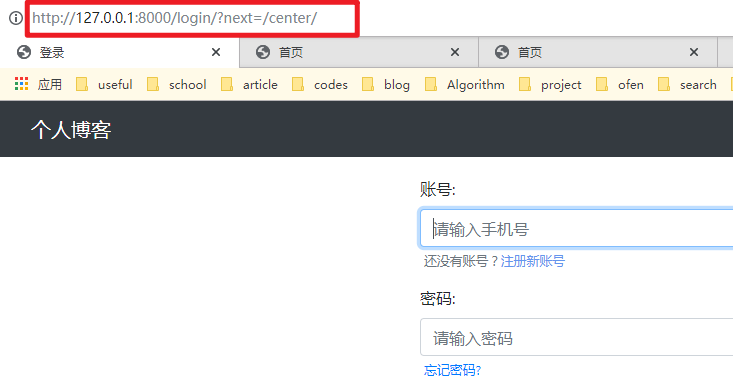
Then start: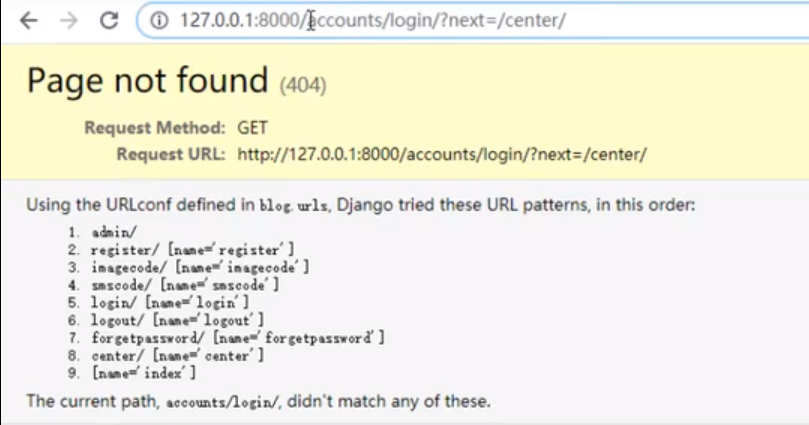
The error report cannot be found because the default jump connection of Django is accounts, which needs to be modified in the settings:
# Set the route for users not logged in to jump
LOGIN_URL = '/login/'
😝 Source address: https://gitee.com/wsuo/Blog_Django Find a Star ⭐.
Getting started with Django: building a popular blog system