I've always envied others for making wheels and open source projects for others to use. I also want to do this. I can learn little by myself. This time, I will upload my own writing tools to Maven's central warehouse.
The detailed step-by-step tutorial is shown as follows:
Notice the Maven addresses at first:
- Work order management: https://issues.sonatype.org
It is the place where you apply for upload qualification and groupId. You can register an account, create and manage an issue. The Jar package is released in the way of solving the issue
- Component warehouse: https://oss.sonatype.org/#welcome
Upload the jar package here, and the Release will be synchronized to the maven central warehouse.
- Warehouse image: http://search.maven.org/
The final artifact can be found here.
Create a new project Issue
Step 1: register sonatype
because Maven central warehouse The enterprise Sonatype,Inc. is responsible for operation and maintenance, so you need to go to https://issues.sonatype.org/secure/Signup!default.jspa Sign up for an account (skip this step if you already have one).
Step 2: create a work order (nexus)
Click the "create" button in the header header to create a work order. The main purpose is to register and upload the basic information of jar package. The main purpose of the work order is to pass the review. There are two purposes: 1. To prevent duplication, to restrict the groupid specification, and to define the domain name to which the groupid belongs
After you log in, you need to create a new issue. Issue is the meaning of the problem. It means that you have submitted a work order to the staff of Sonatype to apply for the permission to open the Maven central warehouse.
Click on the top New Button, fill in the application form to submit the application.
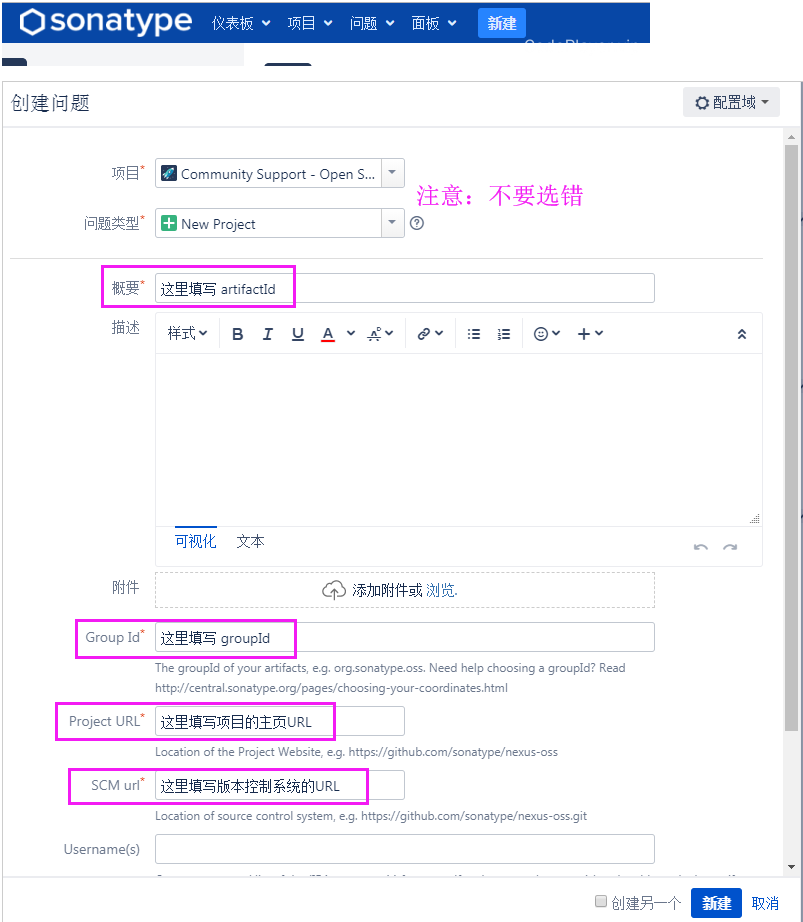
- Project URL: project address.
- SCM URL: git address of the project clone.
- Summary: name your jar package (no requirement).
- Group Id: Project ID.
[reminder] make sure that the group id corresponds to the domain name. It is recommended to use the personal domain name.
Note: groupId cannot be filled in at will.
- If you (or your organization) have your own domain name, you can fill in your own domain name. During the audit, the staff will give you feedback to verify the ownership of the domain name. You can take one of the following two ways to complete the verification:
- Add a TXT record pointing to the Issue number for the domain name;
- Redirect access to the domain name to your project home address (Project URL).
- If you don't have your own domain name, you can only use the domain name of the project's hosting party. For example, your project is in Github, and the home address is https://github.com/username/projectName , then you can only use io.github.username Or com.github.username As groupId.
After clicking Create, you will enter a jira page (sonatype uses jira to track the progress of each project). At the same time, you will receive an email in the mailbox you used when you registered, indicating that the task was created successfully and is waiting for processing.
After the submission is successful, you need to be patient and wait for the review. However, don't worry. The audit efficiency of Sonatype staff is very high. Within the working time range, they will respond within an hour.
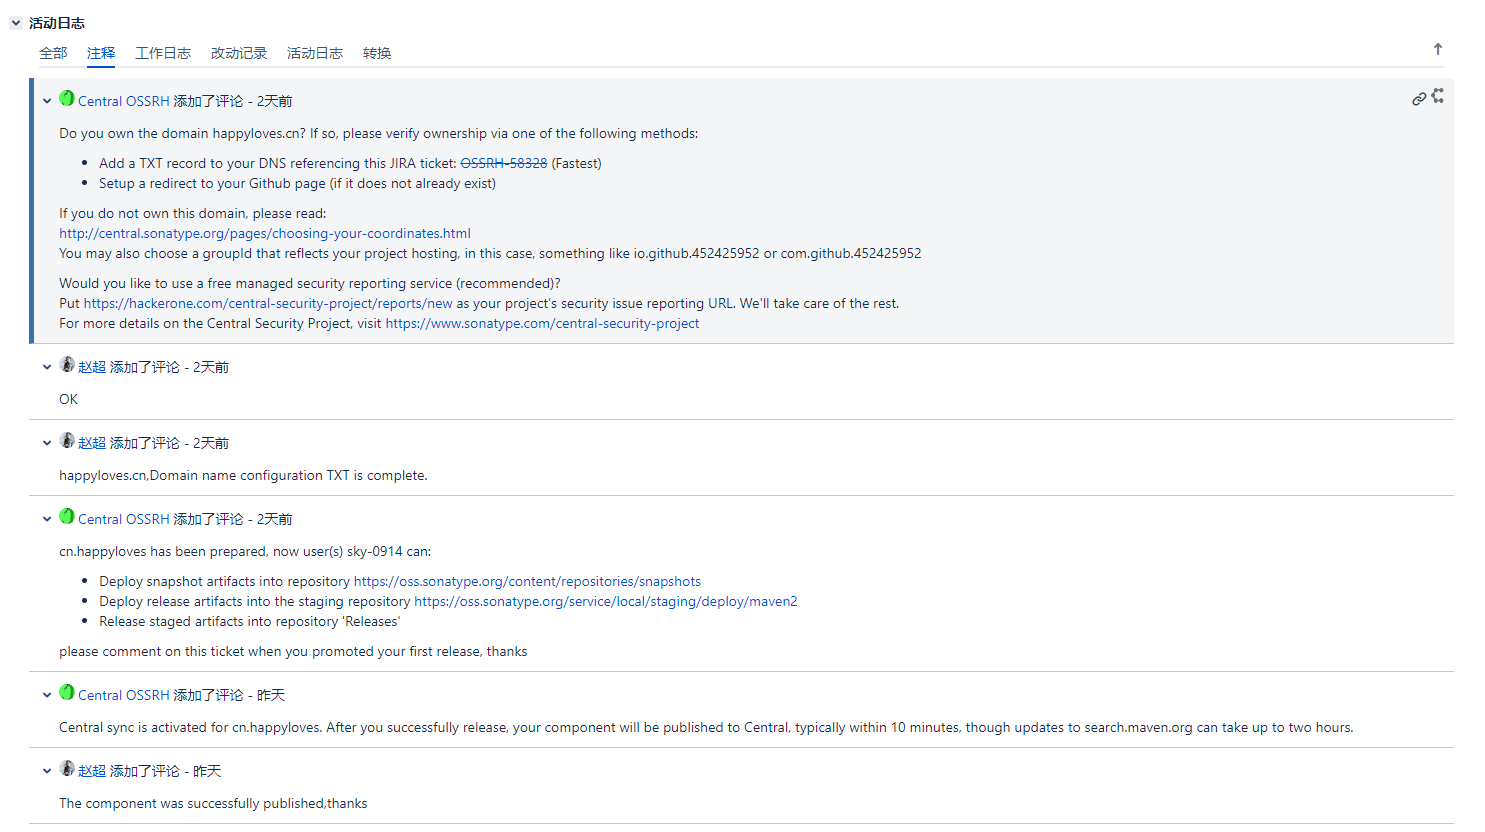
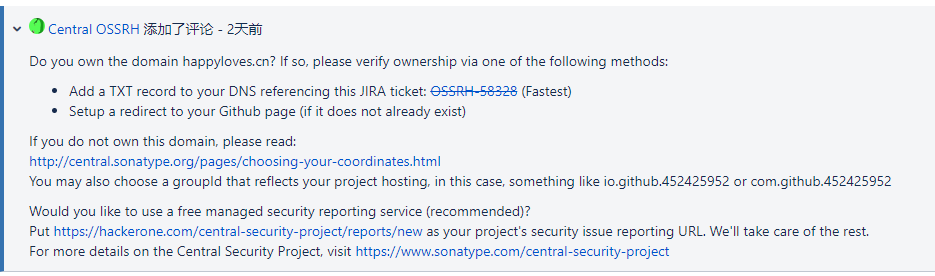
Because I use my own domain name, I need to add a TXT record pointing to the Issue number for the domain name (that is, the address you created for this problem: https://issues.sonatype.org/browse/OSSRH-58328).
Need to reply to staff after adding TXT record
-
After creating a new work order, the staff will reply to you. You need to verify the ownership of your domain name
-
After adding the TXT record, I will reply to the staff

-
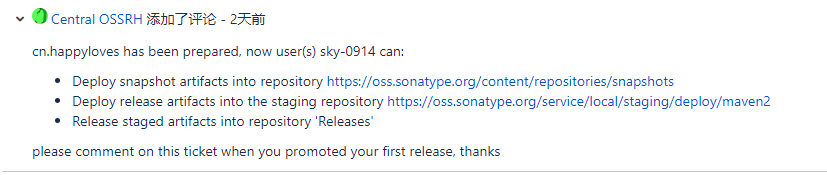
The staff will reply to you after the verification, so that you can upload and build your jar package. When the work order status changes to "solved", you can upload the maven project
gpg environment installation
win download address: https://www.gnupg.org/download/

Install next
Mac installation: brew install gpg
After installing win or mac, enter:
#gpg common commands
gpg --help #help
gpg --version #View version
gpg --list-keys #View generated keys
gpg --delete-key [user ID] #Delete key
gpg --gen-key #Generate key pair
#Step 1: enter the user name
#Step 2: enter email address
#Step 3: enter the password
#After that, you can use GPG -- List keys to view the generated keys

#Upload public key to server
gpg --keyserver hkp://pool.sks - keyservers.net  --Send keys ${public key ID} publishes public key to PGP key server
gpg --keyserver hkp://pool.sks - keyservers.net  --Recv keys ${public key ID} query whether the public key is published successfully

gpg --keyserver hkp://pool.sks-keyservers.net:11371 --send-keys 3C50A16F87687255F1AB96BC7E7CB475C5DF4735
gpg --keyserver hkp://keyserver.ubuntu.com:11371 --send-keys 3C50A16F87687255F1AB96BC7E7CB475C5DF4735
gpg --keyserver hkp://keys.gnupg.net:11371 --send-keys 3C50A16F87687255F1AB96BC7E7CB475C5DF4735

#Check whether the upload is successful
gpg --keyserver hkp://pool.sks - keyservers.net:11371  --Recv keys ${public key ID}

gpg --keyserver hkp://pool.sks-keyservers.net:11371 --recv-keys 3C50A16F87687255F1AB96BC7E7CB475C5DF4735
gpg --keyserver hkp://keyserver.ubuntu.com:11371 --recv-keys 3C50A16F87687255F1AB96BC7E7CB475C5DF4735
gpg --keyserver hkp://keys.gnupg.net:11371 --recv-keys 3C50A16F87687255F1AB96BC7E7CB475C5DF4735

#Export key pair
gpg --armor --output "Output filename" --export "user ID"

gpg --armor --output C:\Config\gpg\test-public-key.asc --export  "user ID"

gpg --armor --output C:\Config\gpg\test-private-key.asc --export-secret-keys

#Import key
gpg --import test-public-key.asc #Import public key
gpg --import test-private-key.asc #Import private key
- Enter GPG -- Gen key to generate a key pair
- Upload key pair public key to server
Configure Maven
The Maven configuration files to be modified include: setting.xml (global level) and pom.xml (project level)
setting.xml (global level)
The username here is the username of the sonatype account you registered at the beginning, not the email you filled in at the time of registration.
    <servers>
        <server>
            <id>ossrh</id>
            <username>user name</username>
            <password>password</password>
        </server>
    </servers>
Use the user name and password of the registered Sonatype account to configure the above server information.
Here id ossrh should match the following pom.xml The id in the snapshot repository and the repository are consistent.
pom.xml (project level)
explain
<name>ali-tools</name>
<url>https://github.com/452425952/ali-tools</url>
<description>Ali Tools project for Spring Boot</description>
certificate
<licenses>
    <license>
        <name>The Apache Software License, Version 2.0</name>
        <url>http://www.apache.org/licenses/LICENSE-2.0.txt</url>
        <distribution>repo</distribution>
    </license>
</licenses>
scm software configuration management
<scm>
    <connection>https://github.com/452425952/ali-tools.git</connection>
    <developerConnection>https://github.com/452425952/ali-tools.git</developerConnection>
    <url>https://github.com/452425952/ali-tools</url>
</scm>
Developer Information
<developers>
    <developer>
        <id>sky-0914</id>
        <name>sky-0914</name>
        <email>sky-0914@qq.com</email>
        <roles>
            <role>Developer</role>
        </roles>
        <timezone>+8</timezone>
    </developer>
</developers>
Packaging configuration: since publishing to maven central warehouse requires us to simultaneously upload jar s to Javadoc, source and ASC (use gpg to generate to verify), we need to add the following building plug-ins to maven
<build>
    <plugins>
        <!-- Skip test on packaging -->
        <plugin>
            <groupId>org.apache.maven.plugins</groupId>
            <artifactId>maven-surefire-plugin</artifactId>
            <version>2.18.1</version>
            <configuration>
                <skipTests>true</skipTests>
            </configuration>
        </plugin>

        <plugin>
            <groupId>org.apache.maven.plugins</groupId>
            <artifactId>maven-compiler-plugin</artifactId>
            <configuration>
                <source>${java.version}</source>
                <target>${java.version}</target>
                <encoding>UTF-8</encoding>
            </configuration>
        </plugin>
        <!-- The following are all uploads jar Default configuration is not modified -->
        <plugin>
            <groupId>org.sonatype.plugins</groupId>
            <artifactId>nexus-staging-maven-plugin</artifactId>
            <version>1.6.8</version>
            <!-- autoReleaseAfterClose The value of is true,The script will automatically complete on the platform close,release You will have successfully published -->
            <extensions>true</extensions>
            <configuration>
                <serverId>ossrh</serverId>
                <nexusUrl>https://oss.sonatype.org/</nexusUrl>
                <autoReleaseAfterClose>true</autoReleaseAfterClose>
            </configuration>
        </plugin>

        <plugin>
            <groupId>org.apache.maven.plugins</groupId>
            <artifactId>maven-release-plugin</artifactId>
            <version>2.5.3</version>
            <configuration>
                <autoVersionSubmodules>true</autoVersionSubmodules>
                <useReleaseProfile>false</useReleaseProfile>
                <releaseProfiles>release</releaseProfiles>
                <goals>deploy</goals>
            </configuration>
        </plugin>

        <plugin>
            <groupId>org.apache.maven.plugins</groupId>
            <artifactId>maven-gpg-plugin</artifactId>
            <version>1.5</version>
            <executions>
                <execution>
                    <id>sign-artifacts</id>
                    <phase>verify</phase>
                    <goals>
                        <goal>sign</goal>
                    </goals>
                </execution>
            </executions>
        </plugin>

        <plugin>
            <groupId>org.apache.maven.plugins</groupId>
            <artifactId>maven-source-plugin</artifactId>
            <version>2.2.1</version>
            <executions>
                <execution>
                    <id>attach-sources</id>
                    <goals>
                        <goal>jar-no-fork</goal>
                    </goals>
                </execution>
            </executions>
        </plugin>

        <plugin>
            <groupId>org.apache.maven.plugins</groupId>
            <artifactId>maven-javadoc-plugin</artifactId>
            <version>2.9</version>
            <executions>
                <execution>
                    <id>attach-javadocs</id>
                    <goals>
                        <goal>jar</goal>
                    </goals>
                    <!-- JDK8 You must use the following configuration -->
                    <configuration>
                        <encoding>UTF-8</encoding>
                        <charset>UTF-8</charset>
                        <additionalparam>-Xdoclint:none</additionalparam>
                    </configuration>

                </execution>
            </executions>
        </plugin>
    </plugins>
</build>
Upload package file configuration
The id here needs to match the setting.xml The id in the server tag in corresponds to
<distributionManagement>
    <snapshotRepository>
        <id>ossrh</id>
        <url>https://oss.sonatype.org/content/repositories/snapshots</url>
    </snapshotRepository>
    <repository>
        <id>ossrh</id>
        <url>https://oss.sonatype.org/service/local/staging/deploy/maven2</url>
    </repository>
</distributionManagement>
Publish operation
Execute the following command to publish (if pom.xml If the value of autoReleaseAfterClose in is true, the script will automatically complete the operations of close and release on the platform, so far you will successfully publish, otherwise we will continue to see Step 2)
mvn clean deploy -X # -X can view details
There was a problem with the packaging process:
- javadoc format is wrong, so we need to solve the problem.
- Failuremessage no public key. This is because the gpg secret key has not been uploaded successfully. In actual operation, I know that the upload is successful, but I still give the prompt that I can only pack it several times more. I don't know why. Solution: if you know which key server will be queried, you can upload your key directly there.
- During the experiment, my actual execution result is (note that it may time out, just try several times more)
Sign in https://oss.sonatype.org , and then select staging Repositories
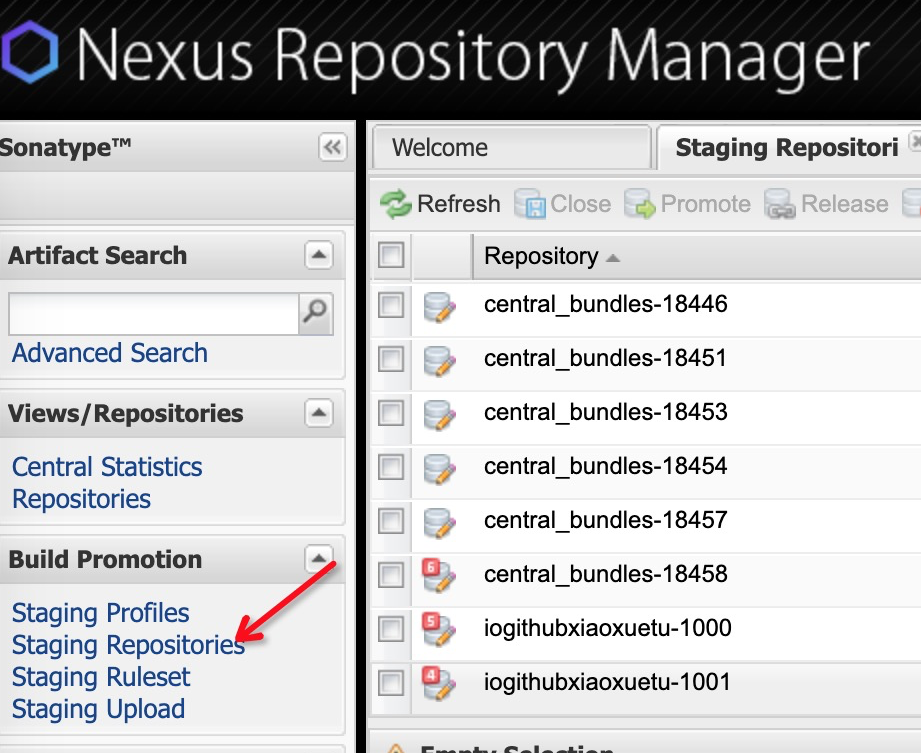
If the value of autoReleaseAfterClose in the pom file is not set, the components that need to be published manually need to perform Close and Release operations in turn

If the Release is successful and you are releasing the component for the first time, you need to reply "I have successfully released the component" when you create the issue. After about 2 hours, the component will be synchronized to the corresponding maven warehouse.

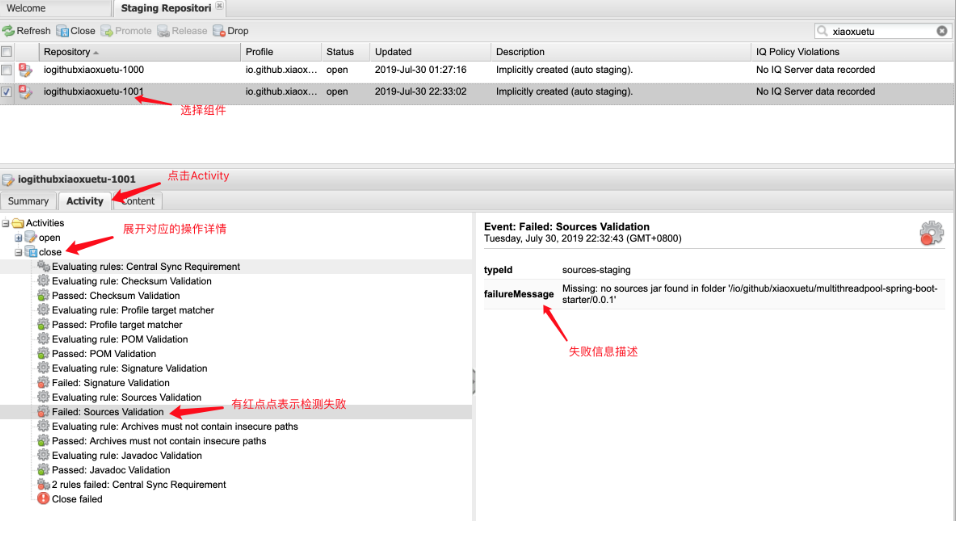
If Close or Release fails, you can check the reason and Google position as shown in the following figure, or reply to the consultation
Find open source libraries
Note that after the open source library is released, you still need to wait for a while to be here https://search.maven.org/ Find our open source libraries and see how to rely on your own.

Subsequent release to central warehouse
The first release is quite painful. When we release for the first time, we actually encounter many problems, and we also need to verify the Sonatype. The first time is always troublesome. It's so-called "everything is open and hard to get". The subsequent release actions are not so troublesome
The issuing command is the same as the original one; if it is issued on the same computer as the first time (and it has not been reinstalled, and the gpg key pair is still available), execute it directly
mvn clean deploy -X
If it is released by another computer, the original gpg key pair (public key and private key) needs to be exported and saved, and then re imported to the new computer (the above content introduces the common gpg commands)
#Export key pair
gpg --armor --output "Output filename" --export "user ID"

gpg --armor --output C:\Config\gpg\test-public-key.asc --export  "user ID"

gpg --armor --output C:\Config\gpg\test-private-key.asc --export-secret-keys

#Import
gpg --import test-public-key.asc #Import public key
gpg --import test-private-key.asc #Import private key
Reference article:
http://www.itmuch.com/work/sonartype-deploy-mvn-depencency-to-maven-central/
gpg key pair expiration solution: http://blog.didispace.com/maven-gpg-expire/
gpg: signing failed: Inappropriate ioctl for device
When uploading the jar to the central warehouse recently, there is a problem:
gpg: signing failed: Inappropriate ioctl for device
The reason is that gpg cannot pop up the password input page at the current terminal.
The solution is simple:
export GPG_TTY=$(tty)
Execute again, and a password input interface will pop up.
Mac hits maven package -- gpg: failed to sign
gpg: signing failed: Inappropriate ioctl for device
Because the GPG version is the latest version, you need to add two configurations under the. gnupg folder,
Modify in the two folders ~ /. gnupg under mac
gpg.conf And gpg-agent.conf Two files,
At gpg-agent.conf Add a new line in
allow-loopback-pinentry
stay gpg.conf add to
use-agent
pinentry-mode loopback
Save it.
Zhao xiaopang's personal blog