-
Purchase domain name. Example: example.com
-
Set multiple secondary domain names. As shown in the figure:
-
To configure the tomcat file:
-
Modify the server.xml File:
- The following configuration configures three containers with three different ports.
- Please note three points: ① port number: Connector port; ② container name: portservice name; ③ project storage address: Host appBase;
-
The sample configuration is as follows, which can be used directly.
<Service name="Catalina"> <Connector port="8080" protocol="HTTP/1.1" connectionTimeout="20000" redirectPort="8443" /> <Connector port="8009" protocol="AJP/1.3" redirectPort="8443" /> <Engine name="Catalina" defaultHost="localhost"> <Realm className="org.apache.catalina.realm.LockOutRealm"> <Realm className="org.apache.catalina.realm.UserDatabaseRealm" resourceName="UserDatabase"/> </Realm> <Host name="localhost" appBase="webapps" unpackWARs="true" autoDeploy="true"> <Valve className="org.apache.catalina.valves.AccessLogValve" directory="logs" prefix="localhost_access_log" suffix=".txt" pattern="%h %l %u %t "%r" %s %b" /> </Host> </Engine> </Service> <Service name="Catalina1"> <Connector port="8081" protocol="HTTP/1.1" connectionTimeout="20000" redirectPort="8443" /> <Connector port="8010" protocol="AJP/1.3" redirectPort="8443" /> <Engine name="Catalina1" defaultHost="localhost"> <Realm className="org.apache.catalina.realm.LockOutRealm"> <Realm className="org.apache.catalina.realm.UserDatabaseRealm" resourceName="UserDatabase"/> </Realm> <Host name="localhost" appBase="webapps1" unpackWARs="true" autoDeploy="true"> <Valve className="org.apache.catalina.valves.AccessLogValve" directory="logs" prefix="localhost_access_log" suffix=".txt" pattern="%h %l %u %t "%r" %s %b" /> </Host> </Engine> </Service> <Service name="Catalina2"> <Connector port="8082" protocol="HTTP/1.1" connectionTimeout="20000" redirectPort="8443" /> <Connector port="8011" protocol="AJP/1.3" redirectPort="8443" /> <Engine name="Catalina1" defaultHost="localhost"> <Realm className="org.apache.catalina.realm.LockOutRealm"> <Realm className="org.apache.catalina.realm.UserDatabaseRealm" resourceName="UserDatabase"/> </Realm> <Host name="localhost" appBase="webapps2" unpackWARs="true" autoDeploy="true"> <Valve className="org.apache.catalina.valves.AccessLogValve" directory="logs" prefix="localhost_access_log" suffix=".txt" pattern="%h %l %u %t "%r" %s %b" /> </Host> </Engine> </Service>
-
In the tomcat root directory, copy the webapps folder, and paste two copies in the tomcat root directory, named webapps1 and webapps2 respectively. Note that this folder name needs to match the first step server.xml The Host appBase names added in are consistent. An example is as follows:
-
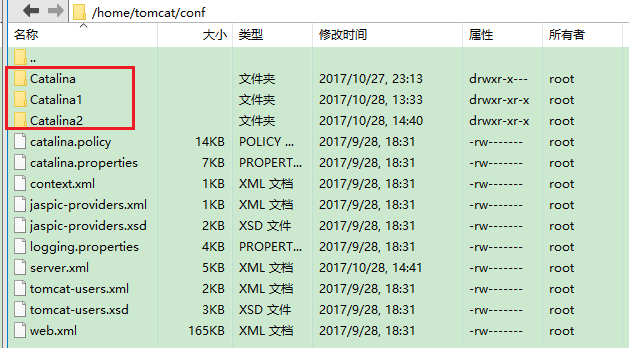
In the tomcat/conf folder, copy Catalina and paste two copies in the tomcat/conf directory (do not change the name of the localhost folder in the Catalina folder, otherwise server.xml The added configuration also needs to be changed. In order not to cause trouble, it is recommended to directly copy the Catalina folder), which is named Catalina1 and Catalina2 respectively. Note that this folder needs to be named in accordance with the first step server.xml The portservice name added in is the same. An example is as follows:
-
-
Configure Nginx reverse agent: modify the nginx.conf File, add reverse agent configuration and virtual host configuration:
#Reverse proxy
    upstream www.example.com{
        server 110.110.110.110:8080;    #host ip+Port number
    }
    upstream me.example.com{
        server 110.110.110.110:8081;
    }
    upstream dev.example.com{
        server 110.110.110.110:8082;
    }

#Configure virtual host
    server {
        listen 80;
        server_name www.example.com;
        index index.jsp index.html index.htm;

        #include proxy-pass-php.conf;

        location / {
                proxy_pass http://www.example.com;    #And server_name bring into correspondence with
                proxy_set_header Host $http_host;
                proxy_set_header X-Real-IP $remote_addr;
                proxy_set_header X-Forwarded-For $proxy_add_x_forwarded_for;
        }
        access_log  /home/wwwlogs/www.example.com.log;
    }

    server {
        listen 80;
        server_name me.example.com;
        index index.jsp index.html index.htm;

        #include proxy-pass-php.conf;

        location / {
                proxy_pass http://me.example.com;
                proxy_set_header Host $http_host;
                proxy_set_header X-Real-IP $remote_addr;
                proxy_set_header X-Forwarded-For $proxy_add_x_forwarded_for;
        }
        access_log  /home/wwwlogs/me.example.com.log;
    }

    server {
        listen 80;
        server_name dev.example.com;
        index index.jsp index.html index.htm;

        #include proxy-pass-php.conf;

        location / {
                proxy_pass http://dev.example.com;
                proxy_set_header Host $http_host;
                proxy_set_header X-Real-IP $remote_addr;
                proxy_set_header X-Forwarded-For $proxy_add_x_forwarded_for;
        }
        access_log  /home/wwwlogs/dev.example.com.log;
    }

include vhost/*.conf;
-
After configuration, deploy three different projects in tomcat, start tomcat, and access www.example.com , me.example.com , dev.example.com Just.
Deploy multiple projects in Tomcat, and configure the process of secondary domain name through Nginx reverse agent


Posted by kenchucky on Sun, 17 May 2020 08:11:31 -0700