jdk environment: 1.8
linux version: CentOS 6.10
git version: 2.1.1
maven version: 3.5.4
Prepare jdk in advance (omitted)
2. Upload to server and install
3. Modify jenkins port (default 8080)
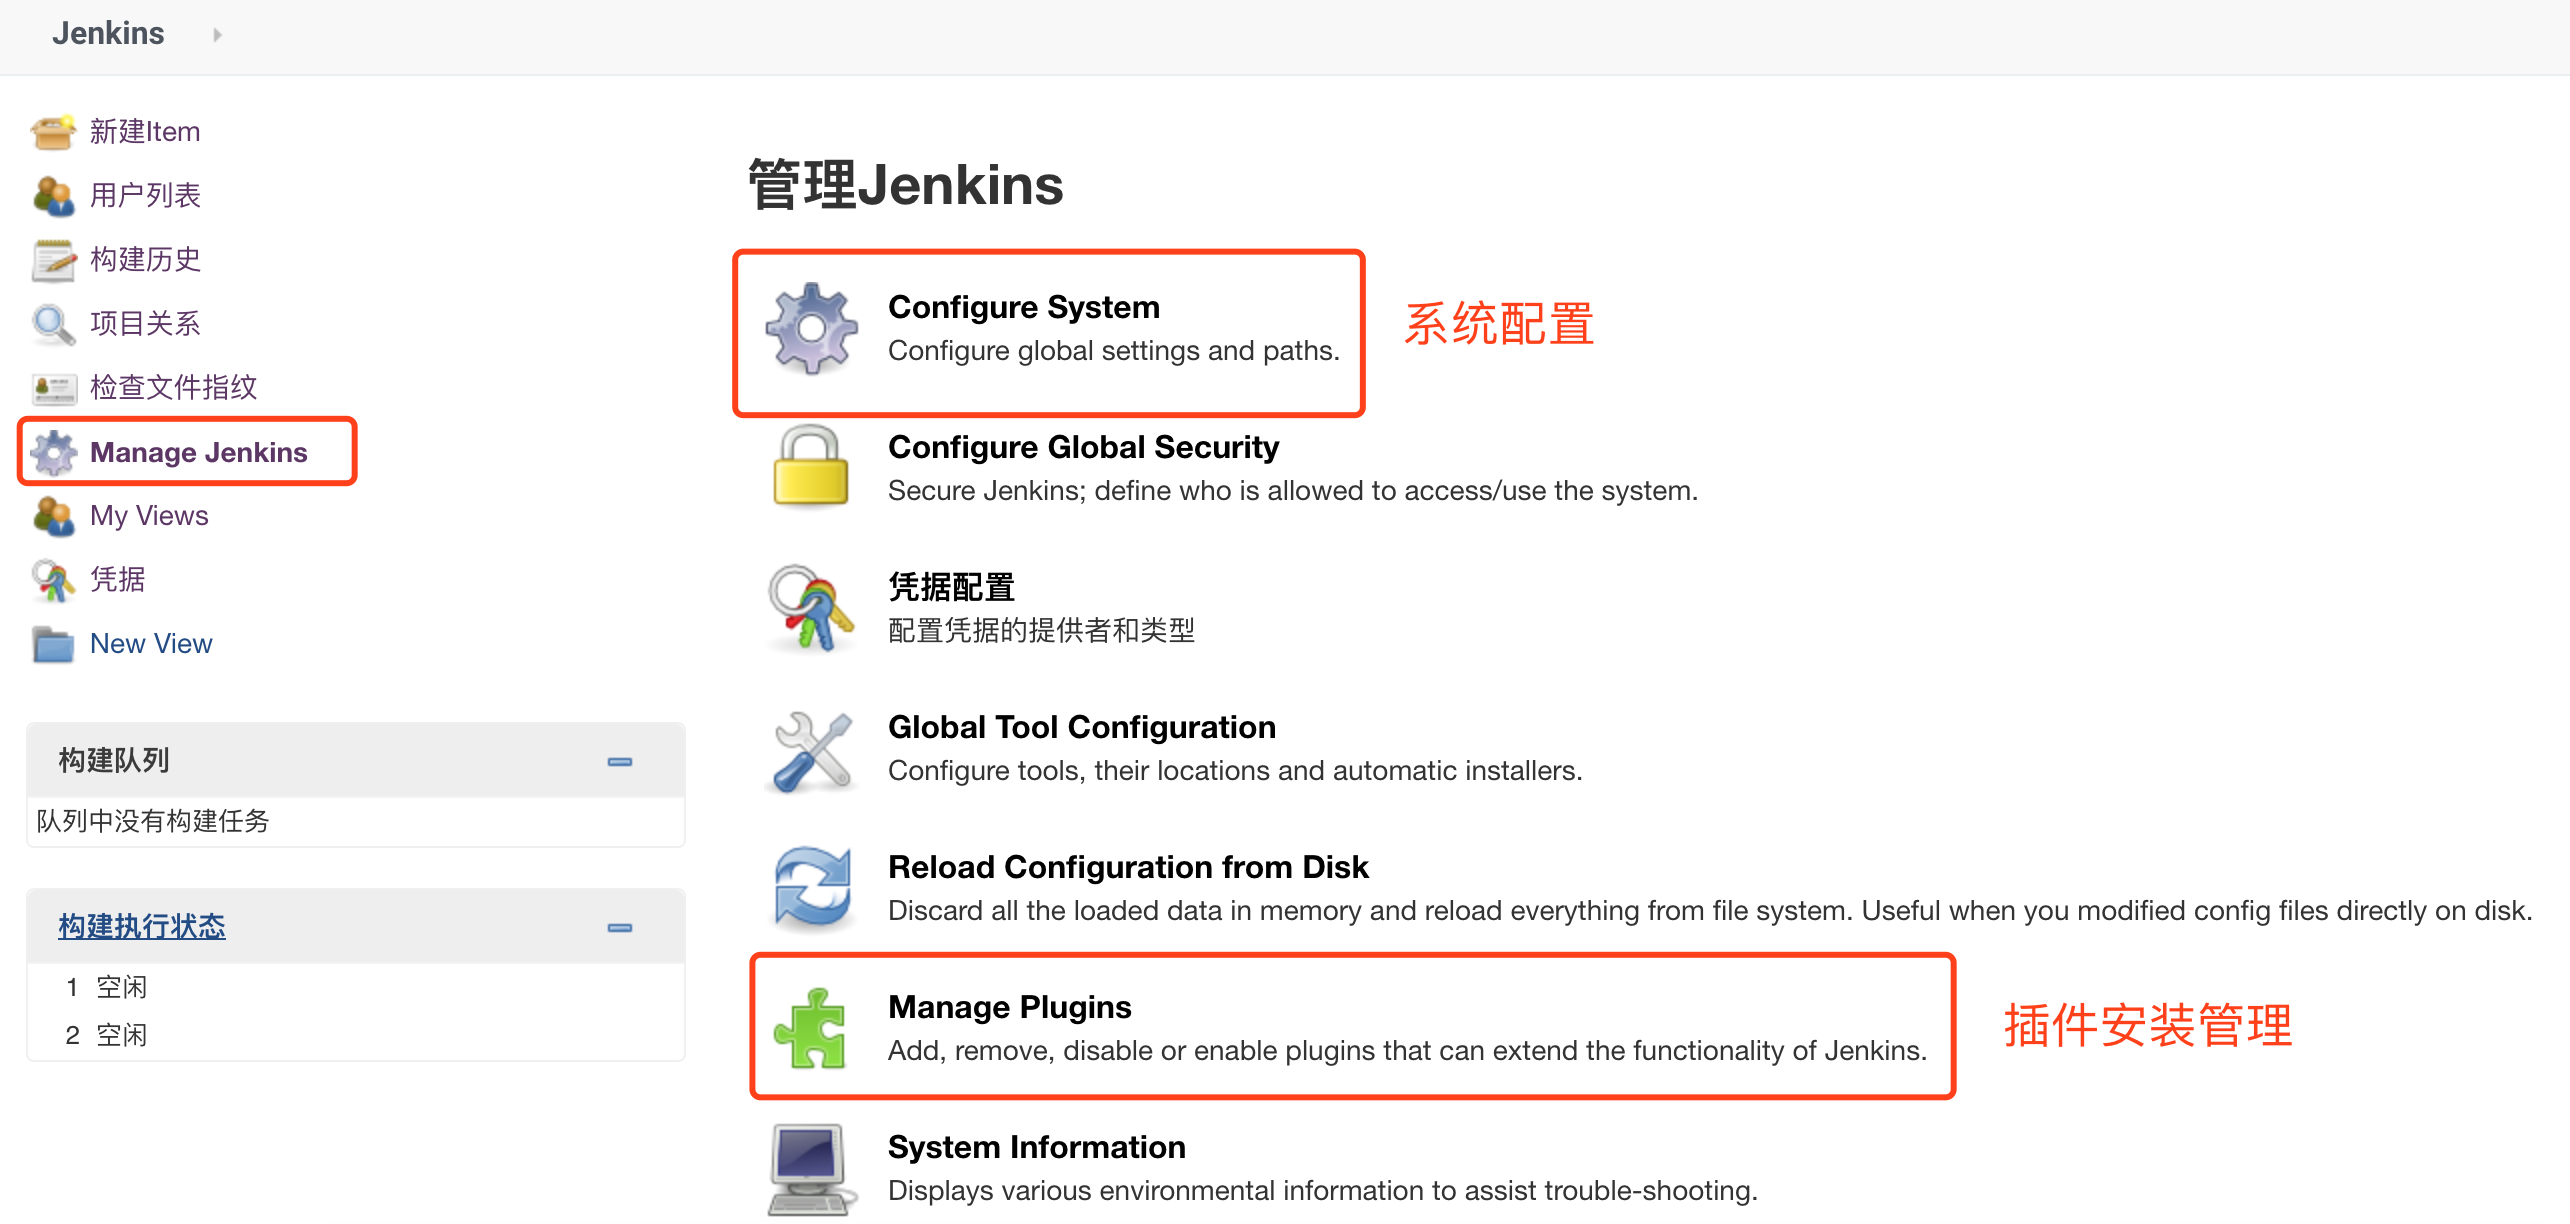
6. Install plug-ins and create users
1. Download, decompress, move and delete the installation package
2. Setting environment variables
2. Add git to environment variable
3. View git version and its path git --version
4, jenkins deployment maven project
1. Install the required plug-ins: Git plugin, Maven Integration plugin
3. Credentials (configure git's user name and password, or ssh)
4. Create a maven project Important
5. maven project construction detailed configuration Important
6. Finally, click apply to save and execute
1, Install and deploy jenkins
1. Download rpm file:
Download address: http://mirrors.jenkins-ci.org/redhat/
This example downloads jenkins-2.222-1.1.noarch.rpm
Direct downloading on the website may be slow You can download jenkins-2.222-1.1.noarch.rpm from csdn here
2. Upload to server and install
rpm -ivh jenkins-2.222-1.1.noarch.rpm
3. Modify jenkins port (default 8080)
vim /etc/sysconfig/jenkins
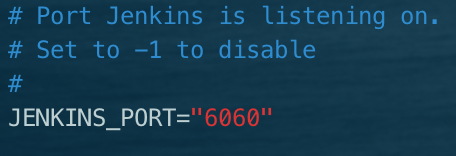
4. Start and restart jenkins
service jenkins start
service jenkins restart
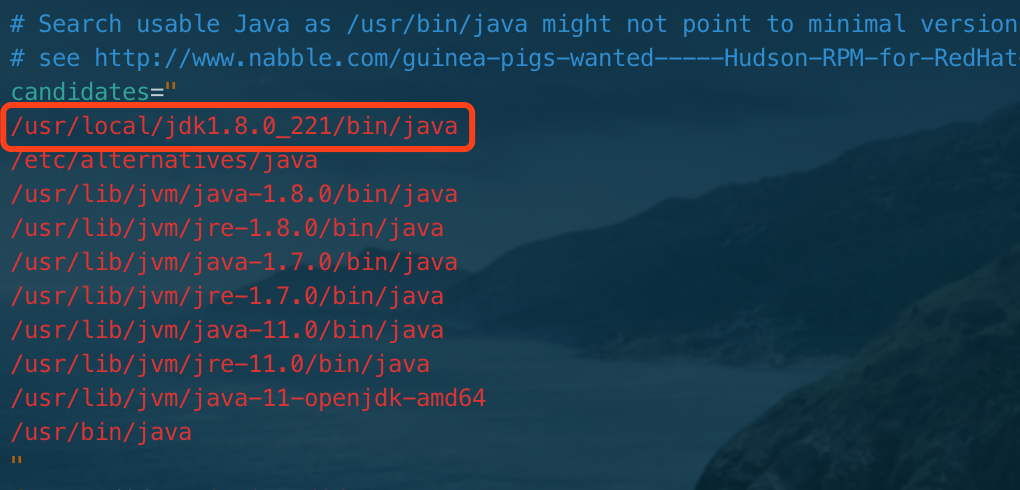
Start Jenkins bash: / usr / bin / java: no such file or directory (java not found)
Solution: vim / etc/init.d/jenkins add jdk path
5. Visit jenkins
Access address: http://ip:6060
The following will appear in the first entry

cat /var/lib/jenkins/secrets/initialAdminPassword
Follow the prompts to copy the password on the server and paste it into the input box to log in
6. Install plug-ins and create users
After successful login for the first time, you will enter the install plug-in page and create user page. The recommended plug-in installation is OK, and others will follow the instructions step by step
(if jenkins is not Chinese, install two plug-ins: Locale and Localization: Chinese, and then in system management - > system configuration, the default language of Locale is changed to zn_CN.)

2, Install and deploy maven
1. Download, decompress, move and delete the installation package
wget http://mirrors.hust.edu.cn/apache/maven/maven-3/3.5.4/binaries/apache-maven-3.5.4-bin.tar.gz
tar zxf apache-maven-3.5.4-bin.tar.gz
mv apache-maven-3.5.4 /usr/local/maven
rm -f apache-maven-3.5.4-bin.tar.gz
2. Setting environment variables
vim /etc/profile add the following two lines at the bottom
export M2_HOME=/usr/local/maven
export PATH=$PATH:$JAVA_HOME/bin:$M2_HOME/bin
Execute source /etc/profile after saving
3. View maven version: mvn -v
The installation is successful if

3, Install and deploy Git
1. Download and install
yum -y install libcurl-devel expat-devel curl-devel  gettext-devel openssl-devel zlib-devel
yum -y install  gcc perl-ExtUtils-MakeMaker
cd /usr/local/src/
wget https://mirrors.edge.kernel.org/pub/software/scm/git/git-2.1.1.tar.gz
tar -zvxf git-2.1.1.tar.gz
cd git-2.1.1
make prefix=/usr/local/git all
make prefix=/usr/local/git install
2. Add git to environment variable
echo "export PATH=$PATH:/usr/local/git/bin" >> /etc/bashrc
source /etc/bashrc
3. View git version and its path git --version

4, jenkins deployment maven project
1. Install the required plug-ins: Git plugin, Maven Integration plugin


2. Global tool configuration
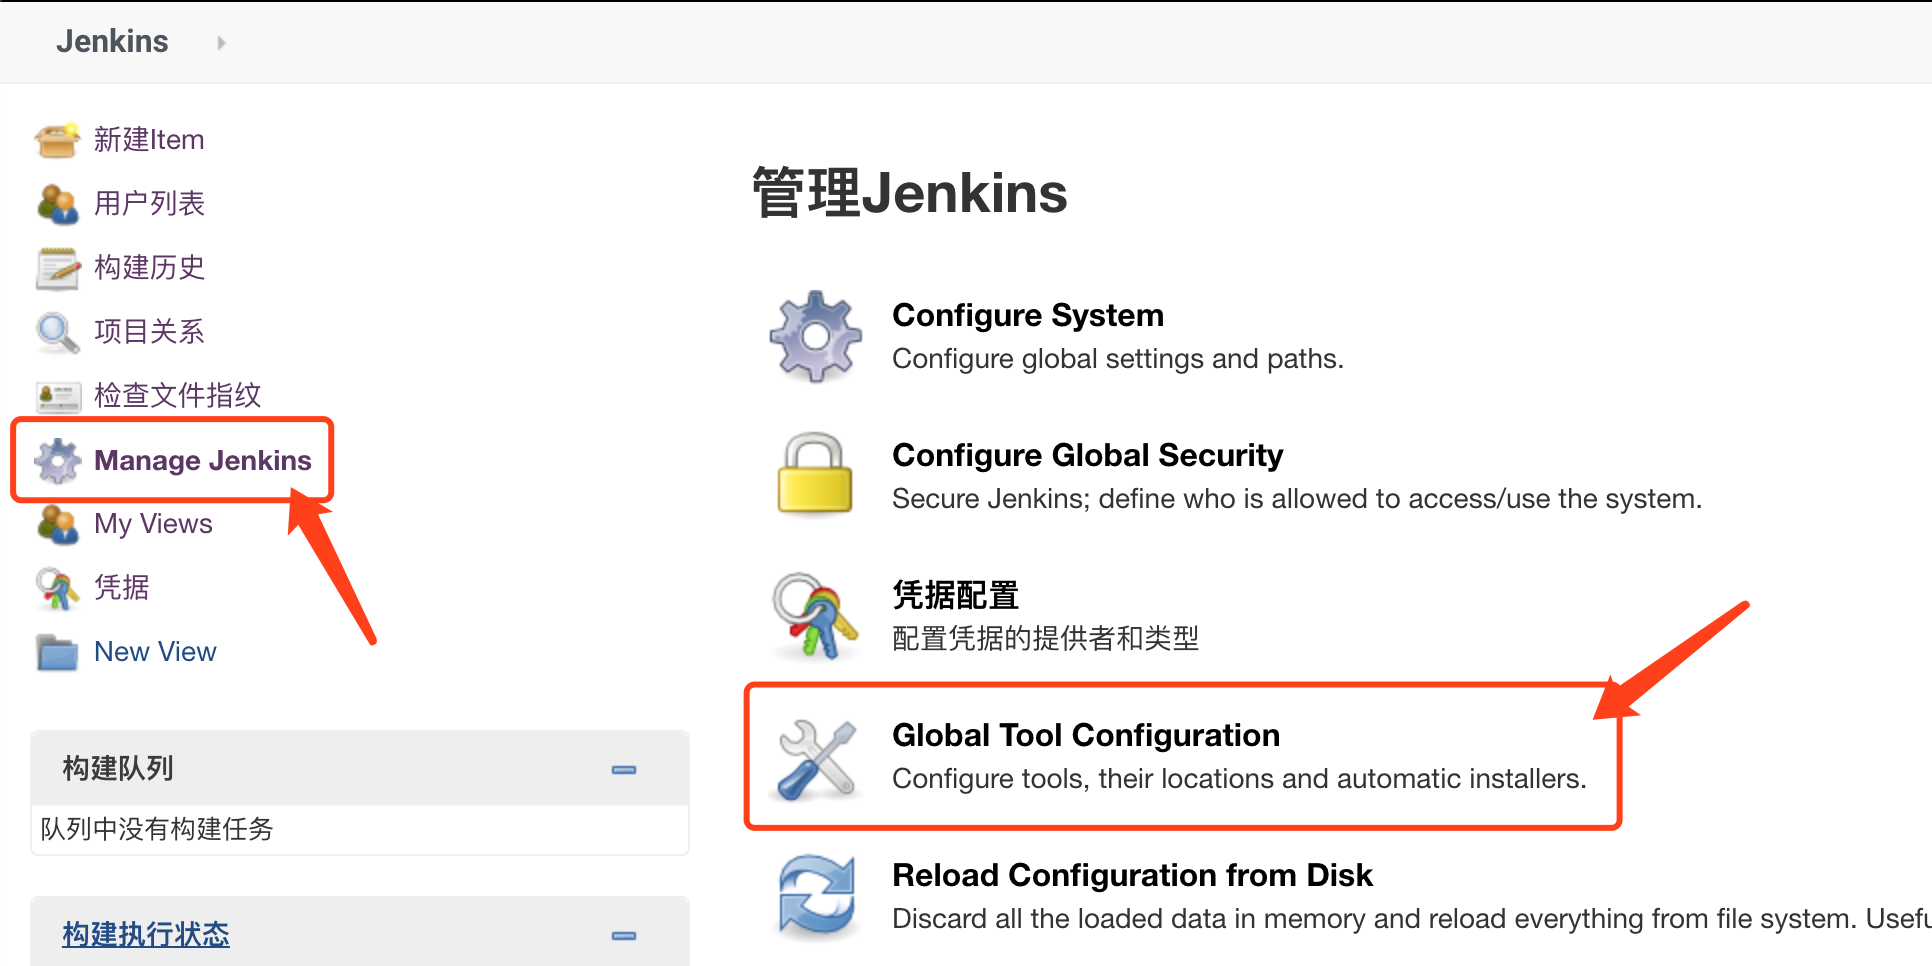
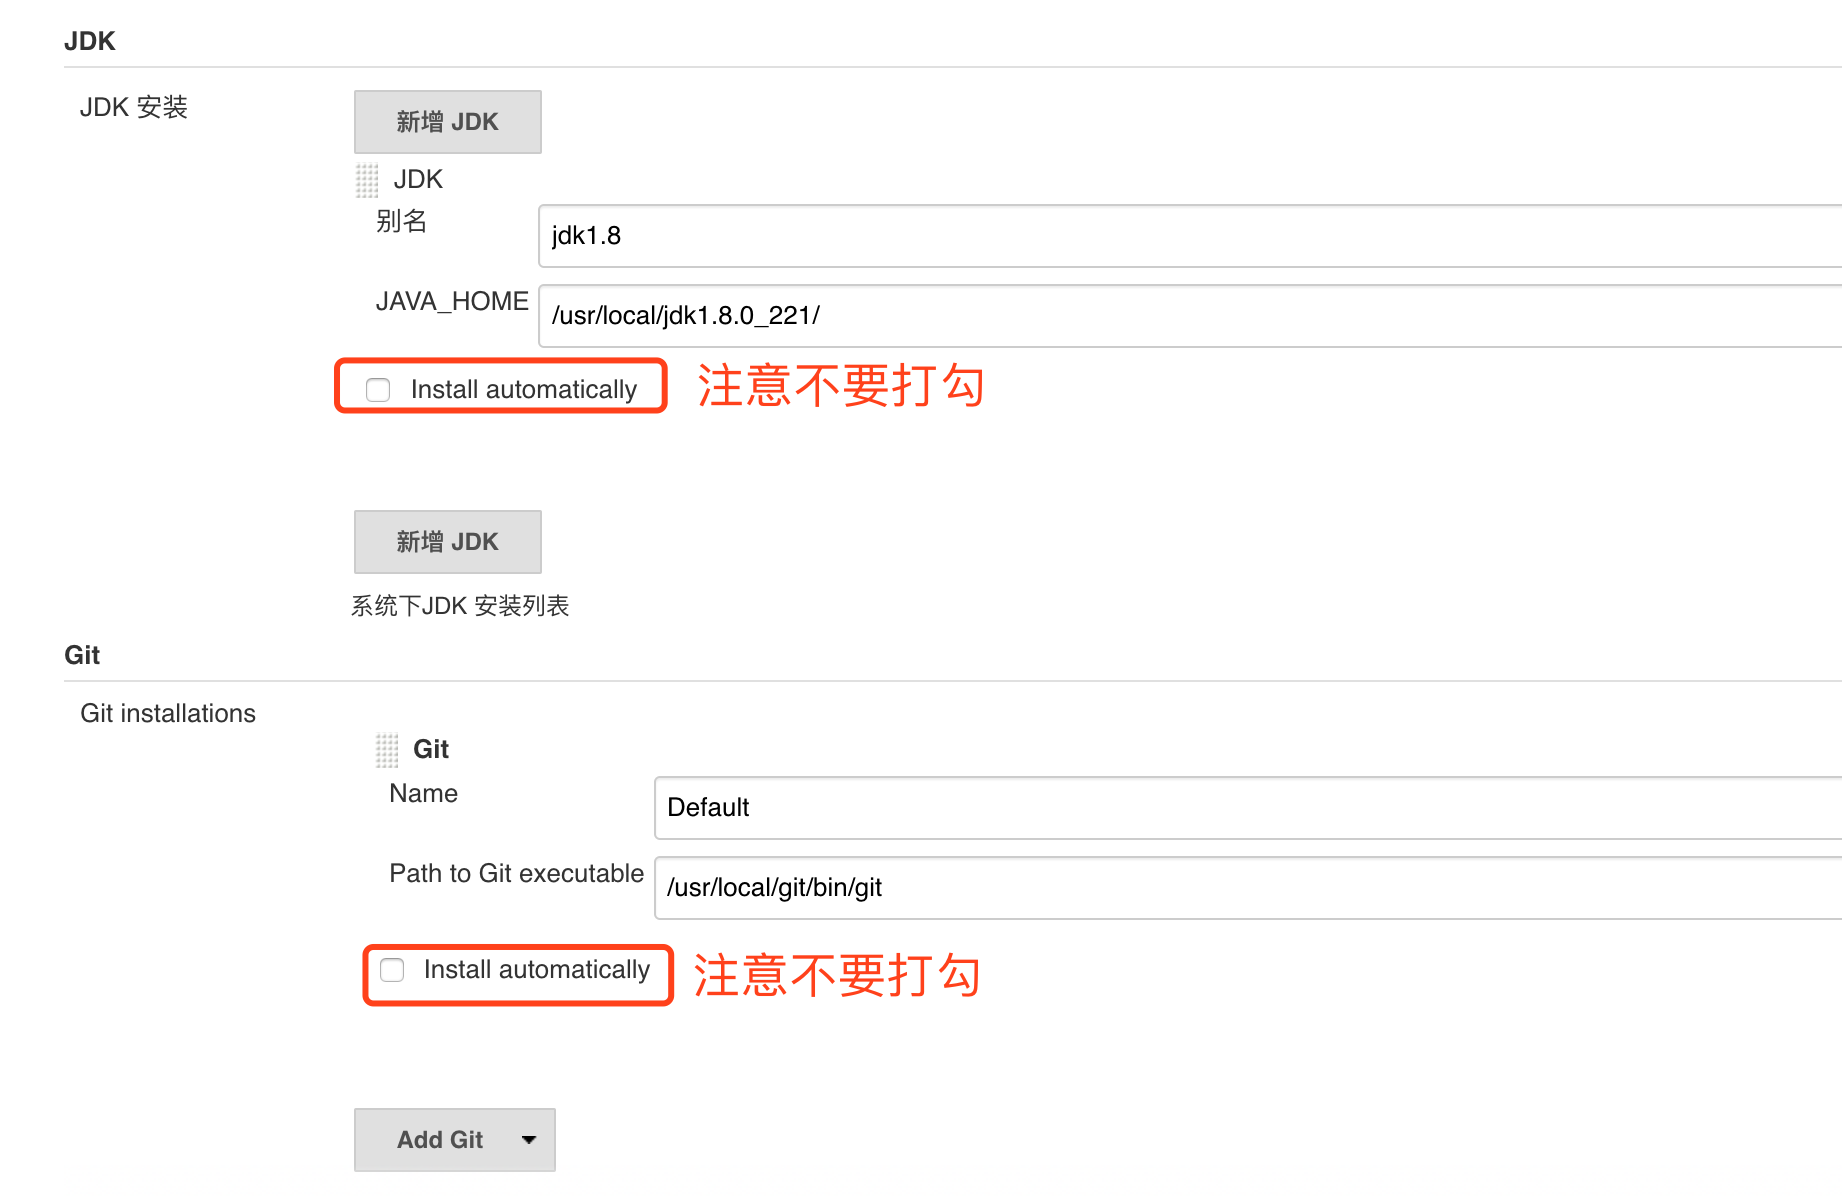
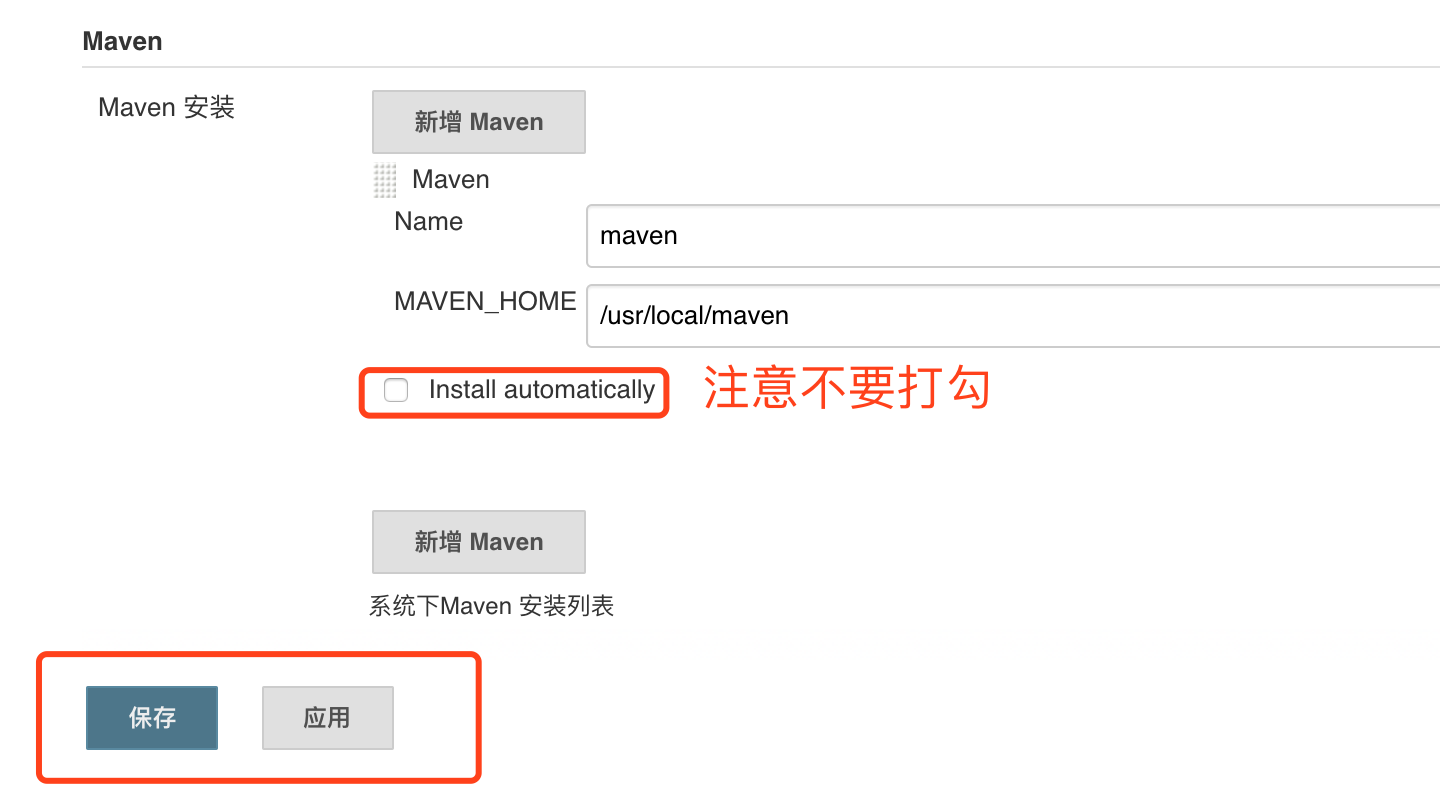
JDK path / usr / local / jdk1.8.0 (the actual path of the JDK installation)
Git path / usr/local/git/bin/git
Maven path / usr/local/maven
3. Credentials (configure git's user name and password, or ssh)
Take the user name and password as an example
(ssh requires the server to generate a public and Private Key, and then configure the public key in the relevant git remote warehouse. Finally, add the Private Key to the Private Key by selecting ssh according to the following example.)
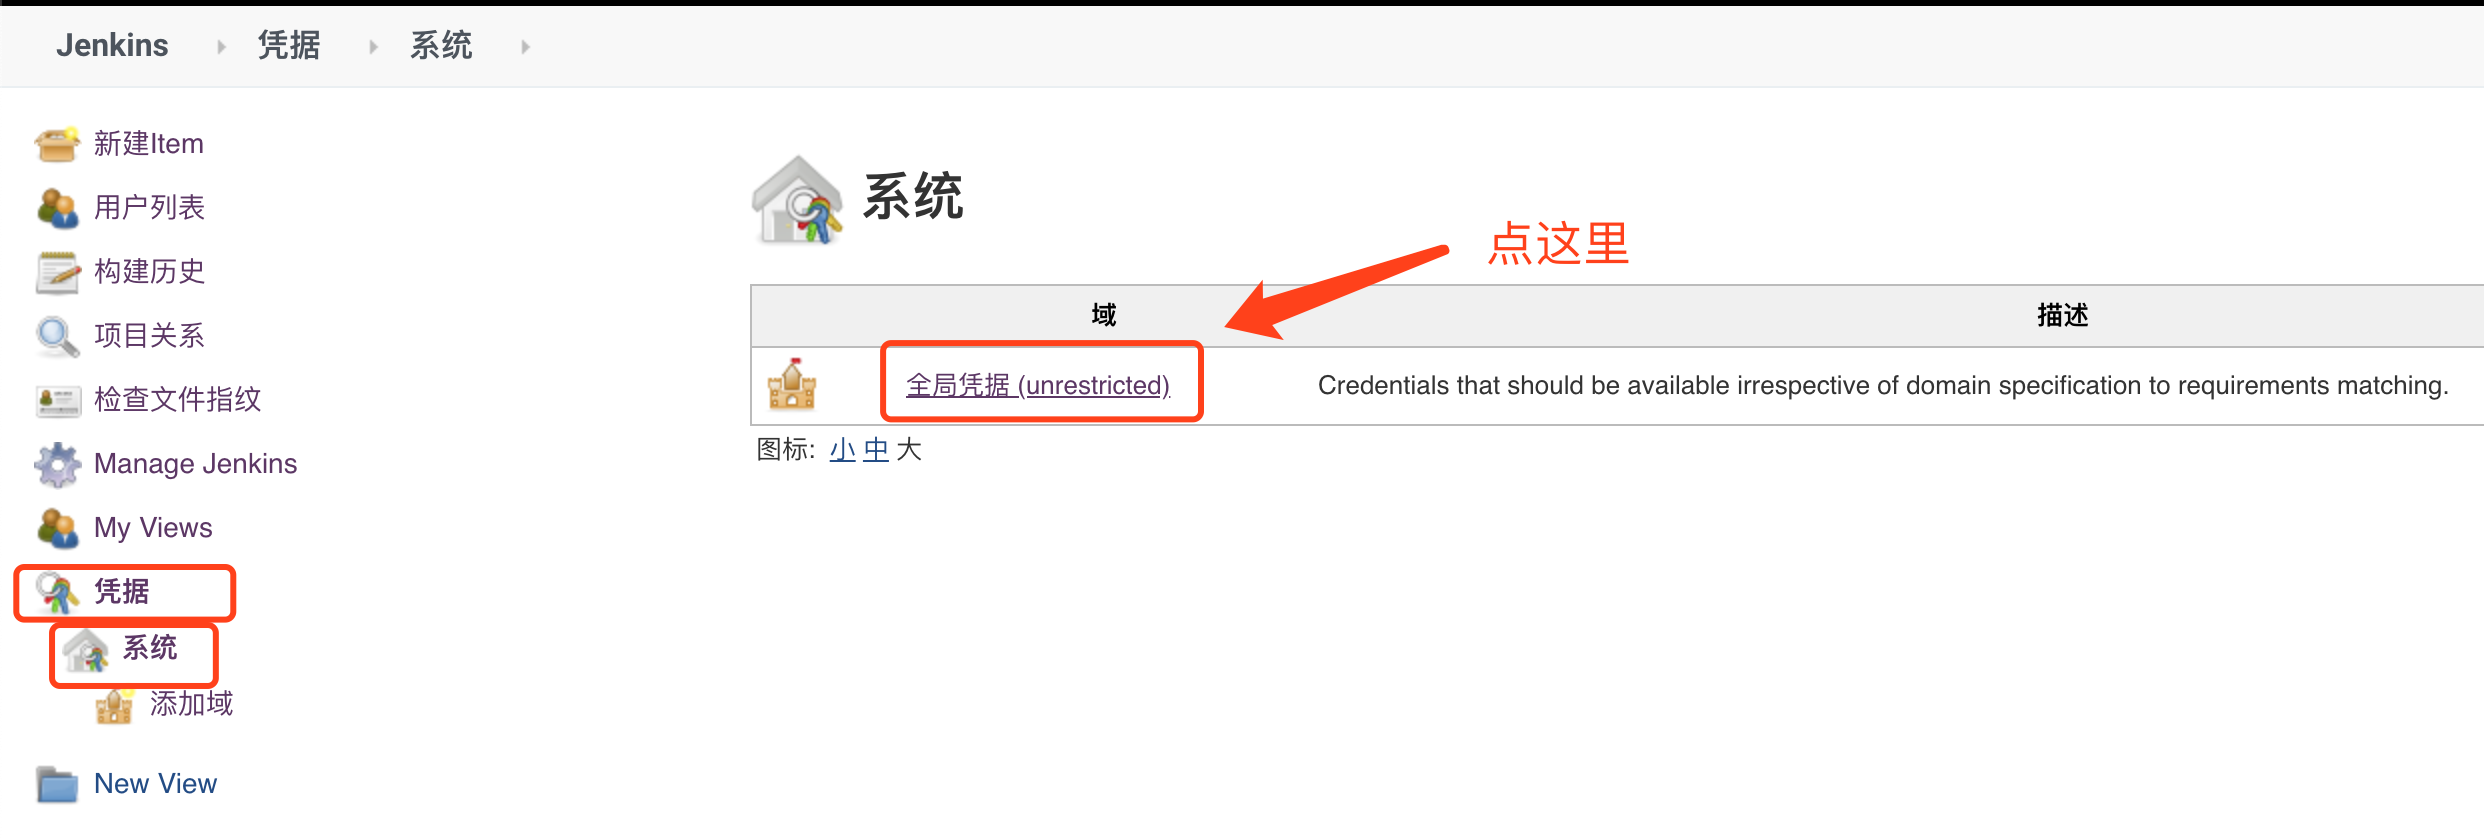
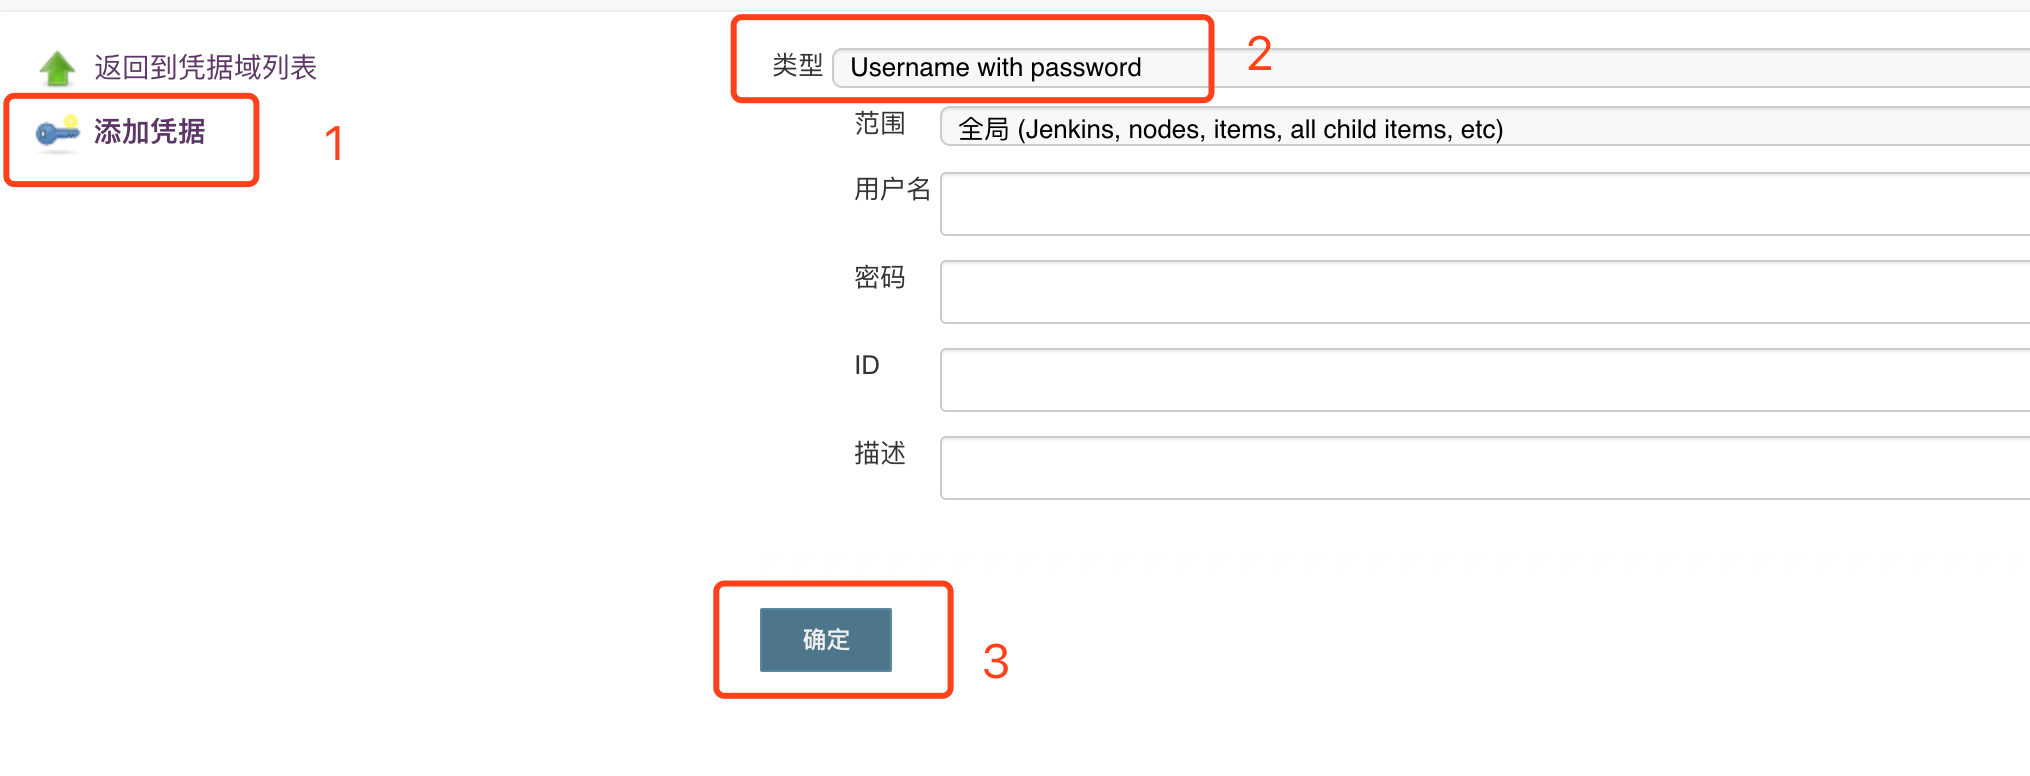
Add git accounts and passwords in order as shown in the figure
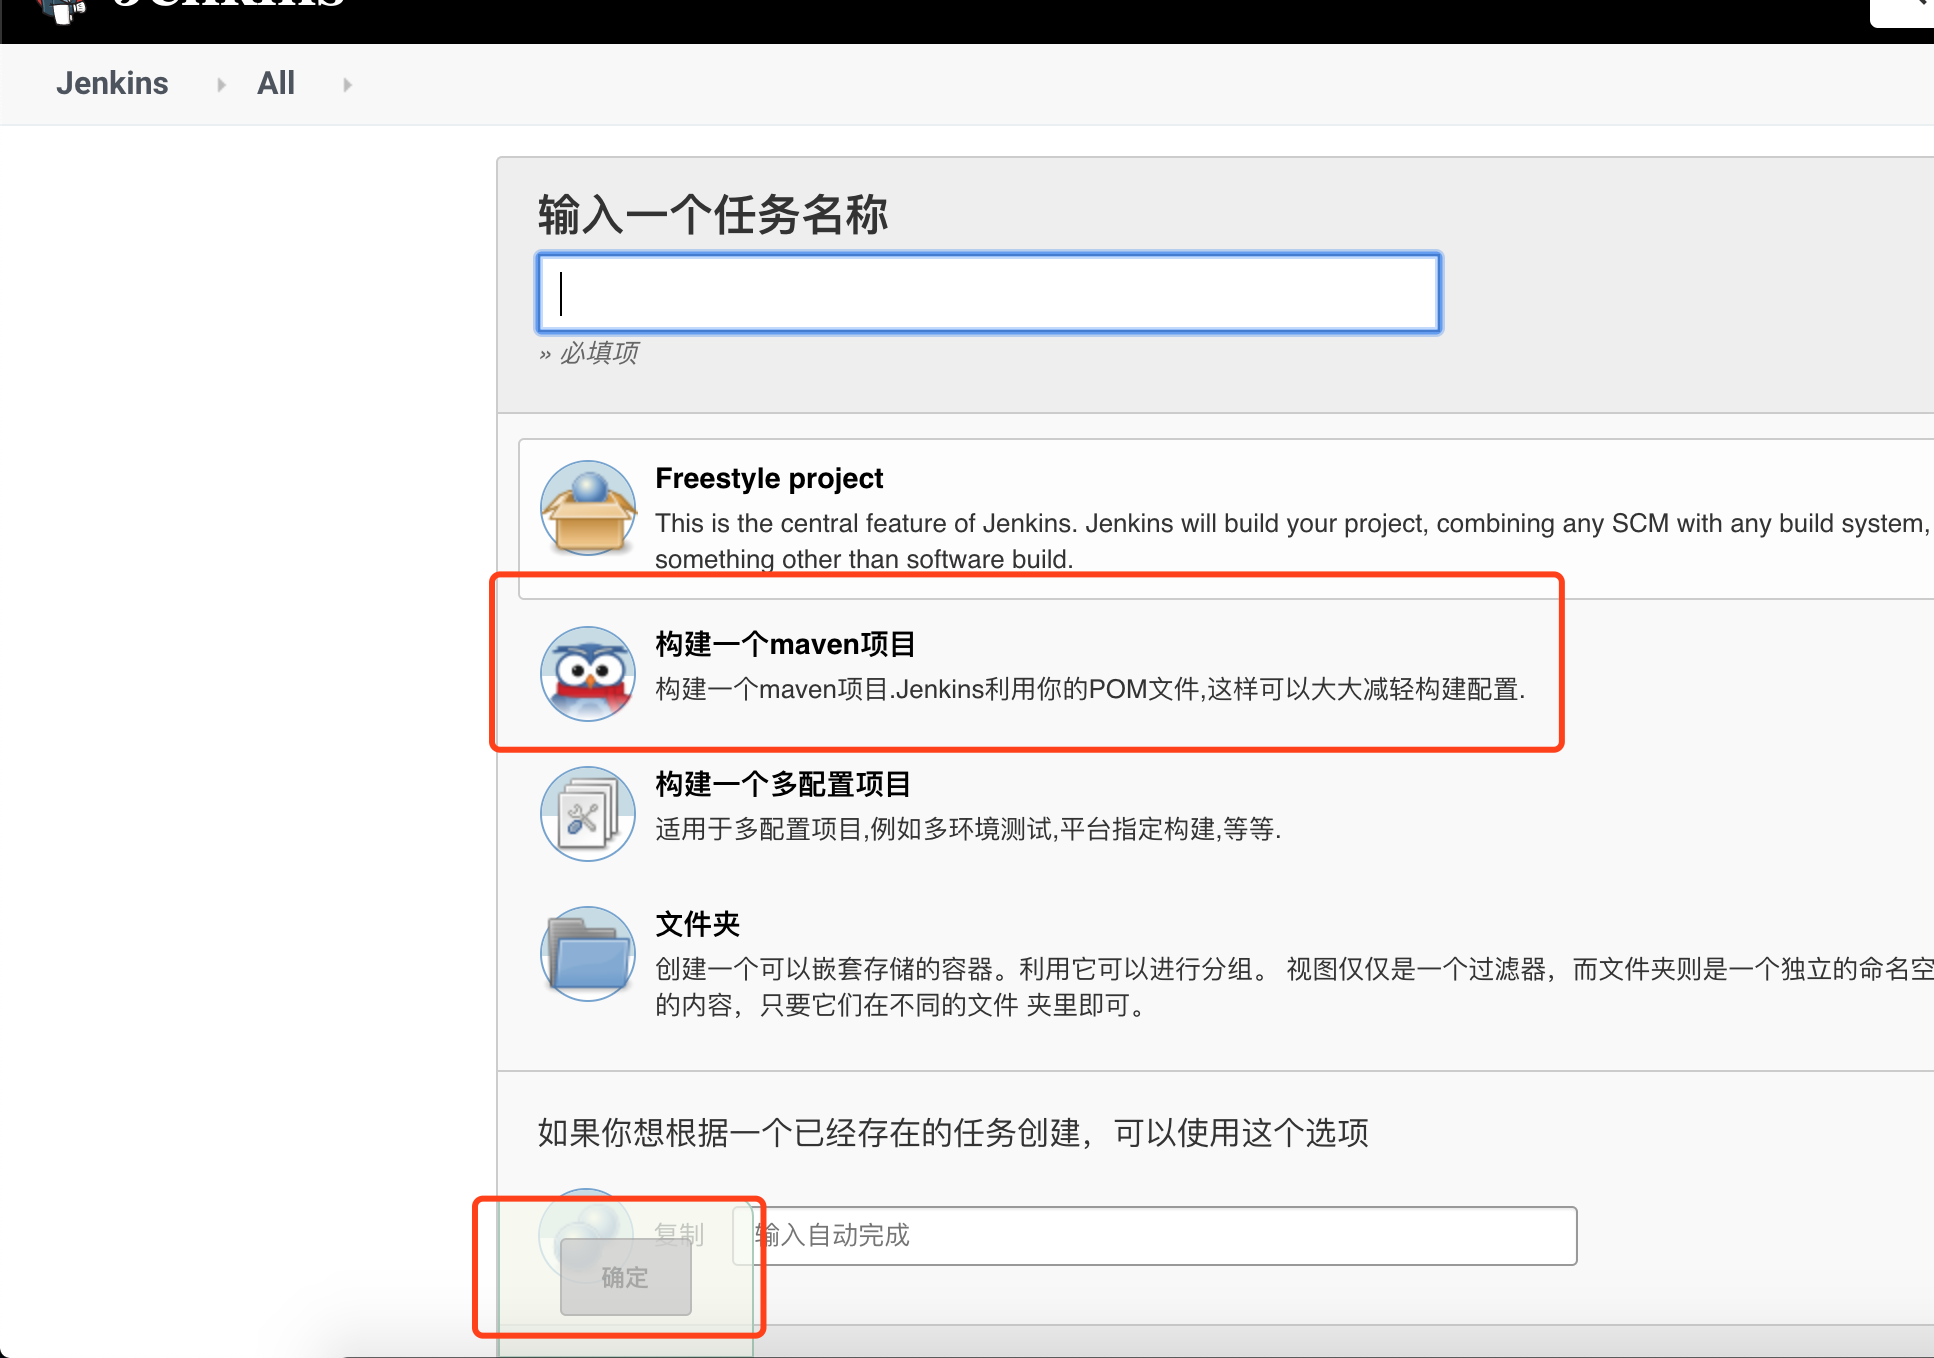
4. Create a maven project

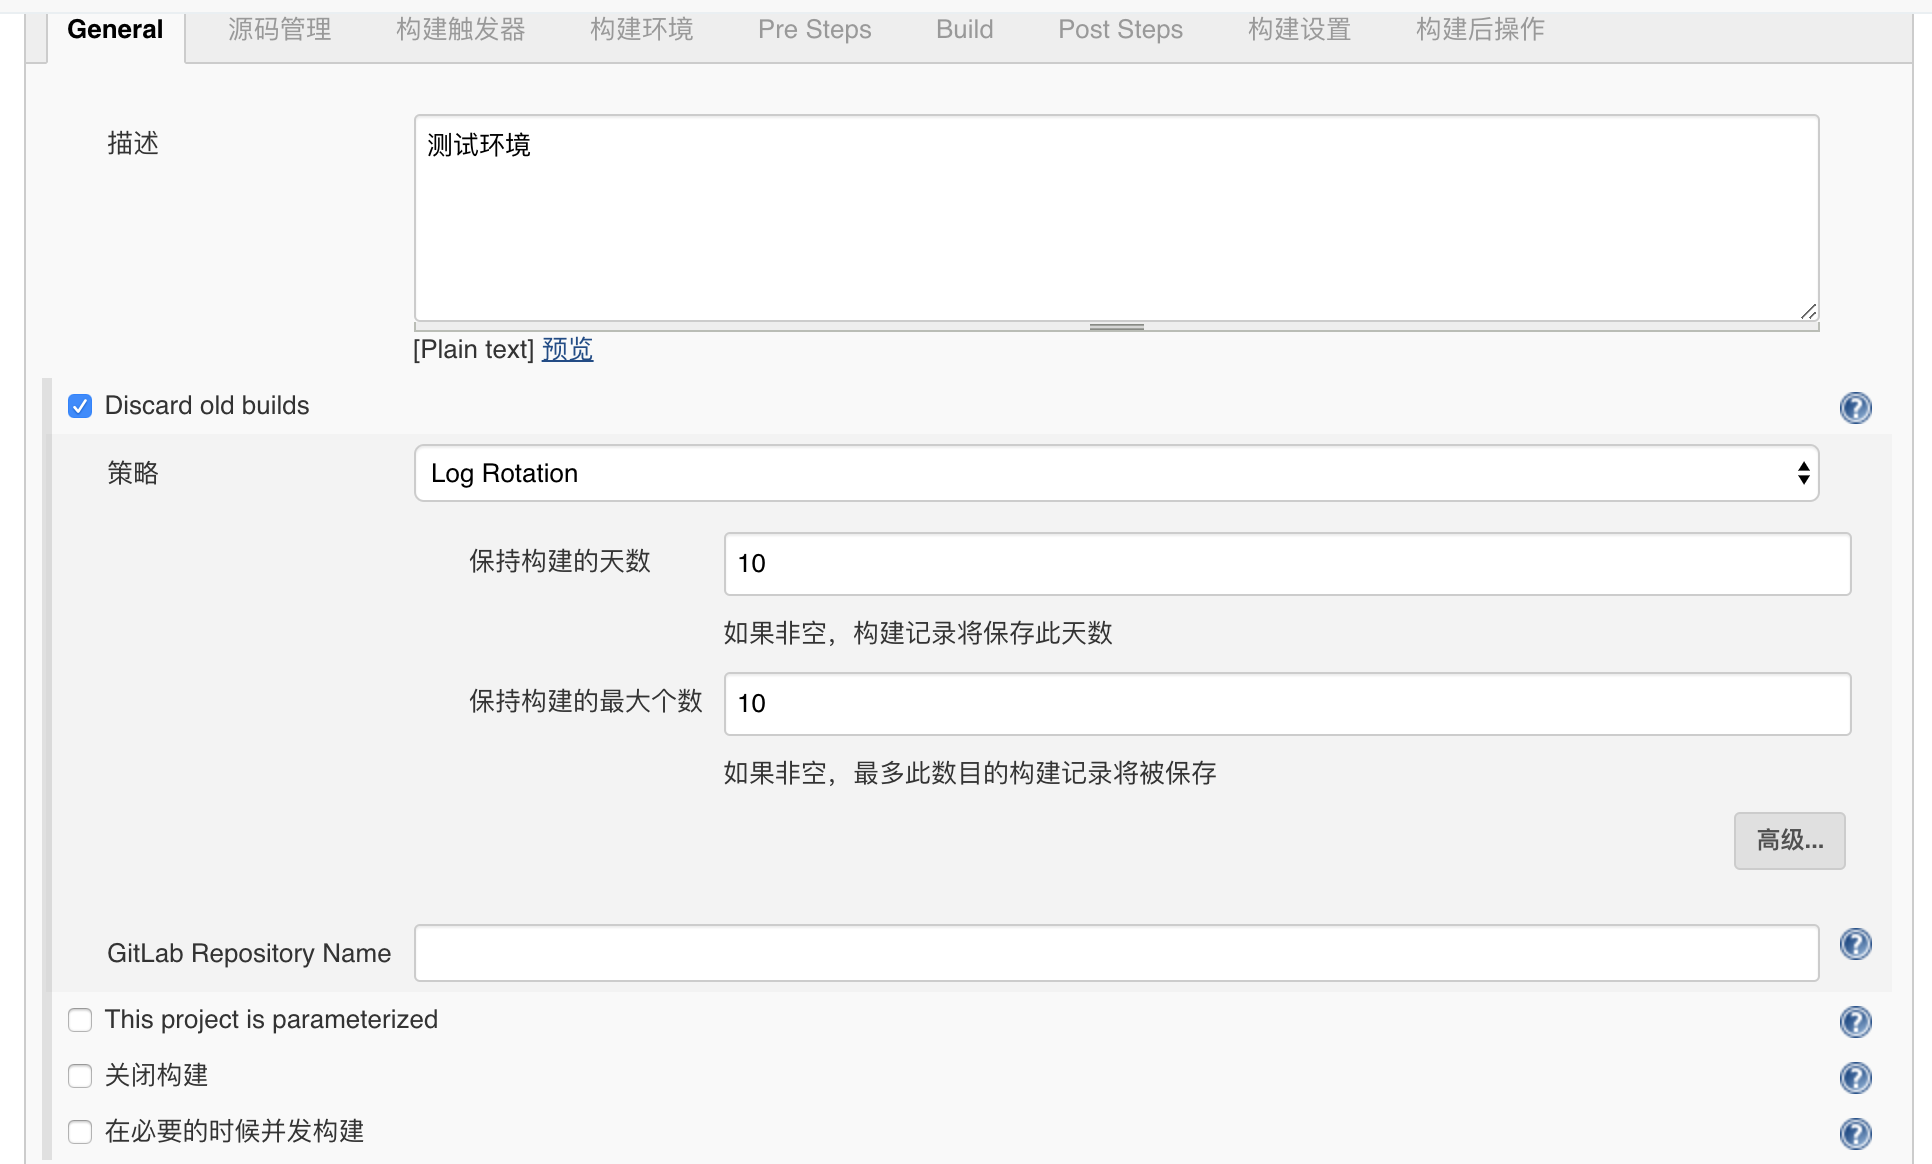
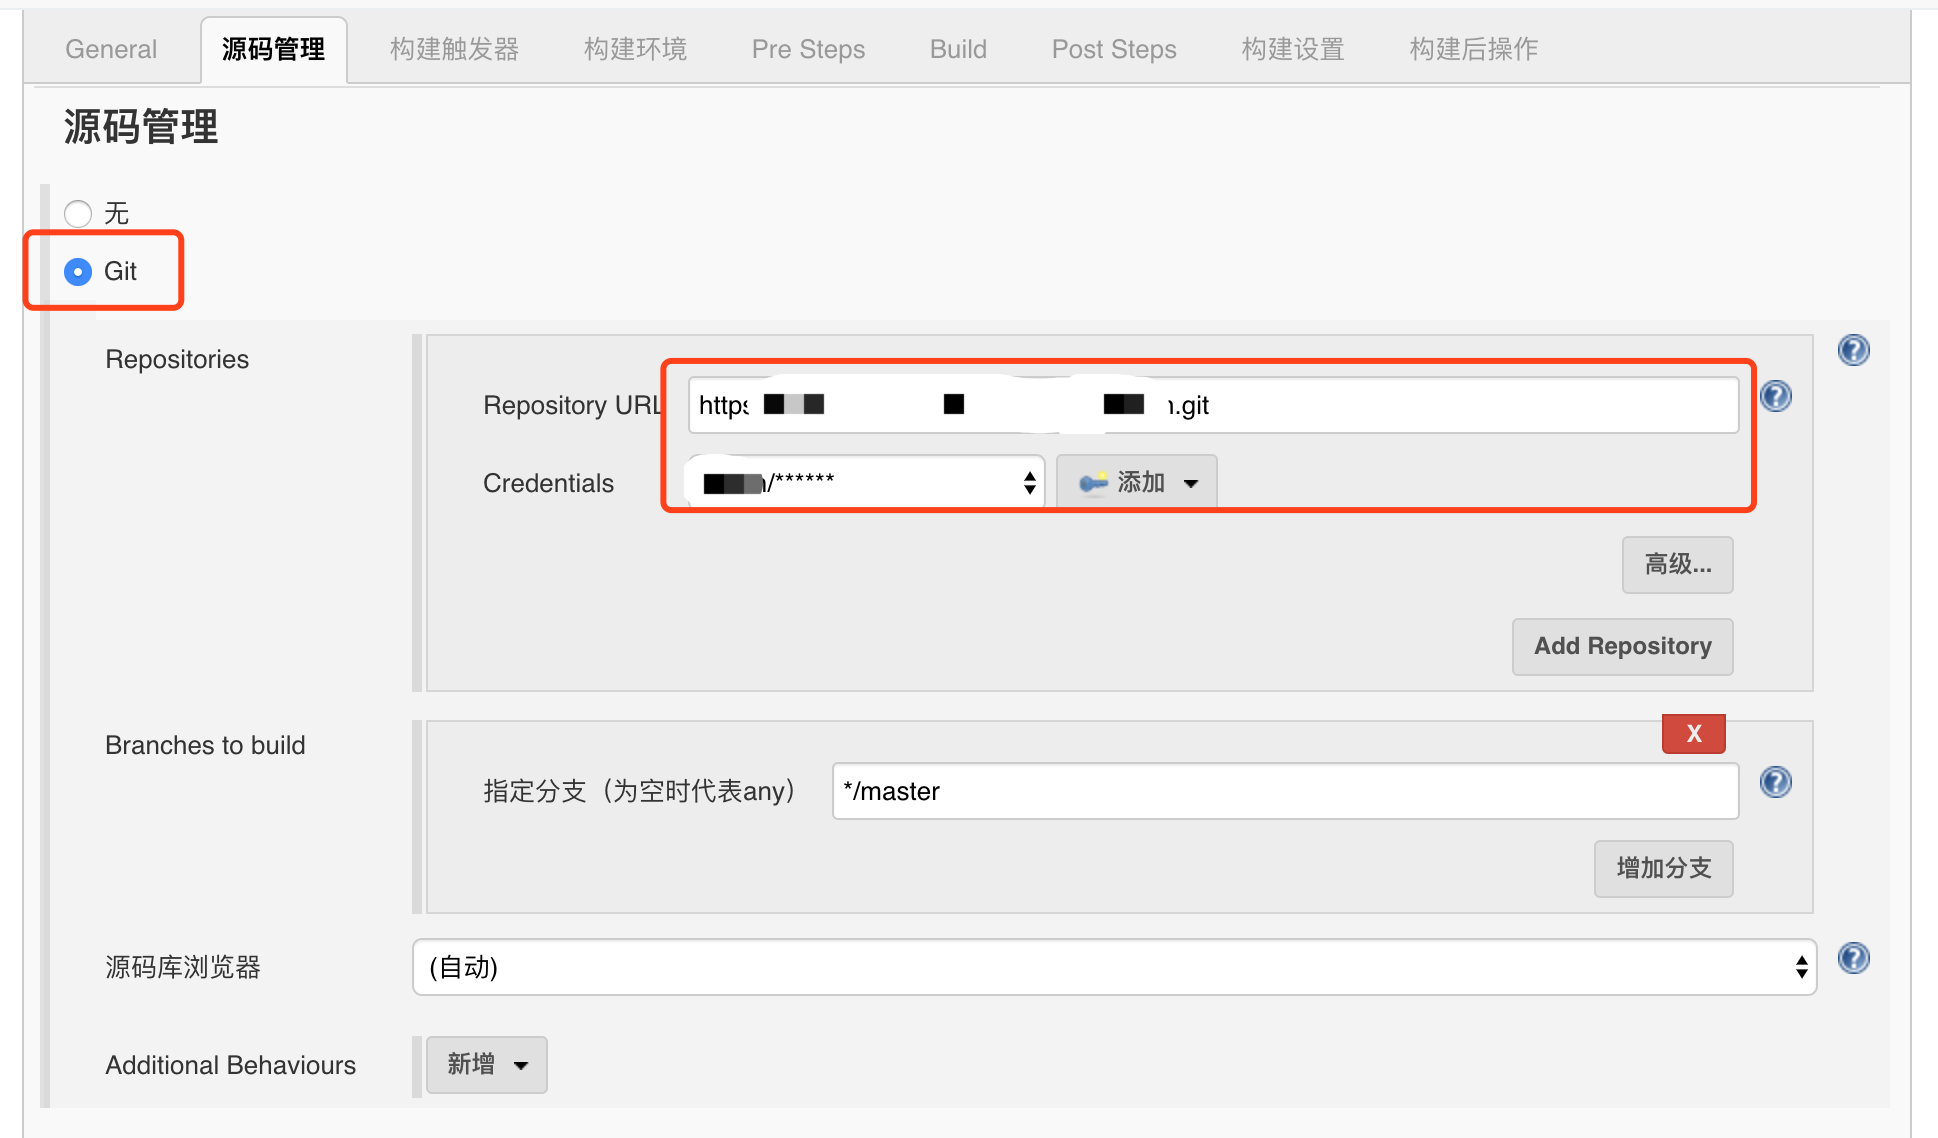
Source management input the remote warehouse address and select the newly configured credentials
Build triggers and build environment
Check:
Build whenever a SNAPSHOT dependency is built
Trigger a remote build (for example, using scripts) (whenever code is submitted to the repository, a hook program is triggered, and jenkins automatically deploys the build)
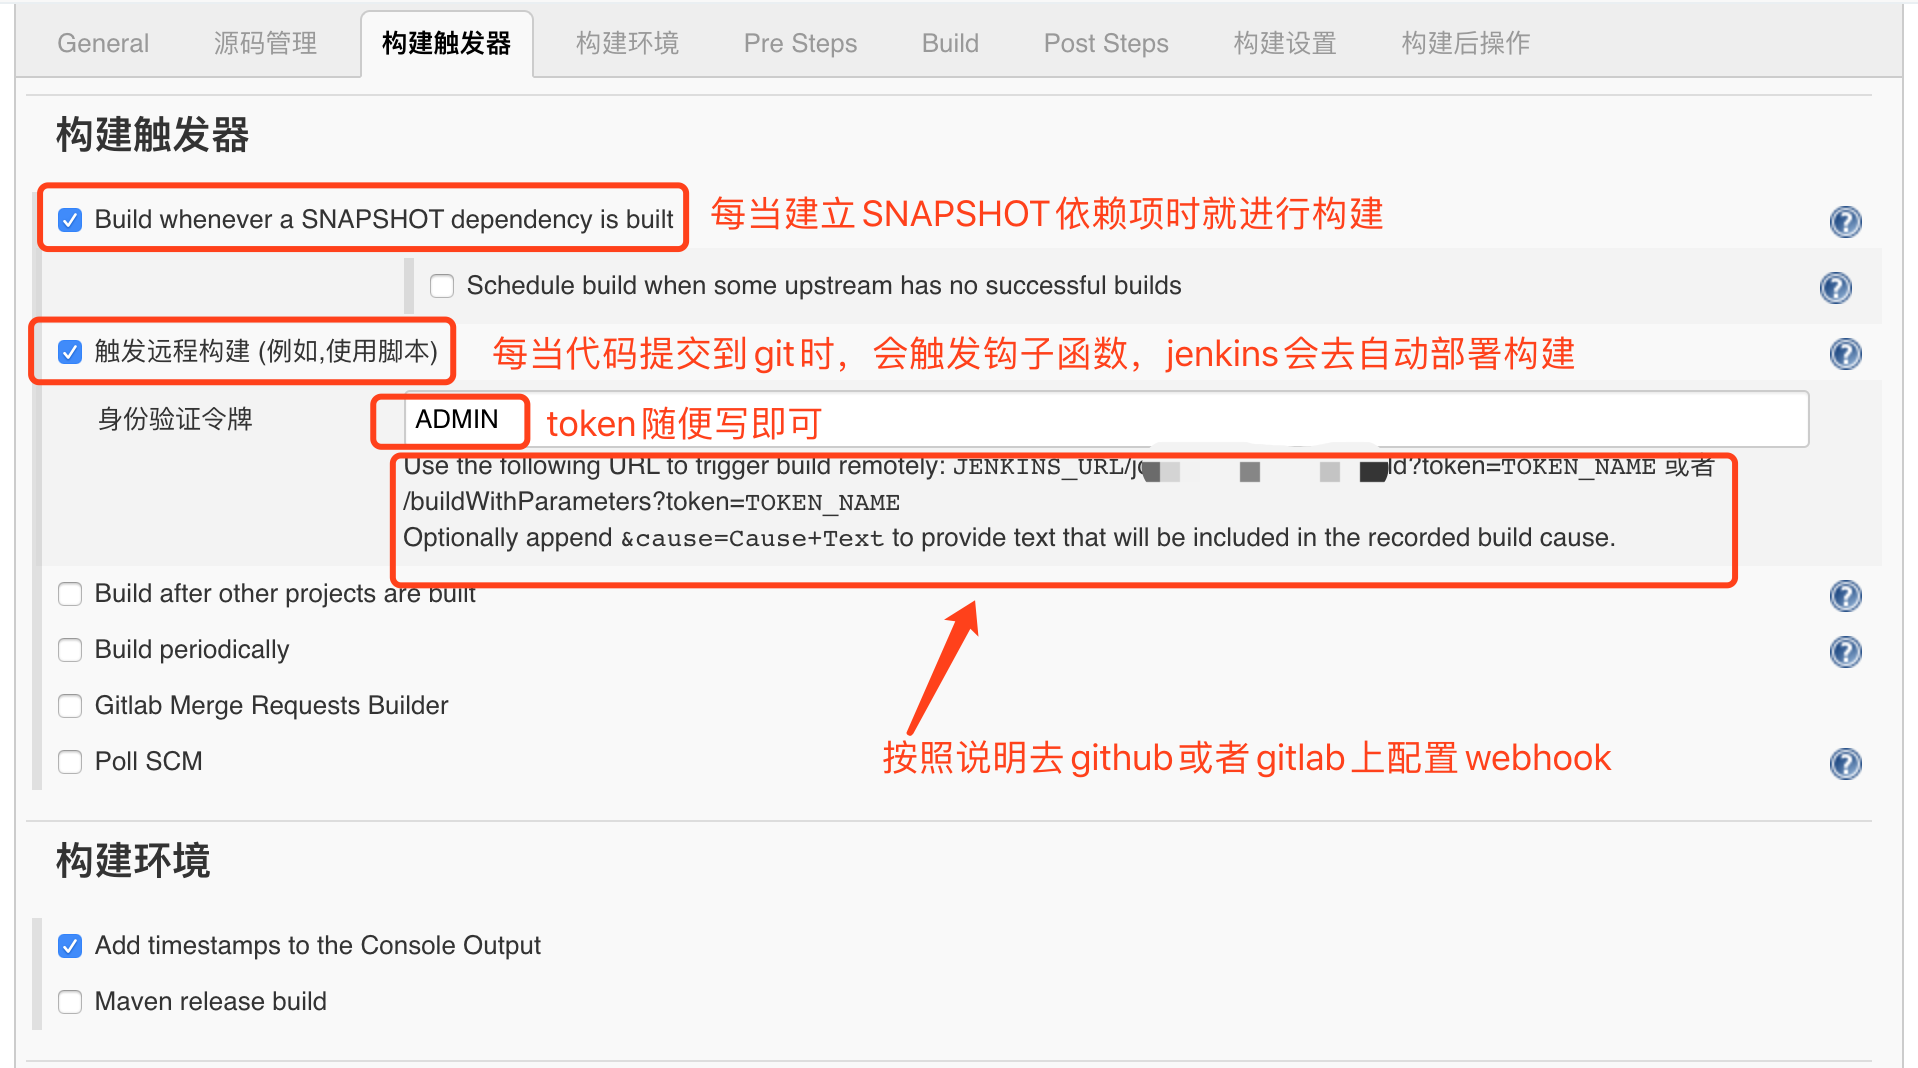
For WebHooks configuration, take Alibaba cloud code (based on gitlab) as an example
Find the relevant warehouse and click settings to have a menu of WebHooks. Click WebHooks
WebHook example: http://www.baidu.com/job/test-admin/build?token=ADMIN
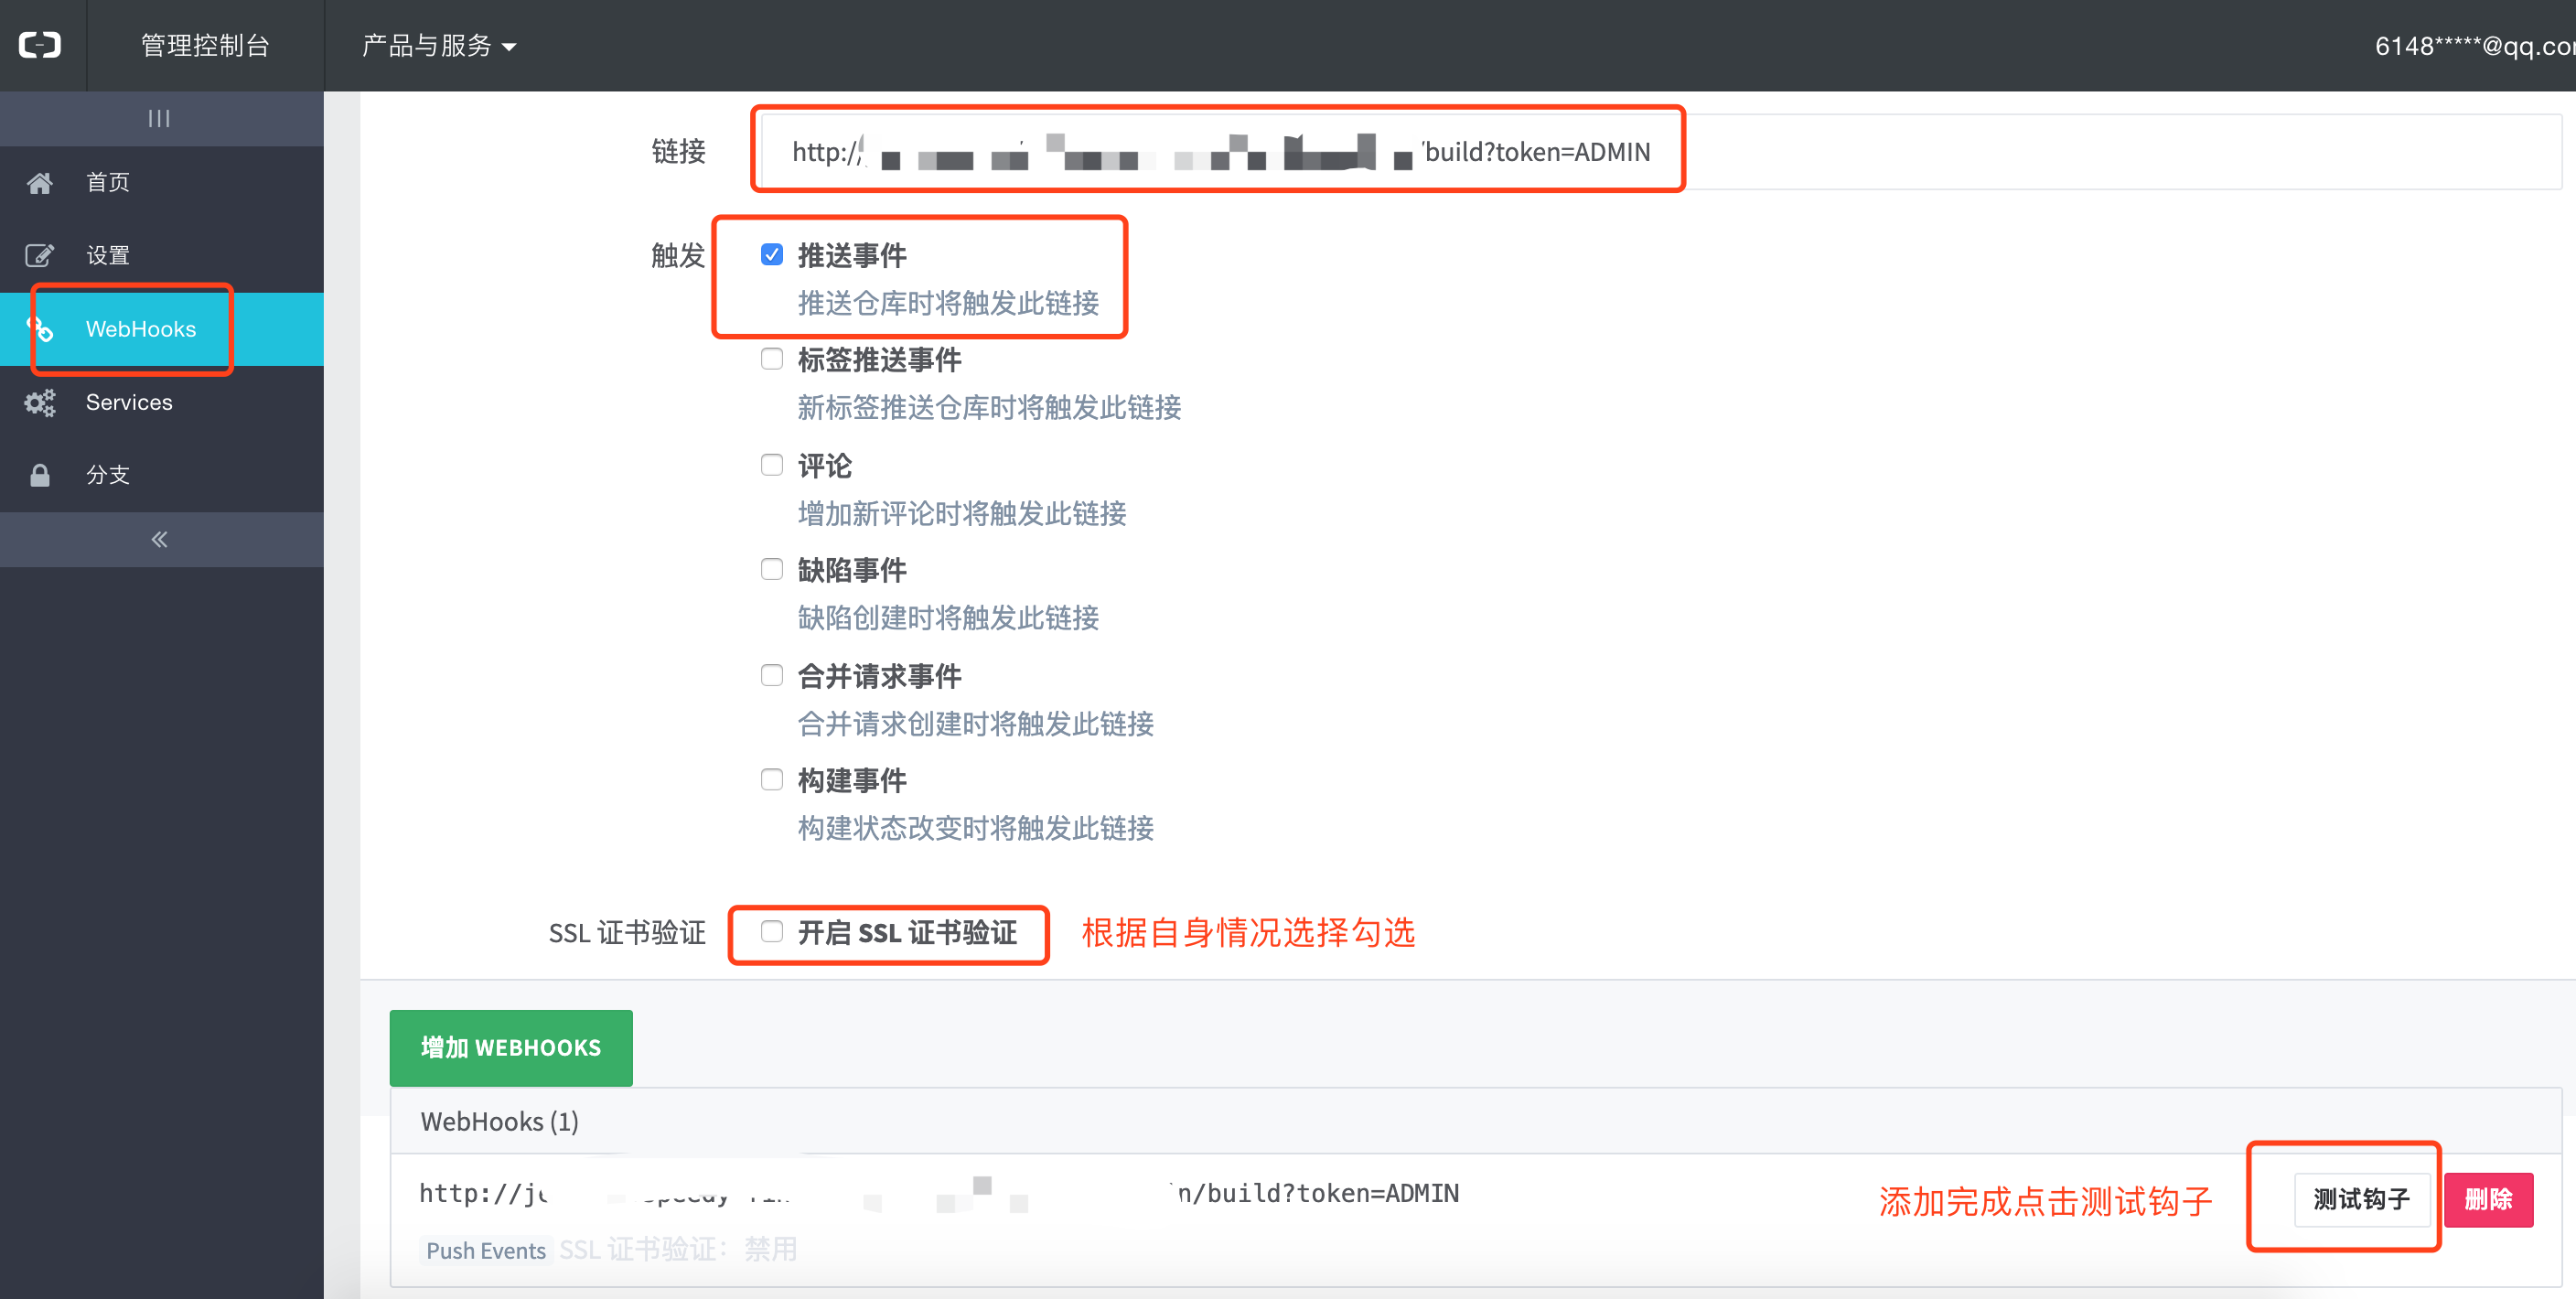
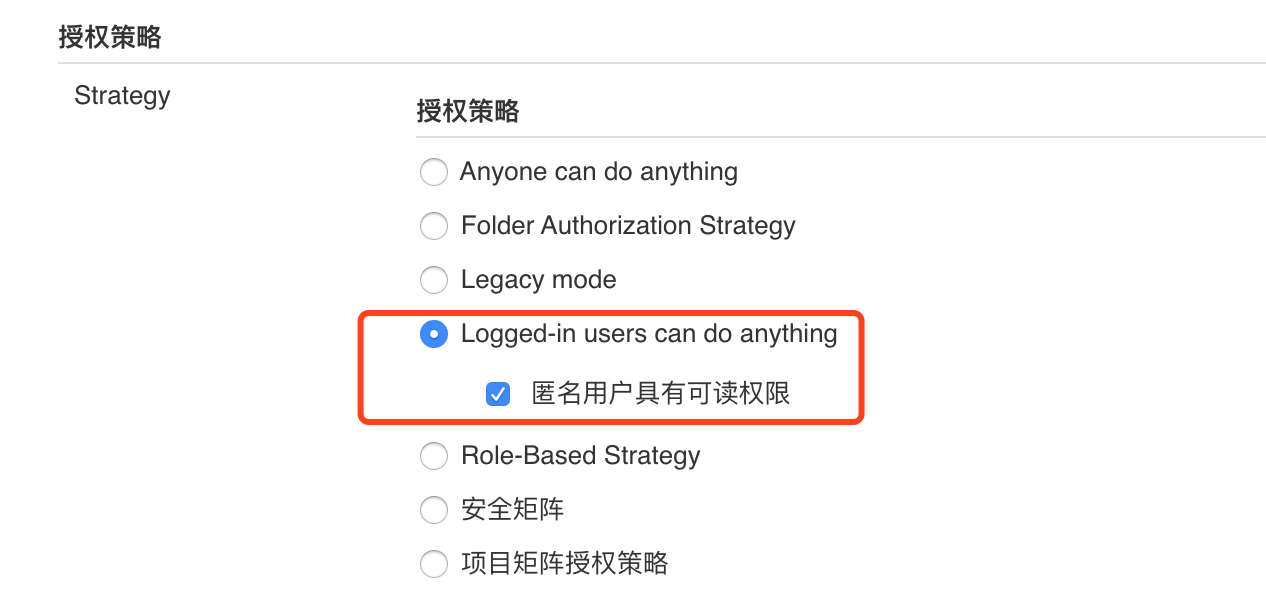
If the error "Hook executed successfully but returned HTTP 403 Err message is large" appears during the test
Go to jenkins system management - Global Security Management - change authorization policy to the following example
5. maven project construction detailed configuration
Root POM is: pom.xml
Goals and options input: clean package -Dmaven.test.skip=true
(- Dmaven.test.skip=true optional means not to execute test cases or compile test case classes.)
Post Steps select the first run only if build successes
Execute shell input:
BUILD_ID=DONTKILLME
sudo cp /var/lib/jenkins/workspace/test-admin/target/test-admin-0.0.1-SNAPSHOT.jar /home/admin/data/package/test-admin-0.0.1-SNAPSHOT.jar
sudo nohup /home/admin/data/sh/test-admin.sh restart 2>&1 &
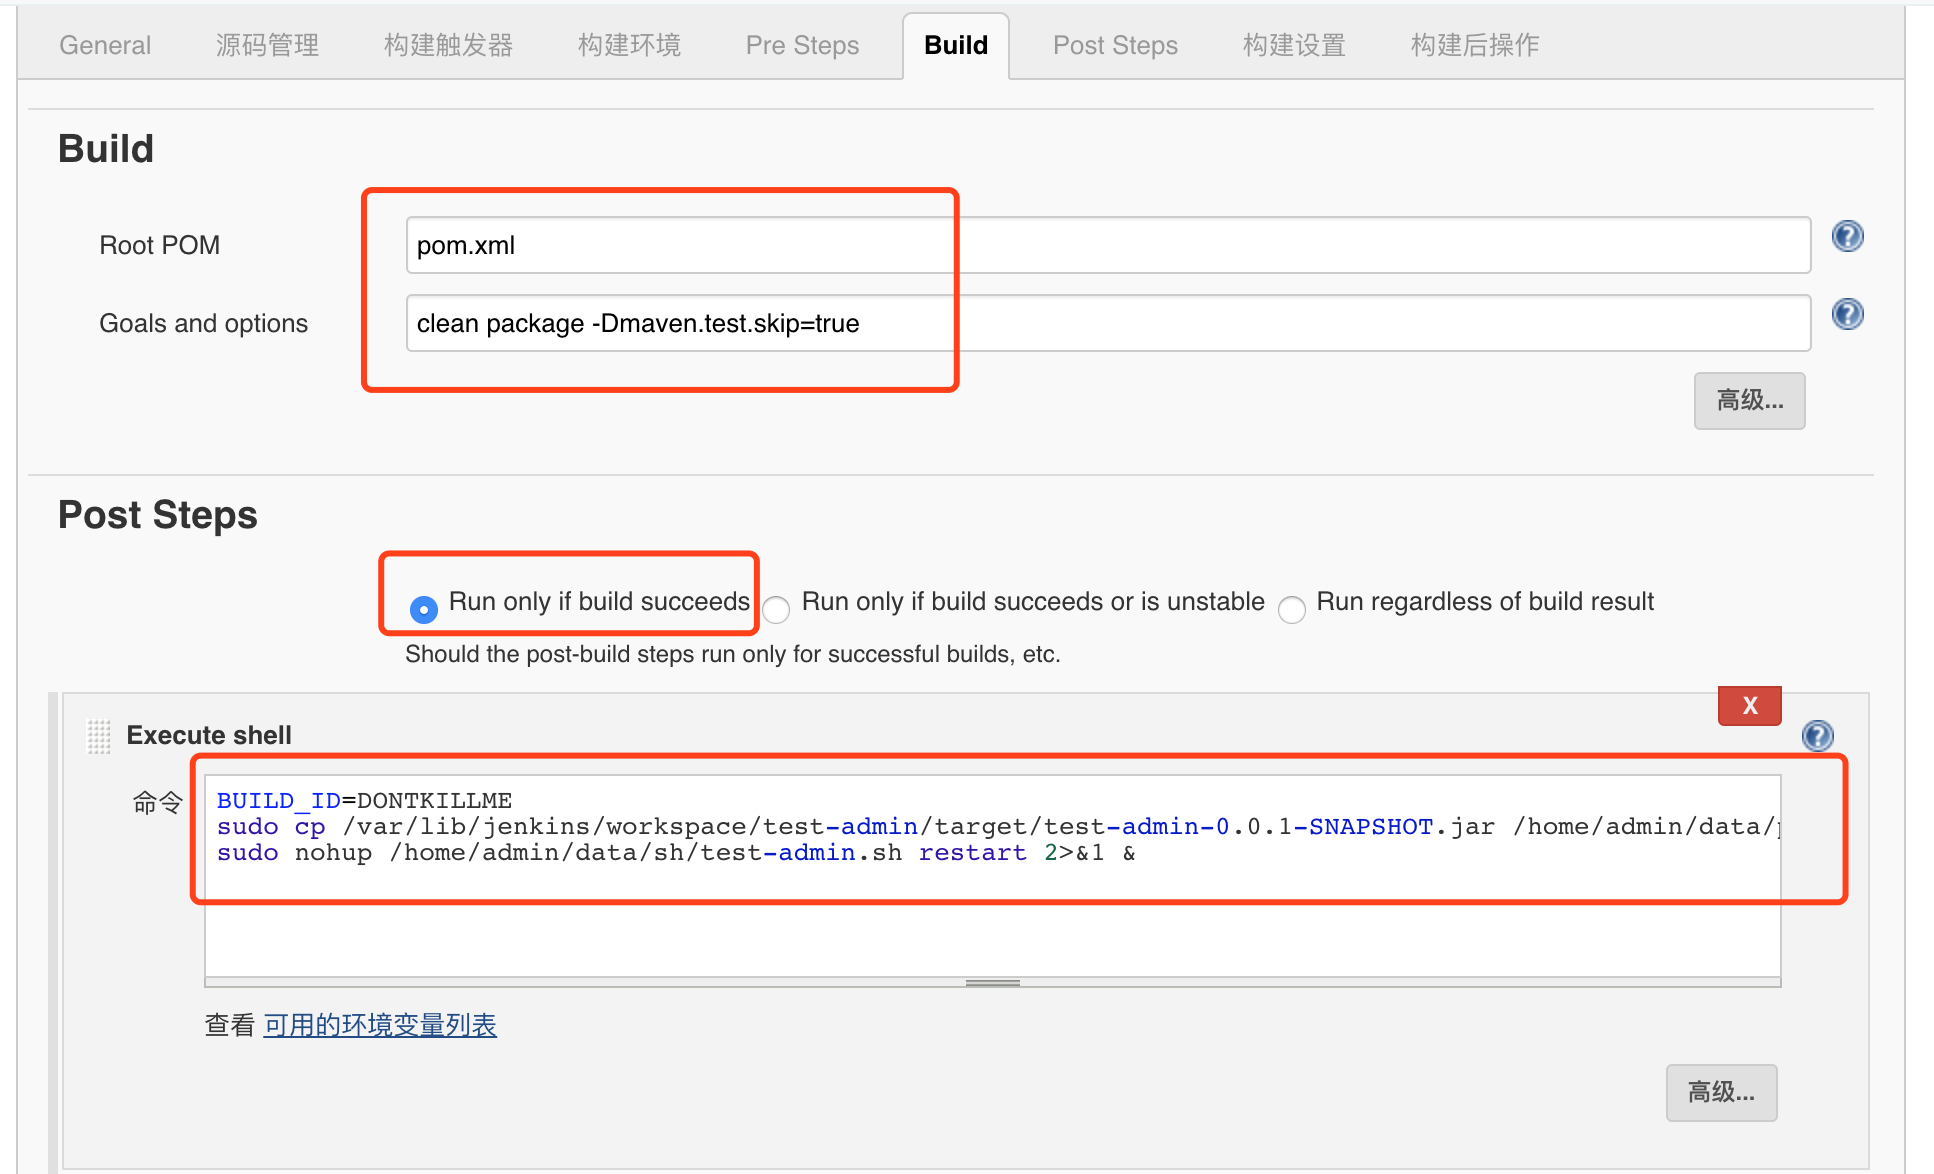
After the construction, you can view the specific project in / var/lib/jenkins/workspace /. Find the jar package to be started in the relevant target directory and execute the startup script
/home/admin/data/sh/test-admin.sh is the content of the auto deployment script:
#!/bin/bash
#Modify to the actual path of jar package
SpringBoot=/home/admin/data/package/test-admin-0.0.1-SNAPSHOT.jar

if [ "$1" = "" ];
then
    echo -e "\033[0;31m No operation name entered \033[0m  \033[0;34m {start|stop|restart|status} \033[0m"
    exit 1
fi

if [ "$SpringBoot" = "" ];
then
    echo -e "\033[0;31m App name not entered \033[0m"
    exit 1
fi

function start()
{
	count=`ps -ef |grep java|grep $SpringBoot|grep -v grep|wc -l`
	if [ $count != 0 ];then
		echo "$SpringBoot is running..."
	else
		echo "Start $SpringBoot success..."
		#nohup java -jar $SpringBoot > /dev/null 2>&1 &
        	nohup /usr/local/jdk1.8.0_221/bin/java -jar $SpringBoot --spring.profiles.active=test > /home/admin/data/logs/test-admin/catalina.out 2>&1
	fi
}

function stop()
{
	echo "Stop $SpringBoot"
	boot_id=`ps -ef |grep java|grep $SpringBoot|grep -v grep|awk '{print $2}'`
	count=`ps -ef |grep java|grep $SpringBoot|grep -v grep|wc -l`
	if [ $count != 0 ];then
	    kill $boot_id
    	count=`ps -ef |grep java|grep $SpringBoot|grep -v grep|wc -l`

		boot_id=`ps -ef |grep java|grep $SpringBoot|grep -v grep|awk '{print $2}'`
		kill -9 $boot_id
	fi
}

function restart()
{
	stop
	sleep 2
	start
}

function status()
{
    count=`ps -ef |grep java|grep $SpringBoot|grep -v grep|wc -l`
    if [ $count != 0 ];then
        echo "$SpringBoot is running..."
    else
        echo "$SpringBoot is not running..."
    fi
}

case $1 in
	start)
	start;;
	stop)
	stop;;
	restart)
	restart;;
	status)
	status;;
	*)

	echo -e "\033[0;31m Usage: \033[0m  \033[0;34m sh  $0  {start|stop|restart|status}  {SpringBootJarName} \033[0m
\033[0;31m Example: \033[0m
	  \033[0;33m sh  $0  start esmart-test.jar \033[0m"
esac
6. Finally, click apply to save and execute
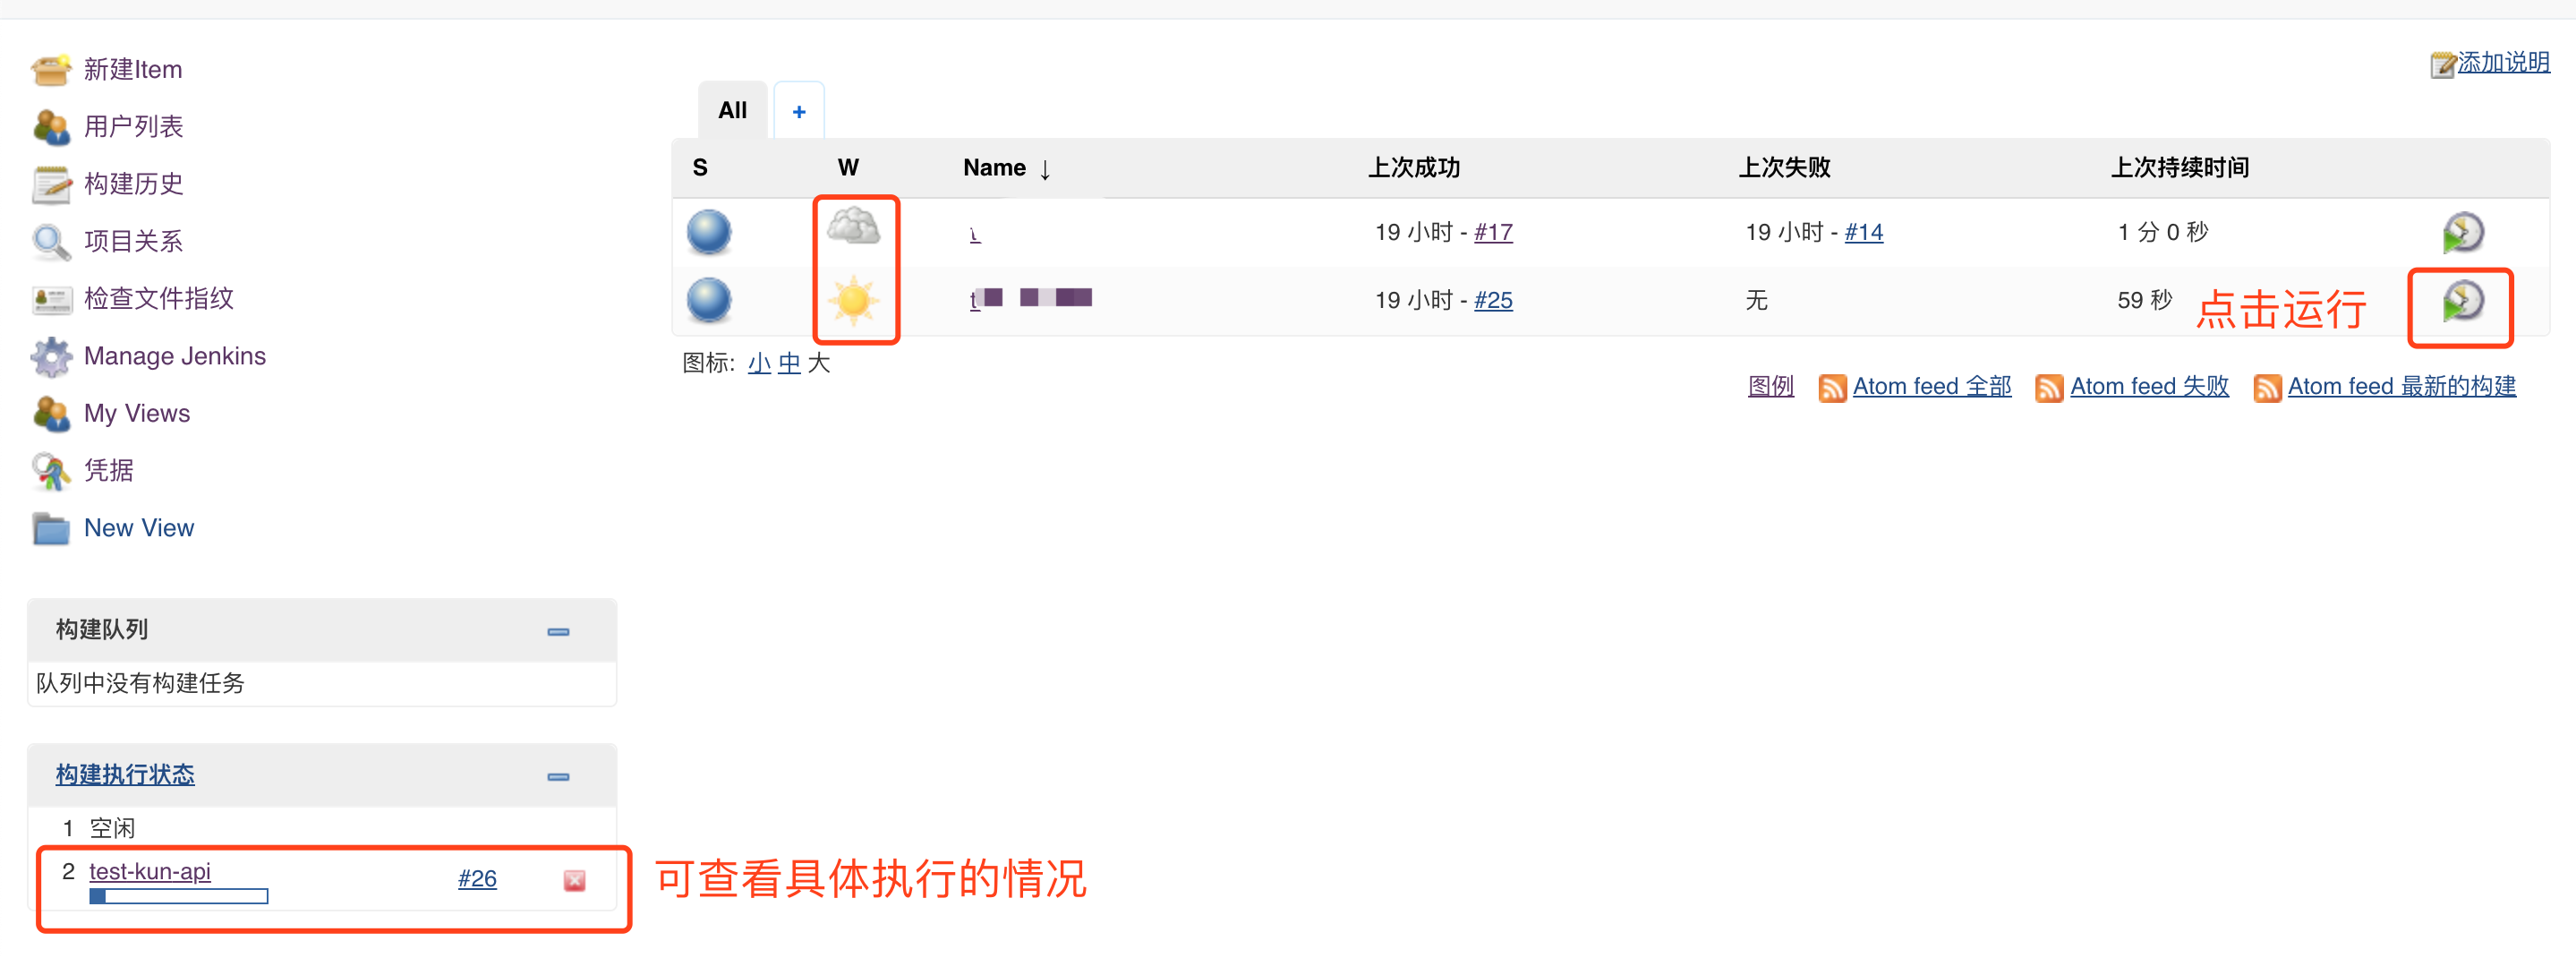
Second column: black clouds and sun icons represent recent builds
View console log when viewing specific execution
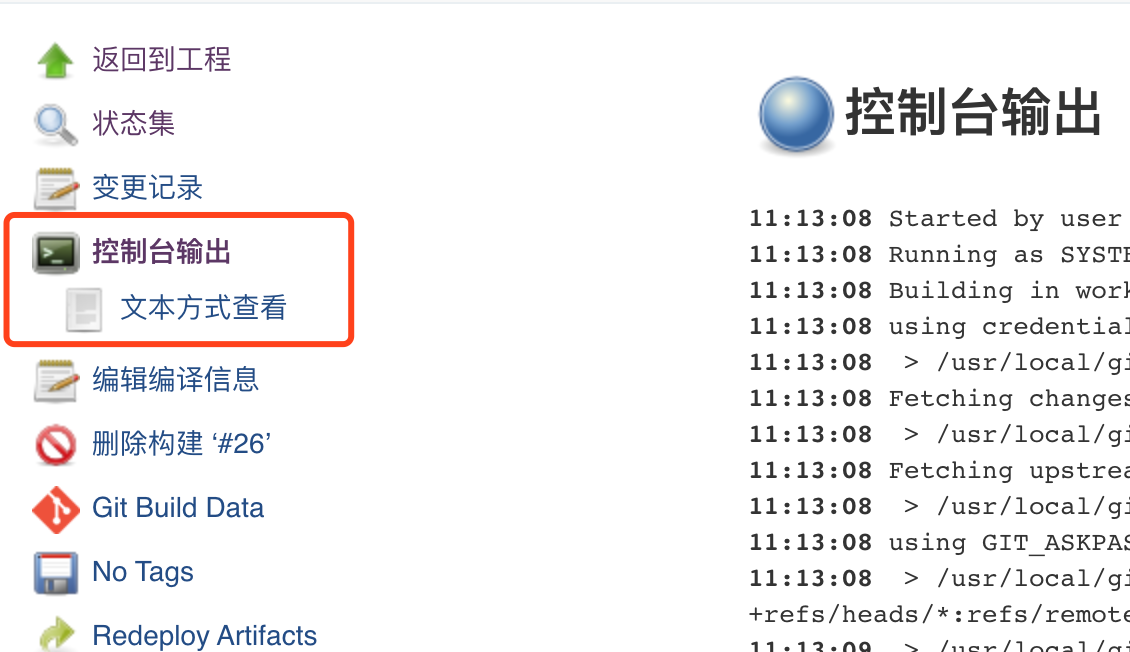

When the execution result is Finished: SUCCESS, it means success. Finally, confirm whether the project gets the latest code and restarts
7. Precautions
It may fail because jenkins does not have sudo permission
The solution is switched to root. Find "Same thing without a password" in / etc/sudoers and add it below
jenkins ALL=(ALL) NOPASSWD: ALL
Specific steps:
su - root
chmod u+w /etc/sudoers
vim /etc/sudoers
#add to
jenkins   ALL=(ALL)       NOPASSWD: ALL
chmod u-w /etc/sudoers
Or change jenkins users directly
vim /etc/sysconfig/jenkins find JENKINS_USER="jenkins"
Change Jenkins Uuser = "Jenkins" to Jenkins Uuser = "root"
JENKINS_USER="root"
Restart: service jenkins restart