If the article is original, it cannot be reproduced without permission
Original blog address: https://blog.csdn.net/qq21497936
Original blogger blog navigation: https://blog.csdn.net/qq21497936/article/details/102478062
Blog address: https://blog.csdn.net/qq21497936/article/details/105943977
Dear readers, knowledge is endless and manpower is poor. Either we need to change our needs, or we need to find professionals, or we need to study by ourselves
Catalog
The difference between perspective transformation and affine transformation
Perspective transformation function prototype
Get 3 x 3 matrix function prototype
Project template: corresponding version No. v1.46.0
Red fat man (red imitation): the collection of development technologies (including Qt practical technology, raspberry pie, 3D, OpenCV, OpenGL, ffmpeg, OSG, SCM, software and hardware combination, etc.) is continuously updated(click on the portal)
OpenCV development column (click on the portal)
OpenCV Development Notes (51): red fat man takes you 8 minutes to learn more about perspective transformation (illustrated + easy to understand + program source code)
Preface
Red fatso come!!!
When the ID card is recognized, the ID card is actually a fixed object. If the fixed object is recognized, it is through the feature points, but the fixed problems have different angles and directions. If the identification is recognized, it is likely to be corrected through perspective transformation, such as: correction of ocr tilt, correction of known objects, etc.
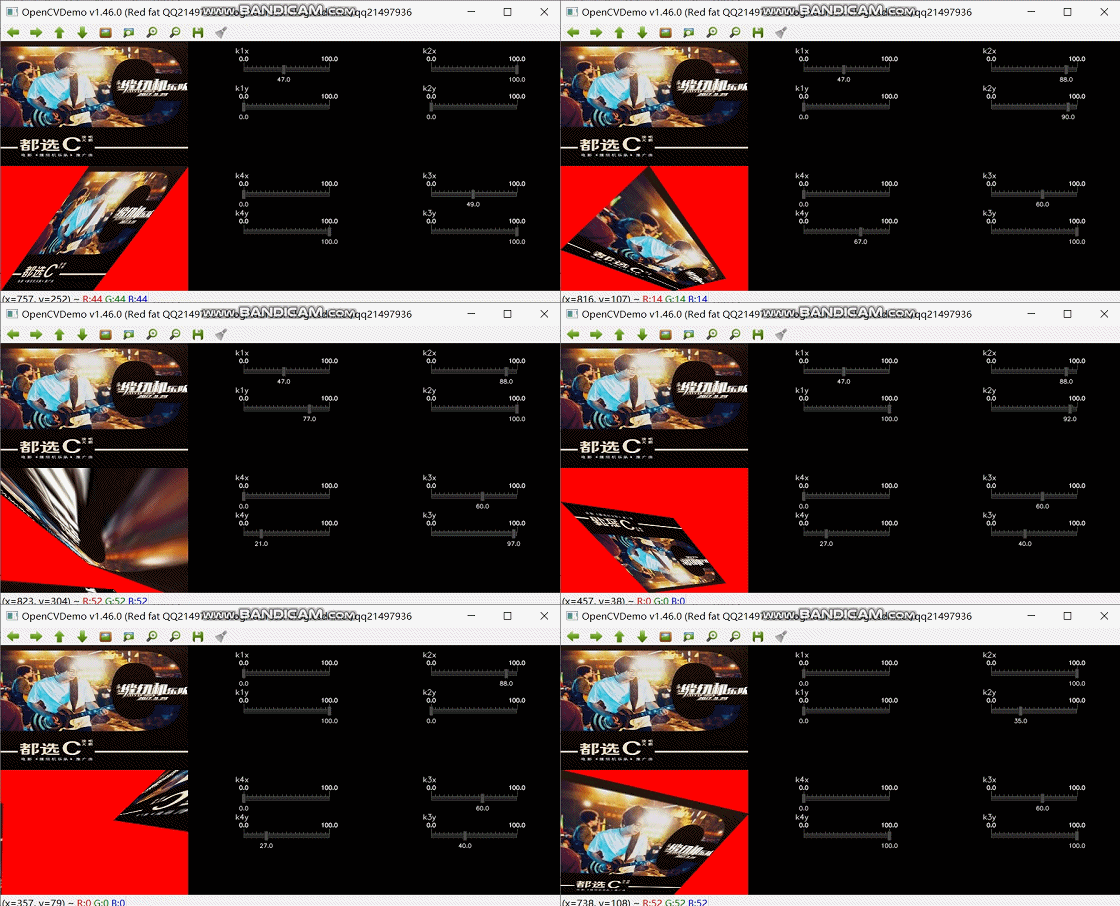
Demo

The difference between perspective transformation and affine transformation
- Affine transformation: a more intuitive term for affine transformation can be called "plane transformation" or "two-dimensional coordinate transformation". The calculation method is the product of coordinate vector and transformation matrix, in other words, matrix operation. At the application level, the radiometric transformation is based on three fixed vertices. For affine transformation, please refer to the blog:< OpenCV Development Notes (46): red fat man takes you 8 minutes to learn more about affine changes (illustrated + easy to understand + program source code)>
- Perspective transformation: a more intuitive way to call perspective transformation is called "space transformation" or "three-dimensional coordinate transformation". In the figure, the red dot is the fixed vertex, and the pixel value of the fixed vertex is the same after the transformation. The whole image is transformed according to the transformation rules. Perspective transformation is the transformation of the image based on four fixed vertices.
Perspective transformation
Summary
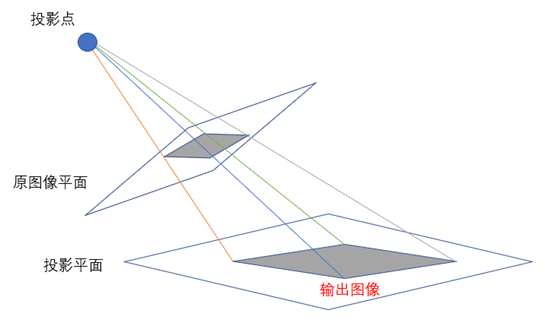
Perspective transformation refers to the transformation that uses the condition that the perspective center, image point and target point are collinear, according to the perspective rotation law, the bearing surface (perspective surface) rotates a certain angle around the trace (perspective axis), destroys the original projection beam, and still keeps the projection geometry on the bearing surface unchanged.
Generally speaking, perspective transformation is to project the image to a new viewing plane, also known as projection mapping.
principle
The perspective transformation in Opencv is based on the transformation of four vertices. The center of projection is adjusted according to the position of four vertices.

Perspective transformation function prototype
void warpPerspective( InputArray src,
                      OutputArray dst,
                      InputArray M,
                      Size dsize,
                      int flags = INTER_LINEAR,
                      int borderMode = BORDER_CONSTANT,
                      const Scalar& borderValue = Scalar());
- Parameter 1: src of InputArray type, input image;
- Parameter 2: output array type dst, output image, size and type consistent with the input image;
- Parameter 3: M, 3 x 3 transformation matrix of inputarray type;
- Parameter 4: dsize of Size type, Size of output image;
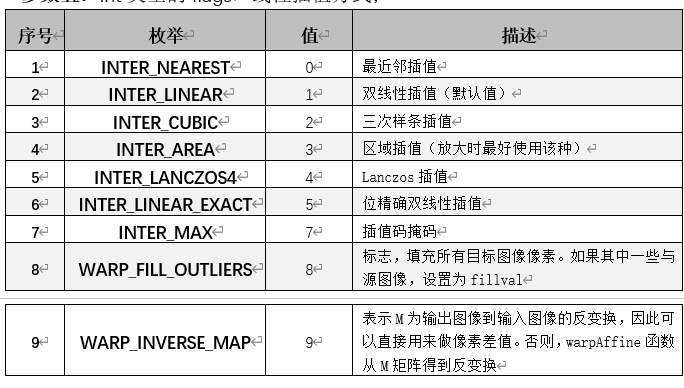
- Parameter 5: int type flags, linear interpolation;

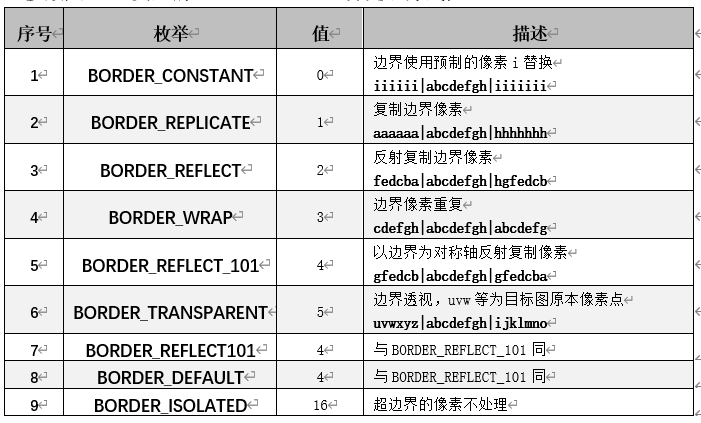
- Parameter 6: borderMode of int type, boundary processing method;

- Parameter 7: border value of Scalar type, and the extra filling color of the border;
Get 3 x 3 matrix function prototype
The transmission transformation is calculated from four pairs of points.
Mat getPerspectiveTransform( InputArray src,
                             InputArray dst );
- Parameter 1: src of InputArray type, input 4 points, STD:: vector < CV:: point2f >;
- Parameter 2: input dst of InputArray type, input 4 points;
Demo source code
void OpenCVManager::testWarpPerspective()
{
    QString fileName1 ="E:/qtProject/openCVDemo/openCVDemo/modules/openCVManager/images/1.jpg";
    cv::Mat srcMat = cv::imread(fileName1.toStdString());
    cv::Mat dstMat;
    int width = 300;
    int height = 200;

    cv::resize(srcMat, srcMat, cv::Size(width, height));

    cv::String windowName = _windowTitle.toStdString();
    cvui::init(windowName);

    cv::Mat windowMat = cv::Mat(cv::Size(srcMat.cols * 3,
                                         srcMat.rows * 2),
                                srcMat.type());

    int k1x = 0;
    int k1y = 0;
    int k2x = 100;
    int k2y = 0;
    int k3x = 100;
    int k3y = 100;
    int k4x = 0;
    int k4y = 100;

    while(true)
    {
        // Refresh full black
        windowMat = cv::Scalar(0, 0, 0);

        // Original copy
        cv::Mat mat = windowMat(cv::Range(srcMat.rows * 0, srcMat.rows * 1),
                                cv::Range(srcMat.cols * 0, srcMat.cols * 1));
        cv::addWeighted(mat, 0.0f, srcMat, 1.0f, 0.0f, mat);


        {
            std::vector<cv::Point2f> srcPoints;
            std::vector<cv::Point2f> dstPoints;

            srcPoints.push_back(cv::Point2f(0.0f, 0.0f));
            srcPoints.push_back(cv::Point2f(srcMat.cols - 1, 0.0f));
            srcPoints.push_back(cv::Point2f(srcMat.cols - 1, srcMat.rows - 1));
            srcPoints.push_back(cv::Point2f(0.0f, srcMat.rows - 1));

            cvui::printf(windowMat, 75 + width * 1, 10 + height * 0, "k1x");
            cvui::trackbar(windowMat, 75 + width * 1, 20 + height * 0, 165, &k1x, 0, 100);
            cvui::printf(windowMat, 75 + width * 1, 70 + height * 0, "k1y");
            cvui::trackbar(windowMat, 75 + width * 1, 80 + height * 0, 165, &k1y, 0, 100);

            cvui::printf(windowMat, 75 + width * 2, 10 + height * 0, "k2x");
            cvui::trackbar(windowMat, 75 + width * 2, 20 + height * 0, 165, &k2x, 0, 100);
            cvui::printf(windowMat, 75 + width * 2, 70 + height * 0, "k2y");
            cvui::trackbar(windowMat, 75 + width * 2, 80 + height * 0, 165, &k2y, 0, 100);

            cvui::printf(windowMat, 75 + width * 2, 10 + height * 1, "k3x");
            cvui::trackbar(windowMat, 75 + width * 2, 20 + height * 1, 165, &k3x, 0, 100);
            cvui::printf(windowMat, 75 + width * 2, 70 + height * 1, "k3y");
            cvui::trackbar(windowMat, 75 + width * 2, 80 + height * 1, 165, &k3y, 0, 100);

            cvui::printf(windowMat, 75 + width * 1, 10 + height * 1, "k4x");
            cvui::trackbar(windowMat, 75 + width * 1, 20 + height * 1, 165, &k4x, 0, 100);
            cvui::printf(windowMat, 75 + width * 1, 70 + height * 1, "k4y");
            cvui::trackbar(windowMat, 75 + width * 1, 80 + height * 1, 165, &k4y, 0, 100);

            dstPoints.push_back(cv::Point2f(srcMat.cols * k1x / 100.0f, srcMat.rows * k1y / 100.0f));
            dstPoints.push_back(cv::Point2f(srcMat.cols * k2x / 100.0f, srcMat.rows * k2y / 100.0f));
            dstPoints.push_back(cv::Point2f(srcMat.cols * k3x / 100.0f, srcMat.rows * k3y / 100.0f));
            dstPoints.push_back(cv::Point2f(srcMat.cols * k4x / 100.0f, srcMat.rows * k4y / 100.0f));

            cv::Mat M = cv::getPerspectiveTransform(srcPoints, dstPoints);
            cv::warpPerspective(srcMat,
                                dstMat,
                                M,
                                cv::Size(srcMat.cols, srcMat.rows),
                                cv::INTER_LINEAR,
                                cv::BORDER_CONSTANT,
                                cv::Scalar(0, 0, 255));

            mat = windowMat(cv::Range(srcMat.rows * 1, srcMat.rows * 2),
                            cv::Range(srcMat.cols * 0, srcMat.cols * 1));
            cv::addWeighted(mat, 0.0f, dstMat, 1.0f, 0.0f, mat);
        }

        // To update
        cvui::update();
        // display
        cv::imshow(windowName, windowMat);
        // esc key exit
        if(cv::waitKey(25) == 27)
        {
            break;
        }
    }
}
Project template: corresponding version No. v1.46.0
Corresponding version No. v1.46.0
Original blog address: https://blog.csdn.net/qq21497936
Original blogger blog navigation: https://blog.csdn.net/qq21497936/article/details/102478062
Blog address: https://blog.csdn.net/qq21497936/article/details/105943977