Learning React Native for the first time, if there is no guidance, you will find that many things can not be started, but when there is guidance, you will find it is very simple. This is also the main reason for me to write this blog, hoping to help beginners.
This article will not introduce how to build a development environment. If you haven't, please refer to the official documents here: https://react-native.org/doc/getting-started.html .
This article will not introduce various components, too many, please refer to the official documents here: https://react-native.org/doc/components-and-apis.html .
This article will start from the creation of projects, to the basic common layout (tabs), navigation between multiple pages, adding hot update, user behavior analysis functions. In a word, I want to tell you how a React Native App is developed in practice.
Every knowledge point will not be explained in detail. This blog only serves as a guide, which can make you less detour and less time to explore.
Step 1: create a project
Of course, the premise is that you have built the development environment.
On the command line, go to the place where you want to put the project file. I put it in the mydocs folder on disk D (D:\mydocs \), and execute the following command:
React native init project name
My project name is "test0", so the complete command should be as follows:
react-native init test0
This command may take a long time to execute due to the need to download files to the Internet, and I have control over the network. As long as the network is uninterrupted and error free, wait patiently.
After the command is executed, there is an additional test0 folder in the D:\mydocs \ directory. There are many files and folders that have been created by default.
First, let's make a simple understanding of the project file created by default.
Use any editor you like (I like to use VS Code )Open this folder. You will see a directory structure similar to this:
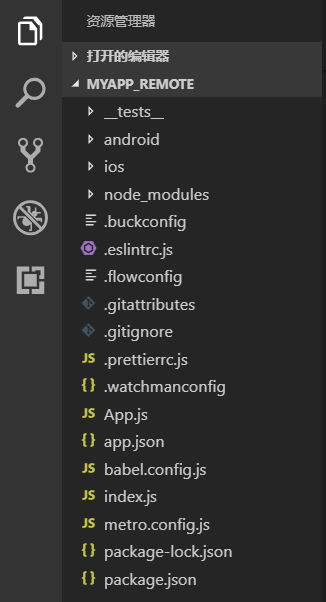
Among them,
/package.json is the configuration file of package management. You can configure the package you want to install here. You can also configure the basic information of the project, such as project name, version number, project description, etc. But most of the time, you can leave it alone.
/The startup file of the index.js project.
/App.js homepage file, which will be loaded in / index.js.
/All packages used in the node modules project are stored in this folder. Don't put your own project files here.
/Android here puts some files related to Android native compilation. As a real native developer, you don't need to worry about it in general.
/iOS puts some files related to iOS native compilation. As a real native developer, you don't need to worry about it in general.
It needs to be explained here that if you need to move a lot of code under / android and / ios in your project development, or even add a lot of business logic to it, it means that there are problems in your project development. Generally, only some code related to compilation, configuration and distribution can move here.
Step 2: create our first page - Hello React Native
Actually, now we can run the project. React native init Test0 has created a home page for us by default, but I want to replace it with my own content.
Modify / App.js, and replace all the original codes with the following codes:
 1 import React from 'react';
 2 import { SafeAreaView, View, Text } from 'react-native';
 3
 4 class App extends React.Component {
 5     render() {
 6         return (
 7             <SafeAreaView>
 8                 <View>
 9                     <Text>Hello React Native</Text>
10                 </View>
11             </SafeAreaView>
12         );
13     }
14 };
15
16 export default App;
The code generated by default is hooks syntax, but I don't like it. I prefer class. I think the structure of class is clearer.
Step 3: check the running effect in the simulator
Our first page has been created, now we need to see the running effect. It can be debugged with a real machine, but in most cases, it is more convenient to use a simulator.
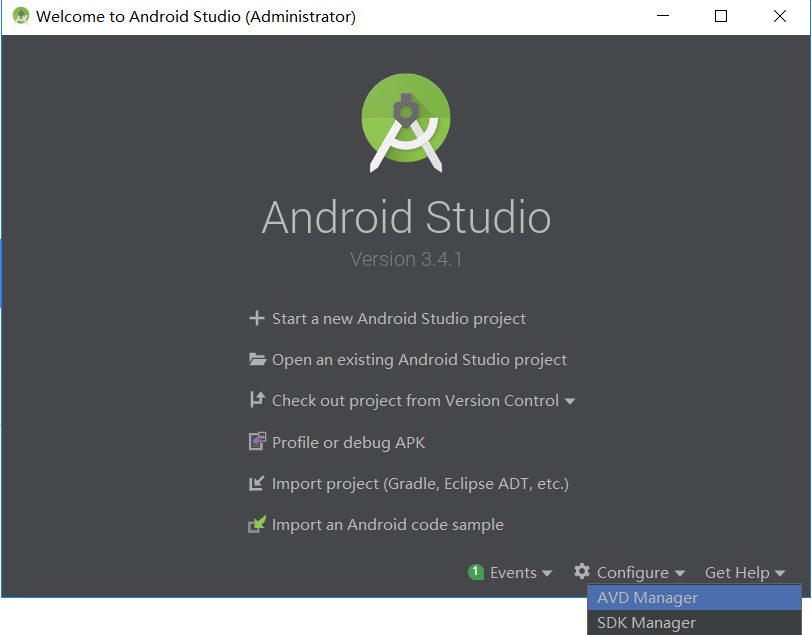
There are a variety of simulators to choose from. I like to use the emulator that comes with Android Studio. The installation method is also shown in this document: https://react-native.org/doc/getting-started.html .
Open Android Studio and click Configure - > AVD Manager
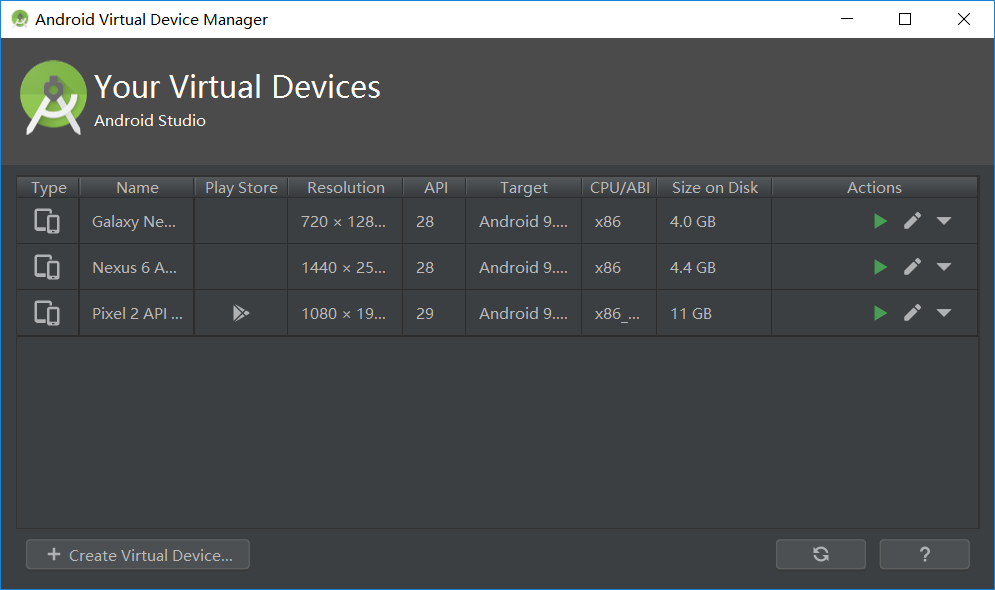
In the open window, you can see all the simulators you have created. If you haven't created a simulator yet, click Create Virtual Device to create one. Here is the simulator I have created.
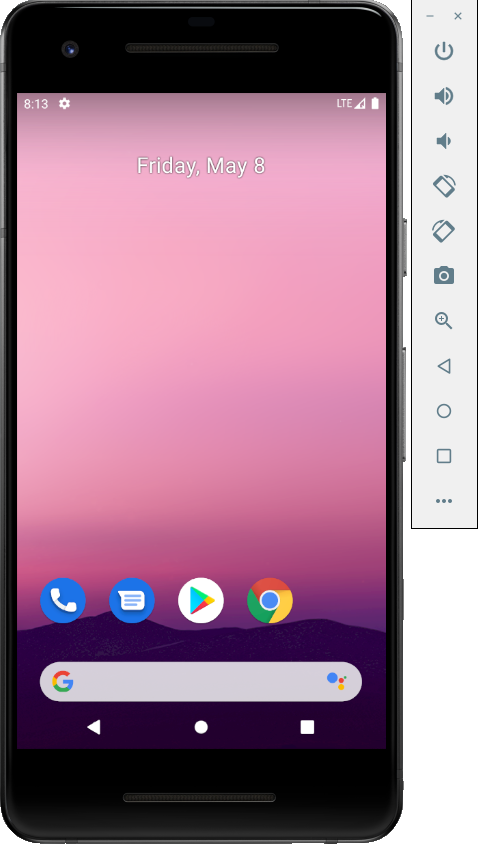
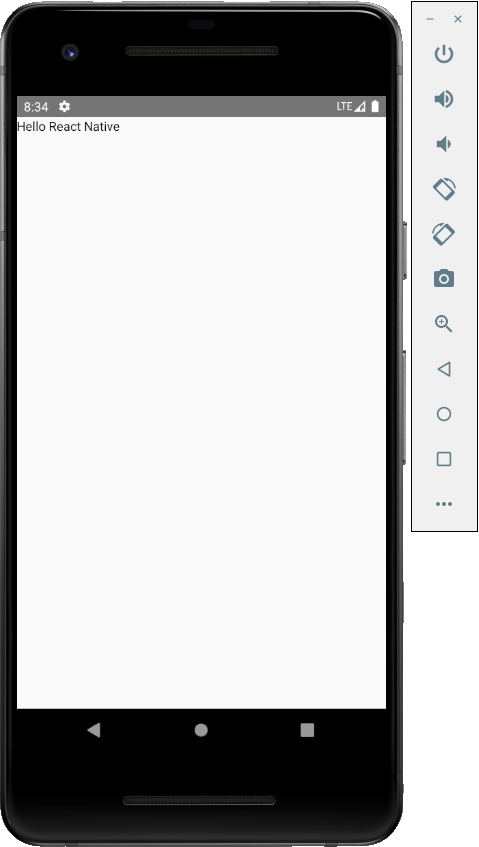
Click the green triangle at the back to start the simulator. After starting, it looks like this:
Back to our project again. On the command line, go to the project folder (D:\mydocs\test0 \), and execute the following command:
react-native run-android
Because I use the Windows system, I will not demonstrate the operation effect of ios. To run ios, you need to execute the following commands on the Mac:
react-native run-ios
In the same way, it may take a long time to wait, because you also need to download compilation tools from the Internet. It will be much faster to execute this command later. (this is one of the main reasons why many farmers hate GFW.)
Here's how our code works at the moment:
Step 4: navigation between multiple pages
Now our example has only one page. If there are multiple pages, how can we jump from one page to another?
In React Native, there are many packages that can implement this function. For example: React Navigation, React Native Navigation, etc.
There are various articles on the Internet that compare the quality of various packages, but for general applications, the difference is not big. Although I usually use React Native Navigation in projects, it is relatively simple and easy to use. So in this example, I choose to use React Navigation.
Create a second page first.
Create a file in the root directory of the project: / one.js. And add the following code:
 1 import React from 'react';
 2 import { View, Text } from 'react-native';
 3
 4 class One extends React.Component {
 5     render() {
 6         return (
 8             <View>
 9                 <Text>Another page</Text>
10             </View>
12         );
13     }
14 };
15
16 export default One;
Then add a button in / App.js, hoping to jump to / one.js after clicking it. Modify the code of / App.js as follows:
 1 import React from 'react';
 2 import { SafeAreaView, View, Text, Button } from 'react-native';
 3
 4 class App extends React.Component {
 5     onPress() {
 6         // TODO: Jump to another page
 7     }
 8
 9     render() {
10         return (
11             <SafeAreaView>
12                 <View>
13                     <Text>Hello React Native</Text>
14                 </View>
15                 <View>
16                     <Button title="Click on me to go to another page" onPress={this.onPress}></Button>
17                 </View>
18             </SafeAreaView>
19         );
20     }
21 };
22
23 export default App;
Next you need to add jump code to the onPress() method. Before that, you need to install the React Navigation package.
Execute the following command in the root directory of the project (you may need to close the App opened in the emulator first, or close the emulator directly and end the project):
npm install @react-navigation/native
npm install react-native-reanimated react-native-gesture-handler react-native-screens react-native-safe-area-context @react-native-community/masked-view
npm install @react-navigation/stack
Then change the code in / App.js to look like this:
 1 import React from 'react';
 2 import { View, Text, Button } from 'react-native';
 3 import { NavigationContainer } from '@react-navigation/native';
 4 import { createStackNavigator } from '@react-navigation/stack';
 5 import One from './one';
 6
 7 const Stack = createStackNavigator();
 8
 9 class Home extends React.Component {
10     onPress = () => {
11         this.props.navigation.navigate('One');
12     }
13
14     render() {
15         return (
16             <View>
17                 <View>
18                     <Text>Hello React Native</Text>
19                 </View>
20                 <View>
21                     <Button title="Click on me to go to another page" onPress={this.onPress}></Button>
22                 </View>
23             </View>
24         );
25     }
26 };
27
28 class App extends React.Component {
29     render() {
30         return (
31             <NavigationContainer>
32                 <Stack.Navigator initialRouteName="Home">
33                     <Stack.Screen name="Home" component={Home} />
34                     <Stack.Screen name="One" component={One} />
35                 </Stack.Navigator>
36             </NavigationContainer>
37         );
38     }
39 }
40
41 export default App;
This time the changes are quite large. A new class Home is added, which moves the code from the previous class App to the class Home. The current class App is a container for maintaining navigation.
Notice the code in onPress() in class Home, where you can use navigation.navigate(name) to jump to another page. Through the processing in class App, there is a navigation object in props of class Home.
Execute react native run Android again to see the effect in the simulator:
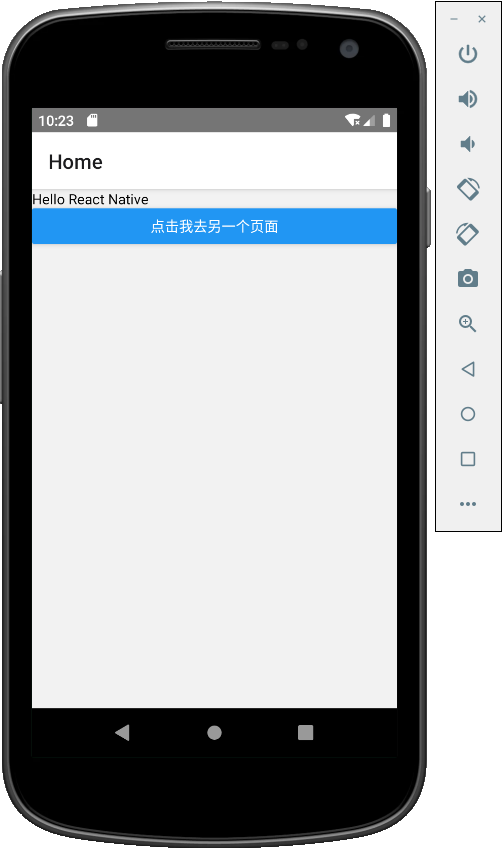
Click the Button on the page to jump to / one.js.
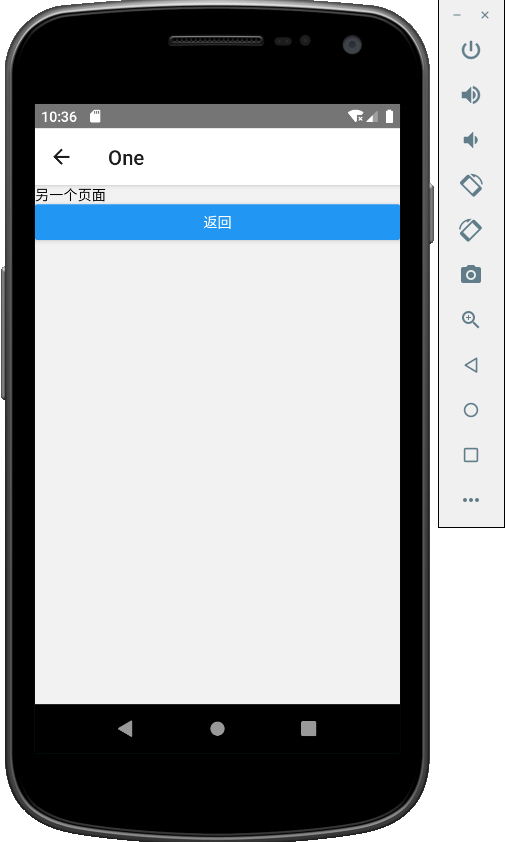
In / one.js, you can directly click the "back" icon in the upper left corner to return to the previous page. But to demonstrate how to use the code to return to the previous page, I changed the code of / one.js to look like this:
 1 import React from 'react';
 2 import { View, Text, Button } from 'react-native';
 3
 4 class One extends React.Component {
 5     onPress = () => {
 6         this.props.navigation.goBack();
 7     }
 8
 9     render() {
10         return (
11             <View>
12                 <Text>Another page</Text>
13                 <View>
14                     <Button title="Return" onPress={this.onPress}></Button>
15                 </View>
16             </View>
17         );
18     }
19 };
20
21 export default One;
Here we use navigation.goBack() to go back to the previous page.
Now, click the "return" Button in / one.js to return to the previous page.
navigation also has a push() method, which is more commonly used. You can try the effect. Refer to official documents for specific usage: https://react-native.org/doc/navigation.html .
Step 5: add tabs
In App, a common layout is a row of tabs at the bottom.
In fact, tabs are composed of multiple pages. Therefore, switching between tabs is also to navigate between multiple pages. Therefore, React Navigation is also needed here.
Execute the following command at the root of the project (again, you may need to stop the project first):
npm install @react-navigation/bottom-tabs
For better demonstration effect, add the third page / two.js, and the code is as follows:
 1 import React from 'react';
 2 import { View, Text } from 'react-native';
 3
 4 class Two extends React.Component {
 5     render() {
 6         return (
 7             <View>
 8                 <Text>Third page</Text>
 9             </View>
10         );
11     }
12 };
13
14 export default Two;
Introduce it in / App.js:
1 import Two from './two';
Put the previous
1 import { createStackNavigator } from '@react-navigation/stack';
Replace with:
1 import { createBottomTabNavigator } from '@react-navigation/bottom-tabs';
And
1 const Stack = createStackNavigator();
Replace with:
1 const Tab = createBottomTabNavigator();
Then change the class App to:
 1 class App extends React.Component {
 2     render() {
 3         return (
 4             <NavigationContainer>
 5                 <Tab.Navigator>
 6                     <Tab.Screen name="Home" component={Home} options={{title: 'Javascript'}} />
 7                     <Tab.Screen name="One" component={One} options={{title: 'Python'}} />
 8                     <Tab.Screen name="Two" component={Two} options={{title: 'PHP'}} />
 9                 </Tab.Navigator>
10             </NavigationContainer>
11         );
12     }
13 }
Execute react native run Android in the root directory of the project again to check the operation effect:
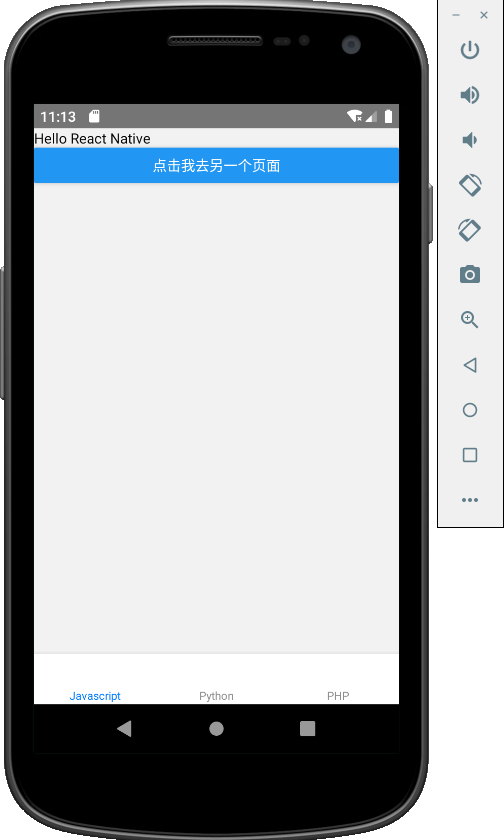
You can see a row of tabs at the bottom. Click it to switch between different pages.
Of course, you can also add Icon icon to tabs. I won't show it here. I'm too lazy to find the Icon. For more information, please refer to the official documents: https://react-native.org/doc/navigation.html .
Step 6: add the hot update function
Well, let's assume that the functions of our App have been developed.
But can it end like this?
Of course not.
Our boss said: why do you use React Native to make apps without hot updates?
This is a joke, of course, but it's true. As long as you use React Native to develop apps, you will generally add hot update function, which is one of the biggest advantages of developing apps with React Native. If the biggest advantages are discarded, it's hard to say.
Here I use the hot update service provided by CodePush China. The method used is relatively simple. The official sample document has been written clearly, so I will go directly to the code without explanation.
Here is the official sample document: http://code-push.cn/docs/1600.htm .
After installing cpcn react native according to the official document, import it into the / App.js file:
1 import cpcn from "cpcn-react-native";
To be lazy, I copy the code in the official website example directly to class Home:
 1 class Home extends React.Component {
 2     constructor(props) {
 3         super(props);
 4         this.state = {
 5             upgradeState: 0,
 6             upgradeAllBytes: 0,
 7             upgradeReceived: 0
 8         };
 9     }
10
11     onPress = () => {
12         this.props.navigation.navigate('One');
13     }
14
15     componentDidMount() {
16         cpcn.check({
17             // Check whether there is a new version after calling this method.
18             checkCallback: (remotePackage, agreeContinueFun) => {
19                 if(remotePackage){
20                     // If remotePackage A value indicates that there is a new version to update.
21                     // take this.state.upgradeState The value of is set to 1 to display a prompt message
22                     this.setState({
23                         upgradeState: 1
24                     });
25                 }
26             },
27             // Call this method when downloading a new version
28             downloadProgressCallback: (downloadProgress) => {
29                 // Update the values in the displayed download progress
30                 this.setState({
31                     upgradeReceived: downloadProgress.receivedBytes,
32                     upgradeAllBytes: downloadProgress.totalBytes
33                 });
34             },
35             // Call this method after installing the new version.
36             installedCallback: (restartFun) => {
37                 // The new version is installed successfully, and the this.state.upgradeState To close the dialog box
38                 this.setState({
39                     upgradeState: 0
40                 }, () => {
41                     // Call this method to restart App,New version will be used after restart
42                     restartFun(true);
43                 });
44             }
45         });
46     }
47
48     upgradeContinue = () => {
49         // After the user determines the update, call this method to start the update
50         cpcn.agreeContinue(true);
51         // take this.state.upgradeState The value of is set to 2 to display the download progress
52         this.setState({
53             upgradeState: 2
54         });
55     }
56
57     render() {
58         return (
59             <>
60                 <View>
61                     <View>
62                         <Text>Hello React Native</Text>
63                     </View>
64                     <View>
65                         <Button title="Click on me to go to another page" onPress={this.onPress}></Button>
66                     </View>
67                 </View>
68                 <Modal
69                     visible={this.state.upgradeState > 0}
70                     transparent={true}>
71                     <View style={{padding:18, backgroundColor:"rgba(10,10,10,0.6)", height:"100%", display:"flex", flexDirection:"row", alignItems:"center"}}>
72                         <View style={{backgroundColor:"#fff", width:"100%", padding:18}}>
73                             {
74                                 this.state.upgradeState == 1
75                                 &&
76                                 <View>
77                                     <View style={{paddingBottom:20}}>
78                                         <Text>New version found</Text>
79                                     </View>
80                                     <View>
81                                         <Button title="Update now" onPress={this.upgradeContinue}/>
82                                     </View>
83                                 </View>
84                             }
85                             {
86                                 this.state.upgradeState == 2
87                                 &&
88                                 <View>
89                                     <Text style={{textAlign:"center"}}>{this.state.upgradeReceived} / {this.state.upgradeAllBytes}</Text>
90                                 </View>
91                             }
92                         </View>
93                     </View>
94                 </Modal>
95             </>
96         );
97     }
98 };
It's done. This App already has a hot update feature.
Step 7: add user behavior analysis function
That's not all. In the real development work, after an App goes online, there are still many things to do, such as sending the error log to the server to monitor whether there is a Bug. For another example, it is very important to analyze the user's behavior to facilitate product improvement. This is an important reference data for the company when operating the App.
Before, we all wrote our own user behavior analysis. But the code is messy, every time we modify and add new monitoring is very troublesome, and our own analysis function is not well written.
Some time ago, I found out by chance that CodePush already has the function of user behavior analysis, so I proposed to the boss to use this, and the result was praised by the boss. C
Official documents are here: http://code-push.cn/docs/1700.htm .
Next, I add user behavior analysis to this sample project. I need to know what my users are interested in, Javascript or Python? Or PHP?
Just make a burying point for each page to see which one users visit more to know the results.
Since cpcn react native has been introduced in the previous hot update, there is no need to introduce it again. However, it should be noted that cpcn react nataive must be introduced before all components are introduced. For example, my current order of introduction is as follows:
1 import React from 'react';
2 import cpcn from "cpcn-react-native";
3 import { View, Text, Button, Modal } from 'react-native';
4 import { NavigationContainer } from '@react-navigation/native';
5 import { createBottomTabNavigator } from '@react-navigation/bottom-tabs';
6 import One from './one';
7 import Two from './two';
Then add the following code after the import statement:
1 cpcn.useFootprint();
Then modify the class Home in / App.js, and add the embedded point in its constructor:
1 class Home extends React.Component {
2     constructor(props) {
3         super(props);
4         this.footprint('Javascript');
5         // Other code....
6     }
7     // Other code....
8 }
Add burying points to / one.js/two.js:
1 class One extends React.Component {
2     constructor(props) {
3         super(props);
4         this.footprint('Python');
5     }
6     // Other code....
7 }
1 class Two extends React.Component {
2     constructor(props) {
3         super(props);
4         this.footprint('PHP');
5     }
6     // Other codes....
7 }
There is a Button in / one.js, and I also want to be able to monitor whether the user clicks it. Therefore, add a buried point to the Button:
1 <Button footprint="Click the back button" title="Return" onPress={this.onPress}></Button>
Then you can go to the CodePush console to view the analysis report. Here are my test results:
Step 8: should it be over now?
Is that over?
No, not yet. C
For example, as mentioned above, in the real development work, we also need to record the user's crash log. For another example, we need to know where our users are mainly distributed. For another example, we need to cache some data. For another example, we need to give users a friendly prompt when there is an error on the server. Wait, wait.....
In short, in the actual development work, developing an App is much more than doing a project in a training class.
Step 9: it's over
As mentioned above, there are still many things to do, but I will not write in this blog. I'll write later when I have time.
I once said to myself that if you want to write more blogs, you can record some knowledge points and help others. But it never did. I really don't want to move after work. C
This is the first time to write such a long blog, I hope to help you to read this blog.