One: Background
1. Storytelling
After reading a few articles in the Public Number the other day, one of my brothers was ready to try it out with windbg. As a result, the match took several days. (_) I think a lot of friends who are eager to try will definitely encounter problems like this and that when configuring it, so I think it's necessary to tidy it up and make less detours for everyone.
Two: Some basic concepts
1. Where to download
Now it is more and more difficult to install windbg, but also install Windows 10 SDK. Many people are planted here. In fact, you can find a packaged version of windbg 6.0 directly on the internet, only over 30M. It is very convenient to adjust production and localization, and you can also practice SOS commands by the way.
Cloud Disk: https://pan.baidu.com/s/1VqXVIGVHxAZVPNds1525Jg Extraction Code: mahg
External network: http://www.33lc.com/soft/96743.html
2. Version issues
Unzip opens with an x64 and x86 folder. Obviously, 32-bit programs are debugged with windbg under x86, and 64-bit programs are debugged with windbg under x64, as shown below:

3. Other issues
I prefer to use 64bit programs, so here's 64-bit windbg.
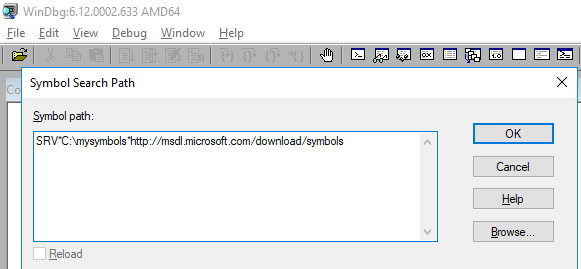
<1>Configure Microsoft Public Symbols
Symbols are actually pdb files, as you can see when you compile a project in debug mode. They mark DLLs so that you can see local variables, global variables, line numbers and other information through pdb when debugging. The pdb files in the FCL library are placed on Microsoft's public server, SRV*C:\mysymbols*http://msdl.microsoft.com/download/symbols.
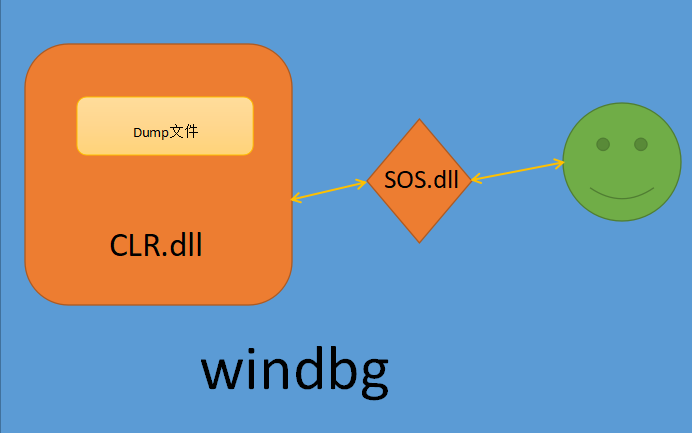
<2>Understand sos.dll and clr.dll
Many times people debug after the fact, so we need to grab a dump file in production. In order to reverse the dump file to the runtime state on clr, you must find the CLR version of the running program at that time, and also find the corresponding CLR version of sos.dll. They are usually together, SOS is you andThe channel through which CLR interacts, many people are stuck looking for the correct version of SOS and clr.If it's not clear, I can draw a picture.
With this front-end foundation, you can now configure your practices on windows and centos.😄😄😄
Configuration of netcore 3.1 on windows
To demonstrate, let me start with a simple code:
        static void Main(string[] args)
        {
            var info = "hello world!";
            Console.WriteLine(info);
            Console.ReadLine();
        }
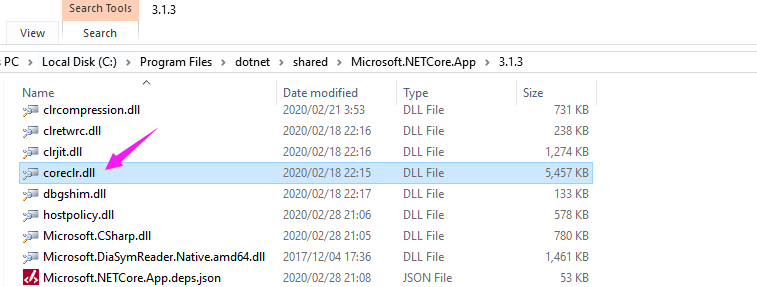
1. Find clr.dll
In netcore, the name of clr becomes coreclr.dll, with the path C:\Program Files\dotnet\shared\Microsoft.NETCore.App\3.1.3
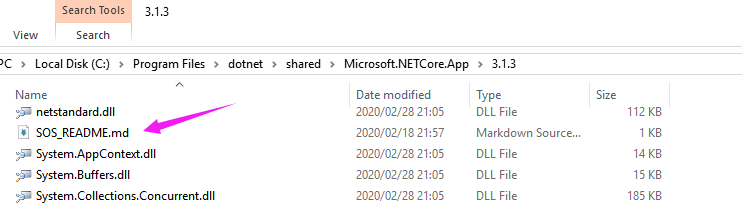
2. Find sos.dll
Since NETCORE 3.0, sos have not been placed under the version number file, as detailed in SOS_README.md.
SOS and other diagnostic tools now ship of band and work with any version of the .NET Core runtime.
SOS has moved to the diagnostics repo here: https://github.com/dotnet/diagnostics.git.
Instructions to install SOS: https://github.com/dotnet/diagnostics#installing-sos.
Looking at the above document, I mean that older versions of windbg need to generate a sos.dll by using the dotnet-sos widget, so follow the documentation
PS C:\WINDOWS\system32> dotnet tool install -g dotnet-sos
You can invoke the tool using the following command: dotnet-sos
Tool 'dotnet-sos' (version '3.1.122203') was successfully installed.
PS C:\WINDOWS\system32> dotnet-sos install
Installing SOS to C:\Users\hxc\.dotnet\sos from C:\Users\hxc\.dotnet\tools\.store\dotnet-sos\3.1.122203\dotnet-sos\3.1.122203\tools\netcoreapp2.1\any\win-x64
Installing over existing installation...
Creating installation directory...
Copying files...
Execute '.load C:\Users\hxc\.dotnet\sos\sos.dll' to load SOS in your Windows debugger.
Cleaning up...
SOS install succeeded
PS C:\WINDOWS\system32>
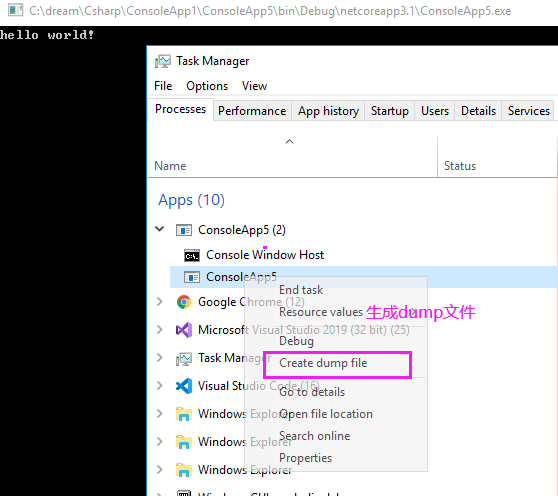
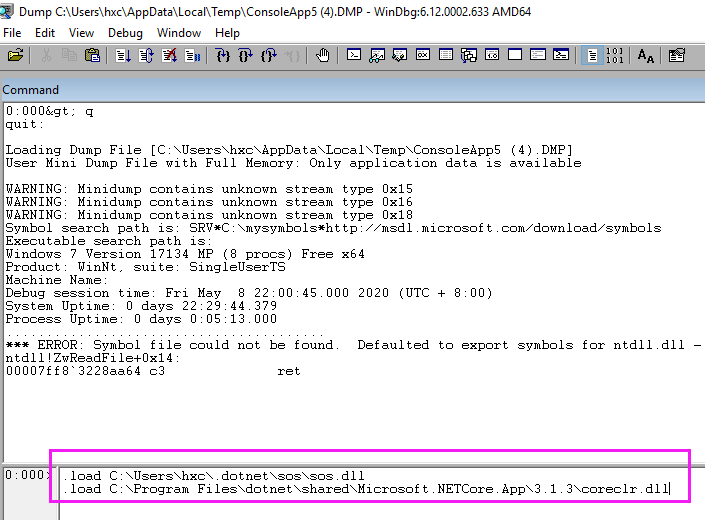
Looking closely at the output, sos.dll has been generated. Next, a dump file is generated in the Task Manager, and then coreclr and SOS are loaded using the.load command.
.load C:\Users\hxc\.dotnet\sos\sos.dll
.load C:\Program Files\dotnet\shared\Microsoft.NETCore.App\3.1.3\coreclr.dll
Finally, let's take a look at the distribution of info variables on the heap.
0:000> ~0s
ntdll!ZwReadFile+0x14:
00007ff8`3228aa64 c3              ret

0:000> !clrstack -l
OS Thread Id: 0x41d4 (0)

000000246097EA40 00007FFF89C50F97 Error: Fail to initialize CoreCLR 80131022
ConsoleApp5.Program.Main(System.String[])
    LOCALS:
        0x000000246097EA68 = 0x0000021d8141aba8

0:000> !do 0x0000021d8141aba8
Name:        System.String
MethodTable: 00007fff89cd1e18
EEClass:     00007fff89cc2128
Size:        46(0x2e) bytes
File:        C:\Program Files\dotnet\shared\Microsoft.NETCore.App\3.1.3\System.Private.CoreLib.dll
String:      hello world!
Fields:
              MT    Field   Offset                 Type VT     Attr            Value Name
00007fff89c1b1e8  4000242        8         System.Int32  1 instance               12 _stringLength
00007fff89c18000  4000243        c          System.Char  1 instance               68 _firstChar
00007fff89cd1e18  4000244      110        System.String  0   static 0000021d81411360 Empty
Well, netcore debugging on windows is as simple as that, and hopefully these configurations will save you time.
4. Configuration of netframework on windows
The framework program is much more convenient than netcore configuration and does not need to generate sos by itself, as shown in the following code:
64 Bitmap Load Path

 .load C:\Windows\Microsoft.NET\Framework64\v4.0.30319\sos.dll
 .load C:\Windows\Microsoft.NET\Framework64\v4.0.30319\clr.dll

32 Bitmap Load Path

 .load C:\Windows\Microsoft.NET\Framework\v4.0.30319\sos.dll
 .load C:\Windows\Microsoft.NET\Framework\v4.0.30319\clr.dll
5. netcore 3.1 configuration on centos
The first thing to understand is that the linux kernel windbg will fail, so how do you debug it?There are two ways.
1. Use the dotnet-dump widget built into netcore
This tool_The point is that neither sos nor clr needs your configuration, use it directly to generate dump, and then debug it directly for maximum convenience. Here's how to install it, start with two terminal s, as follows:
terminal 1:

[root@10-25-198-96 data]# dotnet build
[root@10-25-198-96 netcoreapp3.1]# dotnet data.dll
hello world


terminal 2:

[root@10-25-198-96 cs2]# ps -ef | grep dotnet
root     31555 31247  0 22:28 pts/0    00:00:00 dotnet cs2.dll
root     32112 31995  0 22:29 pts/2    00:00:00 grep --color=auto dotnet

[root@10-25-198-96 cs2]# dotnet tool install -g dotnet-dump
You can invoke the tool using the following command: dotnet-dump
Tool 'dotnet-dump' (version '3.1.122203') was successfully installed.
[root@10-25-198-96 cs2]# export PATH=$PATH:$HOME/.dotnet/tools
[root@10-25-198-96 cs2]# dotnet-dump collect --process-id 31555
Writing full to /cs2/core_20200508_223204
Complete
You can see that the dump file is ready/cs2/core_20200508_223204, and then use dotnet-dump to debug the dump file.
[root@10-25-198-96 cs2]# dotnet-dump analyze /cs2/core_20200508_223204
Loading core dump: /cs2/core_20200508_223204 ...
Ready to process analysis commands. Type 'help' to list available commands or 'help [command]' to get detailed help on a command.
Type 'quit' or 'exit' to exit the session.
> clrstack -l
OS Thread Id: 0x7b43 (0)
        Child SP               IP Call Site
00007FFDFCABF2D0 00007fb0397af7fd [InlinedCallFrame: 00007ffdfcabf2d0] Interop+Sys.ReadStdin(Byte*, Int32)
00007FFDFCABF2D0 00007fafbebbb4db [InlinedCallFrame: 00007ffdfcabf2d0] Interop+Sys.ReadStdin(Byte*, Int32)
00007FFDFCABF2C0 00007FAFBEBBB4DB ILStubClass.IL_STUB_PInvoke(Byte*, Int32)

00007FFDFCABF9D0 00007FAFBECF844D System.Console.ReadLine()

00007FFDFCABF9E0 00007FAFBEBB037D cs2.Program.Main(System.String[]) [/cs2/Program.cs @ 13]
    LOCALS:
        0x00007FFDFCABF9F0 = 0x00007faf980081d8

00007FFDFCABFD08 00007fb037fc0f7f [GCFrame: 00007ffdfcabfd08]
00007FFDFCAC01F0 00007fb037fc0f7f [GCFrame: 00007ffdfcac01f0]
> dumpobj 0x00007faf980081d8
Name:        System.String
MethodTable: 00007fafbec30f90
EEClass:     00007fafbeb9e1b0
Size:        44(0x2c) bytes
File:        /usr/share/dotnet/shared/Microsoft.NETCore.App/3.1.3/System.Private.CoreLib.dll
String:      hello world
Fields:
              MT    Field   Offset                 Type VT     Attr            Value Name
00007fafbec2a0e8  400022a        8         System.Int32  1 instance               11 _stringLength
00007fafbec26f00  400022b        c          System.Char  1 instance               68 _firstChar
00007fafbec30f90  400022c      108        System.String  0   static 00007faf97fff360 Empty
>
It's that simple, but this tool is good, but it can't debug unmanaged heaps, and there aren't too many commands, which is certainly enough for our normal use.
2. Use the lldb debugger exclusive to linux
To implement debugging at the windbg level, you can use the lldb debugger, which is very powerful. Let me also introduce it here.
<1>Install lldb
lldb is written in C++, or you can find an installation at https://github.com/dotnet/diagnostics/blob/master/documentation/building/linux-instructions.md.
sudo yum install centos-release-SCL epel-release
sudo yum install cmake cmake3 gcc gcc-c++ gdb git libicu libunwind make python27 tar wget which zip
cd $HOME
git clone https://github.com/dotnet/diagnostics.git
$HOME/diagnostics/documentation/lldb/centos7/build-install-lldb.sh
Installed after a convulsion, you can see below that the current version is 3.9.1.
[root@10-25-198-96 cs2]# lldb -v
lldb version 3.9.1 ( revision )
<2>Find sos.dll
Like windbg, you need to generate a sos.dll.It is also generated using dotnet-sos.
[root@10-25-198-96 cs2]# dotnet tool install -g dotnet-sos
You can invoke the tool using the following command: dotnet-sos
Tool 'dotnet-sos' (version '3.1.122203') was successfully installed.
[root@10-25-198-96 cs2]# dotnet-sos install
Installing SOS to /root/.dotnet/sos from /root/.dotnet/tools/.store/dotnet-sos/3.1.122203/dotnet-sos/3.1.122203/tools/netcoreapp2.1/any/linux-x64
Installing over existing installation...
Creating installation directory...
Copying files...
Updating existing /root/.lldbinit file - LLDB will load SOS automatically at startup
Cleaning up...
SOS install succeeded
From the above information, SOS is installed in the / root/.dotnet/sos directory, and you can also see that sos.dll is automatically loaded when lldb starts.
<3>Use createdump to generate dump files
There is a createdump program under each dotnet version that can be used to generate dump files. For specific configuration documents, see:
https://github.com/dotnet/diagnostics/blob/master/documentation/debugging-coredump.md
[root@10-25-198-96 cs2]# ps -ef | grep dotnet
root     31555 31247  0 22:28 pts/0    00:00:00 dotnet cs2.dll
root     32112 31995  0 22:29 pts/2    00:00:00 grep --color=auto dotnet

[root@10-25-198-96 cs2]# find / -name createdump
/usr/share/dotnet/shared/Microsoft.NETCore.App/3.1.3/createdump

[root@10-25-198-96 3.1.3]# ./createdump 31555  -f /lldb/test.dump
Writing minidump with heap to file /lldb/test.dump
Written 84692992 bytes (20677 pages) to core file

[root@10-25-198-96 3.1.3]# lldb --core /lldb/test.dump
(lldb) target create --core "/lldb/test.dump"
Core file '/lldb/test.dump' (x86_64) was loaded.
(lldb) clrstack -l
OS Thread Id: 0x7b43 (1)
00007FFDFCABF9E0 00007FAFBEBB037D cs2.Program.Main(System.String[]) [/cs2/Program.cs @ 13]
    LOCALS:
        0x00007FFDFCABF9F0 = 0x00007faf980081d8

00007FFDFCABFD08 00007fb037fc0f7f [GCFrame: 00007ffdfcabfd08]
00007FFDFCAC01F0 00007fb037fc0f7f [GCFrame: 00007ffdfcac01f0]
(lldb) dumpobj 0x00007faf980081d8
Name:        System.String
MethodTable: 00007fafbec30f90
EEClass:     00007fafbeb9e1b0
Size:        44(0x2c) bytes
File:        /usr/share/dotnet/shared/Microsoft.NETCore.App/3.1.3/System.Private.CoreLib.dll
String:      hello world
Fields:
              MT    Field   Offset                 Type VT     Attr            Value Name
00007fafbec2a0e8  400022a        8         System.Int32  1 instance               11 _stringLength
00007fafbec26f00  400022b        c          System.Char  1 instance               68 _firstChar
00007fafbec30f90  400022c      108        System.String  0   static 00007faf97fff360 Empty
(lldb)
As you can see, lldb also allows you to enter the clr directly.
Six: Summary
I think this article will certainly save a lot of time for many friends, recalling Zhu once said: The happiness of rich people is so simple and dull, Ha-ha~~
If you have more questions to interact with me, scan below to enter ~