It took a long time to write.. It feels good.. If you look, look closely.. Mua~
Z-Stack Protocol Stack Base and Data Transfer Experiments
1. Experimental Purpose
End nodes send data wirelessly to the coordinator, which sends data to the PC through a serial port and displays it on the screen.Serial port optimization changes wired serial port transmission to wireless Bluetooth transmission.
2. Experimental Platform
Hardware: 2 zigbee nodes, 1 compiler, 1 Square to USB cable, and a Bluetooth module
Software: The experiment is based on the SamplleApp project.
3. EXPERIMENTAL STEPS
- Serial Initialization Code
- Send Part Code
- Receive Part Code
4. Protocol Stack Base
Learn a little about the protocol stack before doing the experiment.
What is a protocol stack?We know that Zigbee is generally used for networking and data transfer.It's conceivable that the number of code in it is so large that it would be a hassle if we had to write it ourselves every time we used zigbee.So there's a protocol stack.It can be said that it is a small operating system, encapsulating a lot of code such as communication, networking, etc.All we have to do is call functions to achieve our goal.
Take a look at the workflow of the protocol stack (Figure 1).Then I'll do a simple analysis of the protocol stack against the flowchart.
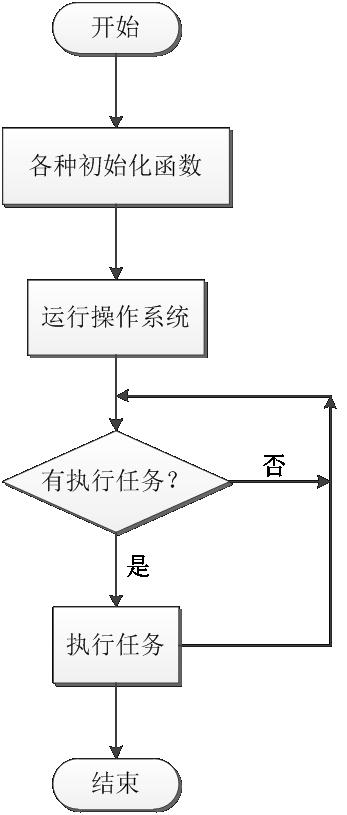
Figure 1
Let's start with the "Start" of the flowchart.
Open the project file SampleApp, the main function is the beginning of the program execution, we need to find it first.The Main function opens under ZMain.c in the ZMAin folder and finds the main function.


  1 int main( void )
  2
  3 {
  4
  5   // Turn off interrupts
  6
  7   //Close all interrupts
  8
  9   osal_int_disable( INTS_ALL );
 10
 11
 12
 13   // Initialization for board related stuff such as LEDs
 14
 15   //Initialize the system clock
 16
 17   HAL_BOARD_INIT();
 18
 19
 20
 21   // Make sure supply voltage is high enough to run
 22
 23   //Detect if chip voltage is normal
 24
 25   zmain_vdd_check();
 26
 27
 28
 29   // Initialize board I/O
 30
 31   //Initialize peripherals
 32
 33   InitBoard( OB_COLD );
 34
 35
 36
 37   // Initialze HAL drivers
 38
 39   //Initialize each hardware module of the chip
 40
 41   HalDriverInit();
 42
 43
 44
 45   // Initialize NV System
 46
 47   //Initialization flash storage
 48
 49   osal_nv_init( NULL );
 50
 51
 52
 53   // Initialize the MAC
 54
 55   //Initialization MAC layer
 56
 57   ZMacInit();
 58
 59
 60
 61   // Determine the extended address
 62
 63   //Determine IEEE 64 Bit Address
 64
 65   zmain_ext_addr();
 66
 67
 68
 69 #if defined ZCL_KEY_ESTABLISH
 70
 71   //Initialize the Certicom certificate information.
 72
 73   zmain_cert_init();
 74
 75 #endif
 76
 77
 78
 79   // Initialize basic NV items
 80
 81   //Initialize non-volatile variables
 82
 83   zgInit();
 84
 85
 86
 87 #ifndef NONWK
 88
 89   // Since the AF isn't a task, call it's initialization routine
 90
 91   afInit();
 92
 93 #endif
 94
 95
 96
 97   // Initialize the operating system
 98
 99   //Initialize Operating System***********************************Initialization focus
100
101   osal_init_system();
102
103
104
105   // Allow interrupts
106
107   //Allow interruption of enabling
108
109   osal_int_enable( INTS_ALL );
110
111
112
113   // Final board initialization
114
115   //Initialization keys
116
117   InitBoard( OB_READY );
118
119
120
121   // Display information about this device
122
123   //Display device information
124
125   zmain_dev_info();
126
127
128
129   /* Display the device info on the LCD */
130
131 #ifdef LCD_SUPPORTED
132
133   zmain_lcd_init();
134
135 #endif
136
137
138
139 #ifdef WDT_IN_PM1
140
141   /* If WDT is used, this is a good place to enable it. */
142
143   WatchDogEnable( WDTIMX );
144
145 #endif
146
147
148
149   // No Return from here
150
151   // Execute the operating system and do not return after entering************************Operational focus
152
153   osal_start_system();
154
155
156
157   return 0;  // Shouldn't get here.
158
159 }
Looking at the main function, you can see that there are all kinds of initialization functions at the beginning, that is, the "various initialization functions" in the corresponding flowchart.One thing to note in initialization is that "osal_init_system();" initializes operating system functions.It will be explained later.Continue to read, "osal_start_system();" This is the execution of operating system functions, corresponding to the "running operating system" in the process.Note that this function does not return when it is entered.Summarizing the main function is to initialize and execute the operating system.
Let's take another look at osal_init_system(); this function, which initializes the operating system.Let's go to definition and look at the code for this function.
 1 uint8 osal_init_system( void )
 2
 3 {
 4
 5   // Initialize the Memory Allocation System
 6
 7   // Initialize memory allocation system
 8
 9   osal_mem_init();
10
11
12
13   // Initialize the message queue
14
15   // Initialize message queue
16
17   osal_qHead = NULL;
18
19
20
21   // Initialize the timers
22
23   // Initialization timer
24
25   osalTimerInit();
26
27
28
29   // Initialize the Power Management System
30
31   // Initialize power management system
32
33   osal_pwrmgr_init();
34
35
36
37   // Initialize the system tasks.
38
39   // Initialize System Tasks**********************************A key
40
41   osalInitTasks();
42
43
44
45   // Setup efficient search for the first free block of heap.
46
47   osal_mem_kick();
48
49
50
51   return ( SUCCESS );
52
53 }
Looking at this function, we can see that there are still various initialization functions.Focus on "osalInitTasks();" This function, the function is to initialize the task system, continue to go to definition, view the function.
 1 void osalInitTasks( void )
 2
 3 {
 4
 5   uint8 taskID = 0;
 6
 7
 8
 9   //Allocate buffer memory, return pointer
10
11   tasksEvents = (uint16 *)osal_mem_alloc( sizeof( uint16 ) * tasksCnt);
12
13   //Set the allocated memory space unit value to 0
14
15   osal_memset( tasksEvents, 0, (sizeof( uint16 ) * tasksCnt));
16
17
18
19   // Task priority ranks from high to low, with high priority corresponding taskID Small
20
21   macTaskInit( taskID++ );  //0 Not to be considered
22
23   nwk_init( taskID++ );     //1 |
24
25   Hal_Init( taskID++ );     //2 |
26
27 #if defined( MT_TASK )
28
29   MT_TaskInit( taskID++ );
30
31 #endif
32
33   APS_Init( taskID++ );     //3 |
34
35 #if defined ( ZIGBEE_FRAGMENTATION )
36
37   APSF_Init( taskID++ );
38
39 #endif
40
41   ZDApp_Init( taskID++ );   //4 Need to be considered
42
43 #if defined ( ZIGBEE_FREQ_AGILITY ) || defined ( ZIGBEE_PANID_CONFLICT )
44
45   ZDNwkMgr_Init( taskID++ );
46
47 #endif
48
49   SampleApp_Init( taskID ); //5 Need to be considered*************************A key
50
51                             //Usually initialize your own thing here
52
53 }
From the comments we can see that this function was also initialized and that the code inside is a bit difficult to understand... here we need to know a little first, then we will mention it later, so let's explain it first.Well, since this is my own understanding, some of the descriptions may not be very professional, so it's good to understand this, and come back to modify it later when you're professional...The protocol stack uses a task mechanism and then uses polling to process tasks.That is, when it is idle, it starts with higher priority tasks, checks one by one for whether there are any tasks to process, handles the task, and continues circular detection if there are no tasks to process.
OK~That's it!Then, let's look at this function again. Its function is to give them an ID number according to their priority and initialize the task at the same time.Note that the higher the priority of the task, the smaller its ID number!Then those above we don't need to consider at all are the last two functions (we could have operated with the lowest priority...).Hmm... it feels like go ing to definition for a long time... don't look any further, and then read both functions in more detail.
This way, the initialized function is interpreted. Let's go back to the main function and continue with the next function, "osal_start_system();" to execute the operating system function!Come on, go on to definition to find it.
 1 void osal_start_system( void )
 2
 3 {
 4
 5 #if !defined ( ZBIT ) && !defined ( UBIT )
 6
 7   for(;;)  // Forever Loop
 8
 9 #endif
10
11   {
12
13     osal_run_system();
14
15   }
16
17 }
"Hmm, find"osal_run_system();"Let's continue...
 1 void osal_run_system( void )
 2
 3 {
 4
 5   uint8 idx = 0;
 6
 7
 8
 9   osalTimeUpdate();        //Scan which event was triggered, set corresponding flag bit
10
11   Hal_ProcessPoll();
12
13
14
15   //Retrieve if a task needs to be processed starting at 0 (highest priority)
16
17   //Others jump out of the loop immediately, not until the retrieval is complete
18
19   do {
20
21     if (tasksEvents[idx])  // Task is highest priority that is ready.
22
23     {
24
25       break;
26
27     }
28
29   } while (++idx < tasksCnt);
30
31
32
33   //Analyze index numbers, process tasks, skip without tasks
34
35   if (idx < tasksCnt)
36
37   {
38
39     uint16 events;
40
41     halIntState_t intState;
42
43
44
45     HAL_ENTER_CRITICAL_SECTION(intState);    //Enter critical zone, protect
46
47     events = tasksEvents[idx];               //Extraction Task
48
49     tasksEvents[idx] = 0;  // Clear the Events for this task.Clear Tasks
50
51     HAL_EXIT_CRITICAL_SECTION(intState);     //Exit critical zone
52
53
54
55     activeTaskID = idx;
56
57     events = (tasksArr[idx])( idx, events ); //Call task handler via pointer********A key
58
59     activeTaskID = TASK_NO_TASK;
60
61
62
63     HAL_ENTER_CRITICAL_SECTION(intState);    //Enter critical zone
64
65     tasksEvents[idx] |= events;  // Add back unprocessed events to the current task.
66
67                                              //Save Unhandled Events
68
69     HAL_EXIT_CRITICAL_SECTION(intState);     //Exit critical zone
70
71   }
72
73 #if defined( POWER_SAVING )
74
75   else  // Complete pass through all task events with no activity?
76
77   {
78
79     osal_pwrmgr_powerconserve();  // Put the processor/system into sleep
80
81   }
82
83 #endif
84
85
86
87   /* Yield in case cooperative scheduling is being used. */
88
89 #if defined (configUSE_PREEMPTION) && (configUSE_PREEMPTION == 0)
90
91   {
92
93     osal_task_yield();
94
95   }
96
97 #endif
98
99 }
Here's where I've been polling before~Let's talk about my understanding here...but I'm not sure it's right...The general idea should be right...
First divide the work into two parts, one part is the task request, and if there is a task request, place the corresponding flag at position 1.The other part is the function we see.At the beginning of the function, read the register of the task request (which may not be a register, in that sense), and then retrieve whether there is a task request in turn from the highest priority.As long as there are task requests, enter the processing task request section (that is, the contents of the if statement "if (idx < tasksCnt)) and continue the loop if there are No.There are two things to note in the Processing Task Request section: 1. It continues to detect whether there are still task requests after the high-priority task has been processed, until the processing of the request using the task has been completed.2. After a task is processed, it clears the flags of the task.
Well, I don't know if you understand... Then the main function here is the sentence "events = (tasksArr[idx]) (idx, events);".Let's first look at the definition of the tasksArr[] array.
 1 const pTaskEventHandlerFn tasksArr[] = {
 2
 3   macEventLoop,
 4
 5   nwk_event_loop,
 6
 7   Hal_ProcessEvent,
 8
 9 #if defined( MT_TASK )
10
11   MT_ProcessEvent,
12
13 #endif
14
15   APS_event_loop,
16
17 #if defined ( ZIGBEE_FRAGMENTATION )
18
19   APSF_ProcessEvent,
20
21 #endif
22
23   ZDApp_event_loop,
24
25 #if defined ( ZIGBEE_FREQ_AGILITY ) || defined ( ZIGBEE_PANID_CONFLICT )
26
27   ZDNwkMgr_event_loop,
28
29 #endif
30
31   SampleApp_ProcessEvent
32
33 };
Did you find it in the same file as the function osalInitTasks()?Did you find it on top of the osalInitTasks() function?Take a closer look and see if it defines member variable names in the same order as the initialization function below!Let's say it's still cloudy... (because I still don't fully understand it when I write here...) I'll explain the white dot again... Before, I didn't mean that every task has an ID number. Priority starts at 0, and the first index number in the array is also 0, which means that the task ID number corresponds to the array index number, so you can find the phase in the array by using the task ID number.Corresponding tasks.And it's amazing, at least how do I feel...................................................................................Just to understand, the type of the original array is a function!That is to say, find the corresponding function to process the task through the task ID!Do you understand that?I don't understand the message...Has anyone read it?Laugh...
Finally, the analysis of the protocol stack is complete... would it be confusing?Take a look at the flowchart below to review it again.

Figure 2
5. Experiments and Explanations
1. Serial initialization code
In the protocol stack, the folder App is the place where users add their own code.Open the file SampleApp.c and add code in the INCLUDES section
#include "MT_UART.h"
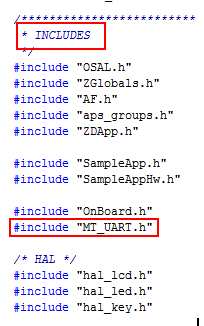
Figure 3
Instructions for operation: There are two files in the protocol stack about serial port encapsulation, one is HAL->Target->CC2530EB->Drivers->hal_uart.c, the other is MT->MT_UART.c.What is the difference between the two files?Open the file to study.First, there is include "hal_uart.h" in MT_UART.c, so just write the header file "MT_UART.h".Then, look carefully at the code and analyze the file hal_uart.c. MT_UART.c is an operation on any serial port as long as the corresponding operation is selected for different serial port types.That is, MT_UART.c is a bit lower.
(2) In the same SampleApp.c file, find the function void SampleApp_Init (uint8 task_id) and add the serial initialization code to it.
/************Serial Initialization******************/

  MT_UartInit();                      //Serial port initialization

  MT_UartRegisterTaskID(task_id);     //Registration Task Number

Figure 4
Instructions for operation: Serial port initialization is not necessary.To register a task number is to register a serial event in SamplleApp_Init(); through task_id.SampleApp_Init() was mentioned earlier; the important function is to assign an ID number, which is also the lowest priority.To give the ID number of this function to the serial port is to tell the serial port that I initialized in this function, and the corresponding task priority is the lowest...
(3) Change serial initialization configuration.
The MT_UartInit() shown in the figure above; go to definition, and enter the MT_UartInit() function (Figure 5).Find MT_UART_DEFAULT_BAUDRATE and set the baud rate to 11520 after go to definition (Figure 6).
Go back to Figure 3, find MT_UART_DEFAULT_OVERFLOW, and go to definition set the parameter to FALSE (Figure 7).

Figure 5

Figure 6

Figure 7
Instructions: Modifying the baud rate will not explain.
#define MT_UART_DEFAULT_OVERFLOW FALSE
This line of code means to turn on serial flow control.Because our serial communication is two wires, it must be closed.
2. Send some code
(1) Open SampleApp.c and find the SampleApp event handler, SampleApp_ProcessEvent().
Additionally, we can add our own events under SamplleApp, each with its own event number.Event numbers are 16 bits, but only one of 16 bits is allowed per event number, which means a maximum of 16 events.
Let's first browse through the code, roughly to analyze the event number passed in and trigger the corresponding event.It feels like the task number processing mode.What we need to focus on is when the System Message Event is triggered.That is, the part after the if (events & SYS_EVENT_MSG) statement.First line:
MSGpkt = (afIncomingMSGPacket_t *)osal_msg_receive( SampleApp_TaskID );
This line of code implements the ability to retrieve system message data.We can look at the definitions on our own.afIncomingMSGPacket is the type of structure that contains the entire message content.
The subsequent selection statements process the data accordingly based on the information in the message.We need to focus on the following code (Figure 8)

Figure 8
After half a day, it was still initializing... which means that when the network state changes (in fact, the network is open), the data is initialized for sending.Look at these three parameters, the first one is the task number, do not repeat.The second is the Event Number, which is also said, only one event per event!The third is to set the time, which is how often you send messages!Here we preset SAMPLEAPP_SEND_PERIODIC_MSG_TIMEOUT = 5000, which can be modified by itself in milliseconds, which means the program sends data once in five seconds.
(2) Set up the sending content and send it automatically and periodically.The following code is found under the same function (Figure 9)

Figure 9
If the periodic data sending section is triggered (that is, five seconds have passed before the message is sent), execute the SampleApp_SendPeriodicMessage() function.This function is the focus. It contains the data we need to send.Continue to go to definition...
After finding the function, make the following modifications to the function (Figure 10).

Figure 10
Let's take a look at the function AF_DataRequest(), which tells us from the context that it must be the function that decides to send the data content.We need to focus on the third, fourth, and fifth parameters, which are used to establish contact with the recipient. Here we define SAMPLEAPP_PERIODIC_CLUSTERID=1. If the coordinator receives a packet and gets the label inside, it is a proof that the packet is coming in periodically.The fourth parameter represents the length of the data to be sent, and the fifth parameter is a pointer to the data to be sent.
The sending data section is over here~~
3. Receive partial code
Under SampleApp.c, find the function "void SampleApp_MessageMSGCB" (afIncomingMSGPacket_t *pkt), and add code in the line below "case SAMPLEAPP_PERIODIC_CLUSTERID:" (Figure 11):
HalUARTWrite(0, "I get data!\n", 12);

 HalUARTWrite(0, &pkt->cmd.Data[0], pkt->cmd.DataLength);

 HalUARTWrite(0, "\n", 1);

Figure 11
Instructions: Let's first look at the conditional statement "case SAMPLEAPP_PERIODIC_CLUSTERID:".This is the number that is set in the send section to represent periodic sending of data.Look, it's here to use ~
Where code is added, we can process the data we receive (not limited to serial sending).The three lines of code here are all sent by serial port, so don't say anything more.
Focus on "afIncomingMSGPacket_t *pkt".All data and information are in the afIncomingMSGPacket passed in by the function, see this definition
 1 typedef struct
 2
 3 {
 4
 5   osal_event_hdr_t hdr;     /* OSAL Message header */
 6
 7   uint16 groupId;           /* Message's group ID - 0 if not set */
 8
 9   uint16 clusterId;         /* Message's cluster ID */
10
11   afAddrType_t srcAddr;     /* Source Address, if endpoint is STUBAPS_INTER_PAN_EP,
12
13                                it's an InterPAN message */
14
15   uint16 macDestAddr;       /* MAC header destination short address */
16
17   uint8 endPoint;           /* destination endpoint */
18
19   uint8 wasBroadcast;       /* TRUE if network destination was a broadcast address */
20
21   uint8 LinkQuality;        /* The link quality of the received data frame */
22
23   uint8 correlation;        /* The raw correlation value of the received data frame */
24
25   int8  rssi;               /* The received RF power in units dBm */
26
27   uint8 SecurityUse;        /* deprecated */
28
29   uint32 timestamp;         /* receipt timestamp from MAC */
30
31   uint8 nwkSeqNum;          /* network header frame sequence number */
32
33   afMSGCommandFormat_t cmd; /* Application Data */
34
35 } afIncomingMSGPacket_t;
It's a structure that contains the contents of the data package, so let's not mention it here. Want to know your own translation notes ~We'll focus on afMSGCommandFormat_t cmd.View its definition
typedef struct

{

  uint8   TransSeqNumber;

  uint16  DataLength;              // Number of bytes in TransData

  uint8  *Data;

} afMSGCommandFormat_t;
Oh, here's the data we're sending!The DataLength is the length of the data, and the Data is the pointer to the data content.
Looking back, HalUARTWrite(0, &pkt->cmd.Data[0], pkt->cmd.DataLength); this code sends the received data to the serial port.
4. Program burning
Here's a note!Select mode when downloading!As shown in Figure 12, CoordinatorEB mode is loaded to the coordinator (the one connected to the computer!), EndDeviceEB mode to the terminal module!
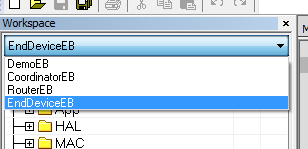
Figure 12
The wireless data transfer experiment is over.
Didn't you remember?No problem!Here's a summary of the whole process.
6. Process Analysis

Figure 13
Does this flowchart make it easier to understand?
7. Serial port optimization
This recommendation goes to the basic Bluetooth slave usage method I wrote before
Address: http://www.cnblogs.com/Donut/p/4054348.html
Hee-hee Advertise yourself ~
The same way, except that the baud rate is 115200, and then the serial port connects to zigbee's UART0 (for this experiment only, then you define which serial port connects which one)