Yunqi information:[ Click to see more industry information]
Here you can find the first-hand cloud information of different industries. What are you waiting for? Come on!
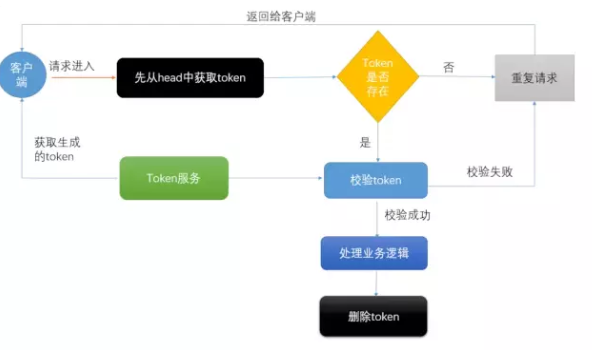
In a real development project, an exposed interface is often faced with a large number of repeated requests submitted in an instant. If you want to filter out the repeated requests and cause damage to the business, you need to implement idempotent!
Let's explain the concept of idempotent:
Any number of executions has the same impact as a single execution. According to this meaning, the final meaning is that the impact on the database can only be one-time and cannot be processed repeatedly.
How to ensure its idempotence, there are usually the following means:
1. Establishing a unique index of the database can ensure that only one piece of data is finally inserted into the database
2. Token mechanism: obtain a token before each interface request, and then add the token in the header body of the request at the next request for background verification. If the verification passes deleting the token, the next request will judge the token again
3. Pessimistic lock or optimistic lock, pessimistic lock can ensure that other sql cannot update data every time for update (when the database engine is innodb, the condition of select must be unique index to prevent locking the whole table)
4. First, query and then judge. First, query whether there is data in the database. If the existence certificate has been requested, directly reject the request. If it does not exist, it is the first time to enter and directly release.
The schematic diagram of redis realizing automatic idempotent:
1, Set up the service Api of redis
1. First, build a redis server.
2. It is also possible to introduce the redis state or Spring packaged jedis from springboot. The main api used later is its set method and exists method. Here we use the Spring boot packaged redisTemplate
/** * redis Tool class */@ComponentpublicclassRedisService{ @Autowired privateRedisTemplate redisTemplate; /** * Write cache * @ param key * @ param value * @ return */ publicbooleanset(finalString key, Object value) { boolean result = false; try{ ValueOperations<Serializable, Object> operations = redisTemplate.opsForValue(); operations.set(key, value); result = true; } catch(Exception e) { e.printStackTrace(); } return result; } /** * Write cache set time effective * @ param key * @ param value * @ return */ publicboolean setEx(finalString key, Object value, Long expireTime) { boolean result = false; try{ ValueOperations<Serializable, Object> operations = redisTemplate.opsForValue(); operations.set(key, value); redisTemplate.expire(key, expireTime, TimeUnit.SECONDS); result = true; } catch(Exception e) { e.printStackTrace(); } return result; } /** * Determine whether there is a corresponding value * @ param key * @ return in the cache */ publicboolean exists(finalString key) { return redisTemplate.hasKey(key); } /** * Read cache * @ param key * @ return */ publicObjectget(finalString key) { Object result = null; ValueOperations<Serializable, Object> operations = redisTemplate.opsForValue(); result = operations.get(key); return result; } /** * Delete the corresponding value * @ param key */ publicboolean remove(finalString key) { if(exists(key)) { Booleandelete= redisTemplate.delete(key); returndelete; } returnfalse; }}
2, Custom annotation AutoIdempotent
Customize an annotation. The main purpose of defining this annotation is to add it to the method that needs to implement idempotent. If a method annotates it, it will implement automatic idempotent. If the annotation is scanned by reflection in the background, the method will be processed to realize automatic idempotence. The meta annotation ElementType.METHOD indicates that it can only be placed on the method, and etentionPolicy.RUNTIME indicates that it is running.
@Target({ElementType.METHOD})@Retention(RetentionPolicy.RUNTIME)public@interfaceAutoIdempotent{}
3, token creation and verification
1. token service interface
We create a new interface to create a token service. There are two main methods, one is used to create a token and the other is used to verify the token. Creating a token mainly produces a string. When checking a token, it mainly conveys the request object. Why do you want to pass the request object? The main function is to obtain the token in the header, and then check it. The specific error reporting information will be obtained and returned to the front end through the Exception thrown.
publicinterfaceTokenService{ /** * Create token * @ return */ public String createToken(); /** * Verify token * @ param request * @ return */ publicboolean checkToken(HttpServletRequest request) throwsException;}
2. Service implementation class of token
The token refers to the redis service, creates a token, generates a random uuid string using a random algorithm tool class, and then puts it into redis (in order to prevent redundant retention of data, the expiration time is set to 10000 seconds here, depending on the business). If the token is put in successfully, the value of the token will be returned at last. The checkToken method is to get the token from the header to the value (if the header can't get it, get it from paramter). If it doesn't exist, throw an exception directly. This exception information can be captured by the interceptor and then returned to the front end.
@ServicepublicclassTokenServiceImplimplementsTokenService{ @Autowired privateRedisService redisService; /** * Create token * * @ return */ @Override publicString createToken() { String str = RandomUtil.randomUUID(); StrBuilder token = newStrBuilder(); try{ token.append(Constant.Redis.TOKEN_PREFIX).append(str); redisService.setEx(token.toString(), token.toString(),10000L); boolean notEmpty = StrUtil.isNotEmpty(token.toString()); if(notEmpty) { return token.toString(); } }catch(Exception ex){ ex.printStackTrace(); } returnnull; } /** * Verify token * * @ param request * @ return */ @Override publicboolean checkToken(HttpServletRequest request) throwsException{ String token = request.getHeader(Constant.TOKEN_NAME); if(StrUtil.isBlank(token)) {// There is no token token = request.getparameter (constant. Token_name); if (strutil. Isblank (token)) {/ / there is no token throw newserviceexception (constant. Responsecode. Ilegal_argument, 100) in the parameter; } } if(!redisService.exists(token)) { thrownewServiceException(Constant.ResponseCode.REPETITIVE_OPERATION, 200); } boolean remove = redisService.remove(token); if(!remove) { thrownewServiceException(Constant.ResponseCode.REPETITIVE_OPERATION, 200); } returntrue; }}
4, Interceptor configuration
1. The web Configuration class implements the WebMvcConfigurerAdapter. Its main function is to add the autoidemponentinterceptor to the Configuration class, so that we can enter the interceptor. Pay attention to the @ Configuration annotation, so that it can be added into the context when the container is started.
@ConfigurationpublicclassWebConfigurationextendsWebMvcConfigurerAdapter{ @Resource privateAutoIdempotentInterceptor autoIdempotentInterceptor; /** * Add interceptor * @ param registry */ @Override publicvoid addInterceptors(InterceptorRegistry registry) { registry.addInterceptor(autoIdempotentInterceptor); super.addInterceptors(registry); }}
2, interceptor processor: the main function is to intercept scan to AutoIdempotent to annotation to the method, then call the checkToken() method of tokenService to check if token is correct. If the exception is caught, render the abnormal information to json and return it to the front end.
/** * Interceptor */@ComponentpublicclassAutoIdempotentInterceptorimplementsHandlerInterceptor{ @Autowired privateTokenService tokenService; /** * Preprocessing * @ param request * @ param response * @ param handler * @ return * @ throws exception */ @Override publicboolean preHandle(HttpServletRequest request, HttpServletResponse response, Object handler) throwsException{ if(!(handler instanceofHandlerMethod)) { returntrue; } HandlerMethod handlerMethod = (HandlerMethod) handler; Method method = handlerMethod.getMethod(); //Scan marked by ApiIdempotment AutoIdempotent methodAnnotation = method.getAnnotation (AutoIdempotent.class); if (methodAnnotation! = null) {try{return tokenService.checkToken (request); / / idempotent check. If the check passes, it will be released. If the check fails, an exception will be thrown }Catch (exception Ex) {resultvo failedresult = resultvo. Getfailedresult (101, ex.getmessage()); writereturnjson (response, jsonutil. Tojsonstr (failedresult)); throw ex;} / / must return true, otherwise all requests will be blocked returnrule; }@ override publicvoid posthandle (HttpServletRequest request request, httpservletresponse response, object handler, modelandview modelandview) throwsexception {} @ override publicvoid aftercompletion (HttpServletRequest request, httpservletresponse response, object handler, exception Ex) throwsexception {} / * * * @param response * @param json * @throws Exception */ privatevoid writeReturnJson(HttpServletResponse response, String json) throwsException{ PrintWriter writer = null; response.setCharacterEncoding(UTF-8); response.setContentType(text/html; charset=utf-8); try{ writer = response.getWriter(); writer.print(json); } catch(IOException e) { } finally{ if(writer != null) writer.close(); } }}
5, Test case
1. Simulate business request class
First of all, we need to get the specific token through the / get/token path through the getToken() method, and then we call the testIdempotence method, which annotates @ AutoIdempotent. The interceptor will intercept all requests. When it is judged that there is such annotation on the processed method, it will call the checkToken() method in the TokenService. If it catches an exception, it will be different The caller is often thrown. Let's simulate the request as follows:
@RestControllerpublicclassBusinessController{ @Resource privateTokenService tokenService; @Resource privateTestService testService; @PostMapping(/get/token) publicString getToken(){ String token = tokenService.createToken(); if(StrUtil.isNotEmpty(token)) { ResultVo resultVo = newResultVo(); resultVo.setCode(Constant.code_success); resultVo.setMessage(Constant.SUCCESS); resultVo.setData(token); returnJSONUtil.toJsonStr(resultVo); } returnStrUtil.EMPTY; } @AutoIdempotent @PostMapping(/test/Idempotence) publicString testIdempotence() { String businessResult = testService.testIdempotence(); if(StrUtil.isNotEmpty(businessResult)) { ResultVo successResult = ResultVo.getSuccessResult(businessResult); returnJSONUtil.toJsonStr(successResult); } returnStrUtil.EMPTY; }}
2. Using postman requests
First, access the get/token path to get the specific token:
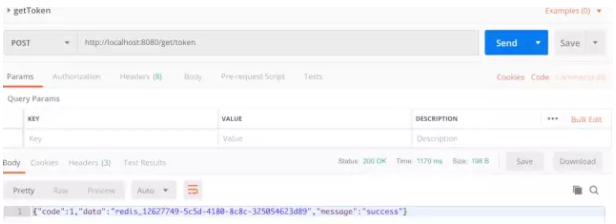
Get the token and put it in the specific request to the header. You can see that the first request is successful. Then we request the second time:
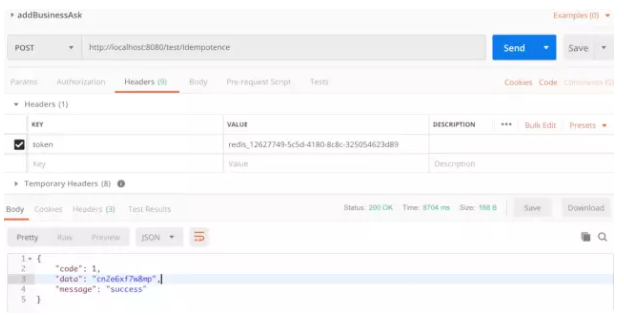
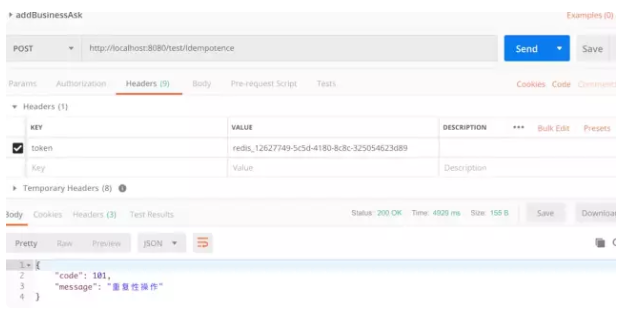
The second request is a repetitive operation. It can be seen that the repeatability verification is passed. When the second request is repeated, we will only let it succeed for the first time. The second request is a failure:
Six, summary
This blog introduces how to use springboot, interceptor and redis to implement interface idempotent gracefully, which is very important in the actual development process, because an interface may be called by countless clients, how to ensure that it does not affect the background business processing, how to ensure that it only affects the data once is very important, it can prevent the generation of dirty data or Random data can also reduce the amount of concurrency, which is a very useful thing. The traditional method is to judge the data every time. This method is not intelligent and automatic, which is troublesome. Today's automation can also improve program scalability.
[yunqi online class] product technology experts share every day!
Course address: https://yqh.aliyun.com/zhibo
Join the community immediately, face to face with experts, and keep abreast of the latest news of the course!
[yunqi online classroom community] https://c.tb.cn/F3.Z8gvnK
Original release time: March 24, 2020
Author: Murong Qianyu
This article comes from:“ Internet architect WeChat official account ”, you can pay attention to“ Internet architect "