notes preceding the text of a book or following the title of an article - Keep a sword everywhere, starting from your little accumulation, where you reach, you will strive for perfection, that is, to toss through every day.
Important news
- Mastery points can see a summary here
- Flutter goes from getting started to developing an APP UI Basics Video
- Flutter From Beginning Practice to Developing an APP Development Practice Foundation
- flutter Getting Started to Master Series
>This section describes: > 1 VideoPlayer Video Player Component Use > 2 VideoPlayerController usage analysis > 3 FutureBuilder usage analysis > 4 PageView builds a full-screen switching page that slides up and down > 5 TabBar and TabBarView to build left-right switching pages
1 First let's implement the main part of the page
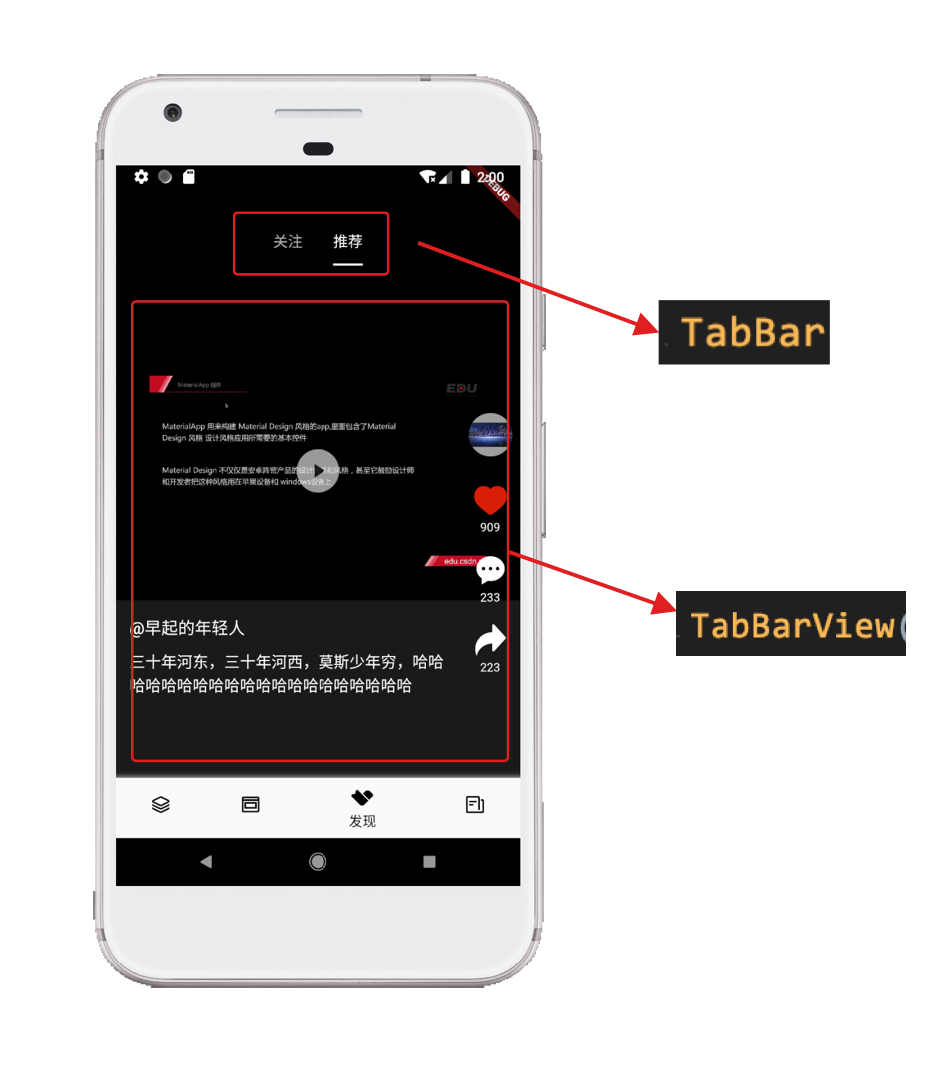
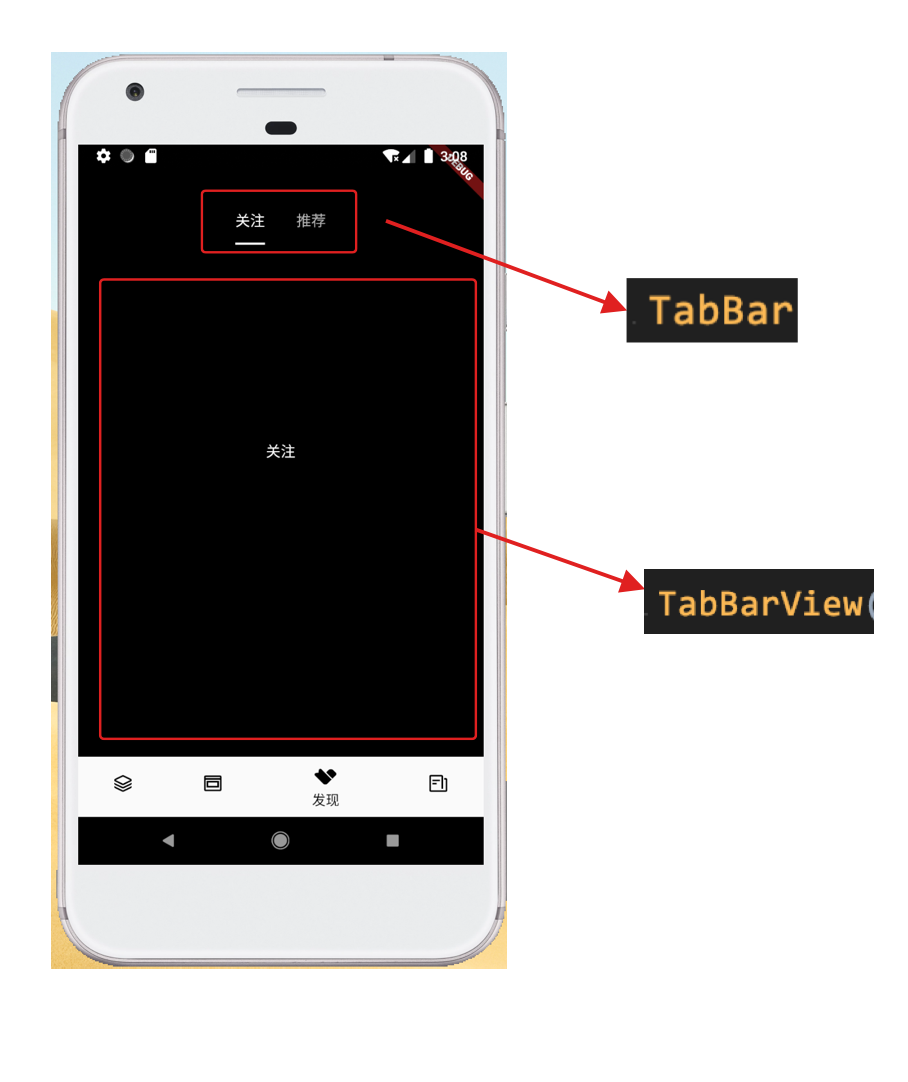
Page switching from left to right via TabBar and TabBarView
import 'package:flutter/cupertino.dart'; import 'package:flutter/material.dart'; class MainFind3Page extends StatefulWidget { @override State<statefulwidget> createState() { return MainFindPage3State(); } } class MainFindPage3State extends State with SingleTickerProviderStateMixin { List<string> tabTextList = ["follow", "Recommend"]; List<tab> tabWidgetList = []; TabController tabController; @override void initState() { super.initState(); for (var value in tabTextList) { tabWidgetList.add(Tab( text: "$value", )); } tabController = new TabController(length: tabTextList.length, vsync: this); } @override Widget build(BuildContext context) { return buildRootBody(); } Widget buildRootBody() { return Scaffold( body: Stack( children: <widget>[ Positioned( left: 0, right: 0, top: 0, bottom: 0, child: Container( color: Colors.black, ), ), Positioned( left: 0, right: 0, top: 0, bottom: 0, child: buildTableViewWidget(), ), Positioned( left: 0, right: 0, bottom: 0, top: 54, child: buildTabBarWidget(), ), ], ), ); } ///Build TabBarView buildTableViewWidget() { return TabBarView( controller: tabController, children: tabTextList .map((value) => Container( alignment: Alignment.center, child: Text("$value",style: TextStyle(color: Colors.white),), )) .toList(), ); } ///Build top label section buildTabBarWidget() { return Container( ///Align in the middle of the top alignment: Alignment.topCenter, child: TabBar( controller: tabController, tabs: tabWidgetList, ///Indicator color indicatorColor: Colors.white, ///Indicator height indicatorWeight: 2.0, isScrollable: true, ///Width of indicator aligned with text indicatorSize: TabBarIndicatorSize.label, ), ); } }
Here TabBar and TabBarView are stacked together through a frame layout.
The effect is as follows
2 Full screen up-down switching via PageView
We'll use PageView instead of the code above to build a full-screen up-down page switching effect
  ///Build TabBarView
  buildTableViewWidget() {
    return TabBarView(
      controller: tabController,
      children: tabTextList
          .map((value) => buildTableViewItemWidget(value))
          .toList(),
    );
  }
   ///used to create pages that slide up and down
  Widget buildTableViewItemWidget(String value) {

    List<videomodel> list =[];
    if(value == "Recommend"){
      list= videoList;
    }else{
      list = videoList2;
    }
    return PageView.builder(
      /// Number of subentries in pageview
      itemCount:list.length ,
      ///Slide up and down
        scrollDirection: Axis.vertical,
        itemBuilder: (BuildContext context,int index){
          VideoModel videoModel = list[index];
      return buildPageViewItemWidget(value,videoModel);
    });
  }
VieoList and VieoList2 are used here, and the saved data model is initialized in the initState function
///Recommend simulated data List <videomodel> videoList =[]; ///Focus on simulated data List <videomodel> videoList2 =[]; @override void initState() { super.initState(); ... ///Create simulation data for (int i = 0; i < 10; i++) { VideoModel videoModel = new VideoModel(); videoModel.videoName = "Recommended test data $i"; videoModel.pariseCount = i * 22; if (i % 3 == 0) { videoModel.isAttention = true; videoModel.isLike = true; } else { videoModel.isAttention = false; videoModel.isLike = false; } videoModel.videoImag =""; videoModel.videoUrl =""; videoList.add(videoModel); } for (int i = 0; i < 3; i++) { VideoModel videoModel = new VideoModel(); videoModel.videoName = "Focus on test data $i"; videoModel.pariseCount = i * 22; videoModel.isAttention = true; if (i % 3 == 0) { videoModel.isLike = true; } else { videoModel.isLike = false; } videoModel.videoImag =""; videoModel.videoUrl =""; videoList2.add(videoModel); } }
For VideoModel, it's our data model for storing video information
class VideoModel {
  ///Video Name
  String videoName ='';
  ///Video Link
  String videoUrl ='';
  ///Video Screenshot
  String videoImag ='';
  ///Concern
  bool isAttention =false;
  ///Number of concerns
  num attentCount =0;
  ///Do you like it
  bool isLike = false;
  ///Number of compliments
  num pariseCount = 0;
  ///Number of Shares
  num shareCount=0;
}
The buildPageViewItemWidget function is also used in the above code, as follows
  buildPageViewItemWidget(String value, VideoModel videoModel) {
    return FindVideoItemPage(value,videoModel);
  }
FindVideoItemPage built directly here, see the definition of FindVideoItemPage as follows
///Page to play video
class FindVideoItemPage extends StatefulWidget {
  String tabValue;
  VideoModel videoModel;
  FindVideoItemPage(this.tabValue, this.videoModel);

  @override
  State<statefulwidget> createState() {
    return FindVideoItemPageState();
  }
}

class FindVideoItemPageState extends State<findvideoitempage> {
  ///Create a video playback controller
  VideoPlayerController videoPlayerController;
  ///Control Update Video Load Initialization Complete Status Update
  Future videoPlayFuture;

  @override
  void initState() {
    super.initState();

    videoPlayerController =
        VideoPlayerController.network(widget.videoModel.videoUrl);

    videoPlayFuture = videoPlayerController.initialize().then((_) {
      ///After initial video completion
      ///Call Playback
      videoPlayerController.play();
      setState(() {});
    });
  }

  @override
  Widget build(BuildContext context) {
    return Stack(
      children: <widget>[
        ///Play video
        buildVideoWidget(),

        ///control play video button
        buildControllWidget(),

        ///Video description of bottom area
        buildBottmFlagWidget(),

        ///Right User Information Button Area
        buildRightUserWidget(),
      ],
    );
  }

  @override
  void dispose() {
    super.dispose();
    videoPlayerController.dispose();
  }

}
The FindVideoItemPage is actually a subview built in our PageView. We can see that the VideoPlayerController is created in the initState initialization function. As the name implies, the VideoPlayerController is used to control the playback of the current page video and is destroyed in dispose VideoPlayerController, which understands, is that the current page has been released, and of course the video you're playing will stop playing.
Here a videoPlayFuture is created to listen for the VideoPlayerController initialization State and to update the page State in real time with FutureBuilder, such as in the method buildVideoWidget()
 ///Play video
  buildVideoWidget() {
    return FutureBuilder(
      future: videoPlayFuture,
      builder: (BuildContext contex, value) {
        if (value.connectionState == ConnectionState.done) {
          ///Click Events
          return InkWell(
            onTap: () {
              if (videoPlayerController.value.initialized) {
                ///Video Initialized
                if (videoPlayerController.value.isPlaying) {
                  ///Playing - Pause
                  videoPlayerController.pause();
                } else {
                  ///Pause - Play
                  videoPlayerController.play();
                }

                setState(() {});
              } else {
                ///uninitialized
                videoPlayerController.initialize().then((_) {
                  videoPlayerController.play();
                  setState(() {});
                });
              }
            },

            ///Centered
            child: Center(
              /// AspectRatio component is used to set subcomponent aspect ratio
              child: AspectRatio(
                ///Set the aspect ratio of the video.The aspect ratio is expressed as the aspect ratio.For example, a 16:9 aspect ratio of 16.0/9.0
                aspectRatio: videoPlayerController.value.aspectRatio,
                ///Components for playing video
                child: VideoPlayer(videoPlayerController),
              ),
            ),
          );
        } else {
          return Container(
            alignment: Alignment.center,
            ///Round Loading Progress
            child: CircularProgressIndicator(),
          );
        }
      },
    );
  }
FutureBuilder will depend on a Future for FutureBuilder
FutureBuilder({
  this.future,
  this.initialData,
  @required this.builder,
})
Future, the future that FutureBuilder relies on, is usually an asynchronous time-consuming task, such as videoPlayFuture here, which is an asynchronous time-consuming operation pointing to the initialize function of the videoPlayerController. Builder, Widget builder, which is called multiple times at different stages of Future execution in the following format
Function (BuildContext context, AsyncSnapshot snapshot)
  /**
   * snapshot Contains status and results information for the current asynchronous task.
   * For example, we can get the status information of asynchronous tasks through snapshot.connectionState.
   * Determining whether an asynchronous task has errors by snapshot.hasError, and so on
   */
The ConnectionState status obtained from snapshot.connectionState has the following values:
enum ConnectionState {
  ///There are currently no asynchronous tasks, such as when [future] of [FutureBuilder] is null
  none,
  ///Asynchronous task is on hold
  waiting,
  /// Stream is active (there is already data transfer on the stream) and not for FutureBuilder.
  active,
  ///Asynchronous task terminated.
  done,
}
3 Play video via VideoPlayer
With VideoPlayer, we first need to add dependencies
video_player: ^0.6.4
For VideoPlayer, it only receives one VideoPlayerController and we can bind the video address to play through VideoPlayerController
    ///Network Links
    videoPlayerController = VideoPlayerController.network(widget.videoModel.videoUrl);
    ///Local Links
    VideoPlayerController videoPlayerController2 = VideoPlayerController.asset(widget.videoModel.videoUrl);
    ///File Video
    VideoPlayerController videoPlayerController3 = VideoPlayerController.file(File(widget.videoModel.videoUrl));
When the playing address is bound, VideoPlayerController can be used to preload the initialization player
videoPlayerController.initialize().then((_) {
      ///After initial video completion
      ///Call Playback
      videoPlayerController.play();
      setState(() {});
    });
For the initialize() method, this is an asynchronous, time-consuming operation.
VideoPlayerValue records some status information about the current video playback
VideoPlayerValue videoPlayerValue = videoPlayerController.value;


///Is initialization complete
bool initialized = videoPlayerValue.initialized;
///Is it playing
bool isPlaying = videoPlayerValue.isPlaying;
///aspect ratio of currently playing video
double aspectRatio = videoPlayerValue.aspectRatio;
///Is the current video cached
bool  isBuffer = videoPlayerValue.isBuffering;
///Whether the current video is looping
bool isLoop = videoPlayerValue.isLooping;
///Total length of time the video is currently playing
Duration totalDuration = videoPlayerValue.duration;
///Current Play Video Location
Duration currentDuration = videoPlayerValue.position;
Here, we can draw the progress bar of playback progress by totalDuration and currentDuration.
Finish </widget></findvideoitempage></statefulwidget></videomodel></videomodel></videomodel></widget></tab></string></statefulwidget>