LNMP architecture introduction and construction (source code compilation Nginx, MYSQL, PHP)
1. What is LNMP
LNMP is a set of free software acronyms commonly used together to run a dynamic web site or server. L refers to Linux, N refers to Nginx, M generally refers to MySQL, MariaDB, P generally refers to PHP, Perl or Python.
Generally speaking, LNMP stands for the web server architecture of Nginx+MySQL+PHP under Linux system.
LNMP = Linux+Nginx+Mysql+PHP
- Linux is a kind of Unix computer operating system, which is the most popular free operating system. Representative versions include debian, centos, ubuntu, fedora, gentoo, etc.
- Nginx is a high-performance HTTP and reverse proxy server, and also an IMAP/POP3/SMTP proxy server.
- Mysql is a small relational database management system.
- PHP is a script language that embeds HTML documents on the server side.
- These four kinds of software are free and open-source software, combined to become a free, efficient, scalable website service system.
PHP in Nginx is combined with Nginx in the way of fastcgi. It can be understood that Nginx represents the fastcgi of PHP.
The only difference between LNMP and LAMP is that it is nginx rather than Apache that provides web Services: in Apache, PHP exists as a module. In nginx, PHP exists as an independent service, which is called PHP FPM. Nginx directly processes static requests, and dynamic requests are forwarded to PHP FPM
2. Working principle of LNMP
- Browser sends http request request to server (Nginx)
- The server responds to and processes web requests, saves some static resources (CSS, pictures, videos, etc.) on the server, and then transfers php scripts to php FPM (Process Manager) through the interface transfer protocol (Gateway Protocol) php fcgi (fast CGI)
- PHP-FPM does not process, and then PHP-FPM calls the PHP parser process, which parses PHP script information.
- The PHP parser process can start multiple processes for concurrent execution. Then return the parsed script to PHP-FPM
- PHP FPM then transmits script information to Nginx in the form of fast CGI
- The server then transmits it to the browser in the form of Http response.
- The browser then parses and renders and renders.
3. Source compilation of MySQL database
Step 1 decompress and install mysql:
tar zxf mysql-boost-5.7.28.tar.gz
Step 2 create mysql user:
useradd -s /sbin/nologin -M mysql
step3 compile MYSQL:
cmake cross platform tool is used to precompile mysql source code and set compilation parameters of mysql. For example: installation directory, data storage directory, character code, sorting rules, etc
yum install -y cmake	#Packages needed to compile mysql
cd mysql-5.7.28	#Enter the directory after mysql decompression
#The following command is compiled:
cmake -DCMAKE_INSTALL_PREFIX=/usr/local/lnmp/mysql \			#Installation location
> -DMYSQL_UNIX_ADDR=/usr/local/lnmp/mysql/data/mysql.sock \ 	#Specify socket file location
> -DEXTRA_CHARSETS=all \ 										#Extended character set
> -DDEFAULT_CHARSET=utf8 \										#Default character set
> -DDEFAULT_COLLATION=utf8_general_ci \							#Default character proofing
> -DWITH_INNOBASE_STORAGE_ENGINE=1 \							#Installing the myisam storage engine
> -DWITH_MYISAM_STORAGE_ENGINE=1 \								#Install innodb storage engine
> -DWITH_MEMORY_STORAGE_ENGINE=1 \								#Installing the memory storage engine
> -DWITH_READLINE=1 \											#Support readline Library
> -DENABLED_LOCAL_INFILE=1 \									#Enable loading local data
> -DMYSQL_USER=mysql \											#Specify mysql running user
> -DMYSQL_TCP_PORT=3306											#Specify mysql port
step4 solves the dependency problem according to the prompts:
yum install -y gcc gcc-c++ ncurses-devel openssl-devel -y
Step 5 may see an error message like this:
CMake Error at cmake/boost.cmake:81 (MESSAGE):
You can download it with -DDOWNLOAD_BOOST=1 -DWITH_BOOST=<directory>
This CMake script will look for boost in <directory>. If it is not there,
it will download and unpack it (in that directory) for you.
If you are inside a firewall, you may need to use an http proxy:
export http_proxy=http://example.com:80
Solve:
Missing - dwith? Boot = < Directory > parameter
 When recompiling, add the following parameters:
-DWITH_BOOST=boost/boost_1_59_0/
When recompiling, you need to clear the original object file and cache information:
make clean
rm -fr CmakeCache.txt
There may be a warn during later compilation:
CMake Warning at cmake/bison.cmake:20 (MESSAGE):
Bison executable not found in PATH
Call Stack (most recent call first):
sql/CMakeLists.txt:514 (INCLUDE)
Solve:
yum install -y bison
step6 installation:
make && make install ##If make still has problems, delete the original directory, decompress and compile again (the installation process is long)
step7 modify permission:
cd /usr/local/lnmp/mysql
mkdir data
chown -R root .
chown -R mysql data
ln -s /usr/local/lnmp/mysql/bin/* /usr/local/bin/
step8 copy configuration file:
cd /usr/local/lnmp/mysql/mysql-test/include
cp default_my.cnf /etc/my.cnf
cd /usr/local/lnmp/mysql/support-files
cp -a mysql.server /etc/init.d/mysqld
chmod +x /etc/init.d/mysqld
chkconfig mysqld on
systemctl status mysqld
step9 initialization:
mysqld --user=mysql --initialize ා initialize as mysql user
 Note: initialization generates a temporary password to log in to MySQL (remember this password)
For example: 2019-01-03T09:06:09.448851Z 1 [Note] A temporary password is generated
for root@localhost: r#9VqAoA/au
 R × 9vqaoa / Au is the temporary password
Step 10 start mysql:
systemctl start mysqld
Step 11 enters mysql:
mysql -uroot -pr#9VqAoA/au: #Use the temporary password just now (error will be reported, so security initialization is required)
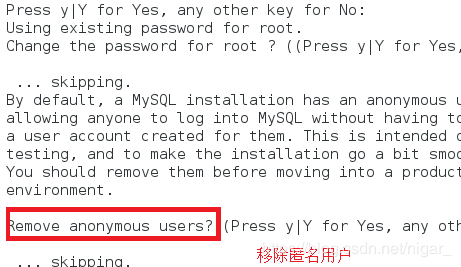
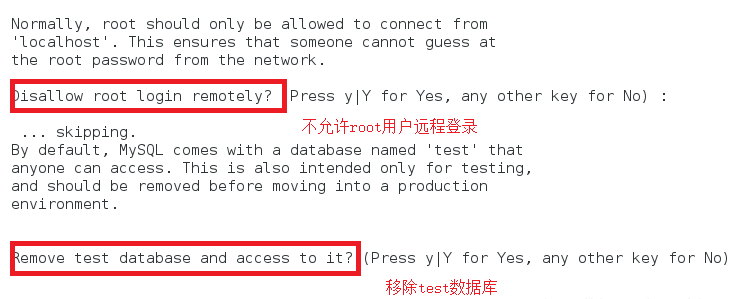
step12 security initialization:
mysql_secure_installation #Then you will be prompted whether to enable the password detection plug-in. If you press enter directly, you will not be enabled. Otherwise, you will be required to have case and special character requirements for the password. Select y for the rest


mysql installation and configuration completed
4. PHP source compilation
step1 decompress the installation package:
tar zxf php-7.4.1.tar.gz
step2 solves dependency:
yum -y install bzip2
step3 enters the decompressed directory and starts compiling:
./configure --prefix=/usr/local/lnmp/php --with-config-file-path=/usr/local/lnmp/php/etc \
--with-mysqli=/usr/local/lnmp/mysql/bin/mysql_config \
--enable-soap \
--enable-mbstring=all \
--enable-sockets \
--with-pdo-mysql=/usr/local/lnmp/mysql \
--enable-gd \
--without-pear \
--enable-fpm
step4 solves the dependency step by step according to the error reporting during compilation:
Packages that may need to be installed:
yum install -y libxml2-devel
yum install -y libpng-devel
yum install -y oniguruma-*
step5 installation:
make && make install
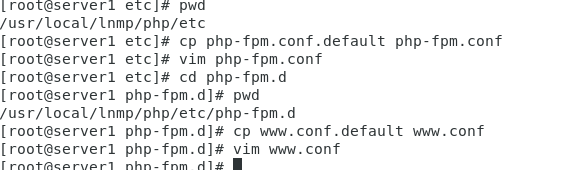
step6 copy change profile:
cd /usr/local/lnmp/php/etc
cp php-fpm.conf.default php-fpm.conf
vim php-fpm.conf		#Open 17 lines: pid = run/php-fpm.pid

step7 copy configuration file:
cd /usr/local/lnmp/php/etc/php-fpm.d
cp www.conf.default www.conf
vim www.conf	#Change lines 23 and 24 as follows
user = nginx
group = nginx

step8 copy to change the php main configuration file:
cd php-7.4.1
cp php.ini-production /usr/local/lnmp/php/etc/php.ini
vim /usr/local/lnmp/php/etc/php.ini	#Line 961 changes the time zone as follows
date.timezone = Asia/Shanghai

step9 copies the php startup script to / etc/init.d /:
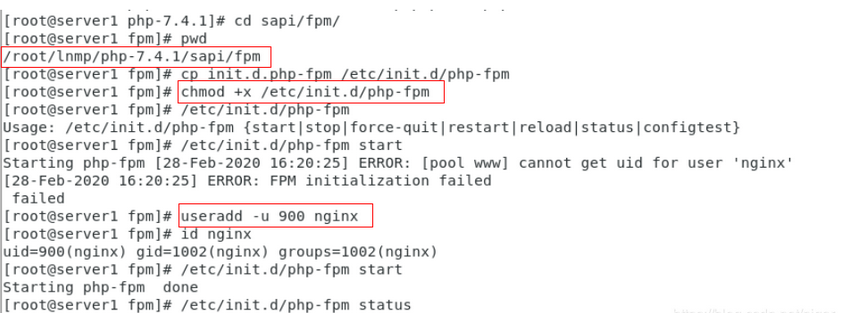
cd /root/lnmp/php-7.4.1/sapi/fpm
cp init.d.php-fpm /etc/init.d/php-fpm
chmod +x /etc/init.d/php-fpm	#Add execution permission
step10 start php:
/etc/init.d/php-fpm start
Be careful:
Error report may be generated manually because there is no nginx user
useradd -u 900 nginx
php installation and configuration complete
5. Source compilation of nginx
step1 decompress the installation package
tar zxf nginx-1.16.0.tar.gz
step2 remove the version number of nginx:
cd /root/lnmp/nginx-1.16.0
vim src/core/nginx.h

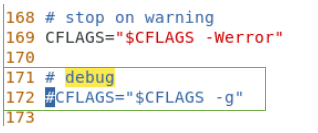
Step 3 close the debug date to:
Because there are so many debug logs, you don't need to open them in the enterprise
vim auto/cc/gcc
 Make the following modifications:
# debug
 #Cflags = $cflags - G "(turn off debug by adjusting these two comments)
Step 4 compile and install nginx:
./configure --prefix=/usr/local/lnmp/nginx --with-http_ssl_module --with-http_stub_status_module --user=nginx --group=nginx
step5 solves the dependency according to the prompt:
PCRE devel should also be installed here:
yum install pcre-devel -y
step6 installation:
make && make install
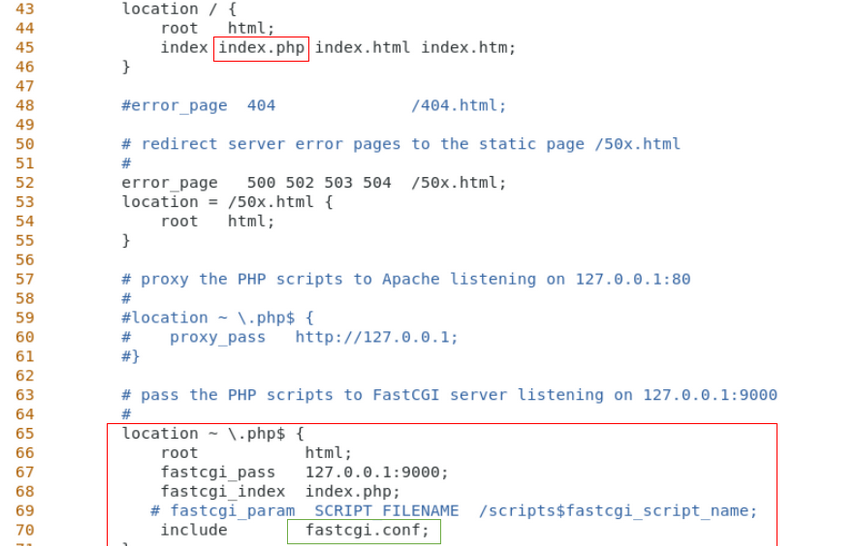
step7 modify the nginx configuration file and open the php module:
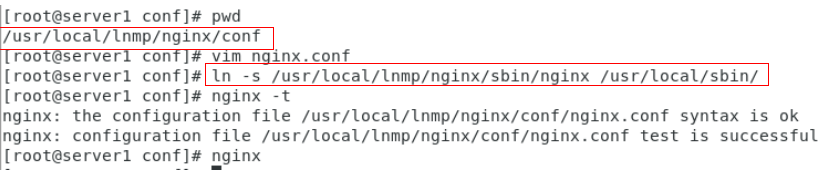
cd /usr/local/lnmp/nginx/conf
vim nginx.conf
step8 links the nginx startup script to / usr/local/sbin /:
ln -s /usr/local/lnmp/nginx/sbin/nginx /usr/local/sbin/
step9 enable nginx:
nginx -t ##Testing syntax
nginx
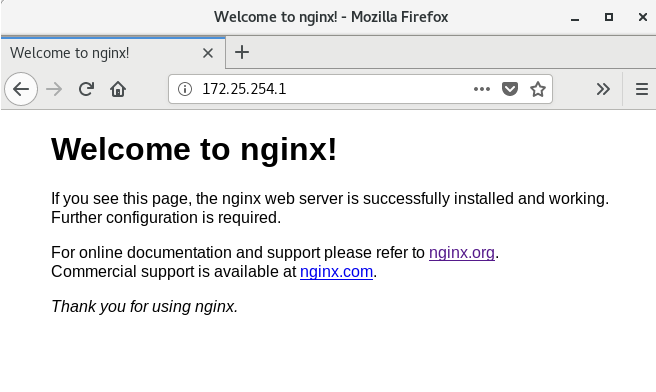
step10 test:
Try to visit http://172.25.254.1, which is the default page of nginx
Add index.php to the default publishing directory of nginx:
vim /usr/local/lnmp/nginx/html/index.php
//Write in:
<?php
phpinfo()
?>

Refresh http://172.25.254.1 to see the default page of php
nginx installation and configuration completed

