1, Install plug-ins for vscode and cc + +
2, Install and configure MinGW-w64
1. Download and install
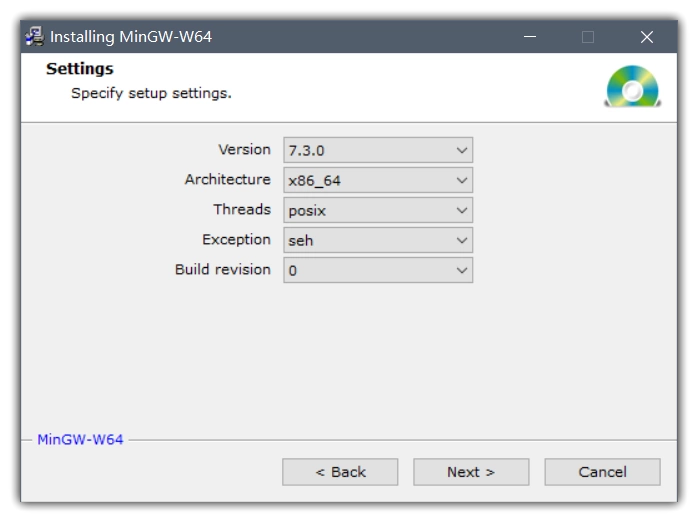
Download MinGW-w64 After downloading, install. During installation, you can customize or default the installation directory. Options to be set during installation:
- Version: GCC version, select the highest version directly;
- Architecture: CPU architecture. If the system is 64 bit, select x86? 64;
- Threads: API mode, using the default option;
- Exception: exception handling method: seh is only for 64 bit architecture, sjlj is compatible with 32-bit architecture;
- Build revision: revision, using default options;
If some files fail to download during the installation, please select the installation free version, Click here to download , extraction code: 97x4, directly decompress after downloading.
2. Configure environment variables
Find the system environment variable path under win7, and add the installed or unzipped installation directory of MinGW-w64 (all the way to bin directory). My installation directory is C:\MinGW-w64\mingw64\bin. After adding, save and exit step by step. Open cmd and enter whether gcc --version has taken effect, as shown below.
3, Configure files such as compilation and startup
1. Write a demo
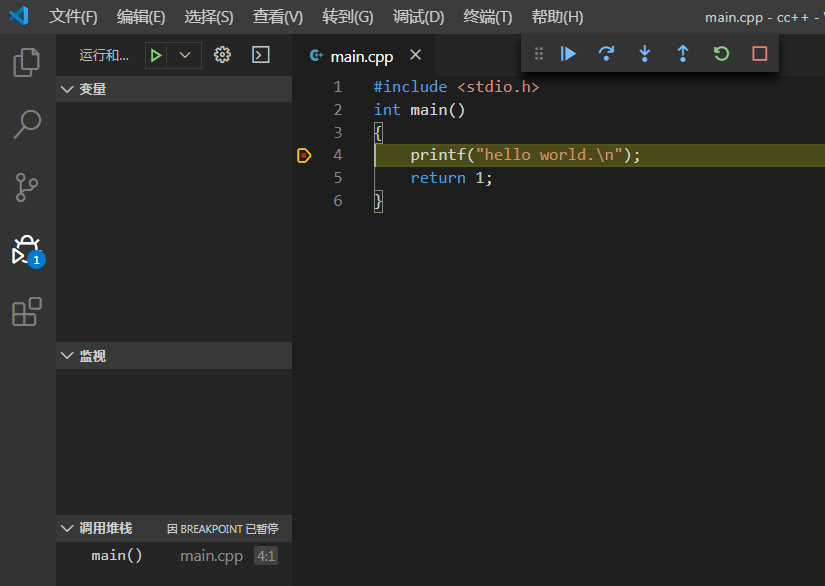
Create your workspace, for example, F:\cc + +, create a new main.cpp file, which contains:
#include <stdio.h>
int main()
{
    printf("hello world.\n");
    return 1;
}
2. Configure C? CPP? Properties.json
After writing, vscode automatically prompts that "include < stdio. H > is not found. Click the yellow light of the prompt, click the button Add include path to setting, and a folder of. Vscode will be generated in the workspace. There is a file of C ﹐ CPP ﹐ properties.json below. If not prompted, go directly to the directory of your workspace to create a directory of C ﹣ CPP ﹣ properties.json. Then fill in the following content. Note: Note: the path below should be consistent with your own installation directory.
{
    "configurations": [{
        "name": "MinGW",
        "intelliSenseMode": "gcc-x64",
        "compilerPath": "C:/MinGW-w64/mingw64/bin/x86_64-w64-mingw32-gcc.exe",
        "cStandard": "c11",
        "cppStandard": "c++17",
        "includePath": [
           ## The C / MinGw-w64 part of the following path needs to be replaced with your MinGw-w64 installation path
            "${workspaceFolder}/**",
            "C:/MinGW-w64/mingw64/x86_64-w64-mingw32/include",
            "C:/MinGW-w64/mingw64/lib/gcc/x86_64-w64-mingw32/7.3.0/include/c++",
            "C:/MinGW-w64/mingw64/lib/gcc/x86_64-w64-mingw32/7.3.0/include/c++/tr1"
        ],
        "defines": [
            "_DEBUG",
            "UNICODE",
            "_UNICODE",
            "__GNUC__=7",
            "__cdecl=__attribute__((__cdecl__))"
        ],
        "browse": {
            "path": [
                ## The C / MinGw-w64 part of the following path needs to be replaced with your MinGw-w64 installation path
                "${workspaceFolder}/**",
                "C:/MinGW-w64/mingw64/x86_64-w64-mingw32/include",
                "C:/MinGW-w64/mingw64/lib/gcc/x86_64-w64-mingw32/7.3.0/include/c++",
                "C:/MinGW-w64/mingw64/lib/gcc/x86_64-w64-mingw32/7.3.0/include/c++/tr1"
            ],
            "limitSymbolsToIncludedHeaders": true,
            "databaseFilename": ""
        }
    }],
    "version": 4
}
3. Configure launch.json
Open main.cpp and F5 to start debugging. The environment selection panel will pop up. Here, choose C++(GDB/LLDB), as follows: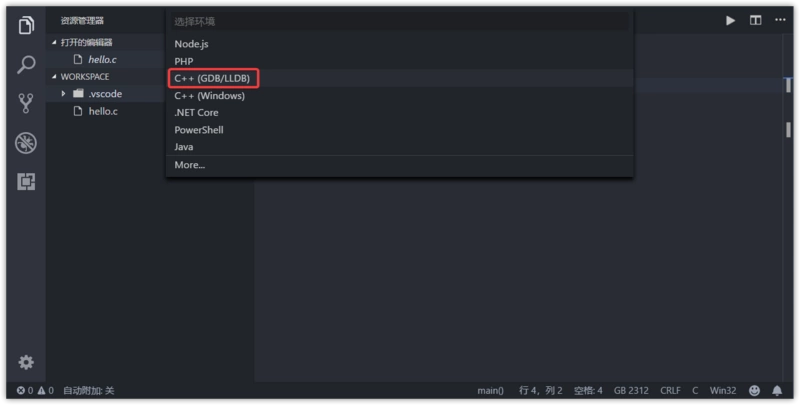
Similarly, open the luanch.json file under the workspace. vscode, empty the contents, fill in the following contents and save them:
{
    "version": "0.2.0",
    "configurations": [{
        // Configure VS Code debugging behavior:
        "name": "GDB Debug", // Set to display the name of the debug configuration in the startup configuration drop-down menu.
        "preLaunchTask": "Compile", // The task to run before the debug session starts.
        "type": "cppdbg", // Set the base debugger to use. Must be cppdbg when using GDB or LLDB.
        "request": "launch", // Set whether the startup program is attached to an already running instance. Launch attach
        "program": "${fileDirname}/${fileBasenameNoExtension}.exe", // The full path to the executable that the debugger will launch or attach.
        "externalConsole": true, // Sets whether the external console is displayed.
        "logging": { // Used to determine which types of messages should be logged to the debug console.
            "exceptions": true, // Whether exception messages should be logged to the debug console. The default is true.
            "moduleLoad": false, // Whether module load events should be logged to the debug console. The default is true.
            "programOutput": true, // Optional flag whether program output should be logged to the debug console. The default is true.
            "engineLogging": false, // Whether the diagnostic engine log should be logged to the debug console. The default is false.
            "trace": false, // Whether to log the diagnostic adapter command trace to the debug console. The default is false.
            "traceResponse": false // Whether to log diagnostic adapter commands and response traces to the debug console. The default is false.
        },
        // To configure the target application:
        "args": [], // Sets the command line parameters passed to the program during debugging.
        "cwd": "${workspaceFolder}", // Sets the working directory of the application launched by the debugger.
        "environment": [], // Set the environment variables added to the program environment when debugging, for example: [{"name": "squid", "value": "clam"}].
        // Custom GDB or LLDB:
        "windows": {
            "MIMode": "gdb", // Specifies the debugger for the VS Code connection, which must be gdb or lldb.
            "miDebuggerPath": "C:/MinGW-w64/mingw64/bin/gdb.exe" // Debugger path, change to your installation path
        },
        "miDebuggerArgs": "", // Additional parameters passed to debugger
        "stopAtEntry": false, // Sets whether the debugger stops at the target's entry (ignored when attaching). The default is false.
        "setupCommands": [{ // Execute the following command array to set GDB or LLDB
            "description": "Enable pretty-printing for gdb",
            "text": "-enable-pretty-printing", // To view the value of a variable over the mouse, you need to enable pretty printing.
            "ignoreFailures": true // Ignore failed commands, default is false.
        }]
    }]
}
The content of the modified field miDebuggerPath is consistent with the installation directory on your environment.
4. Configure task.json
Press F5 again, and you will be prompted that the task entry cannot be found. Click Configure task, and then choose to create the task.json file using the template on the command panel that pops up. Clear the contents and add the following contents:
{
    // Use IntelliSense for properties.
    // Hover to view the description of an existing property.
    // For more information, please visit: https://go.microsoft.com/fwlink/?linkid=830387
    "version": "0.2.0",
    "configurations": [
        {
            "name": "g++.exe build and debug active file",
            "type": "cppdbg",
            "request": "launch",
            "program": "${fileDirname}\\${fileBasenameNoExtension}.exe",
            "args": [],
            "stopAtEntry": false,
            "cwd": "${workspaceFolder}",
            "environment": [],
            "externalConsole": false,
            "MIMode": "gdb",
            "miDebuggerPath": "\\usr\\bin\\gdb.exe",
            "setupCommands": [
                {
                    "description": "by gdb Enable neat printing",
                    "text": "-enable-pretty-printing",
                    "ignoreFailures": true
                }
            ],
            "preLaunchTask": "g++.exe build active file"
        }
    ]
}
5, This configuration is complete
After configuration, there are three files in the workspace. vscode, which are the three files added above. If you want to create another C language development workspace, we just need to create a new folder, and then copy the. vscode folder under the existing workspace directory to the new folder: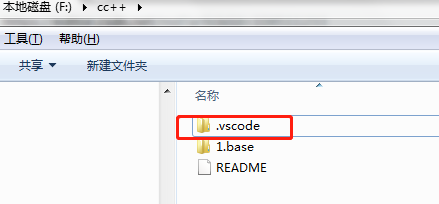

The following buttons, choose compile or debug.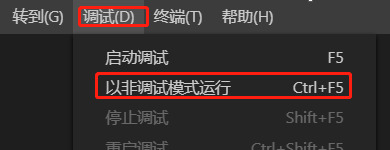
Reference link: https://segmentfault.com/a/119000014800106

