When writing Java code, it often involves repetitive operations. At this time, it's better to have such a plug-in. If it's a scenario that everyone will encounter, the IDE may have provided it. Otherwise, someone may have written related plug-ins. If this operation is unique to your coding environment, you can only write your own tools. So here we learn how to write IDEA plug-ins to make our programming environment more powerful and better.
development environment
The development of IDEA plug-ins has the following dependencies:
- IntelliJ IDEA Community Edition
- IntelliJ IDEA Community Edition source code
- Plugin DevKit plug in
- IntelliJ Platform SDK
Installing IntelliJ IDEA Community Edition
You may have installed Ultimate, but you still need to install the community version of IDEA. Because the commercial version is closed-source, the core code cannot be debugged during debugging.
Download IntelliJ IDEA Community Edition source code
The community version installation package does not contain the source code, so we need to manually copy clone from github:
git clone --depth 1 git://git.jetbrains.org/idea/community.git idea
Add IDEA jdk
Although we don't know the reason, according to the above link, we need to create an IDEA jdk to run the plug-in: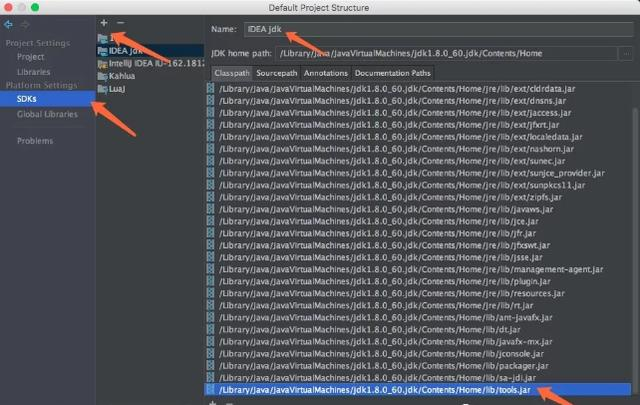
Unless you use the official JDK on your Mac, you need to manually add / lib/tools.jar to your classpath.
Configure the IntelliJ Platform SDK
Open File | Project Structure to create a new IntelliJ Platform SDK: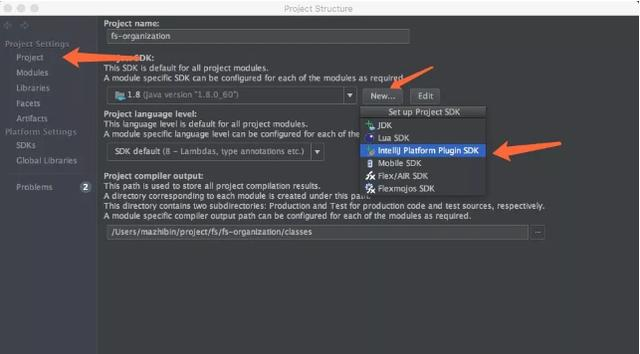
The Java SDK selects the IDEA jdk we just created: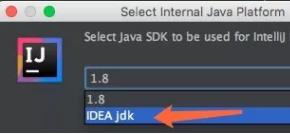
Then we can add the downloaded IDEA community version source code to the source path, so that when debugging, we can debug the IDEA's own code: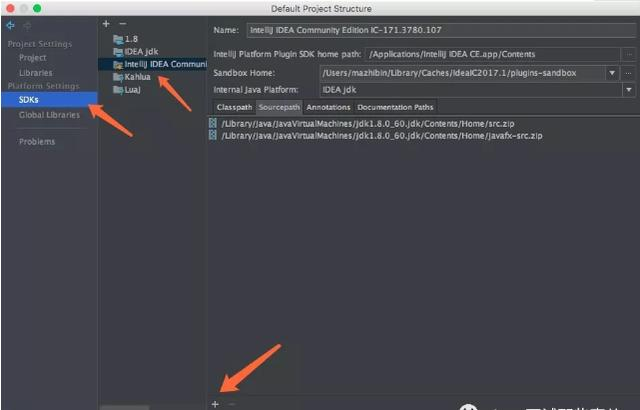

First plug-in
Let's write the simplest plug-in to learn the whole process of writing a plug-in.
New project
Select the IntelliJ platform plugin, and then the Project SDK specifies the plugin sdk you just created: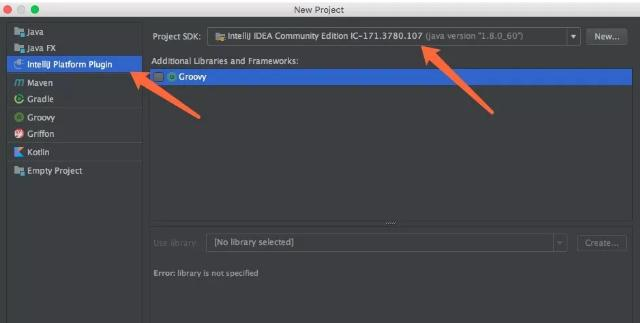
New plug-in project: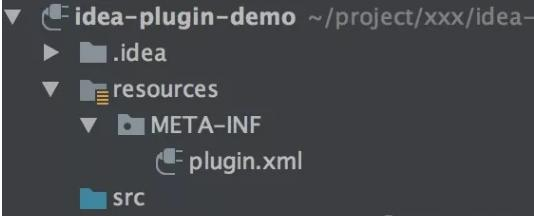
There are two directories src and resources under the plug-in root directory. src is the plug-in code directory, and resource is the plug-in resource directory. META-INF/plugin.xml is the description file of the plug-in, just like the web.xml of Java web project.
The default content of plugin.xml is as follows:
<idea-plugin>
<id>com.your.company.unique.plugin.id</id>
<name>Plugin display name here</name>
<version>1.0</version>
<vendor email="support@yourcompany.com" url="http://www.yourcompany.com">YourCompany</vendor>

<description><![CDATA[
      Enter short description for your plugin here.<br>
      <em>most HTML tags may be used</em>
    ]]></description>

<change-notes><![CDATA[
      Add change notes here.<br>
      <em>most HTML tags may be used</em>
    ]]>
</change-notes>

<!-- please see http://www.jetbrains.org/intellij/sdk/docs/basics/getting_started/build_number_ranges.html for description -->
<idea-version since-build="145.0"/>

<!-- please see http://www.jetbrains.org/intellij/sdk/docs/basics/getting_started/plugin_compatibility.html
       on how to target different products -->
<!-- uncomment to enable plugin in all products
  <depends>com.intellij.modules.lang</depends>
  -->

<extensions defaultExtensionNs="com.intellij">
<!-- Add your extensions here -->
</extensions>

<actions>
<!-- Add your actions here -->
</actions>

</idea-plugin>
Create an Action
The most common way for plug-in extension IDEA is to add menu items to the menu bar or toolbar. Users can trigger plug-in functions by clicking menu items. IDEA provides the AnAction class, which has a virtual method actionPerformed, which will be called every time the menu is clicked.
There are two steps to create a custom Action:
Inherit the AnAction class and implement the plug-in logic in the actionPerformed method
There are two ways to register action: code registration and plugin.xml registration
Let's write a simple Action class first:
public class TextBoxes extends AnAction {
// If registered by Java code, this constructor will be called and the string passed to the parent class will be used as the name of the menu item
// If you register with plugin.xml, you can ignore this constructor
public TextBoxes() {
// Set menu item name
super("Text _Boxes");
// You can also set menu item name, description, Icon
// super("Text _Boxes","Item description",IconLoader.getIcon("/Mypackage/icon.png"));
    }

public void actionPerformed(AnActionEvent event) {
        Project project = event.getData(PlatformDataKeys.PROJECT);
        String txt= Messages.showInputDialog(project, "What is your name?", "Input your name", Messages.getQuestionIcon());
        Messages.showMessageDialog(project, "Hello, " + txt + "!\n I am glad to see you.", "Information", Messages.getInformationIcon());
    }
}
Then we register the Action in plugin.xml:
<actions>
  <group id="MyPlugin.SampleMenu" text="_Sample Menu" description="Sample menu">
    <add-to-group group-id="MainMenu" anchor="last"  />
       <action id="Myplugin.Textboxes" class="Mypackage.TextBoxes" text="Text _Boxes" description="A test menu item" />
  </group>
</actions>
Here we create a new menu group, where the underline of the text string indicates the letter as the shortcut key. The effect of this menu is as follows: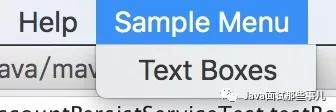
In addition to creating an Action manually, IDEA also provides a quick way to create an Action. Click New in the code directory to see the Action: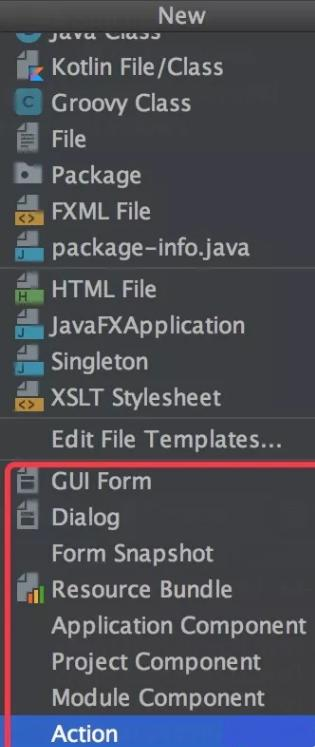
You can fill in the Action information you want to create in this panel, IDEA will help you create a new class, and help you register in plugin.xml: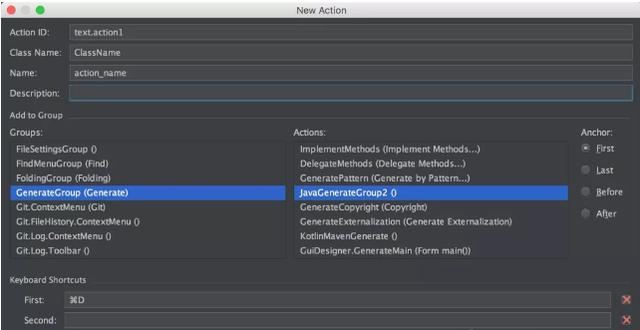
Run plug-ins
Running plug-ins is very simple. Just like running ordinary Java code, clicking the run or debug button will start a new IDEA instance, in which the plug-ins are effective.
Click Text Boxes to see the effect of the plug-in.