Android imitates meituan, a modified version of the suspension effect of the purchase box

Keywords: Android less

Please indicate that this article is from xiaamming's blog( http://blog.csdn.net/xiaanming/article/details/17761431 )Please respect the hard work of others, thank you!

I wrote an article about meituan.com, the effect of purchase box in public comments Android monitors ScrollView to achieve the purchase suspension effect of meituan and popular Reviews , I don't think the effect is very good. If I quickly slide the interface and display the hover box, there will be a card phenomenon. Some friends say that sometimes there will be two layouts, especially the ScrollView scrolling Y is worth monitoring. I also use the Handler to get it. Some friends introduced the Scrolling Tricks to me. I downloaded it and tried it. It's really meituan The purchase box of popular reviews uses this effect, but the Scrolling Tricks can only be used above API11, which is a little tragic. Then I made some modifications and shared the implementation ideas to you, which is very simple

First of all, you need to monitor ScrollView first. You can get the Y value of scrolling directly in the onScrollChanged() method. In the previous article, Handler is used. Take a detour. Look at the code directly

  1. package com.example.meituandemo;
  2. import android.content.Context;
  3. import android.util.AttributeSet;
  4. import android.widget.ScrollView;
  5. /**
  6. * @blog http://blog.csdn.net/xiaanming
  7. *
  8. * @author xiaanming
  9. *
  10. */
  11. public class MyScrollView extends ScrollView {
  12. private OnScrollListener onScrollListener;
  13. public MyScrollView(Context context) {
  14. this(context, null);
  15. }
  16. public MyScrollView(Context context, AttributeSet attrs) {
  17. this(context, attrs, 0);
  18. }
  19. public MyScrollView(Context context, AttributeSet attrs, int defStyle) {
  20. super(context, attrs, defStyle);
  21. }
  22. /**
  23. * Set scroll interface
  24. * @param onScrollListener
  25. */
  26. public void setOnScrollListener(OnScrollListener onScrollListener) {
  27. this.onScrollListener = onScrollListener;
  28. }
  29. @Override
  30. public int computeVerticalScrollRange() {
  31. return super.computeVerticalScrollRange();
  32. }
  33. @Override
  34. protected void onScrollChanged(int l, int t, int oldl, int oldt) {
  35. super.onScrollChanged(l, t, oldl, oldt);
  36. if(onScrollListener != null){
  37. onScrollListener.onScroll(t);
  38. }
  39. }
  40. /**
  41. *
  42. * Scrolling callback interface
  43. *
  44. * @author xiaanming
  45. *
  46. */
  47. public interface OnScrollListener{
  48. /**
  49. * Callback method, return the Y direction distance of MyScrollView sliding
  50. * @param scrollY
  51. * ,
  52. */
  53. public void onScroll(int scrollY);
  54. }
  55. }
Next let's look at the layout file of the main interface
  1. <LinearLayout xmlns:android="http://schemas.android.com/apk/res/android"
  2. android:id="@+id/parent_layout"
  3. xmlns:tools="http://schemas.android.com/tools"
  4. android:layout_width="match_parent"
  5. android:layout_height="match_parent"
  6. android:orientation="vertical" >
  7. <ImageView
  8. android:id="@+id/imageView1"
  9. android:layout_width="match_parent"
  10. android:layout_height="45dip"
  11. android:scaleType="centerCrop"
  12. android:src="@drawable/navigation_bar" />
  13. <com.example.meituandemo.MyScrollView
  14. android:id="@+id/scrollView"
  15. android:layout_width="fill_parent"
  16. android:layout_height="fill_parent" >
  17. <FrameLayout
  18. android:layout_width="match_parent"
  19. android:layout_height="wrap_content" >
  20. <LinearLayout
  21. android:layout_width="match_parent"
  22. android:layout_height="wrap_content"
  23. android:orientation="vertical" >
  24. <ImageView
  25. android:id="@+id/iamge"
  26. android:layout_width="match_parent"
  27. android:layout_height="wrap_content"
  28. android:background="@drawable/pic"
  29. android:scaleType="centerCrop" />
  30. <include
  31. android:id="@+id/buy"
  32. layout="@layout/buy_layout" />
  33. <ImageView
  34. android:layout_width="match_parent"
  35. android:layout_height="wrap_content"
  36. android:background="@drawable/one"
  37. android:scaleType="centerCrop" />
  38. <ImageView
  39. android:layout_width="match_parent"
  40. android:layout_height="wrap_content"
  41. android:background="@drawable/one"
  42. android:scaleType="centerCrop" />
  43. <ImageView
  44. android:layout_width="match_parent"
  45. android:layout_height="wrap_content"
  46. android:background="@drawable/one"
  47. android:scaleType="centerCrop" />
  48. </LinearLayout>
  49. <include
  50. android:id="@+id/top_buy_layout"
  51. layout="@layout/buy_layout" />
  52. </FrameLayout>
  53. </com.example.meituandemo.MyScrollView>
  54. </LinearLayout>

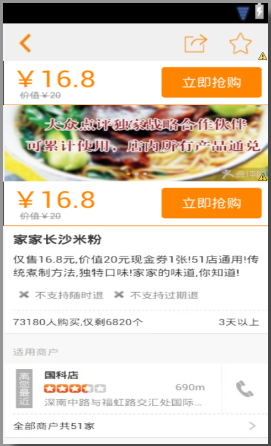
Here is the renderings of the layout


From the layout of the main interface, you can see that we have placed a purchase layout on it. You may think, first, let the layout on it be hidden, and then the layout on it will be displayed when it slides up. If it looks like the article I wrote before, the effect is not great, so this modified version is definitely not like this. Let's look at the main interface first Interface code

  1. package com.example.meituandemo;
  2. import android.app.Activity;
  3. import android.os.Bundle;
  4. import android.view.ViewTreeObserver.OnGlobalLayoutListener;
  5. import android.widget.LinearLayout;
  6. import com.example.meituandemo.MyScrollView.OnScrollListener;
  7. /**
  8. * @blog http://blog.csdn.net/xiaanming
  9. *
  10. * @author xiaanming
  11. *
  12. */
  13. public class MainActivity extends Activity implements OnScrollListener{
  14. /**
  15. * Custom MyScrollView
  16. */
  17. private MyScrollView myScrollView;
  18. /**
  19. * Purchase layout in MyScrollView
  20. */
  21. private LinearLayout mBuyLayout;
  22. /**
  23. * Purchase layout at top
  24. */
  25. private LinearLayout mTopBuyLayout;
  26. @SuppressWarnings("deprecation")
  27. @Override
  28. protected void onCreate(Bundle savedInstanceState) {
  29. super.onCreate(savedInstanceState);
  30. setContentView(R.layout.activity_main);
  31. myScrollView = (MyScrollView) findViewById(R.id.scrollView);
  32. mBuyLayout = (LinearLayout) findViewById(R.id.buy);
  33. mTopBuyLayout = (LinearLayout) findViewById(R.id.top_buy_layout);
  34. myScrollView.setOnScrollListener(this);
  35. //Callback interface when layout state or control visibility changes
  36. findViewById(R.id.parent_layout).getViewTreeObserver().addOnGlobalLayoutListener(new OnGlobalLayoutListener() {
  37. @Override
  38. public void onGlobalLayout() {
  39. //This step is very important to make the purchase layout above coincide with the purchase layout below
  40. onScroll(myScrollView.getScrollY());
  41. }
  42. });
  43. }
  44. @Override
  45. public void onScroll(int scrollY) {
  46. int mBuyLayout2ParentTop = Math.max(scrollY, mBuyLayout.getTop());
  47. mTopBuyLayout.layout(0, mBuyLayout2ParentTop, mTopBuyLayout.getWidth(), mBuyLayout2ParentTop + mTopBuyLayout.getHeight());
  48. }
  49. }
There are only a few lines of code in the main interface. After reading these codes, you still don't understand how to do it. It doesn't matter. Let me tell you, in fact, we made the purchase layout above coincide with the purchase layout below, layout()This method is to confirm View And then draw it out. The four parameters are View The coordinates of the four points are not relative to the origin of the screen, but also relative to the layout of his father,
We are on the outermost layer of the main page ViewGroup Add the listener of layout state change, when the screen is drawn, it will call back to the method onGlobalLayout()Middle, we are onGlobalLayout()Method manually called the following onScroll()Method, just started myScrollView.getScrollY()Equal to 0, so when scrollY less than mBuyLayout.getTop()When the upper edge of the purchase layout above myScrollView The distance from the top edge of is equal to mBuyLayout.getTop()(That is, the top edge of the layout below to myScrollView So in the beginning, the purchase layout above coincides with the purchase layout below.
When myScrollView Scroll up, and the top edge of the purchase layout above always matches myScrollView Top edge of mBuyLayout.getTop()This distance, so the above purchase layout also scroll up, when scrollY greater than mBuyLayout.getTop()It means that the top edge of the purchase layout slides to the navigation bar layout, so the top edge of the purchase layout is in line with the myScrollView Always keep the top edge of scrollY This distance, so the purchase layout will always be under the navigation bar, as if it's stuck, don't you know? OK, but according to this idea, you can also start using a hover box to cover the purchase layout below, and then onScroll()Method, but the x,y It's not relative to the layout of the parent. Pay attention to this, so that the child can achieve the effect, but it's much more complicated than this. So we can use this function directly when we encounter similar functions. It's simple and clear. OK, you can't wait to see the effect. Let's run the next program


Run the program you will find that no matter how we slide, there will be no situation of the previous article. It's very smooth. It's completely consistent with the effect of meituan and public comments. OK, the explanation of the revised version is over here. If you have any questions, please leave a message below, and I will answer them for you!

Project source code, click download


It contains the effect of multiple purchase layouts. The next purchase layout will top the previous purchase layout. The usage method is very simple. You only need to set the layout settings you need to set Tag by sticky, as

  1. <FrameLayout
  2. android:layout_width="fill_parent"
  3. android:layout_height="100dip"
  4. android:background="#ff00ffff"
  5. android:tag="sticky" >
  6. <Button
  7. android:id="@+id/button"
  8. android:layout_width="fill_parent"
  9. android:layout_height="wrap_content"
  10. android:text="Button" />
  11. </FrameLayout>

In this way, the layout will stick to the top when scrolling to the top. You can download it and try!


We recommend that you download the following code


Multiple purchase layout effect source codes, click download


            </div>

Posted by linda_v on Fri, 31 Jan 2020 04:33:55 -0800