Article directory
This article is the last one in AQS series. In the first one, we analyzed the core of AQS through ReentrantLock fair lock. In the second one, we explained the Condition and the use of thread interruption.
This article, our focus is the last part of AQS, the use of AQS sharing mode. With the foreshadowing of the first two articles, the remaining source code analysis will be much simpler.
This article first uses CountDownLatch to clarify the sharing mode, and then follows the source code of other AQS related classes, CyclicBarrier and Semaphore.
Relatively speaking, if the reader has the basis of the previous two articles, this article is much simpler, but for beginners, one hour is also inevitable.
CountDownLatch
CountDownLatch is a typical use of AQS sharing mode, which is a high-frequency use class. The Chinese meaning of latch is gate bolt and fence. I will not talk nonsense about how to explain it. Let's see two examples to know where and how to use it.
Use example
Let's take a look at the example given by Doug Lea in the java doc. This example is very practical. I often write this code.
Suppose we have N (N > 0) tasks, then we will use N to initialize a CountDownLatch, and then pass the reference of the latch to each thread. After each thread finishes the task, calling latch.countDown() means that a task has been completed.
The thread of the method calling latch.await() will block until all tasks are completed.
class Driver2 { // ...
    void main() throws InterruptedException {
        CountDownLatch doneSignal = new CountDownLatch(N);
        Executor e = Executors.newFixedThreadPool(8);

        // Create N tasks and submit them to thread pool for execution
        for (int i = 0; i < N; ++i) // create and start threads
            e.execute(new WorkerRunnable(doneSignal, i));

        // Wait for all tasks to complete before this method returns
        doneSignal.await();           // wait for all to finish
    }
}

class WorkerRunnable implements Runnable {
    private final CountDownLatch doneSignal;
    private final int i;

    WorkerRunnable(CountDownLatch doneSignal, int i) {
        this.doneSignal = doneSignal;
        this.i = i;
    }

    public void run() {
        try {
            doWork(i);
            // The task of this thread is completed. Call the countDown method
            doneSignal.countDown();
        } catch (InterruptedException ex) {
        } // return;
    }

    void doWork() { ...}
}
So CountDownLatch is very practical. We often split a relatively large task, and then start multiple threads to execute it. After all threads are finished, we can perform other operations. In this example, only the main thread calls the await method.
Let's take another example. This example is very typical. Two CountDownLatch are used:
class Driver { // ...
    void main() throws InterruptedException {
        CountDownLatch startSignal = new CountDownLatch(1);
        CountDownLatch doneSignal = new CountDownLatch(N);

        for (int i = 0; i < N; ++i) // create and start threads
            new Thread(new Worker(startSignal, doneSignal)).start();

        // Insert some code here to make sure that each thread above starts before executing the following code.
        doSomethingElse();            // don't let run yet
        // Because here N == 1, all await methods can pass the
        startSignal.countDown();      // let all threads proceed
        doSomethingElse();
        // Wait for all tasks to finish
        doneSignal.await();           // wait for all to finish
    }
}

class Worker implements Runnable {
    private final CountDownLatch startSignal;
    private final CountDownLatch doneSignal;

    Worker(CountDownLatch startSignal, CountDownLatch doneSignal) {
        this.startSignal = startSignal;
        this.doneSignal = doneSignal;
    }

    public void run() {
        try {
            // In order for all threads to start tasks at the same time, let's let all threads block here first
            // When everyone is ready, open the door bolt
            startSignal.await();
            doWork();
            doneSignal.countDown();
        } catch (InterruptedException ex) {
        } // return;
    }

    void doWork() { ...}
}
In this example, doneSignal is used with the first example. Let's talk about startSignal here. N newly opened threads call startSignal.await() to block and wait. They block on the fence. Only when the conditions are met (startSignal.countDown()), they can pass the fence at the same time. The purpose is to make all threads stand on the same starting line.

If there is only one thread calling the await method to wait for the task to be completed, CountDownLatch will be much simpler. Therefore, readers of the source code analysis must build a scenario in their mind: there are m threads that do tasks, and N threads waiting on a fence for the M threads to finish tasks. Until all m tasks are completed, n threads are the same Through the fence.
Source code analysis
Talk is cheap, show me the code.
To construct a method, you need to pass in an integer no less than 0:
public CountDownLatch(int count) {
    if (count < 0) throw new IllegalArgumentException("count < 0");
    this.sync = new Sync(count);
}
// In the old way, an internal package of Sync class inherits from AQS
private static final class Sync extends AbstractQueuedSynchronizer {
    Sync(int count) {
        // So state == count
        setState(count);
    }
    ...
}
The code is a routine. First analyze the routine: the state in AQS is an integer value, which is set by an int count parameter. All waiting threads that call the await method will hang, and then some other threads will do the operation of state = state - 1. When the state is reduced to 0, the thread that reduces the state to 0 will be responsible for calling Wake up all threads that call the await method. It's all routines. It's just that Doug Lea's routines are deep and the code is clever. Otherwise, we don't need to analyze the source code.
For CountDownLatch, we only need to care about two methods, one is the countDown() method, and the other is the await() method.
The countDown() method decrements the state by 1 every time it is called, until the value of state is 0; and await is a blocking method, when the state is decremented to 0, the await method will return. Await can be called by multiple threads. At this time, the reader should have a graph in his mind: all threads calling the await method are blocked in the blocking queue of AQS, waiting conditions are met (state == 0), and the threads are awakened from the queue one by one.
We use the following programs to analyze the source code. t1 and t2 are responsible for calling the countDown() method, and t3 and t4 are responsible for calling the await method to block:
public class CountDownLatchDemo {

    public static void main(String[] args) {

        CountDownLatch latch = new CountDownLatch(2);

        Thread t1 = new Thread(new Runnable() {
            @Override
            public void run() {
                try {
                    Thread.sleep(5000);
                } catch (InterruptedException ignore) {
                }
                // After 5 seconds of rest (5 seconds after the simulation thread works), call countDown()
                latch.countDown();
            }
        }, "t1");

        Thread t2 = new Thread(new Runnable() {
            @Override
            public void run() {
                try {
                    Thread.sleep(10000);
                } catch (InterruptedException ignore) {
                }
                // After 10 seconds of rest (10 seconds after the simulation thread works), call countDown()
                latch.countDown();
            }
        }, "t2");

        t1.start();
        t2.start();

        Thread t3 = new Thread(new Runnable() {
            @Override
            public void run() {
                try {
                    // Block, wait for state to decrease to 0
                    latch.await();
                    System.out.println("thread t3 from await Returned to China");
                } catch (InterruptedException e) {
                    System.out.println("thread t3 await Be interrupted");
                    Thread.currentThread().interrupt();
                }
            }
        }, "t3");
        Thread t4 = new Thread(new Runnable() {
            @Override
            public void run() {
                try {
                    // Block, wait for state to decrease to 0
                    latch.await();
                    System.out.println("thread t4 from await Returned to China");
                } catch (InterruptedException e) {
                    System.out.println("thread t4 await Be interrupted");
                    Thread.currentThread().interrupt();
                }
            }
        }, "t4");

        t3.start();
        t4.start();
    }
}
After about 10 seconds, the above program will output:
Thread t3 returned from await
 Thread t4 returned from await
The order of these two outputs is not absolute
In the following analysis, we assume that t3 enters the blocking queue first
Next, we follow the process step by step: wait for await, then wake it up, and the await method returns.
First, let's look at the await() method, which represents a thread blocking, waiting for the value of state to be reduced to 0.
public void await() throws InterruptedException {
    sync.acquireSharedInterruptibly(1);
}
public final void acquireSharedInterruptibly(int arg)
        throws InterruptedException {
    // It's the same old pattern. I said it in the interruption section of the second chapter
    if (Thread.interrupted())
        throw new InterruptedException();

    // When t3 and t4 call await, state is greater than 0 (state is 2 at this time).
    // That is to say, this if returns true, and then looks in
    if (tryAcquireShared(arg) < 0)
        doAcquireSharedInterruptibly(arg);
}
// This method returns 1 only when state == 0
protected int tryAcquireShared(int acquires) {
    return (getState() == 0) ? 1 : -1;
}
From the method name, we can see that this method obtains the shared lock, and this method is interruptible (throw InterruptedException to exit this method when interrupting).
private void doAcquireSharedInterruptibly(int arg)
    throws InterruptedException {
    // 1. team entry
    final Node node = addWaiter(Node.SHARED);
    boolean failed = true;
    try {
        for (;;) {
            final Node p = node.predecessor();
            if (p == head) {
                // As above, as long as state is not equal to 0, this method returns - 1
                int r = tryAcquireShared(arg);
                if (r >= 0) {
                    setHeadAndPropagate(node, r);
                    p.next = null; // help GC
                    failed = false;
                    return;
                }
            }
            // 2
            if (shouldParkAfterFailedAcquire(p, node) &&
                parkAndCheckInterrupt())
                throw new InterruptedException();
        }
    } finally {
        if (failed)
            cancelAcquire(node);
    }
}
Let's analyze this method carefully. After thread t3 enters the team through the first step of addWaiter, we should be able to get this:

Since the tryAcquireShared method returns - 1, the if (r > = 0) branch will not go in. At shouldParkAfterFailedAcquire, t3 sets the waitStatus value of head to - 1, as follows:
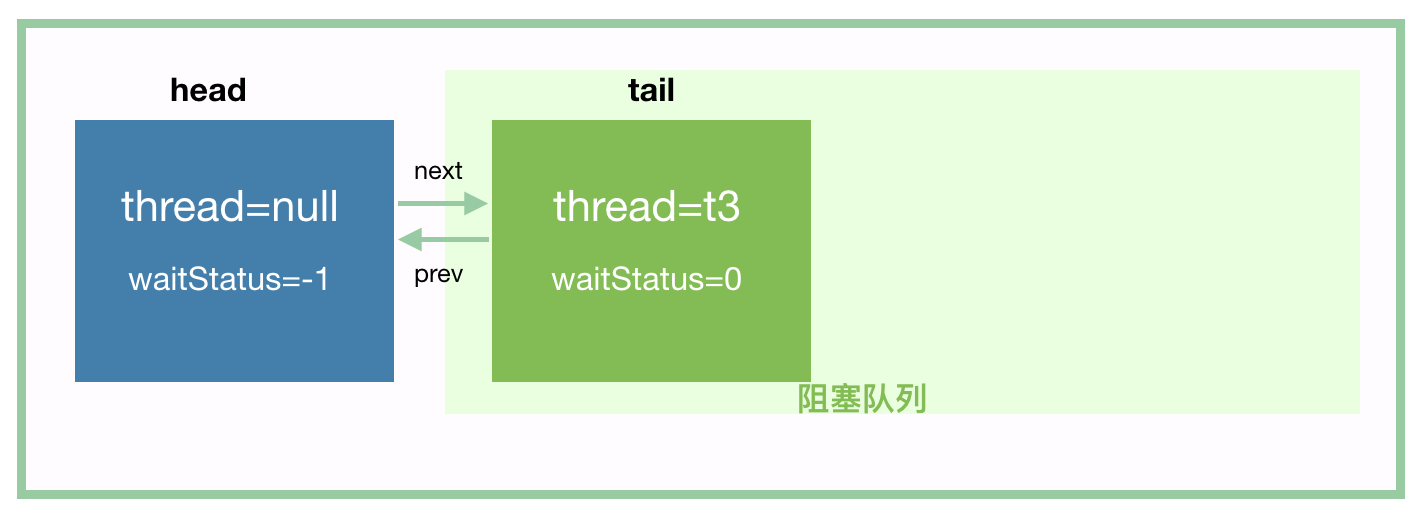
Then when you go to parkAndCheckInterrupt, t3 hangs.
Let's analyze t4 joining the team again. t4 will set the waitStatus of the node where the precursor node t3 is located to - 1. After t4 joining the team, it should be as follows:
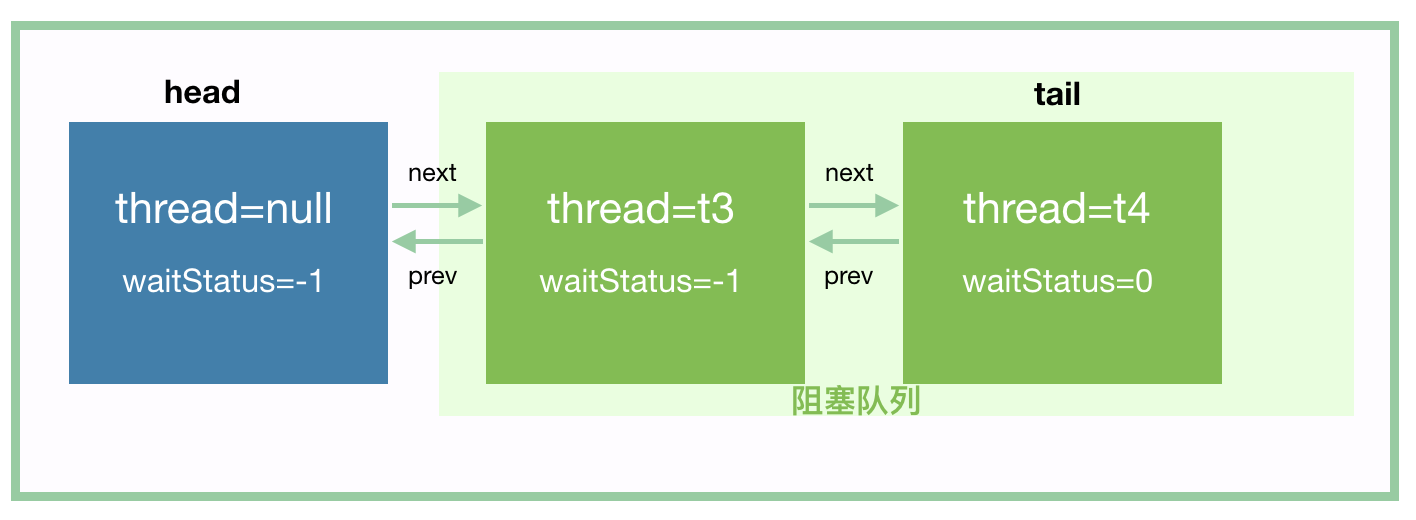
Then, t4 also hangs. Next, t3 and t4 wait to wake up.
Next, let's look at the wake-up process. To make the following diagram richer, let's assume that CountDownLatch is initialized with 10.
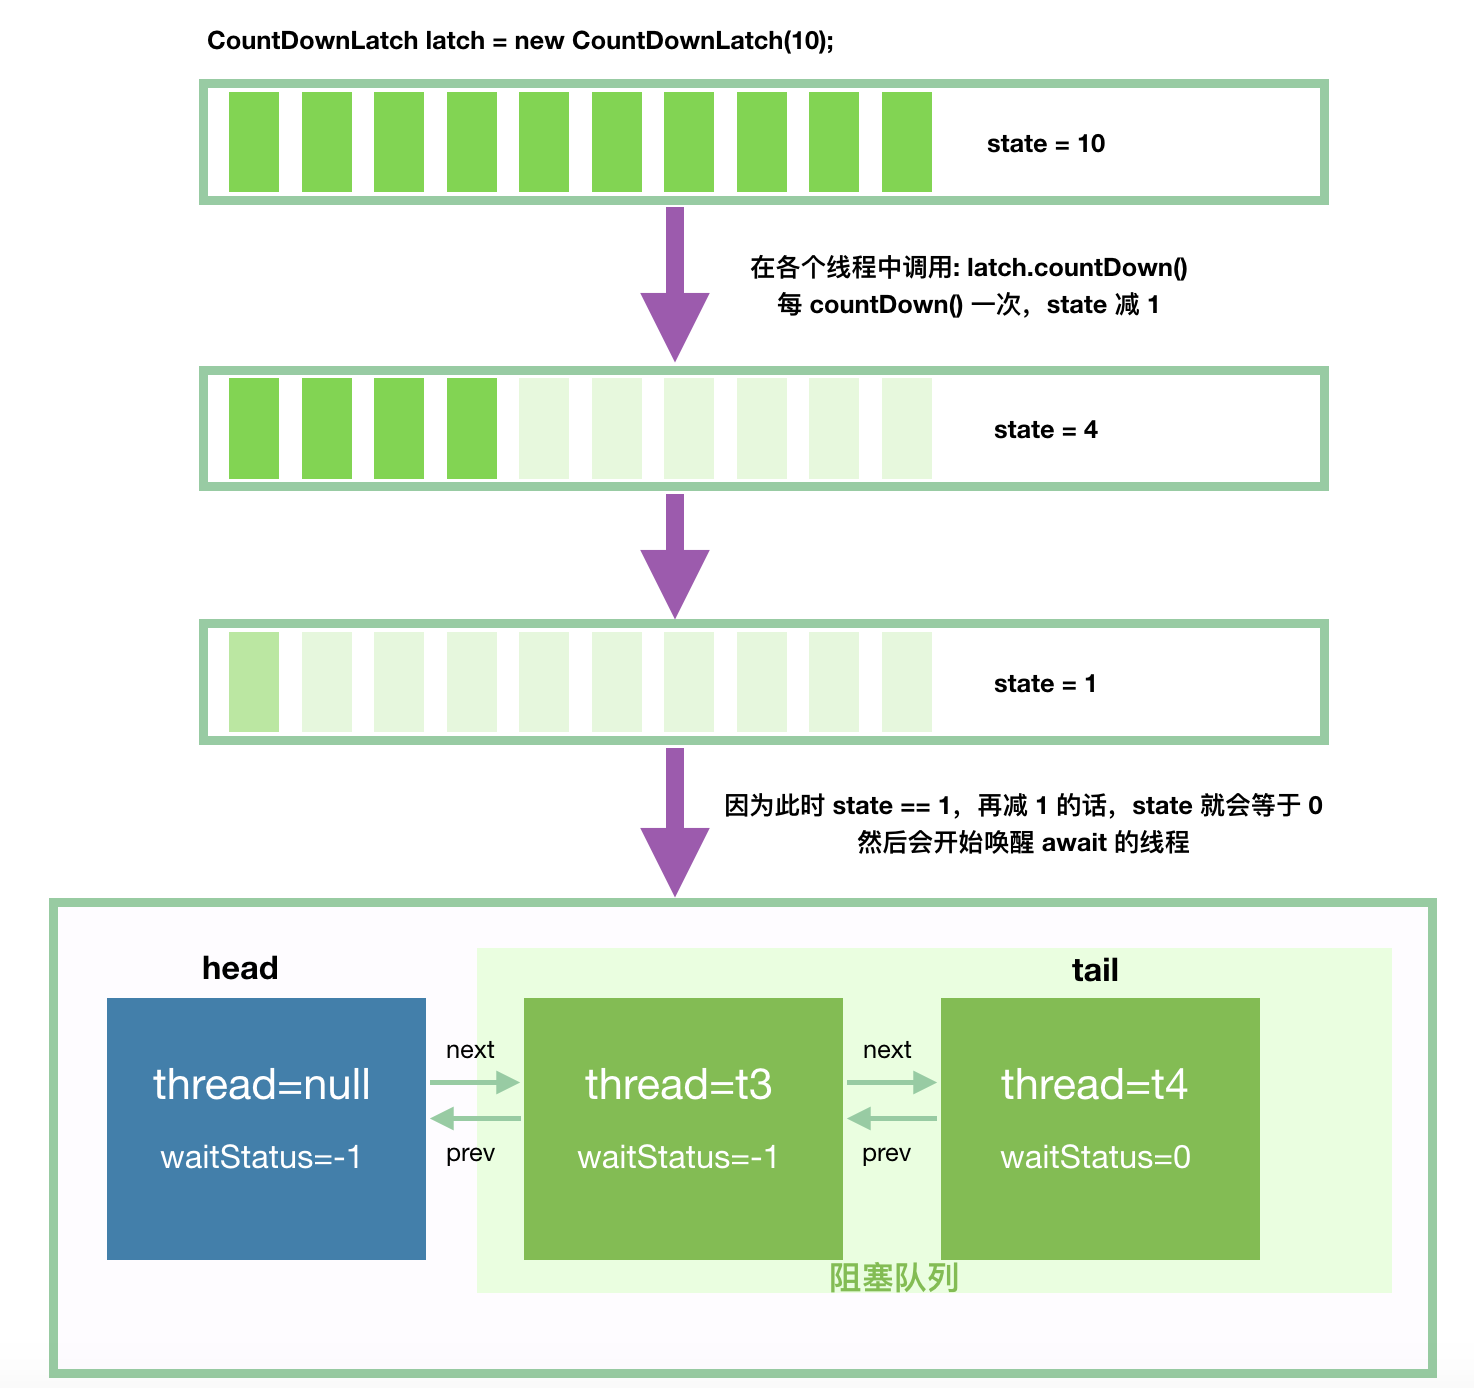
Of course, in our example, there are no 10 threads, only 2 threads t1 and t2, just to make the figure better.
Let's look at the specific process step by step. First, let's look at the countDown() method:
public void countDown() {
    sync.releaseShared(1);
}
public final boolean releaseShared(int arg) {
    // Tryrelease shared returns true only when state is reduced to 0
    // Otherwise, simply state = state - 1, and the countDown() method is over
    //    The operation of reducing state to 0 is the most complicated. Go on
    if (tryReleaseShared(arg)) {
        // Thread to wake up await
        doReleaseShared();
        return true;
    }
    return false;
}
// This method is very simple, using the spin method to realize the state minus 1
protected boolean tryReleaseShared(int releases) {
    for (;;) {
        int c = getState();
        if (c == 0)
            return false;
        int nextc = c-1;
        if (compareAndSetState(c, nextc))
            return nextc == 0;
    }
}
The countDown method subtracts the state value by 1 every time it is called. If the state value is reduced to 0, the following methods are called to wake up the threads in the blocking queue:
// When this method is called, state == 0
// This method doesn't look at all the codes first, but goes down to the place where I write the comments according to the idea. We will run through a process first, and analyze the rest carefully later
private void doReleaseShared() {
    for (;;) {
        Node h = head;
        if (h != null && h != tail) {
            int ws = h.waitStatus;
            // When t3 joins the team, the waitStatus of the header node has been set to Node.SIGNAL (- 1)
            if (ws == Node.SIGNAL) {
                // Set waitStatue of head to 0
                if (!compareAndSetWaitStatus(h, Node.SIGNAL, 0))
                    continue;            // loop to recheck cases
                // Here, wake up the successor node of the head, which is the first node in the blocking queue
                // Here, i.e. wake up t3
                unparkSuccessor(h);
            }
            else if (ws == 0 &&
                     !compareAndSetWaitStatus(h, 0, Node.PROPAGATE)) // todo
                continue;                // loop on failed CAS
        }
        if (h == head)                   // loop if head changed
            break;
    }
}
Once t3 is waked up, we continue to return to the code of await, parkAndCheckInterrupt. We do not consider the interruption first:
private void doAcquireSharedInterruptibly(int arg)
    throws InterruptedException {
    final Node node = addWaiter(Node.SHARED);
    boolean failed = true;
    try {
        for (;;) {
            final Node p = node.predecessor();
            if (p == head) {
                int r = tryAcquireShared(arg);
                if (r >= 0) {
                    setHeadAndPropagate(node, r); // 2. Here is the next step
                    p.next = null; // help GC
                    failed = false;
                    return;
                }
            }
            if (shouldParkAfterFailedAcquire(p, node) &&
                // 1. After wake-up, this method returns
                parkAndCheckInterrupt())
                throw new InterruptedException();
        }
    } finally {
        if (failed)
            cancelAcquire(node);
    }
}
Next, t3 will enter the setHeadAndPropagate(node, r) method, first occupy the head, and then wake up other threads in the queue:
private void setHeadAndPropagate(Node node, int propagate) {
    Node h = head; // Record old head for check below
    setHead(node);

    // Next, wake up the node after the current node, that is, t3 is awake, wake up t4 immediately
    // Similarly, if there is a t5 after t4, when t4 wakes up, it wakes up t5 immediately
    if (propagate > 0 || h == null || h.waitStatus < 0 ||
        (h = head) == null || h.waitStatus < 0) {
        Node s = node.next;
        if (s == null || s.isShared())
            // It's this method again, but now the head is not the original empty node, it's the t3 node
            doReleaseShared();
    }
}
Back to this method, let's analyze the doReleaseShared method. According to the process, the head node is t3 at this time:
// When this method is called, state == 0
private void doReleaseShared() {
    for (;;) {
        Node h = head;
        // 1. h == null: the blocking queue is empty
        // 2. h == tail: indicates that the header node may be the newly initialized header node,
        //   Or a normal thread node, but since this node is the head node, it means that it has been awakened and there is no other node in the blocking queue
        // So there is no need to wake up the successor nodes in these two cases
        if (h != null && h != tail) {
            int ws = h.waitStatus;
            // t4 sets the waitStatus of the header node (now t3) to Node.SIGNAL (- 1)
            if (ws == Node.SIGNAL) {
                // See the following interpretation for CAS failure scenario
                if (!compareAndSetWaitStatus(h, Node.SIGNAL, 0))
                    continue;            // loop to recheck cases
                // Here, wake up the successor node of the head, which is the first node in the blocking queue
                // Here, that is, wake up t4
                unparkSuccessor(h);
            }
            else if (ws == 0 &&
                     // The scenario of CAS failure is: at the time of execution here, just one node enters the queue, and the queue will set the ws to - 1
                     !compareAndSetWaitStatus(h, 0, Node.PROPAGATE))
                continue;                // loop on failed CAS
        }
        // If by the time we get here, the previously awakened thread has occupied the head, then recycle
        // Otherwise, if the head does not change, exit the loop,
        // Does the exit loop mean that other nodes in the blocking queue will not wake up? Of course not. This method will be called after the thread wakes up
        if (h == head)                   // loop if head changed
            break;
    }
}
We will analyze the next if statement before we can explain why the first CAS may fail:
- h == head: it means that the head node has not been occupied by the thread just woken up with unparkSuccessor (in this case, it can be understood as t4). At this time, break exits the loop.
- H! = head: the head node is occupied by the thread that just wakes up (in this case, it can be understood as t4). Then, enter the next cycle again and wake up the next node (in this case, t4). We know that when t4 is awakened, it will actually wake up t5, t6, t7 , so why do we have the next cycle here to wake up t5? I think it's for throughput.
If the above scenario 2 is satisfied, then we can know why the above CAS operation compareAndSetWaitStatus(h, Node.SIGNAL, 0) fails?
Because when the current for loop thread arrives here, the thread t4 that just woke up may just be better, so CAS may fail.
During the first round of for loop, t4 will wake up, and t4 will set itself as the head node after waking up. If the for loop runs to if (h == head) after t4 sets the head node, then false will be returned, and for loop will enter the next round. After t4 wakes up, it will also enter this method. Then the second round of for loop and t4 may meet in this CAS, and only one success will be achieved.
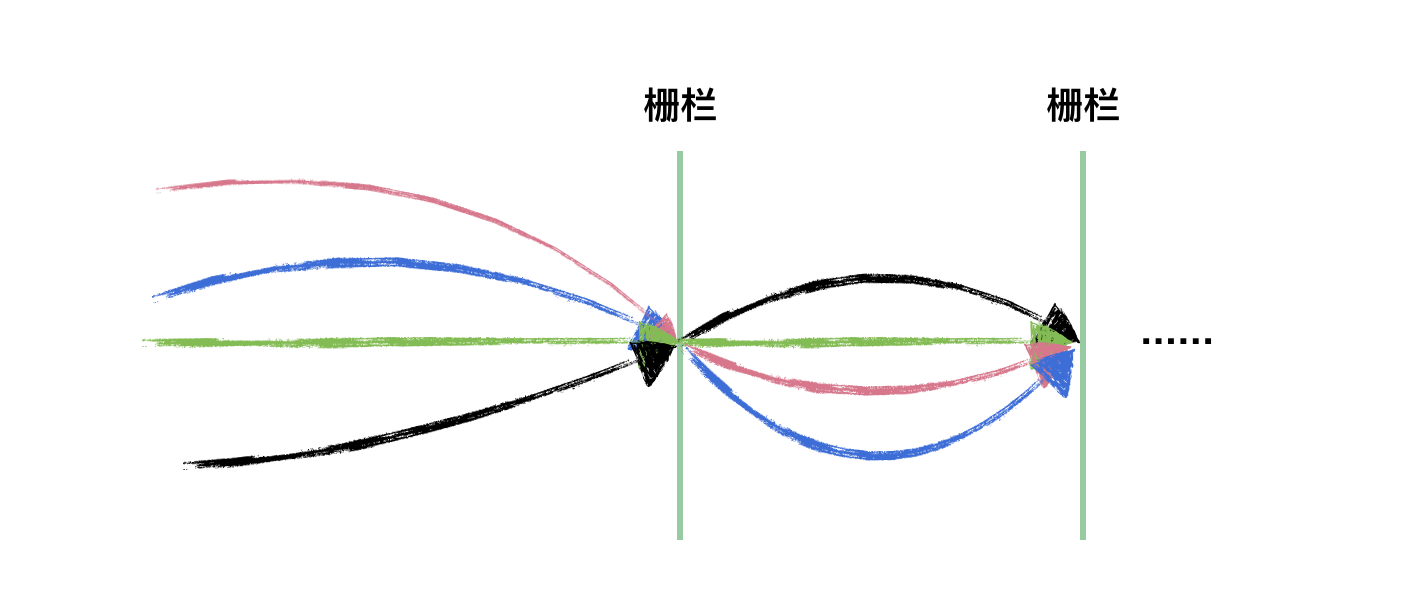
CyclicBarrier
It literally means "reusable fence" or "periodic fence". In a word, it's not useless after being used once. Compared with CountDownLatch, CyclicBarrier is much simpler. Its source code has no deep place. It's a combination of ReentrantLock and Condition. As shown in the following diagram, is CyclicBarrier similar to CountDownLatch, but CyclicBarrier can have more than one fence, because its fence can be reused.
First of all, the source code implementation of CyclicBarrier is quite different from CountDownLatch. CountDownLatch is based on AQS sharing mode, while CyclicBarrier is based on Condition.
Because the source code of CyclicBarrier is relatively simple. As long as readers are familiar with the previous analysis of Condition, there is no pressure on the source code here, just a few special concepts.
First, use a diagram to describe some concepts in the CyclicBarrier and its basic use process:
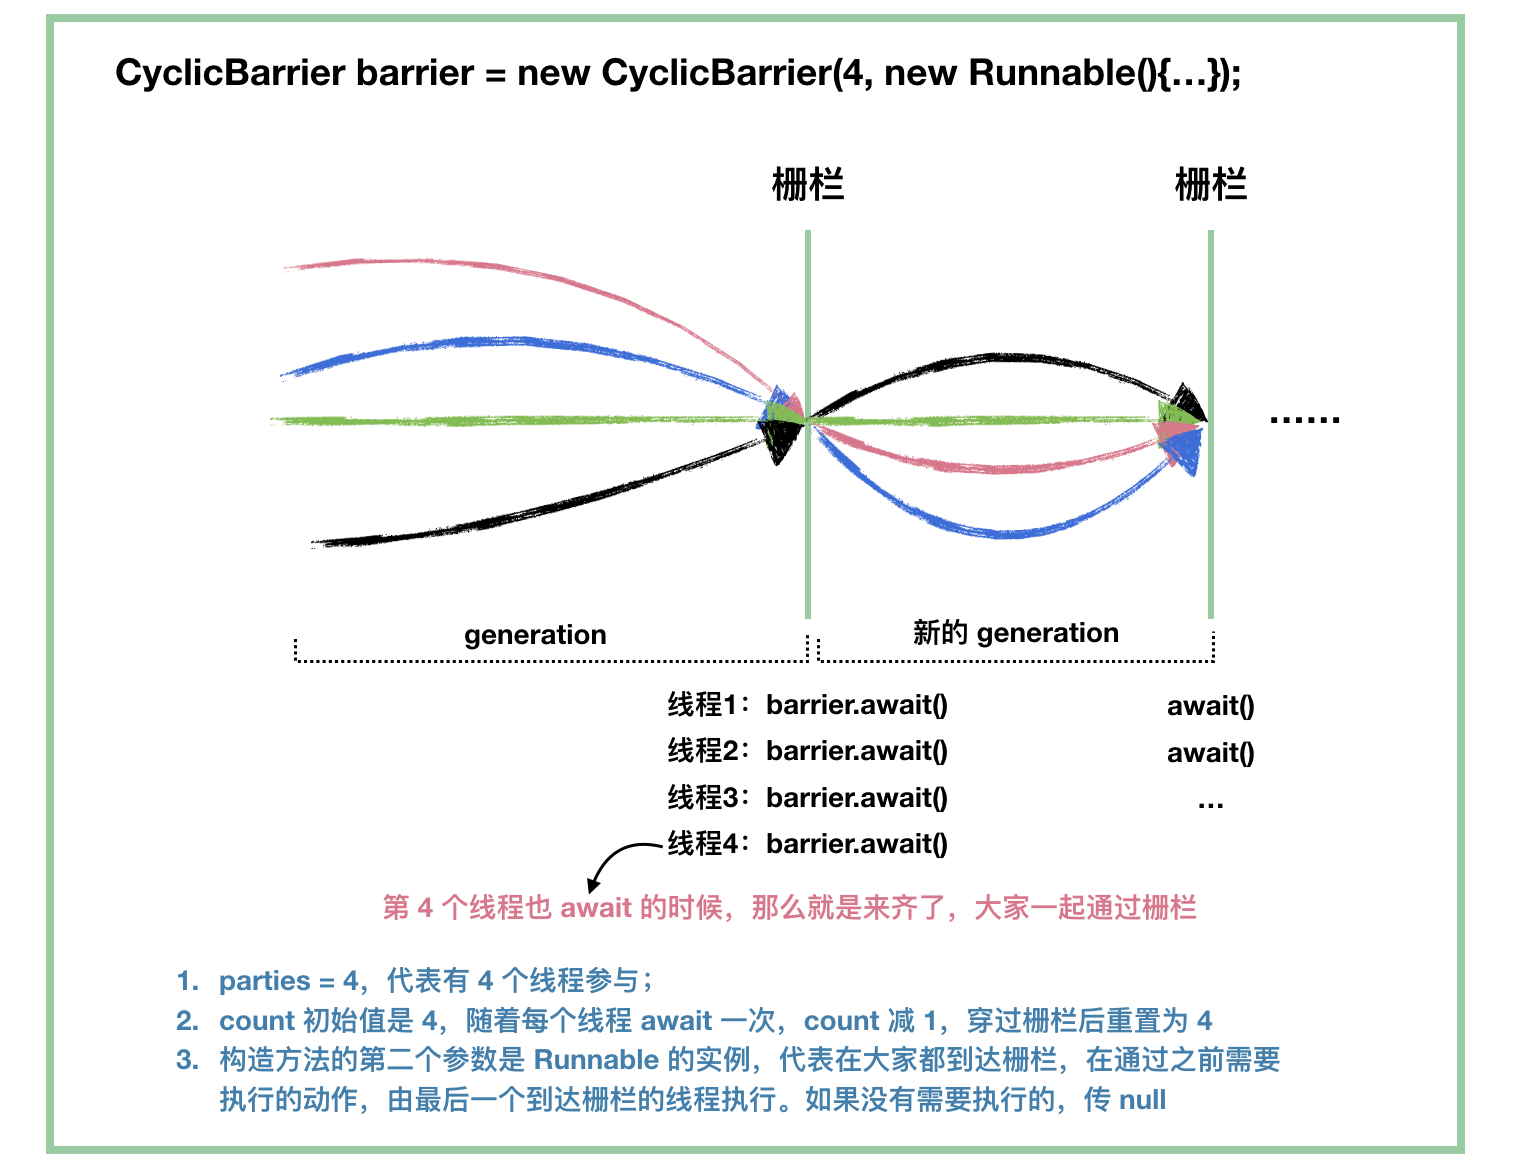
As you can see from the figure, the most important source code of CyclicBarrier is the await() method.
Let's finish the figure first, and then we start source code analysis:
public class CyclicBarrier {
    // We said that CyclicBarrier can be used repeatedly. We regard each time from the beginning to the time of crossing the fence as "a generation", or "a cycle"
    private static class Generation {
        boolean broken = false;
    }

    /** The lock for guarding barrier entry */
    private final ReentrantLock lock = new ReentrantLock();

    // CyclicBarrier is Condition based
    // Condition means "condition". The waiting thread of the CyclicBarrier passes through the barrier. The "condition" is that everyone is on the fence
    private final Condition trip = lock.newCondition();

    // Number of threads involved
    private final int parties;

    // If this is set, it means to perform the corresponding operation before crossing the fence
    private final Runnable barrierCommand;

    // Current generation
    private Generation generation = new Generation();

    // The number of threads that have not yet reached the fence. This value is initially parties, and then decrements
    // Threads not yet to fence = parties - number of threads already to fence
    private int count;

    public CyclicBarrier(int parties, Runnable barrierAction) {
        if (parties <= 0) throw new IllegalArgumentException();
        this.parties = parties;
        this.count = parties;
        this.barrierCommand = barrierAction;
    }

    public CyclicBarrier(int parties) {
        this(parties, null);
    }
First, how to start a new generation:
// Start a new generation. When the last thread reaches the fence, call this method to wake up other threads and initialize "next generation"
private void nextGeneration() {
    // First, you need to wake up all the threads waiting on the fence
    trip.signalAll();
    // Update the value of count
    count = parties;
    // Regenerate next generation
    generation = new Generation();
}
Opening a new generation is similar to re instantiating a CyclicBarrier instance
See how to break a fence:
private void breakBarrier() {
    // Set state broken to true
    generation.broken = true;
    // Reset count to initial value parties
    count = parties;
    // Wake up all threads that are already waiting
    trip.signalAll();
}
These two methods are used later. Now we start to analyze the most important wait through fence method await method:
// Without timeout mechanism
public int await() throws InterruptedException, BrokenBarrierException {
    try {
        return dowait(false, 0L);
    } catch (TimeoutException toe) {
        throw new Error(toe); // cannot happen
    }
}
// With timeout mechanism, if timeout throws TimeoutException exception
public int await(long timeout, TimeUnit unit)
    throws InterruptedException,
           BrokenBarrierException,
           TimeoutException {
    return dowait(true, unit.toNanos(timeout));
}
Keep looking in:
private int dowait(boolean timed, long nanos)
        throws InterruptedException, BrokenBarrierException,
               TimeoutException {
    final ReentrantLock lock = this.lock;
    // First get the lock, and then remember to release the lock in finally
    // If we remember the condition part, we know that await() of the condition will release the lock, and we need to acquire the lock again when wake up by signal()
    lock.lock();
    try {
        final Generation g = generation;
        // Check whether the fence is broken. If it is broken, throw the BrokenBarrierException exception
        if (g.broken)
            throw new BrokenBarrierException();
        // Check the interrupt status and throw InterruptedException exception if it is interrupted
        if (Thread.interrupted()) {
            breakBarrier();
            throw new InterruptedException();
        }
        // index is the return value of this await method
        // Notice here that this is the value obtained from count decrement
        int index = --count;

        // If it is equal to 0, all threads are on the fence, ready to pass
        if (index == 0) {  // tripped
            boolean ranAction = false;
            try {
                // If the operation to be performed before passing the fence is specified during initialization, it will be performed here
                final Runnable command = barrierCommand;
                if (command != null)
                    command.run();
                // If ranAction is true, there is no abnormal exit when command.run() is executed
                ranAction = true;
                // Wake up the waiting thread and start a new generation
                nextGeneration();
                return 0;
            } finally {
                if (!ranAction)
                    // When entering here, it indicates that there is an exception when performing the specified operation, so you need to break the fence
                    // As we said before, breaking the fence means waking up all waiting threads, setting the broken to true, and resetting the count to parties
                    breakBarrier();
            }
        }

        // loop until tripped, broken, interrupted, or timed out
        // If the last thread calls await, the above returns
        // The following operations are performed for threads that are not the last to reach the fence
        for (;;) {
            try {
                // If there is a timeout mechanism, call the await method of the Condition with timeout and wait until the last thread calls await
                if (!timed)
                    trip.await();
                else if (nanos > 0L)
                    nanos = trip.awaitNanos(nanos);
            } catch (InterruptedException ie) {
                // If you arrive here, the waiting thread is interrupted when await (await of Condition)
                if (g == generation && ! g.broken) {
                    // Break the fence
                    breakBarrier();
                    // After breaking the fence, throw the InterruptedException exception again to the method called by the outer layer
                    throw ie;
                } else {
                    // Here, G! = generation, indicating that a new generation has been generated, that is, the last thread await is completed,
                    // At this time, there is no need to throw an InterruptedException exception. Record the interrupt information
                    // Or if the fence has been broken, the InterruptedException exception should not be thrown,
                    // Instead, a BrokenBarrierException is thrown
                    Thread.currentThread().interrupt();
                }
            }

          	// After waking up, check if the fence is "broken"
            if (g.broken)
                throw new BrokenBarrierException();

            // Except for exceptions, this for loop is about to exit from here
            // We should be clear that the last thread will call nextGeneration to start a new generation after executing the specified task (if any)
            // Then release the lock. Other threads get the lock from the await method of Condition and return it. When they get here, they will meet the requirements of G! = generation
            // When is it not enough? If an exception is thrown during the execution of barrierCommand, the barrier breaking operation will be performed,
            // Set the broken to true, and then wake up the threads. These threads will throw the broken barrier exception from the if (g.broken) branch above to return
            // Of course, there is a final possibility, that is, the await timeout. In this case, it will not return from the if branch exception above, nor from here. It will execute the following code
            if (g != generation)
                return index;

            // If you wake up and find that it's time-out, break the fence and throw an exception
            if (timed && nanos <= 0L) {
                breakBarrier();
                throw new TimeoutException();
            }
        }
    } finally {
        lock.unlock();
    }
}
Well, I think I should make it clear. I don't seem to have missed a single line of code, do I?
Now let's finish the work.
First of all, let's see how to get the number of threads on the fence and wait:
public int getNumberWaiting() {
    final ReentrantLock lock = this.lock;
    lock.lock();
    try {
        return parties - count;
    } finally {
        lock.unlock();
    }
}
It's very simple to judge whether a fence has been broken. Just look at the broken value:
public boolean isBroken() {
    final ReentrantLock lock = this.lock;
    lock.lock();
    try {
        return generation.broken;
    } finally {
        lock.unlock();
    }
}
When we talked about await, we almost made it clear when the fence would be broken. The summary is as follows:
- Interrupt, we said that if a waiting thread is interrupted, it will break the fence and throw an InterruptedException exception;
- Timeout, break the fence and throw TimeoutException exception at the same time;
- The specified operation threw an exception, which we said earlier.
Finally, let's see how to reset a fence:
public void reset() {
    final ReentrantLock lock = this.lock;
    lock.lock();
    try {
        breakBarrier();   // break the current generation
        nextGeneration(); // start a new generation
    } finally {
        lock.unlock();
    }
}
Let's imagine that when initializing, if the thread parties = 4 is specified, and three threads call await to wait, and before the fourth thread calls await, we call reset method, what happens?
First of all, breaking the fence means that all waiting threads (three waiting threads) will wake up, and the await method will return by throwing a BrokenBarrierException exception. Then start a new generation, reset count and generation, and it's zero.
Well, the source code of CyclicBarrier is very simple.
Semaphore
With the foundation of CountDownLatch, it's much easier to analyze Semaphore. What is Semaphore? It is similar to a resource pool (readers can compare it with thread pool). Each thread needs to call the acquire() method to get the resource, and then it can be executed. After execution, it needs to release the resource to other threads.
As you can probably guess, Semaphore is also the use of shared locks in AQS, because each thread shares a pool.
Routine interpretation: when creating a Semaphore instance, you need a parameter, limits, which is basically set to the state of AQS. Then when each thread calls acquire, it executes state = state - 1, and when it releases, it executes state = state + 1. Of course, if state = 0 when it acquires, it means there are no resources, and you need to wait for other lines release.
Construction method:
public Semaphore(int permits) {
    sync = new NonfairSync(permits);
}

public Semaphore(int permits, boolean fair) {
    sync = fair ? new FairSync(permits) : new NonfairSync(permits);
}
Similar to ReentrantLock, it uses fair strategy and unfair strategy.
See the acquire method:
public void acquire() throws InterruptedException {
    sync.acquireSharedInterruptibly(1);
}
public void acquireUninterruptibly() {
    sync.acquireShared(1);
}
public void acquire(int permits) throws InterruptedException {
    if (permits < 0) throw new IllegalArgumentException();
    sync.acquireSharedInterruptibly(permits);
}
public void acquireUninterruptibly(int permits) {
    if (permits < 0) throw new IllegalArgumentException();
    sync.acquireShared(permits);
}
These methods are also old-fashioned. You basically understand them. There are two more acquire methods that can pass parameters here. But you also understand them. If we need to obtain more than one resource at a time, we will use them.
Let's take a look at acquirenterruptibly() method that does not throw InterruptedException exception:
public void acquireUninterruptibly() {
    sync.acquireShared(1);
}
public final void acquireShared(int arg) {
    if (tryAcquireShared(arg) < 0)
        doAcquireShared(arg);
}
As mentioned earlier, Semaphore is divided into fair strategy and unfair strategy. Let's compare two tryAcquireShared methods:
// Equity Strategy:
protected int tryAcquireShared(int acquires) {
    for (;;) {
        // The difference is whether the CAS subtraction operation will be performed after judging whether there are threads queuing
        if (hasQueuedPredecessors())
            return -1;
        int available = getState();
        int remaining = available - acquires;
        if (remaining < 0 ||
            compareAndSetState(available, remaining))
            return remaining;
    }
}
// Unfair strategy:
protected int tryAcquireShared(int acquires) {
    return nonfairTryAcquireShared(acquires);
}
final int nonfairTryAcquireShared(int acquires) {
    for (;;) {
        int available = getState();
        int remaining = available - acquires;
        if (remaining < 0 ||
            compareAndSetState(available, remaining))
            return remaining;
    }
}
It's also an old pattern, so from the source code analysis point of view, we don't really need to care about whether it's a fair strategy or an unfair strategy. The difference between them is usually one or two lines.
Let's go back to acquiresshared,
public final void acquireShared(int arg) {
    if (tryAcquireShared(arg) < 0)
        doAcquireShared(arg);
}
When tryAcquireShared(arg) returns less than 0, it means that the state is already less than 0 (no resources). At this time, acquire can't get the resources immediately and needs to enter the blocking queue to wait. Although there are many codes posted, it doesn't care much more:
private void doAcquireShared(int arg) {
    final Node node = addWaiter(Node.SHARED);
    boolean failed = true;
    try {
        boolean interrupted = false;
        for (;;) {
            final Node p = node.predecessor();
            if (p == head) {
                int r = tryAcquireShared(arg);
                if (r >= 0) {
                    setHeadAndPropagate(node, r);
                    p.next = null; // help GC
                    if (interrupted)
                        selfInterrupt();
                    failed = false;
                    return;
                }
            }
            if (shouldParkAfterFailedAcquire(p, node) &&
                parkAndCheckInterrupt())
                interrupted = true;
        }
    } finally {
        if (failed)
            cancelAcquire(node);
    }
}
I will not introduce this method. After the thread is suspended, wait for a resource to be released. Next, we will look at the release method:
// Task introduction, release a resource
public void release() {
    sync.releaseShared(1);
}
public final boolean releaseShared(int arg) {
    if (tryReleaseShared(arg)) {
        doReleaseShared();
        return true;
    }
    return false;
}

protected final boolean tryReleaseShared(int releases) {
    for (;;) {
        int current = getState();
        int next = current + releases;
        // Spillover, of course, we don't usually use such a large number
        if (next < current) // overflow
            throw new Error("Maximum permit count exceeded");
        if (compareAndSetState(current, next))
            return true;
    }
}
The tryreleased method always returns true, and then doReleaseShared. This is also a familiar method. I'll post the code instead of analyzing it. This method is used to wake up all waiting threads:
private void doReleaseShared() {
    for (;;) {
        Node h = head;
        if (h != null && h != tail) {
            int ws = h.waitStatus;
            if (ws == Node.SIGNAL) {
                if (!compareAndSetWaitStatus(h, Node.SIGNAL, 0))
                    continue;            // loop to recheck cases
                unparkSuccessor(h);
            }
            else if (ws == 0 &&
                     !compareAndSetWaitStatus(h, 0, Node.PROPAGATE))
                continue;                // loop on failed CAS
        }
        if (h == head)                   // loop if head changed
            break;
    }
}
Semphore's source code is really simple. It's basically a combination of analyzed old code.
summary
At last, I have finished AbstractQueuedSynchronizer. For Java concurrency, Doug Lea is really a god like existence. In the future, we will come into contact with a lot of Doug Lea code. I hope that all of us can continue to polish our technology in the direction of the great God, with less high architecture and more real excellent code.
(end of the paper)

